


 Loading...
Doro PhoneEasy® 508
English


The items supplied with your phone might vary depending on the software and accessories available in your region or offered by your service provider. You can obtain additional accessories from your local Doro dealer. The supplied accessories provide the best performance with your phone.
English
1. Earpiece
2. Left selection button
3. Call button
4. Speed dials
5. Voicemail
6. Keypad lock
7. Silent/Input method
8. Microphone
9. Torch shortcut
10. Message shortcut

English |
|
Contents |
|
Congratulations on your purchase............................................................... |
1 |
Get started..................................................................................................... |
1 |
Insert the SIM card and battery ........................................................... |
1 |
Charge the phone.................................................................................. |
2 |
Get to know your phone................................................................................ |
2 |
Assistive functions................................................................................. |
2 |
Turn the phone on and off.................................................................... |
3 |
Start-up wizard ...................................................................................... |
3 |
Navigate the phone ....................................................................... |
3 |
Enter text ........................................................................................ |
4 |
Phone settings....................................................................................... |
5 |
Calls................................................................................................................ |
7 |
Make a call............................................................................................. |
7 |
Call from the phonebook ...................................................................... |
7 |
Receive a call......................................................................................... |
8 |
Volume control....................................................................................... |
8 |
Call options............................................................................................ |
9 |
Speed dial ...................................................................................... |
9 |
SOS calls.............................................................................................. |
10 |
Call log.................................................................................................. |
10 |
Call settings ......................................................................................... |
11 |
Phonebook................................................................................................... |
14 |
Add contact.......................................................................................... |
14 |
Manage phonebook contacts............................................................. |
14 |
Phonebook settings ............................................................................ |
15 |
ICE (In Case of Emergency) ........................................................... |
16 |
Assistance button .................................................................................. |
17 |
Make an assistance call ..................................................................... |
17 |
Activation ............................................................................................. |
18 |
Number list .......................................................................................... |
18 |
Activate text messages (SMS)............................................................ |
19 |
Assistance settings ............................................................................. |
19 |
Messages..................................................................................................... |
20 |
Create and send text message (SMS) ............................................... |
20 |
Inbox, Outbox and Sent....................................................................... |
20 |

|
English |
Message settings ................................................................................ |
21 |
Connectivity ................................................................................................. |
23 |
Network setup ..................................................................................... |
23 |
Bluetooth® ............................................................................................ |
24 |
Sound & Display.......................................................................................... |
25 |
Audio setup ..................................................................................... |
25 |
Tone setup (ringtone).......................................................................... |
25 |
Ringtone volume ............................................................................. |
26 |
Silent.................................................................................................... |
26 |
Alert type.............................................................................................. |
26 |
Extra tone............................................................................................. |
26 |
Wallpaper............................................................................................. |
26 |
Text size ........................................................................................ |
27 |
Idle display........................................................................................... |
27 |
LCD backlight....................................................................................... |
27 |
Brightness .................................................................................... |
27 |
Additional functions .................................................................................... |
27 |
Alarm.................................................................................................... |
27 |
Calendar............................................................................................... |
28 |
Daily reminder ..................................................................................... |
28 |
Calculator............................................................................................. |
29 |
FM radio............................................................................................... |
29 |
Torch..................................................................................................... |
31 |
Reset settings...................................................................................... |
31 |
Display status symbols ....................................................................... |
31 |
Display main symbols ......................................................................... |
32 |
Remote configuration.......................................................................... |
33 |
Troubleshooting........................................................................................... |
35 |
Safety instructions....................................................................................... |
37 |
Network services and costs................................................................ |
38 |
Operating environment....................................................................... |
38 |
Medical units....................................................................................... |
38 |
Areas with explosion risk .................................................................... |
39 |
Li-ion battery........................................................................................ |
39 |
Protect your hearing............................................................................ |
39 |
Emergency calls................................................................................... |
39 |
Vehicles................................................................................................ |
40 |

English |
|
Care and maintenance ............................................................................... |
40 |
Warranty....................................................................................................... |
40 |
Copyright and other notices........................................................................ |
41 |
Content copyright ................................................................................ |
42 |
Specifications.............................................................................................. |
42 |
Specific Absorption Rate (SAR) .......................................................... |
42 |
Declaration of Conformity................................................................... |
42 |
English
Congratulations on your purchase
Doro PhoneEasy® 508 is a good-looking phone bringing you widely spaced, convex keys, predictive text, direct memories and an SMS button for easy dialling and texting. A crisp colour display and enhanced sound simplify usage even more. Other practical features include a torch, reminders, wake-up alarm, vibrating ringer and one-touch assistance dialling with SMS alerts. For more information about accessories or other Doro products please visit www.doro.com
Get started
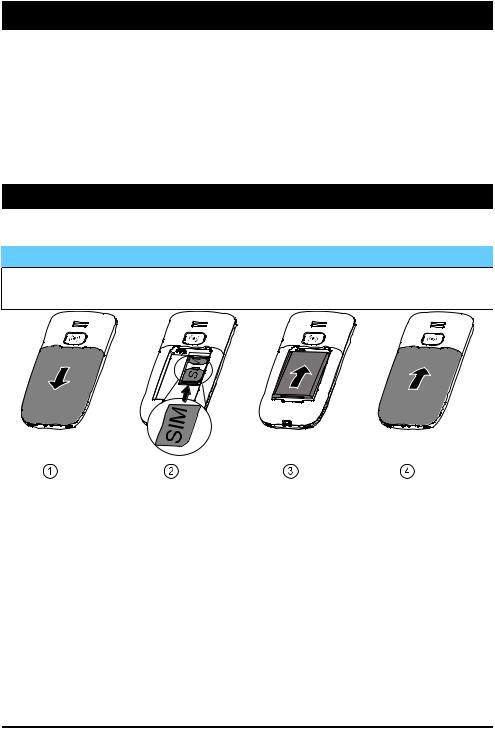
Insert the SIM card and battery
 IMPORTANT!
Turn off the phone and disconnect the charger before removing the battery cover.
1.Remove the battery cover and the battery if it is already installed.
2.Insert the SIM card by gently sliding it into the holder. Make sure that the SIM card’s contacts are facing inwards and that the cut off corner is pointing down. Take care not to scratch or bend the contacts on the SIM card.
3.Insert the battery by sliding it into the battery compartment with the contacts facing downwards to the right.
4.Replace the battery cover.
1

English
Charge the phone

 CAUTION
Only use batteries, charger and accessories that have been approved for use with this particular model. Connecting other accessories may be dangerous and may invalidate the phones type approval and guarantee.
When the battery is running low,  is displayed and a warning signal is heard.
1.Connect the mains adapter to a wall socket and to the charging socket y. The battery charge indicator is animated while charging. It takes approximately 3 hours to fully charge the battery. When the charger is connected to the phone,  is displayed briefly, and
  when it is disconnected.
2.When charging is completed,  is displayed on the screen. If the phone is turned off when the charger is connected to the
phone only the battery charge indicator will be shown on the display.
Note! To save power the LCD backlight goes off after a while. Press any button to illuminate the display. Full battery capacity will not be reached until the battery has been charged 3–4 times. Batteries degrade over time, which means that call time and standby time will normally decrease with regular use.
Save energy
When you have fully charged the battery and disconnected the charger from the device, unplug the charger from the wall outlet.
Get to know your phone
Assistive functions
Use below symbols to guide you through supporting sections in the manual.
Seeing |
Handling |
Hearing |
Safety |
2

English
Turn the phone on and off
1.Press and hold  on the phone to turn it on/off. Confirm with Yes to power off.
2.If the SIM card is valid but protected with a PIN code (Personal Identification Number), PIN is displayed. Enter the PIN code and press OK ( upper left corner of keypad). Delete with Clear (
 upper right corner of keypad).
Note! If PIN and PUK codes were not provided with your SIM card, please contact your service provider.
Tip: It is recommended to remove the protective plastic film from the display to enhance the visibility.
Attempts: # shows the number of PIN attempts left. When no more attempts remain, PIN blocked is displayed. The SIM card must then be unlocked with the PUK code (Personal Unblocking Key).
1. Enter the PUK code and confirm with OK |
. |
2.Enter a new PIN code and confirm with OK
3.Re-enter new PIN code and confirm with OK
Start-up wizard
When starting the phone for the first time, you can use the Start-up wizard to set some basic settings.
•Press Yes to change or No if you do not want to change.
The default language is determined by the SIM card. See Phone settings, p.5 on how to change language, time and date.
Tip: You can run the start-up wizard later if you want. From standby mode, press Menu  Settings
  General
  Start-up wizard
Navigate the phone 
Standby (idle mode)
When the phone is ready to use, and you have not keyed in any characters, the phone is in standby.
•Press  to return to standby mode.
3

English
•Press left selection button  to access the phone Menu or right selection button
  Name to access your saved contacts in the phonebook.
Tip: You can always press  to return to standby.
Scroll
•Use the arrow buttons  /
/ to scroll in menus.
Step-by-step instructions
The arrow ( ) indicates next action in step-by-step instructions. To confirm an action, press OK To select an item, scroll or highlight. the item using
  /
/ and then press OK .
Example:
•Press Menu  Phonebook
  -New contact-
  Add
Add
To perform the example on your Doro PhoneEasy® 508 you should do the following:
1.Press Menu scroll to Phonebook and press OK
2.Select -New contactand press Add
Enter text 
Enter text manually
Select character
•Press a numerical key repeatedly until the desired character is
shown. Wait a few seconds before entering the next character.
Special characters/smileys
1.Press * for a list of special characters.
2.Select the desired character with  /
/ and press OK to confirm.
Move the cursor within text
•Use  /
/ to move the cursor within the text.
Upper case, lower case and numerals
•Press # to choose between upper case, lower case and numerals.
See Input mode, p.5.
Change writing language
1.Press and hold #for a list of available languages.
2.Select language with  /
/ and press OK to confirm.
4
English
Enter text with predictive text
In some languages you can use the Smart ABC (eZiType™) input method which uses a dictionary to suggest words.
•Press each key once even if the displayed character is not the one you want. The dictionary will suggest words based on the keys you
have pressed.
Example
1.Press 3, 7, 3, 3 to write the word “Fred”. Complete the word before looking at the suggestions.
2.Use  /
/ to view the suggested words.
3.Press Select and continue with the next word. Alternatively, press 0to continue with the next word.
4.If none of the suggested words are correct, use manual input mode.
Note! See Predictive text, p.21 for more information.
Input mode
•Press # to change input mode. The icon on the top left of the display indicates the input mode.
Abc |
Sentence case with predictive text |
ABC |
UPPER CASE with predictive text |
abc |
lower case with predictive text |
Abc |
Sentence case |
ABC |
UPPER CASE |
abc |
lower case |
123 |
Numerals |
Phone settings
Time & date
Set the time and date
1. Press Menu |
Settings |
General |
Time & date |
: |
|
• |
Set time to enter the time ( |
HH:MM |
|
||
• |
Set date to enter the date ( |
DD/MM/YYYY |
|
||
2.Press OK to confirm.
5

English
Tip: You can also set the phone to automatically update the time and date according to the current time zone. In Time & date select Auto time  On Automatic update of date and.time does not change the time you have set for the alarm clock or the calendar. They are in local time. Updating may cause some alarms you have set to expire depending on network support and subscription.
Set the time/date format
1.Press Menu  Settings
  General
  Time & date
  Set format
•Time format  12 hours or 24 hours
•Date format and select the desired date format.
2.Press OK to confirm.
Language
The default language for the phone menus, messages, etc. is determined by the SIM card. You can change this to any other language supported by the phone.
1.Press Menu  Settings
  General
  Language
2.Use  /
/ to select a language.
3.Press OK to confirm.
Block function
1.Press Menu  Settings
  General
  Block function
2. |
Select each function you want to disable and press Off |
. |
3. |
Press Done to confirm. |
|
PIN code options
1.Press Menu  Settings
  Security
  SIM lock
•On to activate the PIN code. You need to enter the PIN code every time the phone is started.
•Off to deactivate the PIN code.

 WARNING
If the SIM card is lost/stolen it is unprotected.
•Automatic to start the phone without the PIN code. The phone remembers it automatically, but if the SIM card is moved to another phone (lost/stolen) the PIN code needs to be entered when the phone is started.
6

English
2. Press OK to confirm.
Change PIN code
1.Press Menu  Settings
  Security
  Passwords
  PIN
PIN
2. |
Enter current PIN code and press OK |
. |
3. |
Enter new PIN and press OK Repeat to confirm. |
. |
Keypad lock
You can lock the keypad to prevent the keys being accidentally pressed, for example, when your phone is in your handbag.
Incoming calls can be answered by pressing  even if the keypad is locked. During the call, the keypad is unlocked. When the call is ended or rejected, the keypad is locked again.
•Press and hold *to lock/unlock the keypad.
Note! The main local emergency number can be dialled without unlocking the keypad.
Activate
1.Press Menu  Settings
  Security
  Keypad lock
•Auto keylock to select the time delay for automatic keypad locking.
•Unlock mode to select Single key to unlock the keypad with *
or Dual key to lock/unlock with right selection button ( |
Name |
Unlock and *. |
|
2. Press OK to confirm. |
|
Calls
Make a call
1.Enter the phone number including the area code. Delete with Clear.
2.Press  to dial. Press Abort to cancel dialling.
3.Press  to end the call.
Tip: For international calls, always use + before the country code for best
operation. Press * twice for the international prefix + |
. |
Call from the phonebook
1.Press Name to open the phonebook.
7

English
2.Use  /
/ to scroll through the phonebook, or quick search by pressing the key corresponding to the first letter of the entry, see Enter text
  , p.4.
3.Press Call to dial the selected entry. If needed, select the number. Alternatively, press  to dial.
4.Press Abort or  to cancel dialling.
Receive a call
1.Press  to answer, or press Silent to switch off the ringsignal and then Reject to reject the call (busy signal).
Alternatively, press  to reject the call directly.
2.Press  to end the call.
Volume control
Use  /
/ to adjust the sound volume during a call. The volume level is indicated on the display. If you use a hearing aid or have hearing difficulties when using the telephone in a noisy environment, you can cus-
tomise the phone's audio settings, see Audio setup  , p.25.
Silent
Silent is a fixed profile with Keypad tone, Message tone and Ringtone disabled, while Vibration, Tasks, Daily reminder and Alarm are unchanged.
•Press and hold shortcut button # to activate/deactivate silent mode.
Headset
When a headset is connected, the internal microphone in the phone is automatically disconnected. If available, use the answer key on the headset to answer and end calls.

 CAUTION
Using a headset at high volume may damage your hearing. Adjust the volume level carefully when using a headset.
8

English
Call options
During a call the selection buttons1 ( ) give access to additional functions.
Options (left selection button)
• Hold etrieve to hold/retrieve the current call. / R
•End single call to end the current call (same as  ).
).
•New call to call another number (Conference).
•Phonebook to search the phonebook.
•Messages to write or read text messages.
•Mute to disable the microphone.
SPK on (right selection button)
The loudspeaker allows you to speak without holding the phone closely to the ear.
1.Press SPK on to activate. Speak clearly into the phone microphone at a maximum distance of 1 m. Use  /
/ to adjust the loudspeaker volume.
2.Press SPK off to return to normal mode.
Note! Loud background noises (music, etc.) may interfere with the sound quality.
Speed dial 
Use A–B, 0and 2–9to speed dial an entry from standby.
• Press and hold the corresponding key to speed dial.
Add speed dial numbers
1.Press Menu  Settings
  Calls
Calls  Speed dial
2.Select A Add and select an entry from the phonebook.
3.Press OK to confirm.
4.Repeat to add speed dial entries for buttons B, 0, 2–9.
Tip: To change contact, select an existing entry and press Options  Edit . / Delete
1.Selection buttons have multiple functions. The current function is shown above the selection button on the display.
9
Loading...