


Doro PhoneEasy®
312cs

1
|
9 |
2 |
10 |
|
11 |
3 |
4
5


6
7


8
English
1. |
Telephone line socket |
9. |
Ring volume |
2. |
Handset hook |
10. |
Speed dial keys |
3. |
Keypad |
11. |
Phone book |
4. |
Handset cord socket |
12. |
Speaker volume |
5. |
Handset volume |
13. |
Speakerphone |
6. |
Recall |
14. |
UP/DOWN |
7. |
Call memory / OK |
15. |
New call indicator |
8. |
Delete |
16. |
Ringer indicator |
 12
12
13
14
15
16
Français
1. |
Prise de ligne téléphonique |
8. |
Effacer |
2. |
Languette de support du |
9. |
Volume de la sonnerie |
|
combiné |
10. |
Touches mémoires directes |
3. |
Clavier |
11. |
Répertoire |
4. |
Prise du cordon du combiné |
12. |
Volume du haut-parleur |
5. |
Volume du combiné |
13. |
Haut-parleur |
6. |
Touche R |
14. |
HAUT/BAS |
7. |
Journal des appels / OK |
15. |
Témoin de nouvel appel |
|
|
16. |
Témoin de la sonnerie |
Español
1. |
Toma de la línea telefónica |
9. |
Volumen de la señal |
2. |
Gancho del auricular |
10. |
Teclas de marcación rápida |
3. |
Teclado |
11. |
Guía |
4. |
Toma del cable del auricular |
12. |
Volumen del altavoz |
5. |
Volumen del auricular |
13. |
Altavoz |
6. |
Tecla de retirada de línea |
14. |
ARRIBA / ABAJO |
7. |
Memoria de llamadas / Aceptar |
15. |
Indicador de llamada nueva |
8. |
Borrar |
16. |
Indicador de señal |
Deutsch
1. |
Anschluss für das Telefonkabel |
9. |
Klingellautstärke |
2. |
Höreraufhängung |
10. |
Schnellwahltasten |
3. |
Tastatur |
11. |
Telefonbuch |
4. |
Anschluss für Hörerkabel |
12. |
Lautsprecherlautstärke |
5. |
Hörerlautstärke |
13. |
Lautsprecherfunktion |
6. |
R-Taste |
14. |
NACH OBEN/NACH UNTEN |
7. |
Anrufliste / OK |
15. |
Anzeige neue Anrufe |
8. |
Löschen |
16. |
Klingeltonanzeige |
Nederlands
1. |
Telefoonlijnaansluiting |
9. |
Belvolume |
2. |
Haak handset |
10. |
Sneltoetsen |
3. |
Toetsenblok |
11. |
Telefoonboek |
4. |
Aansluiting handsetsnoer |
12. |
Luidsprekervolume |
5. |
Volume handset |
13. |
Luidspreker |
6. |
Opnieuw bellen |
14. |
OMHOOG/OMLAAG |
7. |
Oproepgeheugen / OK |
15. |
Indicator nieuwe oproep |
8. |
Verwijderen |
16. |
Belindicator |

English
Description
Doro PhoneEasy 312cs
Doro PhoneEasy 312cs can be used as a desktop or wall-mounted telephone. Enhanced ring volume and visual call indication make this telephone well suited for people with hearing difficulties.
The extra-large keypad and easy to read display with large characters make the telephone easy to use even with impaired eyesight.
The built-in phonebook can store up to 30 names and numbers. Three one touch memory keys can be programmed for frequently used numbers or emergency numbers. A call memory logs the 15 most recently incoming and outgoing calls.
A speakerphone function allows you to talk hands-free with the simple press of a button.
This device is intended for the analogue telephone network lines in AT, BE, BG, CH, CY, CZ, DE, DK, EE, ES, FI, FR, GB, GR, HU, IE, IS, IT, LV, LT, LU, MT, NL, NO, PL, PT, RO, SI, SK, SE.
1

English
Installation
Connection
1.Connect the curly cord to the handset and to socket marked yon the telephone.
2.Connect the telephone line cord to a network wall socket and to the Ksocket on the back of the telephone.
3.Lift the handset and listen for the dial tone.
Batteries
This telephone is powered from the telephone line.
If the power from the line is insufficient, you can install four AA alkaline batteries as backup for the Caller ID and speakerphone.
Use only AA alkaline batteries of good quality.
Note!
Before installing or changing the batteries, make sure that the telephone is not connected to the telephone network.
1.Disconnect the telephone line cord.
2.Remove the battery cover.
3.Insert the batteries ensuring correct battery polarity is observed.
4.Replace the battery cover and reconnect the telephone line cord.
Basic setup
Before using the telephone the first time, the following basic settings should be made.
After confirming a setting, the next setting is automatically displayed. The setup mode will automatically time out after 30 seconds of inactivity. You can exit setup mode anytime by pressing 
 .
.
2

English
Time and date
If the phone has not been setup, the display clock will show 00:00 when the batteries are installed.
1.Press and hold * for about 5 seconds until the hour flashes.
2.Use v/ Vto change the value and confirm with  .
.
3.Repeat steps 1–2 to set the minutes, day and month.
Display language
When the date has been set, ENGLISH is displayed. You can now choose between 8 display languages:
English - Français - Español - Italiano
Deutsch - Nederlands - Polski - Svenska
Use v/ Vto select the desired language, and confirm with  .
.
Display contrast
-2- CONTRAST is displayed.
Use v/ Vto select a suitable display contrast setting (1–4), and confirm with  .
.
Flash time
-100- FLASH is displayed.
Use v/ Vto set the flash key time (100/300/600 ms), and confirm with  .
.
100 is the standard setting for most countries.
300 for France/Portugal.
Call indicator
LED OFF is displayed.
3

English
Use v/ Vto enable/disable the LED indicator for new calls, and confirm with  .
.
Tone/pulse
TONE is displayed.
Use v/ Vto select either tone or pulse dialling mode, and confirm with  .
.
Note!
If you are unsure of which dialling mode to use, select TONE as this works in most locations.
Basic setup of the telephone is now completed.
Wall mounting
The telephone can be wall mounted by using the included wall mount bracket and two screws (not included).
Warning!
Make sure that no cables, water pipes or gas pipes are located inside the wall before drilling into it.
1.Drill two holes in the wall, corresponding to the holes in the wall mount bracket.
2.Insert the screws, allowing them to project ~5 mm out from the wall.
3.Unplug and remove the handset.
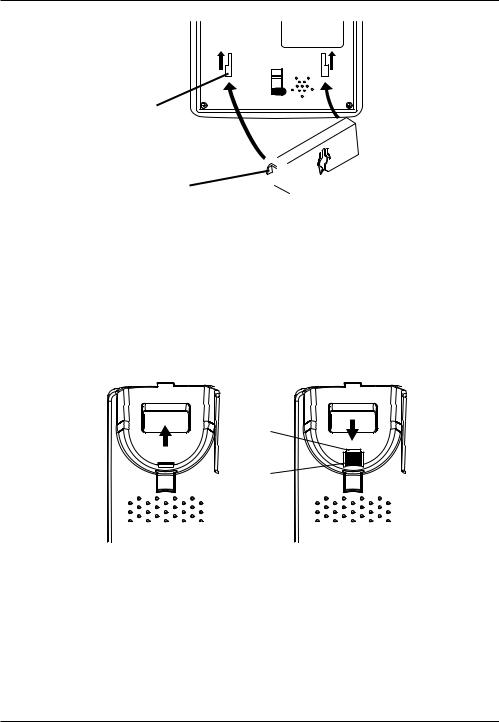
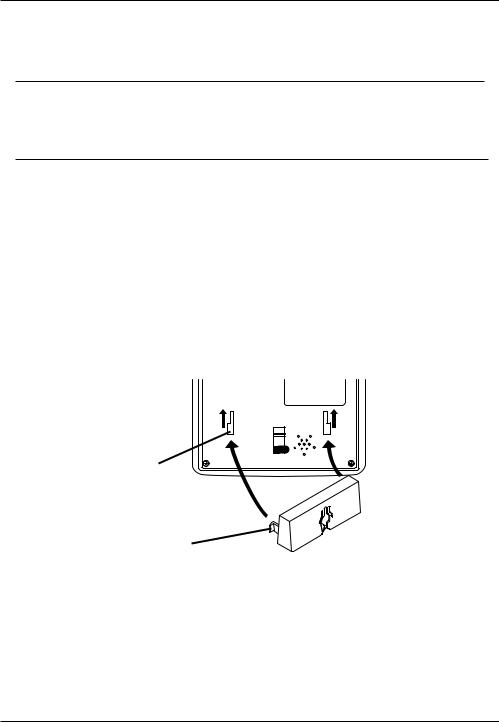
4.Fit the guide tabs (A) on the bracket into the slots (B) on the back of the telephone, then slide the bracket upwards until it snaps into place.
4
English
B
A

5.Position the telephone so that the screws on the wall fit into the slots in the bracket, then slide the telephone downwards until it is hanging on the screws.
6.Remove the handset hook (C) by pushing it upwards, and insert it in the reversed position so that the small tab (D) protrudes. The hook will now keep the handset in the cradle when the phone is wall mounted.
D
C 


C
7.Reconnect the handset and place it in the cradle.
Note!
If the phone is to be used as a desktop phone again, remember to reverse the position of the handset hook.
5

English
Operation
Making a call
Normal dialling
1.Lift the handset.
2.Dial the desired telephone number using the keypad. Hang up the handset to terminate the call.
Speakerphone
The speakerphone function allows you to make a call without using the handset.
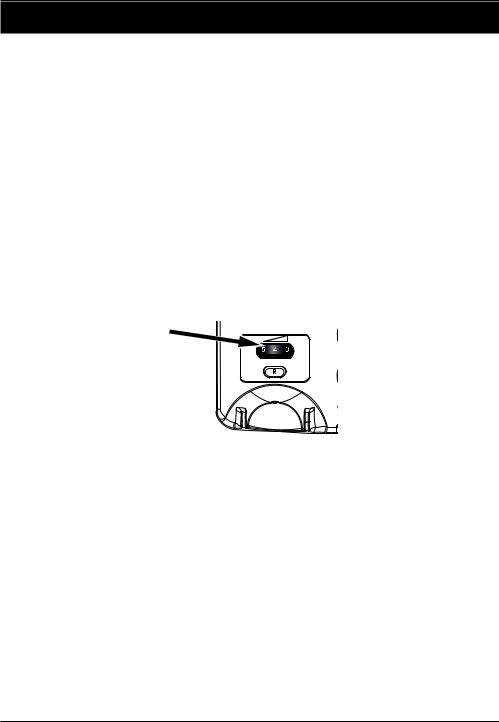
1.Press sto activate the speakerphone. The LED next to the key will light up.
2.Dial the desired telephone number using the keypad. Press sagain to terminate the call.
Lift the handset to switch from speaker to handset during a call.
Pre-dialling
The pre-dialling function allows you to enter and change a number before it is dialled.
1.Enter the desired telephone number using the keypad. Press 
 to delete the last entered digit.
2.Lift the handset or press sto dial the number.
3.Hang up the handset or press sto terminate the call.
6

English
Quick redial
1.Lift the handset or press s.
2.Press  to redial the last dialled number.
Dialling numbers in the call memory
1.Press  to display the most recent call.
2.Use v/ Vto scroll through the last 15 incoming and outgoing calls.
 = Incoming call
 = Outgoing call
3.Lift the handset or press sto dial the displayed number.
Speed dial (one-touch dialling)
1.Press one of the speed dialling keys A–C. The stored telephone number is displayed.
2.Lift the handset or press sto dial the number.
3.Hang up the handset or press sto terminate the call.
Dialling numbers in the phone book
1.Press bto open the phone book.
2.Use v/ Vto browse through the phone book, or enter the first character in the name to quickly find an entry.
3.Lift the handset or press sto dial the number.
Answering
Lift the handset to answer an incoming call, or press sto answer using the speakerphone.
7
English
Additional functions
Call timer
The display shows the current time when in standby mode. During a call the display will show a call timer instead, indicating the duration of the call. The call duration is displayed for 5 seconds after the call is terminated.
Recall key (R)
R

Press the R key followed by the extension number to transfer a call when connected to a PBX system.
Additional network services may be accessible by using the R, * and # keys. Please contact your network operator for more information about the available network services.
Hearing aid
This telephone is hearing aid compatible. Select the T mode on your hearing aid to enable this feature.
8

English
Phone book
The built-in phone book can store up to 30 entries. When the phone book memory is full, ----100% is displayed
Storing numbers in the phone book
1.Press and hold buntil a flashing cursor is shown.
2.Enter a telephone number (up to 22 digits) using the keypad.
Use v/Vto move the cursor and 
 to erase if needed. Use # to insert a pause in the number.
3.Press  to confirm. A flashing cursor will be shown on the second line on the display.
4.Use the keypad to enter a name (up to 9 characters) for the number to be stored. Press repeatedly to select from the characters for each key:
5.Press  to confirm. OK is displayed.
6.Repeat steps 1–5 to store another number, or press and hold 
 to exit from the phone book.
9

English
Deleting numbers from the phone book
1.Press bto open the phone book.
2.Use v/Vto browse through the phone book, or enter the first character to quickly find an entry.
3.Press and hold 
 to delete the selected entry.
Editing numbers in the phone book
1.Press bto open the phone book.
2.Use v/Vto browse through the phone book, or enter the first character to quickly find an entry.
3.Press and hold buntil the flashing cursor appears in the selected number.
4.Use v/Vto move the cursor, and use 
 and the keypad to erase and enter new data.
5.Press  to confirm. The cursor will move to the second line on the display.
6.Repeat step 4 to edit the name/description for the selected number.
7.Press  to confirm. OK is displayed.
Dialling from the phone book
1.Press bto open the phone book.
2.Use v/ Vto browse through the phone book, or enter the first character in the name to quickly find an entry.
3.Lift the handset or press sto dial the number.
10

English
Speed dial (one-touch dialling)
The telephone has 3 speed dialling keys that can be used for numbers that are called frequently, or for emergency numbers.
Storing speed dial numbers
1.Press and hold one of the speed dialling keys A–C until a flashing cursor is shown on the first line on the display.
2.Enter a telephone number (up to 22 digits) using the keypad.
Use v/Vto move the cursor and 
 to erase if needed. Use # to insert a pause in the number.
3.Press  to confirm. A flashing cursor will be shown on the second line on the display.
4.Enter a name or description for the number to be stored (up to 9 characters). Press repeatedly to scroll through the characters for each keypad key (see figure on facing page).
5.Press  to confirm. OK is displayed.
6.Repeat steps 1–5 to store numbers for the other speed dialling keys.
Deleting speed dial numbers
Speed dial numbers can not be deleted, they can only be replaced by storing a new number.
Dialling speed dial numbers
1.Press one of the speed dialling keys A–C. The stored telephone number is displayed.
2.Lift the handset or press sto dial the number.
3.Hang up the handset or press sto terminate the call.
11

English
Caller ID and call memory
Caller ID allows you to see who is calling before you answer and to see who has called in your absence.
Note!
The Caller ID function must be subscribed. Please contact your network operator for more information.
The call memory will store the last 15 incoming and 15 outgoing calls. On the display, incoming (answered and unanswered) calls are indicated with  and outgoing calls with
  .
.
If the Call Indicator function is active, a blinking light indicates that an unanswered call has been received since the call memory was last checked.
Browsing the call memory
1.Press  then v/ Vto scroll through the call memory. The number and time of each call will be displayed. For calls older than 24 hours, the date of the call is displayed instead of the time.
2.Press 
 to exit the call memory.
Calling numbers in the call memory
1.Press  then v/ Vto scroll through the call memory.
2.Lift the handset or press sto dial the displayed number
Deleting numbers from the call memory
1.Press  then v/ Vto scroll through the call memory.
2.Press and hold 
 to delete the selected entry.
12

English
Copying call memory entries to the phone book
1.Press  then v/ Vto scroll through the call memory.
2.Press and hold *. Press  to confirm. A flashing cursor will be shown on the second line on the display.
3.Use the keypad to enter a name (up to 9 characters) for the number to be stored. Press repeatedly to select from the characters for each key.
4.Press  to confirm. OK is displayed.
13
English
Settings
See also Installation / Basic setup.
Ring signal
The ring volume can be adjusted using the slider on the right side of the telephone.
e Ring volume (High/Low/Off)
Volume control
The speaker volume is adjusted with a slider on the right side of the telephone.
The handset volume control is located under the handset.
14

English
Care and maintenance
Your unit is a technically advanced product and should be treated with the greatest care. Negligence may void the warranty.
•Protect the unit from moisture. Rain/snowfall, moisture and all types of liquid can contain substances that corrode the electronic circuits. If the unit gets wet, you should remove the battery and allow the unit to dry completely before you replace it.
•Do not use or keep the unit in dusty, dirty environments. The unit’s moving parts and electronic components can be damaged.
•Do not keep the unit in warm places. High temperatures can reduce the lifespan for electronic equipment, damage batteries and distort or melt certain plastics.
•Do not keep the unit in cold places. When the unit warms up to normal temperature, condensation can form on the inside which can damage the electronic circuits.
•Do not try to open the unit in any other way than that which is indicated here.
•Do not drop the unit. Do not knock or shake it either. If it is treated roughly the circuits and precision mechanics can be broken.
•Do not use strong chemicals to clean the unit.
The advice above applies to the unit, battery and other accessories. If the telephone is not working as it should, please contact the place of purchase for service. Don’t forget the receipt or a copy of the invoice.
15

English
Warranty and technical data
This product is guaranteed for a period of 12 months from the date of purchase. In the unlikely event of a fault occurring during this period, please contact the place of purchase. Proof of purchase is required for any service or support needed during the guarantee period.
This guarantee will not apply to a fault caused by an accident or a similar incident or damage, liquid ingress, negligence, abnormal usage, non-maintenance or any other circumstances on the user’s part. Furthermore, this guarantee will not apply to any fault caused by a thunderstorm or any other voltage fluctuations. As a matter of precaution, we recommend disconnecting the device during a thunderstorm.
Batteries are consumables and are not included in any guarantee. Use only AA Alkaline batteries of good quality.
Specifications
Size: 175 mm x 175 mm x 60 mm
Weight:
Battery:
Declaration of Conformity
Doro hereby declares that Doro PhoneEasy 312cs conforms to the essential requirements and other relevant regulations contained in the Directives 1999/5/EC (R&TTE) and 2002/95/EC (RoHS).
A copy of the Declaration of Conformity is available at www.doro.com/dofc
16

Français
Description
Doro PhoneEasy 312cs
Doro PhoneEasy 312cs peut être utilisé comme téléphone de bureau ou mural. L’augmentation du volume de sonnerie et le témoin d’appel visuel rendent ce téléphone particulièrement adapté aux personnes présentant une déficience auditive.
Le téléphone équipé d’un clavier extralarge et d’un afficheur à grands caractères facile à lire est simple d’utilisation, même par les personnes malvoyantes.
Le répertoire intégré peut mémoriser jusqu’à 30 noms et numéros. Trois touches de mémoire directe peuvent être programmées pour les numéros fréquemment utilisés ou les numéros d’urgence. Un journal des appels enregistre les 15 derniers appels entrants et sortants.
Une fonction haut-parleur vous permet de téléphoner en mains libres en appuyant simplement sur un bouton.
Cet équipement est conçu pour être utilisé sur le réseau téléphonique analogique AT, BE, BG, CH, CY, CZ, DE, DK, EE, ES, FI, FR, GB, GR, HU, IE, IS, IT, LV, LT, LU, MT, NL, NO, PL, PT, RO, SI, SK, SE.
1
Français
Installation
Raccordement
1.Reliez le cordon spiralé au combiné et à la prise marquée ydu téléphone.
2.Reliez le cordon de ligne téléphonique à une prise de courant du réseau et à la prise Ksituée à l’arrière du téléphone.
3.Décrochez le combiné et vérifiez que vous avez la tonalité.
Piles
Ce téléphone est alimenté par la ligne téléphonique.
Si la puissance de la ligne est insuffisante, vous pouvez installer quatre piles alcalines AA pour la sauvegarde du journal des appelants et le haut-parleur.
N’utilisez que des piles alcalines AA de bonne qualité.
Remarque :
Avant d’installer ou de remplacer les piles, assurez-vous que le téléphone n’est pas branché sur le réseau téléphonique.
1.Débranchez le cordon de ligne téléphonique.
2.Retirez la trappe des piles.
3.Placez les piles en veillant bien à respecter les polarités.
4.Remettez la trappe en place et rebranchez le cordon de ligne téléphonique.
2

Français
Réglages de base
Avant d’utiliser le téléphone pour la première fois, vous devez procéder aux réglages de base ci-dessous.
Une fois un réglage confirmé, le réglage suivant s’affiche automatiquement. Le mode de réglage s’éteindra automatiquement après 30 secondes d’inactivité. Vous pouvez quitter le mode de réglage à tout moment en appuyant sur la touche 
 .
.
Heure et date
Si les réglages du téléphone n’ont pas été effectués, l’affichage de l’horloge indiquera 00:00 lorsque les piles sont installées.
1.Maintenez la touche * enfoncée pendant environ 5 secondes jusqu’à ce que l’heure clignote.
2.Utilisez les touches v/ Vpour modifier la valeur et confirmez à l’aide de la touche  .
.
3.Répétez les étapes 1–2 pour régler les minutes, le jour et le mois.
Langue d’affichage
Une fois la date réglée, ENGLISH s’affiche. Vous pouvez maintenant choisir entre 8 langues :
English - Français - Español - Italiano
Deutsch - Nederlands - Polski - Svenska
Utilisez les touches v/ Vpour sélectionner la langue souhaitée et confirmez à l’aide de la touche  .
.
Contraste de l’afficheur
-2- CONTRASTE s’affiche.
Utilisez les touches v/ Vpour sélectionner un réglage de contraste de l’afficheur adapté (1–4) et confirmez à l’aide de la touche  .
.
3

Français
Durée de touche R
-100- FLASH s’affiche.
Utilisez les touches v/ Vpour régler la durée de touche R (100/300/600 ms) et confirmez à l’aide de la touche  .
.
100 est le réglage standard pour la plupart des pays. 300 est le réglage pour la France / le Portugal.
Témoin d’appel
LED OFF s’affiche.
Utilisez les touches v/ Vpour activer/désactiver le témoin LED des nouveaux appels et confirmez à l’aide de la touche  .
.
Tonalité/impulsion
FV s’affiche.
Utilisez les touches v/ Vpour sélectionner le mode de numérotation par tonalité ou par impulsion et confirmez à l’aide de la touche  .
.
Remarque :
Si vous n’êtes pas certain du mode de numérotation à utiliser, sélectionnez TONE car il fonctionne dans la plupart des endroits.
Les réglages de base du téléphone sont maintenant terminés.
4
Français
Fixation au mur
Le téléphone peut être fixé au mur à l’aide du support de fixation mural fourni et de deux vis (non incluses).
Avertissement !
Assurez-vous qu’aucun câble, qu’aucune conduite d’eau ou de gaz n’est situé(e) dans le mur avant de per forer.
1.Perforez deux trous dans le mur, en les faisant correspondre aux trous du support de fixation mural.
2.Insérez les vis, en laissant une saillie de ~5 mm à partir du mur.
3.Débranchez et retirez le combiné.
4.Placez les onglets de guidage (A) du support dans les fentes
(B) situées à l’arrière du téléphone, puis faites glisser le support vers le haut jusqu’à ce qu’il se mette en place.
B
A
5

Français
5.Placez le téléphone de sorte que les vis du mur correspondent aux fentes du support, puis glissez le téléphone vers le bas jusqu’à ce qu’il s’accroche aux vis.
6.Retirez la languette de support du combiné (C) en le poussant vers le haut et introduisez-le dans la position inverse de manière à ce que le petit onglet (D) fasse saillie. La languette sera désormais maintenue dans le support lorsque le téléphone est fixé au mur.
D
C 


C
7.Rebranchez le combiné et placez-le dans le support.
Remarque :
Si le téléphone doit être à nouveau utilisé comme téléphone de bureau, rappelez-vous d’inverser la position de la languette de support du combiné.
6

Français
Utilisation
Passer un appel
Numérotation normale
1.Décrochez le combiné.
2.Composez le numéro de téléphone souhaité à l’aide du clavier. Raccrochez le combiné pour mettre fin à l’appel.
Haut-parleur
La fonction haut-parleur vous permet de passer un appel sans utiliser le combiné.
1.Appuyez sur la touche spour activer le haut-parleur. La LED situé e à côté de la touche s’allume.
2.Composez le numéro de téléphone souhaité à l’aide du clavier. Appuyez une nouvelle fois sur la touche spour mettre fin à l’appel.
Décrochez le combiné pour passer du haut-parleur au combiné pendant un appel.
Pré-numérotation
La fonction de pré-numérotation vous permet de saisir et de modifier un numéro avant de le composer.
1.Saisissez le numéro de téléphone souhaité à l’aide du clavier. Appuyez sur la touche 
 pour supprimer le dernier chiffre saisi.
2.Décrochez le combiné ou appuyez sur la touche spour composer le numéro.
3.Raccrochez le combiné ou appuyez sur la touche spour mettre fin à l’appel.
7

Français
Composition rapide du numéro
1.Décrochez le combiné ou appuyez sur la touche s.
2.Appuyez sur la touche  pour composer à nouveau le dernier numéro composé.
Composition des numéros enregistrés dans la mémoire des appels
1.Appuyez sur la touche  pour afficher l’appel le plus récent.
2.Utilisez les touches v/ Vpour faire défiler les 15 derniers appels entrants et sortants.
 = Appel entrant
 = Appel sortant
3.Décrochez le combiné ou appuyez sur la touche spour composer le numéro affiché.
Mémoires directes (numérotation directe)
1.Appuyez sur l’une des touches de s mémoires directes A, B ou C. Le numéro de téléphone mémorisé s’affiche.
2.Décrochez le combiné ou appuyez sur la touche spour composer le numéro.
3.Raccrochez le combiné ou appuyez sur la touche spour mettre fin à l’appel.
Composition des numéros mémorisés dans le répertoire
1.Appuyez sur la touche bpour ouvrir le répertoire.
2.Utilisez les touches v/ Vpour parcourir le répertoire ou saisissez le premier caractère du nom pour trouver rapidement une entrée.
3.Décrochez le combiné ou appuyez sur la touche spour composer le numéro.
Répondre
Décrochez le combiné pour répondre à un appel entrant ou appuyez sur la touche spour répondre à l’aide du haut-parleur.
8
 Loading...