


AUB 300i

1 |
|
|
|
|
||
2 |
|
|
|
19 |
||
3 |
|
|
|
|||
DIAL |
|
CID |
18 |
|||
|
|
|
|
|||
|
|
|
|
|
||
4 |
- |
|
- |
17 |
||
|
|
|
|
|||
5 |
- |
|
- |
|
||
- |
|
- |
|
|||
6 |
- |
|
- |
16 |
||
- |
|
- |
||||
|
|
- |
|
- |
|
|
7 |
- |
|
- |
|
||
- |
|
- |
|
|||
8 |
|
!"# |
$%& |
15 |
||
9 |
'() |
*+, |
-./ |
14 |
||
0123 |
456 |
789: |
||||
|
|
|
||||
10 |
34/2% |
-54% |
|
13 |
||
11 |
2%#!,, |
2%$)!, |
|
12 |
||
|
|
|
||||
English |
|
|
|
|
||
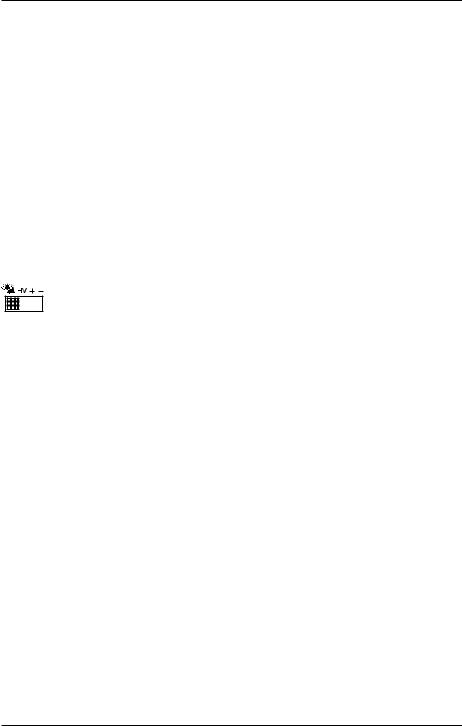
1 |
Line connector |
11 |
Recall button |
|
|
|
2 |
Scroll UP/DOWN buttons |
12 |
Redial button |
|
|
|
3 |
Dial displayed number |
13 |
Hands free button and LED |
|
||
4 |
Wall mounting hanger hook |
14 |
Headset button and LED |
|
||
5 |
Clear/OK button |
15 |
Speaker volume control |
|
||
6 |
One-Touch memories |
16 |
Handset/Headset volume control |
|||
7 |
Headset socket |
17 |
Ringer/Message waiting indicator |
|||
8 |
Handset socket |
18 |
Caller ID/Phone book |
|
||
9 |
Mute button and LED |
19 |
Input socket for additional equipment |
|||
10 |
Store button |
|
|
|
|
|
Français
1Prise téléphonique
2Touches navigation (haut et bas)
3Touche de numérotation
4Languette de support du combiné
5Touche Effacer / OK
6Touches des mémoires directes
7Prise casque
8Prise du combiné
9Touche Secret avec LED
10Touche de programmation
11Touche R
12Touche Bis
13Touche Mains-libres avec LED
14Touche Casque avec LED
15Molette de réglage du volume du hautparleur
16Molette de réglage du volume du casque ou du combiné
17Témoin lumineux nouvel appel / message en attente / sonnerie
18Touche du journal des appelants / Répertoire
19Prise pour connexion modem (Dataport)
Deutsch
1 |
Telefonkabelanschluss |
11 |
Rückruftaste |
2 |
HOCH/RUNTER-Tasten |
12 |
Wahlwiederholungstaste |
3 |
Angezeigte Nummer wählen |
13 |
Freisprechtaste und LED |
4 |
Aufhängung bei Wandmontage |
14 |
Headset-Taste und LED |
5 |
Löschen/OK-Taste |
15 |
Lautstärke des Lautsprechers |
6 |
One-Touch Speicher |
16 |
Lautstärke Hörer/Headset |
7 |
Headset-Anschluss |
17 |
Rufsignal/Anzeige „Nachricht wartet“ |
8 |
Hörer-Anschluss |
18 |
Anruferkennung/Telefonbuch |
9 |
Stummschaltung und LED |
19 |
Anschluss für weitere Geräte |
10 |
Speichertaste |
|
|
Español
1 |
Conector de línea |
11 |
|
Tecla R |
|
2 |
Teclas de Desplazamiento hacia |
12 |
Tecla de Rellamada |
||
|
ARRIBA/ABAJO |
13 |
Tecla e indicador de Manos libres |
||
3 |
Marcar número mostrado |
||||
14 |
Tecla e indicador de cascos con micrófono |
||||
4 |
Gancho de colgar para montaje mural |
||||
15 |
Control de volumen del altavoz |
||||
5 |
Tecla Borrar/Aceptar |
||||
16 |
Control de volumen de Auricular/Cascos |
||||
6 |
Memorias directas |
|
|
con micrófono |
|
7 |
Conector de cascos con micrófono |
17 |
Indicador de Timbre/Mensaje en espera |
||
8 |
Conector de auricular |
18 |
Identificación de llamadas/Agenda |
||
9 |
Tecla e indicador de Silencio |
19 |
Conector de entrada para equipos |
||
10 |
Tecla de Almacenamiento |
|
|
adicionales |
|
|
|
|
|||
Italiano |
|
|
|
||
1 |
Connettore di linea |
11 |
Tasto Recall |
||
2 |
Tasti di scorrimento SU/GIÙ |
12 |
Tasto Ripetizione numero |
||
3 |
Composizione del numero visualizzato |
13 |
Tasto Vivavoce e LED |
||
4 |
Gancio per montaggio a parete |
14 |
Tasto Cuffia auricolare e LED |
||
5 |
Annulla/Tasto OK |
15 |
Controllo volume dell’altoparlante |
||
6 |
Memorie rapide |
16 |
Controllo volume microtelefono/cuffia |
||
7 |
Presa per cuffia auricolare |
17 |
Indicatore messaggio in attesa/squillo |
||
8 |
Presa per microtelefono |
18 |
ID chiamante/Rubrica |
||
9 |
Tasto Silenziamento e LED |
19 |
Presa per apparecchi supplementari |
||
10 |
Tasto Memorizzazione |
|
|
|
|
Nederlands
1 |
Telefoonlijnconnector |
11 |
Doorverbinden |
2 |
Omhoog/Omlaag scrollen |
12 |
Opnieuw kiezen |
3 |
Afgebeeld nummer bellen |
13 |
Handsfree en LED |
4 |
Ophanghaak voor wandmontage |
14 |
Headset en LED |
5 |
Wissen/OK |
15 |
Luidsprekervolume |
6 |
Geheugentoetsen |
16 |
Volumeregeling hoorn/headset |
7 |
Headsetcontact |
17 |
Beltoon/Aanduiding wachtend bericht |
8 |
Hoorncontact |
18 |
Beller-ID/Telefoonboek |
9 |
Geluid uitschakelen en LED |
19 |
Aansluiting voor aanvullende apparatuur |
10 |
Opslaan |
|
|
Česky
1 |
Konektor tel. linky |
11 |
Tlačítko Recall |
2 |
Tlačítka NAHORU/DOLŮ |
12 |
Tlačítko Volat znovu |
3 |
Tlačítko Volat |
13 |
Tlačítko Hands free a kontrolka |
4 |
Háček pro zavěšení na zeď |
14 |
Tlačítko headsetu a kontrolka |
5 |
Tlačítko Smazat/OK |
15 |
Ovládání hlasitosti reproduktoru |
6 |
Jednotlačítkové paměti |
16 |
Ovládání hlasitosti sluchátka/headsetu |
7 |
Konektor headsetu |
17 |
Vyzvánění/Indikátor čekající zprávy |
8 |
Konektor sluchátka |
18 |
ID volajícího/Telefonní seznam |
9 |
Tlačítko Ztlumit a kontrolka |
19 |
Vstupní zdířka pro doplňkové vybavení |
10 |
Tlačítko Uložit |
|
|
Magyarul
1 Telefoncsatlakozó
2Görgetőgombok (FEL/LE)
3Megjelenített szám tárcsázása
4Horog falra szereléshez
5Törlés/OK gomb
6Egygombos memóriák
7Fejhallgatóaljzat
8Kézibeszélő-aljzat
9Némítás gomb és LED
10Mentés gomb
11Hívásátadás gomb
12Újrahívás gomb
13Kihangosítás gomb és LED
14Fejhallgató gomb és LED
15Hangszóró hangerő-szabályozója
16Kézibeszélő/fejhallgató hangerőszabályzója
17Csengés/várakozó üzenet jelzője
18Hívóazonosító/Telefonkönyv
19Bemeneti aljzat kiegészítő berendezés számára

English
Important!
The earpiece of the handset may attract small ferromagnetic objects such as staples and pins, care should be taken when placing the handset near these items.
Connection
1.Connect the curly cord to the handset and to the socket marked q on the side of the telephone.
2.Place the handset into the cradle.
3.Connect the telephone line cord to the socket marked T on the telephone, and to a telephone network wall socket. Lift the handset and listen for the dial tone. Your telephone is ready to operate approximately 10 seconds after connection, the display indicators appear after about 60 seconds.
Setting the language, clock or contrast
If you wish to set the language, clock or contrast settings, follow the steps below:
1.Press and hold v until the display flashes ENGLISH.
2.Select the required language using v/V. Press OK.
3.Select the desired contrast setting (3=normal) using v/V. Press OK.
4.Set the correct hour (00-23) using v/V. Press OK.
5.Set the correct minute/s using v/V. Press OK.
6.Set the correct day using v/V. Press OK.
7.Set the correct month using v/V. Press OK.
8.Select the required pause setting (2 seconds=normal) using v/V. Press OK.
The display
In standby mode the date and time, number of new and total number of calls stored in the Caller ID memory will be displayed. Immediately following the connection of a call, a call timer will be shown on the display.
Hearing aid compatible
This telephone is hearing aid compatible. Select the T mode on your hearing aid to enable this feature.
Ringer
The ringer volume, melody and tone can be selected using the switches located on the underside of the telephone behind the battery cover:
Labels/protective cover
The memory index cover can be accessed by carefully removing the transparent plastic using a small flat blade screwdriver or similar.

English
Wall mounting
The telephone can be wall mounted using an optional wall mount bracket.
The wall mount bracket is available as an accessory, part number WB200/300 in white or black.
1.Fix the wall mount bracket on the back of the telephone.
2.Secure two screws, vertically positioned 83 mm apart.
3.The screws should locate into the two keyholes on the wall mount bracket.
4.Activate the hanging peg (located by the hook switch) by lifting it upwards and rotating it 180 degrees.
Making a call
Lift the handset and dial the required telephone number.
Pre-Dialling
You can enter and correct a telephone number before dialling.
1.Dial the required telephone number. Mistakes can be erased using C.
2.Press DIAL OR press s to dial the number.
Redial
Repeatedly press REDIAL to view the last 5 numbers dialled. Press DIAL OR press s to dial the number.
Volume control
The Handset/headset earpiece volume may be increased or decreased during a call. Use  on the side of the phone to adjust the volume.
To adjust the speaker volume (hands free and group listening) use 


 on the side of the phone.
Recall
Press the recall button RECALL followed by the extension number to transfer calls when connected to a PBX (TBR only). Access to additional network services can be gained by using the recall button RECALL, * and # keys. Contact your network operator for more information.
Mute button
The handset/headset/hands free microphone can be disconnected during a call by pressing MUTE. Press MUTE once more to reactivate the microphone.
The MUTE LED will illuminate while the function is active.

English
Hands free function
1.Press s. The hands free function will be activated and the LED indicator next to the button will illuminate.
2.Dial the required telephone number. Adjust the volume using the volume control located on the side of the telephone.
3.Speak towards the microphone located on the front edge of the telephone.
4.Press s to terminate the call.
If you wish, you can switch between handset and hands free mode by simply pressing s or lifting the handset.
Please note!
Please remember that in hands free mode it is only possible for one person at a time to talk. The switchover between speaker and microphone is automatic and dependent on the sound level of the incoming call and the microphone respectively. It is therefore essential that there are no loud noises, e.g. music, in the immediate vicinity of the telephone, as this will disrupt the hands free function.
Group listening
Group listening allows anyone in the same room as the base unit to hear both parties and follow the conversation through the base units speaker.
The ongoing call is not affected and can continue via the handset or optional headset.
1.Once the call has been connected, press s to activate the Group Listening function. The LED indicator by the button will illuminate and the conversation can then be heard through the speaker.
2.To deactivate the Group Listening function, press s again.
Connection of a headset
An additional headset can be connected to the socket on the side of the telephone marked =. To access an incoming call or dial press =, to terminate a call press = again. The LED next to the headset button will illuminate when activated.
Please note!
DORO original headsets are tested and adapted for this telephone. Other types and makes of headsets may be used, though the function and sound quality cannot be guaranteed. In the worst case, these could damage the headset and telephone. This type of damage is not covered by the telephone guarantee.

English
Phone book
The phone book will store 20 names (16 characters) and telephone (22 digits) numbers.
Letters
Each number key is allocated certain letters, these do not follow the standard for all languages with some country-specific characters unavailable. The Phonebook is also arranged according to the order of the buttons.
To insert a space press 1, to erase press C.
Storing names/numbers
1.Press b repeatedly until the symbol b is displayed. Press STORE.
2.Press STORE again.
3.Enter the telephone number to be stored (up to 22 digits). Mistakes can be erased by pressing C. Press STORE.
4.Enter name. Press the corresponding number key one or more times for the first letter. Press STORE.
Please note!
If you need to insert a pause in the telephone number press REDIAL.
Dialling from the Phone book
1.Press b repeatedly until the symbol b is displayed.
2.Scroll through the entries using v/V. To perform a quick-search press the corresponding number button one or more times for the first letter.
3.Press DIAL to dial the displayed number, or just wait to return to standby mode.
Changing phone numbers/names
1.Press b repeatedly until the symbol b is displayed.
2.Scroll through the entries using v/V. To perform a quick-search press the corresponding number button one or more times for the first letter.
3.Press and hold STORE until the display shows EDIT ? Press STORE.
4.Correct the number using C and v/V. Press STORE.
5.Correct the name using C and v/V. Press STORE to confirm.
Deleting a Phone book entry
1.Press b repeatedly until the symbol b is displayed.
2.Scroll through the entries using v/V.
3.Press C, DELETE ? will be displayed.
4.Press and hold C until the displayed telephone number disappears.

English
Deleting all entries in the Phone book
1.Press b repeatedly until the symbol b is displayed.
2.Scroll through the entries using v/V.
3.Press and hold C until the display shows DELETE ALL ?.
4.Press and hold C again until all the numbers disappear.
Memory
This telephone has 16 One-Touch memories numbered M1-M16.
Once a number has been stored in a memory location, you only need to press one button to make the call.
Storing One-Touch Memories
1.Press CID/b repeatedly until the symbol 

 is displayed. Press STORE.
2.Enter the telephone number to be stored (up to 22 digits). Press STORE.
3.Enter name. Press the corresponding number key one or more times for the first letter. Press STORE.
4.Select a One-Touch memory location (M1-M16) by pressing the corresponding button.
Please note!
If you need to insert a pause in the telephone number press REDIAL.
If you need to change a number, store the new number in the same location as the old one.
Dialling using One-Touch Memories
1.Lift the handset (or press s) and wait for a dial tone.
2.Select the required One-Touch memory location (M1-M16) by pressing the corresponding button.

English
Caller ID
Caller ID allows you to see who is calling before you answer a call or to see who has called in your absence. If the number received is stored in the Phone book its associated name will be displayed instead. The CID memory will store up to 30 names/telephone numbers stored chronologically. The sequence number is shown in the top right-hand side of the display.
When the memory is full, the oldest number will be deleted automatically as the new call is logged. New calls are indicated in plain text in the display.
Please note!
In order for numbers to be shown you must subscribe to the Caller ID service provided by your network operator. Contact your operator for more information.
Retrieving and dialling incoming numbers
1.Press CID repeatedly until the symbol 

 is displayed.
2.Scroll through the entries using v/V.
3.Press DIAL to dial the displayed number, or just wait to return to standby mode.
Caller ID Messages
Apart from showing telephone numbers, the display can also show:
OUT OF AREA |
It is an International call or a call from a PBX (no |
|
information received). |
PRIVATE |
The call comes from a blocked number or a PBX. |
T |
New number not previously displayed. |
Z (double envelope) |
Several calls have been received from the same telephone |
|
number. |
q |
The call was received using the Call Waiting function |
|
Message indication. |
* Message indication can be erased manually by pressing C.
Deleting numbers
1.Scroll to the desired entry using v/V.
2.Press C, DELETE ? is displayed, alternatively press and hold C until DELETE ALL ? is displayed.
3.Press and hold C again until the telephone number disappears.
Transferring numbers to the Phone book
1.Scroll to the desired entry using v/V.
2.Press STORE.
3.Press STORE again. To enter a name please refer to Changing phone numbers/names.
English
Technical information
Within the battery compartment located on the underside of the telephone you will find several switches, these switches determine certain technical parameters when connecting the telephone.
IMPORTANT NOTE: These switches should only be adjusted by qualified personnel.
Recall time
The recall button timing can be switched between either 100ms (AU/UK/EU)/300ms (FR)/600ms (NZ), using the RECALL TIME switch located on the underside of the telephone (within the battery compartment).
EARTH/TIME (UK only)
Selection of either earth or timed loop break recall method.
PULSE/TONE
Select the required dialling type, Tone or Pulse using the PULSE/TONE switch located on the underside of the telephone (within the battery compartment).
Message Waiting indicator
Some PBX systems use a function called Message Waiting.
The switch is located behind the battery cover on the underside of the telephone.
The MW function operates differently depending on the PBX in question. Please contact the system controller for more information. The following four alternatives are available: +, -, ringer indicator ( 
 ) and high DC voltage (HV). When the telephone is used in systems without a telephone exchange (
 ) should be selected.
Connection of additional equipment
On the right side of the telephone there is a socket marked 8. This is used for connecting additional telephone equipment to the same telephone line, e.g. a wireless telephone, modem, etc.
Declaration of conformity
Doro hereby declares that this product, Doro AUB 300i, conforms with the essential requirements and other regulations contained in the directives 1999/5/EC (R&TTE), 2002/95/EC (ROHS).
A copy of the manufacturer’s declaration is available at www.doro.com/dofc.

English
Troubleshooting
Check that the telephone cord is undamaged and properly plugged in.
Disconnect any additional equipment, extension cords and other telephones. If the problem is resolved, the fault is with other equipment.
Test the equipment on another working line. If the product works, then the fault is probably with your line. Please inform your local telephone company.
No number shown in display when ringing
-In order for this feature to function, you must subscribe to the Caller ID service from your network provider.
-If a text message is shown on the display, the call may be an international call (no data received), or from a private or withheld number.
-It may not be possible to receive Caller ID information if the phone is connected to a PBX system.
If the telephone still does not work, contact the place of purchase. Don’t forget the receipt or a copy of the invoice.
Guarantee
This product is guaranteed for a period of 10 years from the date of purchase. Proof of purchase is required for any service or support required during the guarantee period. This guarantee shall not apply to a fault caused by an accident or a similar incident or damage, liquid ingress, negligence, abnormal usage, not reasonably maintained or any other circumstances on the purchaser’s part. Furthermore, this guarantee shall not apply to a fault caused by a thunderstorm or any other voltage fluctuations.
This guarantee does not in any way affect your statutory rights. (As a matter of precaution, we recommend disconnecting the telephone during a thunderstorm.)
UK
If you cannot resolve the fault using the faultfinder section, technical support is available by email on tech@doro-uk.com or via a premium rate telephone number: 0905 895 0854, calls cost 50 pence per minute (prices correct at the time of publication). Further contact details are available on our website:
www.doro-uk.com
Alternatively you can write to: Customer Services
Doro UK Ltd
1 High Street Chalfont St Peter Buckinghamshire SL9 9QE

Français
Raccordement
1.Reliez le cordon spiralé au combiné et à la fiche du côté du téléphone marquée q.
2.Placez le combiné sur la base.
3.Reliez le câble téléphonique fourni à la prise du téléphone marquée T et à la prise téléphonique murale. Attendez 1 minute avant de décrocher le combiné. Votre téléphone est ensuite prêt à fonctionner: vous devez entendre la tonalité.
Régler la langue, l’horloge ou le contraste
Réglez la langue, l’horloge ou le contraste comme suit :
1.Appuyez sur la touche v jusqu’à ce que ENGLISH s’affiche.
2.Atteignez la langue désirée à l’aide des touches v/V. Appuyez sur OK.
3.Atteignez le contraste désiré (3=normal) avec les touches v/V. Appuyez sur OK.
4.Atteignez l’heure désirée (00-23) avec les touches v/V. Appuyez sur OK.
5.Atteignez la minute désirée avec les touches v/V. Appuyez sur OK.
6.Atteignez le jour désiré avec les touches v/V. Appuyez sur OK.
7.Atteignez le mois désiré avec les touches v/V. Appuyez sur OK.
8.Atteignez la durée de pause désirée (2 secondes=normal) avec les touches v/V. Appuyez sur OK.
Afficheur
Au repos, la date et l’heure ainsi que le nombre d’appels du JAP (nouveaux appels et nombre total d’appels) sont affichés. Lorsque la communication est établie, un chronomètre s’affiche.
Compatibilité appareil auditif
Ce téléphone est compatible avec les appareils auditifs. Pour utiliser cette fonction, mettez votre appareil auditif sur la position T.
Choix de sonnerie
Réglez la mélodie, le volume et la tonalité de la sonnerie à l’aide des curseurs situés sous la trappe des piles au dos du téléphone.
Etiquettes/façade translucide
Pour remplir l’étiquette d’index des numéros, retirez sa façade en plastique transparent en utilisant un petit tournevis plat.

Français
Position murale
Vous pouvez fixer ce téléphone au mur à l’aide du support mural (en option).
Ce support référencé WB200/300, existe en noir ou en blanc.
1.Fixer le support mural au dos du téléphone.
2.Fixez au mur deux vis espacées verticalement de 83mm d’entre-axe.
3.Encastrez la tête des vis dans les trous correspondants de la fixation murale.
4.Retirez la languette de support du combiné (près de la pédale de raccroché) en la tirant vers le haut, tournez-la d’un demi-tour et remettez-la en place.
Appeler
Prenez le combiné et composez le numéro désiré.
Appeler avec la fonction de correction
Vous pouvez composer un numéro et le corriger avant de l’appeler.
1.Composez le numéro de téléphone. En cas d’erreur, effacez avec la touche C.
2.Appuyez sur la touche de prise de ligne DIAL OU sur s pour appeler le numéro.
Touche Bis
Appuyez plusieurs fois sur la touche REDIAL pour faire défiler les 5 derniers numéros composés. Appuyez sur la touche de numérotation DIAL OU sur s pour appeler le numéro.
Régler le volume
Vous pouvez ajuster le volume d’écoute du combiné ou du casque en cours de conversation grâce à la molette  située sur le coté du téléphone.
Ajustez le volume du haut-parleur (en mains-libres et écoute amplifiée) grâce à la molette 


 située sur le coté du téléphone.
Touche R
Si le téléphone est connecté derrière un PABX, appuyez sur la touche RECALL puis composez le numéro du poste pour effectuer, par exemple, un transfert de l’appel. La touche RECALL et les touches * et # vous permettent d’accéder à certains services Réseaux /Opérateur. Pour toute information, adressez-vous directement à votre opérateur ou à votre installateur.
Touche Secret
En cours d’appel, vous pouvez couper le haut-parleur ou le micro du combiné ou du casque en appuyant sur la touche MUTE. Appuyez à nouveau sur cette touche pour réactiver le micro.
La LED de la touche Secret reste allumée tant que la fonction est activée.

Français
Fonction Mains-libres
1.Appuyez sur s. Le haut-parleur est activé et la LED en regard de la touche s’allume.
2.Composez le numéro de téléphone. Vous pouvez régler le volume grâce à la molette située sur le côté du téléphone.
3.Parlez face au téléphone.
4.Appuyez sur s pour mettre fin à la communication.
En cours de conversation (mode combiné) vous pouvez rentrer en mode mains-libres en appuyant sur s et en raccrochant le combiné.
Vous pouvez également revenir en mode combiné en décrochant le combiné.
Remarque !
Notez qu’en position mains-libres les deux correspondants ne peuvent pas parler simultanément, mais uniquement un à la fois. L’alternance entre celui qui parle et celui qui écoute se fait automatiquement, et elle est gérée par le niveau du son de la ligne téléphonique (votre correspondant) et celui du micro (votre discours). C’est pourquoi il est important qu’il n’y ait pas trop de bruit dans l’entourage du téléphone, comme par exemple de la musique à haut volume.
Ecoute amplifiée
L’écoute amplifiée permet aux personnes se trouvant à proximité de la base de suivre la conversation.
Ceci n’affecte pas la communication qui peut continuer au niveau du combiné ou du casque.
1.Une fois la communication établie, appuyez sur s pour activer l’écoute amplifiée. La LED en regard de la touche s’allume et le haut-parleur est activé, permettant de suivre la conversation.
2.Pour désactiver l’écoute amplifiée, appuyez à nouveau sur la touche s.
Brancher un casque
Vous pouvez raccorder un casque à la fiche du côté du téléphone marquée =. Pour appeler ou prendre un appel, appuyez sur la touche =; pour mettre fin à la communication, appuyez à nouveau sur =. Quand le casque est branché, la LED en regard de la touche est allumée.
Remarque !
Le casque DORO d’origine est testé et adapté à ce téléphone. Vous pouvez utiliser d’autres types ou marques de casques mais dans ce cas nous ne pourrons pas garantir leur qualité sonore et leur bon fonctionnement. Il est possible que le casque et le téléphone soient endommagés. La garantie du téléphone ne couvre pas ce type de dommage.

Français
Répertoire
Le répertoire enregistre 20 jeux de noms (de 16 caractères) et numéros (de 22 chiffres).
Lettres
A chaque touche numérotée correspondent des lettres données; certains caractères spécifiques à certains pays ne sont pas disponibles. Le contenu du répertoire est présenté dans le même ordre que les touches.
Pour insérer un espace, appuyez sur 1 ; pour effacer, appuyez sur C.
Enregistrer un nom/numéro
1.Appuyez plusieurs fois sur la touche b jusqu’à ce que b s’affiche. Appuyez sur la touche STORE.
2.Appuyez à nouveau sur la touche STORE.
3.Composez le numéro de téléphone à enregistrer (22 chiffres maximum). En cas d’erreur, effacez avec la touche C. Appuyez sur la touche STORE.
4.Entrez le nom. Appuyez une ou plusieurs fois sur la touche numérotée correspondant à la première lettre. Appuyez sur la touche STORE.
Remarque !
Insérez une pause en appuyant sur REDIAL.
Appeler un numéro du répertoire
1.Appuyez plusieurs fois sur la touche b jusqu’à ce que b s’affiche.
2.Faites défiler les entrées avec les touches v/V. Vous pouvez aussi effectuer une recherche rapide en appuyant une ou plusieurs fois sur la touche numérotée correspondant à la première lettre du nom de l’entrée.
3.Appuyez sur DIAL pour appeler le numéro affiché ou attendez pour repasser en veille.
Modifier un nom/numéro du répertoire
1.Appuyez plusieurs fois sur la touche b jusqu’à ce que b s’affiche.
2.Faites défiler les entrées avec les touches v/V. Vous pouvez aussi effectuer une recherche rapide en appuyant une ou plusieurs fois sur la touche numérotée correspondant à la première lettre du nom de l’entrée.
3.Appuyez sur la touche STORE jusqu’à ce que EDITER ? s’affiche. Appuyez sur la touche STORE.
4.Corrigez le numéro avec les touches C et v/V. Appuyez sur STORE.
5.Corrigez le nom avec les touches C et v/V. Appuyez sur STORE pour enregistrer.
Effacer un correspondant du répertoire
1.Appuyez plusieurs fois sur la touche b jusqu’à ce que b s’affiche.
2.Faites défiler les entrées à l’aide des touches v/V.
3.Appuyez sur c. EFFACER ? s’affiche.
4.Appuyez sur c jusqu’à ce que le numéro de téléphone affiché s’efface.

Français
Effacer le contenu du répertoire
1.Appuyez plusieurs fois sur la touche b jusqu’à ce que b s’affiche.
2.Faites défiler les entrées à l’aide des touches v/V.
3.Appuyez sur c jusqu’à ce que TOUT EFFACER ? s’affiche.
4.Appuyez sur c jusqu’à ce que tous les numéros s’effacent.
Mémoires
Ce téléphone dispose de 16 touches de mémoire directe, M1 à M16.
Une fois qu’un numéro est enregistré sur une de ces plages, vous le composez en pressant simplement la touche correspondante.
Enregistrer les numéros en mémoire directe
1.Appuyez plusieurs fois sur la touche CID/b jusqu’à ce que 

 s’affiche. Appuyez sur la touche STORE.
2.Composez le numéro de téléphone à enregistrer (22 chiffres maximum). Appuyez sur la touche STORE.
3.Entrez le nom. Appuyez une ou plusieurs fois sur la touche numérotée correspondant à la première lettre du nom. Appuyez sur la touche STORE.
4.Sélectionnez une des plages de mémoire directe (M1 à M16) en appuyant sur la touche correspondante.
Remarque !
Insérez une pause en appuyant sur REDIAL.
En cas de changement de numéro, remplacez l’ancien par le nouveau.
Appeler un numéro en mémoire directe.
1.Prenez le combiné (ou appuyez sur s) et attendez la tonalité.
2.Sélectionnez la plage de mémoire directe désirée (M1 à M16) en appuyant sur la touche correspondante.

Français
Présentation du nom/numéro
La présentation du nom/numéro vous permet de voir qui vous appelle avant de répondre ou qui a appelé en votre absence. Si le nom/numéro du correspondant est déjà dans votre répertoire, son nom est affiché. Le JAP (Journal des appelants) enregistre jusqu’à 30 noms/numéros par ordre chronologique. L’ordre est affiché en haut à droite.
Quand le journal atteint sa capacité maximum, les numéros les plus anciens sont effacés automatiquement au fur et à mesure des nouveaux appels. Les nouveaux appels sont indiqués sur l’afficheur.
Remarque !
Pour que la présentation du nom/numéro puisse fonctionner vous devez vous abonner à ce service auprès de votre opérateur. Pour toute information, adressez-vous directement à votre opérateur.
Consulter et appeler à partir du journal des appelants (JAP)
1.Appuyez plusieurs fois sur la touche CID/b jusqu’à ce que 

 s’affiche.
2.Faites défiler les entrées à l’aide des touches v/V.
3.Appuyez sur DIAL pour appeler le numéro affiché ou attendez pour repasser en veille.
Informations supplémentaires
En plus des numéros de téléphone, l’afficheur indique :
HORS ZONE |
S’affiche lorsque vous recevez un appel international ou un |
|
appel provenant d’un PABX (aucune information reçue). |
PRIVE |
S’affiche lorsque vous recevez un appel provenant d’un |
|
numéro verrouillé ou masqué ou d’un PABX. |
TS’affiche lorsque vous recevez un appel provenant d’un numéro inconnu.
Z(double enveloppe) |
S’affiche lorsque vous avez reçu plusieurs appels d’un |
|
même numéro. |
q |
S’affiche lorsque l’appel reçu est un appel en attente. |
|
Indication de message sur la messagerie du réseau de votre |
|
opérateur*. |
* Vous pouvez effacer la notification de messages en appuyant sur C.
Effacer un numéro
1.Atteignez l’entrée désirée à l’aide des touches v/V.
2.Appuyez sur C, EFFACER ? s’affiche ou appuyez sur C jusqu’à ce que
TOUT EFFACER ? s’affiche.
3.Appuyez sur c jusqu’à ce que le numéro affiché s’efface.
Transférer les numéros dans le répertoire
1.Atteignez l’entrée désirée à l’aide des touches v/V.
2.Appuyez sur la touche STORE.
3.Appuyez à nouveau sur la touche STORE. Pour entrer un nom, consultez la section
Modifier un nom/numéro du répertoire.
Français
Informations techniques
Il y a plusieurs curseurs sous la trappe des piles située au dos du téléphone ; ceux-ci permettent de configurer l’appareil.
IMPORTANT : Ces réglages doivent être effectués par une personne qualifiée.
Réglage de la touche R
Positionnez le curseur RECALL TIME sur 300ms pour la France (100ms=AU/UK/ EU, 600ms=NZ).
Numérotation fréquences vocales (Tone) ou décimales (Pulse)
Sélectionnez le type de numérotation désirée: fréquences vocales ou décimale à l’aide du curseur PULSE/TONE.
Témoin lumineux de message en attente
Certains standards téléphoniques ont une fonction de message en attente. Les messages sont alors signalés en veille par le clignotement d’un témoin lumineux.
Le curseur pour cette fonction est situé sous la trappe des piles au dos du téléphone.
Cette fonction varie selon le type de PABX. Pour de plus amples informations sur votre installation, contactez le responsable de votre système. Il existe quatre réglages : +, -, témoin de sonnerie ( 
 ) et haute tension CC (HV). Si votre appareil ne fonctionne pas derrière un PABX, sélectionnez le témoin de sonnerie (
 ).
).
Raccordement d’un modem (Dataport)
La fiche marquée 8située sur le côté droit du téléphone permet de brancher un modem (ou tout autre équipement téléphonique additionnel) sur la même ligne téléphonique.
Déclaration de conformité
Doro certifie que cet appareil Doro AUB 300i est compatible avec l’essentiel des spécifications requises et autres points des directives 1999/5/EC (R&TTE) et 2002/95/
EC (ROHS). La déclaration de conformité peut être consultée à l’adresse suivante : www.doro.com/dofc

Français
En cas de problèmes
Vérifiez l’état du câble téléphonique et son raccordement.
Débranchez tout autre matériel, rallonges et téléphones. Si l’appareil fonctionne alors normalement, la panne est causée par le matériel additionnel.
Testez le matériel sur une ligne en état de marche. S’il fonctionne, cela signifie que votre propre raccordement téléphonique est défectueux. Signalez la panne à votre opérateur.
Pas de présentation du numéro à la réception d’un appel
-Pour que la présentation du numéro fonctionne, vous devez vous abonner à ce service auprès de votre opérateur.
-Si un message s’affiche, il peut s’agir d’un appel international (pas d’informations disponibles) ou provenant d’un numéro masqué ou hors annuaire.
-Il est possible que la présentation du numéro ne fonctionne pas si le téléphone est derrière un PABX.
Si le téléphone ne fonctionne toujours pas, contactez votre revendeur. N’oubliez pas de vous munir du ticket de caisse ou d’une copie de la facture.
Garantie et S.A.V.
Pour la France
Cet appareil est garanti deux ans à partir de sa date d’achat, la facture faisant foi. La réparation dans le cadre de cette garantie sera effectuée gratuitement.
La garantie est valable pour un usage normal de l’appareil tel qu’il est défini dans la notice d’utilisation. Les fournitures utilisées avec l’appareil ne sont pas couvertes par la garantie. Sont exclues de cette garantie les détériorations dues à une cause étrangère à l’appareil. Les dommages dus à des manipulations ou à un emploi non conformes, à un montage ou entreposage dans de mauvaises conditions, à un branchement ou une installation non-conformes ne sont pas pris en charge par la garantie. Par ailleurs, la garantie ne s’appliquera pas si l’appareil a été endommagé à la suite d’un choc ou d’une chute, d’une fausse manœuvre, d’un branchement non-conforme aux instructions mentionnées dans la notice, de l’effet de la foudre, de surtensions électriques ou
électrostatiques, d’une protection insuffisante contre l’humidité, la chaleur ou le gel. En tout état de cause, la garantie légale pour vices cachés s’appliquera conformément aux articles 1641 et suivants du Code Civil.
Si vous souhaitez obtenir de l’aide lors de l’installation ou poser une question technique sur le produit, contactez notre Service d’Assistance Téléphonique au
08 92 68 90 18 ( N° Audiotel - 0,34€ /min.).
En cas de panne, adressez-vous au S.A.V.de votre revendeur ou installateur. (Il est recommandé de débrancher le téléphone en cas d’orage.)
Deutsch
Anschließen
1.Schließen Sie das Spiralkabel an den Hörer und an den Anschluss, der mit q markiert ist, an der Seite des Telefons an.
2.Legen Sie den Hörer auf die Gabel.
3.Schließen Sie das Telefonkabel an den Anschluss T am Telefon und an die Telefonsteckdose an. Heben Sie den Hörer ab und warten Sie auf das Freizeichen. Ihr Telefon funktioniert ca. 10 Sekunden nach dem Anschließen. Die Displayanzeige erscheint nach ca. 60 Sekunden.
Sprache, Uhr oder Kontrast einstellen
Wenn Sie die Sprache, Uhr oder den Kontrast einstellen möchten, führen Sie die untenstehenden Schritte aus:
1.Halten Sie v gedrückt, bis das Display ENGLISH anzeigt.
2.Wählen Sie die gewünschte Sprache mit v/V. Drücken Sie OK.
3.Wählen Sie die gewünschte Kontrasteinstellung (3=Normal) mit v/V. Drücken Sie OK.
4.Stellen Sie die korrekte Stunde (00-23) mit v/V ein. Drücken Sie OK.
5.Stellen Sie die korrekte Minute mit v/V ein. Drücken Sie OK.
6.Stellen Sie den korrekten Tag mit v/V ein. Drücken Sie OK.
7.Stellen Sie den korrekten Monat mit v/V ein. Drücken Sie OK.
8.Wählen Sie die gewünschte Pauseneinstellung (2 Sek. = Normal) mit v/V. Drücken Sie OK.
Das Display
Im Standby-Modus werden Datum und Zeit, die Anzahl neuer Anrufe und die Gesamtanzahl der Anrufe im Speicher angezeigt. Direkt nach Gesprächsaufbau wird ein Gesprächstimer auf dem Display angezeigt.
Hörgerätekompatibel
Dieses Telefon ist Hörgerätekompatibel. Stellen Sie ihr Hörgerät auf den T-Modus, um die Funktion zu aktivieren.
Klingel
Die Lautstärke, die Melodie und der Ton der Klingel, können mit den Schaltern an der Unterseite hinter der Batterieabdeckung des Telefons eingestellt werden:
Etiketten/Schutzabdeckung
Die Liste der gespeicherten Telefonnummern liegt hinter einer Plastikabdeckung. Nehmen
Sie die Abdeckung mit einem kleinem, flachen Schraubendreher oder ähnlichem ab.

Deutsch
Wandmontage
Das Telefon kann mit der optionalen Wandhalterung an der Wand befestigt werden. Die Wandhalterung ist als Zubehör erhältlich: Teil Nr. WB200/300 in weiß oder schwarz.
1.Befestigen Sie die Wandhalterung an der Rückseite des Telefons.
2.Befestigen Sie zwei Schrauben, waagerecht 83 mm voneinander entfernt.
3.Die Schrauben sollten in die Löcher an der Wandhalterung passen.
4.Aktivieren Sie den Aufhänger (an der Hörergabel), indem Sie diesen nach oben heben und um 180 Grad drehen.
Anruf tätigen
Heben Sie den Hörer ab und wählen Sie die gewünschte Telefonnummer.
Telefonnummer eingeben
Sie können vor dem Wählen eine Telefonnummer eingeben und, wenn nötig, korrigieren.
1.Geben Sie die gewünschte Rufnummer ein. Eine falsche Eingabe kann mit C gelöscht werden.
2.Drücken Sie DIAL ODER drücken Sie s, um die Nummer zu wählen.
Wahlwiederholung
Drücken Sie wiederholt REDIAL, um die 5 zuletzt gewählten Nummern anzuzeigen. Drücken Sie DIAL ODER drücken Sie s, um die Nummer zu wählen.
Lautstärkeregelung
Die Lautstärke des Hörers/Headsets kann während des Gesprächs erhöht bzw. gesenkt werden.
Benutzen Sie  , um die Lautstärke an der Seite des Telefons einzustellen.
Zur Einstellung des Lautsprechers (Freisprechen) verwenden Sie 


 an der Seite des Telefons.
Rückruf
Drücken Sie die Rückruf-Taste RECALL und dann die Nummer, zu der Sie den Anruf weiterleiten möchten, wenn Sie an eine Telefonzentrale angeschlossen sind (nur TBR). Zugang zu weiteren Netzwerkdiensten erhalten Sie mit der Rückruf-Taste RECALL, und den Tasten * und #. Weitere Informationen erhalten Sie von ihrem Netzwerkanbieter.
Stummschaltungstaste
Der Hörer, das Headset, und die Freisprecheinrichtung können während des Gesprächs mit MUTE ausgeschaltet werden. Drücken Sie MUTE nochmals, um das Mikrofon wieder einzuschalten.
Die MUTE LED leuchtet, solange das Mikrofon ausgeschaltet ist.
 Loading...