


Doro 8040
English
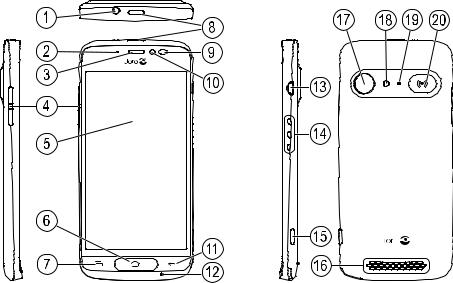
Note! All illustrations are for illustrative purposes only and may not accurately depict the actual device.
English |
|
|
|
1. |
Headset port |
11. |
Back key |
2. |
LED indicator |
12. |
Microphone |
3. |
Earpiece |
13. |
Charging port |
4. |
Volume keys |
14. |
Charging cradle connectors |
5. |
Touch display |
15. |
Camera button |
6. |
Home key |
16. |
Loudspeaker |
7. |
Recents key |
17. |
Rear camera |
8. |
Power button |
18. |
Flash |
9. |
Proximity sensors |
19. |
Second microphone |
10. |
Front camera |
20. |
Assistance button |
This guide is for reference only. The actual device, including but not limited to the colour, size, and screen layout, may vary. The actual device an the items supplied may vary depending on the software and accessories available in your region or offered by your service provider. Your local Doro dealer provides additional accessories. The supplied accessories provide the best performance with your phone.
English |
|
Contents |
|
How to set up your Doro 8040 ..................................................................... |
1 |
Step 1 — Unbox your new phone.......................................................... |
1 |
Step 2 — Getting started....................................................................... |
2 |
Step 3— Insert SIM card and memory card......................................... |
3 |
Step 4— Charge..................................................................................... |
5 |
Step 5— Turn on the phone .................................................................. |
7 |
Get to know your phone................................................................................ |
8 |
Sign in to Google™ .................................................................................. |
8 |
Assistive functions................................................................................. |
8 |
Touchscreen motion and gestures....................................................... |
9 |
Sensors................................................................................................ |
10 |
Home screen ....................................................................................... |
11 |
Lock screen.......................................................................................... |
12 |
Screen lock.......................................................................................... |
12 |
To use the phone keys ........................................................................ |
13 |
My applications screen....................................................................... |
14 |
Quick and easy way to quiet your phone ....................................... |
16 |
Status bar ............................................................................................ |
16 |
Notification panel................................................................................ |
16 |
Quick settings panel............................................................................ |
17 |
Enter text ....................................................................................... |
18 |
Capture a screenshot.......................................................................... |
20 |
Connect to the Internet....................................................................... |
20 |
Battery.................................................................................................. |
23 |
Navigate your phone ............................................................................. |
24 |
Select on-screen actions..................................................................... |
24 |
Call.................................................................................................. |
25 |
View ................................................................................................ |
25 |
Send................................................................................................ |
26 |
Search ............................................................................................ |
26 |
Add.................................................................................................. |
27 |
Snap ............................................................................................... |
27 |
Discover.......................................................................................... |
27 |
Listen.............................................................................................. |
28 |
Set .................................................................................................. |
28 |

English |
|
Phone settings............................................................................................. |
29 |
Where to find the settings .................................................................. |
29 |
The date and time............................................................................... |
29 |
Vibrate on touch (vibrate on touch).................................................... |
30 |
Screen timeout.................................................................................... |
30 |
My wallpaper........................................................................................ |
30 |
Home screen shortcuts....................................................................... |
31 |
My widgets........................................................................................... |
31 |
The text size......................................................................................... |
32 |
The screen brightness......................................................................... |
32 |
The text contrast.................................................................................. |
32 |
The colour inversion............................................................................ |
33 |
The colour correction .......................................................................... |
33 |
Improve accessibility further .............................................................. |
33 |
The volume .......................................................................................... |
33 |
My ringtone.......................................................................................... |
34 |
My audio setup for voice calls............................................................ |
34 |
The Bluetooth connection® ................................................................. |
35 |
Aeroplane mode .................................................................................. |
36 |
Connect the phone to a computer ..................................................... |
37 |
My phone information......................................................................... |
39 |
Backup ................................................................................................. |
39 |
Reboot the phone................................................................................ |
40 |
Reset the phone.................................................................................. |
40 |
Memory and storage........................................................................... |
41 |
Change the SIM PIN code................................................................... |
43 |
Google™ Play Store....................................................................................... |
44 |
Install applications.............................................................................. |
44 |
Uninstall applications.......................................................................... |
45 |
Calls.............................................................................................................. |
45 |
Make a call........................................................................................... |
45 |
Answer a call........................................................................................ |
45 |
End a call ............................................................................................. |
46 |
Options during a call ........................................................................... |
46 |
Headset................................................................................................ |
47 |
Call log.................................................................................................. |
47 |
Call settings ......................................................................................... |
47 |
SOS calls.............................................................................................. |
48 |

English |
|
Contacts....................................................................................................... |
49 |
Add new contact.................................................................................. |
49 |
Manage your contacts......................................................................... |
49 |
Import and export contacts................................................................ |
49 |
How to find the ICE contacts .............................................................. |
50 |
An assistance option ............................................................................. |
50 |
My assistance button .................................................................... |
50 |
ICE (In Case of Emergency) ........................................................... |
53 |
How to use Remote help ............................................................... |
53 |
Applications ................................................................................................. |
54 |
Beginners guide - Discover your phone ............................................. |
54 |
Doro Selection..................................................................................... |
54 |
Messages............................................................................................. |
55 |
Email .................................................................................................... |
56 |
Camera................................................................................................. |
57 |
Handle pictures in the Gallery............................................................ |
59 |
Doro Connect & Care .......................................................................... |
60 |
My Doro Manager................................................................................ |
63 |
Google search...................................................................................... |
65 |
Internet (Web browser) ....................................................................... |
65 |
Dock mode........................................................................................... |
66 |
Magnifier.............................................................................................. |
67 |
Music.................................................................................................... |
67 |
Listen to the radio ............................................................................... |
68 |
Calendar............................................................................................... |
68 |
Alarm.................................................................................................... |
69 |
The weather forecast .......................................................................... |
69 |
My notes............................................................................................... |
70 |
Torch..................................................................................................... |
70 |
Timer .................................................................................................... |
70 |
Calculator............................................................................................. |
70 |
Recorded sounds ................................................................................ |
71 |
Code safe............................................................................................. |
71 |
Google Apps......................................................................................... |
72 |
The cloud ............................................................................................. |
73 |
Location based services..................................................................... |
73 |
Status icons................................................................................................. |
74 |
Safety instructions....................................................................................... |
75 |
Network services and costs................................................................ |
75 |

English |
|
Operating environment ....................................................................... |
75 |
Medical units....................................................................................... |
76 |
Areas with explosion risk .................................................................... |
76 |
Li-Polymer battery................................................................................ |
77 |
Protect your hearing............................................................................ |
77 |
Emergency calls................................................................................... |
77 |
GPS/Location based functions .......................................................... |
77 |
Vehicles................................................................................................ |
78 |
Protect your personal data ................................................................. |
78 |
Malware and viruses........................................................................... |
78 |
Care and maintenance ............................................................................... |
79 |
Warranty....................................................................................................... |
80 |
Specifications.............................................................................................. |
80 |
Copyright and other notices................................................................ |
81 |
Hearing aid compatibility.................................................................... |
83 |
Specific Absorption Rate (SAR) .......................................................... |
83 |
Correct disposal of this product......................................................... |
84 |
Correct disposal of batteries in this product ..................................... |
84 |
Declaration of Conformity................................................................... |
85 |

English
How to set up your Doro 8040
When you first get your phone, there is a few actions that you need to take before starting to use it.
Step 1 — Unbox your new phone
The first step is to unbox the phone and assess the items and equipment included in the delivery. Make sure to read through the manual so you can familiarise yourself with the equipment and the basic functions.For more information about accessories or other Doro products please visit www.doro.com or contact our Helpline.
•The items supplied with the device and any available accessories may vary depending on the region or service provider.
•The supplied items are designed for this device and may not be compatible with other devices.
•Appearances and specifications are subject to change without prior notice.
•You can purchase additional accessories from your local Doro retailer. Make sure they are compatible with the device before purchase.
•Only use batteries, chargers and accessories that have been approved for use with this particular model. Connecting other accessories may be dangerous and may invalidate the phone's type approval and warranty.
1

English
Step 2 — Getting started
Before you start using your new phone you may need:
•nano-SIM card. To take full advantage of your new smartphone’s capabilities, you should install a SIM card. The SIM card will enable you to place calls or use mobile data to connect to various Internet services. Your mobile service provider will give you a card and the codes needed for it (PIN and PUK) when you buy a mobile contract or a prepaid SIM card. Make sure you get a suitable contract that fit your needs regarding calls and mobile data.
•Google account. To be able to fully use your new smartphone you need a Google Account. If you don’t have one yet, no worries, as you will be guided through a account setup when starting the phone for the first time. It can however be a good idea to think of a Username and Password as these will be used for many services, such as Gmail, Google +, Google Drive, Google Photos and more.
•Memory card (optional). From Android 6.0, you can select to use a memory card (microSD) as extended internal memory or as a portable memory.
•Wi-Fi access. If you have a Wi-Fi access point available, it’s always good to connect to that to reduce costs for data traffic and possibly increase data speed.
2

English
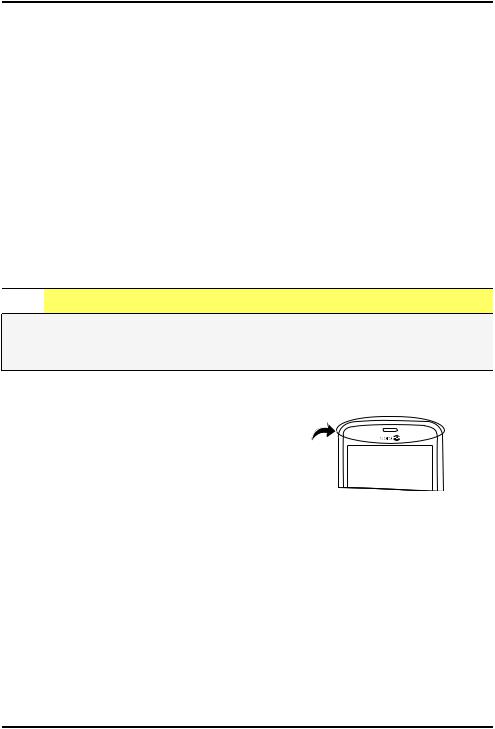
Step 3— Insert SIM card and memory card
 IMPORTANT!
Turn off the phone and disconnect the charger before removing the battery cover.
Remove the back cover
 IMPORTANT!
Be careful not to damage your fingernails when you remove the battery cover. Do not bend or twist the battery cover excessively as it may get damaged.
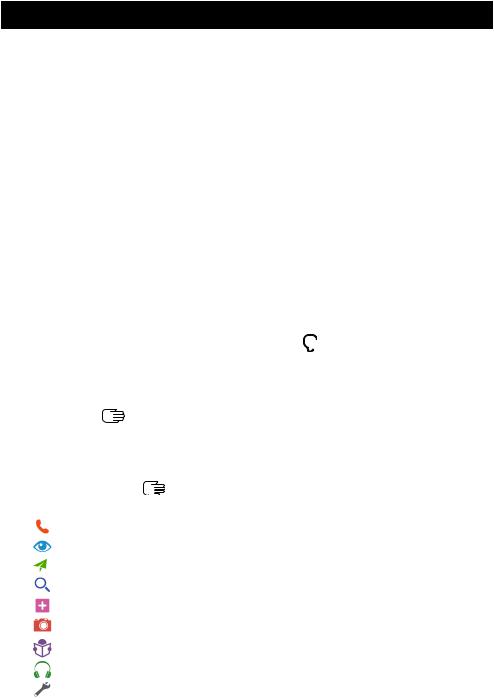
Insert the SIM card (not included)
Insert the nano-SIM card by gently sliding it into the SIM card slot. Make sure that the SIM card’s contacts are facing inwards and that the cut off corner is up, as shown . Take care not to scratch or bend the contacts on the SIM card. Should you need, but have problem to remove/replace the SIM card, use adhesive tape on the exposed part of the SIM card to pull it out.

 CAUTION
This device accepts nano-SIM or 4FF SIM card.
Using a modified incompatible card that is thicker than a nano-SIM card may damage the card itself, the card slot and corrupt any data stored on the card.
3
English
Insert the memory card (optional and not included)
Tip: Take care not to scratch or bend the contacts on the memory or SIM card when inserting them into the card holders.
You may also optionally insert a memory card. Make sure that the memory card’s contacts are facing as shown. To remove the memory card: find the small ridge on the exposed end of the memory card. Put your fingernail into the ridge and gently pull the card out. Replace the back cover.
 IMPORTANT!
Use only compatible memory cards with this device. Compatible card type: microSD, microSDHC.
Incompatible cards may damage the card itself, the device and corrupt any data stored on the card. Some phones may have a pre-installed memory card.
See External memory, p.42 for additional info.
4
English
Step 4— Charge
Charge your phone. While it's possible that your phone will already come with enough charge to be powered on right out of the box, we recommend to fully charge it before first use.

 CAUTION
Only use batteries, chargers and accessories that have been approved for use with this particular model. Connecting other accessories may be dangerous and may invalidate the phone's type approval and warranty.
•Insert the small end 

 of the included USB cable into the charging port on the phone (A).
•You can also charge the phone using the cradle. Insert the small end 

 of the included USB cable into the charging port on the cradle and place the phone in the cradle (B).
•Insert the other end 


 of the included USB cable into the wall charger that you plug into to a wall socket.
5

English
•You can also plug the included USB cable 


 into a USB port on your computer. Generally charging is quicker if plugged directly into the wall socket.
If the phone is turned off during charging, the phone is still charging. Press the Power button to view charging status.
Save energy
When you have fully charged the battery and disconnected the charger from the device, unplug the charger from the wall socket.
Note! To save power, the screen is locked after a while. Press the Power button to activate the screen, see Lock screen, p.12
6

English
Step 5— Turn on the phone
Note! When turning on your phone, the installed applications may need to be updated. Application updates requires Internet connection and can take a few minutes. A Wi-Fi connection is preferable. The phone may appear a bit slow during the update.
•Once you've fully charged the device, turn it on by pressing and holding the Power button. Keep it pressed until the phone vibrates and the display lights up.
•Enter your SIM card PIN if requested, then select  to confirm. Tap
 to erase.
•Wait for the phone to start.
If the wrong PIN code is entered several times Enter PUK is displayed and you need to enter your PUK code (Personal Unblocking Key). Contact your service provider for more information about PIN and PUK code. See Change the SIM PIN code, p.43 for information about changing the PIN code.
To turn off the phone
•Press and hold the Power button until the options menu opens.
•In the options menu, tap Power off.
7
English
Get to know your phone
Sign in to Google™
Unless you already created a Google™ account as part of the Start-up wizard.
 IMPORTANT!
You need an Internet connection to use this service. It is recommended to use Wi-Fi connections when available to reduce costs for data traffic. Contact your service provider for detailed subscription costs before activating.
You need to have a Google™ account, one free account gets you into everything Google. It’s a convenient way to manage your phone’s applications, contacts, calendar events, reminders and more. You can also back up your information in case you should lose your phone. You don't have to use any of the specific Google services like Gmail on a daily basis if you don't want to, and you can add other email accounts to your phone.
Create Google™ account
1.From the Home screen, select  Play Store.
2.Follow the on-screen instructions to complete the account setup.
 IMPORTANT!
Remember the Google account your phone last logged in to. During an untrusted factory settings restoration or microSD card–based update, Google's anti-theft mechanism requires you to enter the Google account your phone last logged in to on the startup navigation screen for identity authentication. Your phone can properly power on only after the identity authentication passes.
Assistive functions
Use the symbols to guide you through supporting sections in the manual.
Seeing |
Handling |
Hearing |
Safety |
8
English
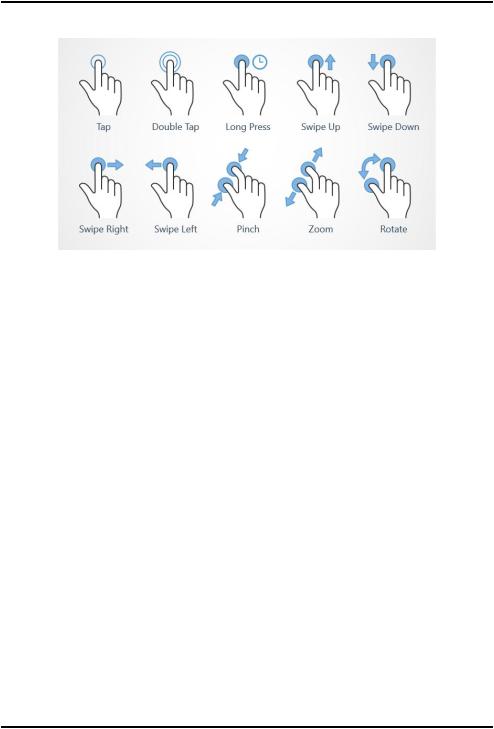
Touchscreen motion and gestures
Tap
•Tap an item, such as a button or a program icon, to select it or to open it. Tap can be used to select or deselect a relevant tick box in a list of options.
Double tap
•Touch the same item twice to zoom in on a map or an image.
Long press
•Touch and hold an item on the screen. Some actions, such as to move an icon on the Home screen, begins with a long press.
Swipe
•A swipe is when you press your finger to the screen and drag it, the screen moves. Swiping to the left on the Home screen, for example, moves you to the next Home screen. Drag or flick your finger on the screen in the direction you want to go. Think of it as using the leftor right-arrow keys on a computer keyboard. Flick means to swipe more quickly on a page, quickly flick your finger on the screen in the direction you want to move.
Pinch
•Place two fingers separated on the screen and pinch them together to zoom out of a map. This function is not always applicable.
9
English
Zoom
•Place two fingers together on the screen and spread them to zoom in. This function is not always applicable.
Rotate view in maps
•Using two fingers, rotate the map clockwise or counterclockwise. Touch the Compass Pointer icon to reorient the map with north at the top of the screen.
Drag and drop
•Dragging and dropping is a way of moving something — for example, an app on your desktop — from one place to another. To drag, put your finger on an app and hold down. As you move your finger across your screen, the app is dragged across the screen, or across several screens. Place your finger where you want the app to go and release your finger. The app drops.

 CAUTION
Avoid scratching the touch screen, do not tap it with anything sharp or allow the touch screen to come into contact with water. Do not touch the screen if the glass is cracked or shattered.
Sensors
Your device has sensors that detect light and proximity.
•Light sensor to detect light and adjust the brightness of the screen, if set to automatic. See The screen brightness, p.32.
•Proximity sensor (touch sensor) to detect motions. It can turn the touch screen off during voice calls when your ear is close to the screen to prevent unintentionally activating other functions. See Call settings, p.47
10

English
Home screen
The Home screen is your start screen on your Doro 8040, and here you can collect the apps and your favourite contacts that you use most often. You can also set your favourite picture as wallpaper. Use the Google™ search bar to quickly find what you are looking for. To add a shortcut to the Home screen see Find and add shortcuts in the menu, p.31 and to remove shortcuts see Find and remove shortcuts in the menu, p.31.
Go to the Home screen
•Press  .
.
Access the extended Home screen
1.From the Home screen swipe up or tap the arrow  at the bottom of the Home screen.
Tip: You can also swipe up or down to open and close the extended Home screen.
11

English
Lock screen
The screen turns off and locks when you are not using the phone. The lock screen can show time and date as well as notifications like missed calls or messages.
Note! Your phone continues to run while it’s sleeping. Mail is received, social networking updates are made, and so on. Your phone also continues to play music while the screen is locked.
Activate the screen
•Briefly press the  or the Power button.
Lock the screen
•Briefly press the Power button.
Screen lock
The screen lock prevents unwanted actions on the touch screen when you are not using the phone.
Screen lock settings
You can change the way that you lock the screen to prevent others from accessing your personal information.
1.To activate the screen lock or change the type of screen lock, tap
 Set.
Set.
2.Tap A general option 
 My screen lock. Tap to select one of the following:
•None to unlock, press  or the Power button. No security.
•Swipe (default setting) to unlock you slide  up with your finger. No security.
•Pattern to unlock you trace a pattern with your finger on the screen. Medium security.
Note! You can trace over the dots in any order, but you can trace over the same dot only once. The pattern must cover at least four dots.
•PIN to unlock you type a PIN. A PIN consists of numbers only. Enter at least four numbers, and then enter the password again to verify it. Medium to high security.
12

English
•Password to unlock you type a password. A password can consists of characters and/or numbers. Enter at least four characters including numbers and symbols, and then enter the password again to verify it. High security.
 IMPORTANT!
It makes sense to choose a PIN code or a pattern that is easy to remember, but try to make it difficult enough so that others can’t guess it. The PIN code or pattern screen lock, together with your Google account login is the basis for the anti-theft features on this phone. Enabling a secure screen lock and having a Google account on your phone will make it difficult for a thief or other person getting access to your personal data or even resetting your phone. Keep the secure screen lock information and Google account login stored in a safe place!, see Reset the phone, p.40.
Note! The available options may vary depending on the screen lock method selected.
To use the phone keys
Recents key
•Press  to view recently used applications.
1.To close an application, swipe it to the left or right. Or tap the
 to close all at once.
2.To open an application, tap it.
Home key
•Press  to return to the Home screen.
•Press and hold  to launch Google Now. Google Now is an intelligent personal assistant developed by Google, that is available within the Google search mobile application.
 IMPORTANT!
You need an Internet connection and a Google account (see, Sign in to Google™, p.8) to use this service. It is recommended to use Wi-Fi connections when available to reduce costs for data traffic. Contact your service provider for detailed subscription costs before activating.
13
English
To set up Wi-Fi, see Connect to Internet using wireless networks (Wi-Fi), p.20.
Back key 
•Press to return to the previous screen, or to close a dialog box, menu, or keyboard. Once you are back to the Home screen, you can’t go back any further.
Volume keys
•During a call the volume keys adjusts the call volume.
•From standby the volume keys adjust the ringtone volume.
•To adjust the volume level for music and videos when in an applications that plays music or other audio (like games or video players).
•To zoom in Camera mode.
Soft keys
Android smart phones like your Doro 8040, as well as most Android applications, feature common icons. Many icons that you see on-screen are actually buttons on the touchscreen. If you don’t see the text, images or information that you want, try to touch the screen or to tap an icon for a pick list or to reach another menu.
To access further options
or |
more options (available in the action bar or in apps). |
|
|
I want to |
more options (available in the action bar or in apps). |
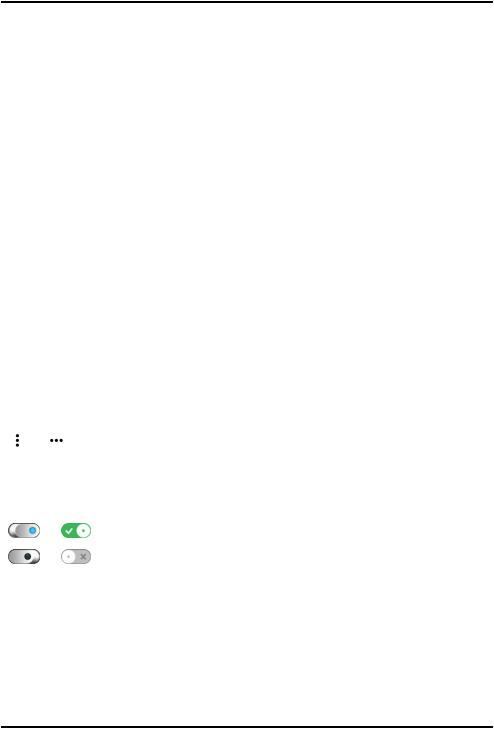
To enable and disable features and functions |
|
or |
enabled functions. |
|
|
or |
disabled functions. |
My applications screen
Application is another word for program or software, a common way to shorten the term application is App. The application screen contains the applications that come pre-installed on your Doro 8040 and any other apps that you choose to install. The applications screen extends beyond the regular screen, so you need to swipe down to view all content.
14
English
Open the application screen
•From the Home screen swipe up or tap the arrow  at the bottom of the Home screen.
•Tap My applications to get to  My applications.
•Swipe up or down to view all installed applications.
Tip: You can also swipe up or down to open and close the extended Home screen.
Close the application screen
•Press  or
or  .
.
To install applications, see Doro Selection, p.54.
Add applications
1.From the Home screen swipe up or tap the arrow  at the bottom of the Home screen.
2.Tap My applications to get to  My applications.
3.Tap I want to.
4.Tap Add.
Tap an item to select it:
•Recommended applications: tap to select an app.
•View by categories to select an option in the pick list. Confirm with  .
.
•Search on Play Store Google Play Store to reach Play Store.
5.Find an item you wish to download by browsing categories or by using the search function.
6.Tap the item to view its details, and follow the instructions to complete the installation/purchase.
Uninstall applications
1.From the Home screen swipe up or tap the arrow  at the bottom of the Home screen.
2.Tap My applications to get to  My applications.
3.Tap I want to.
4.Tap Uninstall.
5.Tap  for the items to delete. Some apps are system applications and cannot be uninstalled.
15
English
6.Tap Yes to confirm.
Quick and easy way to quiet your phone 
•Use the volume keys to adjust the ringtone volume.
•Drag the on-screen slider to adjust the sound level.
•Tap  to enable or disable Silent. Once enabled, your phone will not ring when you receive an incoming call or message, but the screen will still turn on.
•Tap  to enable or disable Vibrate. Once enabled, your phone will vibrate and the screen will turn on to alert you of incoming calls and messages.
Status bar
The status bar, located at the top of your screen, shows signal strength, ongoing and new applications as well as battery status.
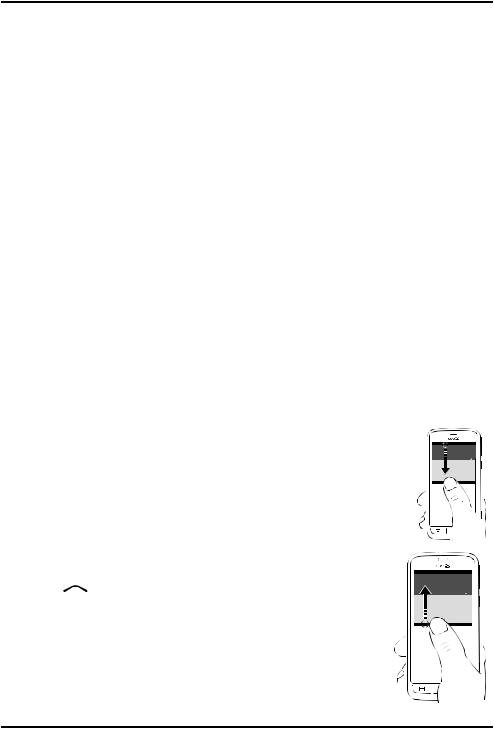
Notification panel
Open the notification panel to view more information about the icons in the status bar, to view your notifications and manage the quick settings like Wi-Fi or Aeroplane mode.
Open and close the notification panel
To open the notification panel, swipe the status bar down.
To close the notification panel, swipe up twice, or tap  twice, or press
  to return to the Home screen.
16

English
Clear the notifications
•To clear all the notifications, tap Clear all. If many notifications Clear all is at the bottom of the screen, i.e. not always visible.
•To close one by one, swipe to the left or right.
Notifications on lock screen
All app notifications appear on the lock screen ready for viewing. Not only that, but you can interact with them as well. Depending on the notification in question you can:
•Swipe to dismiss.
•Tap to reply.
•Double tap to go to the relevant app.
Note! To hide sensitive alerts; swipe the status bar down to open the notification panel and tap 

 A general option
 Advanced settings
  Notifications
  All apps
  No sensitive content on lock screen.
Quick settings panel
Use the quick setting buttons
Tapping a tile enables you to manage the feature directly within the Quick Settings panel, like toggling the flashlight on and off, or connecting to a Wi-Fi network. Long pressing the same tile jumps into the corresponding page within Android’s Settings for full control.
•Wifi.
•Current mobile data network.
•Bluetooth.
•Torch, see Torch, p.70.
•Aeroplane mode.
Tip: Use the shortcut  in the upper right corner to reach Set.
Customise the Quick settings panel
Swiping down once from the top of your phone’s screen shows your notifications as well as a quick access bar containing the first five tiles in your Quick Settings panel.
17

English
1.Swipe down from the top of the screen to reveal the notification bar.
2.Tap Edit to the lower right corner.
3.Long press on any tile to move, add or remove it from Quick Settings.
4.Tap the  to exit Edit mode.
Enter text 
You can enter text, numbers and other characters using the on-screen keyboard. Your phone is preloaded with the Doro keyboard. Select a text field to open the on-screen keyboard. You can adjust your on-screen keyboard in various ways to improve readability.
Activate keyboard
•Tap a text field.
Select Voice input or Classic keyboard
•Tap Voice input or Classic keyboard to select how to enter your text.
Hide the keyboard
•Tap the icon  or press
  .
.
Special characters and numerals
1.Tap ?123 for more characters.
2.Select the desired character or select =\< to view additional characters.
3.To return, select ABC.
Move the cursor within text
•Tap somewhere in the text to get the marker. Put your finger on the marker  to move the cursor within the text. As you move your finger, the marker is dragged over the text. Place your finger where you want the marker to go and release your finger. The marker drops.
Switch between upper case and lower case letters
The Shift-key is found to the lower left of your keyboard. Capitalisation is activated when you start entering text. Capitalisation means writing a word with its first letter in uppercase and the remaining letters in lowercase.
Note! Double tap Spacebar to make a full stop followed by a space.
18

English
•Tap Shift key twice to type ALL CAPS.
•Tap  to type only lower case letters.
• to type with capitalisation.
Smileys
1.Tap  for a list of smileys.
2.Select the desired smiley.
3.To return, select ABC.
Enter text with word predictions
Start entering text and the dictionary suggests words based on the keys you have selected. Predictive text is enabled by default. When you’re done typing something, you can go back and tap a misspelled or mistakenly autocorrected word. Tap the misspelled or mistakenly autocorrected word to select other possible auto corrections. This is the easiest way to fix mistakes — if you don’t find the word you wanted, use the Backspace key to erase and type a new word.
Enter text
1.Start to type a word, your keyboard may provide predictions as you type. You can tap a predicted word below the entered text to automatically complete it.
2.Tap the Spacebar to keep the word you typed and continue with the next word.
Cut, copy, share and assist
Cut, Copy, Share, Select all, and Paste are features available when writing e an email, text message/box, or basically anywhere.
Note! Long pressing on any action bar icon will help to identify them by popping up a text bar describing the action.
1.Touch and hold the text you want to copy.
2.The selected text is highlighted  . Move the marker on either end to increase or decrease the highlighted area.
3.When the highlighted area is the size you want, select Copy or Cut.
4.Touch and hold where you want to paste. The text box Paste will be displayed. Press the text box to paste the text.
19

English
Tip: While you're in the middle of writing a message you can change the keyboard also from the quick settings in the Notification panel. To open the Notification panel, swipe the status bar down.
Select keyboard and personalise your keyboard
You can select to personalise your keyboard, depending on the selected keyboard.
1.From the Home screen, tap  Set.
Set.
2.Tap  A general option
 The keyboard options.
3.Tap Choose a keyboard.
4.Tap wanted keyboard.
5.After you've done that, tap More options to make further personalisations to your keyboard.
6.When done, tap  .
.
Capture a screenshot
It's easy and often useful to get a snapshot of your phone’s screen, a screenshot. To view the screenshot, see Handle pictures in the Gallery, p.59.
Take a screenshot
1.Find the screen you want to get a snapshot of.
2.Simultaneously press and hold the Power button and the Volume minus key.
Connect to the Internet
Your smartphone Doro 8040 is just like any other mobile phone - you can make calls and send texts. But you can also access the Internet, send and receive emails, install apps and games, and check your social networking sites, like Facebook and Twitter, for this you need to be connected to Internet. Unless you configured an internet access in the startup wizard, when first starting your phone, here are the instructions on how to do it.
Connect to Internet using wireless networks (Wi-Fi)
Use Wi-Fi to connect your phone to the Internet instead of the mobile network. You may already have Wi-Fi in your home and it's often available at
20

English
workplaces. Take advantage of free networks in coffee shops, hotels, trains and libraries. Connecting to the Internet with Wi-Fi doesn’t incur additional data traffic costs, unless you have to pay to get on the wireless network.
1.From the Home screen, tap  Set
Set 
 My Internet connection
  Wi-Fi.
2.Switch  to enable. Available networks are displayed in a list. The networks can be open or secured (
 ).
).
3.Select a network and tap  Connect. If secured, enter the password.
For more information, contact the relevant network administrator.
4.Connected network is highlighted with Connected.
Tip:  is shown in the status bar when connected.
You can easily turn on and off Wi-Fi from the quick settings in the notification panel. To open the notification panel, swipe the status bar down.
Note! Keep in mind that your phone remembers Wi-Fi networks you connect to. If Wi-Fi is turned on, the phone automatically connects to the network next time you are within reach. Some open networks require you to log in to a webpage before gaining access to the network.
Connect to Internet using mobile data
Use Mobile data to connect your phone to a network provider with a data traffic plan. What that means is that your phone can connect to the Internet anytime it is in range of your operators mobile network a service you pay for through a monthly data traffic plan. And there may be a limit to the amount of data you can use per month. You can limit your data usage by turning off mobile data. You'll then not be able to access the internet using the mobile network. You can still use Wi-Fi even though mobile data is turned off.
1.From the Home screen, tap  Set
Set 
 My Internet connection
  My Mobile data settings.
2.Switch  to enable.
3.When done, tap  .
.
21

English
Note! You can easily turn on and off Mobile data from the quick settings in the notification panel. To open the notification panel, swipe the status bar down.
Tip: Contact your service provider for detailed subscription costs before activating.
Network services and costs
Your device is approved for use on the 4G LTE FDD 1 (2100), 3 (1800), 7 (2600), 8 (900 MHz), 20 (800) MHz / WCDMA 1 (2100), 2 (1900), 5 (850), 8 (900) MHz / GSM 850, 900, 1800, 1900 MHz networks. To use the device, you need a subscription with a service provider.
Using network services may result in traffic costs. Some product features require support from the network, and you may need to subscribe to them.
Some operations and features are SIM card and/or network dependent or dependent on the compatibility of devices and the content formats supported. Some services are subject to a separate charge.
Data roaming On or Off
When you travel with your device and you are switched from your own network operator's network to another, it’s called roaming. The roaming state allows you to be reachable and you can make or receive phone calls regardless of where you are, but it almost always involves a surcharge for using another operator's network. If you need to access the Internet or other data services using mobile data traffic, then you need to activate data roaming. To limit your data usage when abroad roaming is Off as default.
Tip: R is shown in the status bar when roaming.
Your phone can still access the Internet over the Wi-Fi connection even if you disable roaming.
Note! Using data services while roaming can be costly. Contact your service provider for data roaming rates before you use data roaming.
22
 Loading...