


 Loading...
Doro 7030
English

1.Front camera
2.Speaker
3.Menu button
4.Four-way navigation keys
5.Camera shortcut
6.Call button
7.Voicemail
8.International prefix/ Symbols
9.Microphone
10.Back button
11.Clear button
12.OK-button
13.End call/ Power on/off
14.Input method/ Silent mode
Note! All illustrations may not accurately depict the actual device.
The items supplied with your phone might vary depending on the software and accessories available in your region or offered by your service provider. You can obtain additional accessories from your local Doro dealer. The supplied accessories provide the best performance with your phone.
15.Camera flash and Flashlight
16.Red light = battery level low / charging
17.Green light = New message / missed call
18.Main camera
19.Assistance button
20.Headset socket
21.Charging socket
22.Second microphone
23.Loudspeaker
24.Volume keys
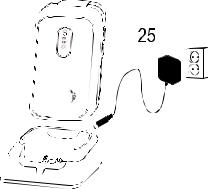
25.Charging cradle (optional accessory)

English |
|
Contents |
|
Congratulations on your purchase ................................................................ |
1 |
Getting started ............................................................................................... |
1 |
Unbox your new phone ......................................................................... |
1 |
Insert SIM card, memory card and battery ........................................... |
2 |
Charge the phone................................................................................... |
4 |
Save energy ............................................................................................ |
5 |
Turn the phone on and off..................................................................... |
5 |
Get to know your phone................................................................................ |
6 |
Assistive functions.................................................................................. |
6 |
Start-up Wizard ...................................................................................... |
6 |
Phone indicators .................................................................................... |
7 |
Notification panel and status bar .......................................................... |
7 |
Descriptions in this document ............................................................... |
7 |
Basic phone operations.......................................................................... |
8 |
Navigate your phone............................................................................ |
10 |
Sharing content .................................................................................... |
12 |
Enter text ....................................................................................... |
13 |
Hearing aid compatible........................................................................ |
14 |
Connect the phone to a computer ...................................................... |
15 |
Calls .............................................................................................................. |
16 |
Make a call ........................................................................................... |
16 |
Call from the phonebook ..................................................................... |
16 |
Receive a call........................................................................................ |
16 |
Call information.................................................................................... |
17 |
Call options........................................................................................... |
17 |
SOS calls ............................................................................................... |
17 |
Call history............................................................................................ |
17 |
Call settings .......................................................................................... |
18 |
Contacts........................................................................................................ |
22 |
Add contact .......................................................................................... |
22 |
Manage phonebook contacts .............................................................. |
22 |
ICE (In Case of Emergency) ............................................................ |
23 |
Phonebook settings.............................................................................. |
24 |
Assistance button......................................................................................... |
24 |
Setting the mode for the Assistance button ....................................... |
25 |
Assistance settings ............................................................................... |
25 |

English |
|
Activation ............................................................................................. |
26 |
Number list........................................................................................... |
26 |
Activate text messages (SMS) .............................................................. |
26 |
Position SMS......................................................................................... |
27 |
Signal type ............................................................................................ |
27 |
MyDoro......................................................................................................... |
28 |
For the helper(s) ............................................................................. |
28 |
For the senior ................................................................................. |
29 |
Messaging..................................................................................................... |
30 |
Create and send text message (SMS)/picture message (MMS).......... |
30 |
Read and handle messages.................................................................. |
31 |
Messaging options ............................................................................... |
31 |
WhatsApp..................................................................................................... |
35 |
Facebook ...................................................................................................... |
35 |
Camera ......................................................................................................... |
35 |
Alarm ............................................................................................................ |
36 |
Media ........................................................................................................... |
37 |
Gallery .................................................................................................. |
37 |
Music .................................................................................................... |
38 |
FM Radio .............................................................................................. |
38 |
Recorder............................................................................................... |
39 |
Videos................................................................................................... |
40 |
Email............................................................................................................. |
40 |
Create and send e-mail ........................................................................ |
40 |
E-mail settings ...................................................................................... |
42 |
Organiser ...................................................................................................... |
43 |
Calculator ............................................................................................. |
43 |
Calendar ............................................................................................... |
44 |
File manager......................................................................................... |
44 |
Notes .................................................................................................... |
45 |
Web browser................................................................................................ |
45 |
Torch............................................................................................................. |
45 |
Settings......................................................................................................... |
45 |
Assistance settings ............................................................................... |
45 |
Network & Internet.............................................................................. |
46 |
Display .................................................................................................. |
58 |
Sound.................................................................................................... |
59 |

English |
|
Storage ................................................................................................. |
61 |
Calls ...................................................................................................... |
61 |
Security & location............................................................................... |
61 |
Start-up Wizard .................................................................................... |
63 |
Tutorials................................................................................................ |
63 |
SIM Toolkit ........................................................................................... |
63 |
System .................................................................................................. |
64 |
Additional functions..................................................................................... |
67 |
Display status symbols ......................................................................... |
67 |
Display main symbols........................................................................... |
67 |
Safety instructions........................................................................................ |
67 |
Network services and costs ................................................................. |
67 |
Operating environment ....................................................................... |
68 |
Medical units........................................................................................ |
68 |
Areas with explosion risk ..................................................................... |
68 |
Li-Ion battery........................................................................................ |
69 |
Protect your hearing ............................................................................ |
69 |
Emergency calls.................................................................................... |
69 |
GPS/Location based functions ............................................................. |
69 |
Vehicles ................................................................................................ |
70 |
Protect your personal data .................................................................. |
70 |
Malware and viruses............................................................................ |
70 |
Care and maintenance ................................................................................. |
71 |
Warranty ...................................................................................................... |
72 |
Specifications ............................................................................................... |
72 |
Copyright and other notices ................................................................ |
73 |
Hearing aid compatibility..................................................................... |
74 |
Specific Absorption Rate (SAR) ............................................................ |
75 |
Correct disposal of this product........................................................... |
75 |
Correct disposal of batteries in this product ....................................... |
76 |
Declaration of Conformity ................................................................... |
76 |

English
Congratulations on your purchase
Enjoy easy calling and messaging with this stylish phone that enables you to use WhatsApp and Facebook over WiFi and high-speed 4G LTE networks. The large 2.8" display and the widely separated, high contrast keys make everything you see and do all very easy, including taking great photos and videos with the 3MP camera. Other features include enhanced audio with HD voice, easy navigation, a torch and an assistance button, as well as reassuring safety features such as support for Response by Doro™ with GPS positioning. For more information about accessories or other Doro products please visit www.doro.com or contact our Helpline.
Getting started
When you get your phone, you will need to set it up before use.
Tip: Remember to remove the plastic screen protector.
Unbox your new phone
The first step is to unbox the phone and assess the items and equipment included in the delivery. Make sure to read through the manual so you can familiarize yourself with the equipment and the basic functions.
•The items supplied with the device and any available accessories may vary depending on the region or service provider.
•The items supplied are designed for this device and might not be compatible with other devices.
•Appearances and specifications are subject to change without prior notice.
•You can purchase additional accessories from your local Doro retailer.
•Make sure accessories are compatible with the device before purchase.
•Only use batteries, chargers and accessories that have been approved for use with this particular model. Connecting other accessories may be dangerous and may invalidate the phone’s type approval and warranty.
•Availability of accessories is subject to change depending on manufacturing availability. For more information about available accessories, refer to the Doro website.
1
English
Insert SIM card, memory card and battery
The SIM and memory card holder’s are located inside the battery compartment.
Tip: Take care not to scratch the metallic contacts on the cards when inserting them into the card holders.
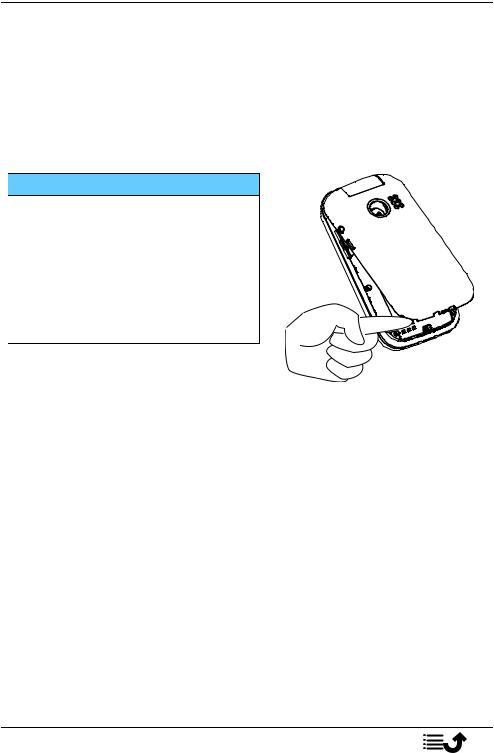
Remove the battery cover
 IMPORTANT!
Turn off the phone and disconnect the charger before removing the battery cover.
Be careful not to damage your fingernails when you remove the battery cover. Do not bend or twist the battery cover excessively as it may get damaged.
2
English
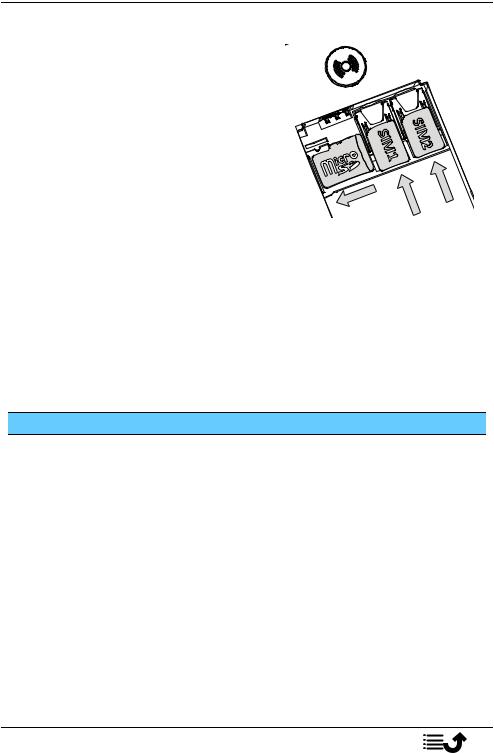
Insert the SIM and memory cards
Insert the nano-SIM (4FF) card by gently sliding it into the SIM card slot. Make
sure that the SIM card’s contacts are facing inwards and that the cut off corner is as shown. You can insert a second SIM card so you can have two phone numbers or service providers on a single device. Data transfer speeds may be
slower, in some cases, if two SIM cards
are inserted in the device than when one SIM card is inserted.
Take care not to scratch or bend the contacts on the SIM card. Should you need, but have problem to remove/replace the SIM card, use adhesive tape on the exposed part of the SIM card to pull it out.
You may optionally install a memory card in the phone to increase the storage space of your phone to be able to store more files, pictures, videos etc. Make sure that the memory card’s contacts are facing downwards, as shown above. Compatible card type: MicroSD, MicroSDHC, MicroSDXC. Incompatible cards may damage the card itself, the device and corrupt data stored on the card.
See Storage, p.61 for additional info.
 IMPORTANT!
This device accepts nano-SIM card or 4FF. Use of incompatible SIM cards may damage the card or the device, and may corrupt data stored on the card.
Use only compatible memory cards with this device. Compatible card types include microSD, microSDHC.
Incompatible memory cards may damage the card itself, the device and corrupt any data stored on the card.
3

English
Insert the battery
Insert the battery by sliding it into the battery compartment.
Replace the back cover.
Charge the phone
While it’s possible that your phone will already come with enough power to be turned on right out of the box, we recommend charging the device fully before using it.

 CAUTION
Only use batteries, chargers and accessories that have been approved for use with this particular model. Using unapproved accessories may be dangerous and may invalidate the phone's type approval and warranty.
When the battery is running low, 

 is displayed and a warning signal is heard. When the charger is connected to the phone,
  is displayed briefly, and
  when it is disconnected. The battery charge indicator is animated while charging. It takes approximately 3 hours to fully charge the battery. If the phone is turned off when the charger is connected to the phone only the battery charge indicator will be shown on the display. When charging is completed,


 is displayed on the screen.
Use a wall power outlet to charge
1.Connect the small head of the USB charging cable to the charging socket y on the phone.
2.Plug the power adapter to a wall power outlet.
4
English
Use a charging cradle to charge (optional)
1.Connect the small head of the USB charging cable to the cradle. Place the phone in the cradle.
2.Plug the power adapter to a wall power outlet.
Use a computer or other power source to charge
1.Connect the small head of the USB charging cable to the phone.
2.Plug the large head of standard USB cable to the computer’s USB port.
Note! Generally charging is quicker if plugged directly into the wall.
If the phone is turned off during charging, the phone is still charging. Press  to view charging status.
Save energy
When the battery is fully charged, disconnect the charger from the device and unplug the charger from the wall outlet. To save power, the screen turns off after a while. Press any button to wake the screen up. Full battery capacity will not be reached until the battery has been charged 3–4 times. Batteries degrade over time, which means that call time and standby time will normally decrease with regular use. During extended operation, the device may feel warm. In most cases, this is normal. To save battery and energy even further, see Battery saver, p.57.
Turn the phone on and off
1.Press and hold  on the phone to turn it on or off. Press OK to
Power off.
2.If the SIM card is valid but protected with a PIN code (Personal Identification Number), Enter SIM PIN is displayed. Enter the PIN code and
press  . Delete entries with
  .
.
Attempts shows the number of PIN attempts left. When no more attempts remain, the SIM card must then be unlocked with the PUK code (Personal Unblocking Key).
Unlock with PUK code
1.Enter the PUK code and press  . Delete entries with
  .
.
2.Enter a new PIN code and press  .
.
5

English
3.Re-enter the new PIN code and confirm with  .
.
Note! If PIN and PUK codes were not provided with your SIM card, please contact your service provider. If you enter the wrong PUK code more than 10 times the SIM card gets permanently locked.
Get to know your phone
Assistive functions
Use the symbols below to guide you through supporting sections in the manual.
Seeing |
Handling |
Hearing |
Safety |
Start-up Wizard
When starting the device for the first time, a Start-up Wizard will be initiated to set some basic settings.
1.Select the wanted language, the standard language is selected by the origin of the SIM card, and press  .
.
2.You will be provided a tutorial about the navigation of the phone. Press Next/ to step through the tutorial. Press Skip to skip pass the tutorial. Press
  to step backward.
3.Select:
•Standard setup to use the phone with the standard settings.
•Manual setup to customise the settings.
You can choose to adjust one or more settings by selecting and pressing  .
.
Select Finish when done.
4.You will be provided a short tutorial of the phone’s menu. Press Next/  to step through the tutorial.
Tip: Launch the start-up wizard at any time. From standby mode, press 

 Settings
  Start-up Wizard.
6

English
Phone indicators
Lights on the phone lid:
•Green light when you have a new message or a missed call.
•Red light when the battery is running low and during charging.
Notification panel and status bar
At the top of the main screen to the left you can see if there are any notifications. The number will show how many notifications you have.
•To view the notifications, press the options/notifications button  .
.
•Press Clear all to remove all notifications.
Note! You do not delete the item itself, just the notification.
 IMPORTANT!
When a new system software is available, a notification message is sent. Select to start downloading. The download time may vary depending on Internet connection. We recommend that you always update your device to the latest software version to get optimal performance and the latest enhancements. During an update your phone will be temporarily out of service, even for emergency calls. All contacts, photos, settings, etc. will remain safely stored in the phone, but we recommend you to regularly backup your phone. Do not interrupt the update process. See System, p.64 for more information. You need to have a working data connection to be able to perform the update with the firmware over-the-air (FOTA) service. See Mobile network, p.48 or Wi-Fi, p.46 on how to activate a data connection.
At the top of the main screen to the right you can see the status symbols, such as network signal strength, battery level, Bluetooth activity and more.
Descriptions in this document
Descriptions in this document are based on your phone’s setup at the time
of purchase. Instructions normally start from the start screen. Press  to reach the start screen. Some descriptions are simplified.
The arrow ( ) indicates next action in step-by-step instructions.
7

English
Basic phone operations
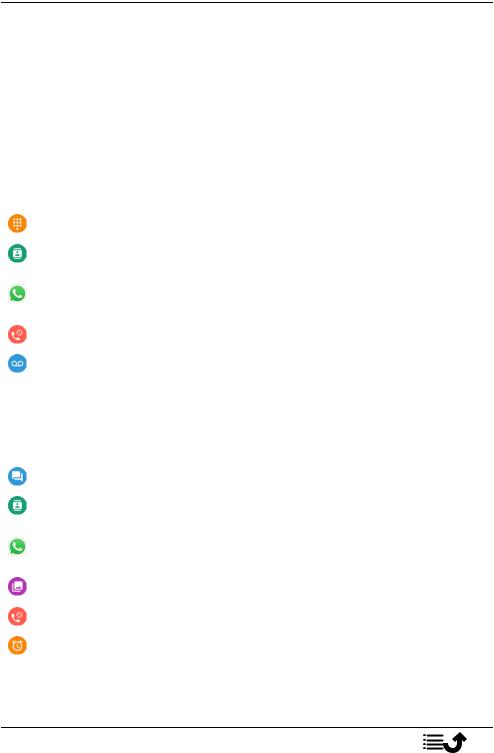
Call  :
:
•Dial a number or answer incoming call.
•Enter the call log.
End call/Power on and off  :
:
•End calls or return to the start screen.
•Long press to power on or off.
Assistance 
 :
:
Press to make an assistance call.
Back  :
:
Return to the previous screen.
Clear  :
:
Press to clear the previous character.
Camera  :
:
Press to initiate the camera app and take a picture or a video.
Options  :
:
The options button have multiple functions. In idle mode it will display eventual notifications. In different menus and features it will display available options for that feature. Try to always press this button to explore more options.
8
English
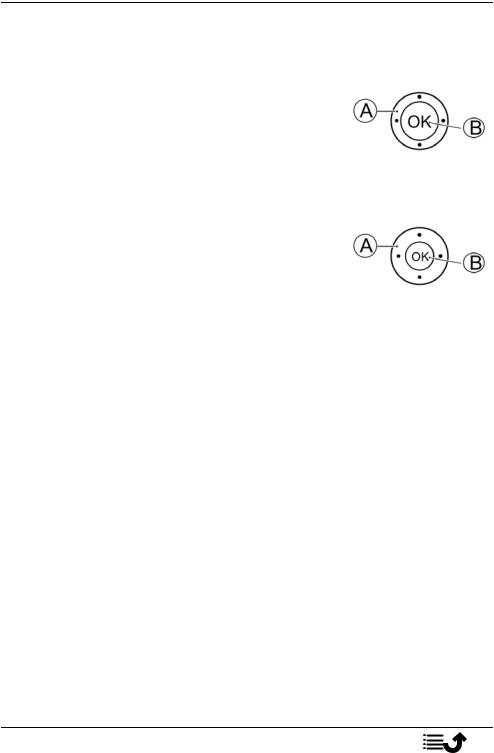
Navigation keys 
•(A) Use the Four-way navigation keys to navigate up, down, left and right.
•(B) Use the  to open the
  Menu and to confirm actions.
Standby (idle mode)
When the phone is ready to use, and you have not keyed in any characters, the phone is in standby.
•Press  to return to standby mode.
•Press the options button  to access the notices, if there’s any.
Tip: You can always press  to return to standby.
Volume keys + / –
•During a call the volume keys adjusts the call volume.
•From standby you can set your device to silent mode: press and hold
#/ until
until  appears.
See also Volume  , p.59 for more information.
9

English
Note! If you use a hearing aid or have hearing difficulties when using the telephone in a noisy environment, you can adjust the phone's audio
settings, see Audio setup  , p.59.
To enable and disable features and functions
enabled functions.
disabled functions.
Headset
When a headset is connected, the internal microphone in the phone is automatically disconnected. If available, use the answer key on the headset to answer and end calls.

 CAUTION
Using a headset at high volume may damage your hearing. Adjust the volume level carefully when using a headset.
Navigate your phone
Meet “EVA” – ”Enkel, Vänlig och för Alla” (Swedish)  (Easy, friendly and for everyone)
Doro aim to take simplicity even further thanks to our intuitive, actionbased interface, EVA. EVA makes using a phone even easier. It’s like having someone who understands your needs always by your side. Users never need to look around for things they can’t find. EVA simply gives them a few clear choices, and then does what the user wishes based on their response. She’s also the perfect companion when starting up the phone for the first time, guiding the user every step of the way. And because she is designed by Doro, EVA makes the technology fun, available and easy for everyone.
Doro's unique telephone menu is action-based, that makes navigating the phone brilliantly simple. It allows you to navigate your phone, by just asking yourself, “What do I want to do?”.
For example, if you want to send a message to a contact that is available in your contact book.
1.Tap the Send button. You are asked, Send What? and responds by selecting A message.
10
English
2.You are asked To whom? and responds by selecting A contact.
3.Select or search for a contact.
4.Compose your message.
5.Press  to access more options.
6.When done, select and press  .
.
 Call
Call
To call someone.
A number to enter a phone number, see Calls, p.16.
A contact to make a call from your contact book. For more info see
Contacts, p.22.
A WhatsApp contact to make a call to a WhatsApp contact . For more info see WhatsApp, p.35.
A recent contact to call from the call history, see Call history, p.17
My voicemail to call your voicemail, see also Set Voicemail, p.21.
 View
View
To see and view content reach many of the most frequently used apps.
My messages to view messages (SMS/MMS).
My contacts to see and handle your ICE card (In Case of Emergency), see Contacts, p.22.
My WhatsApp messages to view WhatsApp messages. For more info see WhatsApp, p.35.
My gallery to view your stored pictures and videos, see Gallery, p.37.
My call history to view your call history, see Call history, p.17.
My alarms to view your alarms or add a new one, see Alarm, p.36.
11
English
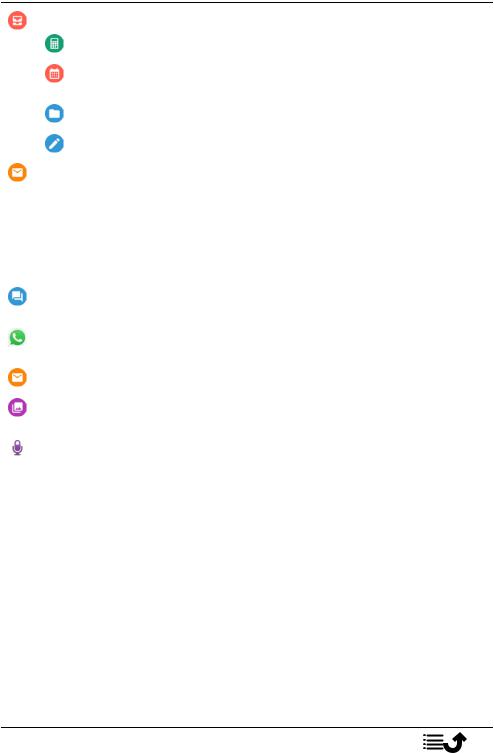
My organiser
Calculator to make some calculations, see Calculator, p.43.
Calendar to view the calendar and your events, see Calendar, p.44.
File manager to view stored videos, see File manager, p.44.
Notes to view your notes, see Notes, p.45.
My e-mails to view emails, create or add an email account, see Email, p.40
 Send
Send
To send and share messages, email, pictures and more from your phone.
A message to send a text (SMS), picture (MMS) message, see Create and send text message (SMS)/picture message (MMS), p.30.
A WhatsApp message to send a WhatsApp message. For more info see WhatsApp, p.35.
An email to send an email, see Create and send e-mail, p.40.
A picture to send a picture or video. To view stored images and videos, see Gallery, p.37
A recording to record and send a recorded sound, see Recorder, p.39.
Note! The action-based navigation telephone menu can be turned off. SeeNavigation guides, p.58.
Press  Menu to reach all the apps.
Sharing content
Share content by using various sharing options.
In many places of the phone menu you can press  or
or  for more options.
Press Share to share a selected item:
12

English
•Messaging to send via a message. See Create and send text message (SMS)/picture message (MMS), p.30.
•Bluetooth to send to a Bluetooth device, see Bluetooth®, p.55.
•Email to send via e-mail, see Create and send e-mail, p.40.
•WhatsApp to send via WhatsApp, see WhatsApp, p.35.
Press Just once to use this app once or Always to always use this when sharing.
Note! If Always is selected, see Reset app preferences, p.65 on how to reset this and again get the option to select app.
Enter text 
Enter text manually
Select character
•Press a numerical key repeatedly until the desired character is shown. Wait a few seconds before entering the next character. Press  to erase characters.
Special characters
1.Press *for a list of special characters.
2.Select the desired character using the Four-way navigation keys and press  to enter it.
Move the cursor within text
•Use the Four-way navigation keys to move the cursor within the text
Upper case, lower case, numerals and predictive text
•Press #to choose between upper case, lower case, numerals and predictive text. Predictive text needs to be activated before use, see
Predictive text, p.64.
Change writing language
•Press and hold # to change writing language.
Enter text with predictive text
In some languages you can use predictive text input method which uses a dictionary to suggest words.
13

English
•Press each key once, even if the displayed character is not the one you want. The dictionary will suggest words based on the keys you have pressed.
Example
1.Press 3, 7, 3, 3 to write the word “Fred”. Complete the word before looking at the suggestions.
2.Use the Four-way navigation keys to move the cursor to view the suggested words.
3.Press OK and continue with the next word. Alternatively, press 0to continue with the next word.
4.If none of the suggested words are correct, use manual input mode.
Note! See Predictive text, p.64 for more information.
Input mode
•Press #to change input mode. The icon on the top left of the display indicates the input mode.
abc KT9 |
Predictive text |
abc |
lower case |
Abc |
Sentence case |
ABC |
UPPER CASE |
123 |
Numerals |
Hearing aid compatible
This phone is hearing aid compatible. Hearing aid compatibility is not a guarantee that a specific hearing aid will work with a specific phone. Mobile phones contain radio transmitters that may interfere with hearing aid performance. This phone has been tested for use with hearing aids, for some of the wireless technologies that it uses, but there may be some newer wireless technologies that have not been tested yet for use with hearing aids. To ensure that a specific hearing aid works well with this phone, test them together before making a purchase.
The standard for hearing aid compatibility contains two types of ratings:
•M: To use your hearing aid in this mode, make sure that your hearing aid is set to "M-mode" or acoustic coupling mode, and position the phones receiver near the hearing aid’s built-in microphone. For the best results, try using the phone in different positions relative to your
14
English
hearing aid—for example, placing the receiver slightly above the ear may result in better performance for hearing aids with microphones positioned behind the ear.
•T: To use your hearing aid in this mode, make sure that your hearing aid is set to "T-mode" or telecoil coupling mode (not all hearing aids have this mode). For the best results, try using the phone in different positions relative to your hearing aid—for example, placing the receiver slightly below or in front of the ear may result in better performance.
See also Audio setup  , p.59 on how you can adjust the audio settings.
Connect the phone to a computer
Connect the phone to a computer and start transferring pictures, music and other file types. All you have to do is connect a USB cable between the phone and computer. From your computer's file explorer, you can drag and drop content between your phone and the computer.
Note! You might not be able to transfer some copyright protected material. USB storage allows a computer connected using a USB-cable to access files on the phone, but this can be disabled. See USB connection, p.56.
Enabling USB storage allows a computer or device connected using a USBcable to access files on this phone.
Drag and drop content between phone and a computer
1.Connect your phone to a computer using a USB cable.
2.Wait until the phone or memory card appears as external disks in the file explorer.
3.Drag and drop selected files between the phone and the computer.
Note! You can transfer files using a USB cable on most devices and operating systems supporting a USB Mass Storage interface.
Disconnect the USB cable safely
1.Make sure to enable the hardware to be safely removed.
2.Disconnect the USB cable.
Note! Computer instructions may vary depending on your operating system. See the documentation of your computer's operating system for more information.
15

English
Calls
Make a call
1.Enter the phone number including the area code. Delete with  .
.
2.Press  to make a call.
Note! If you have more than one SIM card installed, you will be asked what SIM card to use. To set the preferred SIM card, see Dual SIM settings, p.54.
3.Press  to end the call.
Tip: For international calls, always use + before the country code for best operation. Press and hold *for the international prefix +.
Call from the phonebook
1.Press  Call
Call  A contact.
2.Use  /
/ to scroll through the phonebook, or to do a quick search by pressing the key corresponding to the first letter of the entry.
3.Press  to dial the selected entry. If needed, select the number. Alternatively, press
  to dial.
4.Press  to cancel the call.
Receive a call
1.Open the phone and press  to answer. Press
  to reject the call (busy signal).
To not answer an incoming call by opening the phone, see Answer mode, p.22.
Tip: Press + or – to temporarily switch off the ringsignal without opening the phone.
2.Press  to end the call.
16

English
Call information
During a call, the outgoing or incoming phone number and the elapsed call time is displayed. If the identity of the caller is withheld or unknown, Private number or Unknown are displayed.
Call options
Mute
Select and press  to disable the microphone. Press
  to re-enable the microphone.
Loudspeaker
Select and press  to activate loudspeaker mode. Speak clearly into the
phone microphone at a maximum distance of 1 m. Press  to deactivate loudspeaker mode.
Options 
During a call the options button ( ) give access to additional functions.
•Add call to call another number. When the second party is connected you can Merge and Swap.
•Manage is available during a conference call.
•Hold/Retrieve call to hold/retrieve the current call.
Note! For settings related to calling, see Call settings, p.18
SOS calls
As long as the phone is switched on, it is possible to place an SOS call by entering the main local emergency number for your present location fol-
lowed by  .
.
Some networks accept calls to emergency numbers without a valid SIM card. Contact your service provider for more information.
Call history
Received, missed and dialed calls are saved in a combined call log.
1.Press  .
.
17

English
Alternatively, press  View
View  My call history.
2.Calls are displayed as follows depending on call type:
Incoming call
Outgoing call
Missed call
3.Select wanted entry and press  to dial, or...
Select an entry and press  to:
to:
•Create new contact to save the number for a new contact.
•Add to a contact to add the number for an existing contact.
•Send a message to send a text message.
•Block number/Unblock number to block/unblock the number. You will not receive calls or messages from a blocked number. See Call blocking, p.21.
•Call details to show details for the selected call.
•Delete log to delete the selected entry in the call log.
Press  to:
to:
•Settings for call settings. See Call settings, p.18..
•Clear call history to delete all entries in the call log.
Call settings
You can access most of the call settings via  Menu
Menu  Phone
Phone

 Settings.
Display options
Set in what order you sort and display your contacts.
Sort by
Set in what order you sort your contacts.
1.Press  Menu
Menu  Phone
Phone

 Settings
 Display options
 Sort by:
2.Select First name or Surname.
Name format
18

English
Set how your contacts are displayed.
1.Press  Menu
Menu  Phone
Phone

 Settings
  Display options
 Name format:
2.Select First name first or Surname first.
Calls
Note! You need to select the SIM card you want to handle.
Fixed dialling numbers (FDN)
You can limit calls to certain numbers saved on the SIM card. The list of allowed numbers is protected by your PIN2-code.
Note! The PIN2-code is needed to apply fixed dial. Contact your service provider to get the PIN2-code.
1.Press  Menu
Menu  Phone
Phone

 Settings
  Calls
Calls  select SIM card
  Fixed dialling numbers:
•Enable FDN  enter PIN2 to enable the feature.
•Change PIN2 to change the PIN2 code.
•FDN list 
 to add and enter the first allowed number. You can add more numbers or edit or delete existing.
Note! You can save parts of phone numbers. For example, if you save 01234, allows calls to all numbers starting with 01234. It is possible to place an SOS call by entering the main local emergency number followed
by  even when fixed dial is activated. When fixed dial is activated you are not allowed to view or manage any phone numbers saved on the SIM card. You are not able to send any text messages either.
Call forwarding
You can divert calls to an answering service or to another phone number. Set up which calls should be diverted. Select a condition, enter number and then press Turn on. You can also select Turn off or Update.
1.Press  Menu
Menu  Phone
Phone

 Settings
  Calls
Calls  select SIM card
  Call forwarding:
19

English
•Always forward to divert all voice calls.
•When busy to divert incoming calls if the line is busy.
•When unanswered to divert incoming calls if unanswered.
•When unreachable to divert incoming calls if the phone is turned off or out of range.
Call barring
Your phone can be restricted to disallow certain types of calls. Select a condition and select  or
or  .
.
Note! A password is needed to apply call barring. Contact your service provider to get the password.
1.Press  Menu
Menu  Phone
Phone

 Settings
  Calls
Calls  select SIM card
  Call barring.
2.Mark the type of calls that you want to restrict:
•All outgoing calls to answer incoming calls but not calling.
•International outgoing calls to block calls to international numbers.
•International outgoing calls except to home PLMN to block international calls except to the country associated with the SIM card.
•All incoming calls to call but not to receive incoming calls.
•Incoming calls while roaming to block incoming calls while roaming (operating in other networks).
3.Press Cancel all to cancel all call barring (password needed). Press OK to confirm.
4.Press Change barring password to change the barring password.
Note! Changing the password might not be allowed by your service provider.
Additional settings Caller ID
Display or hide your phone number on the recipient's phone when you call.
Press  Menu
Menu  Phone
Phone

 Settings
  Calls
Calls  select SIM card
 Additional settings
  Caller ID:
20
Loading...