


580
Table of contents
 Loading...
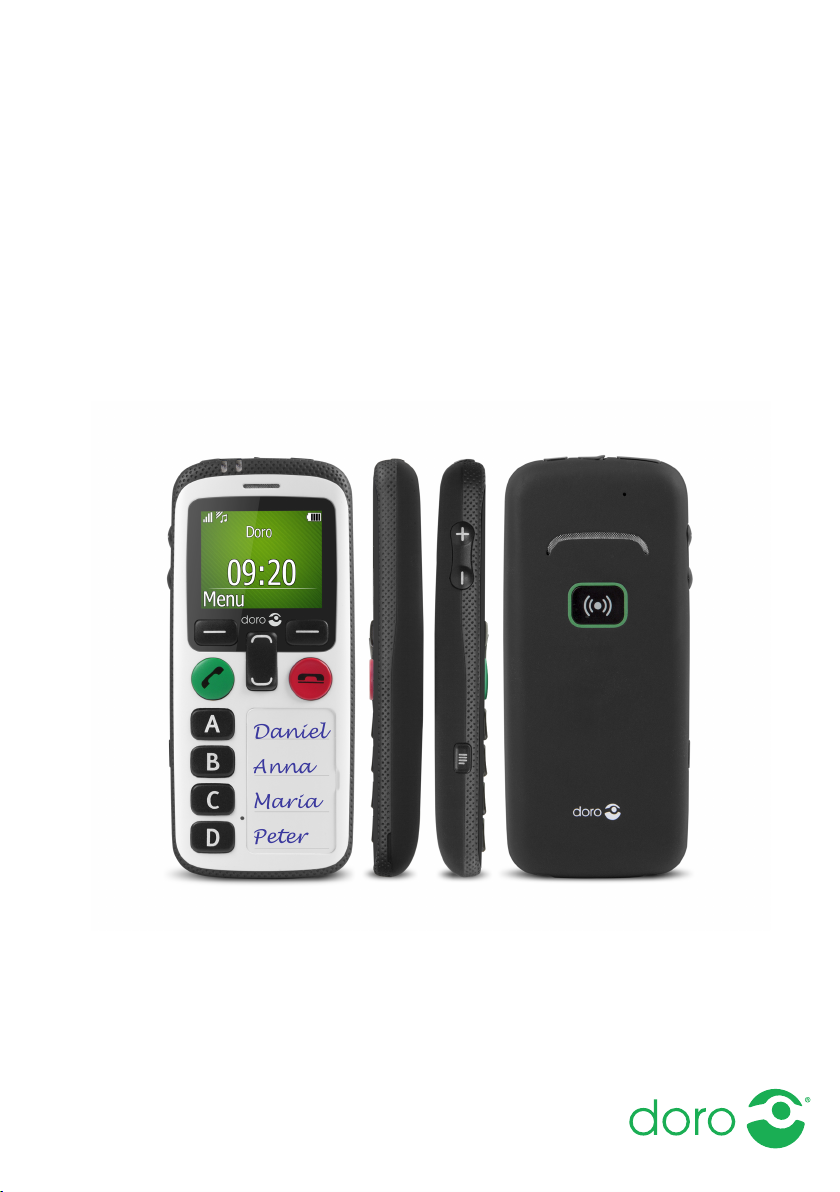
Doro Secure®580
Installation guide
English
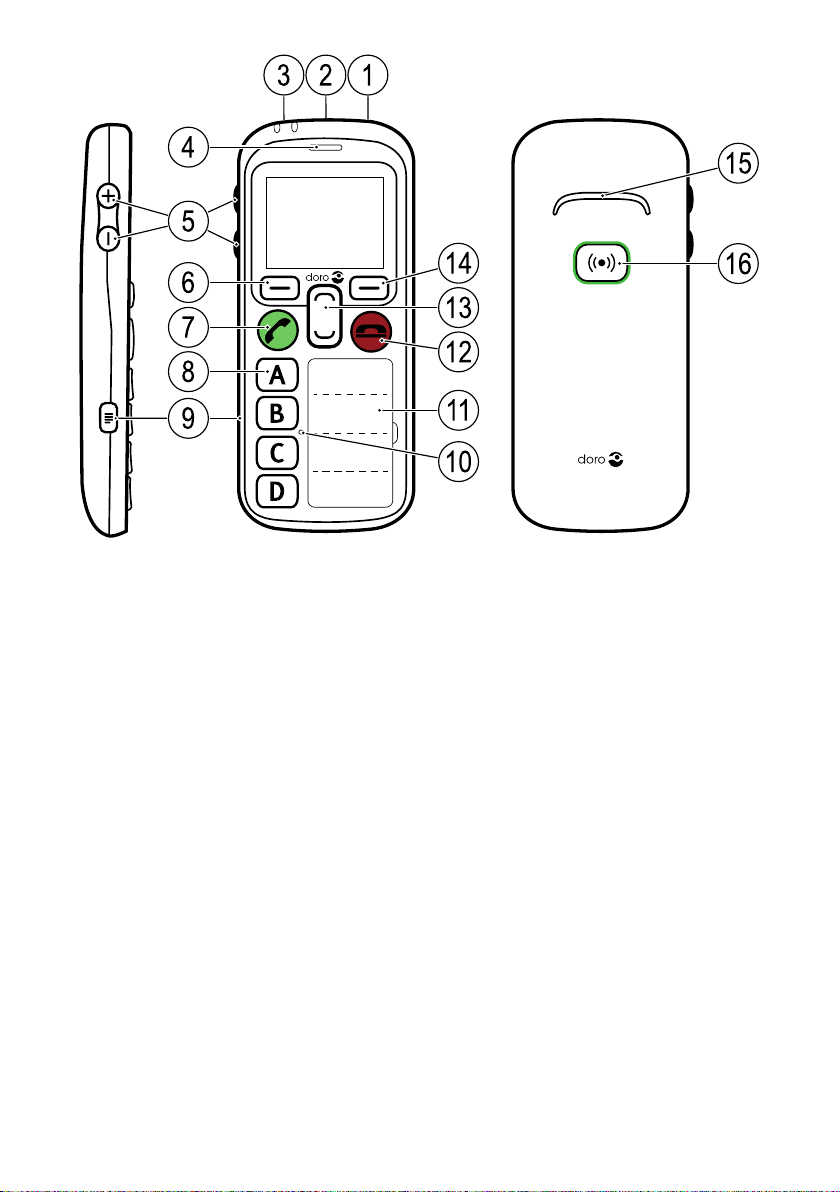
23 1
6
4
7
8
9
5
14
13
11
10
15
16
12
Note! All illustrations are for illustrative purposes only and may not
accurately depict the actual device.
English
1. Power on/off
2. Headset socket
3. Charging socket
4. Earpiece
5. Volume keys (+/-)
6. Left selection button
7. Call key
8. Speed dial keys
(A-D or Telecare functions)
9. Settings menu
10. Microphone
11. Name list
12. End call key/Back
13. Navigation buttons
14. Right selection button
15. Loudspeaker
16. Assistance button
The items supplied with your phone might vary depending on the software and accessories available in your region or offered by your service
provider. You can obtain additional accessories from your local Doro dealer. The supplied accessories provide the best performance with your
phone.

English
Contents
Set up the phone........................................................................................... 1
Get started............................................................................................. 1
Installation and assembly............................................................. 1
Turn the phone on and off ............................................................ 2
Navigate the phone ....................................................................... 2
Enter text........................................................................................ 3
Phonebook............................................................................................. 3
Add number ................................................................................... 3
ICE (In Case of Emergency)........................................................... 3
My number..................................................................................... 4
Emergency call .............................................................................. 4
Phone settings....................................................................................... 5
See
Hear
Handle
Safety
Connectivity ................................................................................. 13
Doro Experience
Create account ............................................................................16
Log in............................................................................................17
Sync. intervals ............................................................................. 17
Account ........................................................................................ 17
Log out ......................................................................................... 17
Doro Experience
Assistance............................................................................................ 20
Activation ..................................................................................... 21
Number list .................................................................................. 21
Activate text messages (SMS) .................................................... 22
Position SMS................................................................................23
Confirm with "0"...........................................................................24
Signal type ................................................................................... 24
Request position .........................................................................25
Safety timer..................................................................................25
Safety Timer.........................................................................................26
General information .................................................................................... 26
Safety instructions...............................................................................26
Network services and costs........................................................26
Operating environment ............................................................... 26
.......................................................................................... 5
........................................................................................... 5
.................................................................................... 7
......................................................................................11
®
.................................................................................16
®
Manager ......................................................... 18

English
Medical units ...............................................................................26
Areas with explosion risk ............................................................ 27
Li-ion battery ................................................................................ 27
Protect your hearing....................................................................27
Emergency calls...........................................................................28
GPS/Location based functions ..................................................28
Vehicles........................................................................................28
Protect your personal data .........................................................28
Malware and viruses...................................................................29
Care and maintenance .......................................................................29
Warranty...............................................................................................30
Copyright and other notices................................................................ 31
Content copyright ........................................................................32
Specifications ......................................................................................32
Hearing aid compatibility ............................................................32
Specific Absorption Rate (SAR) ..................................................33
Correct disposal of this product .................................................33
Correct disposal of batteries in this product .............................34
Declaration of Conformity...........................................................34

English
Set up the phone
Get started
IMPORTANT!
The Assistance alarm feature is disabled when connected to a PC with
a USB cable.
Installation and assembly
Remove the battery cover
IMPORTANT!
Turn off the phone and disconnect the
charger before removing the battery cover.
Insert the SIM card
The Doro Secure®580 accepts micro SIM card.
Use of incompatible SIM cards may damage the
card or the device, and may corrupt data stored
on the card.
Tip: Take care not to scratch or bend the
contacts on the SIM card when inserting into
the card holder.
Remove SIM card
Insert the battery
1

English
Turn the phone on and off
1. Press and hold 1 to turn the phone on/off.
2. If the inserted SIM card is protected with an PIN code (Personal
Identification Number) PIN is displayed. Use the side buttons +/– to
enter the PIN code and press OK to confirm or delete with Clear (
upper right corner of keypad).
Tip: It is recommended to use Automatic SIM lock in order to ease
the use, see SIM lock (PIN code option), p.11.
Note! If PIN and PUK codes were not provided with your SIM card, please
contact your service provider.
Tip: It is recommended to remove the protective plastic film from the
display to enhance the visibility.
Attempts: # shows the number of PIN attempts left. When no more at-
tempts remain, PIN blocked is displayed. The SIM card must then be unlocked with the PUK code (Personal Unblocking Key).
1. Use the side buttons +/– to enter the PUK code and confirm with OK.
2. Use the side buttons +/– to enter a new PIN code and confirm with
OK.
3. Use the side buttons +/– to re-enter new PIN code and confirm with
OK.
Navigate the phone
Step-by-step instructions
• The arrow (
• To confirm an action, press OK.
) indicates next action in step-by-step instructions.
2
English
• To select an item, scroll or highlight the item using / and then
press OK.
Example
1. Press and hold
2. Select Settings
(6 seconds).
Sound Audio setup.
3. Select an option and press OK.
Enter text
• Use the side buttons +/– to select a character from the list. Wait a
few seconds before entering the next character.
Phonebook
Add number
1. Press and hold .
2. Select Phonebook
3. Use the side buttons +/– to enter a name. Delete with Clear.
4. Use the side buttons +/– to enter number, then press OK to confirm.
5. Repeat until you have 4 contacts (maximum).
A-D Empty Add.
Note! To edit or delete contact, select Options
Tip: Use Doro Experience
®
Manager to add numbers using a computer,
Edit or Delete.
see My device, p.18.
ICE (In Case of Emergency)
All fields are optional, but the more information provided the better.
1. Press and hold
2. Select Phonebook
3. Use
/ to scroll the list of entries.
4. Press Edit to add or edit information in each entry. Use the side buttons +/– to enter info. Delete with Clear.
ID
• Name: enter name.
• Birth: enter date of birth.
• Height: enter height.
• Weight: enter weight.
.
ICE.
3

English
• Address: enter home address.
• Language: enter preferred language.
• Insurance: enter insurance provider and policy number.
Contacts
• Contact 1: enter name and number. If possible, add your
relationship.
• Contact 2: enter name and number. If possible, add your
relationship.
• Doctor: enter name and number.
Important info.
• Condition: enter any medical conditions/medical devices (e.g.
diabetic, pacemaker).
• Allergies: enter any known allergies (e.g. penicillin, bee stings).
• Blood type: enter your blood type.
• Vaccination: enter any relevant vaccinations.
• Medication: enter any medication that you are treated with.
• Other info: enter other information (e.g. organ donor, living will,
consent to treat).
5. When done, press Save.
Tip: Use Doro Experience
®
Manager to add ICE information using a
computer, see ICE (In Case of Emergency), p.18.
My number
The phone number assigned to the SIM card is saved as My number if
this is allowed by the card.
1. Press and hold
2. Select Phonebook
.
My number Empty Add.
3. Use the side buttons +/– to enter name and number.
4. When done, press Save.
Emergency call
1. Press and hold .
2. Select Phonebook
3. Use the side buttons +/– to enter name and number.
4. When done, press Save.
Emergency call Empty Add.
4

English
Tip: Use Doro Experience®Manager to edit the emergency number using
a computer, see My device, p.18.
Phone settings
See
Idle display
Select what information is shown in standby mode.
1. Press and hold
2. Select Settings
3. Select Clock only, Clock & Operator or All info.
4. Press OK to confirm.
Themes
The themes use different contrasts between text and the background
mixing colours for optimised readability.
1. Press and hold
2. Select Settings
3. Select Theme 1, Theme 2, Theme 3 or Theme 4.
4. Press OK to confirm.
LCD backlight
Select the delay time for the display backlight.
1. Press and hold
2. Select Settings
3. Select 15 sec., 30 sec. or 1 min.
4. Press OK to confirm.
Brightness
You can adjust the brightness of the display. The higher value, the better
contrast.
.
Display Idle display.
.
Display Themes.
.
Display LCD backlight.
1. Press and hold
2. Select Settings
3. Select Level 1, Level 2 or Level 3.
4. Press OK to confirm.
.
Display Brightness.
Hear
Audio setup
5
English
Customise the audio settings if using a hearing aid or having hearing difficulties when using the device in a noisy environment.
1. Press and hold
2. Select Settings
.
Sound Audio setup:
• Normal for normal hearing in normal conditions.
• High for moderate hearing impairment or use in a very noisy
environment.
• HAC mode for use with hearing aid in T-mode.
3. Press OK to confirm.
Tip: Use Doro Experience
®
Manager to programme audio setup using a
computer, see My device, p.18.
Tone setup (ringtone)
Select a ringtone with the best tone curve adjustments and frequencies
to best fit the requirements.
1. Press and hold
2. Select Settings
3. Use
/ to select one of the available melodies, the melody will
.
Sound Tone setup Ringtone.
be played.
4. Press OK to confirm.
Tip: Set up the Message tone, Keypad tone, Power on and Power off
tones in the same way.
Volume
1. Press and hold
2. Select Settings
3. Use
/ to change the ringtone volume.
.
Sound Volume.
4. Press OK to confirm.
Alert type
Select to use ringtone and/or vibration for incoming calls.
1. Press and hold
2. Select Settings
.
Sound Alert type.
• Ring only for ringtone only.
• Vib. only for vibration only.
• Vib. and ring for vibration and ringtone.
6

English
• Vib. then ring to start with vibration and adds ringtone after a
short while.
• Silent for no sound or vibration, the display light is lit.
3. Press OK to confirm.
Note! Selected alert type is visible in the status bar.
Extra tone
Set warning and error tones to alert of low battery power, phone and SIM
card errors, etc.
1. Press and hold
2. Select Settings
.
Sound Extra tone Warning or Error.
3. Select On to enable, or Off to disable.
4. Press Done to save.
Handle
Time & date
Set the time and date
1. Press and hold
2. Select Settings
• Set time to enter the time (HH:MM).
• Set date to enter the date (DD/MM/YYYY).
• Set format to set time or date format (12 hours or 24 hours).
• Auto time to set the phone to automatically update the time
and date according to the current time zone.
3. Press OK to confirm.
Language
The default language for the phone menus, messages, etc. is determined
by the SIM card. You can select to change to any language supported by
the phone.
.
General Time & date:
1. Press and hold
2. Select Settings
3. Use
/ to select language.
.
General Language.
4. Press OK to confirm.
Tip: Use Doro Experience
see My device, p.18.
®
Manager to set language using a computer,
7

English
Start-up wizard
When starting the phone for the first time, you can use the Start-up wizard to set some basic settings.
• Press Yes to change or No if you do not want to change.
Tip: You can run the start-up wizard later if you want. Press and hold
then select Settings
General Start-up wizard.
Block function
1. Press and hold
2. Select Settings
.
General Block function.
3. Select each function you want to disable and press Off.
4. Press Done to confirm.
Network setup
The phone automatically selects (service provider's) home network if
within range.
1. Press and hold
2. Select Settings
.
General Network setup.
3. Select one of the following options and press OK to confirm:
• Select network to view available network, a list of available net-
work operators is displayed (after a short delay). Select desired
operator.
• Service selection to select type of service for your phone.
• Network information to view current network settings.
Services
This menu may contain pre-programmed services from the service provider depending on network support and subscription.
,
1. Press and hold
2. Select Settings
.
General Services.
3. Press OK to confirm.
Auto answer
Select to activate auto answer to answer incoming calls from contacts
saved in the number list in handsfree/speakerphone mode.
1. Press and hold
2. Select Settings
.
Calls Auto answer Activate On.
3. Select an option.
8
Loading...