


 Loading...
Quick Setup Guide
Start Here MFC-J615W
MFC-J630W
Before you can use the machine, please read this Quick Setup Guide for the correct setup and installation.
WARNING |
Warnings tell you what to do to prevent possible personal injury. |
|
||
CAUTION |
Cautions specify procedures you must follow or avoid to prevent possible minor injuries. |
|||
1 Unpack the machine and check the components |
||||
|
|
|
Black |
|
|
2 |
|
Yellow |
|
|
|
Cyan |
|
|
|
|
|
Quick Setup Guide |
|
|
|
|
Magenta |
|
|
|
Starter Ink |
|
|
|
|
Cartridges |
|
Installation CD-ROM |
|
|
[x4] |
|
|
|
|
|
|
Documentation CD-ROM |
Basic User’s Guide |
Safety and Legal |
Accessory Order |
Product Registration |
Telephone Line Cord |
|
booklet |
Form |
Sheet (USA only) |
|
 WARNING
a b c d
Plastic bags are used in the packaging of your machine. To avoid danger of suffocation, please keep these bags away from babies and children.
Remove the protective tape and film covering the machine, and also from the LCD.
Remove the green protective part a by lifting the front of the machine and then pulling down on the packing part.
Remove the plastic bag b containing the ink cartridges from on top of the paper
tray.
1
Make sure you have all components.
 Note
Note
•The components included in the box may differ depending on your country.
•Save all packing materials and the box in case for any reason you must ship your machine.
•You need to purchase the correct interface cable for the interface you want to use (for USB or network connection).
USB cable
Please make sure you use a USB 2.0 cable (Type A/B) that is no more than 6 feet (2 meters) long (cable not included).
Network cable
Use a straight-through Category5 (or greater) twisted-pair cable for 10BASE-T or 100BASE-TX Fast Ethernet Network.
USA/CAN Version 0
1

2 |
Load plain Letter/A4 |
|
paper |
a Pull the paper tray a completely out of the machine.
1
b Lift the output paper tray cover a.
1
2
c With both hands, gently press and slide the paper side guides aand then the paper length guide b to fit the paper size.
Make sure that the triangular marks c on the paper side guides aand paper length guide b line up with the mark for the paper size you are using.
1
3
2
3
d Fan the stack of paper well to avoid paper jams and misfeeds.
e Gently put the paper into the paper tray print side down and top edge first. Check that the paper is flat in the tray.
 IMPORTANT
DO NOT push the paper in too far.

 Note
Note
When you use Legal size paper, press and hold the universal guide release button a as you slide out the front of the paper tray.
1
f Gently adjust the paper side guides to the paper with both hands. Make sure that the paper side guides touch the edges of the paper.
g Close the output paper tray cover.
h Slowly push the paper tray completely into the machine.
i While holding the paper tray in place, pull out the paper support a until it clicks, and then unfold the paper support flap b.
2 
 1
1
3

3 |
Connect the power cord |
|
and telephone line |
 IMPORTANT
DO NOT connect the USB cable yet (if you are using a USB cable).
a Connect the power cord.
b Connect the telephone line cord. Connect one end of the telephone line cord to the jack on the machine marked LINE and the other end to a modular wall jack.
 IMPORTANT
The telephone line cord MUST be connected to the jack on the machine marked LINE.
4
 Note
Note
If you are sharing one telephone line with an external telephone, connect it as shown below.
Before you connect the external telephone, remove the protective cap a from the EXT. jack on the machine.
1
2
1
1Extension telephone
2External telephone
 Note
Note
If you are sharing one telephone line with an external telephone answering machine, connect it as shown below.
Before you connect the external telephone answering machine, remove the protective cap a from the EXT. jack on the machine.
1
Set the receive mode to External TAD if you have an external answering machine. See
Choose the correct Receive Mode on page 8. For additional details, see Connecting an external TAD (telephone answering device) in chapter 6 in the Basic User’s Guide.

4 |
e |
Install the ink cartridges |
 CAUTION
If ink gets in your eyes, wash them out with water at once, and if irritation occurs consult a doctor.
a Make sure that the power is turned on. The LCD shows No Ink Cartridge.
b Open the ink cartridge cover a.
1
c Remove the green protective part a.
f
1
 Note
Note
Do not throw away the green protective part. You will need it if you transport the machine.
d Unpack the ink cartridge.
 Note
Note
g
Make sure you install the Starter Ink Cartridges included with your machine first.
Turn the green knob on the protective yellow cap clockwise until it clicks to release the vacuum seal, then remove the cap a.
1
Take care to match the color of the lever a with the cartridge color b, as shown in the diagram below.
1
2
Install each ink cartridge in the direction of the arrow on the label.
5
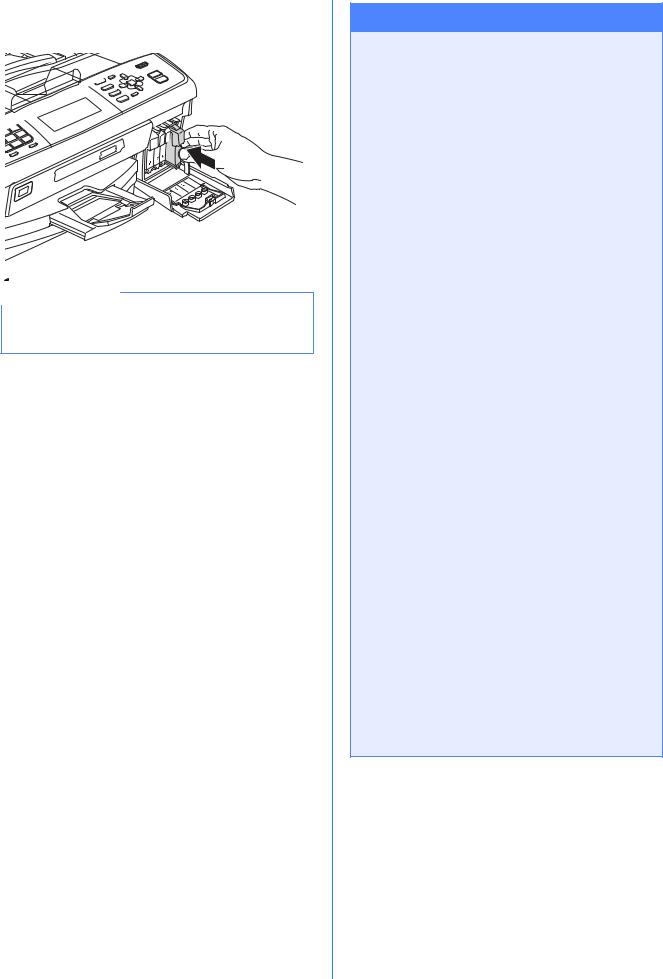
h Gently push the ink cartridge until it clicks. After all the ink cartridges are installed close the ink cartridge cover.
 Note
Note
The machine will prepare the ink tube system for printing. This process will take approximately four minutes. Do not turn off the machine.
6
 IMPORTANT
•DO NOT take out ink cartridges if you do not need to replace them. If you do so, it may reduce the ink quantity and the machine will not know the quantity of ink left in the cartridge.
•DO NOT shake the ink cartridges. If ink stains your skin or clothing, wash with soap or detergent at once.
•DO NOT repeatedly insert and remove the cartridges. If you do so, ink may seep out of the cartridge.
•If you mix the colors by installing an ink cartridge in the wrong position, clean the print head several times after correcting the cartridge installation. (See Cleaning the print head in Appendix A in the Advanced User’s Guide on the documentation CD-ROM.)
•Once you open an ink cartridge, install it in the machine and use it up within six months of installation. Use unopened ink cartridges by the expiration date written on the cartridge package.
•DO NOT dismantle or tamper with the ink cartridge, this can cause the ink to leak out of the cartridge.
•Brother strongly recommends that you do not refill the ink cartridges provided with your machine. We also strongly recommend that you continue to use only Genuine Brother Brand replacement ink cartridges. Use or attempted use of potentially incompatible ink and/or cartridges in the Brother machine may cause damage to the machine and/or may result in unsatisfactory print quality. Our warranty coverage does not apply to any problem that is caused by the use of unauthorized third party ink and/or cartridges. To protect your investment and obtain premium performance from the Brother machine, we strongly recommend the use of Genuine Brother Supplies.

5 Check the print quality
a When the preparation process has finished, the LCD shows Set Paper and Press Start.
Press Color Start.
b Check the quality of the four color blocks a on the sheet. (black/yellow/cyan/magenta)
 1
1
c If all lines are clear and visible, press 1 (Yes) on the dial pad to finish the quality check and go to step 6.
OK
If you can see missing short lines, press 2 (No) on the dial pad and follow the steps on the LCD.
Poor
6 |
Choose your language |
|
(if needed) |
a Press Menu.
b Press a or b to choose Initial Setup. Press OK.
c Press a or b to choose Local Language. Press OK.
d Press a or b to choose your language. Press OK.
e Press Stop/Exit.
7

7 Choose the correct Receive Mode
The correct Receive Mode is determined by the external devices and telephone subscriber services (Voice Mail, Distinctive Ring, etc.) you have (or will be using) on the same line as the Brother machine.
Will you be using a Distinctive Ring number for receiving faxes?
Brother uses the term “Distinctive Ring” but telephone companies may have other names for this service such as Custom Ringing, RingMaster, Personalized Ring, Teen Ring, Ident-A-Call, and Smart Ring. See Distinctive Ring in chapter 6 in the Basic User’s Guide for instruction on setting up your machine using this feature.
Will you be using Voicemail on the same telephone line as your Brother machine?
If you have Voice Mail on the same telephone line as your Brother machine, there is a strong possibility that Voice Mail and the Brother machine will conflict with each other when receiving incoming calls. See Voice Mail in chapter 6 in the Basic User’s Guide for instructions on setting up your machine using this service.
Will you be using a Telephone Answering Device on the same telephone line as your Brother machine?
Your external telephone answering device (TAD) will automatically answer every call. Voice messages are stored on the external TAD and fax messages are printed. Choose External TAD as your receive mode. See the instructions below. For additional information see Connecting an external TAD (telephone answering device) in chapter 6 in the Basic User’s Guide.
Will you be using your Brother machine on a dedicated fax line?
Your machine automatically answers every call as a fax. Choose Fax Only as your receive mode. See the instructions below.
Will you be using your Brother machine on the same line as your telephone?
Do you want to receive voice calls and faxes automatically?
The Fax/Tel receive mode is used when sharing the Brother machine and your telephone on the same line. Choose Fax/Tel as your receive mode. See the instructions below. For additional information see Fax/Tel in chapter 5 in the Basic User’s Guide for instructions on setting up and using this receive mode. Important Note: You cannot receive voice messages on either Voice Mail or an answering machine when choosing the Fax/Tel mode.
Do you expect to receive very few faxes?
Choose Manual as your receive mode. You control the phone line and must answer every call yourself. See the instructions below.
a b
c d
e
For details, see Using receive modes in chapter 5 in the Basic User’s Guide.
Press Menu.
Press a or b to choose Initial Setup.
Press OK.
Press a or b to choose Receive Mode.
Press d or c to choose the receive mode.
Press OK.
Press Stop/Exit.
 Note
Note
If the Receive Mode option is not displayed, make sure the Distinctive Ring feature is set to Off. (See Turning off Distinctive Ring in chapter 6 in the Basic User’s Guide.)
8
8 Set the date and time
The machine displays the date and time, and if you set up the station ID the date and time will be added to each fax you send.
a Press Menu.
b Press a or b to choose Initial Setup. Press OK.
c Press a or b to choose Date&Time. Press OK.
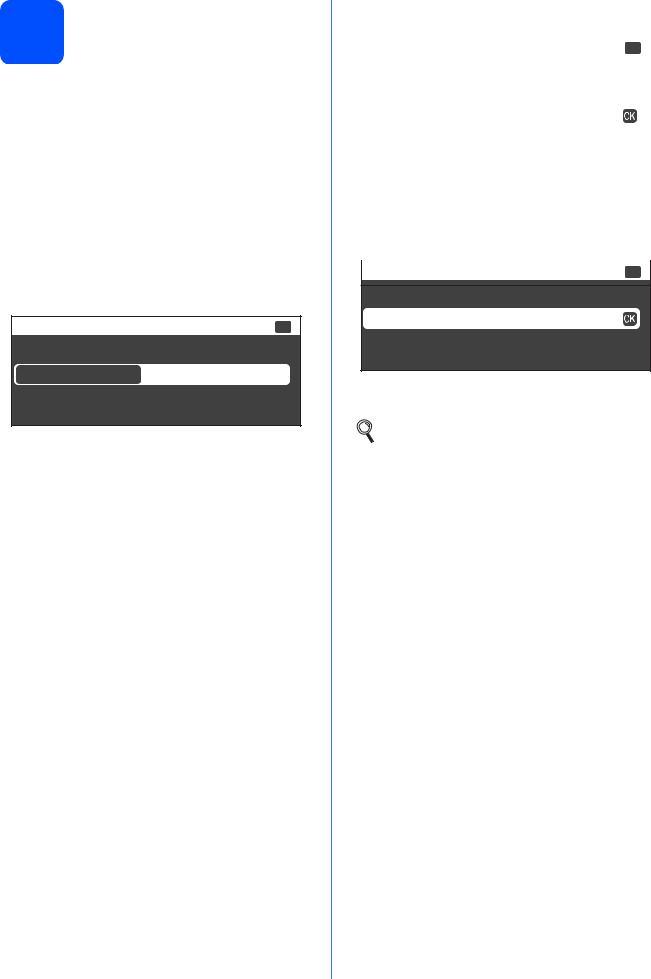
d Enter the last two digits of the year on the dial pad, and then press OK.
|
Date&Tiime |
Input & Press OK |
|
|
Year:20 |
|
|
|
|
|
|
10
(e.g. Enter 1 0 for 2010.)
e Enter the two digits for the month on the dial pad, and then press OK.
f Enter the two digits for the day on the dial pad, and then press OK.
g Press a or b to choose 12h Clock or 24h Clock, and then press OK.
|
Date&Timei |
Select & Press OK |
|
|
|
|
|
|
12 or 24 ? |
|
|
|
12h Clock |
|
|
|
24h Clock |
|
|
|
|
|
|
h |
Enter the time on the dial pad, and then press |
||
i |
OK. |
|
|
(12h Clock only) |
|
|
|
|
Press a or b to choose AM or PM, and then press |
||
|
OK. |
|
|
|
|
|
|
|
Date&Timei |
Select & Press OK |
|
AM or PM ?
AM
PM
j Press Stop/Exit.
To confirm the current date and time, print out the User Settings report. (See Printing reports in chapter 6 in the Advanced User’s Guide on the documentation CD-ROM.)
9

9 Set your Station ID
You should store your name and fax number to be printed on all fax pages that you send.
a Press Menu.
b Press a or b to choose Initial Setup. Press OK.
c Press a or b to choose Station ID. Press OK.
d Enter your fax number (up to 20 digits) on the dial pad, and then press OK.
e Enter your name (up to 20 characters) using the dial pad, and then press OK.
 Note
Note
•See the following chart for entering your name.
•If you need to enter a character that is on the same key as the last character, press c to move the cursor to the right.
•If you entered a letter incorrectly and want to change it, press d or c to move the cursor to the incorrect character, press Clear.
Press |
One |
Two |
Three |
Four |
key |
time |
times |
times |
times |
|
|
|
|
|
2 |
A |
B |
C |
2 |
|
|
|
|
|
3 |
D |
E |
F |
3 |
|
|
|
|
|
4 |
G |
H |
I |
4 |
|
|
|
|
|
5 |
J |
K |
L |
5 |
|
|
|
|
|
6 |
M |
N |
O |
6 |
|
|
|
|
|
7 |
P |
Q |
R |
S |
|
|
|
|
|
8 |
T |
U |
V |
8 |
|
|
|
|
|
9 |
W |
X |
Y |
Z |
|
|
|
|
|
f Press Stop/Exit.
 Note
Note
If you make a mistake and want to start again, press Stop/Exit and go back to a.
For details, see Entering Text in Appendix C in the Basic User’s Guide.
10
 Note
Note
(USA only)
The Telephone Consumer Protection Act of 1991 makes it unlawful for any person to use a computer or electronic device to send any message via a telephone fax machine unless such messages clearly contain, in a margin at the top or bottom of each transmitted page, or on the first page of the transmission, the date and time it is sent and an identification of the business or other entity or other individual sending the message and the telephone number of the sending machines or such business, other entity or individual.
10 Fax Transmission Report
Your Brother machine is equipped with a Transmission Verification Report that can be used as confirmation that you sent a fax. This report lists the name or fax number of the receiving party, the date, time, and duration of the transmission, the number of pages transmitted, and whether or not the transmission was successful. If you want to use the Fax Transmission Report feature, see Printing reports in chapter 6 in the Advanced User’s Guide on the documentation CD-ROM.
11 |
Set Tone or Pulse dialing |
|
(Canadamode |
only) |
|
Your machine comes set for Tone dialing service. If you have Pulse dialing service (rotary), you need to change the dialing mode.
a Press Menu.
b Press a or b to choose Initial Setup. Press OK.
c Press a or b to choose Tone/Pulse.
d Press d or c to choose Pulse (or Tone). Press OK.
e Press Stop/Exit.
12 Set the phone line compatibility
If you are connecting the machine to a VoIP service (over the Internet) you need to change the compatibility setting.
 Note
Note
If you are using an analog telephone line you can skip this step.
a Press Menu.
b Press a or b to choose Initial Setup. Press OK.
c Press a or b to choose Compatibility.
d Press d or c key to choose
Basic(for VoIP). Press OK.
e Press Stop/Exit.
13 Automatic Daylight
Savings Time
You can set the machine to change automatically for daylight savings time. It will reset itself forward one hour in the spring and backward one hour in the fall.
a Press Menu.
b Press a or b to choose General Setup. Press OK.
c Press a or b to choose Auto Daylight.
d Press d or c to choose On (or Off). Press OK.
e Press Stop/Exit.
14 Send in the Product Registration Sheet (USA only)
You can also register your product online using the On-Line Registration link from the installation CD-ROM or visit http://www.brother.com/registration/
a Fill out the Product Registration Sheet.
11

b Put the sheet face down in the ADF (Automatic Document Feeder) or face down on the scanner glass.
c d e
Make sure  (FAX) is illuminated in Blue. Enter the toll-free fax number: 1-877-268-9575.
Press Black Start.
 Note
Note
You will receive a confirmation fax of your Product
Registration.
12
Loading...