


 Loading...
Final Cut Pro7
Exploring Final Cut Pro
KKApple Inc.
Copyright © 2009 Apple Inc. All rights reserved.
Your rights to the software are governed by the accompanying software license agreement. The owner or authorized user of a valid copy of Final Cut Studio software may reproduce this publication for the purpose of learning to use such software. No part of this publication may be reproduced or transmitted for commercial purposes, such as selling copies of this publication or for providing paid for support services.
The Apple logo is a trademark of Apple Inc., registered in the U.S. and other countries. Use of the “keyboard” Apple logo (Shift-Option-K) for commercial purposes without the prior written consent of Apple may constitute trademark infringement and unfair competition in violation of federal and state laws.
Every effort has been made to ensure that the information in this manual is accurate. Apple is not responsible for printing or clerical errors.
Because Apple frequently releases new versions and updates to its system software, applications, and Internet sites, images shown in this book may be slightly different from what you see on your screen.
Apple
1 Infinite Loop
Cupertino, CA 95014 408-996-1010 www.apple.com
Apple, the Apple logo, Final Cut, Final Cut Pro,
Final Cut Studio, iPod, QuickTime, and Soundtrack are trademarks of Apple Inc., registered in the U.S. and other countries.
iPhone is a trademark of Apple Inc. MobileMe is a service mark of Apple Inc.
The YouTube logo is a trademark of Google Inc.
Other company and product names mentioned herein are trademarks of their respective companies. Mention of third-party products is for informational purposes only and constitutes neither an endorsement nor a recommendation. Apple assumes no responsibility with regard to the performance or use of these products.

Contents
7Chapter 1: A First Look at Final Cut Pro
8Opening Final Cut Pro
10 Jump In: Explore the Browser
14 Jump In: Explore the Viewer
19 Jump In: Explore the Canvas
24 Jump In: Explore the Timeline
28Jump In: Work with the Main Windows
29Learning About Projects, Sequences, Clips, and Media Files
31Key Concepts
33Chapter 2: Bringing Media into Your System
34Jump In: Explore Tape-Based Video Capture
40Jump In: Explore File-Based Video Transfer
48Jump In: Import Still Images and Other Media
51Learning About Ingesting Media and Setting Up Projects
53Key Concepts
3

55 Chapter 3: Preparing Clips in the Viewer
55 Jump In: Get to Know the Viewer
61Jump In: Change Clips in the Viewer
62Jump In: Create a Title Clip
68 Jump In: Change Clips over Time
77 Learning About Motion Parameters
79 Key Concepts
81 Chapter 4: Working with the Canvas and Timeline
81 Jump In: Work with the Canvas
86 Jump In: Work with Tracks in the Timeline
93 Jump In: Edit Clips into a Sequence in the Timeline 97 Key Concepts
99 Chapter 5: Basic Editing
99 Jump In: Trim Clips
107 Jump In: Make Simple Split Edits and Cutaways
113 Learning About the Trim Edit Window
115 Key Concepts
117Chapter 6: Working with Audio
118Jump In: Work with a Clip’s Audio in the Viewer
125Jump In: Change Audio Levels over Time
134Jump In: Work with Audio Tracks in the Timeline
140Key Concepts
4 Contents
141 Chapter 7: Creating Voiceovers
141 Jump In: Add Voiceover Clips
150Key Concepts
151Chapter 8: Adding Video Filters and Transitions
152Jump In: Apply Filters to Clips
157 Jump In: Make Simple Color Corrections
159 Jump In: Add Transitions Between Clips
165 Learning About Transitions
169 Key Concepts
171Chapter 9: Outputting Your Finished Movie
172Jump In: Create a QuickTime Movie
173Jump In: Export a Movie in a Specific File Format
176Key Concepts
177 Chapter 10: Getting Answers
177Jump In: Explore Final Cut Pro Help
178What’s Next?
Contents |
5 |
|
|

A First Look at Final Cut Pro |
1 |
|
|
|
|
Welcome to Final Cut Pro. If you’re new to the Final Cut Pro video editing workflow, this guide is for you. Here you’ll create a sample video project and learn by doing.
Each chapter of this book presents major features and guides you in trying things out. Feel free to explore on your own. Have fun learning the basics. Later, when you feel comfortable, you can bring in your own video and other media and begin serious editing with Final Cut Pro.
This book assumes that you’ve installed Final Cut Pro on your computer.
ÂÂ If you haven’t installed Final Cut Pro yet: See the Installing Your Software booklet.
ÂÂ If you prefer to start by reading in-depth explanations of concepts and procedures used with Final Cut Pro: Open Final Cut Pro and choose Help > Final Cut Pro Help. Then click Final Cut Pro 7: User Manual.
7
Opening Final Cut Pro
You’ll start by opening Final Cut Pro and creating a sample project.
To open Final Cut Pro:
1Double-click the Final Cut Pro icon in your Applications folder.
2If you see the Choose Settings dialog, click OK to accept the default settings.
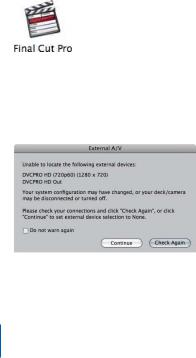
When you open Final Cut Pro, it checks to see if a camera or other device is connected to your computer. If no device for capturing video is connected, a dialog appears asking whether you want to connect a device and have Final Cut Pro check again, or continue without connecting a device.
8 Chapter 1 A First Look at Final Cut Pro

3Click Continue.
When Final Cut Pro opens, your screen will look similar to this:
|
|
Browser |
|
Viewer |
|
|
Canvas |
|
|
|
|||||
|
|
|
|
|
|
|
|
|
|
|
|
|
|
|
|
Timeline
On the left you see the Browser, where you create projects and organize bins that hold your clips. Now you’re ready to explore a simple video editing workflow.
Chapter 1 A First Look at Final Cut Pro |
9 |
|
|

Jump In: Explore the Browser
First, you’ll import some clips into your project, and then you’ll explore some important parts of the Final Cut Pro interface. If you have video files of your own on your computer, feel free to import several and work with them as you explore. You’ll learn more about capturing video from a camcorder or other device later.
Getting Ready
To import sample video files:
1In Final Cut Pro, choose Help > Final Cut Pro Help.
2Click the link below the description of the Exploring Final Cut Pro manual to download the sample files.
3After downloading, double-click the folder to decompress it, then drag the four sample files from your Downloads folder into your Movies folder.
4Choose File > Import > Files.
5Navigate to the Movies folder.
6Select the sample files.You can Shift-click or Command-click files to select several at once.
7Click Choose.
10 Chapter 1 A First Look at Final Cut Pro
To import your own video files that are already on your computer:
1Choose File > Import > Files.
2Navigate to the folder holding your video files.
3Select the files you want to import into Final Cut Pro.You can Shift-click or Command-click files to select several at once.
4Click Choose.
Next, you’ll explore the Browser. Your Browser now looks similar to this:
Project tab
Audio clip
Sample video clips
 Sequence icon
Chapter 1 A First Look at Final Cut Pro |
11 |
|
|

Try This
Feel free to try out any of the following to see what happens.
Change the Browser display:
mm Choose View > Browser Items > as Large Icons to display the clips as icons.
mm Choose View > Browser Items > as Small Icons to display the clips as smaller icons. Drag the clips around in the Browser to reposition or reorder them.
mm Choose View > Browser Items > as List to display the clips as a list of items.
Create and work with bins:
1Choose File > New > Bin to create a new bin to hold clips. Type “Samples” as the bin name and press Return.
You can create bins, which are like folders, to hold and organize the clips in your project.
2Press Command-B to create another bin. Name it “Samples 2” and press Return.
3Double-click the Samples bin to open it. Click the close button to close the bin. Click the Samples 2 bin to select it, and press Return to open it. Press Control-W to close the bin.
4Select the Samples 2 bin and press Delete to delete it.
Select items in the Browser:
mm Click an item in the Browser. Press the Up Arrow and Down Arrow keys to select items. mm Shift-click items in the Browser.
12 Chapter 1 A First Look at Final Cut Pro

Create a new sequence:
1Choose File > New > Sequence.
A new sequence icon appears in the project. A sequence represents clips in the
Timeline. A sequence might hold a scene, a portion of your movie, or the entire movie.
2Select the sequences and name them “Scene 1” and “Scene 2.”
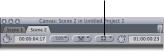
3Double-click the Scene 2 sequence icon and notice that there are now two sequence tabs in the Timeline.
Sequence tabs
4Click the sequence tabs in the Timeline to switch between sequences.
After you open a sequence in the Timeline, you can place the clips you want in it. You’ll learn more about working with sequences later.
View additional Browser information:
mm Drag the scroll bar at the bottom of the Browser to see additional columns of clip information.
mm Control-click an item in the Browser to bring up a shortcut menu of useful commands. Click in the Browser to close the shortcut menu.
Save changes to your project:
mm Choose File > Save Project to save your work. Name the project any name you like.
Chapter 1 A First Look at Final Cut Pro |
13 |
|
|

Jump In: Explore the Viewer
You use the Viewer to view and edit individual clips, set In and Out points, set markers, and more.
Try This
Place a clip in the Viewer:
mm Drag Sample Clip 1 into the Viewer.
Change the display of a clip in the Viewer:
mm Choose Fit to Window from the Zoom pop-up menu in the Viewer. Final Cut Pro resizes the clip to display it completely within the Viewer’s frame. Choose 50% from the Zoom pop-up menu to display the clip at half size.
14 Chapter 1 A First Look at Final Cut Pro
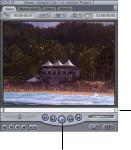
Play a clip in the Viewer:
mm Click the Play button to start and stop playing the video clip. Then press the Space bar to start and stop playing the video clip.
Scrubber bar
Play button
mm Press J to play the clip backward. Press K to stop playback. Press L to play the clip forward. Press the J or L key several times to accelerate the playback speed, and press K to stop playback.
Chapter 1 A First Look at Final Cut Pro |
15 |
|
|
Navigate to specific locations in a clip:
mm Click in the white scrubber bar to reposition the playhead. The scrubber bar represents the length of the clip.
mm Press the Home key or the End key to move the playhead to the beginning or end of the clip.
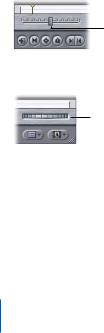
mm Drag the shuttle control right or left to play the clip forward or backward slowly.
Shuttle control
mm Drag the jog control to move the playhead forward or backward by a small number of frames.
Jog control
mm Press the Right Arrow or Left Arrow key to move the playhead forward or backward one frame at a time. Hold down Shift and press the Right Arrow or Left Arrow key to move the playhead forward or backward 1 second at a time.
mm If your mouse has a trackball, position the pointer over the Viewer and roll the trackball left or right to reposition the playhead in the Viewer.
16 Chapter 1 A First Look at Final Cut Pro

Set and work with In and Out points:
mm Position the playhead near the beginning of the clip and choose Mark > Mark In to set an In point. Position the playhead near the end of the clip and choose Mark > Mark Out to set an Out point. Click the Play In to Out button to play the clip starting from the In point. Click the Play In to Out button again to restart the playback from the In point. Press the Space bar to stop playing the clip.
In point marker

 Out point marker
Play In to Out button
mm Drag the In point and Out point markers in the scrubber bar to new positions.
mm Position the playhead near the beginning of the clip and press I to set an In point. Position the playhead near the end of the clip and press O to set an Out point. (You can also press I or O as a clip plays to set In and Out points on the fly.)
Chapter 1 A First Look at Final Cut Pro |
17 |
|
|
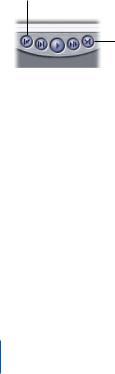
Navigate between edit points:
mm Click the Go to Next Edit button or the Go to Previous Edit button to move the playhead to the next or previous edit point.
Go to Previous Edit button
Go to Next Edit button
mm Press the Up Arrow and Down Arrow keys to move between edit points.
18 Chapter 1 A First Look at Final Cut Pro

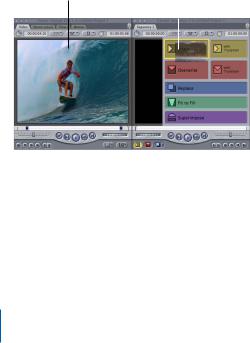
Jump In: Explore the Canvas
The Canvas is where you play back the movie that you’ve created in the Timeline.
Sequence tab
Scrubber bar
Transport controls
Chapter 1 A First Look at Final Cut Pro |
19 |
|
|
Try This
Use the Canvas to place a clip in the Timeline:
mm Drag the clip from the Viewer (just drag the image) into the Canvas until the colored
Edit Overlay appears. Drag the clip to the Insert section of the overlay. The clip is inserted in the Timeline.
Drag from here... |
|
...to here. |
|
||
|
|
|
Note: If you see a message asking if you want Final Cut Pro to set the Timeline sequence settings to match the incoming clip settings, click Yes.
20 Chapter 1 A First Look at Final Cut Pro
Change the display of the Canvas:
mm Choose several different zoom levels from the Zoom pop-up menu. Last, choose the
50% zoom level from the Zoom pop-up menu.
Zoom pop-up menu
Play and navigate within the clip in your sequence:
mm Click the Canvas window to make it active. To play the clip in your sequence in the Timeline, press Home to move the playhead to the beginning of the Timeline, then click the Play button in the Canvas transport controls. Most of the Canvas controls work identically to those you’ve used in the Viewer.
Go to Next Edit button
Scrubber bar
Go to Previous Edit button
Chapter 1 A First Look at Final Cut Pro |
21 |
|
|

mm Press the Space bar to start and stop playback.
mm Click in the white scrubber bar in the Canvas to reposition the playhead. The scrubber bar represents the sequence in the Timeline.
mm Press the Home key or the End key to move the playhead to the beginning or end of the sequence in the Timeline.
mm Press the J key or L key to play the clip backward or forward. Press K to stop playback. Press the J or L key several times to accelerate the playback speed.
Move the playhead forward or backward:
mm Press the Right Arrow key or Left Arrow key to move playhead forward or backward one frame at a time. Hold down Shift and press the Right Arrow or Left Arrow key to move the playhead forward or backward 1 second at a time.
mm Click the Go to Next Edit button or Go to Previous Edit button to move the Canvas playhead to the next or previous edit point in the sequence. Press the Up Arrow and Down Arrow keys to move between edit points.
Go to Previous Edit button
Go to Next Edit button
22 Chapter 1 A First Look at Final Cut Pro
Reposition the playhead in the Canvas (if your mouse has a trackball):
mm Position the pointer over the Canvas and roll the trackball left or right to reposition the playhead in the Canvas and Timeline.
Change the display of the Canvas:
mm Choose Show Overlays from the View pop-up menu. Choose Show Title Safe from the View pop-up menu to have Final Cut Pro display borders showing the part of the image that will appear on a standard video screen. Choose Show Overlays from the
View pop-up menu again to turn off the display of overlays.
View pop-up menu
Chapter 1 A First Look at Final Cut Pro |
23 |
|
|

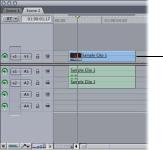
Jump In: Explore the Timeline
The Timeline holds your sequences, which contain the arrangement of video and audio clips, and other items such as titles and transitions, in the order you want them in your movie.
Sequence tab
Playhead
Ruler
Video clip item
 Audio clip items
Zoom slider
Thumb tab
Try This
Play and navigate within the sequence in the Timeline:
mm Click in the Timeline ruler to reposition the playhead.Try using the J, K, and L keys to play the sequence in the Timeline. Press Home and End to jump to the beginning or end of the sequence. Use arrow keys to move the playhead to different locations.
24 Chapter 1 A First Look at Final Cut Pro
mm Drag the thumb tabs at the ends of the Zoom slider to change the displayed length of the Timeline’s clips. Scroll through the Timeline by dragging the Zoom slider left or right.
mm Press Command–Equal Sign (=) and Command-Hyphen (-) to zoom in to and out of the Timeline.
Scroll through the sequence in the Timeline:
mm Press H to select the Hand tool, then drag left or right within the Timeline. Press A to select the Selection tool again.
mm If your mouse has a trackball, position the pointer over the Timeline and roll the trackball left or right to scroll through the sequence.
Change a clip in the Timeline:
mm Drag the clip to the right to reposition it in your sequence in the Timeline. (Just drag the blue bar that represents the clip.)
Drag the clip to move it.
 Drag the end of a clip
to shorten or lengthen it.
Chapter 1 A First Look at Final Cut Pro |
25 |
|
|

mm Position the pointer over the end of the clip and drag to shorten or lengthen the clip. You can trim either end of a clip this way.
mm Click the Razor Blade tool in the Tool palette. Position the pointer over the clip, then click to split the clip. Click the Selection tool. Select part of the clip and press Delete.
Selection tool
Razor Blade tool
Cancel your actions:
mm Choose Edit > Undo to cancel your last change. Press the Undo command’s keyboard shortcut, Command-Z, to undo the change before that. You can undo up to 99 changes.
26 Chapter 1 A First Look at Final Cut Pro

Change the Timeline track size:
mm Change the size of tracks by clicking the Track Height control.
Track Height control
Add more clips to the Timeline using the Canvas window:
1To add another clip to your sequence in the Timeline, first press End to position the playhead at the end of the last clip.
2Drag Sample Clip 2 from the Browser into the Viewer. Set In and Out points if you wish (press I to set an In point, and press O to set an Out point).
3Drag the clip from the Viewer to the Insert section of the Canvas Edit overlay.
Open a sequence clip in the Viewer to make changes:
mm Double-click the blue bar of Sample Clip 1 in the Timeline to open the clip in the Viewer. Change the In and Out points of the clip in the Viewer to make the clip shorter, and see the change appear in the Timeline.
Eliminate gaps between clips in your sequence:
mm To eliminate a gap, click the space in the Timeline where the gap appears (between the clips) to select it, then press Delete.
Experiment with dragging and moving clips in the Timeline:
mm Experiment with dragging and changing the position and lengths of clips in the Timeline.
Chapter 1 A First Look at Final Cut Pro |
27 |
|
|

Jump In: Work with the Main Windows
Final Cut Pro provides some easy methods for working with its main windows.
Try This
Change the active window:
mm Press Command-1 to activate the Viewer. mm Press Command-2 to activate the Canvas. mm Press Command-3 to activate the Timeline. mm Press Command-4 to activate the Browser.
Change the window layout for different editing purposes: mm Drag the title bar of a window to change its position.
mm Choose Window > Arrange > Standard to restore the standard window layout.
mm Choose Window > Arrange > Two Up to change to a window layout that allows you to easily work with the Viewer and Canvas.
mm Choose Window > Arrange > Audio Mixing to change to a layout designed for easily working with the audio in your sequences.
mm Choose Window > Arrange > Color Correction to change to a layout that allows you to easily grade and color correct clips.
mm When you’ve finished exploring these window layouts, press Control-U to restore the standard window layout.
28 Chapter 1 A First Look at Final Cut Pro
Learning About Projects, Sequences, Clips, and Media Files
To begin creating a movie, you create a project in the Browser.To create a new project, choose File > New Project.
You can have multiple projects open at once, each represented by a tab in the Browser. To access a specific project, you click the project tab.You can also drag a project tab out of the Browser window to open the project in a separate window.You can reuse and share sequences and clips between projects.
Learning About Sequences
When you create a new project, a sequence icon appears in the project, too.This sequence icon represents the clips you place in the Timeline. You can open a sequence by double-clicking it in the Browser, and the sequence then appears in the Timeline.
You can create multiple sequences in a project. For a long project, for example, you might create different sequences to hold different scenes.You can create as many sequences as you wish. A sequence tab appears in the Timeline title bar for each open sequence. Clicking the sequence tab in the Timeline displays the sequence’s clips.
You can drag a sequence from the Browser and place it in the Timeline, just as you can with a clip. You can place one sequence after another in the Timeline. You can also place sequences within sequences. So, for example, you might create several different sequences that represent scenes in your movie and then arrange them in their final order within a single master sequence.
Chapter 1 A First Look at Final Cut Pro |
29 |
|
|

Understanding the Relationship Between Clips and Media Files
An important first stage in creating a project is transferring your video to your computer. Final Cut Pro provides a variety of ways to get media into your computer. The method you use depends on the media type. You’ll learn more about capturing and transferring video in the next chapter.
After you’ve captured or transferred your media into a project, clip icons representing the media files appear in the project’s tab of the Browser window. A large project may hold many clips. For complicated projects, you can create a system of bins to hold and organize clips. You can name and organize the bins to suit your work style.
When you capture or transfer clips, the corresponding media files are stored on your computer hard disk.You can specify where you want the media files stored.Because video and audio media files are often large, you’ll want to plan where your files will reside.
An important point to remember is that the media files from your camcorder or other sources are not stored in a project.The clips in a project merely point to the media files stored elsewhere on your hard disk. When you modify a clip, you are not modifying the media file, just the clip’s information in the project.You work with and edit clips in Final Cut Pro, but the underlying media files are unchanged on your hard disk.
30 Chapter 1 A First Look at Final Cut Pro
Loading...