Apple GarageBand - 2 Getting Started

GarageBand
Getting Started
Includes a complete tour of the GarageBand windows, plus step-by-step lessons on working with GarageBand

Contents
Preface |
7 |
About GarageBand Getting Started |
|
8 |
What’s New In GarageBand |
|
9 |
Before You Begin |
Chapter 1 |
10 |
GarageBand at a Glance |
|
11 |
GarageBand Window |
|
12 |
Timeline |
|
14 |
Editor |
|
14 |
For Real Instruments |
|
15 |
For Software Instruments–Graphic View |
|
16 |
For Software Instruments–Notation View |
|
17 |
Loop Browser |
|
17 |
Button View |
|
18 |
Column View |
|
19 |
Track Info Window |
|
19 |
Real and Software Instrument Tracks |
|
21 |
Master Track |
Chapter 2 |
23 |
Working With Songs |
|
23 |
Creating a Song |
|
24 |
Setting the Tempo |
|
24 |
Setting the Time Signature |
|
25 |
Setting the Key |
|
25 |
Setting the Scale |
|
25 |
Opening an Existing Song |
|
26 |
Saving the Song |
|
26 |
Saving a Song as an Archive |
|
26 |
Exporting a Song to an iTunes Playlist |
Chapter 4 |
27 |
Using Apple Loops |
|
27 |
Finding Loops With the Loop Browser |
|
28 |
Finding Loops in Button View |
|
29 |
Finding Loops in Column View |
|
29 |
Previewing Loops in the Loop Browser |
3
30 Refining Your Searches
30Displaying Loops From a Jam Pack or Folder
31Searching by Scale Type
31Limiting Searches to Nearby Keys
31Searching for Specific Text
32Adding Loops to the Timeline
33Creating Your Own Apple Loops
33 Adding Loops to the Loop Library
Chapter 5 |
34 |
Working in the Timeline |
|
34 |
About Regions |
|
35 |
Selecting Regions |
|
35 |
Cutting, Copying, and Pasting Regions |
|
35 |
Looping Regions |
|
36 |
Resizing Regions |
|
36 |
Moving Regions |
|
37 |
Transposing Regions |
|
37 |
Fixing the Timing of Software Instrument Regions |
|
38 |
Splitting Regions |
|
38 |
Joining Regions |
|
39 |
Renaming Regions |
|
39 |
Using the Timeline Grid |
|
39 |
Using Undo and Redo |
Chapter 6 |
41 |
Working With Real Instruments |
|
41 |
Adding a Real Instrument Track |
|
41 |
Monitoring Real Instrument Input |
|
42 |
Getting Ready to Record |
|
42 |
Recording a Real Instrument |
|
43 |
Recording a Real Instrument With the Cycle Region |
|
44 |
Recording Multiple Real Instrument Tracks |
|
45 |
Changing Real Instrument Settings |
|
45 |
Changing the Instrument |
|
46 |
Changing the Input Channel |
|
46 |
Adjusting Input Volume |
|
46 |
Using the Instrument Tuner |
|
47 |
Adding an Audio File from the Finder |
Chapter 7 |
48 |
Working with Software Instruments |
|
48 |
Using Musical Typing |
|
49 |
Using the Onscreen Music Keyboard |
|
50 |
Adding a Software Instrument Track |
|
50 |
Getting Ready to Record |
4 |
Contents |
|
|
|
50 |
Recording a Software Instrument |
|
51 |
Recording a Software Instrument With the Cycle Region |
|
51 |
Changing Software Instrument Settings |
Chapter 8 |
53 |
Working in the Editor |
|
53 |
Selecting Regions |
|
53 |
Editing Real Instrument Regions |
|
54 |
Moving Real Instrument Regions |
|
54 |
Cropping Part of a Real Instrument Region |
|
54 |
Joining Real Instrument Regions |
|
54 |
Enhancing the Tuning of Real Instrument Tracks |
|
55 |
Enhancing the Timing of Real Instrument Tracks |
|
56 |
Editing Software Instrument Regions |
|
56 |
Editing Notes in a Software Instrument Region |
|
57 |
Editing Controller Information in a Software Instrument Region |
Chapter 9 |
58 |
Working In Notation View |
|
58 |
About Notation View |
|
60 |
Editing Notes In Notation View |
|
61 |
Adding Notes |
|
61 |
Selecting Notes |
|
61 |
Moving Notes |
|
61 |
Copying Notes |
|
61 |
Changing the Pitch of Notes |
|
62 |
Changing the Duration of Notes |
|
62 |
Deleting Notes |
|
62 |
Changing Note Velocity |
|
62 |
Adding Pedal Down and Pedal Up Symbols |
Chapter 10 |
64 |
Mixing and Adding Effects |
|
64 |
What Is Mixing? |
|
64 |
Setting Track Volume Levels |
|
65 |
Setting Track Pan |
|
65 |
Using Volume and Pan Curves |
|
66 |
Setting the Output Volume |
|
66 |
Adding Fade Ins and Fade Outs |
|
67 |
Transposing the Song to a Different Key |
|
67 |
Using Effects |
|
68 |
Types of Effects |
|
68 |
Adding Effects |
|
69 |
Adjusting Effects |
|
70 |
Turning Effects On and Off |
|
70 |
Choosing Effect Presets |
Contents |
5 |
|
|
|
70 |
Editing Effect Presets |
|
71 |
Saving Effect Presets |
Appendix A |
72 |
Keyboard Shortcuts |
Appendix B |
75 |
Connecting Music Equipment To Your Computer |
|
75 |
Connecting a Musical Instrument or Microphone |
|
76 |
Connecting a Music Keyboard to Your Computer |
|
76 |
Connecting Other Music Equipment |
6 |
Contents |
|
|

About GarageBand
Getting Started
Preface
Welcome to GarageBand Getting Started. This document gives you useful information and step-by-step instructions for creating songs with GarageBand.
The following chapters give you a tour of the GarageBand windows and a series of lessons to help you create your own songs. The chapters in GarageBand Getting Started cover the following topics:
•“GarageBand at a Glance” provides a tour of the windows and controls in GarageBand.
•“Working With Songs” describes how to create a new song, as well as how to save, archive, and export your songs.
•“Using Apple Loops” describes how to find and preview Apple Loops in the loop browser, add them to the timeline, and create your own Apple Loops.
•“Working in the Timeline” describes how to build your song by arranging regions in the timeline.
•“Working With Real Instruments” describes how to add a Real Instrument track, turn on monitoring, set the input channel and format, record a Real Instrument, and change Real Instrument settings.
•“Working with Software Instruments” describes how to add a Software Instrument track, record a Software Instrument, and change Software Instrument settings.
•“Working in the Editor” describes the different ways you can edit Real and Software Instrument regions.
•“Working In Notation View” describes how to view Software Instrument regions as music notation, and how to edit notes, note velocity, and pedal markings in notation view.
•“Mixing and Adding Effects” describes the steps to follow in mixing your song, and how to use the effects included with GarageBand.
GarageBand Getting Started also includes appendixes listing keyboard shortcuts and describing how to connect music equipment to your computer.
7
What’s New In GarageBand
•You can import MIDI, Apple Lossless, and Sony ACID files into a GarageBand song. MIDI files are imported as Software Instrument regions, Apple Lossless files are imported as Real Instrument regions, and ACID files are imported as Real Instrument loops.
•You can view Software Instrument regions in notation view in the editor. Notation view displays notes, chords, and other musical events in standard music notation. You can also edit notes and controller information, including pedal markings.
•You can record up to eight Real Instruments and one Software Instrument at the same time with an appropriate audio interface connected to your computer.
•You can save both Real and Software Instrument regions you record as Apple Loops, and add your own Apple Loops to the loop browser so you can use them in other songs.
•If you have one or more Jam Packs installed on your computer, you can choose to show only the loops from a specific Jam Pack, or only those included with GarageBand, in the loop browser.
•Musical Typing turns your computer keyboard into a music keyboard so that you can play and record Software Instruments. You can control what octave you play in, and control velocity and other controller information (including mod wheel, pitch bend, and sustain) of the notes you play.
•You can add a pan curve to a Real or Software Instrument track, and add control points to change the track’s pan position over time. Pan curves work in exactly the same way as volume curves.
•You can transpose (change the pitch of) a song to a different key, to add interest and variety to your songs. When you transpose a song using the master pitch curve, Real and Software Instrument regions (both your recordings and loops) are transposed to the new key.
•You can enhance the tuning of Real Instrument tracks that have the right rhythmic feel, but are not perfectly in tune, with the Enhance Tuning slider, located in the Real Instrument editor.
•You can enhance the timing of Real Instrument tracks containing the right notes, but which are not perfectly in time, with the Enhance Timing slider, located in the Real Instrument editor.
•You can check the tuning of any Real Instrument using the built-in instrument tuner. This is especially useful with guitars, basses, and other instruments that may need regular retuning.
•GarageBand features new Software Instruments, including two new synthesizers, Hybrid Basic and Hybrid Morph. You can use these synthesizers, which are based on waveforms, to create rich, complex sounds.
•GarageBand features new effects, including a gender-shifting voice effect, new guitar amp simulations, and bass amp simulations.
8 |
Preface About GarageBand Getting Started |
|
|
Before You Begin
To make it easier to follow the lessons as you work, print each lesson before you start.
In many of the tasks shown in this document you need to choose menu commands. In the lessons, and in GarageBand Help, menu commands appear like this:
Choose Edit > Join Selected.
The first term after Choose is the name of the menu in the GarageBand menu bar. The term (or terms) following the angle bracket are the items you choose from that menu.
Preface About GarageBand Getting Started |
9 |
|
|
GarageBand at a Glance |
1 |
|
|
|
|
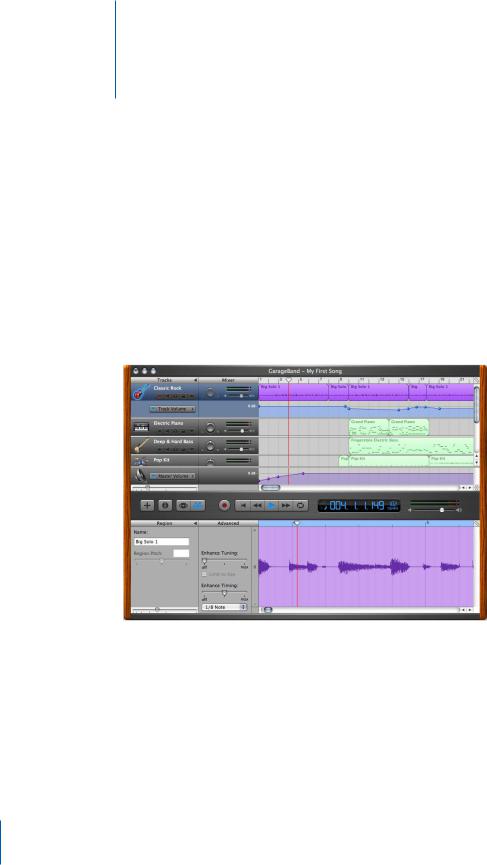
“GarageBand at a Glance” introduces you to the features and controls in the GarageBand windows. You use these controls to create your songs in GarageBand.
Take a look at these pages even if you don’t plan to complete the lessons in the following chapters, because knowing the names and functions of the GarageBand controls will make it easier to find answers to your questions in GarageBand Help.
The pages that follow introduce you to the main GarageBand window–including the timeline, the loop browser, and the editor–and to the Track Info window. You record Real and Software Instruments, add loops, and arrange and mix your songs in the main window, and change track instrument, effects, and input settings in the Track Info window.
10
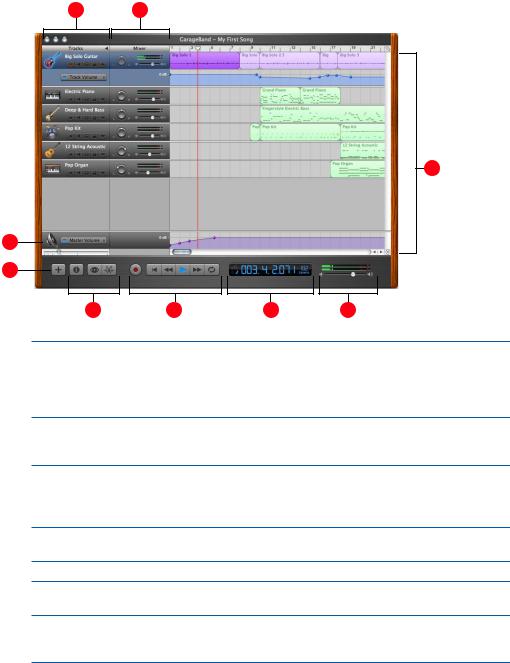
GarageBand Window
AB
C
D
E
F G H I
ATrack headers: The instrument icon and name are shown on the left of each track’s header. Click the name to type a new track name. Click the Record button (with the red circle) to turn on the track for recording. Click the Mute button (with the speaker icon) to silence the track. Click the Solo button (with the headphone icon) to hear the track by itself. Click the Lock Track button to lock the track. Click the triangle to show the track’s volume curve.
BTrack mixer: Drag the pan dial to adjust the pan position of the track (the left-to-right placement in the stereo field). Drag the volume slider to adjust the track’s volume. Watch the level meters to see the track’s volume level as you record and play.
CTimeline: Contains the tracks where you record Real and Software Instruments, add loops, and arrange regions. Also includes the beat ruler, which you use to move the playhead and align items in the timeline with beats and measures. See “Timeline” on page 12 for a description of the features and controls in the timeline.
DZoom slider: Drag the zoom slider to zoom in for a closer view of part of the timeline, or to zoom out to see more of the timeline.
EAdd Track button: Click to add a track below the existing tracks in the timeline.
FTrack Info, Loop Browser, and Editor buttons: Click to open the Track Info window, loop browser, or editor.
GTransport controls: Click the Record button to start recording. Click the Play button to start or stop the song playing. Click the Go to Beginning, Rewind, or Fast Forward buttons to move the playhead to different parts of the song. Click the Cycle button to turn the cycle region on or off.
Chapter 1 GarageBand at a Glance |
11 |
|
|

HTime display/instrument tuner: The time display shows the playhead’s position in musical time (measures, beats, ticks) or absolute time (hours, minutes, seconds, fractions). Drag or double-click the numerals to enter a new playhead position.
The right side of the time display shows the song’s tempo. Click and hold the tempo, then drag the slider to set a new tempo.
You can also show the instrument tuner in the time display window, and use it to check the tuning of a Real Instrument connected to your computer.
IMaster volume slider and level meters: Drag the volume slider to adjust the song’s master output volume level. Watch the level meters to see if clipping is occurring before you export a song.
Timeline
The timeline contains the tracks where you record Real and Software Instruments, add loops, and arrange regions.
|
|
|
|
C |
|||||
A |
|
|
|
|
|
|
|
|
D |
|
|
|
|
||||||
|
|
|
|
|
|
|
|
||
B |
|
|
|
|
|
|
|
|
E |
|
|
|
|
|
|
|
|
||
|
|
|
|
|
|
|
|
F |
|
|
|
|
|
|
|
|
|
||
|
|
|
|
|
|
|
|
||
|
|
|
|
|
|
|
|
|
|
G
H
I
ABeat ruler: Shows beats and measures, the units of musical time in the timeline. You can click the beat ruler to move the playhead to a specific point in the timeline.
BTracks: You record Real and Software Instruments in tracks, and drag loops to tracks to add them to a song. You arrange the song by working with regions in the tracks in the timeline.
CPlayhead: Shows the point in the song currently playing, or the point where playback starts when you click the Play button. Also shows where cut and copied items are pasted in the timeline. You can move the playhead to change what part of the song is playing.
DTimeline Grid button: Choose a note value for the timeline grid, or choose Automatic to have the value change when you zoom in or out.
EVolume and pan curves: Add a volume or pan curve to a track, then add and adjust control points on the volume or pan curve to add dynamic changes to different parts of a song.
12 |
Chapter 1 GarageBand at a Glance |
|
|
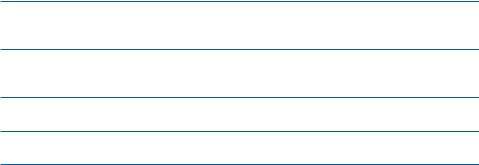
FRegions: When you record a Real Instrument or Software Instrument, or add a loop, you create a region in the timeline. You can cut, copy, and paste regions, loop and resize them, move and transpose them, and make other changes to build the arrangement of the song.
GMaster track: You can change the sound of the overall song by adding effects or a volume curve to the master track. You can also add a pitch curve to the master track to transpose parts of your song to a different key.
HPlayhead Lock button: Click to unlock the playheads in the timeline and the editor, so that you can see different parts of the song in the editor and the timeline.
IScroll bars: Drag the horizontal scroll bar to move to a different part of a song. Drag the vertical scroll bar to see tracks not currently visible.
Chapter 1 GarageBand at a Glance |
13 |
|
|
Editor
The editor is like a microscope showing a close-up view of part of a track. You can edit Real and Software Instrument regions in a variety of ways in the editor.
For Real Instruments
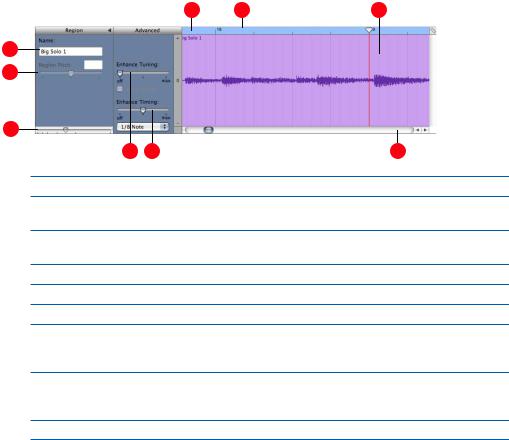
When you select a Real Instrument track, the editor shows the waveform of the track or selected region. You can move, crop, join, transpose, and rename regions in the editor.
D E F
A
B
C
G H I
ARegion Name field: Type a new name for the selected region in the field.
BRegion Pitch slider and field: Drag the slider to transpose the selected Real Instrument region up or down by up to 12 semitones. You can also type the number of semitones in the field.
CZoom slider: Drag to zoom in for a closer view or to zoom out to see more of the track or selected region. Zooming in the editor is independent of the timeline.
DBeat ruler: Shows beats and measures for the area visible in the editor.
EPlayhead: Shows the point in the song currently playing.
FWaveform display: Shows the waveform of the regions in the track.
GEnhance Tuning slider and checkbox: Drag right to increase the amount of tuning enhancement, or drag left to lower the amount. The “Limit to key” checkbox limits tuning enhancement to the song’s key.
HEnhance Timing slider and pop-up menu: Drag right to increase the amount of timing enhancement, or drag left to lower the amount. Choose the note value to use and the basis for timing enhancement from the pop-up menu.
IScroll bar: Drag the scroll bar to move to a different part of the track.
14 |
Chapter 1 GarageBand at a Glance |
|
|
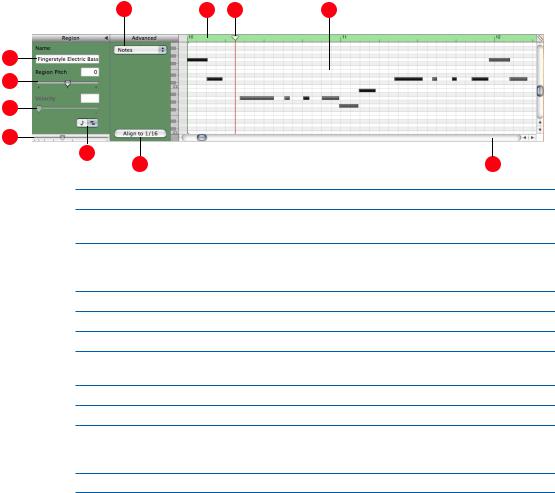
For Software Instruments–Graphic View
When you select a Software Instrument track, the editor shows a graphic display of the track or selected region. You can edit individual notes in Software Instrument regions, fix the timing of notes, and transpose and rename regions. You can also show and edit controller data for pitch bend, a modulation wheel, or a sustain pedal, recorded when you play your music keyboard.
F H I J
A
B
C
D
E
G K
ARegion Name field: Type a new name for the selected region in the field.
BRegion Pitch slider and field: Drag the slider to transpose the selected Software Instrument region up or down by up to 36 semitones. You can also type the number of semitones in the field.
CVelocity slider and field: Drag the slider to change the velocity of selected notes. You can also type the velocity value in the field. A note’s velocity reflects how hard the key is pressed when you play the note.
DZoom slider: Drag to zoom in for a closer view or to zoom out to see more of the track.
EGraphic/Notation View buttons: Click to change the editor to graphic view or notation view.
FDisplay pop-up menu: Choose whether to show notes or controller data in the editor.
GFix Timing button: Click to fix the timing of notes in the selected region, or notes selected in the editor, so that notes move to the nearest grid position.
HBeat ruler: Shows beats and measures for the area visible in the editor.
IPlayhead: Shows the point in the song currently playing.
JNotes/controller data display: Shows the individual notes of Software Instrument regions in a graphic format. You can move and resize notes to adjust their pitch, where they start playing, and how long they play. Shows controller data when chosen in the Display pop-up menu.
KScroll bar: Drag the scroll bar to move to a different part of a track.
Chapter 1 GarageBand at a Glance |
15 |
|
|
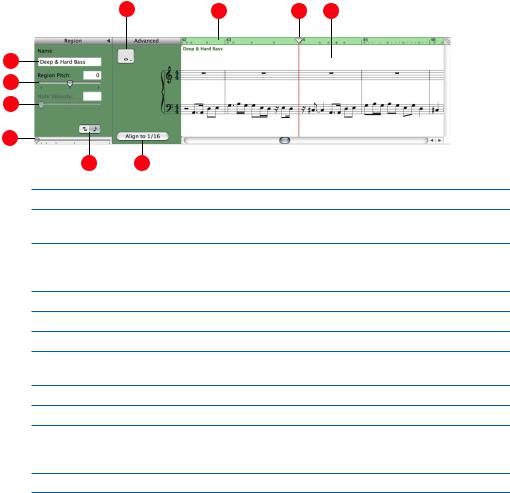
For Software Instruments–Notation View
You can also view Software Instrument tracks and regions in notation view. In notation view, notes and other musical events are shown in standard music notation. You can edit notes and edit controller information (including velocity and pedal markings for sustain) in notation view.
F H I J
A
B
C
D
EG
ARegion Name field: Type a new name for the selected region in the field.
BRegion Pitch slider and field: Drag the slider to transpose the selected Software Instrument region up or down by up to 36 semitones. You can also type the number of semitones in the field.
CVelocity slider and field: Drag the slider to change the velocity of selected notes. You can also type the velocity value in the field. A note’s velocity reflects how hard the key is pressed when you play the note.
DZoom slider: Drag to zoom in for a closer view or to zoom out to see more of the track.
EGraphic/Notation View buttons: Click to change the editor to graphic view or notation view.
FNote value button: Click to choose the note value for notes you add.
GFix Timing button: Click to fix the timing of notes in the selected region, or notes selected in the editor, so that notes move to the nearest grid position.
HBeat ruler: Shows beats and measures for the area visible in the editor.
IPlayhead: Shows the point in the song currently playing.
JNotation display: Shows the musical events of Software Instrument regions in standard music notation. You can move notes to adjust their pitch and where they start playing, and change how long they play.
KScroll bar: Drag the scroll bar to move to a different part of a track.
16 |
Chapter 1 GarageBand at a Glance |
|
|
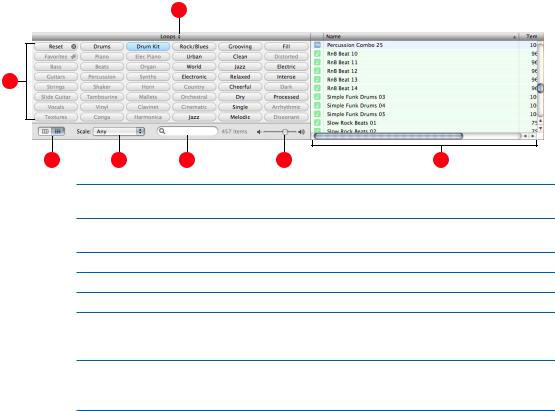
Loop Browser
The loop browser lets you quickly find loops to add to your songs. You can find loops using keywords for instrument, musical genre, or mood. You can also perform text searches, and refine your results in several ways. The loop browser shows the tempo, key, and number of beats for each matching loop. You can preview loops in the loop browser before you add them to a song, and add more loops to GarageBand by dragging them onto the loop browser.
The loop browser gives you two ways to find loops: button view and column view.
Button View
In button view, the loop browser contains a set of keyword buttons. Click a button to show matching loops in the results list. Clicking multiple buttons narrows the results to those loops that match all of the selected keywords.
G
A
B C D E F
AKeyword buttons: Click a keyword button to display matching loops in the results list. You can click multiple keyword buttons to narrow your results.
BView buttons: Click the column button to show column view, or click the grid button to show button view.
CScale type pop-up menu: Choose a scale type to see only loops using that musical scale.
DSearch text field: Type text in the field to see loops with the text in their file name or path.
EPreview volume slider: Drag the slider to adjust the volume of the loop being previewed.
FResults list: Shows loops that match the selected keywords. Also displays the tempo, key, and number of beats for each loop. Click a loop in the results list to preview it. Click the Favs checkbox for a loop to add it to your favorites.
GLoop library pop-up menu: Choose the loops you want to show in the loop browser from the pop-up menu.
Chapter 1 GarageBand at a Glance |
17 |
|
|
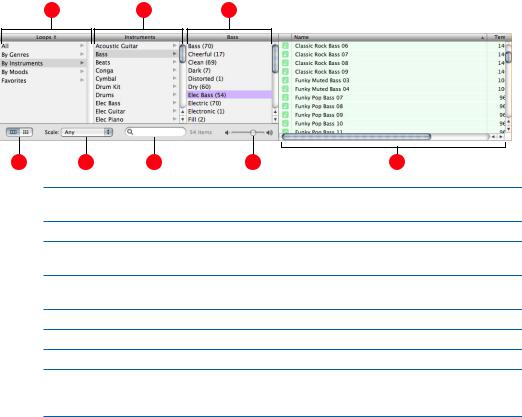
Column View
In column view, the loop browser features columns for keyword type, categories, and keywords. Click a keyword type to show categories for that type, click a category to show keywords, then click a keyword to show matching loops in the results list. Clicking multiple keywords expands the results to those loops matching any of the selected keywords.
A B C
D E F G H
AKeyword type column: Click a keyword type to show the categories for that keyword type in the middle column.
BCategory column: Click a category to show keywords for that category in the right column.
CKeyword column: Click a keyword to show matching loops in the results list. You can click multiple keywords to expand your results.
DView buttons: Click the column button to show column view, or click the grid button to show button view.
EScale type pop-up menu: Choose a scale type to see only loops using that scale.
FSearch text field: Type text in the field to see loops with the text in their file name or path.
GPreview volume slider: Drag the slider to adjust the volume of the loop being previewed.
HResults list: Shows the loops that match the selected keywords. Also displays the tempo, key, and number of beats for each loop. Click a loop in the results list to preview it. Click the Favs checkbox for a loop to add it to your favorites.
18 |
Chapter 1 GarageBand at a Glance |
|
|
Track Info Window
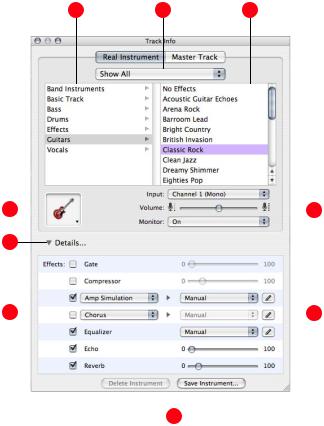
The Track Info window shows the current instrument, effects, and input settings for the selected track, or the master effects settings for the master track. You can change these settings in the Track Info window.
Real and Software Instrument Tracks
Some controls in the Track Info window are different for Real Instrument tracks than for Software Instrument tracks (as noted below).
A B C
D |
|
|
|
|
G |
|
|
|
|
||
|
|
|
|
|
|
E
F |
|
|
|
|
|
|
|
|
H |
|
|
|
|
|
|
|
|
||
|
|
|
|
|
|
|
|
||
|
|
|
|
|
|
|
|
|
|
|
|
|
|
|
|
|
|
|
|
|
|
|
|
|
|
|
|
|
|
|
|
|
|
|
|
|
|
|
|
|
|
|
|
|
|
|
|
|
|
I
Chapter 1 GarageBand at a Glance |
19 |
|
|
AInstrument category list: Click an instrument category to see the instruments for that category in the instrument list on the right.
BInstrument library pop-up menu: Choose which instruments you want to see in the category and instrument lists from the pop-up menu.
CInstrument list: Click an instrument from the list.
DInstrument icon pop-up menu: Click to choose an instrument icon from the icon menu.
EDetails triangle: Click to show the instrument and effects settings.
FEffect checkboxes, sliders, and pop-up menus: Click an effect checkbox to turn the effect on or off. Drag the sliders to adjust the level of the effects, or choose an item from the pop-up menus. The Track Info window includes the following effects for Real and Software Instruments:
•Noise gate slider (Real Instrument tracks only): Drag the slider to adjust the amount of gating.
•Generator and generator preset pop-up menus (Software Instrument tracks only): Choose an instrument generator, and generator preset, from the menus.
•Compression slider: Drag the slider to adjust the amount of compression.
•Equalizer pop-up menu: Choose an EQ setting from the pop-up menu.
•Effect and effect setting pop-up menus: Click a checkbox to turn additional effects on or off. Choose an effect from a pop-up menu on the left, then choose an effect preset from the popup menu on the right.
•Echo slider: Drag the slider to adjust the amount of echo.
•Reverb slider: Drag the slider to adjust the amount of reverb.
GInput channel pop-up menu and buttons (Real Instrument tracks only): Choose the input channel or channels for the instrument from the Input pop-up menu. Drag the Volume slider to set the input volume for the selected channel. Choose whether monitoring is on or off from the Monitor pop-up.
HEffect edit buttons: Click to show an effect’s preset window, where you can edit the effect preset.
ISave Instrument and Delete Instrument buttons: Click the Save Instrument button to save an instrument. Click the Delete Instrument button to delete a saved instrument.
20 |
Chapter 1 GarageBand at a Glance |
|
|
Master Track
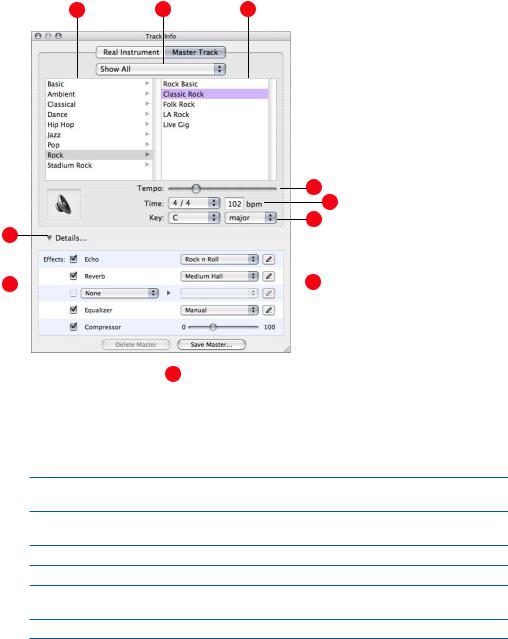
The Track Info window for the master track shows the global song settings and effects settings for the overall song. Global song settings include tempo, time signature, and key. Global effects settings include echo, reverb, equalizer, and compressor settings.
A B C
D
E
FE
G
H |
|
|
|
|
|
|
|
|
I |
|
|
|
|
|
|
|
|
||
|
|
|
|
|
|
|
|
||
|
|
|
|
|
|
|
|
|
|
|
|
|
|
|
|
|
|
|
|
|
|
|
|
|
|
|
|
|
|
|
|
|
|
|
|
|
|
|
|
|
|
|
|
|
|
|
|
|
|
|
|
|
|
|
|
|
|
|
|
J
The Echo and Reverb sliders for individual tracks control the amount of echo and reverb that are sent to the global echo and reverb effects. In the Track Info window for the master track, you can change the global echo and reverb presets that control the sound of these effects.
AMaster effects category list: Click a category to see the effects for that category in the master effects list on the right.
BInstrument library pop-up menu: Choose which instruments you want to see in the category and instrument lists from the pop-up menu.
CMaster effects list: Click a set of master effects from the list.
DTempo slider: Drag the slider to change the song’s tempo.
ETime pop-up menu and field: Choose a time signature from the pop-up menu, or enter a number in the field.
FKey pop-up menu: Choose a key from the pop-up menu.
Chapter 1 GarageBand at a Glance |
21 |
|
|
GDetails triangle: Click to show the global effects settings.
HEffect checkboxes, pop-up menus, and slider: Click an effect checkbox to turn the effect on or off. Choose an item from the pop-up menus, or drag the slider, to adjust an effect. The Track Info window includes the following effects for the master track:
•Echo pop-up menu: Choose a global echo preset.
•Reverb pop-up menu: Choose a global reverb preset.
•Effect and effect setting pop-up menus: Click a checkbox to turn an additional effect on or off. Choose an effect from a pop-up menu on the left, then choose an effect preset from the popup menu on the right.
•Equalizer pop-up menu: Choose a global equalizer setting from the pop-up menu.
•Compression slider: Drag the slider to adjust the amount of global compression.
IEffect edit buttons: Click to show an effect’s preset window, where you can edit the effect preset.
JSave Master and Delete Master buttons: Click the Save Master button to save a set of master effects. Click the Delete Master button to delete a saved set of master effects.
22 |
Chapter 1 GarageBand at a Glance |
|
|

Working With Songs |
2 |
|
|
|
|
Songs are the documents that hold your music and all the changes you make. You can create and save songs, save a song as an archive, and export a song to iTunes.
Each song has a tempo, a time signature, and a key, which last for the entire length of the song. When you create a song, you set the tempo, time signature, and key in the New Project dialog. You can save a song as an archive, and export a song to an iTunes playlist.
Creating a Song
You start working in GarageBand by creating a new song.
To create a new song:
1 Choose File > New Project.
2In the New Project dialog, browse to the location where you want to store the song, then type a name for the song in the name field.
23
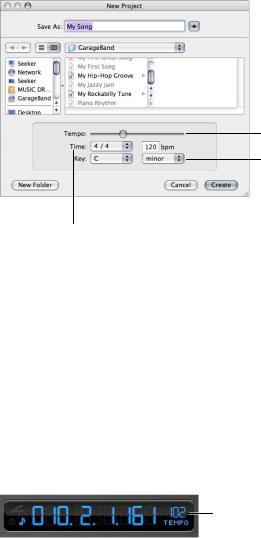
3 Set the song’s tempo, time signature, and key as described in the following sections.
Tempo slider
Scale pop-up menu
Time signature |
|
Key pop-up menu |
|
||
pop-up menu |
|
|
Setting the Tempo
Each song has a speed, or tempo. The tempo defines the rate at which beats, the basic rhythmic pulse, occur in the song. The tempo is measured in beats per minute, or bpm. You can set the tempo to any speed between 60 and 240 bpm. The default tempo is 120 bpm, which is a common tempo used in popular music.
To set the tempo:
mIn the New Project dialog, drag the Tempo slider left to slow down the tempo, or right to speed up the tempo.
Note: You can change the tempo later in the Time display, or in the Track Info window for the master track.
Click here to change the tempo.
Setting the Time Signature
Each song also has a time signature, which controls the relationship between beats and measures. A song's time signature consists of two numbers separated by a forward slash, which look similar to a fraction. The number on the left controls the number of beats in each measure, and the number on the right controls the beat value (the length of the note that gets one beat).
24 |
Chapter 2 Working With Songs |
|
|
 Loading...