Apple FINAL CUT PRO X User Manual

Final Cut Pro X
User Guide

K Apple Inc.
Copyright © 2012 Apple Inc. All rights reserved.
Your rights to the software are governed by the accompanying
software license agreement. The owner or authorized user
of a valid copy of Final Cut Pro software may reproduce this
publication for the purpose of learning to use such software.
No part of this publication may be reproduced or transmitted
for commercial purposes, such as selling copies of this
publication or for providing paid for support services.
The Apple logo is a trademark of Apple Inc., registered in
the U.S. and other countries. Use of the “keyboard” Apple
logo (Shift-Option-K) for commercial purposes without the
prior written consent of Apple may constitute trademark
infringement and unfair competition in violation of federal and
state laws.
Every eort has been made to ensure that the information in
this manual is accurate. Apple is not responsible for printing or
clerical errors.
Note: Because Apple frequently releases new versions and
updates to its system software, applications, and Internet sites,
images shown in this manual may be slightly dierent from
what you see on your screen.
Apple
1 Innite Loop
Cupertino, CA 95014
408-996-1010
www.apple.com
Apple, the Apple logo, Aperture, Apple TV, Final Cut,
Final Cut Pro, Finder, FireWire, GarageBand, iLife, iMovie, iPad,
iPhone, iPhoto, iPod, iSight, iTunes, iWork, Keynote, Logic, Mac,
Mac OS, OS X, QuickTime, and Xsan are trademarks of Apple
Inc., registered in the U.S. and other countries.
Multi-Touch is a trademark of Apple Inc.
Adobe and Photoshop are trademarks or registered
trademarks of Adobe Systems Incorporated in the U.S. and/or
other countries.
Intel, Intel Core, and Xeon are trademarks of Intel Corp. in the
U.S. and other countries.
IOS is a trademark or registered trademark of Cisco in the U.S.
and other countries and is used under license.
Thunderbolt and the Thunderbolt logo are trademarks of Intel
Corporation in the United States and other countries.
The YouTube logo is a trademark of Google Inc.
Production stills from the lm “Koee House Mayhem”
provided courtesy of Jean-Paul Bonjour. “Koee House
Mayhem” © 2004 Jean-Paul Bonjour. All rights reserved.
http://www.jeanpaulbonjour.com
Audi R8 production stills: Closed course with drivers wearing
safety equipment. Do not attempt on public roads; always
obey local trac laws. Audi trademarks are used with
permission of Audi of America, Inc.
Other company and product names mentioned herein
are trademarks of their respective companies. Mention of
third-party products is for informational purposes only and
constitutes neither an endorsement nor a recommendation.
Apple assumes no responsibility with regard to the
performance or use of these products.
019-2412

Contents
10 Chapter 1: What’s new in Final Cut Pro?
10 What’s new in Final Cut Pro 10.0.6?
11 What’s new in Final Cut Pro 10.0.3?
12 What’s new in Final Cut Pro 10.0.1?
13 Chapter 2: Final Cut Pro basics
13 What is Final Cut Pro?
14 Final Cut Pro workow overview
15 Final Cut Pro interface overview
17 Media les and clips
18 Events and projects
19 Chapter 3: Import media
19 Importing overview
20 If it’s your rst import
20 Import from connected cameras
20 Import from le-based cameras
24 Import spanned clips
27 Import from iPhone, iPad, or iPod touch
29 Import from a digital still camera
30 Import from tape-based cameras
31 If your camera or device isn’t recognized
32 Import from other applications
32 Import from Motion
32 Import from iMovie
33 Import from iPhoto and Aperture
34 Import from iTunes
34 Import from devices
34 Import from a hard disk
37 Access media on an archive or disk image
38 Organize les while importing
39 Import while recording
40 About memory cards and cables
42 Supported media formats
43 Import and adjust REDCODE RAW video les
45 Chapter 4: Analyze media
45 Analyzing media overview
45 Video and still-image analysis options
46 Audio analysis options
47 Analyze your media
48 View analysis keywords on clips
3

50 Chapter 5: Organize your media
50 Events and clips overview
51 Organize events
51 Create a new event
51 Rename an event
52 Merge or split events
52 Copy or move clips between events
53 Copy or move events
54 Sort events
55 Delete clips or events
56 Organize clips
56 View and sort clips
60 Rename clips
61 Rate clips as Favorite or Rejected
62 Add keywords to clips
65 Add or edit clip notes
66 Organize clips by roles
66 Find clips in the Event Browser
69 Save searches as Smart Collections
70 Organize Keyword and Smart Collections
71 Chapter 6: Play back and skim media
71 Playback and skimming overview
72 Play back media
74 Skim media
76 Play back and skim media in the Event Viewer
76 View playback on a second display
77 View playback on an external video monitor
78 About background rendering
78 Play your projects on other devices
79 Chapter 7: Create and manage projects
79 Create a new project
80 Preview and open a project
81 Modify a project’s name and properties
84 Organize projects in the Project Library
87 Save projects
88 Chapter 8: Edit your project
88 Editing overview
88 Select clips and ranges
88 About selections and lmstrips
89 Select one or more clips
91 Select a range
94 Manage multiple range selections in event clips
96 Add and remove clips
96 Adding clips overview
97 Drag clips to the Timeline
98 Append clips to your project
98 Insert clips in your project
101 Connect clips to add cutaway shots, titles, and synchronized sound eects
Contents 4

106 Overwrite parts of your project
107 Replace a clip in your project with another clip
109 Add and edit still images
111 Create freeze frames
112 Add clips using video-only or audio-only mode
113 Remove clips from your project
114 Solo, disable, and enable clips
115 Find a Timeline clip’s source clip
115 Arrange clips in the Timeline
121 Cut and trim clips
121 Trimming overview
121 Cut clips with the Blade tool
124 Extend or shorten a clip
129 Make roll edits with the Trim tool
131 Make slip edits with the Trim tool
134 Make slide edits with the Trim tool
136 Show detailed trimming feedback
137 View and navigate
137 Zoom and scroll in the Timeline
139 Adjust Timeline settings
140 Navigate within your project
141 Navigate using timecode
143 Use the Timeline Index to view, navigate, and search your project
146 Work with markers
146 Markers overview
147 Add and remove markers
149 Edit, move, and navigate to markers
151 Manage chapter markers and their thumbnail images
153 Correct excessive shake and rolling shutter issues
155 Chapter 9: Edit audio
155 Audio overview
156 Audio editing basics
156 About audio waveforms
156 About audio channels and audio components
157 Ways to view audio clips
161 View audio waveforms at the audio sample level
162 View and correct audio levels
163 Solo and mute audio clips
164 Add audio
164 Add music and sound
164 Record audio
166 Edit audio clips or audio components
166 Audio editing overview
167 Congure audio channels
170 Adjust volume
172 Fade audio in or out
175 Pan audio
178 Multichannel audio editing examples
184 Use roles to organize clips and export audio les
Contents 5

185 Add and adjust audio eects
185 Add audio eects
187 Adjust audio eects
191 Adjust audio eects using keyframes
198 Audio tools and techniques
198 Enhance audio
201 Sync audio and video automatically
202 Match audio equalization settings
202 Preserve pitch when retiming clips
203 Chapter 10: Add transitions, titles, eects, and generators
203 Transitions, titles, eects, and generators overview
203 Add and adjust transitions
203 Transitions overview
204 How transitions are created
205 Set transition defaults
205 Add transitions to your project
208 Delete transitions from your project
208 Adjust transitions in the Timeline
210 Adjust transitions in the Transition inspector and Viewer
211 Adjust transitions with multiple images
212 Create specialized versions of transitions in Motion
213 Add and adjust titles
213 Titles overview
213 Add titles to your project
214 Adjust titles
218 Remove titles from your project
218 Find and replace text in your project
219 Adjust built-in eects
219 Built-in eects overview
219 Resize, move, and rotate clips
221 Trim clips
222 Crop clips
223 Pan and zoom clips
224 Skew a clip’s perspective
226 Work with built-in eects
231 Add and adjust clip eects
231 Clip eects overview
231 Add eects to your project
232 Adjust eects in Final Cut Pro
234 Change clip eect order
235 Copy eects and attributes between clips
236 Turn o or remove an eect from a clip
237 Create specialized versions of the video eects in Motion
237 Add generators
237 Generators overview
238 Use a placeholder
239 Use a timecode counter
239 Use a shape
240 Use a background
241 Create specialized versions of the generators in Motion
Contents 6

241 Use onscreen controls
241 Onscreen controls overview
241 Show or hide onscreen controls
242 Onscreen control examples
246 Use the Video Animation Editor
246 Video animation overview
246 Adjust video eects using keyframes
252 Adjust eect curves using fade handles or keyframe animation
256 Chapter 11: Advanced editing
256 Group clips with compound clips
256 Compound clips overview
258 Create and break apart compound clips
262 Manage compound clips
264 Add storylines
267 Fine-tune edits with the Precision Editor
270 Create split edits
274 Make three-point edits
274 Three-point editing overview
276 Three-point edit examples
280 Try out clips using auditions
280 Auditions overview
281 Create auditions to try out clips
282 Add and remove clips in auditions
283 Use auditions to try out clips in your project
286 Retime clips to create speed eects
286 Retiming clips overview
287 Change clip speed
291 Reverse or rewind clips
293 Create instant replays
293 Create a hold segment
294 Reset retimed clips to play at normal speeds
295 Conform frame sizes and frame rates
298 Use roles to manage clips
298 Roles overview
299 View and reassign roles
302 Create custom roles and subroles
304 View clips by role in the Timeline
306 Use roles to export media stems
306 Use XML to transfer projects and events
307 Edit with multicam clips
307 Multicam editing overview
308 Multicam editing workow
309 Import media for a multicam edit
310 Assign camera names and multicam angles
311 Create multicam clips in the Event Browser
316 Cut and switch angles in the Angle Viewer
324 Sync and adjust angles and clips in the Angle Editor
330 Edit multicam clips in the Timeline and the Inspector
333 Multicam editing tips and tricks
Contents 7

335 Chapter 12: Keying and compositing
335 Keying
335 Keying overview
336 Use chroma keys
344 Use luma keys
349 Finalize the key
352 Compositing
352 Compositing overview
353 Use alpha channels
355 Use Compositing settings
356 Chapter 13: Color correction
356 Color correction overview
357 Analyze and balance color automatically
357 Color balance overview
357 Analyze a clip for color balance
358 Balance a clip’s colors
359 Match color between clips automatically
360 Adjust color manually
360 Manual color correction overview
360 Color correct the whole image
362 Target a specic color using a color mask
364 Target specic areas using shape masks
367 Add shape masks to a color mask
368 Apply multiple color corrections
369 Add a transition between color corrections
369 Save and apply color correction presets
370 Turn iMovie adjustments on or o
370 Measure video levels
370 Video scopes overview
371 Use the video scopes
372 Waveform Monitor display options
374 Vectorscope display options
375 Histogram display options
377 Chapter 14: Share your project
377 Sharing projects overview
378 Share a project or clip
382 Modify share attributes
386 Export your project using Compressor
386 Status of shared projects
386 Shared project status overview
387 Visit, announce, and view the location of shared projects
388 Remove shared projects
389 Chapter 15: Manage media les
389 Media management overview
389 Where your media and project les are located
391 Manage your media les
391 View a clip’s information
392 Relink clips to media les
Contents 8

397 Transcode media les
400 View background tasks
401 Delete render les to free up disk space
401 Manage your events and project les
401 Before you move or copy events and projects
402 Consolidate a project’s media les
403 Back up projects, your Project Library, and events
406 Edit your project on a dierent computer
410 Use SAN locations for events and projects
411 Create and manage camera archives
414 Solutions to common media management issues
414 Alert icons
416 Common media management issues
417 Chapter 16: Preferences and metadata
417 Preferences and metadata overview
417 Final Cut Pro preferences
417 Change preference settings
418 Editing preferences
419 Playback preferences
420 Import preferences
422 Destinations preferences
427 Work with destinations
432 Work with metadata
432 Display and change clip metadata
433 Modify metadata views
435 Batch rename clips
438 Chapter 17: Keyboard shortcuts and gestures
438 Keyboard shortcuts and Multi-Touch gestures overview
438 Keyboard shortcuts
451 Multi-Touch gestures
451 Customize keyboard shortcuts
451 View keyboard shortcuts in the Command Editor
454 Modify keyboard shortcuts in the Command Editor
455 Export and import command sets in the Command Editor
456 Glossary
Contents 9

10
What’s new in Final Cut Pro 10.0.6?
Final Cut Pro 10.0.6 includes numerous new features and enhancements, detailed below.
Advanced multichannel audio editing
Final Cut Pro automatically groups audio channels into audio components according to how the
channels are congured for the clip. You can now expand the audio portion of clips to view and
edit audio components down to the individual channel level. You can edit audio components in
a variety of ways, including any of the following:
•
Adjust volume or pan.
•
Disable or delete ranges within an audio component to quickly edit out unwanted sounds.
•
Apply and adjust audio eects.
•
Add or remove audio components in a multicam clip.
For more information, see Audio editing overview on page 166.
Streamlined sharing and export
Sharing your nished work is easier and more exible in Final Cut Pro 10.0.6. Destinations—sets
of precongured export settings—allow you to quickly publish a project or clip to a sharing
website, export it for viewing on iPad or iPhone, or burn it to a disc. Final Cut Pro comes with a
variety of destinations, and you can also modify destinations and create new destinations.
The simplied and streamlined sharing workow includes these enhancements:
•
Simplied and consolidated menus that you can easily populate with customized destinations
•
Reusable destination bundles that allow you to share to multiple output formats and locations
at once
•
Automatic sharing of project and clip metadata, with the ability to customize the metadata
that is shared
•
Support for multiple accounts at video-sharing websites such as YouTube
•
Faster sharing and export using the GPU and background processing
For more information, see Sharing projects overview on page 377.
Unied import
Simplied and easier to use, the new unied Media Import window provides one place to go for
all your importing needs. Final Cut Pro 10.0.6 oers dedicated areas for connected cameras and
devices, both le-based and tape-based, as well as a new Favorites section, where you can add
frequently used folders for le import from your hard disk or an external drive. Other new import
features include list view to see multiple columns of metadata, multiple range selections within
individual clips from le-based cameras, and complete archive-management tools.
For more information, see Importing overview on page 19.
What’s new in Final Cut Pro?
1

Chapter 1 What’s new in Final Cut Pro? 11
Dual viewers
The Event Viewer is a separate video display that appears next to the main Viewer so you can
compare shots to match action and color. With the Event Viewer and the Viewer open, you can
display two clips at the same time: one from the Event Browser and one from the Timeline, each
with its own video scope display.
For more information, see Play back and skim media in the Event Viewer on page 76.
Native REDCODE RAW (R3D) support
Final Cut Pro 10.0.6 provides native support for REDCODE RAW (R3D) les. You can now import
RED les directly, make nondestructive RAW settings adjustments, and save those adjustments
as metadata, all within Final Cut Pro. This allows you to take advantage of the full latitude and
dynamic range contained in the REDCODE RAW source les.
For more information, see Import and adjust REDCODE RAW video les on page 43.
Improved range selections
Start and end points in clips in the Event Browser now stay in place when you click elsewhere.
You can also create multiple range selections in one or more clips.
For more information, see Select a range on page 91 and Manage multiple range selections in
event clips on page 94.
Other notable features
•
Chapter markers and chapter marker thumbnails allow you to prepare chapters and their
representative poster frame images directly within Final Cut Pro for output to DVD, Blu-ray
disc, iTunes, QuickTime Player, and Apple devices.
•
The new Paste Attributes window is a powerful way to transfer specic eects and other
settings between clips.
•
You can now add freeze frames quickly and easily with a single keyboard shortcut.
•
Titling is signicantly improved, including support for the new title markers feature in Motion.
•
Flexible connection points improve manual control over connected clips as you slip, slide, or
move clips in the primary storyline.
•
New compound clip architecture makes compound clips easier to reuse in multiple projects
and provides improved performance.
•
You can now import and export MXF les using third-party plug-ins. For a list of supported
media les, see Supported media formats.
•
Final Cut Pro 10.0.6 provides improved support for anamorphic media.
What’s new in Final Cut Pro 10.0.3?
Final Cut Pro 10.0.3 includes major new features and enhancements, detailed below.
Multicam editing
You can now use multicam clips to edit footage from multicamera shoots or other synchronized
footage in real time. Working with multicam clips in Final Cut Pro is a exible and uid process.
While the active angle plays in the Viewer, you can also view all angles playing simultaneously in
the Angle Viewer and easily cut and switch between them. You can create multicam clips from
diverse media sources and modify existing multicam clips during the editing process.
For more information, see Multicam editing overview on page 307.

Chapter 1 What’s new in Final Cut Pro? 12
A/V output
You can now connect your computer to an external video monitor for audio and video (A/V)
output. In addition to showing you how video and audio look and sound on an NTSC/PAL or HD
broadcast monitor, this feature also allows you to test output with more sophisticated devices
such as vectorscopes and waveform monitors.
A/V output is available only with OS X Lion v10.7.2 or later and requires compatible third-
party video interface hardware and software. FireWire DV devices are not supported. For more
information, contact the device manufacturer or go to the Final Cut Pro X Resources webpage at
http://www.apple.com/nalcutpro/resources.
For more information, see View playback on an external video monitor on page 77.
Manual relinking of clips to media les
Now you can manually relink event clips and project clips to media les. Manual relinking gives
you more control over your post-production workow.
For more information, see Relink clips to media les on page 392.
Other notable features
•
Layered graphics les, such as Adobe Photoshop (PSD) les, can now be edited so that each
layer appears as a connected clip in the Timeline.
•
Advanced Keyer controls are now available.
•
Keyframing controls are improved in the Video and Audio Animation Editors.
What’s new in Final Cut Pro 10.0.1?
Final Cut Pro 10.0.1 includes a number of new features, enhancements, and changes. The most
signicant features are introduced below.
Roles
You can use the new roles metadata labels to organize clips in your events and projects, control
the appearance of the Timeline, and export separate video or audio les (also known as media
stems) for broadcast delivery, audio mixing, or post-production. For example, you can export
roles as media stems in a combined, multitrack QuickTime le, or as separate audio or video
les. During the export process you can assign mono, stereo, or surround output for your
audio channels.
For more information, see Roles overview on page 298 and Destinations preferences on
page 422.
Storage area network (SAN) locations
You can now add network volumes as storage locations for events and projects. When you
remove SAN locations in Final Cut Pro, other users on the network can work with the events and
projects stored on those locations.
For more information, see Use SAN locations for events and projects on page 410.
XML export and import
Final Cut Pro now supports XML import and export so that you can transfer your project and
event information to and from systems and third-party applications that don’t recognize
Final Cut Pro projects and events.
For more information, see Use XML to transfer projects and events on page 306.
13
What is Final Cut Pro?
Final Cut Pro X is a revolutionary application for creating, editing, and producing the highest-quality
video. Final Cut Pro combines high-performance digital editing and native support for virtually any
video format with easy-to-use and time-saving features that let you focus on storytelling.
In Final Cut Pro, you can:
•
Edit everything from uncompressed standard-denition video to HDV, DVCPRO HD, and
uncompressed high-denition video—as well as le-based formats such as AVC-Intra, AVCHD,
and XDCAM HD.
•
Play back and skim resolution-independent media up to 1920 x1080, 2K, 4K, and even 5K
resolution. You can also play your video full screen or on a second display.
•
Assemble clips with ease using the Magnetic Timeline, which uidly adjusts clips around the
clip you’re dragging to eliminate gaps, collisions, and sync problems.
•
Edit quickly with the complete set of professional editing and trimming tools. Fine-tune edits
with the inline Precision Editor.
•
Have Final Cut Pro analyze your video and nondestructively x common problems such as
camera shake, excess hum, or loudness. You can also have Final Cut Pro detect the presence of
people or the shot type, and automatically apply keywords such as One Person or Wide Shot.
•
Organize your media using Keyword Collections, which automatically group clips based on
keywords, and Smart Collections, which automatically group clips based on criteria you specify.
•
Try out clips in your project using auditions—sets of alternate takes, eects, or text
treatments—and then choose the best clip for the edit.
•
Create compound clips to group any combination of clips, and nest clips within other clips.
Final Cut Pro basics
2

Chapter 2 Final Cut Pro basics 14
•
Use connected clips and storylines to add cutaway shots, superimposed titles, and sound
eects to your project. Connected clips and storylines always stay in sync.
•
Add special eects to video, audio, and photos, and adjust them using keyframes and onscreen
controls. You can also change clip speed to create fast-motion or slow-motion eects.
•
Automatically balance and match color, or use the color correction tools to precisely control
the look of any clip in your project.
•
Publish your project directly to websites such as YouTube and Facebook, or send your project
to iTunes for syncing with Apple devices such as iPhone, iPad, and Apple TV.
FinalCutProworkowoverview
To give you an idea of the possibilities, the overall process for putting together a movie with
Final Cut Pro is described below. You don’t have to do every step, and you might do others that
aren’t listed. The workow isn’t necessarily linear. You could, for example, go all the way through
editing and adding eects, and then import more new media for your project.
Import your media into Final Cut Pro
To use Final Cut Pro, you need to transfer your media (video, audio, and still images) from your
recording device to your computer or an external disk. You can import media from many kinds of
cameras and other devices, or from other applications such as iMovie.
Organize your media
Final Cut Pro automatically organizes your imported media into events. An event is like a folder
that contains all the media recorded on a certain date. In Final Cut Pro, your media appears as
clips, which link to the media les stored on a disk. You can reorganize your clips by creating or
renaming events and moving clips between events. For example, you could create an event for
all the media shot for a specic client.
As you review your footage, you can easily rate clips as Favorite or Rejected. These ratings make
it easier to focus on your best footage. Final Cut Pro also oers other useful organizing tools, such
as Keyword Collections and Smart Collections.
Create a project and add clips to it
Your project is the movie you create using clips from your events and from the Final Cut Pro media
browsers. Start creating your movie by adding clips to the Timeline. You make all your edits in the
project; your original media les remain untouched (this is known as nondestructive editing).
Arrange and edit your clips
Now your movie can really begin to take shape. To assemble a rough cut, rearrange and trim
clips in the Timeline. You can also try out dierent clips using auditions. Use connected clips
and storylines to add cutaway shots, titles, background music, and sound eects to your project.
Create compound clips to group any combination of clips and nest clips within other clips. You
can simplify a complicated project by creating a separate compound clip for each major section.
Add eects and transitions
Add special eects from the ample collection of video and audio eects in the Final Cut Pro
media browsers. Give your movie titles and credits, and apply video or audio transitions. Adjust
clip speed settings to create fast-motion or slow-motion eects.
To further polish your project, you can ne-tune cuts and transitions with the Precision Editor,
keyframe video and audio eects, correct color, and composite motion graphics.
Chapter 2 Final Cut Pro basics 15
Share your movie
When your project is nished, you can publish your movie right from Final Cut Pro to the web, or
send it to iTunes, iPhone, iPad, iPod, or Apple TV. You can also burn a disc to give to others.
FinalCutProinterfaceoverview
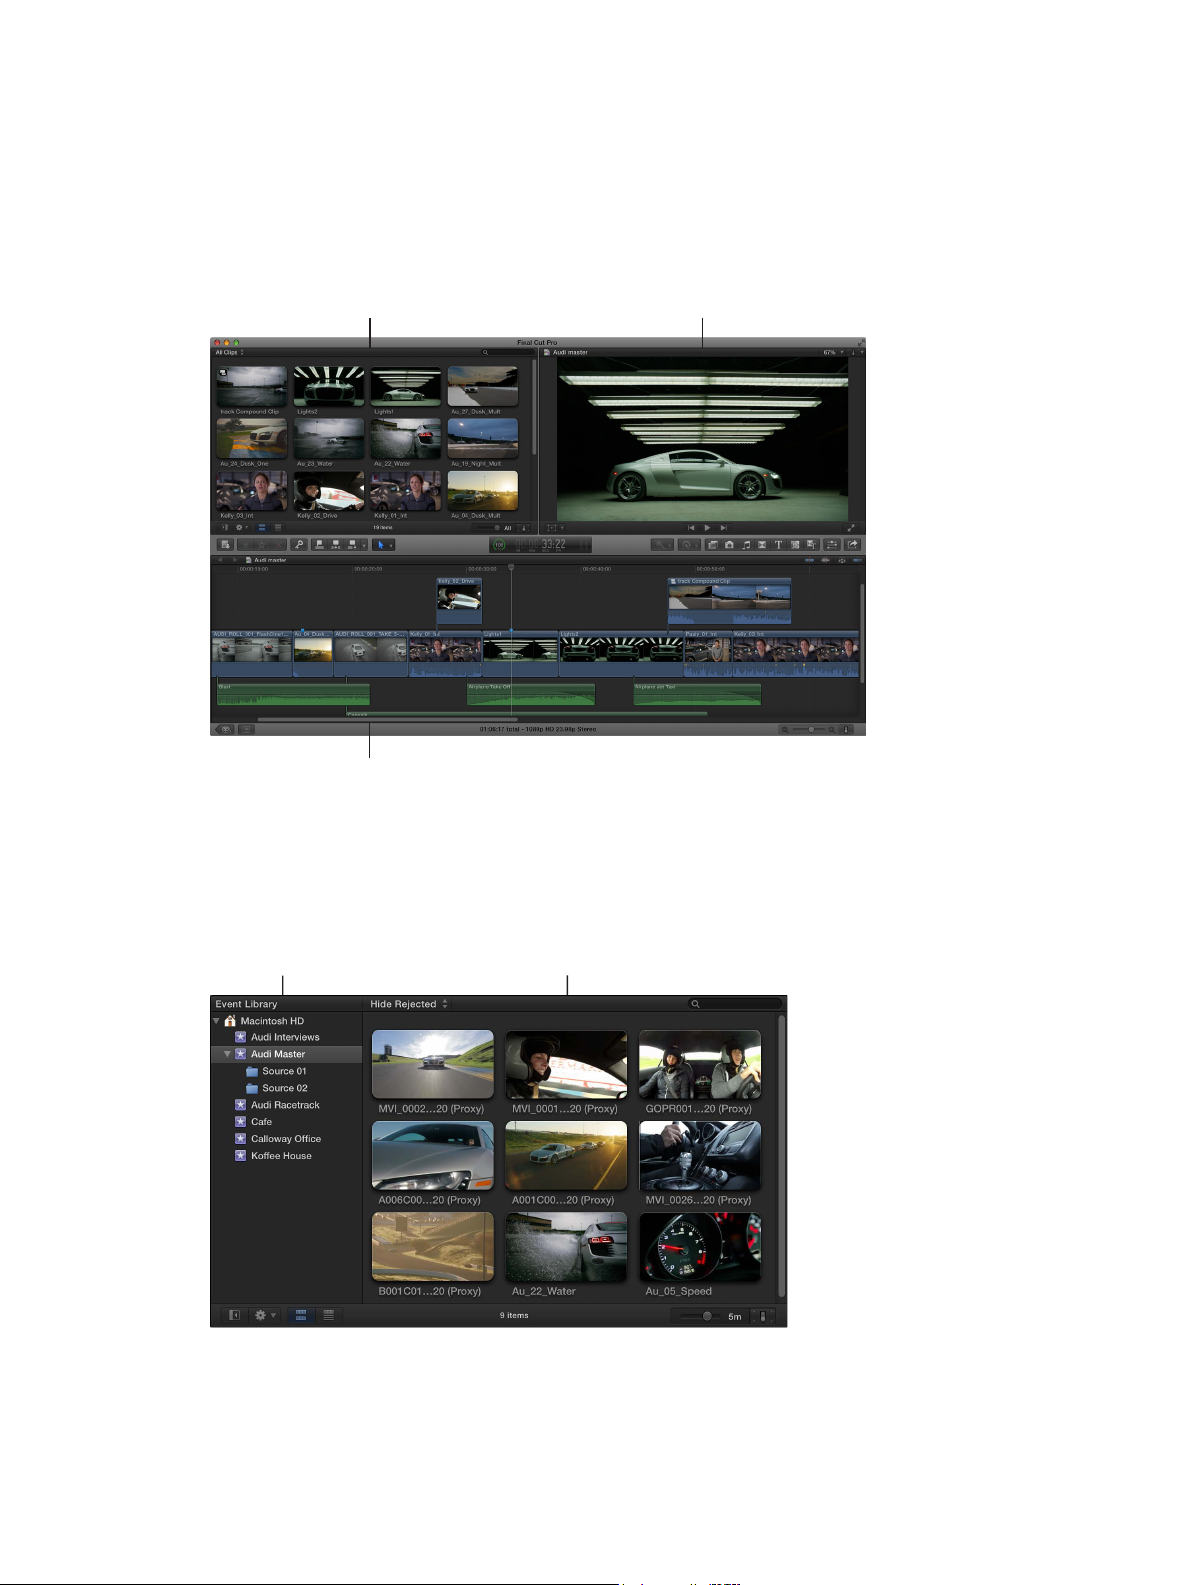
The Final Cut Pro window has three main areas:
Viewer: Play back
clips and projects.
Event Browser: Access all
the source media you import.
Magnetic Timeline: Edit your
movie in this area.
Organize media in the Event Library and Event Browser
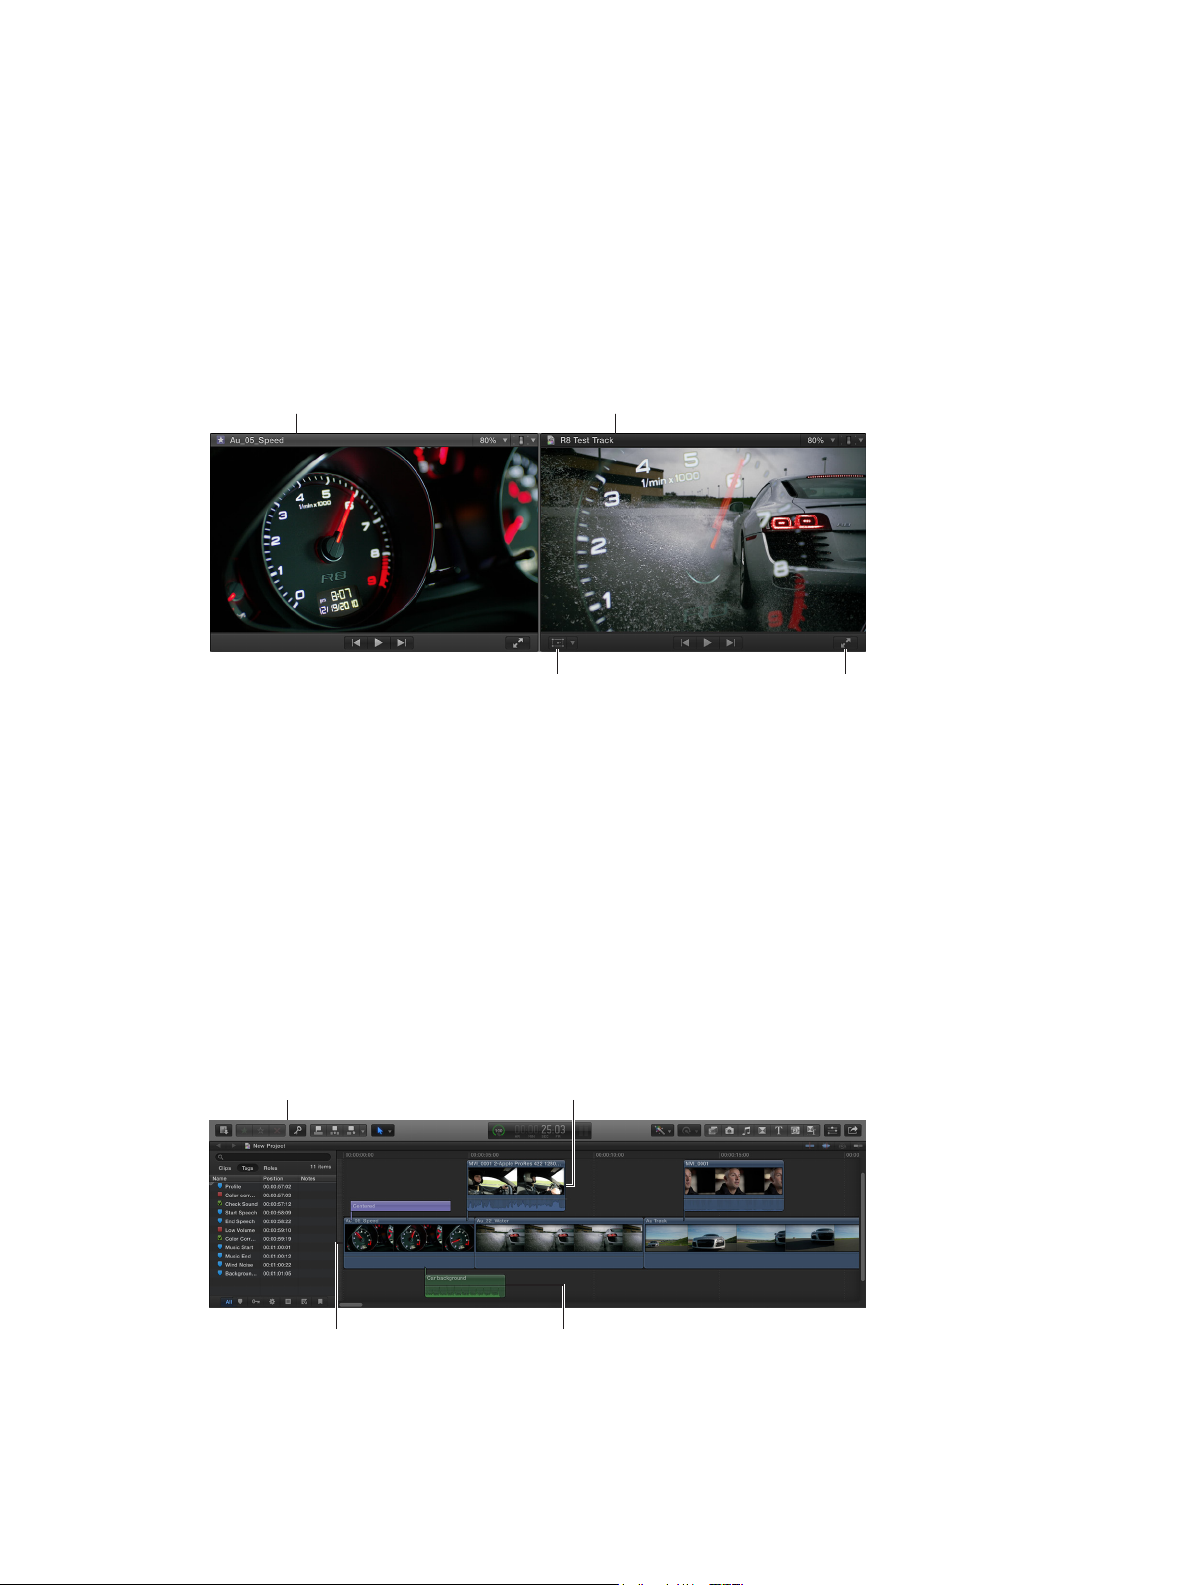
All your imported media is available in the Event Library. (An event is like a folder that
contains clips.)
When you select an event in the Event Library, its clips appear in the Event Browser on the right.
Event Browser: View and sort
the clips in the selected event.
Event Library: Select an event
to view its media on the right.
Chapter 2 Final Cut Pro basics 16
You can reorganize your media however you like at any time, and you can use the Event Library
and the Event Browser to manage, rate, sort, and add keywords to your imported media. For
more information, see Events and clips overview on page 50.
Play back clips and projects in the Viewer
The Viewer is where you play back your video, including clips and projects with up to 1920 x1080,
2K, 4K, and even 5K resolution. You can play back events, projects, or individual clips in full-screen
view or on a second display. With the Event Viewer, a separate video display that can be shown
next to the main Viewer, you can display two clips at the same time: one from the Event Browser
and one from the Timeline. For information about ways to play media, see Play back media on
page 72.
Resolution-independent playback:
Play back video files up to 5K.
Full-screen playback:
Play your video full screen,
or on a second display.
Onscreen controls:
Adjust effects such as
Transform, Crop, and Distort.
Dual viewers: Display event clips
and project clips side by side.
You can also use onscreen controls, superimposed over the video in the Viewer, to adjust settings
for a wide array of eects and transitions.
Edit your project in the Magnetic Timeline
The bottom portion of the Final Cut Pro window contains the Timeline, where you create your
movie by adding and arranging clips and making all your edits. The Timeline in Final Cut Pro
“magnetically” adjusts clips to t around clips that you drag into place. If you drag clips out of
place, the surrounding clips close up to ll the space.
A Final Cut Pro project holds all of the information for your nal movie, including your editing
decisions and links to all the source clips and events. For more information about editing your
project, see Adding clips overview on page 96 and Arrange clips in the Timeline on page 115.
Toolbar: Perform
common tasks by
clicking a button.
Connected clips: Add titles and
cutaway shots. In the Magnetic
Timeline, everything stays in sync.
Audio clips: Add music
and sound effects as
connected clips.
Primary storyline: Add and
arrange clips to construct
your movie.

Chapter 2 Final Cut Pro basics 17
Medialesandclips
After you import media into Final Cut Pro, clips representing the source media les appear in the
Event Browser. A large event may hold many clips.
Media les are the raw materials you use to create your project. A media le is a video, audio,
still-image, or graphics le on your hard disk that contains footage transferred from a camcorder
or recording device or originally created on your computer. Media les can contain multiple
video and audio components. Because media les—especially video les—tend to be quite
large, projects that use a lot of footage require one or more high-capacity hard disks.
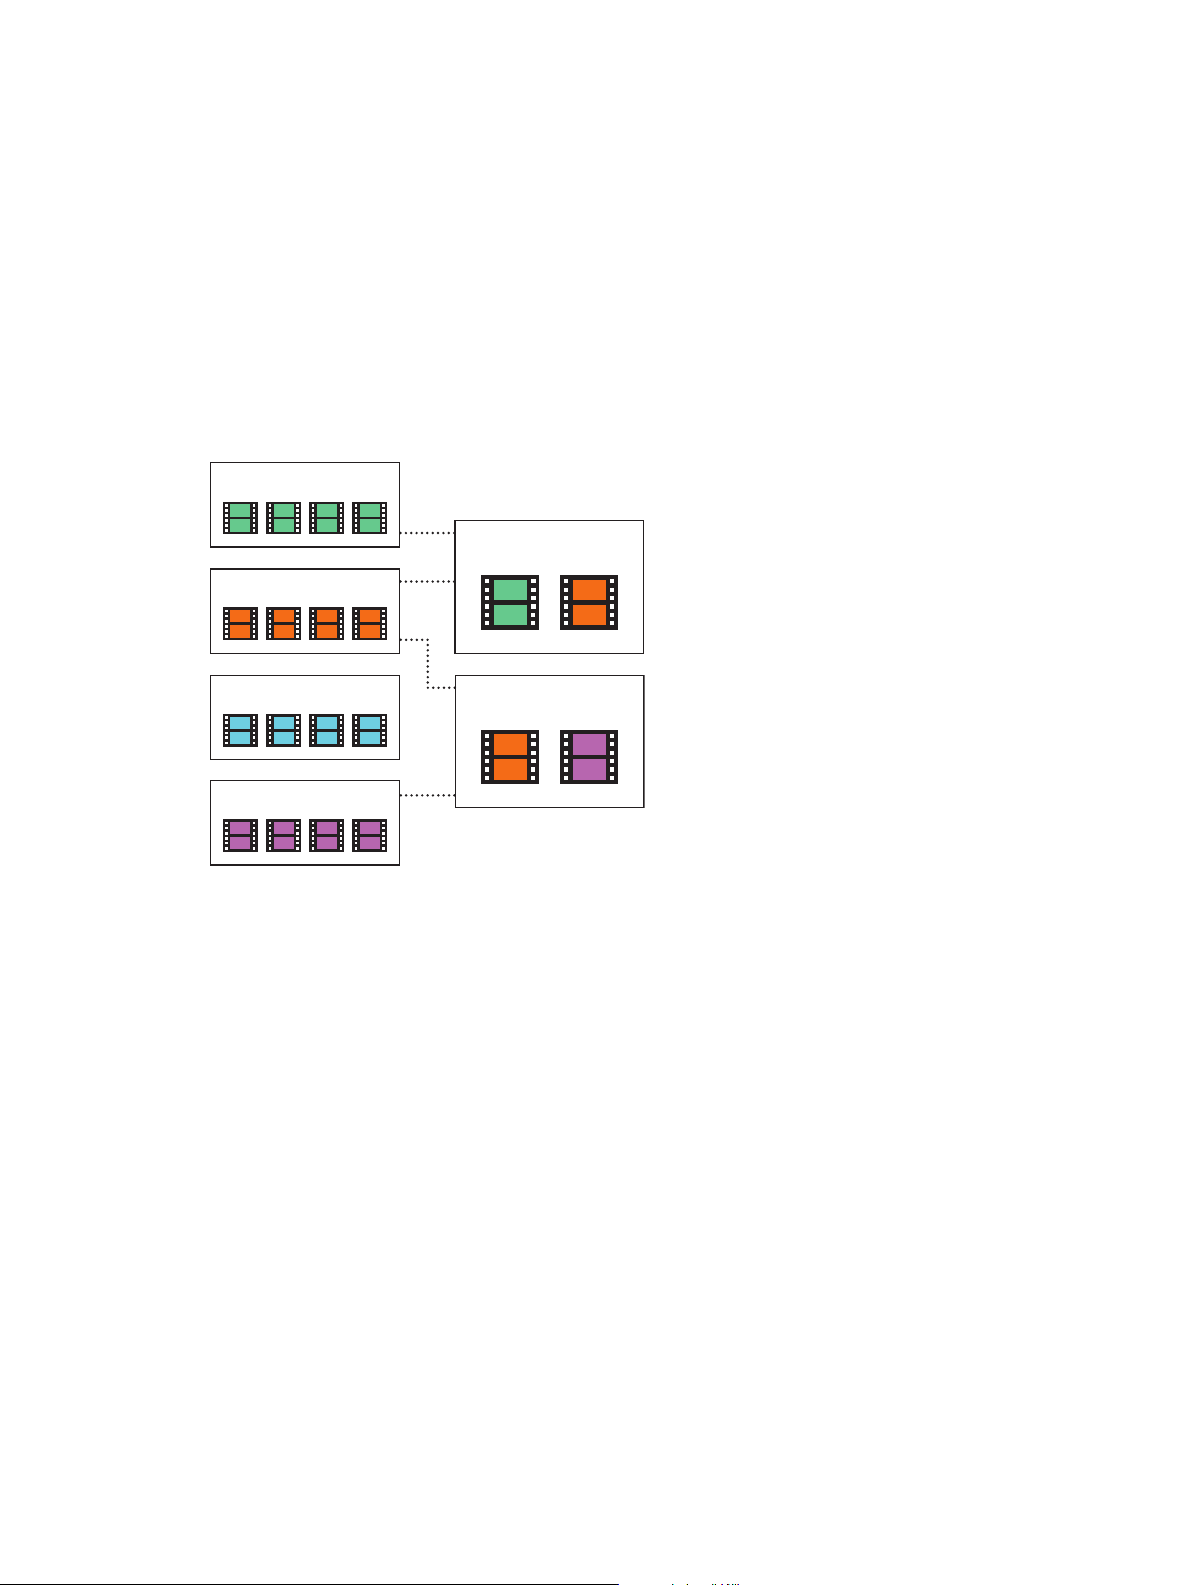
Clips represent your media, but they are not the media les themselves. The clips in a project
simply point to (link to) the source media les on your hard disk. When you modify a clip, you
are not modifying the media le, just the clip’s information in the project. This is known as
nondestructive editing, because all of the changes and eects you apply to clips in Final Cut Pro
never aect the media itself. Trimmed or deleted pieces of clips are removed from your project
only, not from the source clips in your Event Library or from the source media les on your
hard disk.
Project 2
Toy1
Event clips
Media files on your hard disk
Project 3
Project 1
Toy1.mov
Toy1
Toy1
Toy1
Chapter 2 Final Cut Pro basics 18
Eventsandprojects
In Final Cut Pro X, you use events to collect and organize media. Events are like folders that
contain unedited media imported from a camera or some other source.
You use projects to edit and construct movies and share them with your audience. A project is
a record of the work you do in the Timeline and the editing decisions you make. When you add
a clip from an event to a particular project, you create a link between the source event clip and
the corresponding project clip (and, by extension, between the event and the project). However,
neither the event nor the source clip is contained within the project. You can use that event clip
in other projects, and your project can use clips from other events.
The illustration below shows the relationship between events and projects: Final Cut Pro X keeps
track of the links between project clips and their source event clips, but projects and events
remain independent.
Project
Project
Event
Event
Event
Event

19
Importingoverview
Importing media into Final Cut Pro is the rst step toward making your movie. With Final Cut Pro,
you can:
•
Import from a le-based (tapeless) camera or device
•
Import from iPhone, iPad, or iPod touch
•
Import from a tape-based camcorder or device
•
Import from iMovie
•
Import from iPhoto and Aperture
•
Import from iTunes
•
Import from a hard disk
•
Import from a camera archive
During import, you assign your media to an event. You can also transcode your media and
analyze your media for a variety of issues, such as color balance, the presence of people and shot
type, and audio problems.
When you import clips (video, audio, or still images), Final Cut Pro assigns one of ve default roles
to the video and audio components of each clip: Video, Titles, Dialogue, Music, and Eects. For
more information, see View and reassign roles on page 299.
If you want to quickly back up your media (instead of taking the time to import it), you can
create an archive.
Import media
3

Chapter 3 Importmedia 20
Ifit’syourrstimport
The rst time you open Final Cut Pro, it contains no media, no projects, and a single event. Buttons
appear in the Event Browser to help you quickly import events from iMovie, media from your hard
disk or a connected external storage device, or media directly from a connected camera.
Import media into an empty event
m To import events from iMovie: Click the Import iMovie Events button and follow the instructions
for importing iMovie events.
m To import les from a connected camera or from a hard disk: Click the Import Media button and
follow the instructions for importing les from a connected le-based camera, from a hard disk,
from a tape-based camera, or from a camera archive.
Importfromconnectedcameras
Import from le-based cameras
File-based camcorders and cameras can record video, audio, and still images. These kinds of
devices, which record to ash-based storage media, hard disk drives (HDD), and so on, usually
connect to your computer via a USB cable. Some devices have removable memory cards that you
can insert into your computer instead.
If your le-based device provides a clip-spanning feature, you can import all of the media as one
spanned clip.
To check whether your camera is compatible with Final Cut Pro, go to the Final Cut Pro X
Supported Cameras webpage at http://help.apple.com/nalcutpro/cameras.
Chapter 3 Importmedia 21
Import from a le-based camcorder, camera, or device
1 Do one of the following:
•
Connect your camcorder, camera, or device to your computer, using the cable that came with
the device, and turn it on.
If you’re using a camcorder, set it to PC Connect mode. (The name of this transfer mode may
be dierent on your device.) Your camcorder may automatically go into “connect” mode if you
turn it on in playback mode while it’s connected to your computer. For more information, see
the documentation that came with your camcorder.
Note: Connecting a DVD camcorder to your Mac can cause the DVD Player application to
open. If that happens, simply close DVD Player.
•
Remove the memory card from your camcorder or device and insert it into the card slot on
your Mac (if it has one) or into an external card reader.
For more information about memory cards, see About memory cards and cables on page 40.
2 To open the Media Import window, do one of the following:
•
Choose File > Import > Media (or press Command-I).
•
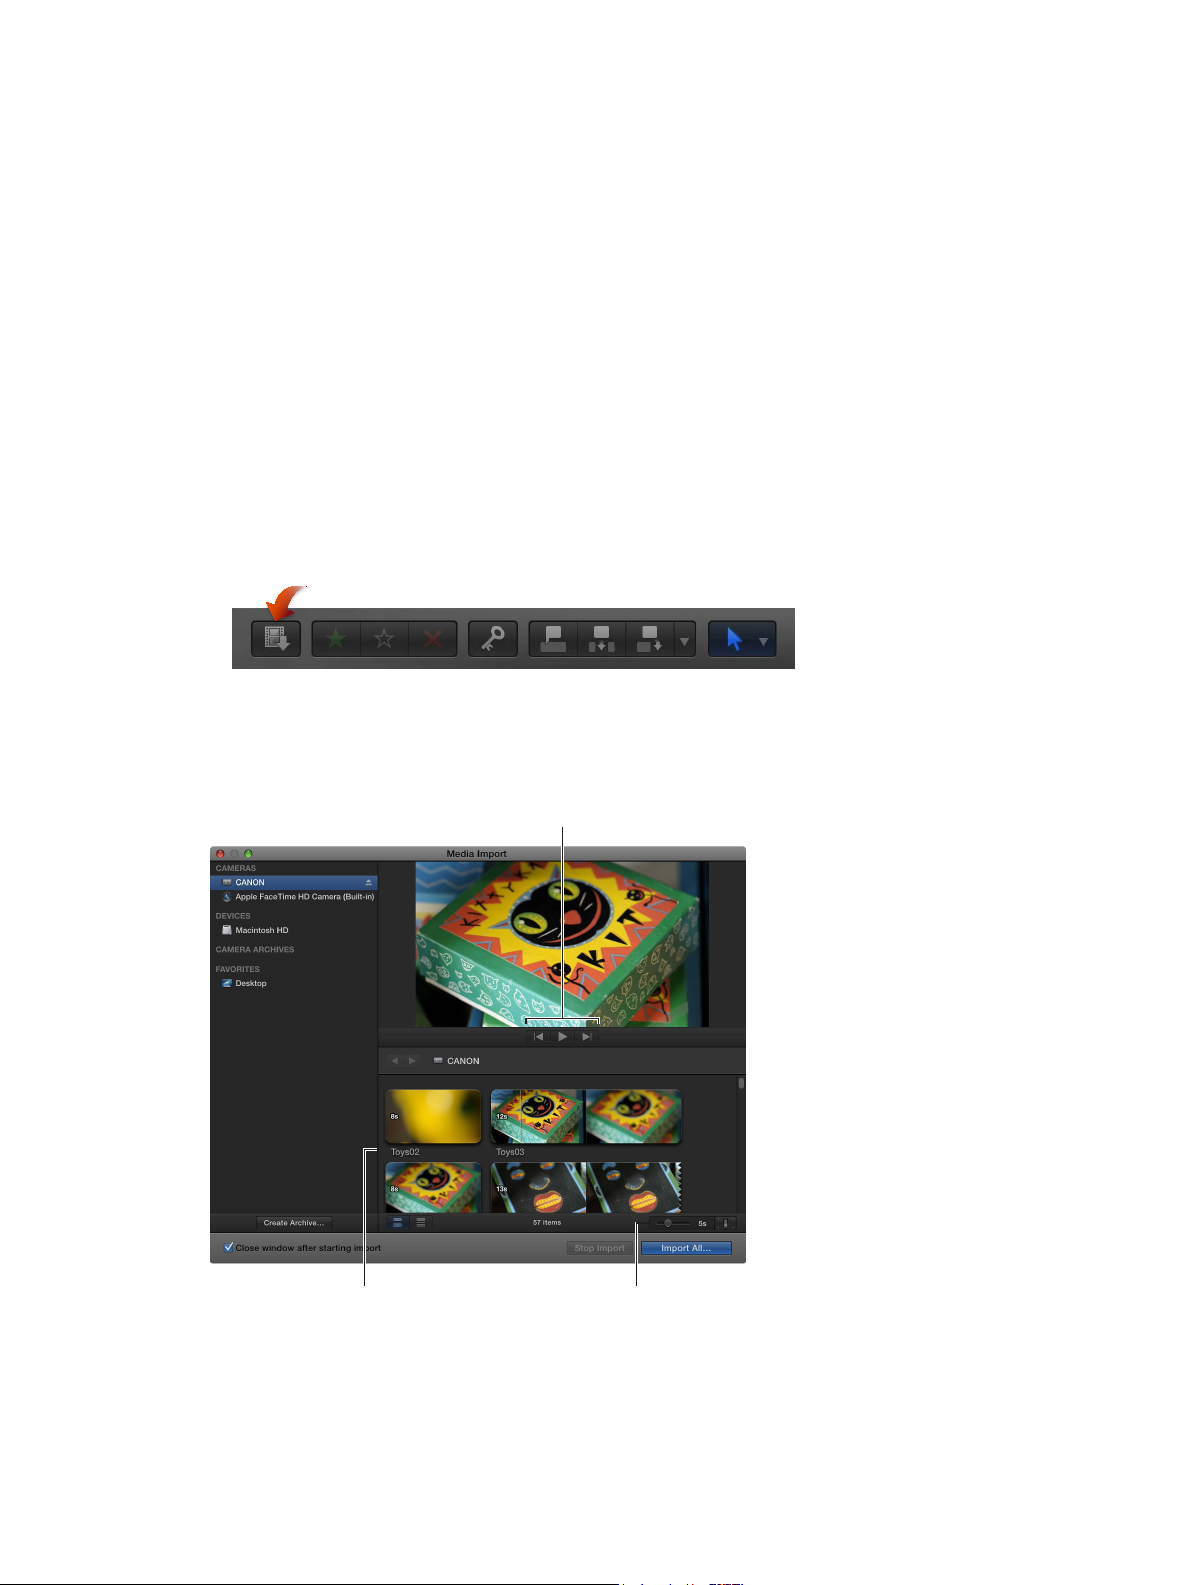
Click the Import Media button on the left end of the toolbar.
3 If necessary, select your camcorder, camera, or device from the Cameras section on the left.
The Media Import window displays all the media on your device. In this window you can preview
the media by either playing it using the playback controls or skimming it by moving the pointer
forward or backward over a lmstrip.
Change the way clips appear
using these controls.
The media on the
device appears here.
Playback controls
Note: Most modern digital cameras can shoot still images and video interchangeably. In
many cases, the video clips and still images in those cameras appear side by side in the Media
Import window.

Chapter 3 Importmedia 22
4 Do any of the following:
•
To change which device to import from: Click the device in the Cameras section.
•
To change the way the clips appear: Click the Clip Appearance button in the bottom-right
corner of the Media Import window.
•
To switch between lmstrip view and list view: Click the List View and Filmstrip View buttons at the
bottom of the Media Import window. (Connected le-based cameras and camera archives only.)
Note: When you select a clip in list view, a lmstrip for the selected clip appears at the top
of the Event Browser. The lmstrip is fully interactive, allowing access to start and end points,
markers, and keywords.
•
To sort clips in list view by data such as duration, creation date, rating, keyword, and so on: Click
the column headings at the top of list view. For more information about list view, see Import
from a hard disk on page 34.
•
To add folders of frequently used media to the Favorites section: Drag them from list view.
To remove a folder from the Favorites section, Control-click the folder and choose Remove
from Sidebar in the shortcut menu.
•
To automatically close the Media Import window when the import begins: Select the “Close
window after starting import” checkbox.
•
To add a folder to the list view by dragging: Drag the folder from the Finder to the list view and
browse its contents in list view.
5 Do one of the following:
•
To import all clips: Click Import All.
•
To import only some of the clips: Select each clip you want to import by Command-clicking each
clip, and click Import Selected (the Import button changes its name).
Tip: To select several clips located together, you can drag around the clips to enclose them
with the selection rectangle.
•
To import portions of clips: Drag inside the lmstrip to select the range that you want, and click
Import Selected. You can also select multiple ranges in each clip. For more information, see
Select a range on page 91.
Tip: You can also select a clip, press the Space bar to play the clip, and press either I to set a
start point or O to set an end point.
6 In the window that appears, choose how you want to organize the imported media in the
Event Library:
•
To add the imported clips to an existing event: Select “Add to existing event,” and choose the
event from the pop-up menu.
•
To create a new event: Select “Create new Event” and type a name (for example, “Chris and Kim
Wedding”) in the text eld; then choose the disk where you want to store the event from the
“Save to” pop-up menu.
To learn more about events, see Events and clips overview on page 50.
7 If you want to organize your media, create optimized or proxy media, analyze the video, or
analyze the audio, select the relevant checkboxes.
If you don’t set Final Cut Pro to analyze your media during the import process, you can analyze it
later (if necessary) in the Event Browser.

Chapter 3 Importmedia 23
8 Click Import.
By default, the Media Import window closes when you click Import. You can begin working with
your clips in the Event Browser. Final Cut Pro imports your media in the background.
If you selected any options in the previous step, Final Cut Pro transcodes and optimizes the
les after the import process is complete. You can view the progress of the import and other
background tasks in the Background Tasks window.
9 When background tasks are completed, disconnect the camcorder, camera, or device.
You can create an archive from your le-based or tape-based camera or device. For more
information, see Create and manage camera archives on page 411.
Reimport a clip
Two situations warrant reimporting a clip:
•
If the clip was not completely imported: If you cancel or quit Final Cut Pro before an import is
nished, a Camera icon appears on the bottom-left corner of the clip. This icon indicates that
Final Cut Pro is using the media on the camera for playback (instead of using the QuickTime
le that was created during import).
Camera icon
To play a clip with a Camera icon, Final Cut Pro locates the media on either a connected
camera or in a connected, available camera archive. (See Access media on an archive or disk
image on page 37 for more information.) If Final Cut Pro can’t locate the media in one of those
locations, the clip will go oine and display the Missing Camera alert icon.
•
If the clip’s source media le is not available: If a clip’s source media le is moved or deleted, or
the volume it is located on is disconnected from the computer, a Missing File icon is displayed
on the clip. To restore the clip, you can reimport it.
See Alert icons on page 414 for more information about alert icons.
When you reimport a clip, Final Cut Pro automatically connects to the necessary camera or
camera archive. There is no need to manually mount a camera archive before reimporting.
1 Do one of the following:
•
Connect the camera that contains the clip to your computer, and turn it on. This will bring the
clip online, but the clip will still display the Camera icon in the lower-left corner.
•
Insert the memory card that contains the clip in your computer or connected card reader.
See About memory cards and cables on page 40 for more information.
•
Make sure the camera archive that contains the clip is located in one of the Final Cut Pro
camera archives.
See Create and manage camera archives on page 411 for more information.
Chapter 3 Importmedia 24
2 In Final Cut Pro, do one of the following:
•
To reimport one clip: Select the clip in the Event Browser.
•
To reimport all clips in an event: Select the event in the Event Library.
3 Choose File > Import > Reimport from Camera/Archive.
The clip or clips are reimported.
Import spanned clips
Some le-based camcorders or devices that have more than one memory card slot can record
one shot over multiple memory cards. The resulting shot is called a spanned clip.
A good way to import a spanned clip into Final Cut Pro is to attach your camera or card reader
to your local system and create a camera archive for each memory card. You can store the
camera archives on your local system or on an external storage device until you are ready to
import the spanned clip. (Even if you are importing the spanned clip immediately, it’s useful to
make the camera archive so you have a backup of the footage that makes up the spanned clip.)
Then, when you’re ready to import, you can mount all of the camera archives and import the
spanned clip.
Create a camera archive for each memory card
1 Connect your camcorder or camera to your computer and turn it on, or connect your card
reader and memory card to your computer. If you’ll be saving the camera archives to an external
storage device, connect that as well.
2 In Final Cut Pro, do one of the following:
•
Choose File > Import > Media (or press Command-I).
•
Click the Import Media button on the left end of the toolbar.
The Media Import window appears.
3 Select a memory card to archive from the list of cameras on the left.
4 Click the Create Archive button at the bottom-left corner of the window.
5 In the “Create Camera Archive as” eld, type a name for the archive.
6 Choose a location to save the archive from the Destination pop-up menu, and click OK.
Note: To protect your media, it is recommended that you save your archive to a disk or partition
dierent from the one where you store the media les used with Final Cut Pro.
7 Repeat steps 3 through 6 to create camera archives for each of the memory cards that contain a
portion of the spanned clip.
The camera archives appear in the Camera Archives list in the Media Import window.
See Create and manage camera archives on page 411 for more information about creating
camera archives.
Chapter 3 Importmedia 25
Import a spanned clip
1 If your camera archives are stored on an external storage device, make sure that it is connected
to your local system.
2 Choose File > Import from Camera.
The Media Import window appears, showing all camera archives on your local system (and on
any connected external storage devices) in the Camera Archives section on the left.
3 Select each camera archive that makes up the spanned clip.
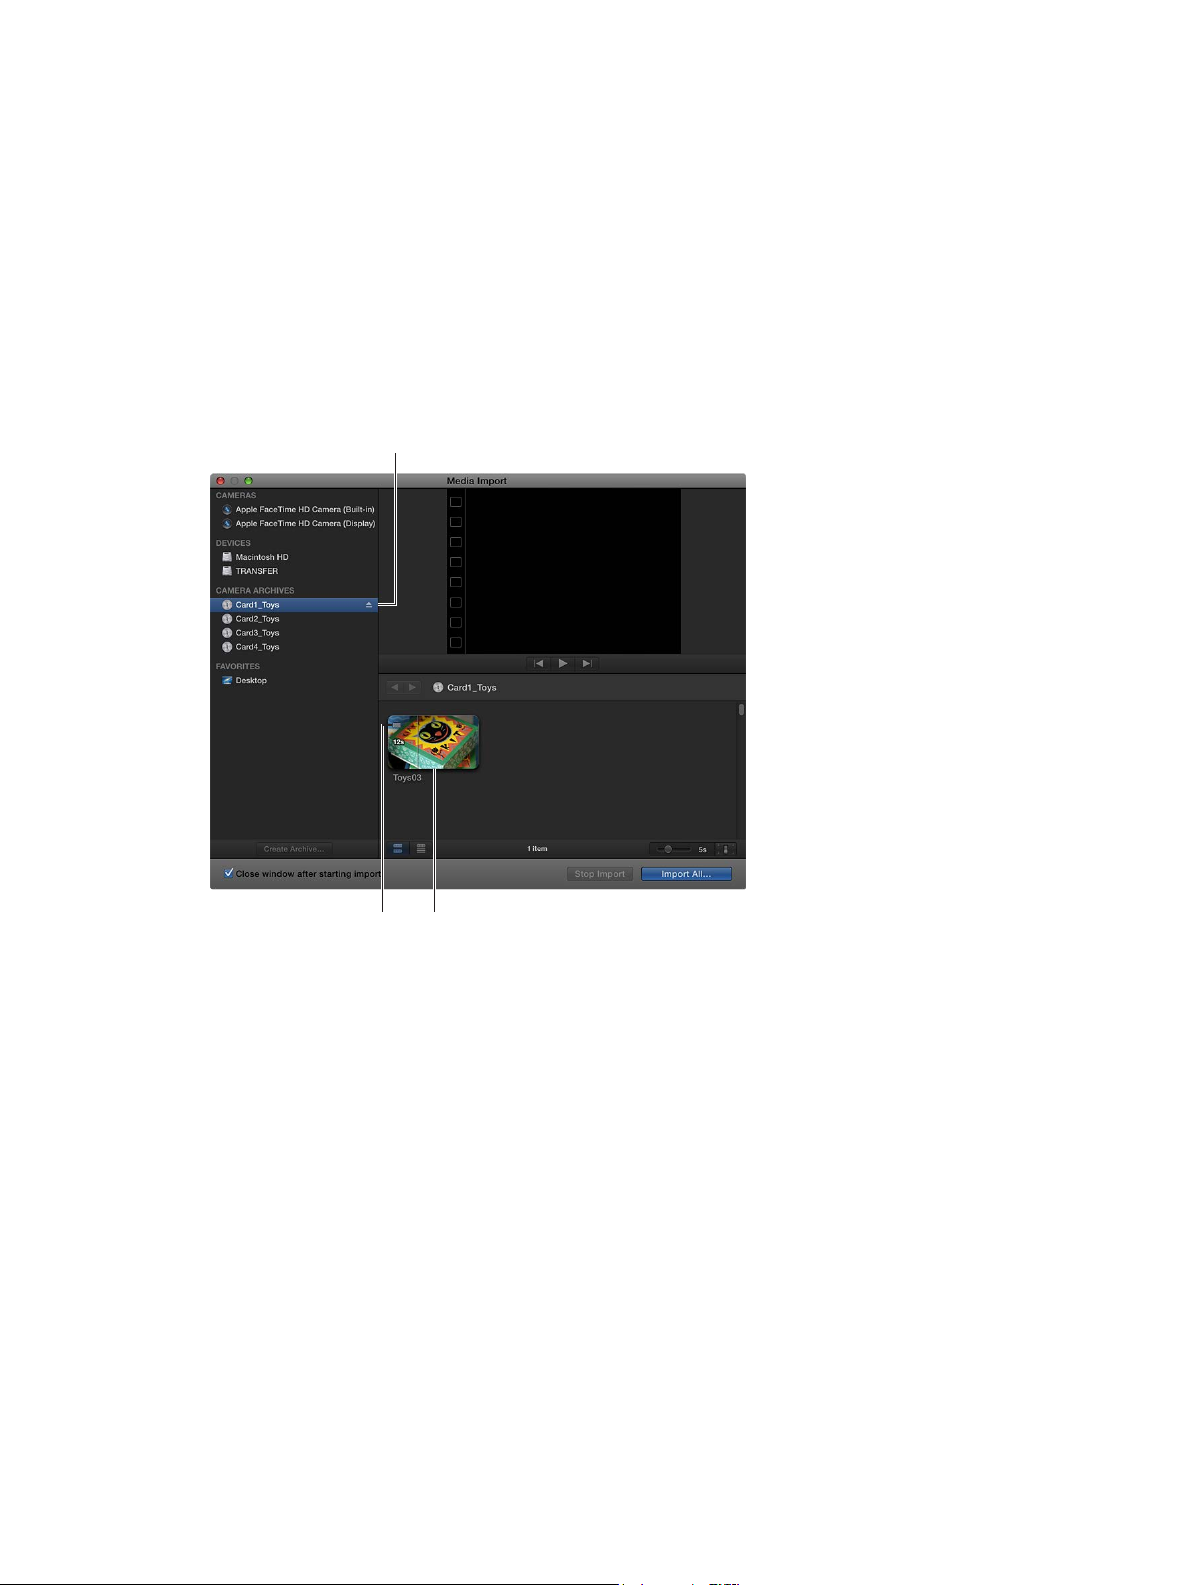
Final Cut Pro mounts all of the camera archives. If all portions of the spanned clip are available, all
the mounted camera archives show a clip with the same duration and an icon indicating that the
spanned clip is complete.
These camera archives
contain all portions
of the spanned clip.
This clip represents the
complete spanned clip.
This icon indicates that all
portions of the spanned
clip are available.

Chapter 3 Importmedia 26
If one or more camera archives is missing, an icon appears on the camera archive to indicate
which part of the spanned clip is available—the beginning, middle, or end. You can select each
camera archive to see the dierent icons.
Indicates that all
portions of the spanned
clip are available.
Indicates that the end
portion of the spanned
clip is available.
Indicates that the
beginning portion of the
spanned clip is available.
Indicates that the middle
portion of the spanned
clip is available.
4 Click Import All to import the spanned clip.
Important: If the camera archives that make up the spanned clip are not all available, you can
import each camera archive separately. Each portion of the spanned clip will be imported into
Final Cut Pro as a separate clip.
5 Choose how you want to organize the imported media in the Event Library:
•
To add the imported media to an existing event: Select “Add to existing event,” and choose the
event from the pop-up menu.
•
To create a new event: Select “Create new Event” and type a name (for example, “Chris and Kim
Wedding”) in the text eld; then choose the disk where you want to store the event from the
“Save to” pop-up menu.
To learn more about events, see Events and clips overview on page 50.
6 If you want to organize your media, transcode your media, analyze the video, or analyze the
audio, select the relevant checkboxes.
If you don’t set Final Cut Pro to analyze your media during the import process, you can analyze it
later (if necessary) in the Event Browser.
7 Click Import.
Final Cut Pro imports your media in the background. If you selected any options in the previous
step, Final Cut Pro transcodes and optimizes the les after the import process is complete. You
can view the progress of the background tasks in the Background Tasks window.
8 To begin working with your clips, close the Media Import window so you can access the
Event Browser.
Chapter 3 Importmedia 27
Import from iPhone, iPad, or iPod touch
Importing media from iPhone, iPad, or iPod touch is the same as importing it from a le-based
camcorder, camera, or device.
Import from iPhone, iPad, or iPod touch
1 Connect your iPhone, iPad, or iPod touch to your computer using the Dock Connector to USB
cable that came with it. (If another application opens, close it.) Then turn on your device and
unlock it.
2 In Final Cut Pro, do one of the following:
•
Choose File > Import > Media (or press Command-I).
•
Click the Import Media button on the left end of the toolbar.
The Media Import window appears.
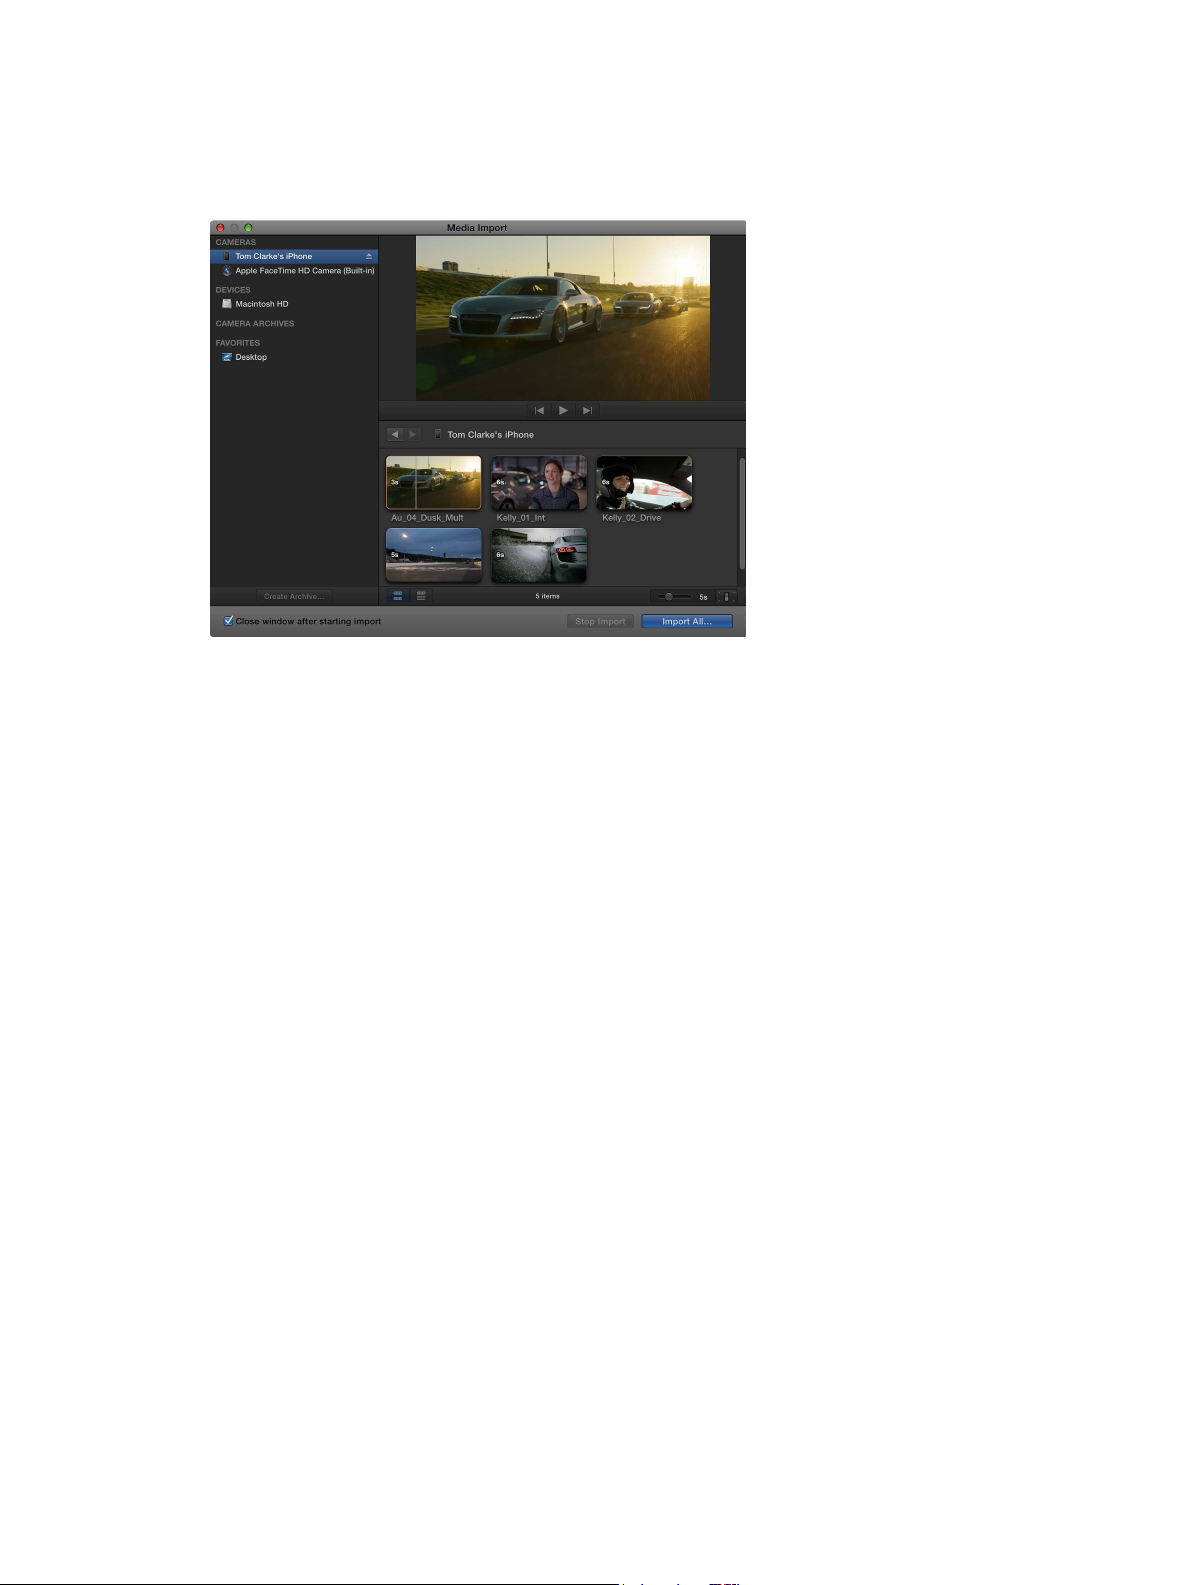
3 If necessary, select your iPhone, iPad, or iPod touch from the Cameras section on the left.
The Media Import window displays all the media on your device. In this window you can preview
the media by either playing it using the playback controls or skimming it by moving the pointer
forward or backward over a lmstrip.
You can also do any of the following:
•
To change which device to import from: Click the device in the Cameras section.
•
To change the way the clips appear: Click the Clip Appearance button in the bottom-right
corner of the Media Import window.
•
To switch between lmstrip view and list view: Click the List View and Filmstrip View buttons at the
bottom of the Media Import window. (Connected le-based cameras and camera archives only.)
Note: When you select a clip in list view, a lmstrip for the selected clip appears at the top
of the Event Browser. The lmstrip is fully interactive, allowing access to start and end points,
markers, and keywords.
•
To sort clips in list view by data such as duration, creation date, rating, keyword, and so on: Click
the column headings at the top of list view. For more information about list view, see Import
from a hard disk on page 34.
•
To add folders of frequently used media to the Favorites section: Drag them from list view.
To remove a folder from the Favorites section, Control-click the folder and choose Remove
from Sidebar in the shortcut menu.
Chapter 3 Importmedia 28
•
To automatically close the Media Import window when the import begins: Select the “Close
window after starting import” checkbox.
•
To add a folder to the list view by dragging: Drag the folder from the Finder to the list view and
browse its contents in list view.
4 Do one of the following:
•
To import all clips: Click Import All.
•
To import only some of the clips: Select each clip you want to import by Command-clicking each
clip, and click Import Selected (the Import button changes its name).
Tip: To select several clips located together, you can drag around the clips to enclose them
with the selection rectangle.
•
To import portions of clips: Drag inside the lmstrip to select the range that you want, and click
Import Selected. You can also select multiple ranges in each clip. For more information, see
Select a range on page 91.
Tip: You can also select a clip, press the Space bar to play the clip, and press either I to set a
start point or O to set an end point.

Chapter 3 Importmedia 29
5 In the window that appears, choose how you want to organize the imported media in the
Event Library:
•
To add the imported clips to an existing event: Select “Add to existing event,” and choose the
event from the pop-up menu.
•
To create a new event: Select “Create new Event” and type a name (for example, “Chris and Kim
Wedding”) in the text eld; then choose the disk where you want to store the event from the
“Save to” pop-up menu.
To learn more about events, see Events and clips overview on page 50.
6 If you want to create optimized or proxy media, analyze the video, or analyze the audio, select
the relevant checkboxes.
If you don’t set Final Cut Pro to analyze your media during the import process, you can analyze it
later (if necessary) in the Event Browser.
7 Click Import.
By default, the Media Import window closes when you click Import. You can begin working with
your clips in the Event Browser. Final Cut Pro imports your media in the background.
If you selected any options in the previous step, Final Cut Pro transcodes and optimizes the
les after the import process is complete. You can view the progress of the import and other
background tasks in the Background Tasks window.
8 When background tasks are completed, disconnect the iPhone, iPad, or iPod touch.
Import from a digital still camera
You can import video and still images from digital still cameras. The steps below describe how
to import video and still images directly into Final Cut Pro. You can also import your photos into
Aperture or iPhoto and access them through the Photos Browser in Final Cut Pro.
To check whether your camera is compatible with Final Cut Pro, go to the Final Cut Pro X
Supported Cameras webpage at http://help.apple.com/nalcutpro/cameras.
Import still-image clips and video clips from a digital still camera
1 Connect your camera to your computer using the cable that came with the camera, and turn
it on.
If your camera doesn’t appear on the left side of the Media Import window (either in the
Cameras or Devices section), remove the camera’s memory card and insert it into the card slot on
your Mac (if it has one) or into an external card reader.
2 In the Finder, locate the DCIM folder inside the camera folder, and then locate the still-image or
video les. The les may be in the DCIM folder, or in a folder one or two levels down. Devices and
le structures vary by model and manufacturer.
3 In Final Cut Pro, do one of the following:
•
Choose File > Import > Media (or press Command-I) and follow the instructions in Import
from a hard disk on page 34.
•
Drag the les from the Finder into an event or Timeline in Final Cut Pro. The les will be
imported using the import settings you congured in Import preferences. See Import from a
hard disk on page 34.
After import, you may have separate audio les that you want to use to replace the video’s audio
track. To do this, you can automatically synchronize the video and audio clips.
Chapter 3 Importmedia 30
Import from tape-based cameras
You can import media from a tape-based camcorder or tape-based device. To determine
which clips you want to import (rather than importing all of them), you can view them using
Final Cut Pro before you import them.
To check whether your camera is compatible with Final Cut Pro, go to the Final Cut Pro X
Supported Cameras webpage at http://help.apple.com/nalcutpro/cameras.
Import media from a tape-based camcorder or device
1 Connect the camcorder to your computer using the cable that came with it, and congure your
device for remote control over FireWire, if necessary.
Note: For best results when importing from a tape-based camcorder, it is recommended that you
import the video using the same camcorder that you used to record it.
2 Turn on the camcorder and set it to VTR or VCR mode. (This mode may have a dierent name on
your camera. For more information, see the documentation that came with your camcorder.)
3 In Final Cut Pro, do one of the following:
•
Choose File > Import > Media (or press Command-I).
•
Click the Import Media button on the left end of the toolbar.
The Media Import window appears.
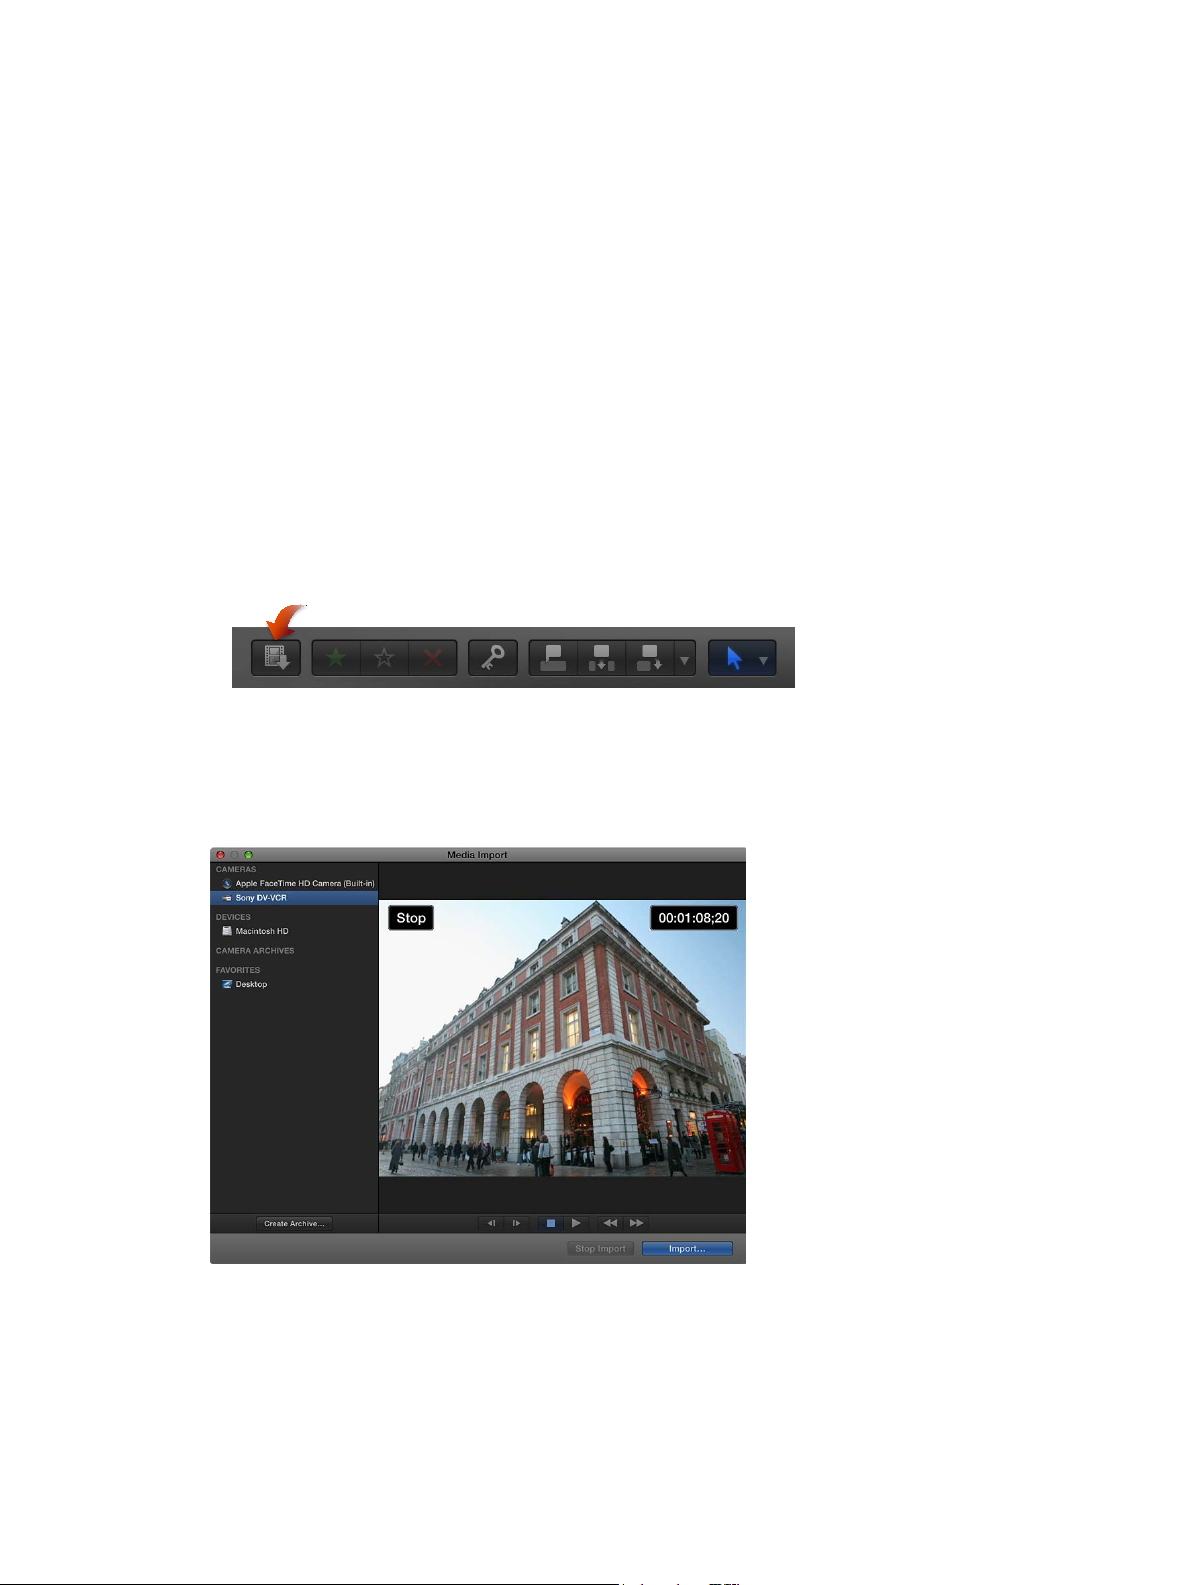
4 If you have multiple devices connected to your computer, choose the device you want to import
from in the list of cameras on the left.
The Media Import window displays the image from the current position of the tape.
5 Use the playback controls (or use the J, K, and L keys) to set your tape to the point where you
want to begin importing, and click Import.
 Loading...