


Apple
Color StyleWriter Pro
User’s Guide
K Apple Computer, Inc.
© 1994 Apple Computer, Inc. All rights reserved.
Under the copyright laws, this manual or the software may not be copied, in whole or in part, without the written consent of Apple, except in the normal use of the software or to make a backup copy of the software. The same proprietary and copyright notices must be affixed to any permitted copies as were affixed to the original. This exception does not allow copies to be made for others, whether or not sold, but all of the material purchased (with all backup copies) may be sold, given, or loaned to another person. Under the law, copying includes translating into another language or format.
You may use the software on any computer owned by you, but extra copies cannot be made for this purpose.
The Apple logo is a trademark of Apple Computer, Inc., registered in the U.S. and other countries. Use of the “keyboard” Apple logo (Option-Shift-K) for commercial purposes without the prior written consent of Apple may constitute trademark infringement and unfair competition in violation of federal and state laws.
Every effort has been made to ensure that the information in this manual is accurate. Apple is not responsible for printing or clerical errors.
© 1994 Apple Computer, Inc. 20525 Mariani Avenue Cupertino, CA 95014-6299 (408) 996-1010
Apple, the Apple logo, AppleTalk, LaserWriter, Macintosh, and StyleWriter are trademarks of Apple Computer, Inc., registered in the U.S. and other countries.
ColorShare, ColorSync, Finder, TrueType, and Zeal are trademarks of Apple Computer, Inc.
ITC Avant Garde, ITC Bookman, ITC Garamond, ITC Lubalin Graph, ITC Machine, ITC Zapf Chancery, and ITC Zapf Dingbats are registered trademarks of International Typeface Corporation.
Adobe, Adobe Illustrator, Adobe Photoshop, and PostScript are trademarks of Adobe Systems Incorporated, which may be registered in certain jurisdictions.
Oxford is a trademark of AlphaOmega Typography, Inc.
Lucida is a registered trademark of Bigelow & Holmes Inc.
Nadianne is a trademark of Miles, Inc.
Old English Text is a registered trademark, and Onyx and Swing are trademarks, of Monotype Corporation plc.
Exposure is a registered trademark of Preferred Publishers, Inc.
Helvetica, Palatino, and Times are registered trademarks of Linotype Company.
QMS is a registered trademark of QMS, Inc.
QuarkXPress is a registered trademark of Quark, Inc.
SuperPaint is a registered trademark of Aldus Corporation.
Tektronix is a registered trademark of Tektronix, Inc.
Simultaneously published in the United States and Canada.
Mention of third-party products is for informational purposes only and constitutes neither an endorsement nor a recommendation. Apple assumes no responsibility with regard to the performance or use of these products.

Contents
Communications regulation information vi
1 Setting Up Your Printer |
1 |
|
|
|
|
|
Main features of the Color StyleWriter Pro |
1 |
|
|
|||
Important safety instructions |
2 |
|
|
|
|
|
Unpacking the printer |
3 |
|
|
|
|
|
Installing the print head |
4 |
|
|
|
|
|
Installing the ink cartridges |
7 |
|
|
|
|
|
Connecting the printer to your Macintosh |
10 |
|
|
|||
Plugging in the printer |
11 |
|
|
|
|
|
Turning on the printer |
12 |
|
|
|
|
|
Loading paper into the sheet feeder |
13 |
|
|
|
||
Installing your printer software |
14 |
|
|
|
|
|
More information about the Installer program |
15 |
|
||||
Telling your computer to use the Color StyleWriter Pro |
16 |
|||||
Trying out the printer and aligning the print head |
16 |
|
||||
iii

2 Using Your Printer |
21 |
|
|
|
|
|
Getting help |
22 |
|
|
|
|
|
Loading the sheet feeder |
22 |
|
|
|
||
Defining the page setup |
|
24 |
|
|
|
|
Printing a document |
25 |
|
|
|
|
|
Adjusting color options |
|
26 |
|
|
|
|
Printing while you use your computer |
27 |
|
|
|||
Sharing your printer with other users on a network |
28 |
|||||
Printing on a shared Color StyleWriter Pro |
29 |
|
||||
3 Tips on Paper, Quality, Speed, and Cost |
31 |
|||
Choosing print materials |
31 |
|
||
Plain paper 31 |
|
|
||
Premium coated paper |
32 |
|
||
Glossy paper |
32 |
|
|
|
Back-print film |
32 |
|
|
|
Transparencies |
33 |
|
|
|
Quality |
33 |
|
|
|
Speed |
34 |
|
|
|
Cost |
34 |
|
|
|
4 Maintaining Your Printer |
35 |
|
||
Safety first |
35 |
|
|
|
Replacing ink cartridges |
|
35 |
|
|
When to change ink cartridges |
36 |
|||
How to change ink cartridges |
36 |
|||
Cleaning the print head |
|
38 |
|
|
Aligning the print head |
|
39 |
|
|
Replacing the print head |
|
40 |
|
|
Cleaning the exterior |
45 |
|
||
Cleaning the interior |
45 |
|
|
|
iv Contents

5 |
Troubleshooting |
47 |
|
|
|
|
|
Safety precautions |
48 |
|
|
|
|
|
The Chooser doesn’t show the Color StyleWriter Pro icon |
48 |
||||
|
The Macintosh doesn’t recognize the Color StyleWriter Pro |
49 |
||||
|
Text changes to the Geneva font or prints jagged 49 |
|
||||
|
Paper is jammed |
50 |
|
|
|
|
|
Paper or envelopes feed improperly |
50 |
|
|||
|
The Color StyleWriter Pro won’t print a particular document |
51 |
||||
|
The lights indicate a problem 52 |
|
|
|||
|
The printer acts as if it’s working but nothing is printed on the page 52 |
|||||
|
The printer seems slow |
53 |
|
|
||
|
Messages on your computer screen |
53 |
|
|||
|
Image problems |
54 |
|
|
|
|
|
Ink cartridges run out of ink too quickly 58 |
|
||||
Appendix A |
Technical Information |
59 |
|
|
||
Appendix B |
Font List |
63 |
|
|
|
|
Appendix C |
Packing and Moving the Printer |
65 |
|
|||
|
Index |
67 |
|
|
|
|
Contents v

Communications regulation information
FCC statement
This equipment has been tested and found to comply with the limits for a Class B digital device in accordance with the specifications in Part 15 of FCC rules. See instructions if interference to radio or television reception is suspected.
Radio and television interference
The equipment described in this manual generates, uses, and can radiate radio-frequency energy. If it is not installed and used properly—that is, in strict accordance with Apple’s instructions—it may cause interference with radio and television reception.
This equipment has been tested and found to comply with the limits for a Class B digital device in accordance with the specifications in Part 15 of FCC rules. These specifications are designed to provide reasonable protection against such interference in a residential installation. However, there is no guarantee that interference will not occur in a particular installation.
You can determine whether your computer system is causing interference by turning it off. If the interference stops, it was probably caused by the computer or one of the peripheral devices.
If your computer system does cause interference to radio or television reception, try to correct the interference by using one or more of the following measures:
mTurn the television or radio antenna until the interference stops.
mMove the computer to one side or the other of the television or radio.
mMove the computer farther away from the television or radio.
mPlug the computer into an outlet that is on a different circuit from the television or radio. (That is, make certain the computer and the television or radio are on circuits controlled by different circuit breakers or fuses.)
If necessary, consult an Apple-authorized service provider or Apple. See the service and support information that came with your Apple product. Or, consult an experienced radio/television technician for additional suggestions. You may find the following booklet helpful: Interference Handbook (stock number 004-000-00493-1). This booklet, prepared by the Federal Communications Commission, is available from the U.S. Government Printing Office, Washington, DC 20402.
IMPORTANT Changes or modifications to this product not authorized by Apple Computer, Inc., could void the FCC Certification and negate your authority to operate the product.
This product was tested for FCC compliance under conditions that included the use of Apple peripheral devices and Apple shielded cables and connectors between system components. It is important that you use Apple peripheral devices and shielded cables and connectors between system components to reduce the possibility of causing interference to radios, television sets, and other electronic devices. You can obtain Apple peripheral devices and the proper shielded cables and connectors through an Apple-authorized dealer. For non-Apple peripheral devices, contact the manufacturer or dealer for assistance.
vi Communications Regulation Information

DOC statement
DOC Class B Compliance This digital apparatus does not exceed the Class B limits for radio noise emissions from digital apparatus as set out in the interference-causing equipment standard entitled “Digital Apparatus,” ICES-003 of the Department of Communications.
Observation des normes—Classe B Cet appareil numérique respecte les limites de bruits radioélectriques applicables aux appareils numériques de Classe B prescrites dans la norme sur le matériel brouilleur: “Appareils Numériques,” NMB-003 édictée par le ministre des Communications.
VCCI statement
Communications Regulation Information |
vii |

1 Setting Up Your Printer
This chapter introduces the Color StyleWriter Pro printer and explains how to set it up. After you follow the instructions in this chapter, you’ll be ready to print.
Before you begin Make sure that your computer is already set up and that you know the basics of its operation.
Main features of the Color StyleWriter Pro
mHigh-quality color graphics and text are printed quietly on plain paper.
mAn energy conservation feature turns off most of the printer’s functions when they aren’t needed and turns them on when they are.
mThe automatic sheet feeder holds up to 100 sheets of paper or up to 15 envelopes.
mThe ink cartridges are easy to replace.
mColorShare software allows you to share the printer with anyone on your AppleTalk network.
mColorSync software ensures that the colors on your monitor and on your printer are the best they can be.
mOver 60 outline fonts print smoothly at almost any size.
1

Important safety instructions
Always take the following precautions:
nKeep the printer away from sources of liquids, such as wash basins, bathtubs, shower stalls, and so on.
nProtect the printer from dampness or wet weather, such as rain, snow, and so on.
nRead all the installation instructions carefully before you plug the printer into a wall socket.
nKeep these instructions handy for reference by you and others.
nFollow all instructions and warnings dealing with your system.
mDon’t use devices that produce open flames, such as Bunsen burners, near the printer.
mDon’t use alcohol-based or ammonia-based cleaners on or around the printer.
mClean the printer exterior with only a damp cloth and, if necessary, a mild soap or detergent. Be careful not to get liquid in the printer or the power cord receptacle.
mKeep the printer cover closed when printing.
mAlways turn off the printer before unplugging it.
mKeep the ink cartridges away from children.
Disconnect the power plug immediately if any of the following situations occur:
nthe power cord or plug becomes frayed or otherwise damaged
nyou spill something into the case
nthe printer is exposed to rain or any other excess moisture
nthe printer has been dropped or the case has been otherwise damaged
nyou suspect that your printer needs service or repair
nyou want to clean the case (use only the recommended procedure described in Chapter 4)
2 Chapter 1
WARNING Electrical equipment may be hazardous if misused. Operation of this product, or similar products, must always be supervised by an adult. Do not allow children access to the interior of any electrical product and do not permit them to handle any cables.
Unpacking the printer
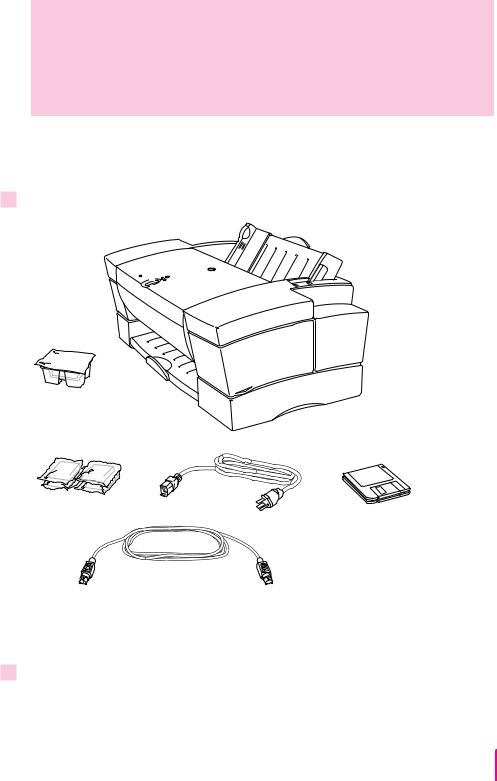
1 Remove everything from the shipping box, but leave the print head in its plastic tub.
Print head |
|
(Leave it in the |
|
plastic tub for now.) |
Color StyleWriter Pro printer |
Power cord
Ink cartridges
Software disks
Apple System/Peripheral-8 cable
Save the carton and the packing materials in case you ever need to ship the printer. (See Appendix C, “Packing and Moving the Printer.”)
2 Remove all the tape and packing material from the inside and outside of the printer.
Setting Up Your Printer |
3 |
3Close the printer’s cover.
4Choose a location for the printer.
Choose a place near your computer that has a grounded electrical outlet and good ventilation, is out of direct sunlight, never gets damp or very hot or very cold, and is away from devices that could cause electromagnetic interference, such as stereo speakers or cordless telephone transmitters. Do not place the printer on an angled surface. See Appendix A, “Technical Information,” for specific information about the physical requirements of your printer.
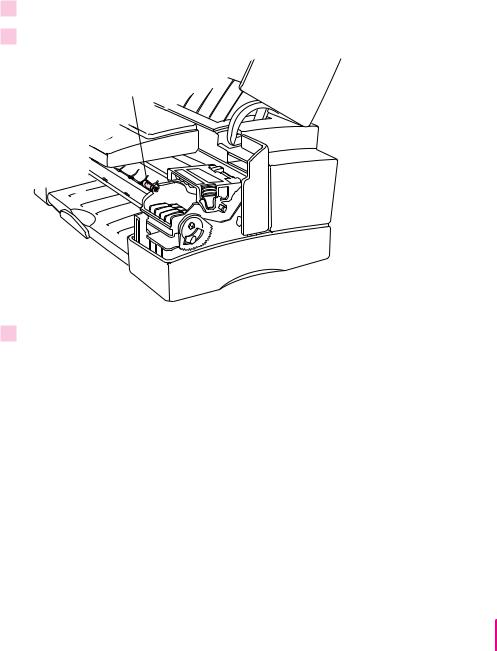
Installing the print head
The print head is the part of the printer that sprays the ink onto the paper. Treat it gently so you don’t damage its tiny nozzles.
WARNING The mechanism in the printer that holds the print head moves back and forth to spray ink on the page. Don’t slide this mechanism by hand or you may damage the printer.
1 Lift up the printer’s cover.
4 Chapter 1
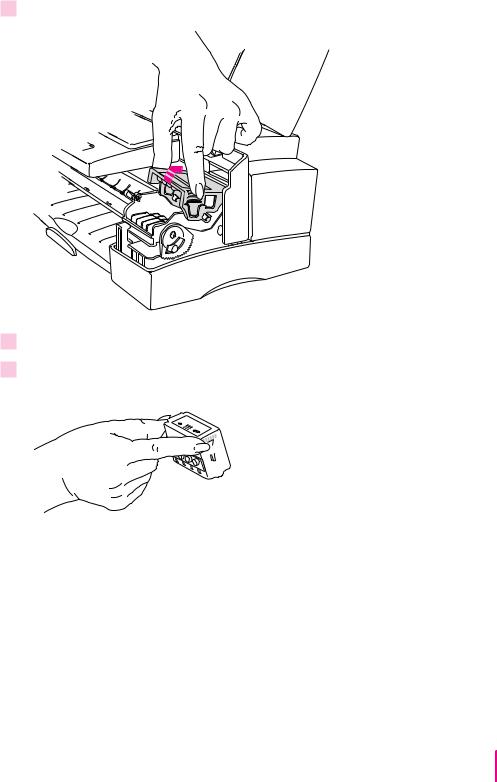
2 Open the print head lid (inside the printer) as shown.
Squeeze both sides and lift up.
3Remove the cover from the plastic tub that contains the print head.
4Pick up the print head as shown. You may safely touch the black plastic, but be careful not to touch any other
Setting Up Your Printer |
5 |
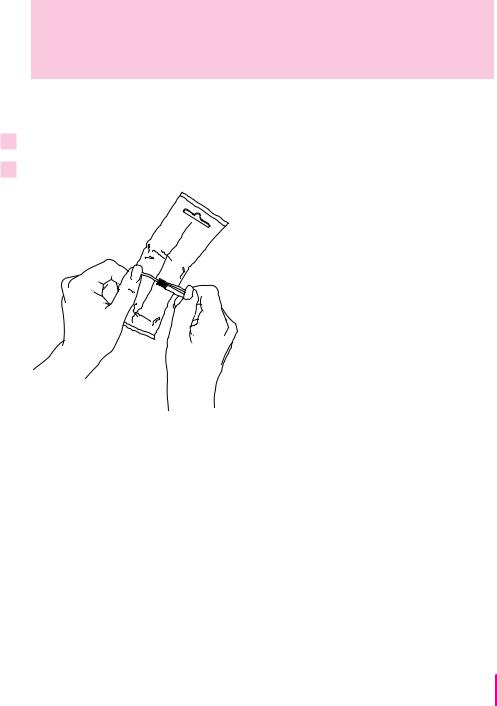
5 Peel the tape off the print head.
6 Angle the print head into the printer as shown.
The green metal plate is on top.
The four ink ports face the front of the printer.
7Close the print head lid by pressing on it firmly until you feel two or more clicks.
The lid should be completely horizontal.
To make sure you’ve closed the print head lid completely, try lifting it up. When it’s completely closed, you won’t be able to open the lid without squeezing its sides.
6 Chapter 1
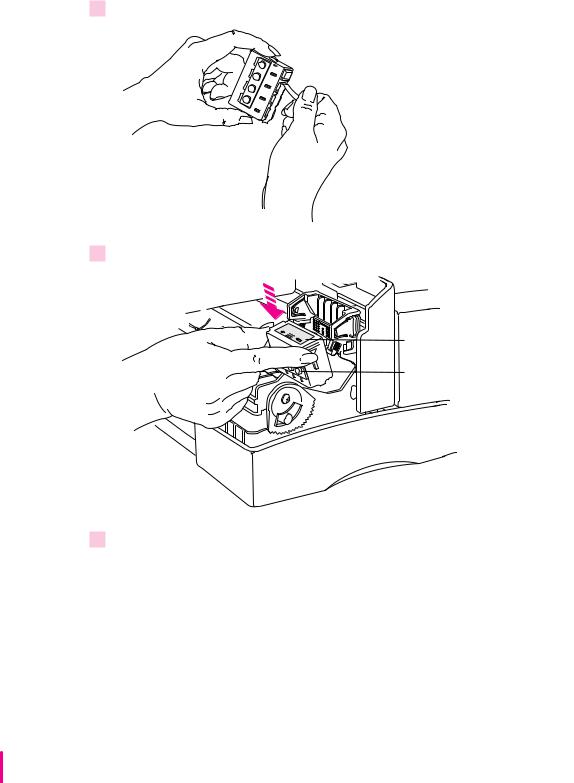
Installing the ink cartridges
The Color StyleWriter Pro uses four numbered and color-coded ink cartridges—black (#1), cyan (#2), magenta (#3), and yellow (#4).
WARNING Be careful to put each color in the appropriate slot on the print head carriage. If you mix up the colors, the printer won’t print as it should.
To install a cartridge, follow these steps:
1If the printer cover is closed, open it.
2Remove the top of the ink cartridge’s plastic bag by peeling off the tape in the middle.
Setting Up Your Printer |
7 |

3 Remove the ink cartridge from the bag by twisting and pulling it.
IMPORTANT Don’t touch the opening in the cartridge.
 Don’t let anything touch this opening.
The ink may cause stains, and any contaminates may harm the print quality.
8 Chapter 1

4Making sure that the number and the color on the cartridge match the number and the color on the slot, slide the cartridge in and push it down so it snaps into place.
The number on the cartridge
 should match the number on the slot.
5Repeat steps 2 through 4 for the other colors, until all four cartridges are in place.
6Check one last time to make sure you have installed all four cartridges and that each is in the right place, as shown in the illustration. Then close the printer cover.
Note: Never remove the cartridges for long periods, because the print head could be damaged if it is stored without the ink cartridges.
Setting Up Your Printer |
9 |
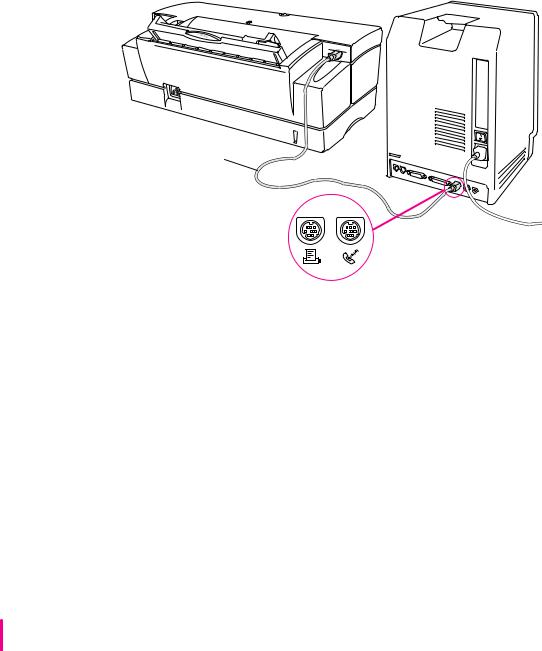
Connecting the printer to your Macintosh
Before you begin Turn off your computer.
IMPORTANT The cable must connect the printer directly to the computer. Use only the cable that comes with the printer. Replace the cable only with another Apple System/Peripheral-8 cable.
Plug one end of the included cable into the printer.
Both ends of the cable are the same.
Connect the cable to either
the printer port or the modem port, which are labeled with these icons.
If your computer is connected to a network, a network cable may already be connected to the printer port ([). If the printer port is unavailable, you can use the modem port (W).
10 Chapter 1
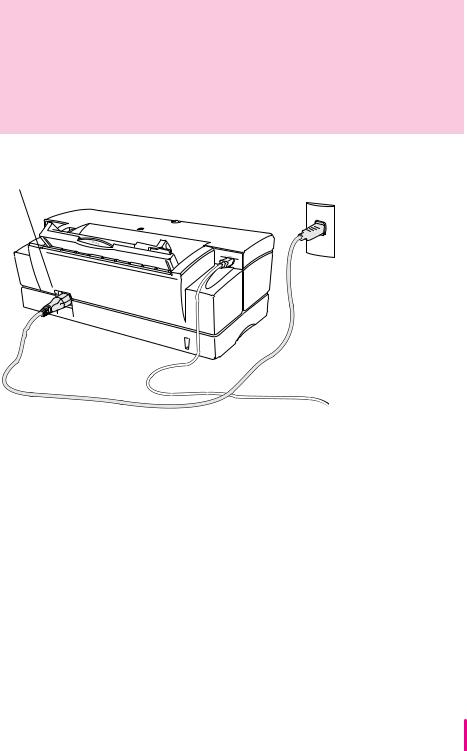
Plugging in the printer
WARNING The Color StyleWriter Pro is equipped with a three-wire grounding plug—a plug that has a third (grounding) pin. This plug fits only a grounded AC outlet. This is a safety feature. If you are unable to insert the plug into the outlet, contact a licensed electrician to replace the outlet with a properly grounded outlet. Do not defeat the purpose of the grounding plug!
First, insert the |
Then plug the power cord into a |
|
power cord here. |
||
grounded outlet or power strip. |
||
|
IMPORTANT The only way to disconnect power completely is to unplug the power cord. Make sure that at least one end of the power cord is within easy reach so that you can unplug the printer when you need to.
Setting Up Your Printer |
11 |

Turning on the printer
Although the printer turns itself on and off automatically to save power, you can also turn it on or off by pressing this button.
This light glows while the printer is on.
The first time you turn on the printer, it takes about seven minutes to prepare itself for printing. During this time the power light flashes.
IMPORTANT Don’t turn the printer off until it has finished preparing itself and the power light stops flashing. If the printer doesn’t finish preparing itself, it may not print properly in the future.
WARNING Never unplug the printer unless the power light indicates that the power is off. When you turn off the printer, or the printer turns itself off, it automatically moves the print head to the the right, where it caps the nozzles to keep the ink cartridges from drying out.
Note: Don’t turn the printer off by unplugging it (or if it’s plugged into a power strip, by turning off the power strip).
12 Chapter 1
Loading paper into the sheet feeder
The sheet feeder holds up to 100 sheets of 20-pound paper and feeds the paper automatically into the printer. You can load many sizes of paper and other media into the sheet feeder as described in Chapter 2, but to print a test sheet, as described later in this chapter, you must use U.S. letter or A4 paper. To load paper into the sheet feeder, follow these steps:
1Open the printer cover.
2Adjust the print head paper selector.
Make sure the paper selector  is next to the paper (∂) icon.
3 Close the printer cover.
Setting Up Your Printer |
13 |
4 Load a stack of U.S. Letter or A4 paper into the sheet feeder.
Slide this guide so it just touches the edge of the paper. If the stack of paper bows out even slightly, the guide is too tight.
Extend this paper support
Make sure the paper lines up evenly at this side of the feeder. Do not stack paper above this line ( ).
).
 Make sure the paper selector is next to the (∂) icon.
Pull here if you want to open the output tray.
Be sure to pull it out all the way.
Installing your printer software
The Color StyleWriter Pro comes with a number of disks that contain the printer software and a program called the Installer that copies the software onto your hard disk. Follow these steps to install the software.
Before you begin Lock all the disks by turning each one over and sliding the small, square plastic tab so you can see through the hole. (The disks may already be locked.) If you have virus protection software, turn it off.
1Insert the Color StyleWriter Pro Installation disk into a floppy disk drive.
The disk’s icon appears on the desktop, as shown in the next step.
2Double-click the disk icon to see what’s on the disk.
14 Chapter 1

3Double-click the Installer icon to start the Installer program.
After a moment, the Installer tells you what will be installed.
IMPORTANT The Installer checks whether you have the correct system software and enough memory to use this printer. If not, it displays a message telling you what you need. You won’t be able to install the software until you correct the problem. If the message says you don’t have the correct system software, you can purchase a new version from an Apple-authorized dealer.
4After you read the information on the screen, click OK.
5Click the Install button.
The Installer takes a few minutes to calculate what needs to be done and then begins to copy files.
6When the disk is ejected, follow the instructions on your screen.
The Installer ejects disks and asks you to insert others. Keep following the instructions on the screen until the installation is complete.
More information about the Installer program
The procedure described in the previous section copies all the software you need onto your hard disk. In rare circumstances, you may want to copy only a subset of the software. In that case, click the Customize button in the Installer to see a list of choices, then click a choice to see a description of it. To install something in the list, click to select it, then click the Install button.
Setting Up Your Printer |
15 |
 Loading...