


1 Setting Up Your Printer
This chapter introduces the Apple Color StyleWriter 1500 printer and explains how to set it up. After you follow the instructions in this chapter, you’ll be ready to print.
Before you begin: Make sure that your Macintosh computer is already set up and that you know the basics of its operation.
Important safety instructions
Always take the following precautions:
mKeep the printer cover closed when printing.
mAlways turn off the printer before unplugging it.
mKeep ink cartridges away from children.
nKeep the printer away from sources of liquids, such as wash basins, bathtubs, and shower stalls.
nProtect the printer from dampness or wet weather, such as rain and snow.
nRead all the installation instructions carefully before you plug the printer into a wall socket.
nKeep these instructions handy for reference by you and others.
nFollow all instructions and warnings dealing with your computer system.
mDon’t use devices that produce open flames, such as Bunsen burners, near the printer.
1

mDon’t use alcohol-based or ammonia-based cleaners on or around the printer.
mAlways unplug the printer before cleaning it. (Use only the cleaning procedure recommended in Chapter 4.)
mClean the outside of the printer with only a damp cloth and, if necessary, a mild soap or detergent. Be careful not to get liquid into the printer or the power cord receptacle.
IMPORTANT The only way to disconnect power completely is to unplug the power cord. Make sure at least one end of the power cord is within easy reach so that you can unplug the Color StyleWriter 1500 when you need to.
Watch for these situations, and if one occurs pull the plug!
nthe power cord or plug becomes frayed or otherwise damaged
nyou spill something into the printer
nthe printer is exposed to rain or any other excess moisture
nthe printer has been dropped or otherwise damaged
nyou suspect that your printer needs service or repair
nyou want to clean the printer (use only the procedure recommended in Chapter 4)
WARNING Electrical equipment may be hazardous if misused. Operation of this product, or similar products, must always be supervised by an adult. Do not allow children access to the interior of any electrical product and do not permit them to handle any cables.
2 Chapter 1
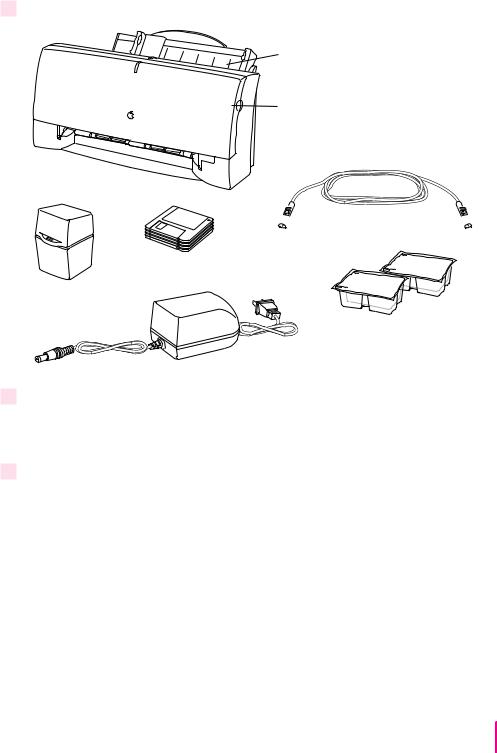
Unpacking the printer
1 Remove everything from the shipping box, but leave the ink cartridge in its package.
Color StyleWriter 1500
Software disks
Storage case
Power cord
Be sure to remove packing material from the sheet feeder.
Be sure to open the printer’s front cover and remove the packing tape from inside.

 Apple System/Peripheral-8 cable
Black and color ink cartridges (leave them in the plastic tubs for now)
2Remove the tape and packing material from the inside and outside of the printer.
Save the carton and the packing material in case you ever need to ship the printer. (See Appendix G, “Packing and Moving the Printer.”)
3Close the printer’s cover.
Setting Up Your Printer |
3 |

4Place the printer in your work area.
Choose a location near your computer that meets these requirements: m a level (not slanted) surface near a grounded electrical outlet
m good ventilation
m out of direct sunlight
m never gets damp or very hot or very cold
m away from devices that could cause electromagnetic interference, such as stereo speakers or cordless telephone transmitters
See Appendix A, “Technical Information,” for specific information about the physical requirements of your printer.
IMPORTANT Don’t accidentally discard the ink cartridge storage case. You need it to store an opened cartridge that you’re not using in the printer. The case keeps the print head from drying out and prevents accidents with ink stains.
Getting acquainted with the Color StyleWriter 1500
Now that the printer is unpacked, take a look at it to familiarize yourself with its parts.
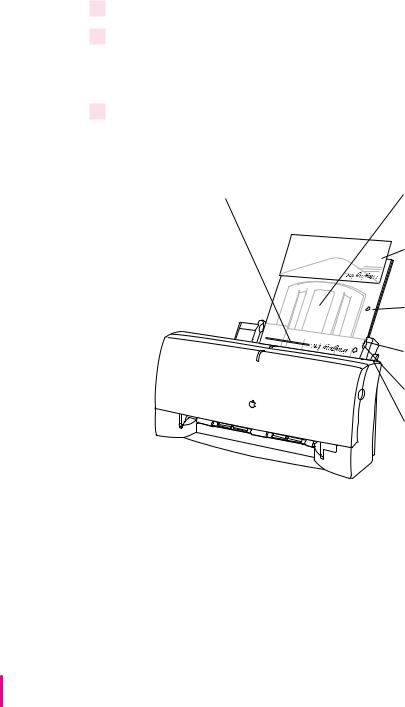
Front view
Power button |
Paper guide |
Paper support |
External paper selector
Power light
Front cover (opens to replace ink cartridge and to set internal paper selector)
4 Chapter 1

Back view
Serial port
Serial number
Power socket
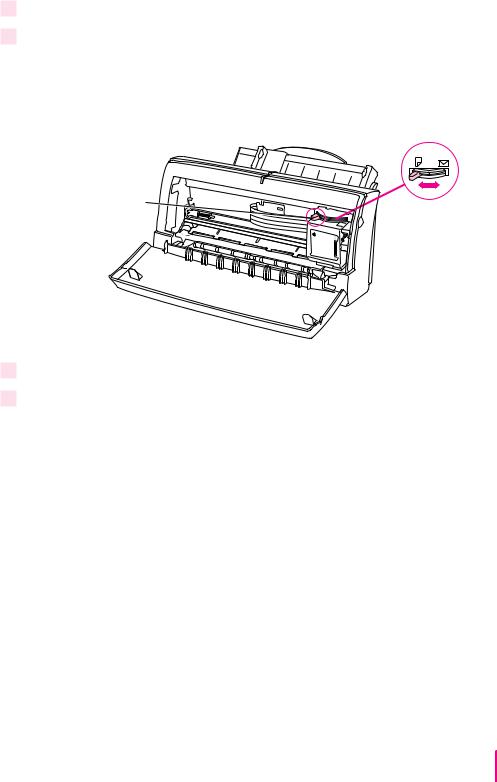
Inside
Internal paper selector
Carrier
Ink cartridge (which you will install later in this chapter)
Ink cartridge release lever
Power Macintosh users and Virtual Memory
If you are using a Power Macintosh computer, be sure to turn on Virtual Memory before you try to print on the Color StyleWriter 1500. Then choose a setting that’s at least 1 MB higher than your “Available built-in memory.” (You can set it higher without any ill effects.) With this setting, you will avoid some potential printing problems. Turning on Virtual Memory also reduces the amount of memory needed by many applications. For instructions on turning on Virtual Memory, see the documentation that came with your computer.
Setting Up Your Printer |
5 |
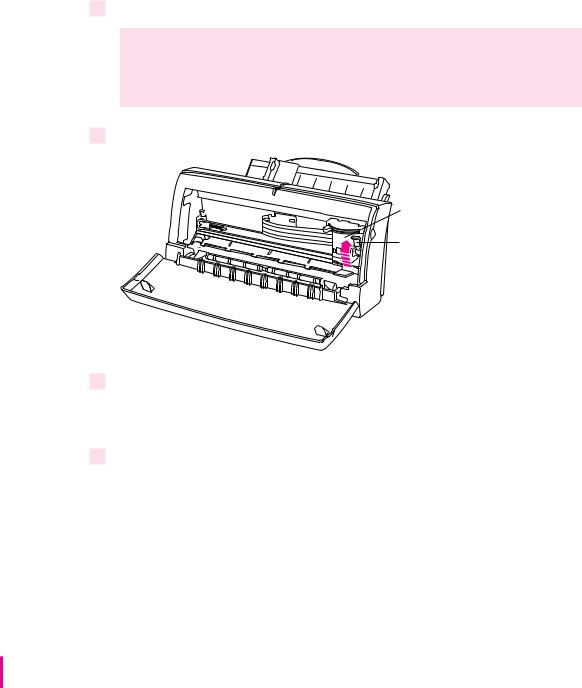
Installing the ink cartridge
The ink cartridge contains the print head, which sprays ink onto the paper. Treat it gently so you don’t damage its tiny nozzles (located under a bright orange cap).
1 Open the printer by pulling down its front cover.
WARNING The carrier holds the ink cartridge and moves it back and forth when you are printing a document. When the printer is plugged in, don’t slide the carrier by hand or you may damage the printer.
2 Raise the bright blue lever on the carrier.
Carrier
Blue lever
3Remove the cover from the plastic tub that contains an ink cartridge.
These instructions show the color cartridge being installed, but the process is the same for either cartridge.
4Remove the ink cartridge from the plastic tub, grasping the cartridge by its sides.
6 Chapter 1
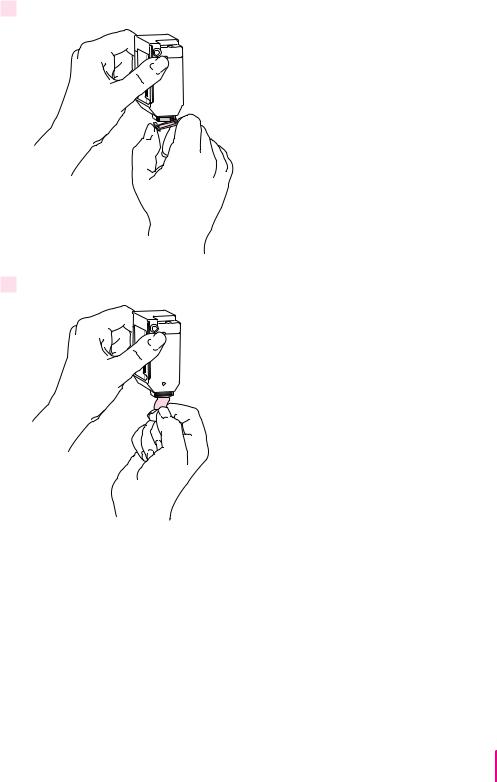
5 Remove the bright orange cap from the cartridge’s print head.
After you snap it off, dispose of the cap.
Be careful not to
touch the nozzles, which are 
 under the cap.
6 Peel the orange tape off the print head.
Setting Up Your Printer |
7 |

7Slide the ink cartridge into its place in the printer.
Don’t worry if the cartridge is tilted a little to the left for now.
Cartridge
Note: There are instructions inscribed inside the printer cover to remind you how to install either the color or black ink cartridge.
8Lower the blue lever to secure the ink cartridge in place.
As you lower the lever, the cartridge straightens.
9 Close the printer’s front cover.
8 Chapter 1
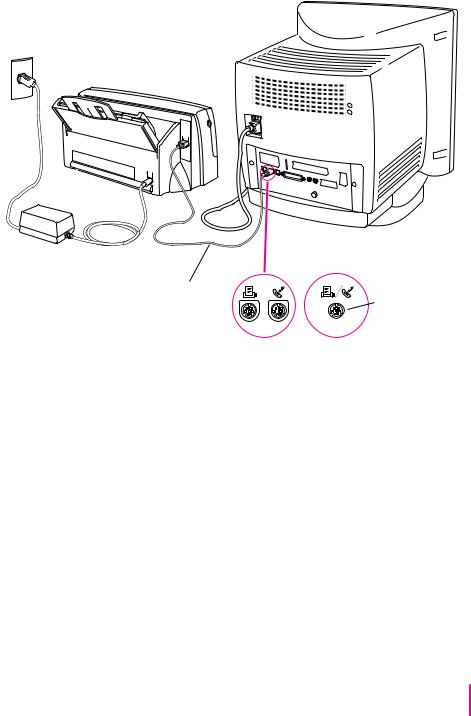
Connecting the printer to your Macintosh
IMPORTANT Be sure you are using a serial cable, not a LocalTalk cable.
Connect this cable to |
Some Macintosh |
either the printer port or |
computers have a |
the modem port, which are |
combined serial |
labeled with these icons. |
port with 2 icons. |
If your computer is connected to a network, a network cable may already be connected to the printer port ([). In that case, use the modem port (W).
If you have the optional EtherTalk Adapter, see “Connecting a Color
StyleWriter 1500 to an EtherTalk Network” in Chapter 2.
Remember which port you use. Later, you must tell the printer software where to look for the printer.
Some PowerBook computers that have an internal modem installed cannot tell that the printer is connected to the computer. You must change a setting in the PowerBook Setup or Express Modem control panel. For details, see “Special Information for PowerBook Owners” in the section “Telling Your Computer to Use the Color StyleWriter 1500,” later in this chapter.
Setting Up Your Printer |
9 |
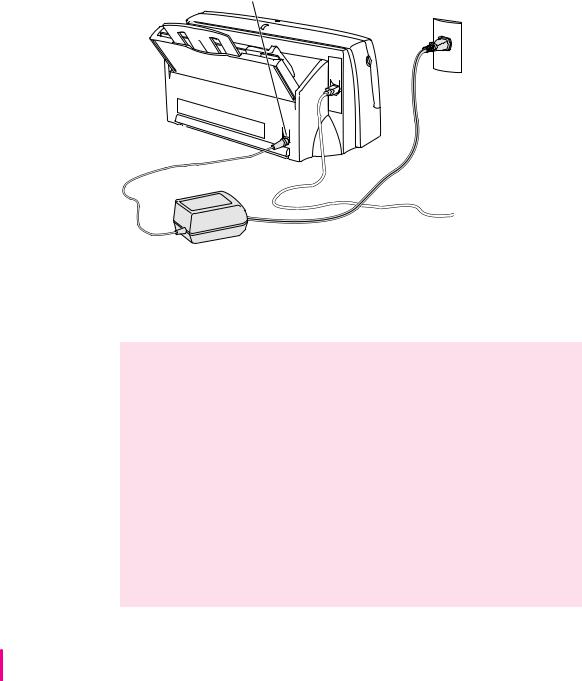
Plugging in the printer
Plug the connector end of the power adapter into the printer and then plug the other end of the adapter into an outlet.
First, insert the |
Then plug the power cord |
power cord here. |
into an outlet or power strip. |
IMPORTANT The only way to disconnect power completely is to unplug the power cord. Make sure that at least one end of the power cord is within easy reach so that you can unplug the printer in an emergency.
WARNING This Color StyleWriter is designed to work with the electrical system of the region in which you purchased it. It works with only one frequency of electricity, either 50 or 60 Hz. The label on the adapter you received with your printer indicates the frequency required.
The label on the adapter also indicates the voltage required. If you are using the printer in a region with a different voltage but the same frequency as that listed on the adapter, you must use a voltage converter to provide the voltage value indicated on the adapter label.
Serious damage to the printer will result from using the Color StyleWriter adapter with an improper electrical frequency or improper voltage converter. Damage resulting from such misuse of the printer is not covered under warranty.
10 Chapter 1
Turning the printer on and off
To turn the printer on (and off), press this button.
This light glows while
 the printer is on.
The first time you turn on the printer, you can hear the printer preparing itself for 15–20 seconds.
Saving energy
To save power, the printer turns itself off after sitting unused for about 5 minutes. As long as you leave it plugged into an active power outlet, the printer turns itself on automatically when you print something.
WARNING Except in an emergency, make sure the printer is turned off before you unplug it. (When the power light is off, the power is off.) If the printer is plugged into a power strip, never turn off the power strip unless you’ve already turned the printer off.
Each time you turn off the printer, or the printer turns itself off, it automatically moves the ink cartridge to the right, where it caps the nozzles to keep the ink cartridges from drying out. If you unplug the printer or discontinue power before turning it off, the printer can’t position the cartridge in the capped position, the print head may dry out, and you’ll have to replace the cartridge.
Setting Up Your Printer |
11 |
Loading paper into the sheet feeder
The sheet feeder holds up to 100 sheets of 20-pound paper and feeds the paper automatically into the printer. You can load many sizes of paper and other materials into the sheet feeder as described in Chapter 2, but to do a nozzle check, as described in the next section, you must use U.S. letter-size or A4 paper. To load paper into the sheet feeder, follow these steps:
1Open the printer cover.
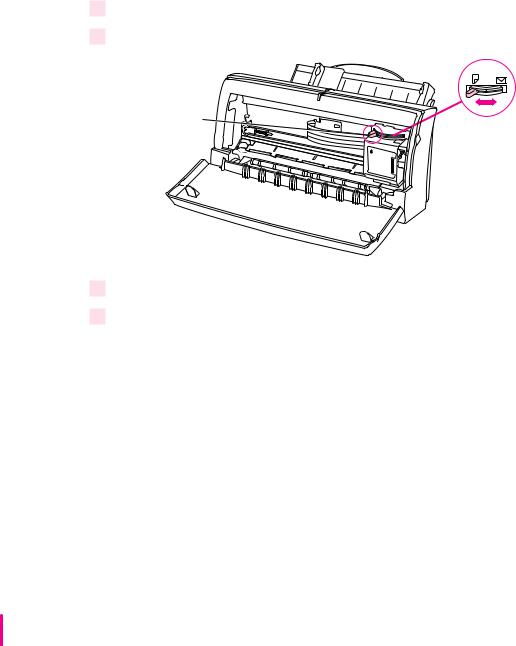
2Adjust the internal paper selector.
For now, make sure the selector is in the left-hand position.
Internal paper selector
3Close the printer cover.
4Adjust the external paper selector, as shown in the next step.
Always adjust the external paper selector lever before loading the paper.
12 Chapter 1
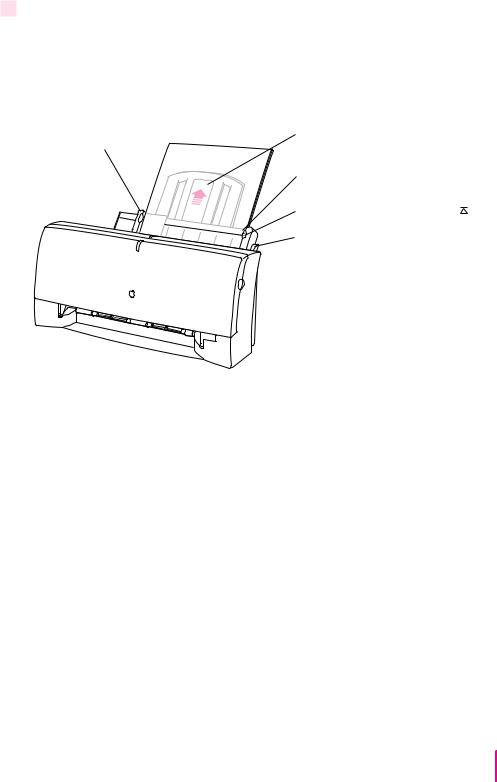
5Load a stack of U.S. letter-size or A4 paper into the sheet feeder.
Instructions for loading paper correctly appear on the paper support. Information on the back of the paper tray shows you where to set the guide for different paper sizes.
Slide this guide so it just touches |
Extend this paper support. |
the edge of the paper. If the |
Make sure the paper extends |
stack of paper bows out |
above the support (and doesn’t |
even slightly, the guide |
slide down inside the printer). |
is too tight. |
Make sure the paper lines up evenly |
|
|
|
at this side of the feeder. |
|
Do not stack paper above this line ( ). |
|
Before loading the paper, |
|
make sure the external paper selector |
|
is next to the « icon. |
Setting Up Your Printer |
13 |

Installing your printer software
The disks that come with the Color StyleWriter 1500 contain the printer software and an Installer program that copies the software onto your hard disk. You need the printer software to use the printer. Before you can print your documents, you need to install the printer software on your Macintosh.
The Installer program installs the new printing software you need, plus any fonts that come with the printer (see Appendix C for a list of available fonts). If you use Apple’s QuickDraw GX software, it will also install new QuickDraw GX software for the Color StyleWriter 1500.
Note: If you ever upgrade your system software (for example, from System 7.1 to System 7.5), you must reinstall the Color StyleWriter 1500 software.
Step-by-step installation instructions
These instructions tell you how to restart your computer with the extensions turned off (which prevents incompatible software from interfering with the installation) and how to use the Installer program.
Before you begin: Lock all the disks by turning each one over and sliding the small, square plastic tab in the corner so you can see through the hole. (The disks may already be locked.)
1Quit any programs you are running.
2While holding down the Shift key on the keyboard, choose Restart from the Special menu. Don’t release the Shift key until you see the “Extensions off” message on your screen.
3After you see the Macintosh desktop, insert Color StyleWriter 1500 Disk 1 into a floppy disk drive.
4To start the Installer program, double-click its icon.
You may have to open the disk icon to see the Installer icon.
14 Chapter 1

5In the Welcome dialog box that appears, click Continue.
IMPORTANT The Installer determines whether you have the correct system software, and enough memory and hard disk space to use this printer. If you do not, the Installer displays a message telling you what you need. You won’t be able to install the printer software until you correct the system software or memory problem. If the message reports a problem, you can purchase new system software or memory from an Apple-authorized dealer, or free up space on your hard disk by throwing away files you don’t need.
6In the Installer dialog box, click Install.
Make sure the disk named here is the one on which you want to install the Color StyleWriter
1500 software. (If not, click Switch Disk.)
When you’re ready to begin, click Install.
After a few moments, the Installer begins to install the printer software. A status box keeps you informed of progress during installation.
7When you see a message on your screen, follow the directions and insert the next disk.
The Installer ejects disks and asks you to insert others. Keep following the instructions on the screen until the installation is complete.
Setting Up Your Printer |
15 |

8 When you see a message reporting that installation was successful, click Restart.
The Installer restarts your Macintosh. After you restart, you may notice a new icon on your desktop, one that represents a printer. It’s called a desktop printer, and it looks like this. For information about desktop printers, see “Desktop Printing” (in the section “Printing a Document”) and “Monitoring and Controlling Background Printing” in Chapter 2.
Examples of desktop printer icons
(a bold outline indicates the selected printer)
If this is your first printer, you won’t see a desktop printer icon yet.
9After the computer restarts, you must select the printer in the Chooser, as described in the next major section, “Telling Your Computer to Use the Color StyleWriter 1500.”
Installation troubleshooting
If the Installer can’t complete the installation, it will issue a warning message. Here are some ways to fix common problems.
mYou may not have the correct hardware or system software for this printer. If so, the Installer will tell you what you’re missing.
mYou may have forgotten to turn off your software extensions as described in the previous section.
mYou may have some corrupted fonts on your hard disk. To solve or work around this problem, see “Installation is Unsuccessful” in Chapter 5.
More information about the Installer program
In the procedure just described, the Installer copies all the software you need to your hard disk. In rare circumstances, you may want to copy only a subset of the software. In that case, choose Custom Install from the pop-up menu in the Installer. A list of choices appears. Select the items you wish to install, then click the Install button. (Click the letter i to the right of any of the choices for information.)
16 Chapter 1

Telling your computer to use the Color StyleWriter 1500
Before using your printer, you must select it in the Chooser.
1Select Chooser from the Apple (K) menu.
2In the Chooser dialog box, click the appropriate items to select them.
On most Macintosh computers, the Chooser looks like this:
First, click this icon. (If you don’t see the icon, use the scroll bar and arrows to find it.)
If your computer is connected to a network, the Chooser may look different, but you can still follow these steps.
Then click one of these items to indicate which port you connected the printer to: the printer port ([) or the modem port (W).
If no port is available and your computer is a PowerBook, see the next
section, “Special Information for PowerBook Owners.”
(If your chooser has a Create button here, you are using QuickDraw GX. See Appendix E.)
3Close the Chooser by clicking its close box (in the top-left corner).
4Notice the new desktop printer icon for the Color StyleWriter 1500.
After you close the Chooser, a desktop printer icon for the Color StyleWriter 1500 appears on the desktop.
This icon cannot be moved off the desktop (unless you throw it away); however, you can move it anywhere on the desktop that you like.
Setting Up Your Printer |
17 |

Special information for PowerBook owners
PowerBook computers that have internal modems may require special setups. What you do depends on whether the Powerbook has one or two serial ports on its back panel.
PowerBook computers with one serial port
Some PowerBook computers have a single serial port identified by a combination printer/modem icon ([/W). If an internal modem is installed on one of these PowerBook computers, the serial port may be in use even though it looks available. When you plug in the Color StyleWriter 1500, the PowerBook may not be able to communicate with the printer.
To make the port available for printing, make sure the serial port setting is Normal or External. To check the setting, open the PowerBook, PowerBook Setup, or Express Modem control panel. (If you have another kind of internal modem, you may have a different control panel. The control panel and the setting you use depend on which PowerBook you have and which internal modem you have.) If you have a PowerBook Express Modem, it is best to leave the serial port setting as Normal or External unless the modem programs you use require another setting for compatibility reasons.
PowerBook computers with two serial ports
Even when a PowerBook has two serial ports, if it also has an internal modem, the modem port (W) may look available but actually be in use. If the printer port ([) is available, connect the Color StyleWriter 1500 to it. If the printer port is unavailable and you must use the modem port, make sure the modem serial port setting is Normal or External. To check the setting, open the PowerBook, PowerBook Setup, or Express Modem control panel. (If you have another kind of internal modem, you may have a different control panel. The control panel and the setting you use depend on which modem and system software version you have.) If you have a PowerBook Express Modem, it is best to leave the serial port setting as Normal or External.
For more information, see the instructions that came with your PowerBook.
18 Chapter 1

Printing a document to make sure everything’s working
The best way to see if your printer is set up correctly is to try printing something. The following steps describe how to print the Color StyleWriter 1500–Troubleshooting file that was installed on your hard disk, but you can print any document you want.
Before you begin: Return to the Finder by quitting any programs you’re running.
1Find the Color StyleWriter 1500–Troubleshooting file.
Unless you moved it, you can find the file by double-clicking your hard disk icon.
2Open the file by double-clicking its icon.
3Choose the Page Setup command from the File menu.
A dialog box opens.
4Indicate what paper size you’re using.
Then click OK.
First, use this popup menu to indicate the size of the paper loaded in the printer.
You don’t need to choose the Page Setup command every time you print—you only need to use it when you want to change the normal settings. Look at the dialog box on your screen to note what the normal settings are. For information about the options in this dialog box, see “Printing a Document” and “Creating Special Effects on the Color StyleWriter 1500” in Chapter 2.
Setting Up Your Printer |
19 |

5Choose the Print command from the File menu.
6In the dialog box that appears, click the Print button.
For information about all the choices you can make in the Print dialog box, see “Printing a Document” and “Creating Special Effects on the Color StyleWriter 1500” in Chapter 2.
Click here.
After a few moments, the printer begins printing the page or pages. If there’s a problem, see Chapter 5 for suggestions. (The most common problem is failing to follow the instructions in “Telling Your Computer to Use the Color StyleWriter 1500,” earlier in this chapter.)
7 Choose Quit from the File menu to leave the Color SW 1500–Troubleshooting file.
20 Chapter 1
Checking the print nozzles
The Color StyleWriter 1500 prints by spraying ink onto the paper through tiny nozzles. Sometimes these small nozzles get clogged after sitting unused for a long time. To make sure all the nozzles are working, follow these steps.
1If necessary, turn off the printer.
The green power light should be off.
2Press and hold down the power button for about 5 seconds.
Press the power button.
3 Release the button and wait for the test page to print.
Setting Up Your Printer |
21 |
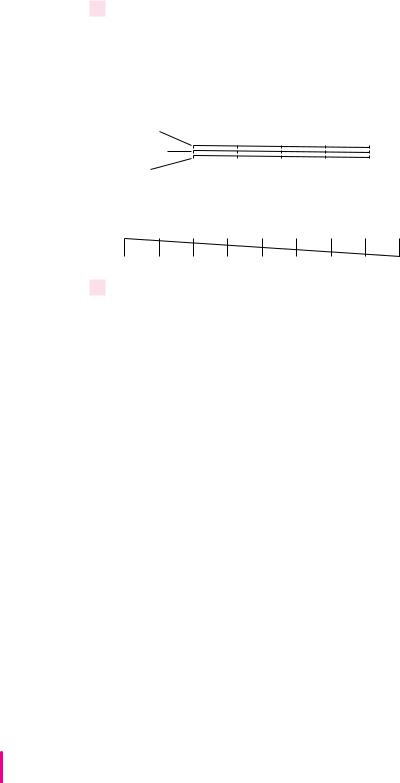
4Examine the nozzle test pattern for broken or missing diagonal lines.
The nozzle test pattern appears near the bottom of the test page. The test pattern for the color ink cartridge looks like this:
A broken line means a nozzle on |
A missing color means you |
the print head needs to be cleaned. |
need to replace the ink cartridge. |
Yellow |
|
Magenta |
|
Cyan |
|
The test pattern for the black ink cartridge looks like this:
5If you see a broken line, one or more nozzles may be clogged. See the section “Cleaning the Print Head” in Chapter 5.
What’s next?
You’re now ready to start using your printer.
mIf you want to share the printer with others on your network, see “Using ColorShare to Share Your Printer With Other Users” and “Printing on a Shared Color StyleWriter 1500” in Chapter 2. If you purchased the optional EtherTalk Adapter for this printer, see “Connecting a Color StyleWriter 1500 to an EtherTalk Network” in Chapter 2.
mIf you have installed QuickDraw GX and turned it on, see Appendix E.
22 Chapter 1

2 Printing
This chapter explains how to use the Color StyleWriter 1500 for everyday tasks. Before you follow the instructions in this chapter, make sure the printer is set up and working, as described in Chapter 1.
Note: If you use QuickDraw GX, not all of the instructions in this chapter will apply to your software. See Appendix E for more information.
Planning documents with the Color StyleWriter 1500 in mind
Many printer options affect how much can fit on a page. Before you spend a lot of time laying out a document, set it up as you plan to print it:
1Select the printer you plan to use.
See “Switching Between Printers,” later in this chapter.
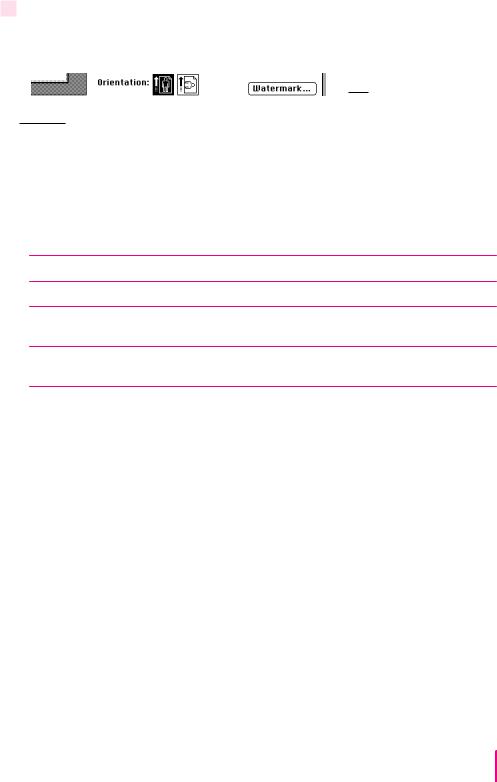
2With the document active on your computer screen, choose Page Setup from the File menu and select the options you like.
The key areas that affect page layout are paper size, orientation, and scaling percentage. When you’re finished setting your options, click the OK button to return to your document. You can now format it as you like. Since you’ve already set your printing options, the document will print as you see it on your screen.
23
Loading the sheet feeder
The sheet feeder holds paper, envelopes, or other materials and feeds them automatically into the printer. To load the sheet feeder, follow these steps:
1Remove any paper or other materials that you don’t want to use.
2Adjust the external paper selector, as shown in the next step.
It’s important to adjust the selector before loading the new material into the sheet feeder.
3Load the paper or other materials.
IMPORTANT Don’t mix envelopes with paper in the feeder.
Insert letterhead paper face up with the top of the page pointing downward.
Slide this guide so it just touches the edge of the paper.
If the stack of paper bows out even slightly,
the guide is too tight.
Extend this paper support. Make sure the paper extends above the support (and doesn’t slide down inside the printer).
Insert envelopes this way. (Make sure the flap is smoothed flat.)
Insert three-hole punched paper so that the holes line up along this side.
Make sure the paper lines up evenly at this side of the feeder.
Don’t stack paper above this line ( ).
).
Before inserting the material,
move the paper selector lever to the envelope icon (E) for envelopes and to the paper icon («) for everything else.
24 Chapter 2
4Open the printer’s front cover.
5Adjust the internal paper selector and extend the output tray.
The selector has two positions (one for paper, the other for envelopes). In the paper («) position (to the left), the lever lowers the ink cartridge, bringing it closer for thin materials; in the envelope (E) position (to the right), the lever raises the cartridge to leave room for thick materials.
For paper, start with the selector in the left position. For envelopes, move the selector to the right.
Internal paper selector
6Close the printer cover.
7Before you print, make sure that you set the software options to indicate the size and kind of material you’re using.
m In the Page Setup dialog box, indicate the size of the page. m In the Print dialog box, indicate the paper type.
Printing 25

Here are details about the kinds of material you can use in the Color StyleWriter 1500 printer.
Print material |
Maximum |
Special instructions |
|
Plain paper |
100 sheets |
m |
Use 16to 24-pound paper. |
Premium coated paper |
50 sheets |
m |
Use only paper designed for StyleWriter printers. |
|
|
m |
The whiter side should face you. |
Glossy paper |
20 sheets |
m |
Use only paper designed for StyleWriter printers. |
|
|
m |
To prevent misfeeds, put one sheet of plain paper at |
|
|
m |
the back of the stack. |
|
|
The shinier side should face you. |
|
Transparencies |
20 |
m |
Use only transparencies designed for StyleWriter |
|
|
m |
printers. |
|
|
The shiny side should face you. |
|
|
|
m |
The edge where the paper and transparency are |
|
|
|
joined should point downward. |
Back-print film |
20 sheets |
m |
Use only film designed for StyleWriter printers. |
|
|
m |
To prevent misfeeds, put one sheet of plain paper |
|
|
m |
at the back of the stack. |
|
|
The chalky side should face you. |
|
Envelopes |
15 |
m |
Make sure the envelope flap is smoothed flat. |
Labels |
20 sheets |
m |
To prevent misfeeds, put one sheet of plain paper |
|
|
m |
at the back of the stack. |
|
|
The labels should face you. |
|
|
|
m In the Print dialog box, specify Plain as the paper |
|
type.
The Color StyleWriter 1500 supports only the following sizes of materials: U.S. Letter, U.S. Legal, A4 Letter, Executive, #6 envelopes, and #10 envelopes. Don’t attempt to use other size materials, or printing errors may result.
For more information about the kinds of material you can use with the Color StyleWriter 1500, see Chapter 3, “Tips on Paper, Quality, Speed, and Cost.”
26 Chapter 2

Notes about envelopes
See the instructions that came with the programs you use to see if they offer special, easy ways to format and print envelopes. If not, choose the envelope size you’re using in the Page Setup dialog box and format the envelope text as you like.
Printing a document
The next three sections explain the different ways you can print a document:
mQuick instructions for printing standard documents. To print documents that don’t require any special options, see this section. (The section describes what a “standard document” is.)
mDetailed instructions for printing other documents. To print documents that require any of the non-standard options, see this section.
mDesktop printing. To print documents without leaving the Finder desktop, see this section. Desktop printing allows you to quickly send multiple documents to multiple printers.
Quick instructions for printing standard documents
Follow the instructions in this section to print a standard document:
mstandard paper size (8.5" by 11" in the United States)
mplain paper
mportrait page orientation (so when you look at the printed page, it is longer than it is wide)
mno special effects and normal print quality
Assuming you already selected the printer in the Chooser as described in Chapter 1, and that the printer is filled with standard paper, you need only follow these steps:
1While the document is in an active window, choose the Print command from the File menu.
The Print dialog box opens on your screen.
Printing 27

2Click the Print button.
After a few moments, the document starts to print. If the printer is off, it automatically turns itself on. If background printing is turned on, you can continue working while the document is printing. You can also monitor and control the documents that are waiting to print. (See “Printing While You Use Your Computer” and “Monitoring and Controlling Background Printing,” later in this chapter.)
Detailed instructions for printing other documents
If your document is not standard (as defined in the previous section), follow these steps:
1If you haven’t already selected the Color StyleWriter 1500 in the Chooser, do so now.
You already selected the Color StyleWriter 1500 in Chapter 1, and if it’s the only printer you ever use, you won’t need to do it again. If you do need to switch, see “Switching Between Printers,” later in this chapter.
2Load the paper, envelopes, or other materials into the printer, as described in “Loading the Sheet Feeder,” earlier in this chapter.
Remember to adjust the external paper selector before filling the sheet feeder.
28 Chapter 2
3While the document is active on your screen, choose Page Setup from the File menu and make adjustments in the dialog box that opens.
If the default settings shown here are satisfactory, you can skip this step.
Set the options, then click OK.
Look here to see the effects of the options you choose.
Item in dialog box |
What you use it for |
Page Size |
Indicate size of paper in the sheet feeder. |
Layout |
Print 2 or 4 mini pages per sheet of paper. |
Borders |
Put a border around the mini pages. |
Scaling |
Enlarge or reduce the printed image. Type a number between 5 and |
|
999 or choose a number from the pop-up menu. |
Orientation |
Indicate whether the printed page should be longer than wide |
|
or vice versa. |
Watermark |
Specify a background image to be printed on every page. |
|
|
|
|
For more information about the layout, borders, scaling, and watermark features, see “Creating Special Effects on the Color StyleWriter 1500,” later in this chapter.
IMPORTANT Make sure you correctly indicate the size of the paper, envelopes, or other material you installed in the sheet feeder. Additionally, if you change the page size, scaling, or orientation in this dialog box, you might want to look over your document to see if any of the page breaks have changed.
Printing 29
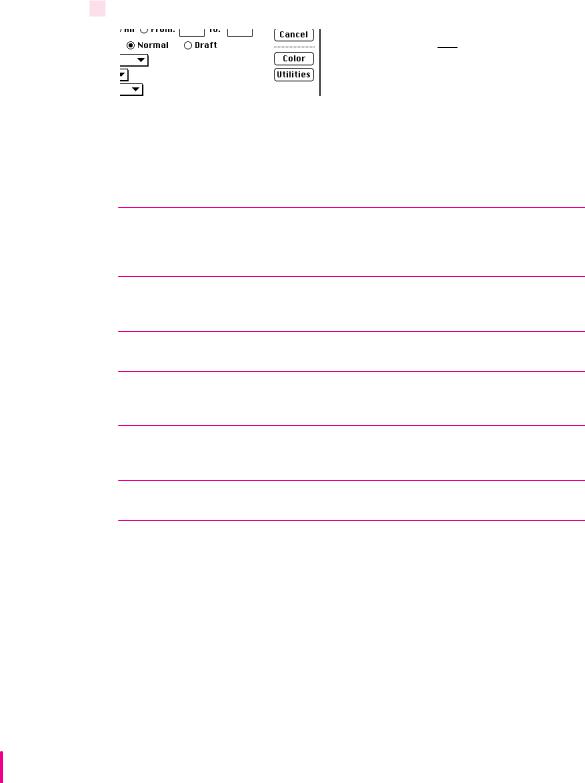
4 Choose Print from the File menu and make adjustments in the dialog box that opens.
Set the options, then click Print.
Item in dialog box |
What you use it for |
Copies |
Type how many copies of the document you want. |
Pages |
Indicate how many pages of the document to print. To print the whole |
|
document, click All. To print a range of pages, type the beginning and end |
|
page numbers. As a shortcut, you can indicate the first page by leaving the |
|
“From” box blank or the last page by leaving the “To” box blank. |
Print Quality |
Select which level of quality you want. Generally, the higher the quality, the |
|
longer the document will take to print. If you use any paper type other than |
|
Plain, the Best option is the only one available. |
Paper Type |
Indicate what type of material is loaded in the sheet feeder by selecting a |
|
choice from the pop-up menu. For labels and envelopes, choose Plain. |
Image |
Indicate whether you want the document to print: in color, grays, or |
|
black and white. (For black and white or grayscale printing, use the |
|
black ink cartridge.) |
Notification |
Choose how (if at all) to be notified when the document is finished printing. |
|
For a visual alert, choose Message from the pop-up menu. For an audio |
|
alert, choose a sound. |
Color |
Open another dialog box, in which you can adjust color options, as |
|
explained in “Adjusting Color Options,” later in this chapter. |
Utilities |
Open another dialog box, in which you can set options to clean the |
|
print head. |
|
|
|
|
IMPORTANT Make sure the Paper Type pop-up menu accurately indicates what you installed in the sheet feeder.
30 Chapter 2
 Loading...