


iBook
User’s Guide • 


 • Manuel de l’utilisateur • Benutzerhandbuch Manual del usuario • Manuale Utente • Guia do Usuário • Gebruikershandleiding • Handbok
Brukerhåndbok • Brugerhåndbog • Käsikirja • 


 •
• 
 •
• 


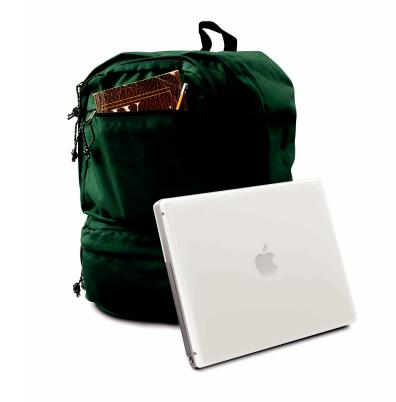
To get started using your iBook, plug in the power adapter and connect a phone cord from a wall jack to the modem port. Then press the power button and follow the onscreen guide to connect to the Internet. Read on to learn more about using your iBook:
2 Your iBook at a glance
4 Mac OS X basics
8 What you can do with your iBook
10 Listen to music on your computer or on the go 12 Make your own movie or watch a movie on DVD 14 Search the Internet
16 Get more out of the Internet
18 Send and receive email
20 Organize, plan, and create
22 Keep your iBook’s software up-to-date 24 Learn more and solve problems
30 Install memory and an AirPort Card
34 Work more comfortably
36 Safety and cleaning
1
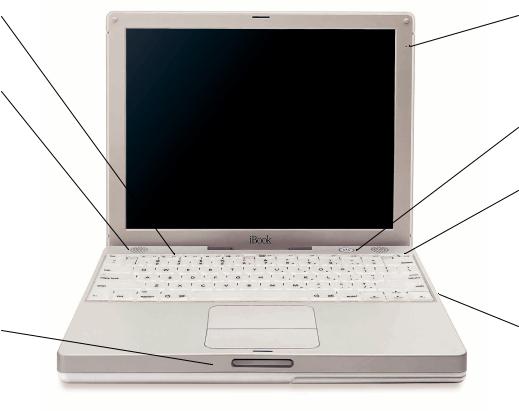
Your iBook at a glance
Your computer has these built-in features:
Volume and  brightness controls
Adjust sound volume and screen brightness.
Two built-in  stereo speakers
Listen to music, movies, games, and multimedia.
Optional AirPort wireless Internet and networking
(underneath keyboard) Using the optional AirPort Card, you can connect to the Internet, use email, share files, play network games, and more—without any wires to hold you down.
Sleep indicator light 
Pulsating light indicates that the computer is in sleep.
 Built-in microphone
Record sound or control your computer with spoken commands.
 ®Power button
Turn your computer on, put it to sleep, or shut it down.

 Media Eject (F12) key
Press and hold to eject a CD or DVD or to open the optical drive tray.

 ¯Power adapter connector
Plug in the power adapter (included) to recharge your
iBook’s battery.
 Optical disc drive
Install and run software or listen to music CDs. Play DVD videos if you have the DVD/CD-RW or Combo drive, or create your own CDs if you have the CD-RW or combo drive.
2
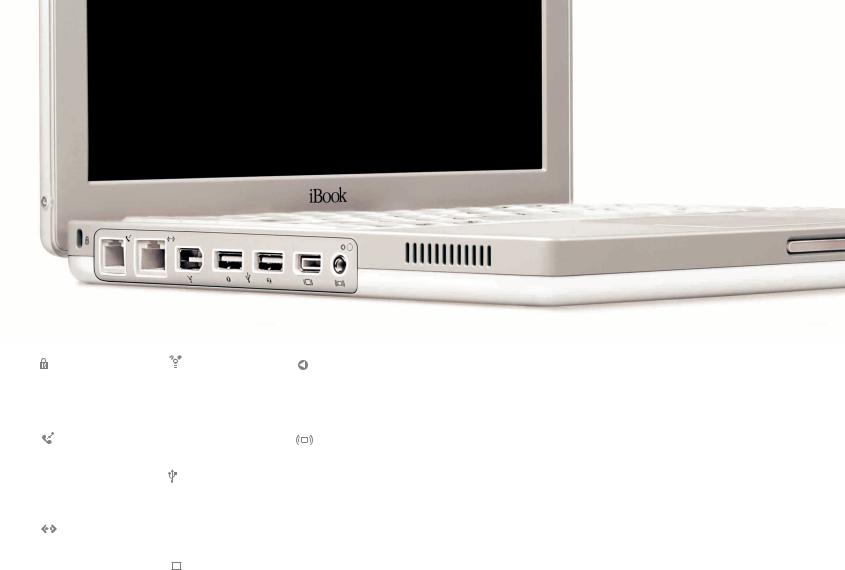
Kensington |
|
|
FireWire |
Reset button |
To learn more about your iBook’s features: |
security slot |
Connect a digital video |
Use during |
m Choose Mac Help from the Help menu. |
||
Attach a lock and cable |
camera and use it to |
troubleshooting to restart |
Then click Go under “iBook at a glance.” |
||
to prevent theft. |
create your own desktop |
your computer. |
|
||
|
movies. You can also |
|
|
||
|
connect FireWire hard |
|
|
||
Modem |
disks, printers, and more. |
Audio/video port |
|
||
Connect to the Internet, |
|
|
|
Connect headphones or |
|
browse the World Wide |
|
|
|
external speakers. |
|
Web, and send and |
|
USB |
Connect a TV or video |
|
|
receive electronic mail. |
Connect printers, Zip |
projector using the |
|
||
|
and other disk drives, |
optional Apple AV cable. |
|
||
|
digital cameras, joysticks, |
|
|
||
Ethernet |
and more. |
|
|
||
Share files with another |
|
|
|
Battery level indicator |
|
computer or access a |
|
|
|
(underneath) When you |
|
computer network. |
|
|
VGA port |
press the button on the |
|
|
|
|
|||
|
Connect an external |
battery, one to four lights |
|
||
|
monitor (using the |
glow to show how much |
|
||
|
included Apple VGA |
charge is left. |
|
||
|
Display Adapter). |
|
|
||
3

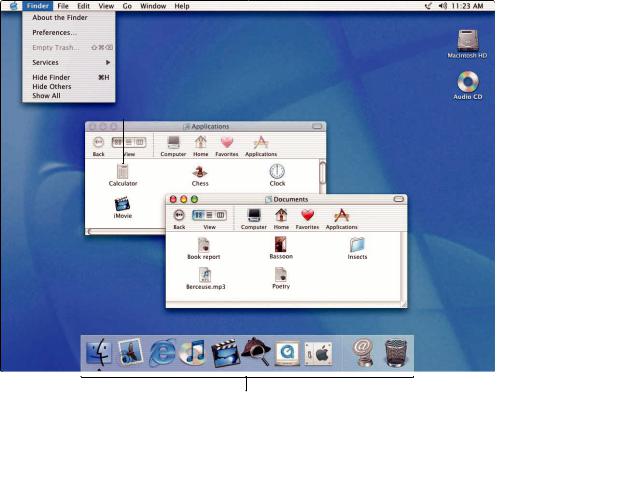
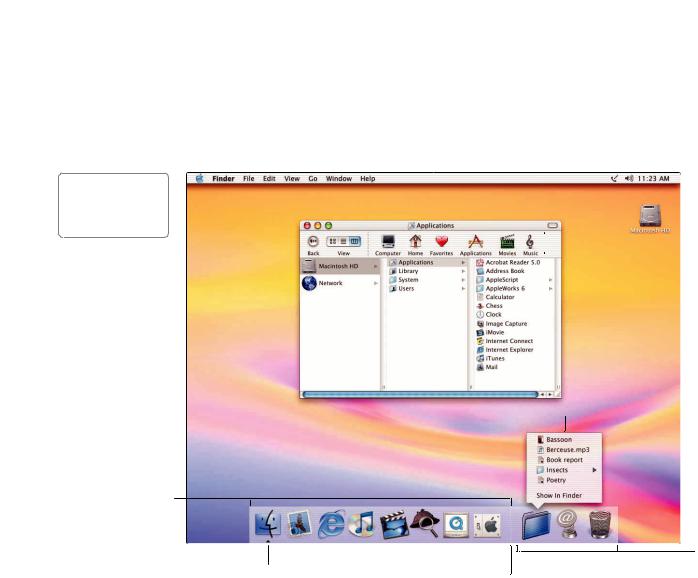
Mac OS X basics
The Macintosh desktop is your starting place.
Apple menu

Use to change system settings, open recent items, and restart or shut down your computer. To see the menu, click the apple ( ) in the menu bar.
Window buttons 

Click the red button to close the window, the yellow one to minimize it into the Dock, and the green one to resize it.
View buttons 

Click to see your files as icons, in lists, or in columns.
Finder icon 
Click to open a Finder window so you can see the files and applications on your computer.

 Modem status
Use this menu
to connect to and disconnect from the Internet using a dialup modem.

 Toolbar button
Click to show or hide the toolbar.

 Toolbar icons
Click to navigate quickly to different folders. Your home folder contains your personal documents.
To learn more about Mac OS X:
mSee the Welcome to Mac OS X document in the Documents folder on your hard disk.
 Trash
Trash
Drag an item here to delete it. Items remain here until you choose Empty Trash from the Finder menu.
4
Application menu

Shows the name of the application you’re using.
Use to set preferences or quit applications (other than the Finder).
Application

Applications are software programs (such as a game or word processor) that you use with your computer. Double-click an application’s icon to open the application.
Document

Documents are files that you create with an application (such as a letter you create with your word processor). Doubleclick the icon to open the file in the application used to create it.
Dock
Click icons in the Dock to open applications, documents, folders, or minimized windows.

 Disc
Disc
This appears when a CD or DVD is in the disc drive. Double-click the icon to see what’s on the disc. To eject a disc, press and hold the Media Eject ( ) key on the keyboard.

 Folder
Folders help organize your files and applications. Doubleclick a folder to
see what’s inside.
5
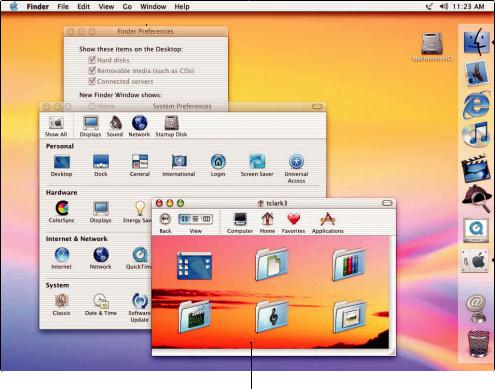
Change the Mac OS to suit your preferences.
There are lots of ways to customize Mac OS X.
To change Finder 
 settings, choose
Preferences from the Finder menu.
Choose System 
 Preferences from
the Apple menu to change most of your computer’s settings.
To select a desktop 
 background picture, open
System Preferences and click Desktop.
 To change icon sizes or the background of a Finder window, choose
Show View Options from the View menu.

 To change the size of the Dock or move it to a different place, open System Preferences and click Dock.
6
Click the icons in the Dock or toolbar to find and open files and applications.
.Drag applications, files, and folders into the Dock for one-click access.
This side of the Dock shows application icons.

 To set up the toolbar the
way you want it, choose Customize Toolbar from the Finder’s View menu, then drag items to
the toolbar.

 Press a folder icon to
see its contents and open items in it.
|
|
This side of the Dock |
The triangle indicates the |
|
shows files, windows, |
application is open. |
Drag this bar up or down to |
and folders. |
|
resize the Dock. |
|
7
What you can do with your iBook
Not sure how to get the most out of your new iBook? Read on for a few ideas.
Make your own CDs. Use iTunes  to transfer music from your CD collection. If your iBook has a CD-RW or Combo drive, burn your own music CDs. Transfer music to an iPod or other MP3 player to listen on the go. Make a movie. Shoot video on a DV camcorder and import it into iMovie
  . Then rearrange, edit, polish, and add titles and soundtracks. Connect to the Internet to send email and browse the Web, or use iTools
  to post digital photos to the Web for everyone to see.
Browse through the next few pages to find out more.
8

The iBook is your digital hub.
Send digital photos to friends and family.
Send email and surf the 'Net.
Watch DVD movies.
Import and edit homemade movies.
Put 1,000 songs in your pocket.
Listen to music and burn your own CDs.
9
Listen to music on your computer or on the go.
Use iTunes to create a library of music and make your own CDs.
Library
Your collection of songs, imported from your own audio CDs or downloaded from the Internet. Easily browse or search for music.
Radio Tuner
Choose from hundreds of Internet radio stations – jazz, rock, talk, and more.
Audio CDs
Play an audio CD on your computer. Import songs to your Library to play them without the CD.
To learn more about iTunes:
mSee iTunes Help, available in the Help menu.
mGo to www.apple.com/itunes
Burn CDs
If your iBook has a CD-RW or Combo drive, make your own audio CDs that play in standard CD players.
Playlists
Make personalized playlists using songs from your Library. Arrange your music by mood, artist, genre, or however you like.
Equalizer
Adjust the sound to your tastes using the 10-band EQ with 22 presets.
10

If you have an iPod, you can transfer up to 1,000 songs.
Connect iPod using the FireWire cable included with iPod. 1. iTunes automatically transfers your music Library to iPod.
Unplug 2. iPod.
Browse for a song on iPod and 3. press the Play button.
To learn more about iPod:
mOpen iTunes and choose iPod Help from the Help menu.
mGo to www.apple.com/ipod
11
 Loading...