


Apple E3238A, E3237A, E3234A, E3233A, E3220A User Manual
...Voice Memos
Draft
Make a recording in Voice Memos on iPhone
With the Voice Memos app  (located in the Utilities folder), you can use iPhone as a portable recording device to record personal notes, classroom lectures, musical ideas, and more. You can fine-tune your recordings with editing tools like trim, replace, and resume. Use Voice Memos with the built-in microphone, an iPhone or Bluetooth headset mic, or a supported external microphone. With Voice Memos in iCloud, you can capture audio anywhere with your device, then open it on your Mac to edit and share recordings, and more.
Make a basic recording
d.To begin recording, tap  , or press the center button on your headset.
To adjust the recording level, move the microphone closer to or farther from what youʼre recording. For better recording quality, the loudest level should be between –3 dB and 0 dB.
e.Tap  to finish recording.

Your recording is saved with the name NewDraftRecording or the name of your location, if Location Services is turned on in Settings  > Privacy. To change the name, tap the
recording, then tap the name and type a new one.
To fine-tune your recording, see Edit a recording in Voice Memos
Use the advanced recording features
You can make a recording in parts, pausing and resuming as you record.
d.To begin recording, tap  , or press the center button on your headset.
To adjust the recording level, move the microphone closer to or farther away from what youʼre recording. For better recording quality, the loudest level should be between –3 dB and 0 dB.
To see more details while youʼre recording, swipe up from the top of the waveform.
e.Tap  to stop recording; tap Resume to continue.
f.To review your recording, tap  .
.
You can start listening from any point; to position the playhead, drag the waveform right or left.
g.To save the recording, tap Done.
Your recording is saved with the name New Recording or the name of your location, if Location Services is turned on in Settings  > Privacy. To change the name, tap the recording, then tap the name and type a new one.
To fine-tune your recording, see Edit or delete a recording in Voice Memos.
Mute the start and stop tones
While recording, use the iPhone volume down button to turn the volume all the way down.
Use another app while recording
d.While recording, you can go to the Home screen and open another app.
e.To return to Voice Memos, tap the red bar at the top of the screen.
If Voice Memos is turned on in iCloud settings, your recording is saved in iCloud and shows up automatically on all your devices where youʼre signed in to iCloud with the same Apple ID.

Recordings using the built-in microphone areDraftmono, but you can record stereo using an external stereo microphone that works with iPhone. Look for accessories marked with the Apple “Made for iPhone” or “Works with iPhone” logo.
Play a recording in Voice Memos on iPhone
In the Voice Memos app  , tap a recording and use the playback controls to listen to it.
Play
Pause
Skip back 15 seconds
Skip forward 15 seconds
Tip: While the recording is open, you can tap its name to rename it.
Edit or delete a recording in Voice Memos on iPhone
In the Voice Memos app  , you can use the editing tools to fine-tune your recordings. You can remove parts you donʼt want, record over parts, or replace an entire recording. You can also delete a recording you no longer need.

Trim the excess |
Draft |
d.In the Voice Memos list, tap the recording you want to edit, tap  , then tap Edit Recording.
e.Tap  at the top right, then drag the yellow trim handles to enclose the section you want to keep or delete.
To check your selection, tap  .
.
f.To keep the selection (and delete the rest of the recording), tap Trim, or to delete the selection, tap Delete.
g.Tap Save, then tap Done.
Replace a recording
d.In the Voice Memos list, tap the recording you want to replace, tap  , then tap Edit Recording.
e.Drag the waveform to position the playhead where you want to start recording new audio.
f.Tap Replace or press the center button on your headset to begin recording (the waveform turns red while youʼre recording).
Tap  to pause; tap Resume to continue.
g.To check your recording, tap  .
.
h.Tap Done to save the changes.
Delete a recording
Do one of the following:
In the Voice Memos list, tap a recording, then tap  .
.
Tap Edit at the top of the Voice Memos list, select one or more recordings, then tap Delete.
Deleted recordings move to the Recently Deleted folder in the Voice Memos list, where theyʼre kept for 30 days by default. To change how long deleted recordings are kept, go to Settings  > Voice Memos > Clear Deleted, then select an option. To erase a recording in the Recently Deleted folder, swipe left on the recording, then tap Erase.
To recover a deleted recording, tap the Recently Deleted folder, tap the recording, then tap Recover. To recover or erase everything in the Recently Deleted folder, tap Edit above the Voice Memos list, then tap Recover All or Erase All.

Search for or rename a recordingDraftin Voice Memos on iPhone
You can search for your recordings in the Voice Memos app  , and rename any recording.
Search for a recording
d.In the Voice Memos list, swipe down to reveal the search field.
e.Tap the search field, enter part or all of the recording name, then tap Search.
Rename a recording
A recording is initially saved with the name New Recording or the name of your location, if Location Services is turned on in Settings > Privacy.
To change the name, tap the recording, tap the name, then type a new one.
Share and sync recordings in Voice Memos on iPhone
In the Voice Memos app  , you can share individual recordings, save them in iCloud so theyʼre available on your other devices, and sync them with your iTunes library on your computer.
Share a recording
d.In your Voice Memos list, tap a saved recording.
e.Tap  .
.
f.Tap  , then choose a sharing option, or save the recording to iCloud Drive.
Use Voice Memos in iCloud
Go to Settings  > [your name] > iCloud, then turn on Voice Memos.
With Voice Memos turned on in iCloud, your audio recordings are synced across all your devices where youʼre signed in to iCloud with the same Apple ID (they appear in your Voice Memos list). You can use your iOS device to capture audio, then use your Mac to edit your recordings, incorporate them in other media, share them, and so on.
Sync recordings with iTunes
If you choose not to sync your Voice Memos using iCloud, you can sync them to your computer using iTunes.

d. Connect iPhone to your computer. |
Draft |
e.Open iTunes on your computer, then select your iPhone near the top-left corner.
f.Click Music in the sidebar.
g.Select Sync Music, make sure Include Voice Memos is selected, then click Sync.
Voice memos synced from iPhone to your computer appear in the Voice Memos list in iTunes. Voice memos synced from your computer appear in your Voice Memos app on iPhone, but not in the Music app.
Duplicate a recording in Voice Memos on iPhone
In the Voice Memos app  , you can duplicate a recording, which is useful when you need a different version of it. You can make changes to the duplicate, save it, and give it a new name.
In the Voice Memos list, tap a recording, tap  , then tap Duplicate.
The copy appears right below the original version in the list and has “copy” added to its name. You can tap the name and type a new one.
Wallet
Draft
About Wallet on iPhone
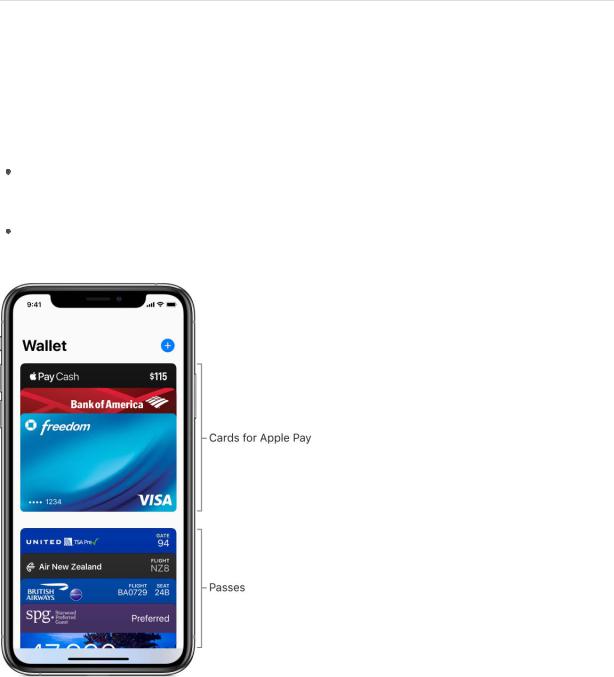
Use the Wallet app  to keep cards and passes in one place for easy access:
Cards for Apple Pay: (not available in all regions) Apple Pay Cash, credit, debit, store, transit, and prepaid cards
Passes: Boarding passes, movie and event tickets, coupons, reward cards, student ID cards, and more
(The Apple Pay Cash card is available only in the U.S.)
Set up Apple Pay in Wallet on iPhone
Using Apple Pay (on supported models) can be simpler than using a physical card, and safer too. With your cards stored in the Wallet app  , you can use Apple Pay to make secure payments in stores, for transit, in apps, and on websites that support Apple Pay. In Messages, use Apple Pay to send and receive money from friends and family and to make purchases using Business Chat.
To set up Apple Pay, add your debit, credit, and prepaid cards to Wallet.

Draft
R>1*%:=='*%E&A%O&$1%(&);%0$%&D&0'&B'*%-+'A%0+%"1*%,FGFT
;AA+'+)#"A14+%#+A"714+)'#A
dF% !+%J&''*"V%"&=% F%X-4%7&A%B*%&$.*;%"-%$02+%0+%"-%0O'-4;%/0"1%A-4)%:=='*%!8F
eF% 8-%-+*%-5%"1*%5-''-/0+2`
'22&0&($)&50*2%%E-$0"0-+%0E1-+*%$-%"1&"%A-4)%(&);%&==*&)$%0+%"1*%5)&7*V%-)%*+"*) "1*%(&);%;*"&0'$%7&+4&''AF
'22&."/*&8*$H;"/:&50*2:%%G*'*("%"1*%(&);%&$$-(0&"*;%/0"1%A-4)%:=='*%!8V%(&);$%A-4 4$*%/0"1%:=='*%E&A%-+%A-4)%-"1*)%;*D0(*$V%-)%(&);$%"1&"%A-4#D*%)*7-D*;F%>&= O-+"0+4*V%"1*+%*+"*)%"1*%O@@%+47B*)%-5%*&(1%(&);F
:'"*)+&"0D*'AV%A-4%7&A%B*%&B'*%"-%&;;%A-4)%(&);%5)-7%"1*%&==%-5%"1*%B&+.%-)%(&);%0$$4*)F
>1*%(&);%0$$4*)%;*"*)70+*$%/1*"1*)%A-4)%(&);%0$%*'020B'*%5-)%:=='*%E&AV%&+;%7&A%&$.%A-4 5-)%&;;0"0-+&'%0+5-)7&"0-+%"-%(-7='*"*%"1*%D*)050(&"0-+%=)-(*$$F
2"4+48"+A"$'6<4+)'#A+'(A+#"'##'(."+C%6#+)'#A-
>1*%50)$"%(&);%A-4%&;;%"-%J&''*"%B*(-7*$%A-4)%;*5&4'"%(&);%5-)%=&A7*+"$F%>-%$*"%& ;055*)*+"%(&);%&$%"1*%;*5&4'"V%7-D*%0"%"-%"1*%5)-+"%-5%"1*%$"&(.F
dF% !+%J&''*"V%(1--$*%A-4)%;*5&4'"%(&);F
eF% >-4(1%&+;%1-';%"1*%(&);V%"1*+%;)&2%0"%"-%"1*%5)-+"%-5%"1*%$"&(.F
fF% >-%)*=-$0"0-+%&+-"1*)%(&);V%"-4(1%&+;%1-';%0"V%"1*+%;)&2%0"%"-%&%+*/%'-(&"0-+F
!"#$%&:=='*%E&A%7&A%+-"%B*%&D&0'&B'*%0+%&''%)*20-+$V%&+;%:=='*%E&A%5*&"4)*$%7&A%D&)A%BA )*20-+F%3-)%7-)*%0+5-)7&"0-+V%$**%"1*%:=='*%G4==-)"%&)"0('*%O-4+")0*$%&+;%)*20-+$%"1&" $4==-)"%:=='*%E&AF

A4/&*6$%.46.3&((*5498&%.(*,(!%B*D553&*"49*Draft $%*!"#$%&
J0"1%A-4)%;*B0"%-)%()*;0"%(&);$%$"-)*;%0+%"1*%J&''*"%&==% %-+%0E1-+*V%4$*%:=='*%E&A%5-) $*(4)*V%(-+"&("'*$$%=&A7*+"$%/1*)*D*)%A-4%$**%-+*%-5%"1*$*%$A7B-'$`
!+%n&=&+V%(-+"&("'*$$%=&A7*+"%"*)70+&'$%7&A%&'$-%;0$='&A%"1*%5-''-/0+2%$A7B-'$`
!'C+@148+C%6#+A"$'6<4+)'#A+%(+1!8%("+Q+'(A+<'4"# dF% 8-4B'*6('0(.%"1*%$0;*%B4""-+F
eF% J1*+%A-4)%;*5&4'"%(&);%&==*&)$V%2'&+(*%&"%0E1-+*%"-%&4"1*+"0(&"*%/0"1%3&(*%!8V%-) *+"*)%A-4)%=&$$(-;*F
fF% E-$0"0-+%"1*%"-=%-5%0E1-+*%/0"10+%&%5*/%(*+"07*"*)$%-5%"1*%(-+"&("'*$$%)*&;*)%4+"0'%A-4 $**%8-+*%&+;%&%(1*(.7&).%-+%"1*%$()**+F

Pay with your default card on iPhone 8 andDraftearlier
d.Rest your finger on Touch ID.
e.Position the top of iPhone within a few centimeters of the contactless reader until you see Done and a checkmark on the screen.
Pay with a different card instead of your default card
d.When your default card appears, tap it, then choose another card.
e.Authenticate with Face ID, Touch ID, or your passcode.
f.Position the top of iPhone within a few centimeters of the contactless reader until you see Done and a checkmark on the screen.
Use a rewards card
At participating stores, you can receive or redeem rewards when you use Apple Pay.
d.Add your rewards card to Wallet.
e.At the payment terminal in the store, present your rewards card by holding iPhone near the contactless reader.
Apple Pay then switches to your default payment card to pay for the purchase. In some stores, you can apply your rewards card and payment card in one step. In other stores, you need to wait until the terminal or cashier asks for payment.
To have your rewards card appear automatically when youʼre in the store, tap  on the card, then turn on Automatic Selection.
Pay for transit
You can pay for your ride with Apple Pay. (If youʼre using Express Transit, see Pay for your ride with Express Transit.)
d.Make sure your device is turned on (it doesnʼt need to be connected to a network).
e.As you approach a fare gate or board the bus, do one of the following:
iPhone X and later: Double-click the side button, then glance at iPhone to authenticate with Face ID or enter your passcode.
Other models: Double-click the Home button with your device on the Lock screen, then rest your finger on Touch ID.
f.Position the top of iPhone within a few centimeters of the contactless reader at the transit gate until you see Done and a checkmark on the screen.
For more information, see Apple Support article:Draft Ride transit with Apple Pay.
Pay for your ride with Express Transit
With Express Transit (available in certain regions), you donʼt need to authenticate with Face ID, Touch ID, or your passcode, and you donʼt need to wake or unlock your device or open an app.
d.Set up Express Transit; see Apple Support articles Using Suica on iPhone or Apple Watch in Japan and Use Express Transit with Apple Pay in Beijing and Shanghai.
e.As you approach a fare gate or board the bus, make sure your device is turned on (it doesnʼt need to be connected to a network). On iPhone XS and iPhone XS Max, your Express Card may be available even when iPhone needs to be charged.
f.Position the top of iPhone within a few centimeters of the contactless reader at the transit gate until you see Done and a checkmark on the screen.
Use Apple Pay at stores in Japan
You need an iPhone model that supports Apple Pay in Japan and a card issued by a bank in Japan.
d.Tell the cashier what type of card youʼre using, as shown on the front of your card in Wallet.
e.Complete the payment.
Note: If you have Location Services turned on, the location of your iPhone at the time you make a payment may be sent to Apple and the card issuer to help prevent fraud. See Set which apps know your location on iPhone.
Pay in apps or on the web using Apple Pay on iPhone
Use Apple Pay to make purchases in apps and on the web in Safari wherever you see the Apple Pay button.

Draft
!'C+1(+'(+'::+%#+%(+48"+@"7
dF% 84)0+2%(1*(.-4"V%"&=%"1*%:=='*%E&A%B4""-+F
eF% Y*D0*/%"1*%=&A7*+"%0+5-)7&"0-+F
X-4%(&+%(1&+2*%"1*%()*;0"%(&);V%$10==0+2%&;;)*$$V%&+;%(-+"&("%0+5-)7&"0-+F
fF% O-7='*"*%"1*%=&A7*+"`
;9-"($&F&0(2&<0#$*%%8-4B'*6('0(.%"1*%$0;*%B4""-+V%"1*+%2'&+(*%&"%0E1-+*%"- &4"1*+"0(&"*%/0"1%3&(*%!8V%-)%*+"*)%A-4)%=&$$(-;*F
,#-$*&1"2$<:%%:4"1*+"0(&"*%/0"1%>-4(1%!8%-)%*+"*)%A-4)%=&$$(-;*F
28%:+1(+2'$'#1+%(+C%6#+,')+'(A+:'C+%(+1!8%("
N*5-)*%A-4%B*20+V%;-%"1*%5-''-/0+2`
G02+%0+%"-%0O'-4;%/0"1%"1*%$&7*%:=='*%!8%-+%B-"1%;*D0(*$F
>4)+%-+%N'4*"--"1%-+%B-"1%;*D0(*$F
U+$4)*%"1&"%0E1-+*%0$%+*&)BA%&+;%(-++*("*;%"-%&%(*''4'&)%-)%J0630%+*"/-).F
J1*+%A-4#)*%)*&;A%"-%(1*(.-4"V%;-%"1*%5-''-/0+2`
dF% K+%A-4)%H&(V%B*20+%(1*(.-4"%/0"1%"1*%:=='*%E&A%=&A7*+"%-="0-+F
eF% Y*D0*/%"1*%=&A7*+"%0+5-)7&"0-+F |
Draft |
X-4%(&+%(1&+2*%"1*%()*;0"%(&);V%$10==0+2%&;;)*$$V%&+;%(-+"&("%0+5-)7&"0-+F
fF% K+%A-4)%0E1-+*V%)*D0*/%"1*%=&A7*+"%$477&)A%&+;%(-7='*"*%"1*%=&A7*+"F
!5%A-4%;-+#"%/&+"%"-%4$*%:=='*%E&A%-+%A-4)%0E1-+*%"-%7&.*%=&A7*+"$%-+%A-4)%H&(V%2-%"- G*""0+2$% %m%J&''*"%l%:=='*%E&AV%"1*+%"4)+%-55%:''-/%E&A7*+"$%-+%H&(F
98'(."+C%6#+A"$'6<4+-81::1(.+'(A+)%(4')4+1($%#&'41%( dF% Z-%"-%G*""0+2$% %m%J&''*"%l%:=='*%E&AF
eF% G*"%&+A%-5%"1*%5-''-/0+2`
G10==0+2%&;;)*$$
U7&0'
E1-+*
2&.*,5*4%-*84%4B&*D553&*"49*C4(#*$%*!"#$%&*['\2\*$%39]
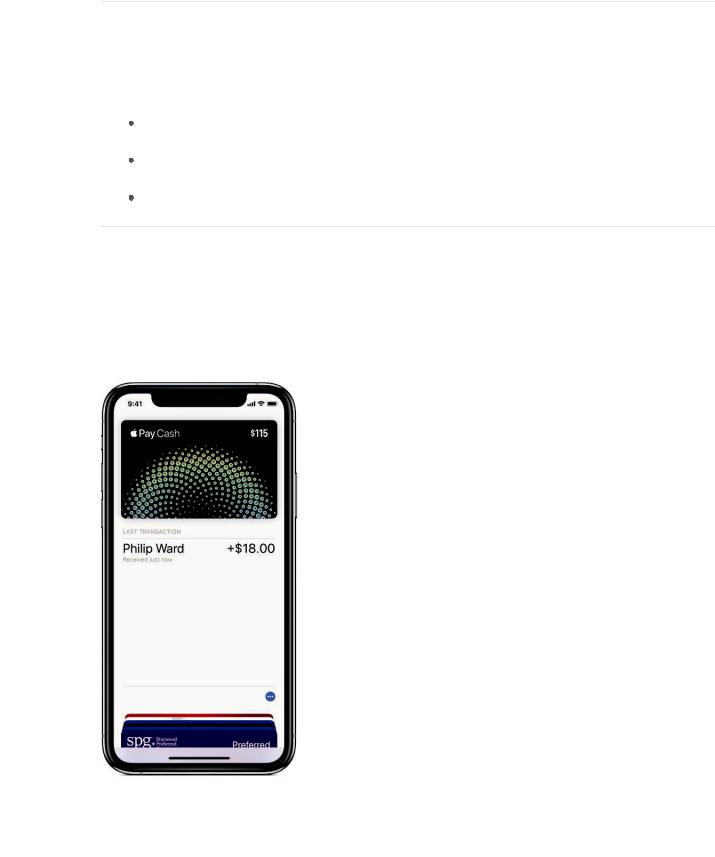
J1*+%A-4%)*(*0D*%7-+*A%0+%H*$$&2*$V%0"#$%&;;*;%"-%A-4)%:=='*%E&A%O&$1%(&);%0+%J&''*"F X-4%(&+%4$*%:=='*%E&A%O&$1%)021"%&/&A%/1*)*D*)%A-4%/-4';%4$*%:=='*%E&AF%X-4%(&+%&'$- ")&+$5*)%A-4)%:=='*%E&A%O&$1%B&'&+(*%"-%A-4)%B&+.%&((-4+"F

Set up Apple Pay Cash |
Draft |
Do any of the following:
Go to Settings  > Wallet & Apple Pay, then turn on Apple Pay Cash.
In Messages, send or accept a payment. See Send and receive money with Apple Pay on iPhone (U.S. only).
Use Apple Pay Cash
You can use Apple Pay cash wherever you would use Apple Pay. For more information, see the following topics:
Send and receive money with Apple Pay on iPhone (U.S. only)
Make contactless payments using Apple Pay on iPhone
Pay in apps or on the web using Apple Pay on iPhone
Manage your Apple Pay Cash
d.In Wallet, tap the Apple Pay Cash card.
e.Tap  , then do any of the following:
Add money from a debit card in Wallet.
Transfer money from your Apple Pay Cash balance to your bank account.
Tap Transactions to view your history and details (including comments sent with payments), manually accept or reject individual payments, and request a statement.
Choose to manually or automatically accept all payments. You have 7 days to manually accept a payment before itʼs returned to the sender.
See your suggested PIN. Apple Pay Cash doesnʼt require a PIN because every payment is authenticated by Face ID (iPhone X and later), Touch ID (other models), or a secure passcode. However, some terminals may still require you to enter a four-digit code to complete the transaction.
Verify your identity for account servicing and to increase your transaction limits.
Contact Apple Support.
Apple Pay Cash and sending and receiving payments through Apple Pay are services provided by Green Dot Bank, member FDIC.

Manage Apple Pay cards and activityDraft on iPhone
In Wallet  , manage the cards you use for Apple Pay and review your recent transactions.
View the information for a card and change its settings
d.In Wallet, tap the card.
Note: The last transaction may appear, showing an authorized amount that may differ from the amount of the payment charged to your account. For example, a gas station may request an authorization of $99, even though you pumped only $25 worth of gasoline. To see the final charges, see the statement from your card issuer, which includes all Apple Pay transactions.
e.Tap  , then do any of the following:
Tap Transactions to view your recent history. To hide this information, turn off Transaction History. To view all your Apple Pay activity, see the statement from your card issuer.
View the last four digits of the card number and Device Account Number—the number transmitted to the merchant.
Change the billing address.
Remove the card from Wallet.
Change your Apple Pay settings
d.Go to Settings  > Wallet & Apple Pay.
e.Choose options such as the following:
Double-Click Side Button: (iPhone X and later) Gets cards or passes ready from the Lock screen when you double-click the Side button.
Double-Click Home Button: (other models) Gets cards or passes ready from the Lock screen when you double-click the Home button.
Allow Payments on Mac: Allows iPhone to confirm payments on your nearby Mac.
Remove your cards from Apple Pay if your iPhone is lost or stolen
If you turned on Find My iPhone, use it to help locate and secure your iPhone.
To remove your cards from Apple Pay, do any of the following:

On a Mac or PC: Sign in to your Apple IDDraftccount. In the Devices section, click the lost iPhone. Below the list of cards, click Remove all.
On an iOS device: Go to Settings  > [your name], tap the lost iPhone, then tap Remove All Cards (below Apple Pay).
Call the issuers of your cards.
If you remove cards, you can add them again later.
Note: If you sign out of iCloud in Settings  > [your name], all your credit and debit cards for Apple Pay are removed from iPhone. You can add the cards again the next time you sign in to iCloud.
Add and use passes in Wallet on iPhone
Use the Wallet app  to keep boarding passes, movie and event tickets, coupons, reward cards, student ID cards, and more in one place for easy access. Passes can include useful information, such as the balance on your coffee card, a couponʼs expiration date, or your seat number for a concert.

;AA+'+:'-- |
Draft |
X-4%7&A%B*%&$.*;%"-%&;;%&%=&$$%/0"10+%&+%&==%&5"*)%A-4%=*)5-)7%&+%&("0-+%$4(1%&$ =4)(1&$0+2%&%"0(.*"F%K)V%A-4%(&+%"&=%:;;%"-%:=='*%J&''*"%/1*+%A-4%$**%0"%5)-7%"1* 5-''-/0+2`
J&''*"6*+&B'*;%&==$
H&0'%-)%H*$$&2*$
J*B%B)-/$*)%$4(1%&$%G&5&)0
:0)8)-=%$1&)0+2
J&''*"%+-"050(&"0-+%&5"*)%A-4%4$*%:=='*%E&A%&"%&%$4==-)"*;%7*)(1&+"
]Y%(-;*%-)%B&)(-;*
>-%$(&+%"1*%(-;*V%-=*+%"1*%O&7*)&%&==% V%"1*+%=-$0"0-+%0E1-+*%$-%"1&"%"1*%(-;* &==*&)$%-+%"1*%$()**+F
N-"+'+:'--+@148+'+SJ+)%A"+%#+7'#)%A"
dF% !5%&%+-"050(&"0-+%5-)%&%=&$$%&==*&)$%-+%"1*%W-(.%$()**+V%"&=%"1*%+-"050(&"0-+i%05%"1*)*#$ +-%+-"050(&"0-+V%-=*+%"1*%J&''*"%&==% V%"1*+%"&=%"1*%=&$$F
eF% E)*$*+"%"1*%]Y%(-;*%-)%B&)(-;*%"-%"1*%)*&;*)F

Use your contactless student ID card Draft
On supported campuses, you can add your contactless student ID card to to Wallet, and then use your iPhone to access locations where your student ID card is accepted like your dorm, the library, and campus events. You can even pay for laundry, snacks, and meals around campus.
d.Download the app that supports student ID cards for your school.
e.Open the app, sign in, then add your student ID card to Wallet.
f.To manage your card, tap the card in Wallet, tap  , then do any of the following:
See your name and ID number.
View your account balance.
Contact the card issuer.
Turn on Express Mode to use your card without Face ID, Touch ID, or a passcode. On iPhone XS and iPhone XS Max, your Express Card may be available even when iPhone needs to be charged.
g.To present your student ID card at a reader, position the top of iPhone within a few centimeters of the reader until iPhone vibrates.
Use a contactless pass
With your pass in Wallet, you can use your iPhone to present your pass at a contactless reader.
d.If a notification for a pass appears on the Lock screen, tap the notification. If thereʼs no notification, open the Wallet app  , then tap the pass.
e.Position the top of iPhone within a few centimeters of the reader until iPhone vibrates. To see the QR code or barcode (if available), tap  .
.
Manage your passes in Wallet on iPhone
In the Wallet app  , you can rearrange or delete passes, view pass information, and change the settings.

Rearrange your passes |
Draft |
d.In the Wallet stack, touch and hold the pass you want to move.
e.Drag the pass to a new place in the stack.
The pass order is updated on all your devices where youʼre signed in to iCloud with the same Apple ID.
View the information for a pass and change its settings
d.Tap the pass, then tap  .
.
e.Choose any of the following (not all options are available on all passes):
Automatic Updates: Allows the pass to receive updates from the issuer.
Suggest on Lock Screen: Shows the pass based on time or location.
To allow location access, go to Settings  > Privacy > Location Services > Wallet, then tap While Using the App.
Automatic Selection: Selects the pass where itʼs requested.
Share Pass: Sends the pass to a friend using Mail, Messages, or AirDrop.
Remove pass: Deletes the pass from all your devices where youʼre signed in to iCloud with the same Apple ID.
f.Scroll down to view other information such as the associated app, usage details, and terms and conditions.
Change the settings for all your passes
Keep your passes up to date on all your iOS devices: Go to Settings  , then sign in to iCloud with the same Apple ID on all your devices.
Note: This setting applies only to passes in Wallet, not to cards you use with Apple Pay.
Set notification options: Go to Settings  > Notifications > Wallet.
Prevent passes from appearing on the Lock screen: Go to Settings  > Wallet & Apple Pay, then turn off Double-Click Side Button (iPhone X and later) or DoubleClick Home Button (other models).

C#&6/*.#&*0&4.#&)*$%*!"#$Draft%&
,$*%"1*%J*&"1*)%&==% %-+%A-4)%0E1-+*%"-%(1*(.%"1*%/*&"1*)%0+%A-4)%(4))*+"%'-(&"0-+%-) 0+%-"1*)%(0"0*$F%J*&"1*)%4$*$%W-(&"0-+%G*)D0(*$%"-%2*"%"1*%5-)*(&$"%5-)%A-4)%(4))*+" '-(&"0-+F%>-%"4)+%-+%W-(&"0-+%G*)D0(*$V%2-%"-%G*""0+2$%
 %m%E)0D&(A%m%W-(&"0-+%G*)D0(*$F
;->+21#1*+G&A%$-7*"10+2%'0.*`%[J1&"#$%"1*%/*&"1*)%5-)%"-;&Aq\%-)%[o-/%/0+;A%0$%0"%-4" "1*)*q\%W*&)+%1-/%"-%&$.%G0)0F
98")>+48"+@"'48"#+$%#")'-4+'(A+)%(A141%(-
K=*+%J*&"1*)%"-%;-%&+A%-5%"1*%5-''-/0+2`
B-$5+&<"50<&)$0#-$*&5"(2;#;"(:%%>1*%;*"&0'$%5-)%A-4)%(4))*+"%'-(&"0-+%&)*%&D&0'&B'* /1*+%A-4%-=*+%J*&"1*)F
[;$)-$&-"/*<.&G"*$50:#%%G/0=*%"1*%1-4)'A%;0$='&A%'*5"%-)%)021"F
4$$&1"*$&2$#0;<:&;(5</2;(I&-/1;2;#.T&5-0(5$&"G&*0;(T&0(2&0;*&_/0<;#.&C("#&0H0;<0A<$&;(&0<< *$I;"(:E%%G()-''%"-%"1*%B-""-7%-5%"1*%$()**+F
B-$5+-$&)$0#-$*&;(&"#-$*&5;#;$:%%G/0=*%'*5"%-)%)021"%-+%"1*%$()**+V%-)%"&=% F
F
4);#5-&A$#)$$(&J0-*$(-$;#&0(2&B$<:;/:%%>&=% V%$()-''%"-%"1*%B-""-7%-5%"1*%'0$"V%"1*+ "&=%á3%-)%áOF
;AAV+A"<"4"V+'(A+#"'##'(."+)141"-+1(+C%6#+@"'48"#+<1Draft -4 dF% >&=% %"-%$**%A-4)%/*&"1*)%'0$"F
eF% 8-%&+A%-5%"1*%5-''-/0+2`
'22&0&5;#.`%>&=% V%"1*+%*+"*)%"1*%+&7*%-5%"1*%(0"AV%?0=%(-;*V%-)%&0)=-)"%(-;*F
L$<$#$&0&5;#.`%G/0=*%'*5"%-+%"1*%(0"AV%"1*+%"&=%8*'*"*F
K$0**0(I$-$&"*2$*&"G&5;#;$:&"(&."/*&<;:#`%>-4(1%&+;%1-';%"1*%(0"AV%"1*+%7-D*%0"%4= -)%;-/+F
N-"+19<%6A+4%+>"":+C%6#+<1-4+%$+)141"-+6:+4%+A'4"+%(+'<<+C%6#+A"D1)"-
Z-%"-%G*""0+2$% V%"1*+%$02+%0+%"-%0O'-4;%/0"1%"1*%$&7*%:=='*%!8%-+%&''%A-4)%;*D0(*$F%G** H&+&2*%:=='*%!8%&+;%0O'-4;%$*""0+2$%-+%0E1-+*F

Draft
Sharing
Share documents from apps on iPhone
On iPhone, you can share a document from any app that supports sharing.
Share documents from an app (except Files). In many apps that support sharing, you can tap Share or  , then choose how to share. Options vary by app and may include choices from apps youʼve downloaded. For example, if you download Pinterest, Pinterest becomes another option for sharing. For more information, see Install and manage app extensions on iPhone.
Share documents from the Files app. You can send a copy of any document in Files. Open Files  on the Home screen, touch and hold the document, tap Share, then choose an option for sending the document (for example, Message, Mail, and so on).
Organize your sharing options. Tap More  , then touch and drag
  to move items to new positions.
Share files from iCloud DriveDrafton iPhone
With iCloud Drive, you can store files in iCloud and access them from all your devices. Any changes you make appear on all your devices set up with iCloud Drive.
You can also invite others to view and edit a file in iCloud Drive. They can access your shared file by tapping a link you send—you donʼt need to send the file.
To use iCloud Drive, you must be signed in to iCloud using your Apple ID, and have iCloud Drive turned on.
Turn on iCloud Drive. Go to Settings  > [your name] > iCloud, then turn on iCloud Drive. See Use iCloud Drive on iPhone.
Invite others to view or edit a file. Tap Files and hold a file in iCloud Drive, tap Share, tap
 , then tap Browse > iCloud Drive. Touch
  , then do one of the following:
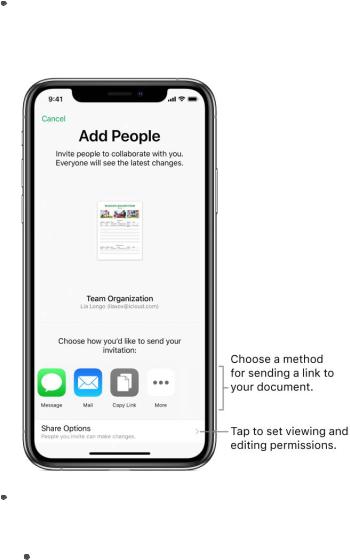
Send a link to the people you want to view and edit the file: Choose a method for sending a link to the file, enter any other requested information, then send or post the invitation. People need an Apple ID to open the file.
Choose specific permission and access options: Tap Share Options, then select permission settings:
Who can open, view, and print the file, but not make changes—only people you invite or anyone with the link.
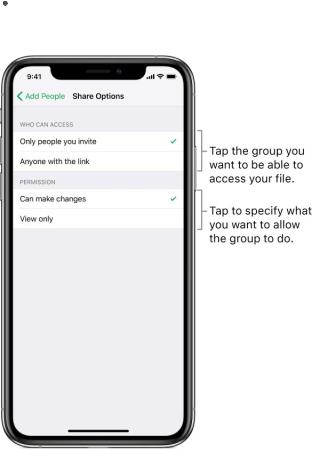
Who can open, view, print, and makeDraftchanges to the file—only people you invite or anyone with the link.
When you allow people to edit a file, itʼs updated with everyoneʼs changes automatically.
Note: If you donʼt see  , the file may be owned by someone else who shared it with you. Tap Show People to see the ownerʼs name.
After you set the share options, tap Add People at the top left. Tap a method for sending a link to the file (Message or Mail, for example), enter any other requested information, then send or post the invitation. See Use iCloud Drive on iPhone.
Important: When you share a file in iCloud Drive, the link to it includes its filename. Therefore, if the document is confidential, be sure to ask recipients not to forward the link to anyone else.
Share files using AirDrop on iPhone
With AirDrop you can wirelessly share your photos, videos, websites, locations, and more, with other nearby devices (iOS 7 or later). With iOS 8 or later, you can share with Mac computers with OS X 10.10 or later. AirDrop transfers information using Wi-Fi and Bluetooth—both must be turned on. To use AirDrop, you need to be signed in to iCloud using your Apple ID. Transfers are encrypted for security.
Note: You can also use AirDrop to securely share app and website passwords with another iOS device or a Mac. See Share website and app passwords on iPhone.

Draft
Share an item using AirDrop. Tap  , then tap the name of a nearby AirDrop user.
Receive AirDrop items from others. Open Control Center, then tap  (if you donʼt see
  , tap and hold the top left group of controls, or, on models with 3D Touch, press the top
left group of controls). Then choose to receive items from Contacts Only or from Everyone. You can accept or decline each request as it arrives.
For more information, see the Apple Support article How to use AirDrop with your iPhone, iPad, or iPod touch.
Share purchases on iPhone with family members
With Family Sharing, up to six family members can share iTunes Store, App Store,
and Apple Books purchases; an Apple Music family membership; an iCloud storage plan; Screen Time information; a family calendar; family photos; and more, all without sharing accounts. For more information, see the Apple Support article Family Sharing.
To use Family Sharing, one adult family member (the organizer) chooses features for the family to share and invites up to five additional family members to participate. When family members join, Family Sharing is set up on their devices automatically.
Family Sharing requires you to sign in to iCloud with your Apple ID, and to confirm the Apple ID you use for the iTunes Store, the App Store, and Apple Books (you usually use the same Apple ID for everything). Family Sharing is available on iOS devices with iOS 8 or later, Mac computers with OS X 10.10 or later, and PCs with iCloud for Windows 5 or later. You can be part of only one family group at a time.

Set up Family Sharing. Go to Settings  >Draft[your name] > Set Up Family Sharing, then follow the onscreen instructions. As the family organizer, you choose the features you
want to share and invite family members to join. Depending on the features you choose, you may be asked to set up an Apple Music family membership or an iCloud Storage subscription. If you choose to share iTunes Store, App Store, and Apple Books purchases with your family members, you agree to pay for any purchases they initiate while part of the family group.
Create an Apple ID for a child. Go to Settings  > [your name] > Family Sharing > Add Family Member, then tap Create a Child Account. This adds the childʼs account to your family until the child is at least 13 years old. For more information, see the Apple Support article Family Sharing and Apple ID for your child.
Accept an invitation to Family Sharing. Tap Accept in your invitation. Or, if you are near the organizer during the setup process, you can enter the Apple ID and password you use for iCloud on the organizerʼs device.
Share purchases. When your family shares iTunes Store, App Store, and Apple Books purchases, all items are billed directly to the family organizerʼs Apple ID. Once purchased, an item is added to the initiating family memberʼs account and is shared with the rest of the family.
Access shared purchases from the iTunes Store. Open the iTunes Store, tap More, then tap Purchased. Choose a family member, tap a category (for example, Music or Movies), then tap a purchased item.
Access shared purchases from the App DraftStore. Open the App Store, then tap  , or your profile picture, at the top right. Tap Purchased, choose a family member, then tap a
purchased item.
Access shared purchases from Apple Books. Open the Books app, tap  , or your profile picture, at the top right, then choose a family member.
Use a shared Apple Music family membership. If your family has an Apple Music family membership, you can simply open Apple Music and start listening. Each family member gets their own music library and personal recommendations. Make sure youʼre signed in with the Apple ID you entered in Family Sharing settings.
Use a shared iCloud storage plan. If your family is sharing an iCloud storage plan (200 GB or 2 TB), you can privately use as much storage as you need. You can also purchase or use your own storage plan if you need more space.
Turn on Ask to Buy. The family organizer can require young family members to request approval for purchases or free downloads. Go to Settings  > [your name] > Family Sharing, then tap the personʼs name.
Note: Age restrictions for Ask to Buy vary by region. In the United States, the family organizer can enable Ask to Buy for any family member under age 18; for children under age 13, itʼs enabled by default.
Hide your iTunes Store, App Store, and Apple Books purchases. To hide all your purchases from family members, go to Settings  > [your name] > Family Sharing, then turn off Share My Purchases. On your computer, you can also hide specific purchases so they arenʼt available to other family members. For more information, see the Apple Support article Hide and unhide apps for your iPhone, iPad, iPod touch, or Mac.
Share photos or videos with family members. When you set up Family Sharing, a shared album called Family is automatically created in the Photos app on all family membersʼ devices. To share a photo or video with family members, open the Photos app, then view a photo or video or select multiple photos or videos. Tap  , tap Shared Albums, add comments, then share to your shared family album. Members can unsubscribe from the family album, and the family organizer can delete it. See Share photos from your iPhone with Shared Albums in iCloud.
Add an event to the family calendar. When you set up Family Sharing, a shared calendar called Family is automatically created in the Calendar app on all family membersʼ devices. To add a family event, open the Calendar app, create an event, then add the event to the family calendar. Members can unsubscribe from the family calendar, and the family organizer can delete it. See Share iCloud calendars on iPhone.
Set up a family reminder. When you set upDraftFamily Sharing, a shared list is automatically created in the Reminders app on all family membersʼ devices. To add a reminder to the family list, open the Reminders app, tap the family list, then add a reminder to the list. Members can unsubscribe from the family reminder list, and the family organizer can delete it. See Make a reminder list on iPhone.
Share your location with family members. Go to Settings  > [your name] > iCloud > Share My Location. To find a family memberʼs location, use the Find My Friends app. You can also send or share your location using the Messages app (iOS 8 or later). For more information about using Messages to share your location, see Send and receive text messages on iPhone.
Set up Screen Time. You can share Screen Time with your family members so that everyone can see how theyʼre using their devices, and use that information to set allowances and limits for app use. Go to Settings  > [your name] >
Family Sharing > Screen Time. You can invite family members to join and have them enter their Apple IDs to begin the process. You can also set up Screen Time for a child or other family member. For information on creating a child account for Family Sharing, see the Apple Support article Family Sharing and Apple ID for your child.
Note: You can also set up Screen Time for individual family members on their own devices. For more information on Screen Time, see Set screen time, allowances, and limits on iPhone.
Keep track of your familyʼs devices. If family members enabled Share My Location in iCloud, you can help them locate missing devices. Open Find iPhone on your device or at iCloud.com. For more information, see Use the Find My iPhone app to locate your device.
Leave Family Sharing. Go to Settings  > [your name] > Family Sharing > [your name], then tap Leave Family Sharing. If youʼre the organizer, tap Stop Family Sharing. For more information, see the Apple Support article Leave Family Sharing.

Draft
Use iPhone with other devices
Accessories included with iPhone
The following accessories are included with iPhone:
EarPods with Lightning Connector (iPhone 7 and later). Use the headset to listen to music and videos, and make phone calls. See Use Apple EarPods.
Lightning to USB Cable. Use the cable to connect iPhone to the USB power adapter or to your computer.
Apple USB power adapter. Use the adapter with the Lightning to USB Cable to charge the iPhone battery. The size of the adapter depends on your iPhone model and region.
SIM eject tool. (not included in all regions) Use the tool to eject the SIM card tray. See Install or switch the SIM card in your iPhone.

Connect Bluetooth devicesDraftto iPhone
WARNING: For important information about avoiding hearing loss and avoiding distractions that could lead to dangerous situations, see Important safety information for iPhone.
You can use Bluetooth devices such as wireless headphones, speakers, car kits, and more with iPhone.
Note: The use of certain accessories with iPhone may affect wireless performance. Not all iOS accessories are fully compatible with iPhone. Turning on airplane mode may eliminate audio interference between iPhone and an accessory. Reorienting or relocating iPhone and the connected accessory may improve wireless performance.
Turn Bluetooth on or off
On iPhone, go to Settings  , then tap Bluetooth.
To quickly disconnect from Bluetooth devices without turning Bluetooth off, open Control Center, then tap  .
.
Pair a Bluetooth device
d.Follow the instructions that came with the device to put it in discovery mode.
e.On iPhone, go to Settings  , then tap Bluetooth.
f.Tap the device in the Devices list to connect.
iPhone must be within about 33 feet (10 meters) of the Bluetooth device.
If you have AirPods and you set them up with one iOS device or Mac computer, they are automatically set up with your other devices where youʼre signed in using the same Apple ID (iOS 10, macOS Sierra, watchOS 3, or later required). For more information about setting up AirPods, go to the AirPods Support website.
Bypass your Bluetooth device for phone calls
To use the iPhone receiver or speaker for calls, do any of the following:
Answer a call by tapping the iPhone screen.
During a call, tap Audio, then choose iPhone or Speaker Phone.
Turn off the Bluetooth device, unpair it, or move out of range.
Go to Settings  , tap Bluetooth, then turn off Bluetooth.
 Loading...