


Color StyleWriter 6500
Color ink-jet printer for Mac OS and Windows users
K Apple Computer, Inc.
© 1997 Apple Computer, Inc. All rights reserved.
Under the copyright laws, this manual may not be copied, in whole or in part, without the written consent of Apple. Your rights to the software are governed by the accompanying software license agreement.
The Apple logo is a trademark of Apple Computer, Inc., registered in the U.S. and other countries. Use of the “keyboard” Apple logo (Option-Shift-K) for commercial purposes without the prior written consent of Apple may constitute trademark infringement and unfair competition in violation of federal and state laws.
Every effort has been made to ensure that the information in this manual is accurate. Apple is not responsible for printing or clerical errors.
Apple Computer, Inc. 1 Infinite Loop
Cupertino, CA 95014-2084 408-996-1010 http://www.apple.com
Apple, the Apple logo, AppleTalk, Chicago, ColorSync, the ColorSync logo, EtherTalk, Extensions Manager, LaserWriter, LocalTalk, Mac, Macintosh, Macintosh Quadra, Monaco, New York, PowerBook, Power Macintosh, QuickDraw, StyleWriter, TrueType, and Zeal are trademarks of Apple Computer, Inc., registered in the U.S. and other countries.
Finder, Geneva, and OneScanner are trademarks of Apple Computer, Inc.
Adobe, Adobe Illustrator, Adobe Type Manager, and PostScript are trademarks of Adobe Systems Incorporated or its subsidiaries and may be registered in certain jurisdictions.
Classic is a registered trademark licensed to Apple Computer, Inc.
Helvetica, Palatino, and Times are registered trademarks of Linotype-Hell AG and/or its subsidiaries.
ITC Avant Garde, ITC Bookman, ITC Garamond, ITC Lubalin Graph, ITC Machine, ITC Zapf Chancery, and ITC Zapf Dingbats are registered trademarks of International Typeface Corporation.
Simultaneously published in the United States and Canada.
Other company and product names mentioned herein may be trademarks of their respective companies. Mention of third-party products is for informational purposes only and constitutes neither an endorsement nor a recommendation. Apple assumes no responsibility with regard to the performance or use of these products.

Contents
Communications regulation information vi
Welcome |
ix |
|
|
|
|
|
|
1 Setting Up Your Printer |
1 |
|
|
|
|
|
|
Important safety instructions |
1 |
|
|
|
|
||
Unpacking the printer |
3 |
|
|
|
|
|
|
Plugging in the printer |
5 |
|
|
|
|
|
|
Turning the printer on and off |
6 |
|
|
|
|
||
Installing the ink cartridges |
7 |
|
|
|
|
||
Loading paper into the paper tray |
10 |
|
|
|
|||
Printing the sample page |
12 |
|
|
|
|
|
|
Connecting the printer directly to a Mac OS computer |
13 |
|
|||||
Connecting to an Apple LocalTalk network (optional) |
14 |
|
|||||
Connecting the printer to an EtherTalk network |
16 |
|
|
||||
Connecting the printer directly to a Windows/DOS computer |
17 |
||||||
iii

2 Printing From a Mac OS Computer |
19 |
|
|
|
|||
Installing the Mac OS printer software |
19 |
|
|
|
|||
Power Macintosh users and virtual memory |
23 |
|
|
||||
Using a directly connected Color StyleWriter 6500 |
24 |
|
|||||
Using a Color StyleWriter 6500 on a LocalTalk network |
25 |
||||||
Aligning the ink cartridges |
27 |
|
|
|
|
|
|
Quick instructions for printing standard documents |
30 |
|
|||||
Detailed instructions for printing documents |
31 |
|
|
||||
Using custom paper sizes |
39 |
|
|
|
|
|
|
Creating your own watermarks |
42 |
|
|
|
|
||
Desktop printing |
43 |
|
|
|
|
|
|
Monitoring and controlling background printing |
47 |
|
|||||
3 Printing From a Windows/DOS Computer |
49 |
|
|
Installing the Windows printer software |
49 |
|
|
Selecting your printer as the default printer—Windows 95 |
52 |
||
Selecting your printer as the default printer—Windows 3.1 |
53 |
||
Using the Toolbox 53 |
|
|
|
Printing from DOS software applications |
54 |
|
|
If you have trouble printing 54 |
|
|
|
4 Loading Paper and Other Materials |
55 |
||||
Printing on standard paper |
55 |
|
|
||
Printing envelopes |
56 |
|
|
|
|
Printing transparencies |
59 |
|
|
||
Printing labels |
60 |
|
|
|
|
Printing on your own custom paper sizes |
60 |
||||
Printing index cards and postcards |
61 |
|
|||
iv Contents

5 Tips on Paper, Quality, Speed, and Cost |
63 |
|
Choosing print materials 63 |
|
|
Quality |
65 |
|
Speed |
66 |
|
Cost |
66 |
|
6 Troubleshooting |
67 |
Safety precautions |
67 |
General problems and solutions 68 |
|
Cleaning the ink cartridges 73 |
|
Solutions specific to a Mac OS computer 75 |
|
Solutions specific to a Windows/DOS computer 81 |
|
Appendix A |
Technical Information |
83 |
|
|
|
||
|
General specifications |
|
83 |
|
|
|
|
|
Apple printer supplies and accessories |
86 |
|
||||
Appendix B Using Fonts With the Color StyleWriter 6500 |
89 |
||||||
|
Kinds of fonts |
89 |
|
|
|
|
|
|
How TrueType fonts work with other kinds of fonts |
92 |
|||||
|
How the computer looks for fonts |
94 |
|
||||
|
Where fonts are stored |
|
94 |
|
|
|
|
|
Styled fonts |
97 |
|
|
|
|
|
|
Common questions about fonts |
98 |
|
|
|||
Appendix C |
Using ColorSync |
101 |
|
|
|
||
|
The problem that ColorSync solves |
101 |
|
||||
|
How ColorSync works |
|
102 |
|
|
|
|
|
Setting up ColorSync |
|
103 |
|
|
|
|
|
Tips for best results |
106 |
|
|
|
||
|
For more information |
|
107 |
|
|
|
|
Index 109
Contents v

Communications regulation information
FCC statement
This equipment has been tested and found to comply with the limits for a Class B digital device in accordance with the specifications in Part 15 of FCC rules. See instructions if interference to radio or television reception is suspected.
Radio and television interference
The equipment described in this manual generates, uses, and can radiate radio-frequency energy. If it is not installed and used properly—that is, in strict accordance with Apple’s instructions—it may cause interference with radio and television reception.
This equipment has been tested and found to comply with the limits for a Class B digital device in accordance with the specifications in Part 15 of FCC rules. These specifications are designed to provide reasonable protection against such interference in a residential installation. However, there is no guarantee that interference will not occur in a particular installation.
You can determine whether your computer system is causing interference by turning it off. If the interference stops, it was probably caused by the computer or one of the peripheral devices.
If your computer system does cause interference to radio or television reception, try to correct the interference by using one or more of the following measures:
mTurn the television or radio antenna until the interference stops.
mMove the computer to one side or the other of the television or radio.
mMove the computer farther away from the television or radio.
mPlug the computer into an outlet that is on a different circuit from the television or radio. (That is, make certain the computer and the television or radio are on circuits controlled by different circuit breakers or fuses.)
If necessary, consult an Apple-authorized service provider or Apple. See the service and support information that came with your Apple product. Or, consult an experienced radio/television technician for additional suggestions.
IMPORTANT Changes or modifications to this product not authorized by Apple Computer, Inc., could void the FCC Certification and negate your authority to operate the product.
vi Communications Regulation Information

Industry Canada statement
This Class B device meets all requirements of the Canadian interference-causing equipment regulations.
Cet appareil numérique de la Class B respecte toutes les exigences du Règlement sur le matériel brouilleur du Canada.
VCCI Class 2 statement
Communications Regulation Information |
vii |

Welcome
Congratulations on your purchase of the Apple Color StyleWriter 6500 printer. This manual describes how to set up the printer and how to use it.
Main features of the Color StyleWriter 6500 printer
The Color StyleWriter 6500 works with Mac OS and Windows/DOS computers.
mThe Color StyleWriter 6500 prints high-quality color graphics and text on a variety of materials, including plain paper.
mThe Color StyleWriter 6500 prints up to eight pages per minute in black, four pages per minute in color.
mAs an Energy Star Partner, Apple Computer has determined that this product meets the Energy Star guidelines for energy efficiency.
mThe paper input tray holds up to 150 sheets of paper, 15 envelopes, 30 cards, and 25 sheets of labels.
mDesktop printing on a Mac OS computer makes it easy to switch printers and monitor your print requests.
mThe printer offers 64 available TrueType (outline) fonts for a Mac OS computer and 42 for a Windows/DOS computer that print smoothly in a variety of sizes.
ix

System requirements for a Mac OS computer
To install the printer software and use the Color StyleWriter 6500 printer with your Mac OS computer, you need
ma Mac OS computer with a 68020 or higher central processing unit (CPU), any Macintosh except a Macintosh Plus, SE, Classic®, Portable, or PowerBook 100
mMacintosh Operating System (Mac OS) version 7.1 or later
mat least 4 megabytes (MB) of random-access memory (RAM) for a non-Power Macintosh; if you have a Power Macintosh, 8 MB of RAM is the minimum requirement, and 16 MB is recommended
mat least 8 MB of space available on your hard disk
The Installer program that comes with the Color StyleWriter 6500 automatically checks whether your computer meets these requirements. Chapter 2 explains how to use the Installer program.
System requirements for a Windows computer
To install the printer software and use the Color StyleWriter 6500 printer with a Windows computer, you need a computer with one of the following combinations of hardware and operating systems:
mWindows 95 version 1.0 or later, 486 (or greater) processor, 8 MB of RAM
mWindows 3.1 or a later version, DOS 3.3 or later, 386 (or greater) processor, 4 MB of RAM
The installation program that comes with the printer automatically checks whether your computer meets these requirements. Chapter 3 explains how to install the printer software on a Windows/DOS computer.
x Welcome

1 Setting Up Your Printer
This chapter introduces the Apple Color StyleWriter 6500 printer and explains how to set it up. After you follow the instructions in this chapter, you’ll be ready to print.
Important safety instructions
Always take the following precautions:
mKeep the printer cover closed when printing.
mAlways turn off the printer before unplugging it.
mKeep the ink cartridges away from children.
mKeep the printer away from sources of liquid, such as washbasins, bathtubs, and shower stalls.
mProtect the printer from dampness or wet weather, such as rain and snow.
mRead all the installation instructions carefully before you plug the printer into a wall socket.
mKeep these instructions handy for reference by you and others.
mFollow all instructions and warnings dealing with your computer system.
mDon’t use devices that produce open flames, such as Bunsen burners, near the printer.
1
mDon’t use alcohol-based or ammonia-based cleaners on or around the printer.
mAlways unplug the printer before cleaning it.
mClean the outside of the printer with a damp cloth and, if necessary, a mild soap or detergent. Be careful not to get liquid into the printer or the power cord receptacle.
Watch for these situations, and if one occurs pull the plug!
mthe power cord or plug becomes frayed or otherwise damaged
myou spill something into the printer
mthe printer is exposed to rain or any other excess moisture
mthe printer has been dropped or otherwise damaged
myou suspect that your printer needs service or repair
WARNING Electrical equipment may be hazardous if misused. Operation of this product, or similar products, must always be supervised by an adult. Do not allow children access to the interior of any electrical product and do not permit them to handle any cables.
2 Chapter 1
Unpacking the printer
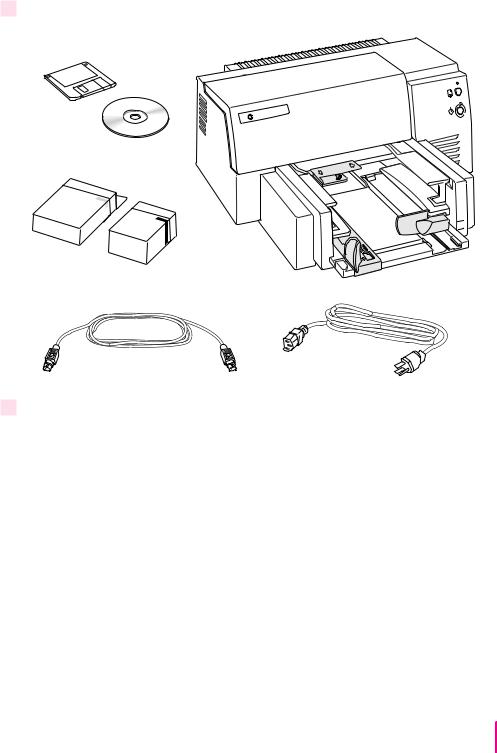
1 Remove everything from the shipping box, but leave the ink cartridges in their packages.
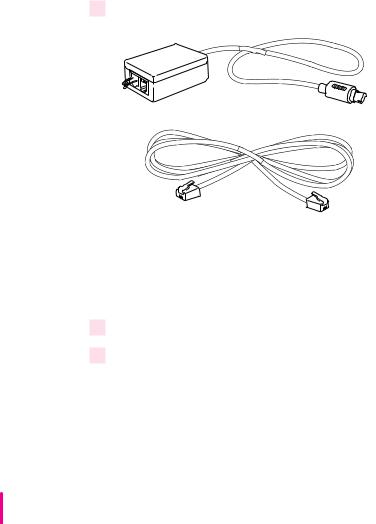
Floppy disk |
Color StyleWriter 6500 |
CD-ROM disc
Color cartridge
Black cartridge |
|
Macintosh serial cable |
Power cord |
2 Remove the tape and packing material from the outside of the printer.
Setting Up Your Printer |
3 |
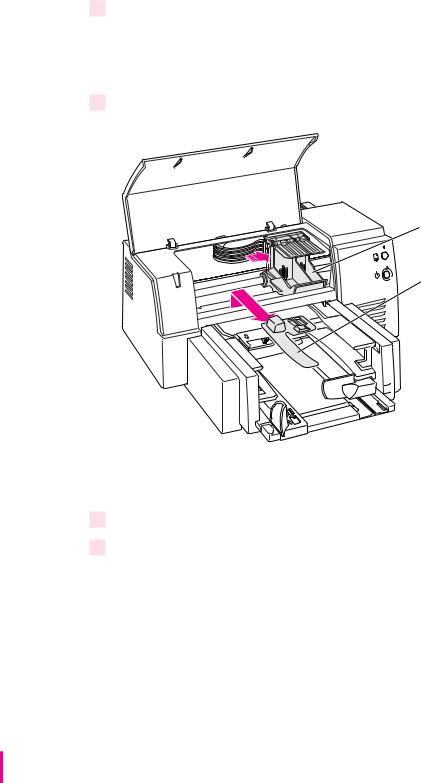
3Open the printer’s cover and remove the packing material from the inside of the printer.
There are three white plastic pieces inserted inside of the printer. Remove the two large pieces that are across the top of the carriage. Then follow the next step to remove the third, smaller piece.
4Slide the carrier to the right and remove the white plastic carrier restraint.
First, slide the carrier to the right.
Then, remove the packing material.
Save the carton and the packing material in case you ever need to ship the printer.
5Close the printer’s cover.
6Place the printer in your work area.
Choose a location near your computer that has an electrical outlet and good ventilation, is out of direct sunlight, never gets damp or very hot or very cold, and is away from devices that could cause electromagnetic interference, such as stereo speakers or cordless telephone transmitters. Do not place the printer on a slanted surface. See Appendix A, “Technical Information,” for specific information about the physical requirements of your printer.
4 Chapter 1
Plugging in the printer
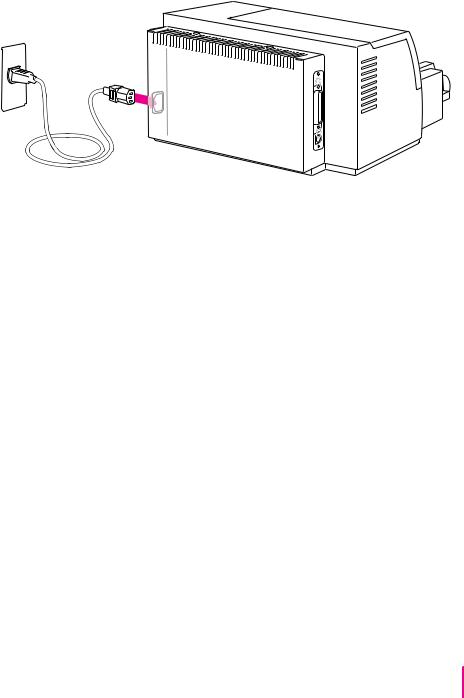
Plug the connector end of the power cord into the printer and then plug the other end into a grounded outlet.
IMPORTANT The only way to disconnect power completely is to unplug the power cord. Make sure that at least one end of the power cord is within easy reach so that you can unplug the printer in an emergency.
Setting Up Your Printer |
5 |

Turning the printer on and off
To turn on the printer, press the power button. The green power light glows.
To turn the printer off, press the power button again. The power light goes out.
Resume button
Power button
make sure the printer is turned off light is off, the power is off.) If strip, never turn off the power strip
unless you’ve already turned the printer off.
When you turn off the printer, it moves the ink cartridges to the right, where it caps the nozzles to keep the ink cartridges from drying out. If you unplug the printer or discontinue power before turning it off, the printer can’t position the cartridges in the capped position, the print head may dry out, and you’ll have to replace the cartridges.
6 Chapter 1
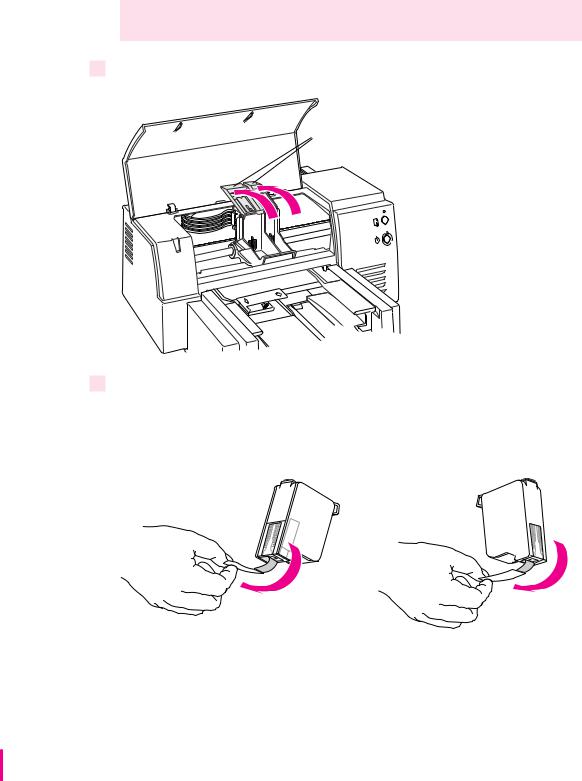
Installing the ink cartridges
Each ink cartridge contains a print head, which sprays the ink onto the paper. Treat it gently so you don’t damage it.
WARNING The carrier holds the ink cartridges and moves them back and forth when you are printing a document. Don’t slide the carrier by hand or you will damage the printer.
1To turn on your printer, press the power button.
The green power light comes on.
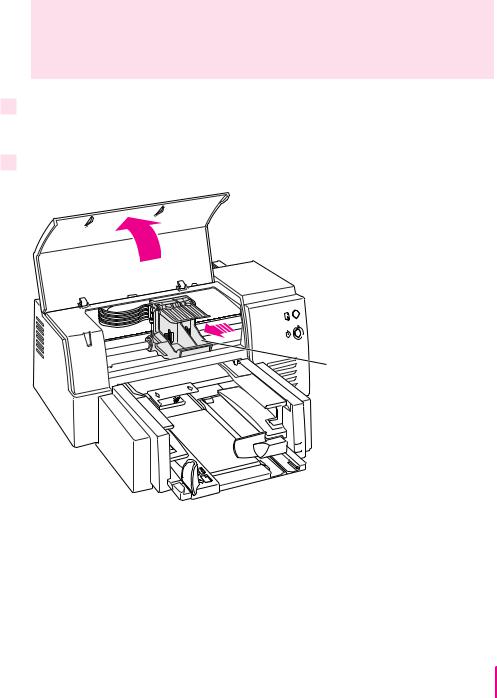
2Open the front cover.
 The resume light flashes when
the power is on and you open the cover.
The carrier moves to the center, automatically.
Do not slide the carrier by hand.
Note: If the carrier does not move automatically to the center, try closing the cover and turning the power off. Then repeat steps 1 and 2.
Setting Up Your Printer |
7 |
WARNING Use only ink designed for use with the Color StyleWriter 6500.
3 Lift both of the ink-cartridge latches.
Ink-cartridge latches
4 |
G |
the tape from the cartridge’s |
|
|
You may safely touch the the black plastic, but be careful not to touch any other part.
Color ink cartridge |
Black ink cartridge |
Make sure you remove
the tape from both cartridges.
8 Chapter 1

5Slide the ink cartridges down into the carrier, and then close the latch over each cartridge.
Press firmly to snap each latch into place.
Color ink cartridge |
Black ink cartridge |
For the printer to work, you must install both ink cartridges.
6 Close the printer’s front cover.
When you close the cover, you can hear the carrier move to the right.

 IMPORTANT If the orange
resume light blinks after you close the cover, the ink cartridges are not installed
properly. Turn the printer off,
then repeat steps 1 through 5.
Be sure to press both ink
cartridges firmly into place in the carrier.
Setting Up Your Printer |
9 |
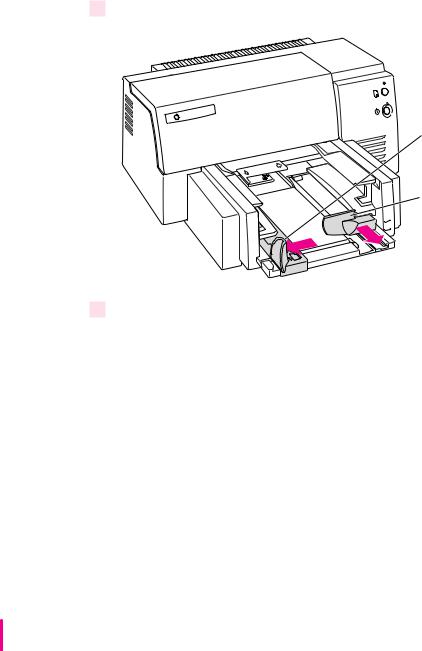
Loading paper into the paper tray
The paper tray holds up to 150 sheets of 20-pound paper and feeds the paper automatically into the printer. You can load many sizes of paper and other media into the sheet feeder as described in Chapter 4, but to print the sample page, as described in the next section, use U.S. letter-size or A4 paper. To load paper into the sheet feeder, follow these steps:
1 Slide the paper adjusters out as far as you can.
Width adjuster
Length adjuster
2 Make sure the edges are even on all sides before inserting a stack of paper.
10 Chapter 1
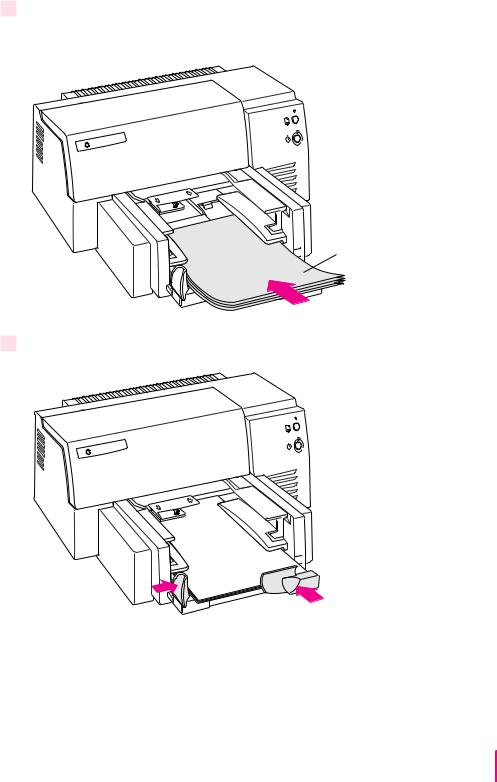
3Load the paper into the lower tray, print side down.
The wrapper that the paper comes in usually tells which side to print first.
Slide the paper lengthwise into the tray, print side down.
4 Slide the paper adjusters in to touch the edges of the stack of paper.
Setting Up Your Printer |
11 |
Printing the sample page
To see what your printer can do, print the sample page.
1Make sure the printer is turned on.
2With the printer’s power light on, press and hold the resume button until the orange light goes out.
Resume button
Power button
The printer prints the sample page, your first full-color document from your Color StyleWriter 6500.
12 Chapter 1
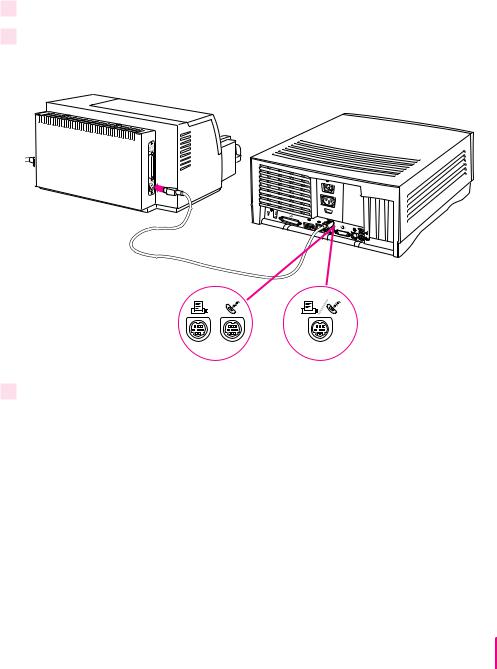
Connecting the printer directly to a Mac OS computer
If you want to add the printer to a LocalTalk network, see the next section, “Connecting to an Apple LocalTalk Network (Optional).” If you have a Windows/DOS computer, see “Connecting the Printer Directly to a Windows/DOS Computer,” later in this chapter.
1Make sure the computer is turned off.
2Plug the cable into the round port on the printer.
You can use the serial cable that came with your printer.
Connect this end of the cable |
Some Macintosh |
to either the printer port or |
computers have a |
the modem port, which are |
combined serial port |
labeled with these icons. |
with two icons. |
3Plug the other end of the cable into one of the ports on your computer.
If the modem port (W) is available, plug the serial cable into that port. Otherwise, plug the cable into the printer port ([).
If your computer has a combined modem and printer port ([/W), use it.
Remember which port on the computer you use. Later you must tell the printer software where to look for the printer.
Setting Up Your Printer |
13 |
Some PowerBook computers may require special settings. For details, see “Special Information for PowerBook Owners” in the section “Using a Color StyleWriter 6500 on a LocalTalk Network” in Chapter 2.
Connecting to an Apple LocalTalk network (optional)
If you want to connect your printer directly to your computer for personal use, see the previous section, “Connecting the Printer Directly to a Mac OS Computer.” If you have a Windows/DOS computer, see the section, “Connecting the Printer Directly to a Windows/DOS Computer” later in this chapter. If you have an existing LocalTalk network and you want to share your printer with other Mac OS computers on the network, follow the steps below.
1 Obtain a LocalTalk Connection Kit.
Connector box
LocalTalk cable
LocalTalk Connection Kits come in many varieties. A kit usually contains one connector box and one LocalTalk cable. Two different LocalTalk connecting kits are available from Apple. For information about these kits, see “Apple Printer Supplies and Accessories” in Appendix A.
2Make sure the computer is turned off.
3Plug the connector box into the round port on the printer.
14 Chapter 1
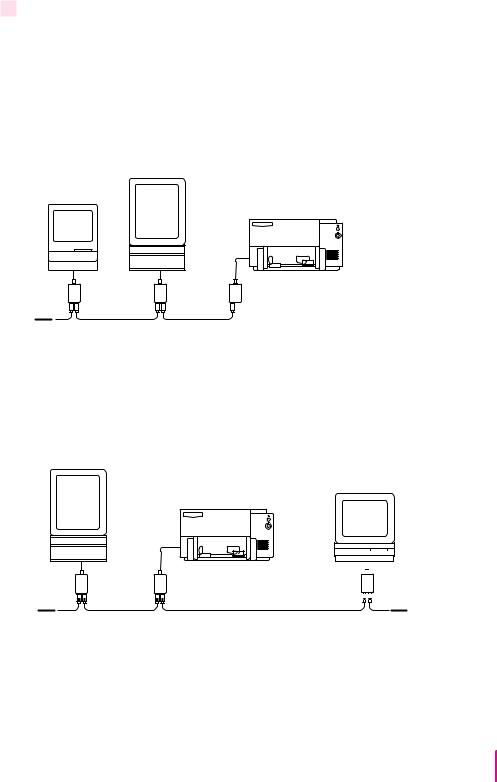
4 Connect the printer to the network in one of these two ways:
mTo connect the printer to the end of a LocalTalk network, use the LocalTalk cable to connect the unused socket of the nearest device’s connector box to the printer’s connector box.
Note: The printer’s connector box may need a terminator placed in the unused socket for the LocalTalk network to work properly. Check the instructions that come with your LocalTalk Connection Kit for further information.
mTo connect the printer between two devices on a LocalTalk network, disconnect one LocalTalk cable from the connector box or the device immediately to the left or right of the printer and plug it into the new printer’s connector box. Then use the new LocalTalk cable to connect the free socket on the printer’s connector box to the socket you freed on the other device’s connector box.
|
|
|
|
|
|
|
|
|
15 |
|
|
|
|
|
|
|
Setting Up Your Printer |
||
|
|
|
|
|
|
|
|||
|
|
|
|
|
|
|
|||
|
|
|
|
|
|
|
|||
|
|
|
|
|
|
|
|||
|
|
|
|
|
|
|
|||
|
|
|
|
|
|
|
|||
|
|
|
|
|
|
|
|||

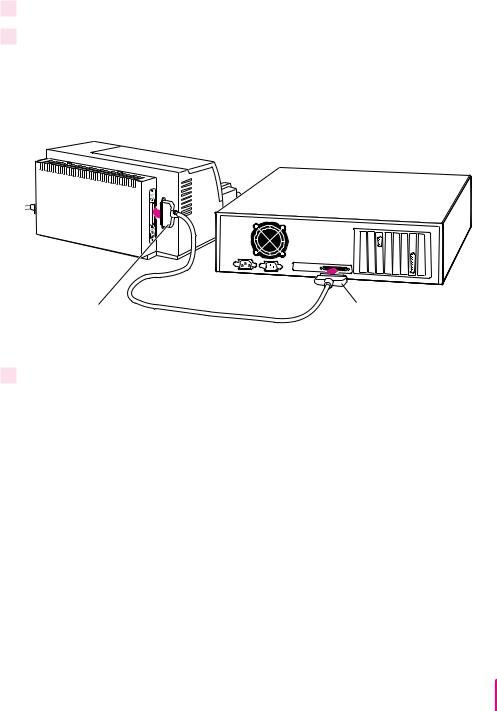
Connecting the printer to an EtherTalk network
If you have the optional Color StyleWriter EtherTalk Adapter II, you can connect a Color StyleWriter 6500 printer directly to an EtherTalk network.
To attach the EtherTalk Adapter and connect your Color StyleWriter 6500 to the network, follow the instructions that came with the adapter. Once the printer is on the network, its name appears in the Chooser just like the names of other network printers.
If you want to change the name, click Rename. In the dialog box that appears, type a new name for the Color StyleWriter 6500 printer. (Note: Anyone on the network can change the name.)
16 Chapter 1
Connecting the printer directly to a Windows/DOS computer
Note: You should not use the printer with a Mac OS computer and a
Windows/DOS computer connected at the same time.
1Make sure the computer is turned off.
2Plug the cable into the parallel port on the printer.
Be sure to clip the connector in place to assure a reliable connection.
Use a high-quality bidirectional parallel printer cable. If you need to purchase a cable, most consumer electronics stores carry them.
Connect this
end of the cable to the parallel port on the printer.
Connect the other end to the appropriate port on your computer.
3Plug the other end of the cable into the appropriate port on your computer.
If your connector has thumbscrews, be sure to tighten them to ensure a reliable connection.
Remember which port on the computer you use. Later you must tell the printer software where to look for the printer.
Setting Up Your Printer |
17 |

2 Printing From a Mac OS Computer
This chapter explains how to install the Color StyleWriter 6000 Series printer software and start printing.
If you have a Windows/DOS computer, see Chapter 3.
For detailed information on printing specific kinds of documents, such as envelopes, index cards, and transparencies, see Chapter 4.
Installing the Mac OS printer software
Before you can print your documents, you need to install the printer software on your computer. The Apple Printer Software Collection CD-ROM disc that comes with the Color StyleWriter 6500 contains the printer software and an Installer program.
The Installer installs the new printing software you need, plus the fonts that come with the printer.
If you have been using Apple’s QuickDraw GX software, turn it off now. The
Color StyleWriter 6500 software is not compatible with QuickDraw GX.
Note: If you ever upgrade your system software you must reinstall the Color
StyleWriter 6000 Series printer software.
19

Using the Minimal Printer Software floppy disk
If you have a CD-ROM drive, skip to the next section, “Using the Apple Printer Software Collection CD-ROM Disc.”
If you do not have a CD-ROM drive, the Color StyleWriter 6000 Series Minimal Printer Software floppy disk that came with your printer contains minimal software that lets you start printing now. For instructions on installing the software, see the Read Me file you’ll find on the floppy disk.
It is recommended, however, that you obtain the complete set of software. Here are two ways to get the software:
mDownload the complete printer software (but not the fonts) from Apple’s Web site at http://www.apple.com.
mIf you have access to a computer with a CD-ROM drive, the Apple Printer Software Collection CD-ROM disc contains special files of the complete set of floppy disks. The CD-ROM disc also contains a disk-duplication application you can use to create your own set of floppy disks from those files. See the instructions that accompany the application. (You cannot simply copy the files to floppy disks; you must use the disk-duplication application to transfer the information to the floppy disks.)
Note: Any software applications or extra fonts from companies other than Apple are available only on the CD-ROM disc. In addition, if you use minimal software, you won’t be able to use features of the printer software such as watermarks, ColorSync color matching, and fonts other than those already installed with your system software or in your applications.
20 Chapter 2

Using the Apple Printer Software Collection CD-ROM disc
1Turn off any automatic virus-detection applications you have on your Mac OS computer.
If you don’t, problems may occur during the installation. After installation is complete, you can turn the virus-detection programs back on. (See the instructions that came with your virus-detection application for how to turn off detection.)
2Insert the Apple Printer Software Collection CD-ROM disc into your CD-ROM drive.
Double-click the CD icon.
3Open the Printer Software folder.
4Open the Macintosh folder.
5Open the Installer folder.
6To start the Installer program, double-click its icon.
7In the Welcome dialog box that appears, click Continue.
IMPORTANT The Installer determines whether you have the correct system software, and enough memory and hard disk space to use this printer. If you don’t, the Installer displays a message telling you what you need. You won’t be able to install the printer software until you correct the system software or memory problem. If the message reports a problem, you can purchase new system software or memory from an Apple-authorized dealer, or make space available on your hard disk by throwing away files you don’t need.
8Read the software license agreement and click Agree.
If you are unwilling to accept the terms of the agreement, click Disagree.
Printing From a Mac OS Computer |
21 |
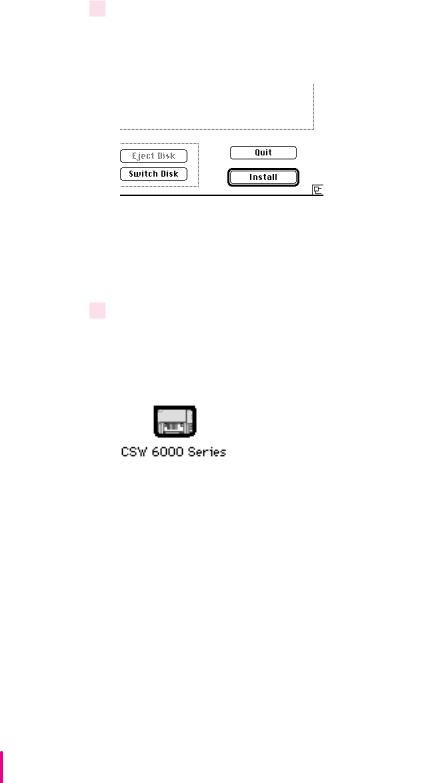
9In the Installer dialog box, click Install.
After a few moments, the Installer begins to install the printer software. A status box keeps you informed of progress during installation.
10When you see a message reporting that installation was successful, click Restart.
The Installer restarts your computer. After you restart, you may notice a new icon on your desktop that represents a printer. It’s called a desktop printer, and it looks like this.
For information about desktop printers, see “Desktop Printing” later in this chapter.
22 Chapter 2
 Loading...