


 Loading...
Compressor basics
What is Compressor?
Compressor is an application that transcodes media files into a variety of formats. You can use Compressor to create files for many uses, including:
Viewing on Apple devices such as Apple TV, iPad, iPhone, iPod, or iTunes using high-definition (HD) or standard-definition (SD) formats (including H.264)
Publishing to video-sharing websites including Facebook, Vimeo, and YouTube using QuickTime
Burning to DVD or Blu-ray disc using H.264, MPEG-2 for DVD, and Dolby Digital formats
Podcasting using H.264, AAC, and MP3 formats
Creating a package of media for submitting to the iTunes store
Compressor comes with built-in settings that you can use to transcode files into the most common media formats. Compressor also provides preconfigured destinations that transcode files and then perform actions on the transcoded files. For example, if you transcode a source file using the built-in “Publish to Vimeo” destination, the destination outputs a high-quality QuickTime movie file, and then automatically publishes the movie file to your Vimeo account.
In addition to transcoding source files, you can use Compressor

to:
Create custom settings and destinations: You can use a variety of formats to build custom settings and destinations tailored to your unique transcoding workflows. For example, you can create a custom setting with specific frame dimensions or with video and audio filters applied. And when you create a destination, you can apply a job action that is performed after the file is transcoded—such as sending an email message or running an Automator workflow.
Create settings to transcode Final Cut Pro X and Motion projects: You can create a custom setting in Compressor and then use it to transcode Final Cut Pro or Motion projects. For example, you can create a setting that outputs a file with the bit rate of your choice.
Transcode files using a network of shared computers: If you need more processing power and shorter transcoding times, you can create a group of shared computers to distribute and speed the transcoding process.
Create Compressor droplets: If you need to provide a very simple workflow for yourself or other users, you can create a Compressor droplet, a standalone application that lets you transcode media files in the Finder, by dragging and dropping.
Compressor workflow
The basic process of transcoding files in Compressor is described below.
Import your media into Compressor
The first step in the transcoding process is to add one or more media source files to Compressor. You can add media files from your computer or a connected hard disk. Each media source file in Compressor is called a job. Each transcoding session, containing one or more jobs, is called a batch.
Apply transcoding instructions
After you add a source file, apply one or more transcoding instructions to it. Compressor provides a variety of preconfigured transcoding instructions called settings, which you can use to convert files to the most common media formats. If you want, you can modify the setting’s properties to meet your requirements.
Compressor also provides a number of preconfigured destinations, which combine settings and a post-transcoding action, such as uploading your file to YouTube or burning a Bluray disc.
Choose an output location
Designate a location on your computer or on a connected storage device where you want to save the transcoded media file. You can choose any of several preconfigured locations, including your computer desktop, your Movies folder, or the source folder of the original media. You can also choose a custom location.
Submit your media for transcoding
After you assign settings or a destination and specify an output location, click the Start Batch button to begin the transcoding process. You can monitor the progress of the transcoding in the Active view. After transcoding is complete, you can see information about the settings or destinations you used in the Completed view.
See Transcode files to view a list of detailed instructions.
Interface overview
The Compressor window has three views: Current, Active, and Completed. You can switch between these views by clicking a view button at the top of the window.
Current view
Current view is the default view in Compressor, where you prepare transcoding jobs and then submit your batch. When you open Compressor for the first time, Current view displays two basic areas:
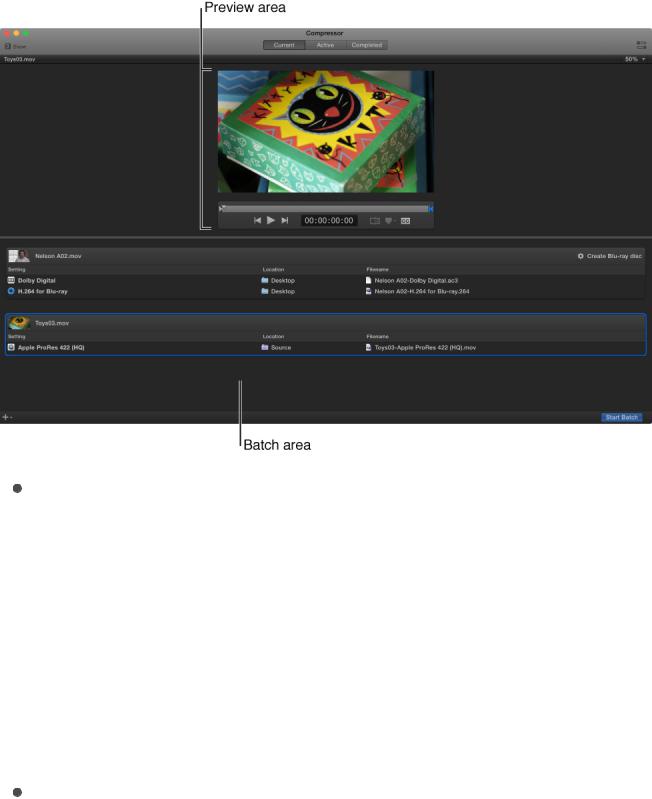
Batch area: The lower half of the main window displays transcoding batches that you add to Compressor. A batch is one or more transcoding jobs to be processed in a given Compressor session. A job is a source file to which you apply transcoding instructions. Each job in the batch area displays information about the source file, the job’s transcoding instructions (setting, output location, and output filename), and any post-transcoding actions that have been added (or that are part of the destination assigned to the job).
Preview area: Above the batch area, the preview area shows how your media file will look and sound after transcoding. Here you can also add metadata and markers to be included in the transcoded file.
You can expand the Current view to display additional areas:

Settings and Locations pane: Click the Settings & Locations button  at the top-left corner of the Compressor window to expand this area, then click Settings or Locations to display the individual panes. The Settings pane provides quick access to all the built-in destinations and settings, as well as to any custom destinations or settings that you created. Likewise, the Locations pane provides quick access to all the built-in save locations, and to any custom save locations that you created. You apply settings, destinations, and locations to a job by dragging an item from these panes to the job in the batch area.
Inspector pane: Click the Inspector button  in the upper-right corner of the Compressor window to expand this area. The inspector pane has several views that change, depending on the item that is selected. When you select a batch (by clicking the background of the batch area), the Batch inspector appears, displaying basic information about the current batch. When you select a job in the batch area, the Job inspector
appears, displaying a summary of the job’s transcoding instructions as well as controls for adding metadata and modifying job actions. When you select a specific transcoding instruction in the batch area (one of the rows under the job), the General, Video, and Audio inspectors appear. These three panes contain adjustable properties that you can use to customize the setting or destination.
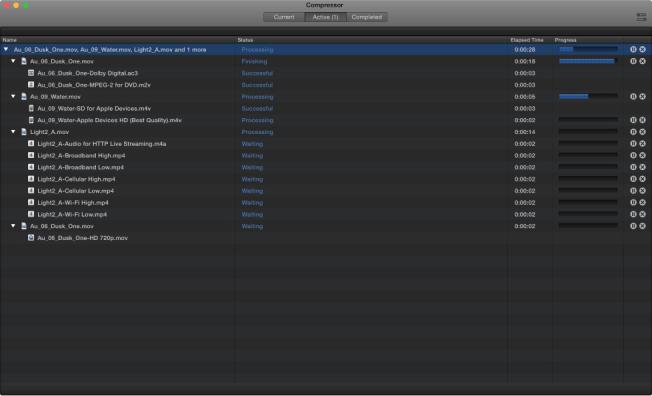
Active view
In Active view, the Compressor window displays status information about batches (and their constituent jobs) currently being transcoded. In this view, you can monitor progress bars as well as pause or cancel the transcoding process.
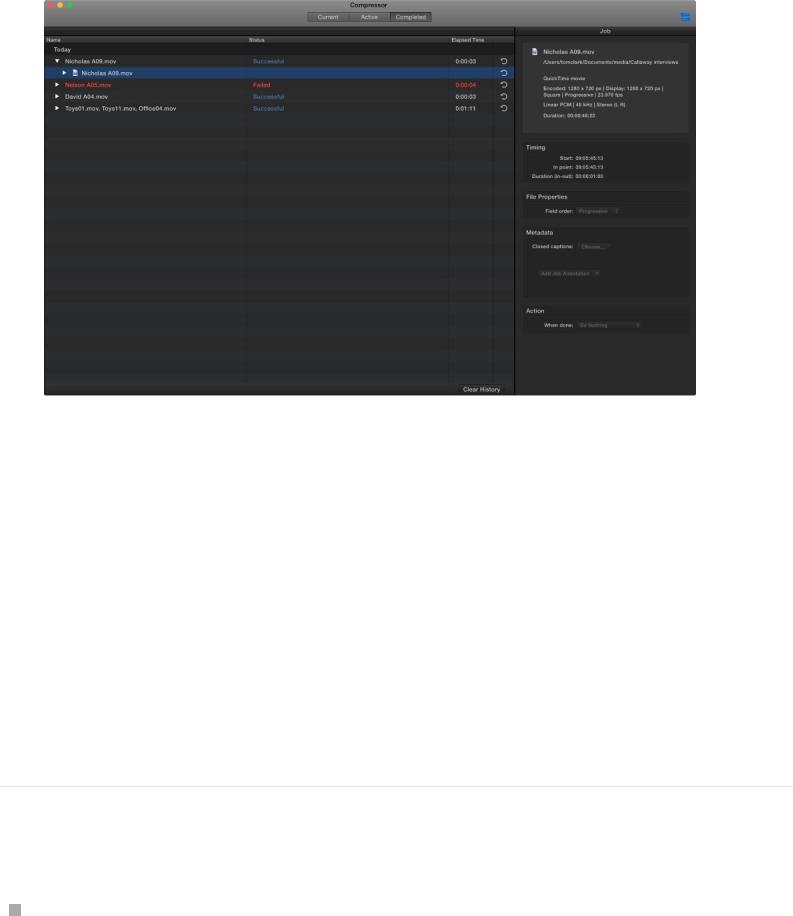
Completed view
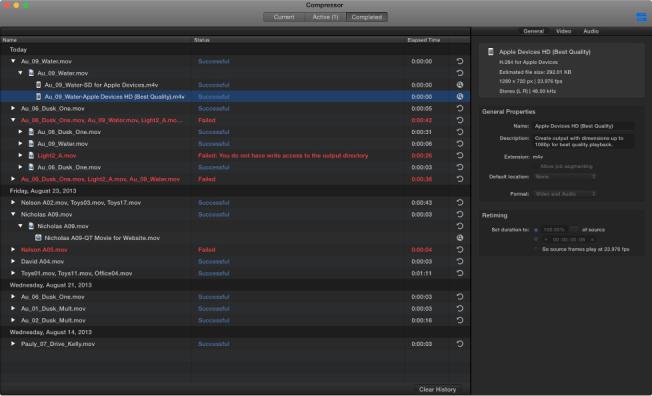
In Completed view, you can view information about batches and jobs that have been successfully transcoded, as well as information about items that failed to transcode.
A list of batches is shown on the left side of the window. Click a disclosure triangle beside a batch to see its constituent jobs and output files. Select a batch, job, or output file in the list to see additional information in the inspector pane (on the right).

Simple transcoding
Simple transcoding overview
When you add a source file to Compressor and apply output instructions (all done in Current view), you create a transcoding job. You can submit a single job for transcoding, or add more source files (and output instructions), then submit a batch of jobs for transcoding.
Each job in a batch has several parts:
Source file: The media file that you want to transcode.
Setting: The transcoding instructions that specify how the file will be processed. Compressor provides a variety of built-in settings that you can use to output files in common media formats. Additionally, Compressor provides a number of preconfigured destinations—one or more settings combined with an automated job action that’s performed after transcoding. For example, if you use the Publish to Facebook destination to transcode a source file, Compressor outputs a high-quality QuickTime movie file, then applies the destination’s job action to upload the transcoded file to your Facebook account.
Location: The place on your computer or a connected device where the transcoded file will be saved. You can use one of the built-in locations, or specify a new location.
Filename: The title of the transcoded file. You can use the

default filename (the name of the source file) or type a custom filename.
Job action: Optionally, you can add a post-transcoding action to a job, such as burning a DVD, uploading to Vimeo or YouTube, and so on. Each of the built-in destinations already contains a job action.
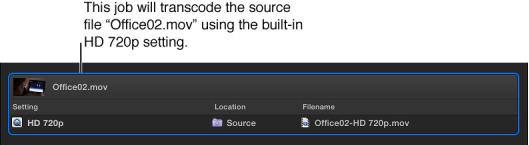
In the example below, two jobs make up the batch:
The first job uses the built-in Create DVD destination to output a Dolby Digital audio file and an MPEG-2 video file. The transcoded files will be saved to the source folder (the folder where the source media is stored), and after the files are transcoded, they’ll be burned to a DVD (using the Create DVD job action).
The second job uses two built-in settings (Small and HD 720p) to create a small QuickTime file and a high-definition (HD) QuickTime file. The transcoded files will be saved to the desktop. Because there’s no job action, the user will have to manually move or otherwise distribute each file.
Transcode files
The easiest way to transcode media files in Compressor is to use or one or more built-in settings or a built-in destination (settings that are combined with a post-transcoding job action, such as uploading to Facebook or burning a Blu-ray disc).
Set up the first transcoding job in a batch
1. Click the Add File button in the batch area.
2.In the file window that appears, select a media file, then click Add.
3.In the Settings window that appears, do the following:
a.Select one or more transcode settings or a destination from the list.
The settings list contains basic settings, as well as
destinations, grouped by category. To choose a specific setting, click the disclosure triangle beside a destination or a setting group (Podcasting, for example), then select one or more settings.
Important: For destinations, always select the destination name. If you select a setting that’s in the destination, the destination’s job action will not be used when processing the job.
b. Choose a save location from the pop-up menu.
4.When you’re satisfied with your setting and location choices, click OK.
The new job is displayed in the batch area. The job includes a thumbnail of the source file and the transcoding output instructions (setting, location, and filename). If you chose multiple settings, or a destination with multiple outputs, each output appears in a separate row. If you chose a destination, its job action appears in the upper-right corner of the job area.
To learn more about the built-in destinations and settings, see Built-in settings and Built-in destinations.
The job also appears in the preview area (above the batch area), where you can see the video you’re transcoding, as well as perform a number of other tasks. See Preview jobs.
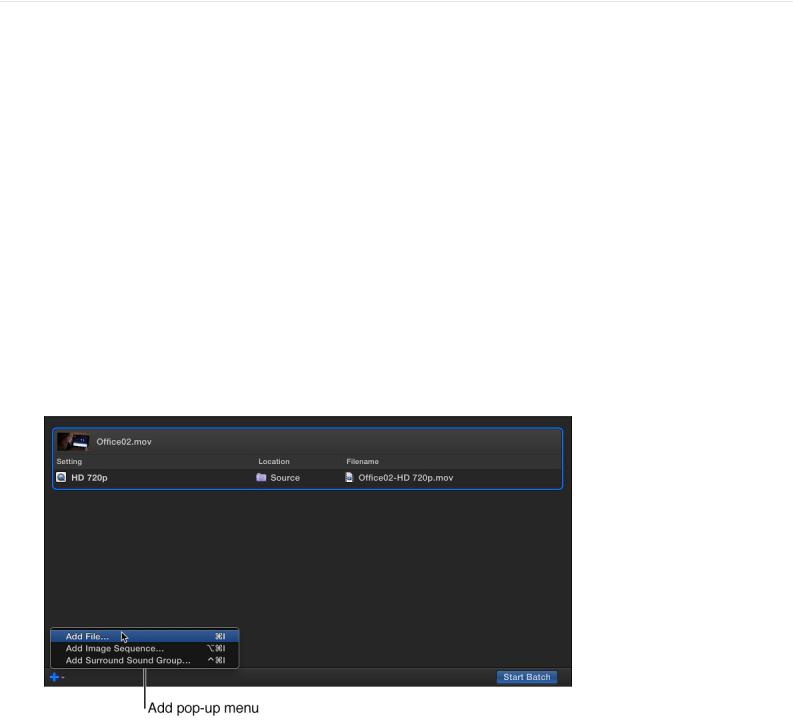
Add additional jobs to a batch
Optionally, you can add additional source files (and transcode instructions) to a batch.
1.Choose Add File from the Add pop-up menu  under the batch area.
You can also add a set of image sequence files or surround sound files. For more information, see Work with image sequence files and Import and modify surround sound files.
2.In the file window that appears, select one or more media files, then click Add.
Shift-click to select consecutive files; Command-click to select nonconsecutive files.
The batch area displays a new job for each source file you add.
3.To add transcode settings, click the Add Outputs button inside each job in the batch area.
4.In the Settings window that appears, select one or more settings or destinations, choose a save location, then click OK.
Tip: Shift-click to select consecutive settings; Command-click to select nonconsecutive settings.
The output instructions that you specified appear in the job. If you chose multiple settings or a destination with multiple outputs, each output appears in a separate row. If you chose a destination, its job action appears in the upper-right corner of the job area.
5.To change the name of a file to be output, double-click its name in the Filename column, then enter a new name.
The default name assigned to each transcoded file is the source filename appended with the extension of the format used during transcoding (.mov or .mp4, for example).
Note: If you see an alert icon  to the left of the filename, the filename assigned to that output row has already been used.
6.To view the properties of a setting, select an output row, then
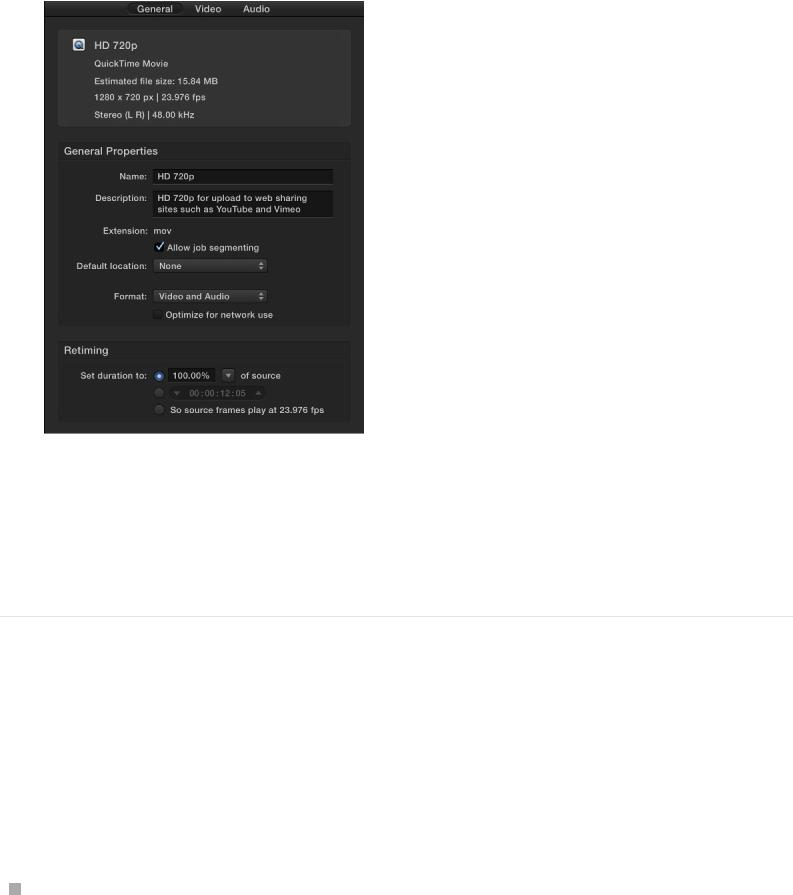
open the inspector by clicking the Inspector button  in the upper-right corner of the Compressor window.
Depending on the setting you’re viewing, general, video, and audio properties are displayed in the inspector. For information about modifying these properties, see View and modify setting properties.
Add and remove job outputs
You can add additional transcoding instructions to a job by adding one or more output rows. You can also remove output rows.
Do one of the following:
Add an output row: Position the cursor over an output row in the job, click the Add button  that appears at the end of the

row, then, in the window that appears, select one or more settings, choose a location, and click OK.
Remove an output row: Position the cursor over the output row that you want to remove, then click the Remove button  that appears at the end of the row.
Transcode a batch
After you’ve configured the jobs in your batch using the tasks above, you can transcode the batch.
Click the Start Batch button in the lower-right corner of the batch area and, if necessary, follow the instructions to complete the transcoding process.
The Compressor window switches to Active view, where you can monitor the transcoding process.
View information about completed jobs
In Completed view, you can see how a file was transcoded.
1.Click the Completed button at the top of the Compressor window.
2.Select a batch, job, or transcoded file and, if necessary, click the Inspector button  .
.
In the inspector (on the right), you can view information about the batch or job, or view the general, video, or audio properties for the setting used to transcode the file.
3.To view the output file, click the Show in Finder button  .
.
If the Show in Finder button is not visible, click the disclosure triangles on the left side of the Completed view window.
Create a new job from a completed job
In Completed view, click a job’s Reuse button  .
.
All of the job’s information is copied to Current view, where you can modify the job’s setting properties and other
information as necessary, then transcode the new job.
Preview jobs
You can preview what your transcoded files will look like before you process a job. The preview area of the Compressor window has a number of tools to help you previsualize how your final output will appear.
Note: Retiming and interlacing property adjustments (that you make in the Video pane of the inspector) are not displayed in the transcoding preview.
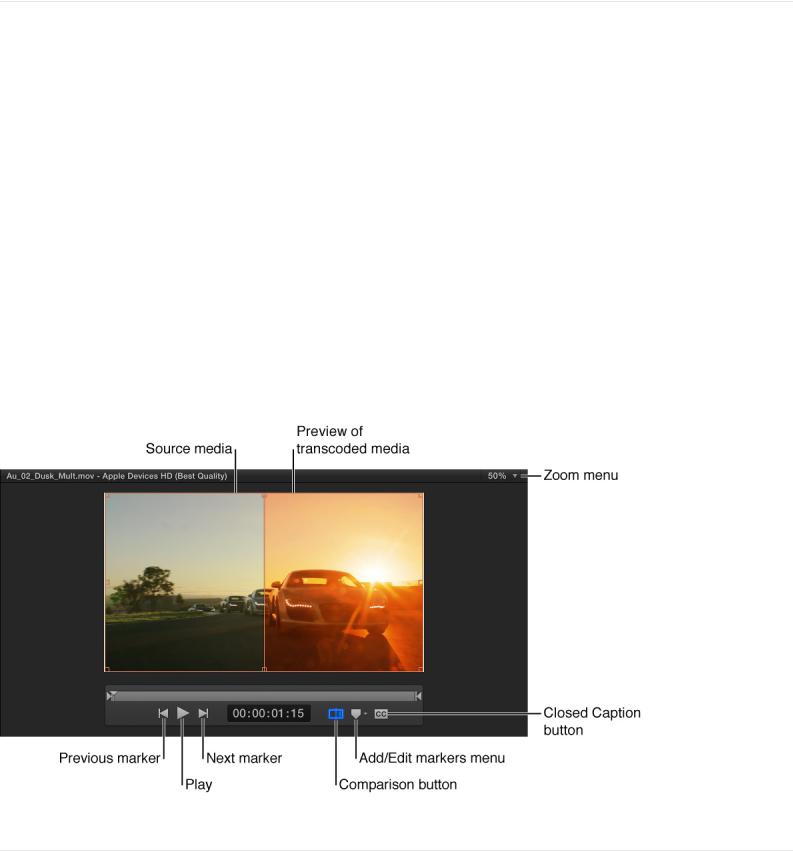
Preview how a transcoded file will look and sound

1.In a job in the batch area, select the output row that includes the setting you want to preview.
2.If the Comparison button  in the preview area isn’t already selected (highlighted blue), click it to turn on comparison previewing.
3.Click the Play button  .
.
The source file video plays on the left side of the preview area, and a preview of the transcoded file plays on the right side. The transcoded audio plays through your computer speakers (or through connected speakers).
Zoom in or out in the preview area
Do one of the following:
Pinch open or closed on a trackpad.
Double-tap on a trackpad to toggle the zoom level between 100% and “Fit.”
Click the Zoom pop-up menu (in the upper-right corner of the preview area), then choose a zoom level.
Press Shift-Z to resize the preview area to fit the current available window space.
Tip: To increase the available preview area space, resize the Compressor window, or drag the divider bar between the preview area and the batch area down.

View different areas of a zoomed-in preview area
When the preview area is zoomed in to a level greater than 100%, you cannot view the entire image at once. However, you can scroll the preview area to see more of the image.
Do one of the following:
Swipe the trackpad using two fingers.
Drag the inner box of the navigation control (in the upper-right corner of the zoomed-in preview area).
View closed-caption or subtitle text in the preview area
If your job includes subtitles or closed-caption data, you can view that text in the preview area.
1.In the batch area, select the output row for the job containing the subtitle or closed-caption data.
2.If there is more than one subtitle or closed-caption file, select the row for the text you want to view.
3.In the preview area click the Closed Caption button  .
.
Note: Subtitles can only be added to iTunes Store packages.
For more information about adding closed-caption data to a job,
see Add metadata.
In the preview area, you can also add markers, set a poster frame, or identify a portion of the source file to transcode.
Built-in settings
Use the built-in settings, grouped by category in the Settings pane, to convert any file from its source format to other commonly used formats.
Built-in setting |
Contains |
Use to |
group |
|
|
|
|
|
Apple Devices |
Apple |
Create iTunes- |
|
Devices HD |
compliant H.264 |
|
(Best Quality) |
files for |
|
Apple |
distribution, |
|
Devices HD |
including files |
|
(Most |
that can be used |
|
Compatible) |
for streaming |
|
SD for Apple |
high-definition |
|
(HD) video and |
|
|
Devices |
|
|
standard- |
|
|
|
|
|
|
definition (SD) |
|
|
video. |

Audio Formats |
AAC File |
Create audio |
|
AC3 File |
files in the most |
|
AIFF File |
commonly used |
|
formats. |
|
|
CAF File |
|
|
|
EC3 File
MP3 File
WAVE File
Motion Graphics |
Open EXR |
Create files for |
|
Image |
use with motion |
|
Sequence |
graphics |
|
QuickTime |
applications. |
|
Animation |
|
QuickTime
ProRes with
Alpha
TIFF Image
Sequence
MPEG Files |
MPEG-2 422 |
Create |
|
Program |
broadcast- |
|
stream, 15 |
quality, high- |
|
Mbps |
resolution, high |
|
MPEG-2 |
bit rate video |

Program files. stream, 15
Mbps
MPEG-2
Transport stream, 15 Mbps
Podcasting |
AAC for |
Create files for |
|
Audio |
audio and video |
|
Podcasting |
podcasting. |
|
H.264 for |
|
|
Video |
|
|
Podcasting |
|
|
MP3 for |
|
|
Audio |
|
|
Podcasting |
|
ProRes |
Apple ProRe |
Create high- |
|
s 4444 XQ |
quality, high- |
|
Apple ProRe |
performance |
|
s 4444 |
files for use with |
|
Apple ProRe |
Final Cut Pro |
|
and post- |
|
|
s 422 HQ |
|
|
production |
|
|
Apple ProRe |
|
|
workflows. |
|
|
|

s 422
Apple ProRe s 422 LT
Apple ProRe s 422 Proxy
Uncompressed |
Uncompress |
Create |
|
ed 10- |
uncompressed |
|
bit 4:2:2 |
10-bit and 8-bit |
|
Uncompress |
4:2:2 QuickTime |
|
ed 8-bit 4:2:2 |
movies. |
Video Sharing |
4K |
Create |
Services |
HD 1080p |
QuickTime files |
|
HD 720p |
for publishing to |
|
video-sharing |
|
|
Large 540p |
|
|
websites like |
|
|
SD 480p |
|
|
YouTube and |
|
|
Small |
|
|
Vimeo. Includes |
|
|
|
large and small |
|
|
HD and SD |
|
|
settings. |
|
|
|
You can also customize a built-in setting or create your own custom setting from scratch. For example, you can create a

custom setting to convert progressive video to interlaced video, or to convert 29.97-fps video to 23.98 fps video. Before you create a custom setting, view the related built-in settings to see if any of those meet your needs. If one does, or if it comes close, duplicate that setting, then modify any properties that you need to change. The advantage of duplicating a setting, rather than creating a new setting from scratch, is that many of the properties are already configured, and thus, you’ll need to make fewer adjustments to the setting. For more information, see Create and work with custom settings.
Built-in destinations
Destinations, available in the Settings pane, combine one or more settings and a post-encode job action, which automates tasks such as emailing, copying, and moving transcoded files.
Built-in |
Contains |
Use to |
destination |
|
|
|
|
|
Add to iTunes |
Setting: Apple |
Create an Apple |
Library |
Devices HD |
device- |
|
(Best Quality) |
compatible |
|
Job action: Add |
H.264 file, then |
|
automatically |
|
|
to iTunes Library |
|
|
add the file to |
|
|
|
|
|
|
your iTunes |
|
|
library. |

Create Blu-ray |
Settings: |
Create an H.264 |
|
Dolby Digital |
elementary |
|
stream and a |
|
|
H.264 for |
|
|
Dolby Digital |
|
|
Blu-ray |
|
|
audio file, then |
|
|
|
|
|
Job action: |
automatically |
|
Create Blu-ray |
burn the files to |
|
disc |
a Blu-ray disc. |
Create DVD |
Settings: |
Create an |
|
Dolby Digital |
MPEG-2 |
|
elementary |
|
|
MPEG-2 for |
|
|
stream and a |
|
|
DVD |
|
|
Dolby Digital |
|
|
|
|
|
Job action: |
audio file, then |
|
Create DVD |
automatically |
|
|
burn the files to |
|
|
a DVD. |
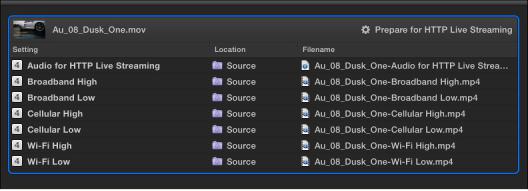
Prepare for |
Settings: |
Create a set of |
|
HTTP Live |
Audio for |
MPEG-4 files, |
|
Streaming |
then process |
||
HTTP Live |
|||
|
your transcoded |
||
|
Streaming |
||
|
files and upload |
||
|
Broadband |
||
|
them to the |
||
|
High |
||
|
server you |
||
|
|

Broadband |
specify. The files |
|
Low |
are compatible |
|
Cellular High |
with a variety of |
|
Cellular Low |
devices, such as |
|
smartphones |
||
Wi-Fi High |
||
and media |
||
Wi-Fi Low |
||
players. |
||
|
||
Job action: |
|
|
Prepare for |
|
|
HTTP Live |
|
|
Streaming |
|
Publish to |
Setting: HD |
Create an H.264 |
720p |
file, then |
|
|
Job action: |
automatically |
|
publish it to your |
|
|
Publishing to |
|
|
||
|
||
|
account. |
|
|
|
Publish to Vimeo Setting: Up to |
Create an H.264 |
|
4K |
file, then |
|
Job action: |
automatically |
|
publish it to your |
||
Publishing to |
||
Vimeo account. |
||
Vimeo |
||
|
||
|
|

Publish to |
Setting: Up to |
Create an H.264 |
YouTube |
4K |
file, then |
|
Job action: |
automatically |
|
publish it to your |
|
|
Publishing to |
|
|
YouTube |
|
|
YouTube |
|
|
account. |
|
|
|
You can also create a custom destination either by duplicating an existing destination or creating a new destination. For example, you can modify the built-in Publish to Vimeo destination to output a larger or smaller frame size. For more information, see Create and work with custom destinations.
Built-in locations
Use the following built-in locations, available in the Locations pane, to specify the save location of a transcoded file.
Built-in location |
Use to |
|
|
Desktop |
Save the transcoded file to |
|
the user’s desktop. |
Movies |
Save the transcoded file to |
|
the user’s Movies folder. |

Source |
Save the transcoded file to |
|
the same location as the |
|
source media file. |
|
|
You can also create a custom location, either by duplicating an existing location or by creating a new location. When you create a custom location, you can also specify a filename format for transcoded files. For more information, see Work with locations.

Advanced adjustments
Advanced adjustments overview
For basic transcoding jobs, you can use the built-in settings and destinations that come with Compressor. However, if you have complex or custom transcoding specifications, you can make adjustments to the built-in settings and destinations in a number of ways:
For a custom transcoding job that you will use only once, apply a built-in setting or destination and then modify its properties in the inspector. See View and modify setting properties and View and modify destination properties.
For a custom transcoding job that you will use more than once, create a custom setting or destination (by duplicating and modifying a built-in setting or destination). See Create and work with custom settings and Create and work with custom destinations.
You can also customize the various other components of a Compressor batch, including save locations, job properties, job actions, and batch properties. See Work with locations, View and modify job properties, and Work with batches.
Work with settings
Loading...