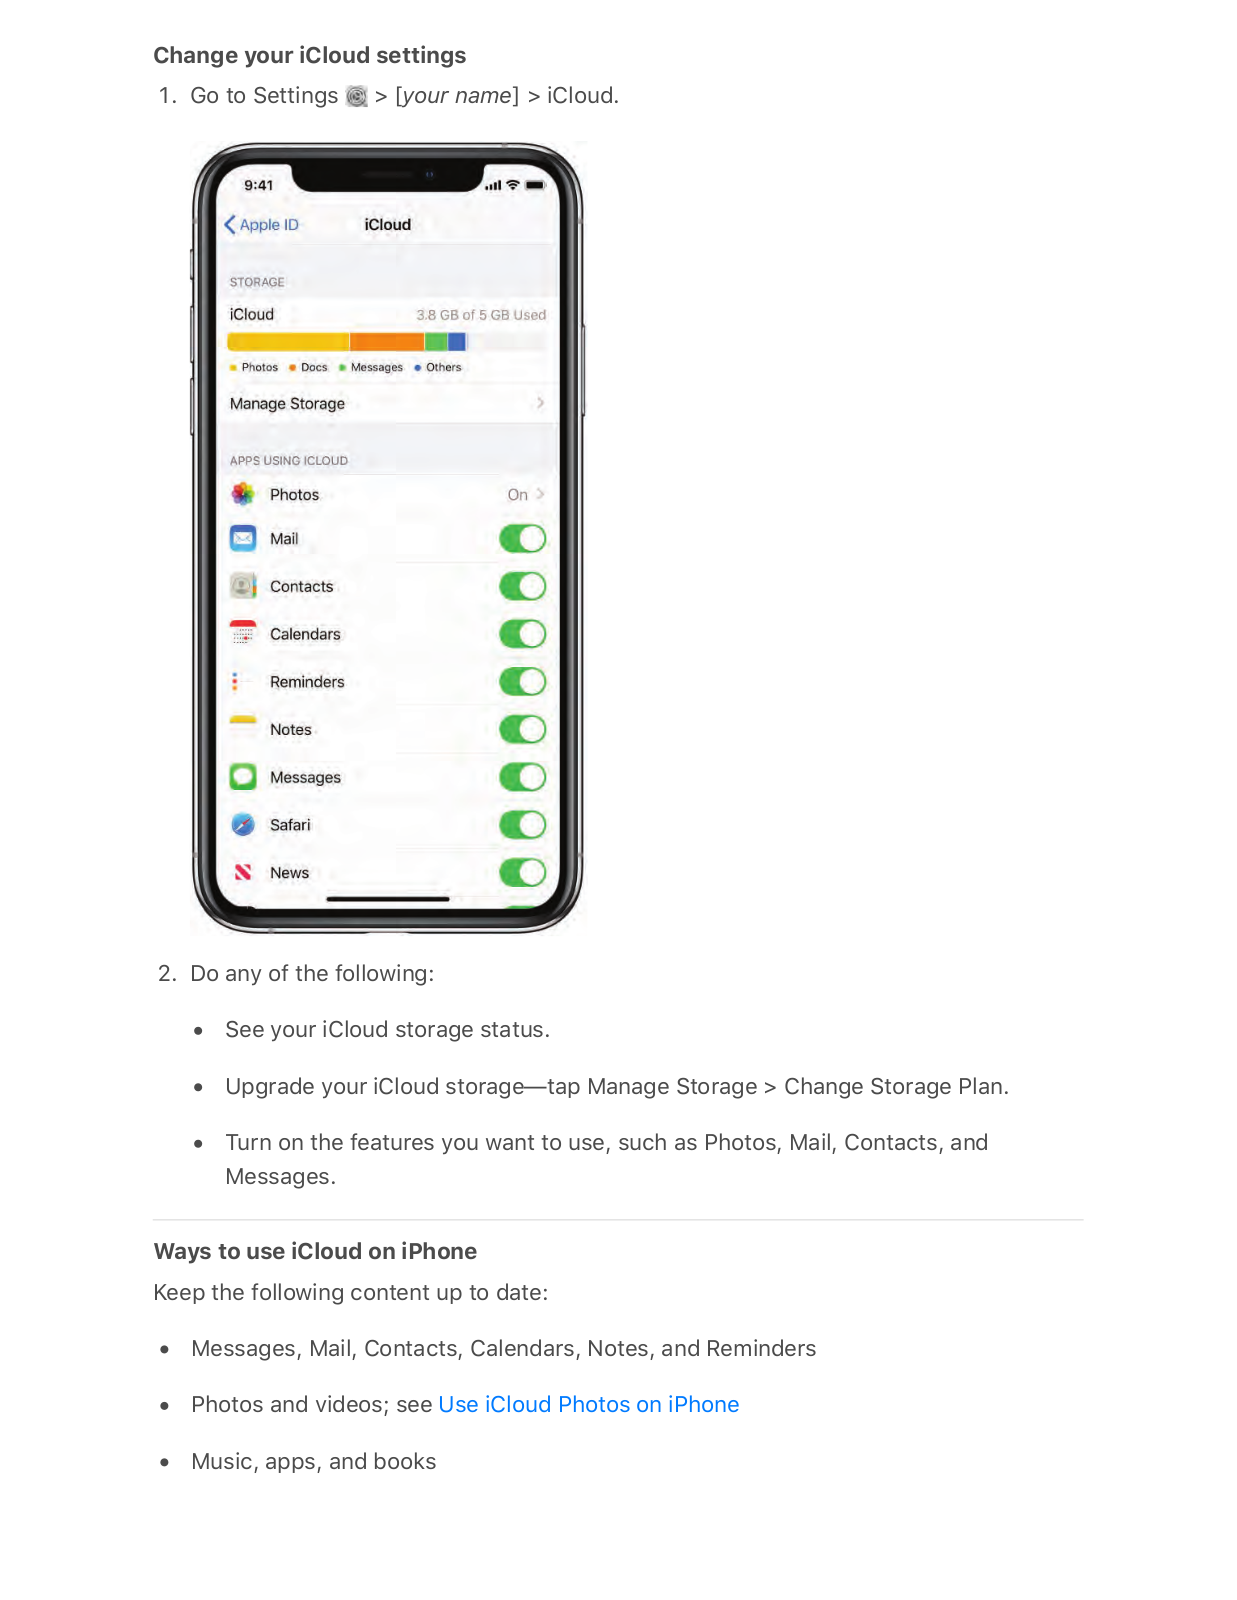
Apple E3304A Users Guide

0 (0)

!"#$%& '(&)*+,!-&

!"#$%&'()*+%,-+)##.+&, /),0+12,-&+(3',)#

!"#$%&''($)($)%&$*+)+,&

!"#$#%$&'%($)*+%'"$,,-$)*+%'"$,,$*.%-$/'0 )*+%'"$,,$*.%$1/23$4"/.'$)'#5)#)6"$7"8#5."8- 58"$9%5.$:/;"$/8$9%5.$</88(%.0-$/'0$8"" (+/#=8$<%88)>?"$()#+$#+"$/@/A)'7$B?#./ C)0"$;/@"./3

D1""#$#+"$'"2#$7"'"./#)%'$%:$)*+%'"E

-.&$/"0&,"$*(,$"''$)%&$1%()1

B8"$9%5.$)*+%'"$#%$#/&"$7."/#$8+%#8$)'$/'9 8)#5/#)%'3$F.%@$/$;/'0)0$<+%#%$#%$/$8#50)%G H5/?)#9$<%.#./)#I9%5$;/'$#/&"$#+"@$/??$()#+ 9%5.$)*+%'"$;/@"./3

DJ/&"$7."/#$<+%#%8$()#+$)*+%'"E

2"3&$"$),45$64)%$47%(.&

)*+%'"$@/&"8$#./6"?)'7$/$>.""A"I8;%5# ?%;/#)%'8$>":%."$9%5$?"/6"-$;+";&$/).<%.# )':%.@/#)%'-$&""<$;."0)#$;/.08$/'0$#./6"?

</88"8$%.7/')A"0-$/'0$."?)6"$#+"$@"@%.)"8 (+"'$9%5$7"#$+%@"3

DK+/'7"$#+"$(/9$9%5$#./6"?E

!)",)$%&"')%#$%"84)1

)*+%'"$;/'$+"?<$9%5$#./;&$0/#/$/>%5#$9%5. +"/?#+$/'0$/;#)6)#9$</##".'8-$>";%@"$@%." @)'0:5?-$/'0$8#/.#$/$>"0#)@"$.%5#)'"3

DM"/;+$9%5.$+"/?#+$/'0$("??'"88$7%/?8E

J%$>.%(8"$#+"$)*+%'"$B8".$!5)0"-$;?);&$J/>?"$%:$K%'#"'#8$/#$#+"$#%<$%: #+"$</7"3

L:$9%5$'""0$@%."$+"?<-$6)8)#$#+"$)*+%'"$N5<<%.#$(">8)#"3

9&'/(0& 9%"):1$.&6$4.$4-!$;< !&)$+5$".=$>&)$1)",)&= ?"14/1 !4,4 @551

A"04'#$!%",4.> B1&$47%(.&$64)%$()%&,$=&C4/&1 7,4C"/#$".=$1&/+,4)# D&1)",)E$+5=")&E$,&1&)E$".=$,&1)(,& @//&11484'4)# !"*&)#E$%".='4.>E$".=$1+55(,)

F(5#,4>%)

.#/01(*%&2*!%*!34*56

!"#$%&'()$@$.&6$G",3$H(=&$(5)4(.$>4C&1$)%&$&.)4,&$4-!$&I5&,4&./&$"$8&"+)4*+'$=",3 /('(,$1/%&0&$)%")$41$&"14&,$(.$#(+,$&1$".=$5&,*&/)$*(,$'(6J'4>%)$&.C4,(.0&.)1K$L+4/3'# )+,.$(.$G",3$H(=&$*,(0$F(.),('$F&.)&,E$(,$1&)$)($"+)(0")4/"''#$)+,.$(.$")$.4>%)K$9%&. G",3$H(=&$41$)+,.&=$(.E$)%&$'4>%)$*,(0$#(+,$=&C4/&$6(.:)$=41)+,8$)%&$5&(5'&$",(+.=$#(+K !&&$@=N+1)$)%&$47%(.&$1/,&&.$8,4>%).&11$".=$/('(,K

*+','-$?,(61&$#(+,$5%()($'48,",#$8#$="#1E$0(.)%1E$".=$#&",1$1($4):1$&"1#$)($*4.=$".= 1%",&$#(+,$5%()(1$".=$C4=&(1K$@1$#(+$1/,(''E$M4C&$7%()(1$".=$C4=&(1$5'"#E$8,4.>4.>$#(+, 5%()($'48,",#$)($'4*&K$D&=&14>.&=$&=4)4.>$)(('1$0"3&$4)$&"1#$*(,$#(+$)($"55'#$/%".>&1$)( #(+,$5%()(1$".=$1&&$")$"$>'"./&$6%&,&$)%(1&$/%".>&1$6&,&$0"=&K$!&&$O4&6$5%()(1$".= C4=&(1$".=$P=4)$5%()(1$".=$C4=&(1K

."/)#"$Q!+55(,)&=$0(=&'1R$@$.&6$7(,),"4)$M4>%)4.>$&**&/)E$S4>%JT$M4>%)$H(.(E /,&")&1$"$8&"+)4*+'$'((3$64)%$"$>,"#$1/"'&$1+8N&/)$(.$"$6%4)&$8"/3>,(+.=K$7(,),"4)$'4>%)4.>

.(6$'&)1$#(+$C4,)+"''#$"=N+1)$)%&$4.)&.14)#$(*$&"/%$1)+=4($'4>%)4.>$&**&/)K$!&&$2"3&$7(,),"4) 0(=&$5%()(1$64)%$#(+,$47%(.&$/"0&,"K

&"0-$D&8+4')$*,(0$)%&$>,(+.=$+5E$H"51$*&")+,&1$0(,&$,&"'41)4/$=&)"4'1$*(,$,("=1E 8&"/%&1E$5",31E$".=$8+4'=4.>1K$PI5'(,&$6%&,&$#(+:,&$>(4.>$8&*(,&$#(+$>&)$)%&,&$64)%$M((3 @,(+.=E$8+4'=$/(''&/)4(.1$(*$#(+,$*"C(,4)&$'(/")4(.1E$".=$0(,&K$!&&$M((3$",(+.=$4.$H"51 ".=$F,&")&$/(''&/)4(.1$4.$H"51K

1234%24%52,+%6007)%8!$!4>.$4.$)($"551$".=$6&814)&1$U+4/3'#$".=$&"14'#$+14.>$)%&$@55'&$VG #(+$"',&"=#$%"C&K$W($*4''4.>$(+)$*(,01$(,$/,&")4.>$.&6$5"116(,=1XN+1)$)"5$!4>.$4.$64)% @55'&E$+1&$A"/&$VG$(,$2(+/%$VGE$".=$#(+:,&$"''$1&)K$!&&$!4>.$4.$)($6&814)&1$".=$"551$64)% #(+,$@55'&$VGK

12#2$2%&$.&6$!4,4$C(4/&$1(+.=1$4./,&=48'#$.")+,"'E$5",)4/+'",'#$6%&.$15&"34.>$'(.>&, 5%,"1&1K$!4,4$"'1($(**&,1$5&,1(."'4Y&=$1+>>&1)4(.1$6%&.$#(+$1&",/%$4.$7(=/"1)1E$!"*",4E ".=$H"51E$".=$/".$=&)&/)$,&04.=&,1$4.$H&11">&1K$!&&$A4.=$(+)$6%")$!4,4$/".$=(K

642/'92%"4(%&)/'92$2%,&&$.&6$@.40(N4$/%","/)&,1X0(+1&E$(/)(5+1E$".=$/(6X>4C&$#(+ 0(,&$(5)4(.1$)($&I5,&11$#(+,1&'*K$H"3&$#(+,$(6.$H&0(N4$(.&$4.$"$),4''4(.$64)%$.&6 %"4,1)#'&1E$%&"=6&",E$0"3&+5E$".=$54&,/4.>1K$@+)(0")4/"''#$>&.&,")&$1)4/3&,$5"/31$8"1&= (.$#(+,$@.40(N4$".=$H&0(N4$/%","/)&,1$)%")$"''(6$#(+$)($&I5,&11$"$,".>&$(*$&0()4(.1$4. H&11">&1K$!&&$B1&$@.40(N4$".=$H&0(N4$4.$H&11">&1K

&)--"3)-$@+)(0")4/"''#$1%",&$#(+,$."0&$".=$5%()($6%&.$#(+$1)",)$"$/(.C&,1")4(.K$Z(+ /".$+1&$".$@.40(N4E$".$40">&E$(,$"$0(.(>,"0$*(,$#(+,$5%()(K$!&&$P=4)$#(+,$H&11">&1

."0&$".=$5%()(K

:'4,-$Z(+$/".$.(6$>&)$/+1)(0$*(.)1$*,(0$)%&$@55$!)(,&$)($+1&$4.$=(/+0&.)1$#(+$/,&")& (.$47%(.&E$47(=$)(+/%E$".=$47"=K$!&&$V.1)"''$/+1)(0$*(.)1K

600%1,'#)$!+81/,48&$)($@55'&$@,/"=&E$"$>"0&$1&,C4/&$64)%$(C&,$;[[$.&6$>"0&1E$"''$64)%

.($"=1$(,$"==4)4(."'$5+,/%"1&1K$@$14.>'&$1+81/,45)4(.$'&)1$#(+$=(6.'("=$".=$5'"#$".# @55'&$@,/"=&$>"0&$*,(0$)%&$@55$!)(,&K$!&&$\&)$"551E$>"0&1E$".=$*(.)1$4.$)%&$@55 !)(,&K

;)<='"#($B1&$L+4/37")%$)#54.>$)($&.)&,$"$6(,=$8#$1'4=4.>$#(+,$*4.>&,$*,(0$(.&$'&))&,$)( )%&$.&I)K$2%&$3(",=$,&/(>.4Y&1$)%&$5")%$#(+$=,"6$".=$/(.C&,)1$4)$*(,$#(+E$0"34.> (.&J%".=&=$)#54.>$"$8,&&Y&K$!&&$P.)&,$)&I)$+14.>$)%&$(.1/,&&.$3(",=K

6>(2'%1+"#243%52,+%62#*'(-$7"4,$)6($1&)1$(*$@4,7(=1$)($(.&$47%(.&$".=$&.N(#$)%&$1"0& 1(.>$(,$0(C4&$"'(.>$64)%$"$*,4&.=K$!&&$M41)&.$64)%$@4,7(=1K

?)"7,+$@$0(,&$5&,1(."'4Y&=$S&"')%$"55$0"3&1$4)$&"14&,$)%".$&C&,$)($"//&11$)%& 4.*(,0")4(.$)%")$0"))&,1$0(1)$)($#(+K$94)%$)%&$.&6$F#/'&$2,"/34.>$(5)4(.E$#(+$/".$3&&5 ),"/3$(*$#(+,$0&.1),+"'$/#/'&E$1&)$+5$*&,)4'4)#$.()4*4/")4(.1E$".=$0(,&K$!&&$O4&6$%&"')%$".= *4).&11$4.*(,0")4(.K

@)/24()#-$2%&$"''J.&6$D&04.=&,1$"55$0"3&1$4)$&C&.$&"14&,$)($/,&")&$".=$(,>".4Y& ,&04.=&,1K$B1&$)%&$U+4/3$)(('8",$)($"==$=")&1E$)40&1E$'(/")4(.1E$*'">1E$5%()(1E$".= 1/"..&=$=(/+0&.)1$)($#(+,$,&04.=&,$'41)1K$!&&$!&)$,&04.=&,1K

1+'#,A>,-$2%&$!%(,)/+)1$"55$41$.(6$8+4')$4.)($4-!$;<$".=$41$)%&$%(0&$*(,$"''$#(+, 1%(,)/+)1K$\&)$1)",)&=$64)%$!%(,)/+)1$8#$"==4.>$"$5&,1(."'4Y&=$="4'#$,(+)4.&$)($%&'5 1),&"0'4.&$#(+,$="#K$!&&$B1&$!%(,)/+)1$)($"+)(0")&$)"131K

."#*7"<$@.$"''J.&6$F",7'"#$="1%8(",=$>4C&1$#(+$"$14.>'&$5'"/&$)($3&&5$),"/3$(*$0"51E "+=4($/(.),('1E$".=$!4,4$1+>>&1)4(.1K$P"14'#$C4&6$)%&$F"'&.=",$"55$)($)"3&$"$>'"./&$")$)%& ="#$"%&"=E$)%&.$)"5$*(,$=4,&/)4(.1$(,$)($=4"'$4.$)($"$0&&)4.>K$!&&$V.),($)($F",7'"#K

*)#B'#/"4A)$A"/&$VG$+.'(/31$#(+,$=&C4/&$+5$)($<[$5&,/&.)$*"1)&,$4.$4-!$;<K$@551$(5&. +5$)($)6($)40&1$*"1)&,E$".=$"551$*,(0$)%&$@55$!)(,&$",&$5"/3">&=$4.$"$.&6$6"#$)%") 0"3&1$)%&0$+5$)($][$5&,/&.)$10"''&,K

*#2C"A<%"4(%-)A>#2,<$F(.),('$)%&$'(/")4(.$=")"$)%")$#(+$1%",&$64)%$"551K$Z(+$/".$/%((1& )($>,".)$".$"55$"//&11$)($#(+,$'(/")4(.$(./&$(,$".#)40&$#(+$+1&$4)K$D&/&4C&$.()4*4/")4(.1 6%&.$".$"55$41$+14.>$#(+,$'(/")4(.$4.$)%&$8"/3>,(+.=E$1($#(+$/".$=&/4=&$6%&)%&,$)( +5=")&$#(+,$5&,04114(.K

D",,)#<%24B'#/",2'4$@$.&6$(5)4(.$%&'51$1'(6$)%&$,")&$(*$8"))&,#$">4.>$8#$,&=+/4.>$)%& )40&$#(+,$47%(.&$15&.=1$*+''#$/%",>&=K$!&&$-5)404Y&$8"))&,#$/%",>4.>K

Learn tricks for iOS 13 The Tips app adds new suggestions frequently, so you can get the most from your iPhone. See Get tips.

Note: New features and apps may vary depending on your iPhone model, region, language, and carrier.

Set up and get started

Supported iPhone models

This guide helps you get started using iPhone and discover all the amazing things it can do on iOS 13, which is compatible with the following models:

iPhone 11 iPhone 11 Pro

iPhone 11 Pro Max

iPhone XS

iPhone XS Max

iPhone XR

iPhone X

iPhone 8 iPhone 8 Plus iPhone 7 iPhone 7 Plus iPhone 6s iPhone 6s Plus iPhone SE

You can update to the latest iOS software if your model supports it. To see the model and software version of your iPhone, go to Settings > General > About. See Get information about your iPhone.

Your features and apps may vary depending on your iPhone model, region, language, and carrier. To find out which features are supported in your region, see the iOS Feature Availability website.

Note: Apps and services that send or receive data over a cellular network may incur additional fees. Contact your carrier for information about your iPhone service plan and fees.

Turn on and set up iPhone

Turn on and set up your new iPhone over an Internet connection. You can also set up iPhone by connecting it to your computer. If you have another iPhone, iPad, iPod touch, or an Android device, you can copy your data to your new iPhone.

Note: If your iPhone is deployed or managed by a company or other organization, see an administrator for setup instructions. For general information, see the Apple at Work website.

Prepare for setup

To make setup as smooth as possible, have the following items available:

An Internet connection through a Wi-Fi network (you may need the name and password of the network) or cellular data service through a carrier

Your Apple ID and password; if you donʼt have an Apple ID, you can create one during setup

Your credit or debit card account information, if you want to add a card to Apple Pay during setup

Your previous iPhone or a backup of your device, if youʼre moving to a new iPhone

Your Android device, if youʼre transferring your Android content

Turn on and set up your iPhone

e.Press and hold the side button or Sleep/Wake button (depending on your model) until the Apple logo appears.

If iPhone doesnʼt turn on, you might need to charge the battery. For more help, see the Apple Support article If your iPhone, iPad, or iPod touch wonʼt turn on or is frozen.

g. Do one of the following:

If you have another iPhone, iPad, or iPod touch, you can use it to automatically set up your new device with Quick Start. Bring the two devices close together, then follow the onscreen instructions to securely copy many of your settings, preferences, and iCloud Keychain. (iOS 11, iPadOS 13, or later required.)

Tap Set Up Manually, then follow the onscreen setup instructions.

If youʼre blind or have low vision, triple-click the Home button to turn on VoiceOver, the screen reader.

Move from an Android device to iPhone

When you first set up your new iPhone, you can automatically and securely move your data from an Android device.

Note: You can use the Move to iOS app only when you first set up iPhone. If you already finished setup and want to use Move to iOS, you must erase your iPhone and start over, or move your data manually. See the Apple Support article Move content manually from your Android device to your iOS device.

e.On your device with Android version 4.0 or later, see the Apple Support article Move from Android to iPhone, iPad, or iPod touch and download the Move to iOS app.

gK$ -.$#(+,$47%(.&^

"K$ A(''(6$)%&$1&)+5$"1141)".)K

8K$ -.$)%&$@551$i$G")"$1/,&&.E$)"5$H(C&$G")"$*,(0$@.=,(4=K jK$ -.$)%&$@.=,(4=$=&C4/&^

"K$ 2+,.$(.$94JA4K

8K$ -5&.$)%&$H(C&$)($4-!$"55K

/K$ A(''(6$)%&$(.1/,&&.$4.1),+/)4(.1K

J6@K8KLM%2($"C(4=$4.N+,#E$,&"=$V05(,)".)$1"*&)#$4.*(,0")4(.$*(,$47%(.&$8&*(,&$+14.> 47%(.&K

4&0*,7*<&99,9/)*(&)=!<&*$%*!"#$%&

2%&$/&''+'",$/(..&/)4(.$(.$#(+,$47%(.&$,&U+4,&1$"$!VH$*,(0$"$/",,4&,d$/(.)"/)$#(+,$/",,4&, )($1&)$+5$"$/&''+'",$5'".K

47%(.&$_$".=$&",'4&,$0(=&'1$1+55(,)$(.&$/&''+'",$5'".$+14.>$"$.".(J!VHK

!(0&$0(=&'1$1+55(,)$G+"'$!VH$+14.>$"$.".(J!VH$".=$".$&!VH$Q.()$"C"4'"8'&$4.$"'' ,&>4(.1RK

S&,&$",&$1(0&$(*$)%&$0".#$6"#1$#(+$/".$+1&$G+"'$!VH^

B1&$(.&$.+08&,$*(,$8+14.&11$".=$".()%&,$.+08&,$*(,$5&,1(."'$/"''1K

@==$"$'(/"'$=")"$5'".$6%&.$#(+$),"C&'$)($".()%&,$,&>4(.K

S"C&$1&5",")&$C(4/&$".=$=")"$5'".1K

!"#$%&2($+1&$)6($=4**&,&.)$/",,4&,1E$#(+,$47%(.&$0+1)$8&$+.'(/3&=K

84-,"77%,+)%4"4'N18&

eK$ V.1&,)$"$5"5&,$/'45$(,$!VH$&N&/)$)(('$4.)($)%&$10"''$%('&$(*$)%&$!VH$),"#E$)%&.$5+1%$4. )(6",=$47%(.&$)($&N&/)$)%&$),"#K

Note: The shape and orientation of the SIM tray depend on the iPhone model and your region.

g. Remove the tray from iPhone.

j. Place the nano-SIM in the tray. The angled corner determines the correct orientation.

k.Insert the tray back into iPhone.

l.If you previously set up a PIN on the nano-SIM, carefully enter the PIN when prompted.

WARNING: Never try to guess a SIM PIN. An incorrect guess can permanently lock your SIM, and you wonʼt be able to make phone calls or use cellular data through your carrier until you get a new SIM. See the Apple Support article Use a SIM PIN for your iPhone or iPad.

Important: A nano-SIM may be required to use cellular services when connecting to GSM networks and some CDMA networks. An iPhone activated on a CDMA wireless network can also use a nano-SIM for connecting to a GSM network, primarily for international roaming. Your iPhone is subject to your wireless service providerʼs policies, which may include restrictions on switching service providers and roaming, even after the conclusion of any required minimum service contract. Contact your wireless service provider for more details. The availability of cellular capabilities depends on the wireless network, your iPhone model, and your location.

Set up your cellular plan with eSIM

On models that support eSIM, the eSIM provided by your carrier is stored digitally in iPhone.

e.Go to Settings > Cellular, then tap Add Cellular Plan.

g. Position iPhone so that the QR code provided by your carrier appears in the frame, or enter the details manually. You may be asked to enter a confirmation code provided by your carrier.

j.Tap Add Cellular Plan.

k.If the new plan is your second line, follow the onscreen instructions to set how you want the plans to work together.

Alternatively, you can activate your cellular plan through your carrierʼs app (if supported). Go to the App Store, download your carrierʼs app, then use the app to purchase a cellular plan.

You can store more than one eSIM on your iPhone, but you can use only one eSIM at a time. To switch eSIMs, go to Settings > Cellular, tap the plan you want to use, then tap Turn On This Line.

If you have a nano-SIM, you can use it as your second line. See the Apple Support article Using Dual SIM with an eSIM.

Manage your cellular plans

During setup on models with Dual SIM, you can choose how iPhone uses each line. To change the settings later, do the following:

e.Go to Settings > Cellular. g. Do the following:

Tap Cellular Data, then choose a default line. To allow iPhone to use either line depending on coverage and availability, turn on Allow Cellular Data Switching.

You may incur roaming charges if Data Roaming is on and youʼre outside the region covered by the carrierʼs network.

Tap Default Voice Line, then choose a line.

Below Cellular Plans, tap a line, then change settings such as Cellular Plan Label, Wi-Fi Calling, Calls on Other Devices, or SIM PIN. The label appears in Phone, Messages, and Contacts.

When using Dual SIM, note the following:

On iPhone 11, iPhone 11 Pro, and iPhone 11 Pro Max, while youʼre on a phone call, you can receive incoming calls on your other line only if the other line has Wi-Fi calling turned on.

On iPhone XR, iPhone XS, and iPhone XS Max, while youʼre on a phone call, any incoming calls on your other line (including calls from emergency services) go directly to voicemail (if available from your carrier); you wonʼt receive missed call notifications.

If you set up conditional call forwarding (if available from your carrier) from one line to another when a line is busy or not in service, the calls donʼt go to voicemail; contact your carrier for setup information.

If you make a phone call from another device by relaying it through your iPhone with Dual SIM, the call is made using your default voice line.

If you start an SMS/MMS Messages conversation using one line, you cannot switch the conversation to your other line; you need to delete the conversation and start a new conversation using the other line. Also, you may incur additional charges if you send SMS/MMS attachments on the line thatʼs not your cellular data line.

Instant HotSpot and Personal Hotspot use the line selected for cellular data.

Consider applicable data, voice, and roaming charges when managing your cellular plans, especially when you travel with iPhone. See View or change cellular settings on iPhone.

Some carriers let you unlock iPhone for use with another carrier (additional fees may apply). Contact your carrier for authorization and setup information. See the Apple Support article How to unlock your iPhone for use with a different carrier.

Connect iPhone to the Internet

Connect your iPhone to the Internet by using an available Wi-Fi or cellular network.

Connect iPhone to a Wi-Fi network

e.Go to Settings > Wi-Fi, then turn on Wi-Fi. g. Tap one of the following:

A network: Enter the password, if required.

Other: Joins a hidden network. Enter the name of the hidden network, security type, and password.

If appears at the top of the screen, iPhone is connected to a Wi-Fi network. (To verify this, open Safari to view a webpage.) iPhone reconnects when you return to the same location.

Connect iPhone to a cellular network

Your iPhone automatically connects to your carrierʼs cellular data network if a Wi-Fi network isnʼt available. If iPhone doesnʼt connect, check the following:

e. Verify that your SIM is activated and unlocked. See Set up cellular service on iPhone.

g.Go to Settings > Cellular.

j. Verify that Cellular Data is turned on. On models with Dual SIM, tap Cellular Data, then verify the selected line. (You can choose only one line for cellular data.)

When you need an Internet connection, iPhone does the following, in order, until the connection is made:

Tries to connect to the most recently used available Wi-Fi network

Shows a list of Wi-Fi networks in range and connects to the one you choose

Connects to your carrierʼs cellular data network

Note: If a Wi-Fi connection to the Internet isnʼt available, apps and services may transfer data over your carrierʼs cellular network, which may result in additional fees. Contact your carrier for information about your cellular data plan rates. To manage cellular data usage, see View or change cellular settings on iPhone.

Manage Apple ID and iCloud settings on iPhone

Your Apple ID is the account you use to access Apple services such as the App Store, the iTunes Store, Apple Books, Apple Music, FaceTime, iCloud, iMessage, and more.

Use iCloud to securely store your photos, videos, documents, music, apps, and more— and keep them updated across all your devices. With iCloud, you can easily share photos, calendars, locations, and more with friends and family. You can even use iCloud to help you find your iPhone if you lose it.

iCloud provides you with a free email account and 5 GB of storage for your mail, documents, photos and videos, and backups. Your purchased music, apps, TV shows, and books donʼt count against your available storage space. You can upgrade your iCloud storage right from iPhone.

Note: Some iCloud features have minimum system requirements. iCloud may not be available in all regions, and iCloud features may vary by region.

Sign in with your Apple ID

If you didnʼt sign in during setup, do the following:

e.Go to Settings .

g. Tap Sign in to your iPhone.

j.Enter your Apple ID and password.

If you donʼt have an Apple ID, you can create one.

k.If you protect your account with two-factor authentication, enter the six-digit verification code.

If you forgot your Apple ID or password, see the Recover your Apple ID website.

Change your Apple ID settings

e. Go to Settings > [your name]. g. Do any of the following:

Update your contact information

Change your password

Manage Family Sharing

.+"43)%<'>#%2.7'>(%-),,243-

eK$ \($)($!&))4.>1$$c$n."/*&(01$o$c$4F'(+=K

gK$ G($".#$(*$)%&$*(''(64.>^

!&&$#(+,$4F'(+=$1)(,">&$1)")+1K

B5>,"=&$#(+,$4F'(+=$1)(,">&X)"5$H".">&$!)(,">&$c$F%".>&$!)(,">&$7'".K

2+,.$(.$)%&$*&")+,&1$#(+$6".)$)($+1&E$1+/%$"1$7%()(1E$H"4'E$F(.)"/)1E$".= H&11">&1K

J"<-%,'%>-)%2.7'>(%'4%2*+'4)

T&&5$)%&$*(''(64.>$/(.)&.)$+5$)($=")&^

H&11">&1E$H"4'E$F(.)"/)1E$F"'&.=",1E$W()&1E$".=$D&04.=&,1 7%()(1$".=$C4=&(1d$1&&$B1&$4F'(+=$7%()(1$(.$47%(.&

H+14/E$"551E$".=$8((31

Documents; see Set up iCloud Drive on iPhone

Bookmarks, your reading list, and the webpages you have open in Safari; see Browse the web using Safari on iPhone

Passwords and credit cards; see Set up iCloud Keychain on iPhone

You can also do the following:

View your iCloud data on iPhone, iPad, iPod touch, Apple Watch, Mac, and iCloud.com (using a Mac or a Windows PC).

Share your photos and videos with the people you choose. See Share iPhone photos with Shared Albums in iCloud.

Share your iCloud storage on plans with 200 GB or more with up to six family members. See Share purchases with family members on iPhone.

Locate a missing iPhone, iPad, iPod touch, Apple Watch, Mac, or AirPods that belong to you or your family members. See Add or remove a device in Find My on iPhone.

Find your friends and family; you, your friends, and family can share locations, follow each other, and see everyoneʼs location on a map. See Add or remove a friend in Find My on iPhone.

Back up and restore your data. See Back up iPhone using iCloud or iTunes.

Note: If you enable iCloud for apps such as Music, Photos, Calendar, and Contacts on your iPhone, you canʼt use iTunes to sync them with your computer.

Download or bookmark the iPhone User Guide

You can view the iPhone User Guide in the Safari app , or download it to the Books app so you can read it even when youʼre offline.

View the user guide in Safari

In Safari, go to https://support.apple.com/guide/iphone.

To view the user guide in a different language, scroll down to the bottom of the page, tap the region link (United States, for example), then choose a region.

Tip: For quick access, add the guide as a shortcut on your Home screen or as a bookmark in Safari. Tap , then choose any of the following:

Add to Home Screen: The shortcut appears as a new icon on the Home screen.

Add Bookmark: The bookmark appears when you tap in Safari.

Download the user guide from Apple Books

If you download the user guide from Apple Books, you can read it even when iPhone isnʼt connected to the Internet.

e.Open the Books app .

g. Tap Search, then enter “iPhone User Guide for iOS 13.” j. Tap Get, then wait for the book to download.

See Buy books from Apple Books on iPhone.

Basics

Wake and unlock iPhone

iPhone turns off the display to save power, locks for security, and goes to sleep when youʼre not using it. You can quickly wake and unlock iPhone when you want to use it again.

Wake iPhone

To wake iPhone, do one of the following:

Press the side button or Sleep/Wake button (depending on your model).

Raise iPhone. You can turn off Raise to Wake in Settings > Display & Brightness.

Apple E3304A Users Guide

Tap the screen (supported models).

Unlock iPhone with Face ID (iPhone X and later)

e.Tap the screen or raise iPhone to wake it, then glance at your iPhone.

The lock icon animates from closed to open to indicate that iPhone is unlocked.

g. Swipe up from the bottom of the screen.

To lock iPhone again, press the side button. iPhone locks automatically if you donʼt touch the screen for a minute or so.

Unlock iPhone with Touch ID (models with a Home button)

Press the Home button using the finger you registered with Touch ID.

To lock iPhone again, press the side button or Sleep/Wake button (depending on your model). iPhone locks automatically if you donʼt touch the screen for a minute or so.

Unlock iPhone with a passcode

e.Swipe up from the bottom of the Lock screen (iPhone X and later) or press the Home button (other models).

g. Enter the passcode.

To lock iPhone again, press the side button or Sleep/Wake button (depending on your model). iPhone locks automatically if you donʼt touch the screen for a minute or so.

Learn basic gestures to interact with iPhone

Control iPhone and its apps using a few simple gestures—tap, touch and hold, swipe, scroll, and zoom.

Tap. Touch one finger lightly on the screen.

Touch and hold. Touch and hold items in an app or in Control Center to preview contents and perform quick actions. On the Home screen, touch and hold an app icon briefly to open a quick actions menu.

Swipe. Move one finger across the screen quickly.

Scroll. Move one finger across the screen without lifting. For example, in Photos, you can drag a list up or down to see more. Swipe to scroll quickly; touch the screen to stop scrolling.

Zoom. Place two fingers on the screen near each other. Spread them apart to zoom in, or move them toward each other to zoom out.

You can also double-tap a photo or webpage to zoom in, and double-tap again to zoom out.

In Maps, double-tap and hold, then drag up to zoom in or drag down to zoom out.

Learn gestures for iPhone X and later

Hereʼs a handy reference to the gestures you use for interacting with iPhone X and later.

Go Home. Swipe up from the bottom edge of the screen to return to the Home screen at any time. See Explore the iPhone Home screen and open apps.

Quickly access controls. Swipe down from the top-right corner to open Control Center; touch and hold a control to reveal more options. To add or remove items, go to Settings > Control Center > Customize Controls. See Use and customize Control Center on iPhone.

Open the App Switcher. Swipe up from the bottom edge, pause in the center of the screen, then lift your finger. To browse the open apps, swipe right, then tap the app you want to use. See Switch between apps on iPhone.

Switch between open apps. Swipe right or left along the bottom edge of the screen to quickly switch between open apps. See Switch between apps on iPhone.

Ask Siri. Just say, “Hey Siri.” Or hold down the side button and make your request. Siri listens until you release the button. See Ask Siri on iPhone.

Use Apple Pay. Double-click the side button to display your default credit card, then glance at iPhone to authenticate with Face ID. See Make contactless payments using Apple Pay on iPhone.

Use Accessibility Shortcut. Triple-click the side button. See Use accessibility shortcuts on iPhone.

Take a screenshot. Simultaneously press and quickly release the side button and volume up button. See Take a screenshot or screen recording on iPhone.

Use Emergency SOS (all regions except India). Simultaneously press and hold the side button and either volume button until the sliders appear, then drag Emergency SOS. See Use Emergency SOS (in all regions except India).

Use Emergency SOS (in India). Triple-click the side button. If youʼve turned on Accessibility Shortcut, simultaneously press and hold the side button and either volume button until the sliders appear, then drag Emergency SOS. See Use Emergency SOS (in India).

Turn off. Simultaneously press and hold the side button and either volume button until the sliders appear, then drag the top slider to power off. Or go to Settings > General > Shut Down. See Turn iPhone off and on.

Loading...
+ 200 hidden pages