


Sony MHC-GNX700, MHC-GNX900, MHC-GNX800, MHC-GNX880, MHC-GNX780 User Manual
...2-661-374-11(4)
Mini Hi-Fi
Component
System
Operating Instructions
MHC-GNX900/GNX780
MHC-GNX880/GNX800
MHC-GNX700
©2006 Sony Corporation
WARNING
To reduce the risk of fire or electric shock, do not expose this apparatus to rain or moisture.
To avoid electrical shock, do not open the cabinet. Refer servicing to qualified personnel only.
To prevent fire, do not cover the ventilation of the apparatus with newspapers, table-cloths, curtains, etc. And don’t place lighted candles on the apparatus.
To prevent fire or shock hazard, do not place objects filled with liquids, such as vases, on the apparatus.
Do not install the appliance in a confined space, such as a bookcase or built-in cabinet.
This appliance is classified as a CLASS 1 LASER product. This label is located on the rear exterior.
Don’t throw away the battery with general house waste, dispose of it correctly as chemical waste.
2GB

Table of Contents |
|
About this manual ................................... |
4 |
Playable discs.......................................... |
4 |
Getting Started |
|
Hooking up the system............................ |
6 |
Positioning the speakers.......................... |
9 |
Setting the clock...................................... |
9 |
Disc – Playback |
|
Loading a disc ....................................... |
10 |
Playing a disc ........................................ |
10 |
— Normal Play/Shuffle Play |
|
Playing repeatedly................................. |
12 |
— Repeat Play |
|
Creating your own program .................. |
12 |
— Program Play |
|
Tuner |
|
Presetting radio stations ........................ |
13 |
Listening to the radio ............................ |
15 |
— Preset Tuning |
|
— Manual Tuning |
|
Tape – Playback |
|
Loading a tape....................................... |
15 |
Playing a tape........................................ |
15 |
Tape – Recording |
|
Recording your favorite tracks on a |
|
disc into a tape ................................ |
16 |
— CD Synchro Recording |
|
— Program Edit |
|
Recording on a tape manually............... |
17 |
— Manual Recording |
|
Sound Adjustment |
|
Adjusting the sound .............................. |
18 |
Selecting the preset effect ..................... |
18 |
Adjusting the graphic equalizer or |
|
selecting the surround effect........... |
18 |
Selecting the MP3 Booster effect ......... |
19 |
Selecting the sound system ................... |
19 |
(MHC-GNX880/GNX800 only) |
|
Using the subwoofer............................. |
19 |
(MHC-GNX880/GNX800/ |
|
GNX700 only) |
|
Creating a party environment ............... |
20 |
— X-TRANCE |
|
Singing karaoke by reducing the vocal |
|
or selecting the audio channel ........ |
21 |
(MHC-GNX880/GNX780 only) |
|
Singing along........................................ |
21 |
Timer |
|
Falling asleep to music ......................... |
22 |
— Sleep Timer |
|
Waking up to music.............................. |
22 |
— Play Timer |
|
Timer recording radio programs........... |
23 |
Display |
|
Turning off the display ......................... |
24 |
— Power Saving Mode |
|
Changing the spectrum analyzer |
|
display ............................................ |
25 |
Adjusting the brightness of the |
|
display ............................................ |
25 |
Changing the power illuminator ........... |
25 |
Viewing information about the disc |
|
in the display .................................. |
25 |
Optional Components |
|
Hooking up optional components......... |
27 |
Listening to audio from a connected |
|
component ...................................... |
28 |
Recording on a connected |
|
component ...................................... |
28 |
Troubleshooting |
|
Problems and remedies......................... |
29 |
Messages............................................... |
32 |
Additional Information |
|
Precautions............................................ |
33 |
Specifications........................................ |
34 |
List of button locations and reference |
|
pages............................................... |
38 |
3GB
About this manual
•The instructions in this manual are for models MHC-GNX900, MHC-GNX780, MHC-GNX880, MHC-GNX800 and MHC-GNX700. In this manual, the MHC-GNX880 is used for illustration purposes unless stated otherwise.
•This manual mainly explains operations using the buttons on the unit, but the same operations can also be performed using the buttons on the remote having the same or similar names or symbols.
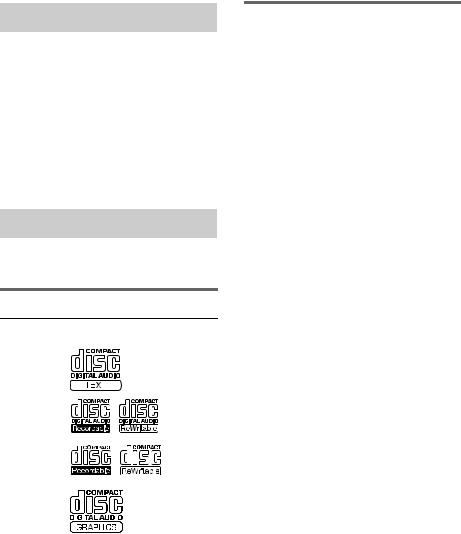
Playable discs
You can play back the following discs on this system. Other discs cannot be played back.
List of playable discs
Format of |
Disc logo |
|
Contents |
||||
discs |
|
||||||
|
|
|
|
|
|
|
|
|
|
|
|
|
|
|
|
Audio CDs |
|
|
|
|
|
|
Audio |
|
|
|
|
|
|
|
|
CD-R/CD-RW |
|
|
|
|
|
|
Audio |
(Audio CDs/ |
|
|
|
|
|
|
|
CD Graphics |
|
|
|
|
|
|
|
|
|
|
|
|
|
|
|
|
|
|
|
|
|
|
|
(CDG)*/Discs |
|
|
|
|
|
|
|
with MP3 audio |
|
|
|
|
|
|
|
tracks) |
|
|
|
|
|
|
|
|
|
|
|
|
|
|
|
|
|
|
|
|
|
|
|
CD Graphics |
|
|
|
|
|
|
Audio + |
(CDG)* |
|
|
|
|
|
|
Video |
|
|
|
|
|
|
|
|
|
|
|
|
|
|
|
|
|
|
|
|
|
|
|
|
|
|
|
|
|
|
|
|
|
|
|
|
|
|
|
|
* MHC-GNX880/GNX780 only
Discs that this system cannot play back
•CD-ROMs other than those has MP3 audio tracks that conforms to ISO 9660a) Level 1, Level 2, Joliet in expansion format.
•CD-Rs/CD-RWs other than those recorded in the following formats:
–audio CD format
–data CD format with MP3 audio track in the format of MPEG 1 Audio Layer 3, MPEG 2 Audio Layer 3 and MPEG 2.5 Audio Layer 3 that conforms to ISO 9660a) Level 1, Level 2 or Joliet in expansion format or Multi Sessionb).
•Data part of CD-Extras.
•Data part of Mixed CDs.
•A disc that has a non-standard shape (e.g., card, heart).
•CD-R and CD-RW discs that have not been correctly finalized (processing to allow play back by a normal CD player).
•CD-R and CD-RW discs recorded in multisession that have not ended by “closing the session”.
•A disc recorded in packet write format.
•A disc with paper or stickers on it.
•A disc that has the adhesive, cellophane tape, or a sticker still left on it.
•Audio side of a DualDisc.
a)A logical format of files and folders on a CD-ROMs, defined by ISO (International Organization for Stardardization).
b)Multi Session
This is a recording method that enables adding of data using the Track-At-Once method. Conventional discs begin at a disc control area called the Lead-in and end at an area called Lead-out. A Multi Session disc is a disc having multiple sessions, with each segment from Lead-in to Lead-out regarded as a single session.
4GB

Notes on CD-R and CD-RW
•This system can play back CD-R/CD-RW discs edited by the user. However, note that playback of some discs may not be possible depending on the recording device used for recording or the disc condition.
•Discs recorded on CD-R/CD-RW drives may not be played back because of scratches, dirt, recording condition or the driver’s characteristics.
Note on DualDiscs
This product is designed to play back discs that conform to the Compact Disc (CD) standard. A DualDisc is a two sided disc product which mates DVD recorded material on one side with digital audio material on the other side. Please be aware that the audio side of a DualDisc may not be played back on this product because these discs do not conform to the CD standard. “DualDisc” is a trademark of the Recording Industry Association of America (RIAA).
Music discs encoded with copyright protection technologies
This product is designed to play back discs that conform to the Compact Disc (CD) standard. Recently, various music discs encoded with copyright protection technologies are marketed by some record companies. Please be aware that among those discs, there are some that do not conform to the CD standard and may not be playable by this product.
Cautions when playing a disc that is recorded in Multi Session
•This system can play back Multi Session discs when an MP3 audio track is contained in the first session. Any subsequent MP3 audio tracks recorded in later sessions can also be played back.
•When you play back Multi Session discs with different formats for each session, the format of the first session is recognized as the disc type. Tracks in the second and subsequent sessions are played back if they are the same formats as the first session.
5GB

Getting Started
Hooking up the system
Do the following procedures 1to 7to hook up your system using the supplied cords and accessories (page 36).
AM loop antenna
FM lead antenna
Surround speaker*2 (Right)
Front speaker (Right)
|
Subwoofer B*2 |
|
|
Subwoofer A*1 |
|
5 |
|
3 |
|
4*3 |
|
|
|
6 |
|
3 |
|
2 |
2 |
|
|
|
|
|
|
7 |
1 |
|
|
|
Unit |
1 |
|
|
*1 MHC-GNX880/GNX800/GNX700 only
*2 MHC-GNX880/GNX800 only
*3 MHC-GNX880/GNX780 only
Surround speaker*2 (Left)
Front speaker (Left)
6GB
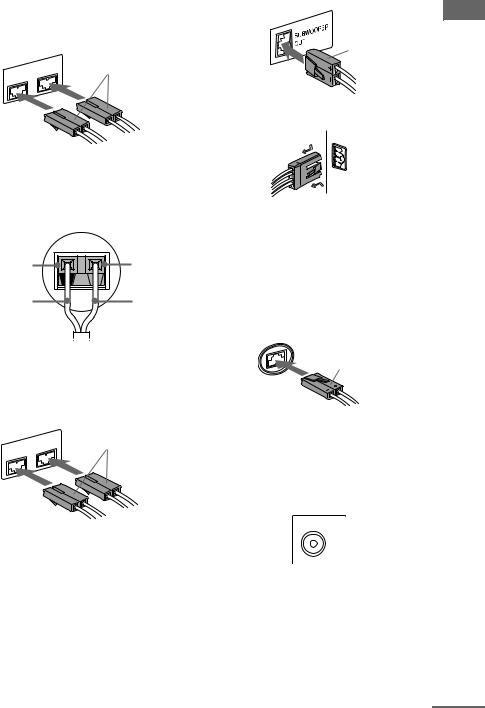
1 Connect the front speakers. |
SUBWOOFER OUT terminal |
||
Connect the speaker cords of the front |
|
||
speakers to the FRONT SPEAKER |
|
||
terminals as shown below. |
Purple |
||
|
|
|
|
|
SPEAKER |
White |
|
|
|
|
|
FRONT |
L |
|
|
R |
|
|
|
SYSTEM CONTROL jack
Started Getting
Tip
(MHC-GNX900/GNX780 (SS-GNX900/ GNX780) only)
Connect the speaker cords to the terminals on the speakers.
Black (#) |
Red (3) |
Black (#) |
Red (3) |
2Connect the surround speakers. (MHC-GNX880/GNX800 only)
Connect the speaker cords of the surround speakers to the SURR SPEAKER terminals as shown below.
|
SPEAKER |
Grey |
SURR |
L |
|
R |
|
|
3Connect the subwoofer. (MHC-GNX880/GNX800/GNX700 only)
Connect the subwoofer cord of the Subwoofer A to the SUBWOOFER OUT terminal and the system cord to the SYSTEM CONTROL jack as shown
below.
SYSTEM
CONTROL
To disconnect
(MHC-GNX880/GNX800 only)
Connect the subwoofer cord of the Subwoofer B (SS-WGV880B/ SS-WG800B) to the Subwoofer A (SS-WGV880A/SS-WG800A) terminal as shown below.
Subwoofer A terminal
Black
Note
Be sure to make this connection before you connect the unit’s power cord to a wall outlet.
4Connect the video input jack of your TV to the VIDEO OUT jack with the supplied video cord. (MHC-GNX880/GNX780 only)
VIDEO OUT
When using a TV
Turn on the TV and select the video input so that you can view the pictures from this system.
continued 
7GB
5Connect the FM and AM antennas.
Set up the AM loop antenna, then connect it.

 AM loop antenna Extend the FM lead
antenna horizontally
6For models equipped with a voltage selector, set VOLTAGE SELECTOR to the position of your local power line voltage.
Brazil model only |
Other models |
VOLTAGE SELECTOR |
VOLTAGE SELECTOR |
220V 127V |
220V 120V |
220V |
230-240V |
7Connect the power cord to a wall outlet.
The demonstration appears in the display. When you press ?/1, the system turns on and the demonstration automatically ends. If the supplied adaptor on the plug does not fit your wall outlet, detach it from the plug (only for models equipped with an adaptor).
Note
Install this system so that the power cord can be unplugged from the wall socket immediately in the event of trouble.
Notes
•Keep the speaker cords away from the antennas to prevent noise.
•(MHC-GNX880/GNX800 only)
Be sure to connect both left and right surround speakers.
•Be sure to match the color of the speaker terminals on the unit and the connectors.
•Be sure to connect the speakers securely and correctly. When connecting speaker cords, insert the connectors straight into the terminals.
To connect optional components
See “Hooking up optional components” on page 27.
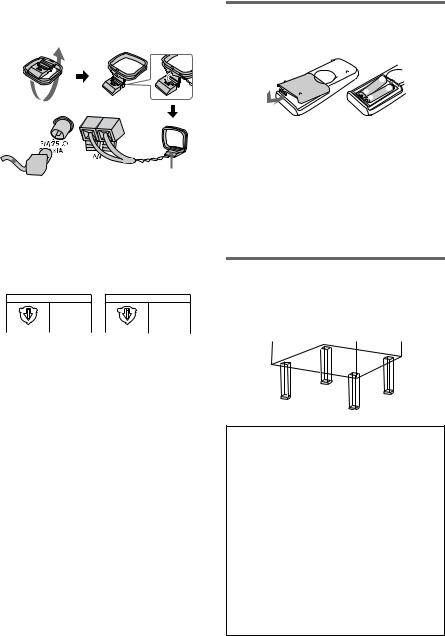
Inserting two R6 (size AA) batteries into the remote
|
e |
E |
E |
|
|
e |
|
Note
If you do not use the remote for a long period of time, remove the batteries to avoid possible damage from battery leakage and corrosion.
Tip
With normal use, the batteries should last for about six months. When the remote no longer operates the system, replace both batteries with new ones.
Attaching the speaker pads
Attach the supplied speaker pads to the bottom of the speakers to stabilize the speakers and prevent them from slipping.
When carrying this unit
Do the following procedure to protect the disc mechanism.
Use buttons on the unit for the operation.
1Press ?/1 to turn on the system.
2Press CD.
3Make sure that all discs are removed from the unit.
4Hold down CD, then press ?/1 until “MECHA LOCK” appears in the display.
5Release ?/1 first, then release CD.
6Unplug the AC power cord.
8GB
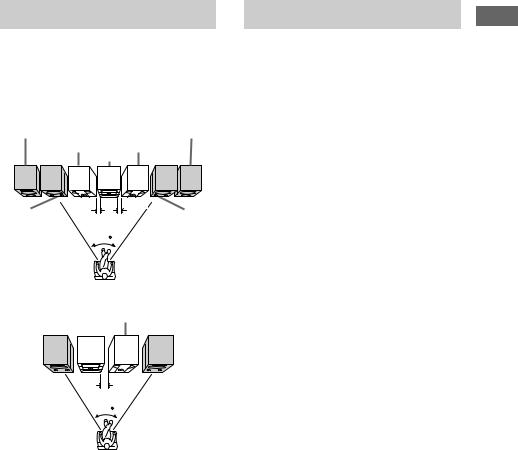
Positioning the speakers
Place the front speakers at an angle of 45 degrees from your listening position.
Place the surround speakers beside the front speakers as shown below. MHC-GNX880/GNX800 only
Front |
Front |
speaker (L) |
speaker (R) |
Subwoofer B |
Subwoofer A |
|
Unit |
0.3m |
0.3m |
Surround |
Surround |
speaker (L) |
speaker (R) |
|
45 |
|
Listener |
MHC-GNX900/GNX780/GNX700 only |
|
|
Subwoofer* |
|
Unit |
Front |
Front |
speaker |
speaker |
(L) |
(R) |
|
0.3m |
|
45 |
Listener
* Except for MHC-GNX900/GNX780
Note
(Except for MHC-GNX900/GNX780)
Place the subwoofer(s) at least 0.3 meters (1 feet) away from the unit.
Setting the clock
Use buttons on the remote for the operation.
1 Press ?/1 to turn on the system.
2 Press CLOCK/TIMER SET.
“CLOCK” appears in the display. Then, the hour indication flashes in the display.
3 Press –. or >+ repeatedly to set the hour.
4 Press ENTER.
The minute indication flashes in the display.
5 Press –. or >+ repeatedly to set the minute.
6 Press ENTER.
The clock starts functioning.
To adjust the clock
1Press CLOCK/TIMER SET.
“SET” appears in the display, then “PLAY SET?” flashes in the display.
2Press –. or >+ repeatedly to select “CLOCK SET?”, then press ENTER.
The hour indication flashes in the display.
3Do the same procedures as step 3 to 6 above.
Notes
•The clock settings are canceled when you disconnect the power cord or if a power failure occurs.
•You cannot set the clock in Power Saving Mode (page 24).
Started Getting
9GB
Disc – Playback
Loading a disc
1 Press Z OPEN/CLOSE.
The disc tray slides out.
2 Load a disc with the label side facing up on the disc tray.
When you play back a 8 cm disc such as CD single, place it on the inner circle of the tray
To load additional discs, press EX-CHANGE/DISC SKIP to rotate the disc tray.
3 Press Z OPEN/CLOSE to close the disc tray.
Notes
•Do not push the disc tray when closing it as this may cause malfunction. Press Z OPEN/CLOSE to close the disc tray.
•Do not use a disc with tape, seals or paste on it as this may cause malfunction.
Playing a disc
— Normal Play/Shuffle Play
This system lets you play back CDGs*, audio CDs and discs with MP3 audio tracks in different play modes.
Before playing a CDG*, turn on your TV and select the video input.
* MHC-GNX880/GNX780 only
When playing an audio CD
Disc tray |
Elapsed |
number Track number |
playing time |
|
|
|
|
|
|
|
|
|
|
|
|
|
|
|
|
|
|
|
|
|
|
|
|
|
|
|
|
|
|
|
|
|
|
|
|
|
|
|
|
|
|
|
|
|
|
LINK |
||||
|
|
|
|
|
|
|
|
|
|
|
|
|||||
|
|
|
|
|
|
|
|
|
|
|
|
|
|
|
|
|
Disc |
|
playing |
|
|
|
|||||||||||
|
Disc presence |
|||||||||||||||
indicator |
|
indicator |
||||||||||||||
When playing an MP3 audio track
Disc tray |
Elapsed |
number Track number |
playing time |
MP3 BOOSTER LINK
Disc playing |
Disc presence |
indicator |
indicator |
When playing a CDG (MHC-GNX880/ GNX780 only)
Disc tray |
Elapsed |
number Track number |
playing time |
LINK
Disc playing |
Disc presence |
indicator |
indicator |
1 Press CD.
2 When playback is stopped, press PLAY MODE on the remote repeatedly until the indication of the play mode you want lights up in the display.
Select |
To play back |
ALL DISCS |
The tracks on all discs in the |
(Normal Play) |
disc tray continuously. |
1DISC |
The tracks on the disc you |
(Normal Play) |
have selected in original |
|
order. |
|
|
10GB
Select |
To play back |
ALBM |
The MP3 audio tracks in the |
(Normal Play) |
album on the disc you have |
|
selected in original order. |
|
For discs other than discs |
|
with MP3 audio tracks, |
|
“ALBM” play mode |
|
performs the same |
|
operation as “1DISC” play |
|
mode. |
|
|
ALL DISCS |
The tracks on all discs in |
SHUF |
random order. |
(Shuffle Play) |
|
|
|
1DISC SHUF |
The tracks on the disc you |
(Shuffle Play) |
have selected in random |
|
order. |
|
|
ALBM SHUF |
The MP3 audio tracks in the |
(Shuffle Play) |
album on the disc you have |
|
selected in random order. |
|
For discs other than discs |
|
with MP3 audio tracks, |
|
“ALBM SHUF” play mode |
|
performs the same |
|
operation as “1DISC |
|
SHUF” play mode. |
|
|
PROGRAM |
The tracks on all discs in the |
(Program Play) |
order you want them to be |
|
played back (see “Creating |
|
your own program” on |
|
page 12). |
|
|
3 Press N.
Other operations
To |
Do this |
Stop playback |
Press x. |
|
|
Pause playback |
Press X. Press X again to |
|
resume playback. |
|
|
Select a track |
Press . or > (or press |
|
–. or >+ on the remote) |
|
repeatedly. |
|
|
Select an album of |
Press ALBUM +/– repeatedly to |
MP3 audio tracks |
select the album you want. |
|
|
Find a point in a |
For audio CD, press m or M |
track1)2) |
repeatedly. For MP3 audio |
|
track, press m or M |
|
repeatedly on the remote. |
|
|
Select a disc when |
Press one of the DISC 1 ~ 3 |
playback is stopped |
buttons or EX-CHANGE/DISC |
|
SKIP (or DISC SKIP on the |
|
remote). |
|
|
To |
Do this |
Switch to CD |
Press one of the DISC 1 ~ 3 |
function from |
buttons (Automatic Source |
another source |
Selection). |
|
|
Exchange other |
Press EX-CHANGE/DISC |
discs while playing |
SKIP. |
|
|
Remove a disc |
Press Z OPEN/CLOSE. |
1)The elapsed playing time may not be displayed correctly depending on the MP3 audio tracks.
2)(MHC-GNX880/GNX780 only)
You cannot find a point in a track when playing a CDG.
Notes
•You cannot change the play mode during playback.
•The following discs take a longer time to start playback.
–a disc recorded with complicated tree structure.
–a disc recorded in Multi Session.
–a disc to which data can be added (non-finalized disc).
•When the disc is loaded, the system reads all the tracks on that disc. If there are many albums or nonMP3 audio tracks on the disc, it may take a longer time for playback to begin or for the next MP3 audio tracks to start playback.
•You are recommended not to save other types of tracks or unnecessary albums on a disc that has MP3 audio tracks.
•Attempting to play back non-MP3 format files that have the extension “.MP3” may result in noise or malfunction.
•The system can play back to a depth of 8 folders only.
•When naming the MP3 audio tracks, be sure to add the file extension “.MP3” to the file name.
•An album that does not include an MP3 audio track is skipped.
•If you save up the extension “.MP3” to a track other than MP3 audio tracks, the system cannot recognize the track properly and will generate a random noise which could damage your speaker.
•The maximum number of albums on a disc which can be recognize by this system is 150 (including root album).
•The maximum number of MP3 audio tracks and albums on a disc which can be recognize by this system is 300.
•Depending on the encoding/writing software, recording device, or the recording media used at the time an MP3 audio track is recorded, you may encounter problems such as cannot play back, sound interruptions and noise.
continued 
Playback – Disc
11GB
Tips
•When you press CD or one of the DISC 1 ~ 3 buttons to switch to “CD” function from “TUNER” function, you may require a longer time to access the disc. In the case, set the CD power manage function to “CD POWER ON” (page 14).
•If you press CD while the system is turned off, the system turns on automatically and “CD” is selected as the function.
•You can also press FUNCTION on the remote repeatedly to select “CD”.
•(MHC-GNX880/GNX780 only)
When you play back a CDG, some operation may cause image distortion on the video output.
•During Shuffle Play, some tracks may be played back repeatedly.
Playing repeatedly
— Repeat Play
You can play back all the tracks or a single track on a disc repeatedly.
Press REPEAT on the remote repeatedly during playback until “REPEAT” or “REPEAT1” lights up in the display.
REPEAT: All the tracks on the disc(s), or all the tracks in the album* are played back repeatedly up to five times.
REPEAT1: A single track is played back repeatedly until “REPEAT1” is cancelled.
*When “ALBM” or “ALBM SHUF” is selected for MP3 audio tracks.
To cancel Repeat Play
Press REPEAT repeatedly until both “REPEAT” and “REPEAT1” disappear from the display.
Note
You cannot select “REPEAT” and “ALL DISCS SHUF” at the same time.
Tip
You can change the Repeat Play setting when the playback is stopped.
Creating your own program
— Program Play
You can make a program of up to 25 steps from all the discs in the order you want to play back. You can synchro record the programmed tracks onto a tape (page 16).
1 Press CD.
2 When playback is stopped, press PLAY MODE on the remote repeatedly until “PROGRAM” lights up in the display.
3 Press one of DISC 1 ~ 3 buttons or EX-CHANGE/DISC SKIP (or DISC SKIP on the remote) to select a disc.
To program all the tracks on a disc at once, proceed to step 5 while “AL” appears in the display.
To program all the MP3 audio tracks on an album at once, press ALBUM +/– repeatedly until the album you want appears in the display, then proceed to step 5.
4 Press . or > (or press –. or >+ on the remote) repeatedly until the track number you want appears in the display.
The total playing time flashes in the display. When programming an MP3 audio track, press ALBUM +/– repeatedly until the album you want appears in the display, then press . or > (or press –. or >+ on the remote) repeatedly until the track number you want appears in the display.
Total playing time Disc tray Track (including selected number number track)
12GB
 Loading...