


OPERATION MANUAL
Thank you very much for purchasing the ZOOM

 .
.
Please read this manual carefully to learn about all the functions of the

 so that you will be able to use it fully for a long time. Keep this manual in a convenient place for reference when necessary.
*A printed list of effect parameters is not included with the

 .
.
Please download a copy from the ZOOM website. ! http://www.zoom.co.jp/downloads/
©ZOOM CORPORATION
If the 

 is not used for 10
hours, it will turn off automatically by default.
If you want the power to stay ON all the time, please see "4 To set the Power Management function" on page 19 and set the value to OFF.
Copying or reproduction of this document in whole or in part without permission is prohibited.

Contents
Usage and Safety Precautions ……………………3 Part Names …………………………………………4 Turning the Power ON ………………………………6 Adjusting Effects ……………………………………8 Selecting and Saving Patch Memories ………… 10 Changing Patch Memories with the Footswitch … 11 Using 2 or More Effects ………………………… 12 Using the Tuner…………………………………… 14
Tapping the Tempo ……………………………… 16 Changing Various Settings ……………………… 18 Updating the Firmware …………………………… 23 Effect Types ……………………………………… 24 Restoring the

 to its Factory Default Settings… 28 Troubleshooting ………………………………… 29 Specifications …………………………………… 30 Tuner Types ……………………………………… 31
Terms used in this manual
Patch memory
The ON/OFF status and the parameter settings of each effect are stored as ”patch memories”.The 

 can store 50 patch memories.
Effect unit
The

 can use between 1 and 6 effects at a time and you can change the number used as you like. Each one of these is called an “effect unit”.
Copyrights
All other trademarks, product names and company names mentioned in this documentation are the property of their respective owners.
Note: All trademarks and registered trademarks mentioned in this manual are for identification purposes only and are not intended to infringe on the copyrights of their respective owners.
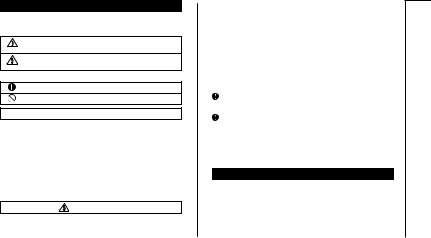
SAFETY PRECAUTIONS
In this manual, symbols are used to highlight warnings and cautions that you must read to prevent accidents. The meanings of these symbols are as follows:
Warning Something that could cause serious injury or death.
Something that could cause injury or damage to the Caution equipment.
Other symbols
Required (mandatory) actions
Prohibited actions
 Warning
Operation using an AC adapter
 Use only a ZOOM AD-16 AC adapter with this unit.
 Do not use do anything that could exceed the ratings of outlets and other electrical wiring equipment.
Operation using batteries
 Use 4 conventional 1.5-volt AA batteries (alkaline or nickel-metal hydride).
 Always close the battery compartment cover when using the unit.
Alterations
 Never open the case or attempt to modify the product.
Precautions
Product handling
 Do not drop, bump or apply excessive force to the unit.
 Be careful not to allow foreign objects or liquids to enter the unit.
Operating environment
 Do not use in extremely high or low temperatures.
 Do not use near heaters, stoves and other heat sources.
 Do not use in very high humidity or near splashing water.
 Do not use in places with excessive vibrations.
 Do not use in places with excessive dust or sand.
AC adapter handling
 When disconnecting the AC adapter from an outlet, always pull the body of the adapter itself.
Battery handling
 Install the batteries with the correct +/- orientation.
Use a specified battery type. Do not mix new and old batteries or different brands or types at the same time. When not using the unit for an extended period of time, remove the batteries from the unit.
If a battery leak should occur, wipe the battery compartment and the battery terminals carefully to remove all battery residue.
Connecting cables with INPUT and OUTPUT jacks
 Always turn the power OFF for all equipment before connecting any cables.
Volume
 Do not use the product at a loud volume for a long time.
Usage Precautions
Cleaning
Use a soft cloth to clean the panels of the unit if they become dirty. If necessary, use a damp cloth that has been wrung out well.
Malfunction
If the unit becomes broken or malfunctions, immediately disconnect the AC adapter, turn the power OFF and disconnect other cables. Contact the store where you bought the unit or ZOOM service with the following information: product model, serial number and specific symptoms of failure or malfunction, along with your name, address and telephone number.
Precautions Safety and Usage
Usage and Safety Precautions 3
Names Part
4
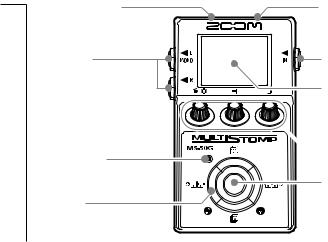
DC9V AC adapter jack
To power the unit from an outlet, connect an AD-16 adapter here (!P6).
OUTPUT jacks
Connect to an amp or another effector. Use the MONO jack for a mono
connection.
ON/OFF indicator
Lights when the current effect is ON. Does not light when the effect is OFF (!P8).
Cursor keys
(!P5)
Part Names
USB connector
Use to connect to a computer and update firmware (!P23).
INPUT jack
Connect a guitar.
Display
Shows the currently selected effect and various other screens (!P7).


 Parameter knobs
(!P5)
Footswitch
Turns the effect shown on the display ON and OFF (!P8).
Press and hold for 1 second to open the Tuner or Tap Tempo (!P14, 16).
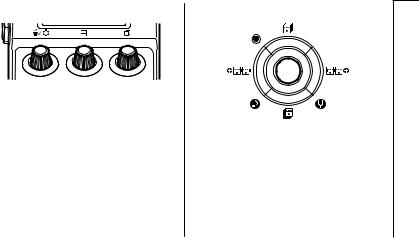
 Parameter knobs
From the left
Parameter knob 1 [ 
 ]
]
Turn left and right to adjust the parameter.
Press to open the MENU where you can remove and rearrange effects and make various settings (!P12, 18). You can also check the firmware version (!P22).
Parameter knob 2 [  ]
]
Turn left and right to adjust the parameter.
Press to open the MEMORY screen where you can select and save patch memories, and change patch memories using the footswitch (!P10, 11).
Parameter knob 3 [  ]
]
Turn left and right to adjust the parameter.
Press to change the parameter page (!P9).
 Cursor keys
Names Part
Up and down cursor keys [  /
/  ]
]
Press to change the effect type.
Press and hold for 1 second to select the effect category (!P8).
Left and right cursor keys [ 

 /
/ 

 ]
]
Press to show the effect to the left or right.
Press and hold for 1 second to add a new effect left or right of the current effect (!P12).
Part Names 5
ON Power the Turning
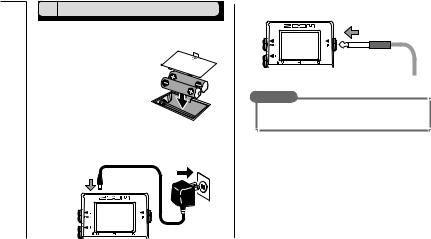
1To turn the power ON
1.Lower the amplifier’s volume all the way.
2.Power the unit with batteries or an adapter.
<When using batteries>
Open the cover on the bottom of the unit and insert batteries in the compartment.
Bottom of the unit
<When using an adapter>
Connect an AD-16 adapter.
3. Plug a guitar cable into the INPUT jack.
HINT
t 8IFO VTJOH CBUUFSJFT UIF QPXFS XJMM UVSO PO XIFO the cable is connected to the INPUT jack.
4.Connect to an amp, then turn the amp on and raise the volume.
6 Turning the Power ON

2 Display information
 The Home Screen shows the current effect
Virtual knob
Graphic for selected effect
Shows other effects are in this direction.
HINT
t 5IF QPTJUJPOT PG UIF WJSUVBM LOPCT DIBOHF XJUI UIF parameter values.
 Edit Screen shows parameter being edited
Effect type
Page tabs
Parameter names 
 Parameter values
HINT
t *G UIFSF BSF PS NPSF QBSBNFUFST UIBU DBO CF adjusted, multiple page tabs will be shown.
ON Power the Turning
Turning the Power ON 7
Effects Adjusting
Confirm that the Home Screen is shown.
1 To turn an effect ON and OFF
Press
OFF |
|
ON |
NOTE
t 8IFO BO FGGFDU JT 0/ UIF GPPUTXJUDI -&% MJHIUT t 8IFO BO FGGFDU JT 0'' UIF GPPUTXJUDI -&% JT VOMJU
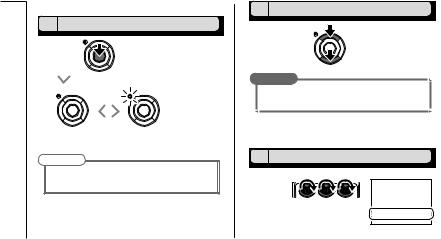
2 To select an effect type
Press either
HINT
t 1SFTT BOE IPME UP TFMFDU UIF FGGFDU DBUFHPSZ
See step 2 of ”To add an effect” . (See page 12.)
3 To adjust parameters
Turn
8 Adjusting Effects
4 To change the page
Press
The next page opens.
Effect processing limit |
Adjusting |
||
types that require great amounts of |
|||
The |
allows you to |
|
|
combine 6 effects as you like. |
|
||
However, if you combine effect |
|
||
processing power (amp models, for |
Effects |
||
example), the available processing |
|||
|
|||
capacity might not be enough. If the processing required for an |
|
||
effect exceeds the available capacity, the effect is bypassed and |
|
||
a ”DSP Full!” message appears. This can be avoided by changing |
|
||
1 or more of the effect types or setting them to THRU. |
|
||
NOTE |
|
||
|
t " O F GGF D U S F R V J S F T U I F T B N F B N P V O U P G |
|
|
|
processing power whether it is ON or OFF. |
|
|
|
HINT |
|
|
|
t 1SFTT BOE IPME UIF CVUUPO GPS |
|
|
|
at least 1 second to immediately set an effect |
|
|
|
to THRU. |
|
|
Adjusting Effects 9

Memories Patch Saving and Selecting
Confirm that the Home Screen is shown.
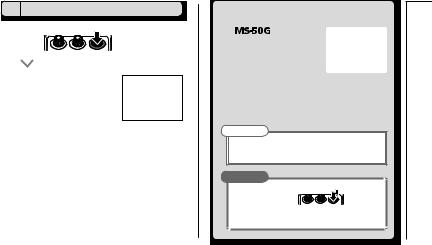
1 To select a patch memory
When shipped from the factory, the automatic patch memory saving function is active. As soon as a parameter is adjusted this change is automatically saved.
1.Open the MEMORY list.
Press 
2.Select a patch memory.
Turn 
2To save a patch memory with a new name
1.Open the MEMORY list.
Press 
2.Select the patch memory to be saved with a new name.
Turn  Press
Press 
3.Change the name and select where to save the patch memory.
t 5VSO UP NPWF UIF DVSTPS
t 5VSO UP DIBOHF UIF DIBSBDUFS
Press to change the type t
of character/symbol
t Turn to select where to save the patch memory
4.Save the patch memory with the new name.
Press 
10 Selecting and Saving Patch Memories
 Loading...