


 Loading...
April 2014
Xerox® WorkCentre™ 3315DN/3325DN/3325DNI System Administrator Guide
©2014 Xerox Corporation. XEROX® and XEROX and Design® are trademarks of Xerox Corporation in the United States and/or other countries.
Document version 1.0: January 2012
Table of Contents
1Introduction
Who should use this Guide? . . . . . . . . . . . . . . . . . . . . . . . . . . . . . . . . . . . . . . . . . . . . . . . . . . . . . . . . . . . . . . 10 Machine Overview. . . . . . . . . . . . . . . . . . . . . . . . . . . . . . . . . . . . . . . . . . . . . . . . . . . . . . . . . . . . . . . . . . . . . . . 11 Product Configurations . . . . . . . . . . . . . . . . . . . . . . . . . . . . . . . . . . . . . . . . . . . . . . . . . . . . . . . . . . . . . . 11 Control Panel Overview . . . . . . . . . . . . . . . . . . . . . . . . . . . . . . . . . . . . . . . . . . . . . . . . . . . . . . . . . . . . . . . . . . 12
2Machine Connection
Machine Parts and Connection Ports . . . . . . . . . . . . . . . . . . . . . . . . . . . . . . . . . . . . . . . . . . . . . . . . . . . . . |
16 |
Front View . . . . . . . . . . . . . . . . . . . . . . . . . . . . . . . . . . . . . . . . . . . . . . . . . . . . . . . . . . . . . . . . . . . . . . . . . . 16
Rear View . . . . . . . . . . . . . . . . . . . . . . . . . . . . . . . . . . . . . . . . . . . . . . . . . . . . . . . . . . . . . . . . . . . . . . . . . . . 17
Interface Ports . . . . . . . . . . . . . . . . . . . . . . . . . . . . . . . . . . . . . . . . . . . . . . . . . . . . . . . . . . . . . . . . . . . . . . 17
Initial Connection . . . . . . . . . . . . . . . . . . . . . . . . . . . . . . . . . . . . . . . . . . . . . . . . . . . . . . . . . . . . . . . . . . . 18
Installation Wizard . . . . . . . . . . . . . . . . . . . . . . . . . . . . . . . . . . . . . . . . . . . . . . . . . . . . . . . . . . . . . . . . . . 18
Administrator Access . . . . . . . . . . . . . . . . . . . . . . . . . . . . . . . . . . . . . . . . . . . . . . . . . . . . . . . . . . . . . . . . 19
Wireless Connectivity (WorkCentre 3325DNI) . . . . . . . . . . . . . . . . . . . . . . . . . . . . . . . . . . . . . . . . . 19
Configure Ethernet Settings . . . . . . . . . . . . . . . . . . . . . . . . . . . . . . . . . . . . . . . . . . . . . . . . . . . . . . . . . . 21
Print a Configuration Report . . . . . . . . . . . . . . . . . . . . . . . . . . . . . . . . . . . . . . . . . . . . . . . . . . . . . . . . . 21
Install the Additional Memory Card. . . . . . . . . . . . . . . . . . . . . . . . . . . . . . . . . . . . . . . . . . . . . . . . . . . 22
CentreWare Internet Services . . . . . . . . . . . . . . . . . . . . . . . . . . . . . . . . . . . . . . . . . . . . . . . . . . . . . . . . . . . . 23
3Network Installation
TCP/IP. . . . . . . . . . . . . . . . . . . . . . . . . . . . . . . . . . . . . . . . . . . . . . . . . . . . . . . . . . . . . . . . . . . . . . . . . . . . . . . . . . 28 Configure Static IPv4 Addressing using the Machine User Interface . . . . . . . . . . . . . . . . . . . . 28 Configure Dynamic IPv4 Addressing using the Machine User Interface . . . . . . . . . . . . . . . . . 29 Configure TCP/IP Settings using Internet Services . . . . . . . . . . . . . . . . . . . . . . . . . . . . . . . . . . . . . 30 Unix . . . . . . . . . . . . . . . . . . . . . . . . . . . . . . . . . . . . . . . . . . . . . . . . . . . . . . . . . . . . . . . . . . . . . . . . . . . . . . . . . . . . 33 HP-UX Client (Version 10.x) . . . . . . . . . . . . . . . . . . . . . . . . . . . . . . . . . . . . . . . . . . . . . . . . . . . . . . . . . . 33 Solaris 2.x . . . . . . . . . . . . . . . . . . . . . . . . . . . . . . . . . . . . . . . . . . . . . . . . . . . . . . . . . . . . . . . . . . . . . . . . . . . 34 SCO . . . . . . . . . . . . . . . . . . . . . . . . . . . . . . . . . . . . . . . . . . . . . . . . . . . . . . . . . . . . . . . . . . . . . . . . . . . . . . . . 36 Linux CUPS. . . . . . . . . . . . . . . . . . . . . . . . . . . . . . . . . . . . . . . . . . . . . . . . . . . . . . . . . . . . . . . . . . . . . . . . . . 37 Linux LPR via PrintTool . . . . . . . . . . . . . . . . . . . . . . . . . . . . . . . . . . . . . . . . . . . . . . . . . . . . . . . . . . . . . . . 38 Linux LPRng . . . . . . . . . . . . . . . . . . . . . . . . . . . . . . . . . . . . . . . . . . . . . . . . . . . . . . . . . . . . . . . . . . . . . . . . . 39 Cloning . . . . . . . . . . . . . . . . . . . . . . . . . . . . . . . . . . . . . . . . . . . . . . . . . . . . . . . . . . . . . . . . . . . . . . . . . . . . . . . . . 41 Procedure . . . . . . . . . . . . . . . . . . . . . . . . . . . . . . . . . . . . . . . . . . . . . . . . . . . . . . . . . . . . . . . . . . . . . . . . . . . 41
4Printer Drivers
Overview . . . . . . . . . . . . . . . . . . . . . . . . . . . . . . . . . . . . . . . . . . . . . . . . . . . . . . . . . . . . . . . . . . . . . . . . . . . . . . . |
44 |
Windows - Installing Driver. . . . . . . . . . . . . . . . . . . . . . . . . . . . . . . . . . . . . . . . . . . . . . . . . . . . . . . . . . . . . . . 45
Macintosh - Installing Driver . . . . . . . . . . . . . . . . . . . . . . . . . . . . . . . . . . . . . . . . . . . . . . . . . . . . . . . . . . . . . 49
Xerox WorkCentre 3315DN/3325DN/3325DNI |
3 |
System Administrator Guide |
|
Linux - Installing Drivers . . . . . . . . . . . . . . . . . . . . . . . . . . . . . . . . . . . . . . . . . . . . . . . . . . . . . . . . . . . . . . . . . 51 Installing the SmartPanel . . . . . . . . . . . . . . . . . . . . . . . . . . . . . . . . . . . . . . . . . . . . . . . . . . . . . . . . . . . . 51 Installing the Printer Setting Utility . . . . . . . . . . . . . . . . . . . . . . . . . . . . . . . . . . . . . . . . . . . . . . . . . . . 51 Unix - Installing Drivers . . . . . . . . . . . . . . . . . . . . . . . . . . . . . . . . . . . . . . . . . . . . . . . . . . . . . . . . . . . . . . . . . . 53 Setting up the printer . . . . . . . . . . . . . . . . . . . . . . . . . . . . . . . . . . . . . . . . . . . . . . . . . . . . . . . . . . . . . . . . 53 Uninstalling the printer driver package . . . . . . . . . . . . . . . . . . . . . . . . . . . . . . . . . . . . . . . . . . . . . . . . 54 Sharing your Machine Locally . . . . . . . . . . . . . . . . . . . . . . . . . . . . . . . . . . . . . . . . . . . . . . . . . . . . . . . . . . . . 55 Windows . . . . . . . . . . . . . . . . . . . . . . . . . . . . . . . . . . . . . . . . . . . . . . . . . . . . . . . . . . . . . . . . . . . . . . . . . . . . 55 Macintosh. . . . . . . . . . . . . . . . . . . . . . . . . . . . . . . . . . . . . . . . . . . . . . . . . . . . . . . . . . . . . . . . . . . . . . . . . . . 56 Windows Printing. . . . . . . . . . . . . . . . . . . . . . . . . . . . . . . . . . . . . . . . . . . . . . . . . . . . . . . . . . . . . . . . . . . . . . . . 57 LPR Printing . . . . . . . . . . . . . . . . . . . . . . . . . . . . . . . . . . . . . . . . . . . . . . . . . . . . . . . . . . . . . . . . . . . . . . . . . 57 Internet Printing Protocol (IPP) Port. . . . . . . . . . . . . . . . . . . . . . . . . . . . . . . . . . . . . . . . . . . . . . . . . . . 60 Raw TCP/IP Printing (Port 9100) . . . . . . . . . . . . . . . . . . . . . . . . . . . . . . . . . . . . . . . . . . . . . . . . . . . . . . 62 USB Printing. . . . . . . . . . . . . . . . . . . . . . . . . . . . . . . . . . . . . . . . . . . . . . . . . . . . . . . . . . . . . . . . . . . . . . . . . 63 Configure the Windows Printer Driver . . . . . . . . . . . . . . . . . . . . . . . . . . . . . . . . . . . . . . . . . . . . . . . . . . . . . 64 Manual Print Driver Configuration . . . . . . . . . . . . . . . . . . . . . . . . . . . . . . . . . . . . . . . . . . . . . . . . . . . . 64 Apple Mac . . . . . . . . . . . . . . . . . . . . . . . . . . . . . . . . . . . . . . . . . . . . . . . . . . . . . . . . . . . . . . . . . . . . . . . . . . . . . . 66 TCP/IP Printing (OSX) . . . . . . . . . . . . . . . . . . . . . . . . . . . . . . . . . . . . . . . . . . . . . . . . . . . . . . . . . . . . . . . . 66 Configure your Apple Mac Print Driver . . . . . . . . . . . . . . . . . . . . . . . . . . . . . . . . . . . . . . . . . . . . . . . . 67
5Scan to Server (WorkCentre 3325DN/3325DNI)
Overview. . . . . . . . . . . . . . . . . . . . . . . . . . . . . . . . . . . . . . . . . . . . . . . . . . . . . . . . . . . . . . . . . . . . . . . . . . . . . . . . 70 Information Checklist . . . . . . . . . . . . . . . . . . . . . . . . . . . . . . . . . . . . . . . . . . . . . . . . . . . . . . . . . . . . . . . . 70 Scan Transfer Methods . . . . . . . . . . . . . . . . . . . . . . . . . . . . . . . . . . . . . . . . . . . . . . . . . . . . . . . . . . . . . . 70 Configure Scan to FTP . . . . . . . . . . . . . . . . . . . . . . . . . . . . . . . . . . . . . . . . . . . . . . . . . . . . . . . . . . . . . . . . . . . 71 Information Checklist . . . . . . . . . . . . . . . . . . . . . . . . . . . . . . . . . . . . . . . . . . . . . . . . . . . . . . . . . . . . . . . . 71 Procedure . . . . . . . . . . . . . . . . . . . . . . . . . . . . . . . . . . . . . . . . . . . . . . . . . . . . . . . . . . . . . . . . . . . . . . . . . . . 71 Configure Scan to FTP Server Default Settings . . . . . . . . . . . . . . . . . . . . . . . . . . . . . . . . . . . . . . . . . 72 Configure Scan to SMB . . . . . . . . . . . . . . . . . . . . . . . . . . . . . . . . . . . . . . . . . . . . . . . . . . . . . . . . . . . . . . . . . . 74 Information Checklist . . . . . . . . . . . . . . . . . . . . . . . . . . . . . . . . . . . . . . . . . . . . . . . . . . . . . . . . . . . . . . . . 74 Procedure . . . . . . . . . . . . . . . . . . . . . . . . . . . . . . . . . . . . . . . . . . . . . . . . . . . . . . . . . . . . . . . . . . . . . . . . . . . 74 Configure Scan to SMB Server Default Settings . . . . . . . . . . . . . . . . . . . . . . . . . . . . . . . . . . . . . . . . 75 Configure Scan Security. . . . . . . . . . . . . . . . . . . . . . . . . . . . . . . . . . . . . . . . . . . . . . . . . . . . . . . . . . . . . . . . . . 76 Enable Scan to Server. . . . . . . . . . . . . . . . . . . . . . . . . . . . . . . . . . . . . . . . . . . . . . . . . . . . . . . . . . . . . . . . . . . . 77 Scan to Home Directory. . . . . . . . . . . . . . . . . . . . . . . . . . . . . . . . . . . . . . . . . . . . . . . . . . . . . . . . . . . . . . . . . . 78
6Scan to Network/Local PC
Overview. . . . . . . . . . . . . . . . . . . . . . . . . . . . . . . . . . . . . . . . . . . . . . . . . . . . . . . . . . . . . . . . . . . . . . . . . . . . . . . . 80 Scan to Network PC. . . . . . . . . . . . . . . . . . . . . . . . . . . . . . . . . . . . . . . . . . . . . . . . . . . . . . . . . . . . . . . . . . . . . . 81 Scan to Local PC. . . . . . . . . . . . . . . . . . . . . . . . . . . . . . . . . . . . . . . . . . . . . . . . . . . . . . . . . . . . . . . . . . . . . . . . . 82
7Fax
Overview. . . . . . . . . . . . . . . . . . . . . . . . . . . . . . . . . . . . . . . . . . . . . . . . . . . . . . . . . . . . . . . . . . . . . . . . . . . . . . . . 84
Information Checklist . . . . . . . . . . . . . . . . . . . . . . . . . . . . . . . . . . . . . . . . . . . . . . . . . . . . . . . . . . . . . . . . 84
4Xerox WorkCentre 3315DN/3325DN/3325DNI System Administrator Guide
Enable Fax from the Machine . . . . . . . . . . . . . . . . . . . . . . . . . . . . . . . . . . . . . . . . . . . . . . . . . . . . . . . . . . . . 85 Test the Fax. . . . . . . . . . . . . . . . . . . . . . . . . . . . . . . . . . . . . . . . . . . . . . . . . . . . . . . . . . . . . . . . . . . . . . . . . 85 Fax Defaults using Internet Services . . . . . . . . . . . . . . . . . . . . . . . . . . . . . . . . . . . . . . . . . . . . . . . . . . 85 Adjusting Fax Document Settings at the Machine . . . . . . . . . . . . . . . . . . . . . . . . . . . . . . . . . . . . . 87
Fax Address Book . . . . . . . . . . . . . . . . . . . . . . . . . . . . . . . . . . . . . . . . . . . . . . . . . . . . . . . . . . . . . . . . . . . . . . . |
88 |
Fax Forward . . . . . . . . . . . . . . . . . . . . . . . . . . . . . . . . . . . . . . . . . . . . . . . . . . . . . . . . . . . . . . . . . . . . . . . . . . . . |
89 |
Overview . . . . . . . . . . . . . . . . . . . . . . . . . . . . . . . . . . . . . . . . . . . . . . . . . . . . . . . . . . . . . . . . . . . . . . . . . . . . 89 Fax Forward to E-mail. . . . . . . . . . . . . . . . . . . . . . . . . . . . . . . . . . . . . . . . . . . . . . . . . . . . . . . . . . . . . . . . 89 Fax Forward to Server. . . . . . . . . . . . . . . . . . . . . . . . . . . . . . . . . . . . . . . . . . . . . . . . . . . . . . . . . . . . . . . . 91 Fax Forward to PC . . . . . . . . . . . . . . . . . . . . . . . . . . . . . . . . . . . . . . . . . . . . . . . . . . . . . . . . . . . . . . . . . . . 93
8 |
PC Fax |
|
|
Overview . . . . . . . . . . . . . . . . . . . . . . . . . . . . . . . . . . . . . . . . . . . . . . . . . . . . . . . . . . . . . . . . . . . . . . . . . . . . . . . |
96 |
|
Installation Checklist . . . . . . . . . . . . . . . . . . . . . . . . . . . . . . . . . . . . . . . . . . . . . . . . . . . . . . . . . . . . . . . . |
96 |
|
Installing PC Fax Software . . . . . . . . . . . . . . . . . . . . . . . . . . . . . . . . . . . . . . . . . . . . . . . . . . . . . . . . . . . . . . . |
97 |
Configure the Fax Port . . . . . . . . . . . . . . . . . . . . . . . . . . . . . . . . . . . . . . . . . . . . . . . . . . . . . . . . . . . . . . . 97 To send a PC Fax . . . . . . . . . . . . . . . . . . . . . . . . . . . . . . . . . . . . . . . . . . . . . . . . . . . . . . . . . . . . . . . . . . . . 97
9USB Port
Overview . . . . . . . . . . . . . . . . . . . . . . . . . . . . . . . . . . . . . . . . . . . . . . . . . . . . . . . . . . . . . . . . . . . . . . . . . . . . . . 100
Enable USB Memory Device Port . . . . . . . . . . . . . . . . . . . . . . . . . . . . . . . . . . . . . . . . . . . . . . . . . . . . . . . . 101
10 E-mail
Overview . . . . . . . . . . . . . . . . . . . . . . . . . . . . . . . . . . . . . . . . . . . . . . . . . . . . . . . . . . . . . . . . . . . . . . . . . . . . . . 104
E-mail Addressing . . . . . . . . . . . . . . . . . . . . . . . . . . . . . . . . . . . . . . . . . . . . . . . . . . . . . . . . . . . . . . . . . . . . . . 105
Information Checklist . . . . . . . . . . . . . . . . . . . . . . . . . . . . . . . . . . . . . . . . . . . . . . . . . . . . . . . . . . . . . . . 105
Configure SMTP . . . . . . . . . . . . . . . . . . . . . . . . . . . . . . . . . . . . . . . . . . . . . . . . . . . . . . . . . . . . . . . . . . . . 105
Configure the Feature . . . . . . . . . . . . . . . . . . . . . . . . . . . . . . . . . . . . . . . . . . . . . . . . . . . . . . . . . . . . . . 106
Address Books. . . . . . . . . . . . . . . . . . . . . . . . . . . . . . . . . . . . . . . . . . . . . . . . . . . . . . . . . . . . . . . . . . . . . . . . . . 108
11 LDAP Configuration and Address Books
Overview . . . . . . . . . . . . . . . . . . . . . . . . . . . . . . . . . . . . . . . . . . . . . . . . . . . . . . . . . . . . . . . . . . . . . . . . . . . . . . 110
Information Checklist . . . . . . . . . . . . . . . . . . . . . . . . . . . . . . . . . . . . . . . . . . . . . . . . . . . . . . . . . . . . . . . 110
LDAP Configuration . . . . . . . . . . . . . . . . . . . . . . . . . . . . . . . . . . . . . . . . . . . . . . . . . . . . . . . . . . . . . . . . . . . . 111
Address Book . . . . . . . . . . . . . . . . . . . . . . . . . . . . . . . . . . . . . . . . . . . . . . . . . . . . . . . . . . . . . . . . . . . . . . . . . . 113
Import/Export Address Book . . . . . . . . . . . . . . . . . . . . . . . . . . . . . . . . . . . . . . . . . . . . . . . . . . . . . . . . 113
Procedure . . . . . . . . . . . . . . . . . . . . . . . . . . . . . . . . . . . . . . . . . . . . . . . . . . . . . . . . . . . . . . . . . . . . . . . . . . 113
Create an Individual Address Book Entry . . . . . . . . . . . . . . . . . . . . . . . . . . . . . . . . . . . . . . . . . . . . . 114
Create an E-mail Group Address Book . . . . . . . . . . . . . . . . . . . . . . . . . . . . . . . . . . . . . . . . . . . . . . . . 115
Create a Fax Group Address Book. . . . . . . . . . . . . . . . . . . . . . . . . . . . . . . . . . . . . . . . . . . . . . . . . . . . 116
Create Speed Dial Numbers at the Machine . . . . . . . . . . . . . . . . . . . . . . . . . . . . . . . . . . . . . . . . . . 116
12 Security
Security @ Xerox . . . . . . . . . . . . . . . . . . . . . . . . . . . . . . . . . . . . . . . . . . . . . . . . . . . . . . . . . . . . . . . . . . . 117
Xerox WorkCentre 3315DN/3325DN/3325DNI |
5 |
System Administrator Guide |
|
Security Settings . . . . . . . . . . . . . . . . . . . . . . . . . . . . . . . . . . . . . . . . . . . . . . . . . . . . . . . . . . . . . . . . . . . . . . . 118 Administrator Accounts . . . . . . . . . . . . . . . . . . . . . . . . . . . . . . . . . . . . . . . . . . . . . . . . . . . . . . . . . . . . . 118 Feature Management. . . . . . . . . . . . . . . . . . . . . . . . . . . . . . . . . . . . . . . . . . . . . . . . . . . . . . . . . . . . . . . 119 Restart Device . . . . . . . . . . . . . . . . . . . . . . . . . . . . . . . . . . . . . . . . . . . . . . . . . . . . . . . . . . . . . . . . . . . . . . 119 Machine Digital Certificate Management . . . . . . . . . . . . . . . . . . . . . . . . . . . . . . . . . . . . . . . . . . . . . . . . 120 SNMP. . . . . . . . . . . . . . . . . . . . . . . . . . . . . . . . . . . . . . . . . . . . . . . . . . . . . . . . . . . . . . . . . . . . . . . . . . . . . . . . . . 125 SNMPv3 . . . . . . . . . . . . . . . . . . . . . . . . . . . . . . . . . . . . . . . . . . . . . . . . . . . . . . . . . . . . . . . . . . . . . . . . . . . . . . . 127 IP Sec. . . . . . . . . . . . . . . . . . . . . . . . . . . . . . . . . . . . . . . . . . . . . . . . . . . . . . . . . . . . . . . . . . . . . . . . . . . . . . . . . . 128 IP Filtering . . . . . . . . . . . . . . . . . . . . . . . . . . . . . . . . . . . . . . . . . . . . . . . . . . . . . . . . . . . . . . . . . . . . . . . . . . . . . 129 Overview . . . . . . . . . . . . . . . . . . . . . . . . . . . . . . . . . . . . . . . . . . . . . . . . . . . . . . . . . . . . . . . . . . . . . . . . . . . 129 Enable IP Filtering . . . . . . . . . . . . . . . . . . . . . . . . . . . . . . . . . . . . . . . . . . . . . . . . . . . . . . . . . . . . . . . . . . 129 802.1X Authentication. . . . . . . . . . . . . . . . . . . . . . . . . . . . . . . . . . . . . . . . . . . . . . . . . . . . . . . . . . . . . . . . . . 131 Overview . . . . . . . . . . . . . . . . . . . . . . . . . . . . . . . . . . . . . . . . . . . . . . . . . . . . . . . . . . . . . . . . . . . . . . . . . . . 131 Information Checklist . . . . . . . . . . . . . . . . . . . . . . . . . . . . . . . . . . . . . . . . . . . . . . . . . . . . . . . . . . . . . . . 131 Enable 802.1X at the machine. . . . . . . . . . . . . . . . . . . . . . . . . . . . . . . . . . . . . . . . . . . . . . . . . . . . . . . 131 Authentication . . . . . . . . . . . . . . . . . . . . . . . . . . . . . . . . . . . . . . . . . . . . . . . . . . . . . . . . . . . . . . . . . . . . . . . . . 133 Overview . . . . . . . . . . . . . . . . . . . . . . . . . . . . . . . . . . . . . . . . . . . . . . . . . . . . . . . . . . . . . . . . . . . . . . . . . . . 133 No Authentication . . . . . . . . . . . . . . . . . . . . . . . . . . . . . . . . . . . . . . . . . . . . . . . . . . . . . . . . . . . . . . . . . . 133 Authentication . . . . . . . . . . . . . . . . . . . . . . . . . . . . . . . . . . . . . . . . . . . . . . . . . . . . . . . . . . . . . . . . . . . . . 133 Configure Local Authentication . . . . . . . . . . . . . . . . . . . . . . . . . . . . . . . . . . . . . . . . . . . . . . . . . . . . . . 133 Configure External Authentication . . . . . . . . . . . . . . . . . . . . . . . . . . . . . . . . . . . . . . . . . . . . . . . . . . . 135 Configure Kerberos (Unix/Linux) . . . . . . . . . . . . . . . . . . . . . . . . . . . . . . . . . . . . . . . . . . . . . . . . . . . . . 135 Configure Kerberos (Windows ADS) . . . . . . . . . . . . . . . . . . . . . . . . . . . . . . . . . . . . . . . . . . . . . . . . . . 135 Configure SMB (Windows NT 4) . . . . . . . . . . . . . . . . . . . . . . . . . . . . . . . . . . . . . . . . . . . . . . . . . . . . . 136 Configure SMB (Windows ADS) . . . . . . . . . . . . . . . . . . . . . . . . . . . . . . . . . . . . . . . . . . . . . . . . . . . . . . 137 Configure LDAP . . . . . . . . . . . . . . . . . . . . . . . . . . . . . . . . . . . . . . . . . . . . . . . . . . . . . . . . . . . . . . . . . . . . 137
Display Network Settings . . . . . . . . . . . . . . . . . . . . . . . . . . . . . . . . . . . . . . . . . . . . . . . . . . . . . . . . . . . . . . . 139
13 CentreWare Internet Services
Overview. . . . . . . . . . . . . . . . . . . . . . . . . . . . . . . . . . . . . . . . . . . . . . . . . . . . . . . . . . . . . . . . . . . . . . . . . . . . . . . 142
Information Checklist . . . . . . . . . . . . . . . . . . . . . . . . . . . . . . . . . . . . . . . . . . . . . . . . . . . . . . . . . . . . . . . 142
Enable HTTP Using the LUI. . . . . . . . . . . . . . . . . . . . . . . . . . . . . . . . . . . . . . . . . . . . . . . . . . . . . . . . . . 142
Access Internet Services. . . . . . . . . . . . . . . . . . . . . . . . . . . . . . . . . . . . . . . . . . . . . . . . . . . . . . . . . . . . . 142
Status . . . . . . . . . . . . . . . . . . . . . . . . . . . . . . . . . . . . . . . . . . . . . . . . . . . . . . . . . . . . . . . . . . . . . . . . . . . . . . . . . 143
Print Information . . . . . . . . . . . . . . . . . . . . . . . . . . . . . . . . . . . . . . . . . . . . . . . . . . . . . . . . . . . . . . . . . . . 143
Jobs . . . . . . . . . . . . . . . . . . . . . . . . . . . . . . . . . . . . . . . . . . . . . . . . . . . . . . . . . . . . . . . . . . . . . . . . . . . . . . . . . . . 144
Folders . . . . . . . . . . . . . . . . . . . . . . . . . . . . . . . . . . . . . . . . . . . . . . . . . . . . . . . . . . . . . . . . . . . . . . . . . . . . . 144
Job Management. . . . . . . . . . . . . . . . . . . . . . . . . . . . . . . . . . . . . . . . . . . . . . . . . . . . . . . . . . . . . . . . . . . 145
Print . . . . . . . . . . . . . . . . . . . . . . . . . . . . . . . . . . . . . . . . . . . . . . . . . . . . . . . . . . . . . . . . . . . . . . . . . . . . . . . . . . . 146
Address Book. . . . . . . . . . . . . . . . . . . . . . . . . . . . . . . . . . . . . . . . . . . . . . . . . . . . . . . . . . . . . . . . . . . . . . . . . . . 147
6Xerox WorkCentre 3315DN/3325DN/3325DNI System Administrator Guide
Properties. . . . . . . . . . . . . . . . . . . . . . . . . . . . . . . . . . . . . . . . . . . . . . . . . . . . . . . . . . . . . . . . . . . . . . . . . . . . . . 148
Machine Settings . . . . . . . . . . . . . . . . . . . . . . . . . . . . . . . . . . . . . . . . . . . . . . . . . . . . . . . . . . . . . . . . . . . 148
System . . . . . . . . . . . . . . . . . . . . . . . . . . . . . . . . . . . . . . . . . . . . . . . . . . . . . . . . . . . . . . . . . . . . . . . . . . . . 149
Printer . . . . . . . . . . . . . . . . . . . . . . . . . . . . . . . . . . . . . . . . . . . . . . . . . . . . . . . . . . . . . . . . . . . . . . . . . . . . . 151
Copy. . . . . . . . . . . . . . . . . . . . . . . . . . . . . . . . . . . . . . . . . . . . . . . . . . . . . . . . . . . . . . . . . . . . . . . . . . . . . . . 154
Fax . . . . . . . . . . . . . . . . . . . . . . . . . . . . . . . . . . . . . . . . . . . . . . . . . . . . . . . . . . . . . . . . . . . . . . . . . . . . . . . . 155
Scan . . . . . . . . . . . . . . . . . . . . . . . . . . . . . . . . . . . . . . . . . . . . . . . . . . . . . . . . . . . . . . . . . . . . . . . . . . . . . . . 155
E-mail Notification . . . . . . . . . . . . . . . . . . . . . . . . . . . . . . . . . . . . . . . . . . . . . . . . . . . . . . . . . . . . . . . . . 155
Network Settings . . . . . . . . . . . . . . . . . . . . . . . . . . . . . . . . . . . . . . . . . . . . . . . . . . . . . . . . . . . . . . . . . . . 156
Security . . . . . . . . . . . . . . . . . . . . . . . . . . . . . . . . . . . . . . . . . . . . . . . . . . . . . . . . . . . . . . . . . . . . . . . . . . . . 159
Support. . . . . . . . . . . . . . . . . . . . . . . . . . . . . . . . . . . . . . . . . . . . . . . . . . . . . . . . . . . . . . . . . . . . . . . . . . . . . . . . 162
Version Information . . . . . . . . . . . . . . . . . . . . . . . . . . . . . . . . . . . . . . . . . . . . . . . . . . . . . . . . . . . . . . . . 162
Firmware Upgrade. . . . . . . . . . . . . . . . . . . . . . . . . . . . . . . . . . . . . . . . . . . . . . . . . . . . . . . . . . . . . . . . . . 162
To Edit Contact Information Details . . . . . . . . . . . . . . . . . . . . . . . . . . . . . . . . . . . . . . . . . . . . . . . . . 162
Support Links. . . . . . . . . . . . . . . . . . . . . . . . . . . . . . . . . . . . . . . . . . . . . . . . . . . . . . . . . . . . . . . . . . . . . . . 163
14 Software Upgrade
Overview . . . . . . . . . . . . . . . . . . . . . . . . . . . . . . . . . . . . . . . . . . . . . . . . . . . . . . . . . . . . . . . . . . . . . . . . . . . . . . 166 When should I upgrade the software? . . . . . . . . . . . . . . . . . . . . . . . . . . . . . . . . . . . . . . . . . . . . . . . 166 How do I upgrade the software?. . . . . . . . . . . . . . . . . . . . . . . . . . . . . . . . . . . . . . . . . . . . . . . . . . . . . 166 Upgrade using Internet Services. . . . . . . . . . . . . . . . . . . . . . . . . . . . . . . . . . . . . . . . . . . . . . . . . . . . . . . . . 167 Information Checklist . . . . . . . . . . . . . . . . . . . . . . . . . . . . . . . . . . . . . . . . . . . . . . . . . . . . . . . . . . . . . . . 167 Procedure . . . . . . . . . . . . . . . . . . . . . . . . . . . . . . . . . . . . . . . . . . . . . . . . . . . . . . . . . . . . . . . . . . . . . . . . . . 167 Upgrade using a USB flash drive . . . . . . . . . . . . . . . . . . . . . . . . . . . . . . . . . . . . . . . . . . . . . . . . . . . . . . . . 169 Information Checklist . . . . . . . . . . . . . . . . . . . . . . . . . . . . . . . . . . . . . . . . . . . . . . . . . . . . . . . . . . . . . . . 169 Procedure . . . . . . . . . . . . . . . . . . . . . . . . . . . . . . . . . . . . . . . . . . . . . . . . . . . . . . . . . . . . . . . . . . . . . . . . . . 169
15 Troubleshooting
Problem Solving Procedure . . . . . . . . . . . . . . . . . . . . . . . . . . . . . . . . . . . . . . . . . . . . . . . . . . . . . . . . . . . . . . 172 Scan to Server (WorkCentre 3325DN/3325DNI). . . . . . . . . . . . . . . . . . . . . . . . . . . . . . . . . . . . . . . . . . 173 LDAP . . . . . . . . . . . . . . . . . . . . . . . . . . . . . . . . . . . . . . . . . . . . . . . . . . . . . . . . . . . . . . . . . . . . . . . . . . . . . . . . . . 175 Fax . . . . . . . . . . . . . . . . . . . . . . . . . . . . . . . . . . . . . . . . . . . . . . . . . . . . . . . . . . . . . . . . . . . . . . . . . . . . . . . . . . . . 176 Printing . . . . . . . . . . . . . . . . . . . . . . . . . . . . . . . . . . . . . . . . . . . . . . . . . . . . . . . . . . . . . . . . . . . . . . . . . . . . . . . . 177 Connectivity . . . . . . . . . . . . . . . . . . . . . . . . . . . . . . . . . . . . . . . . . . . . . . . . . . . . . . . . . . . . . . . . . . . . . . . . . . . 178
16 Xerox Secure Access
Overview . . . . . . . . . . . . . . . . . . . . . . . . . . . . . . . . . . . . . . . . . . . . . . . . . . . . . . . . . . . . . . . . . . . . . . . . . . . . . . 182 Information Checklist . . . . . . . . . . . . . . . . . . . . . . . . . . . . . . . . . . . . . . . . . . . . . . . . . . . . . . . . . . . . . . . . . . 182 Configure Xerox Secure Access on the Device . . . . . . . . . . . . . . . . . . . . . . . . . . . . . . . . . . . . . . . . . . . . 183 Access the Authentication Page . . . . . . . . . . . . . . . . . . . . . . . . . . . . . . . . . . . . . . . . . . . . . . . . . . . . . 183 Configure Xerox Secure Access . . . . . . . . . . . . . . . . . . . . . . . . . . . . . . . . . . . . . . . . . . . . . . . . . . . . . . 183 Configure the Xerox Secure Access Server . . . . . . . . . . . . . . . . . . . . . . . . . . . . . . . . . . . . . . . . . . . . 184 Use Secure Access . . . . . . . . . . . . . . . . . . . . . . . . . . . . . . . . . . . . . . . . . . . . . . . . . . . . . . . . . . . . . . . . . . . . . . 184
Xerox WorkCentre 3315DN/3325DN/3325DNI |
7 |
System Administrator Guide |
|
17 Appendix A
Management Information Base (MIB) . . . . . . . . . . . . . . . . . . . . . . . . . . . . . . . . . . . . . . . . . . . . . . . 185
8Xerox WorkCentre 3315DN/3325DN/3325DNI System Administrator Guide
Introduction |
1 |
Welcome to the Xerox WorkCentre 3315DN/3325DN/3325DNI System Administrator Guide. This chapter includes:
•Who should use this Guide? on page 10
•Machine Overview on page 11
•Control Panel Overview on page 12
Xerox WorkCentre 3315DN/3325DN/3325DNI |
9 |
System Administrator Guide |
|
Who should use this Guide?
Who should use this Guide?
This guide is intended for System Administrators who need to install, setup and manage printers and other services on their network.
To use the procedures in this guide effectively, System Administrators must have previous experience working in a network environment and must possess Supervisor, Administrator, Account Operator, or equivalent rights to the network. They must also have prior knowledge of how to create and manage network user accounts.
10Xerox WorkCentre 3315DN/3325DN/3325DNI System Administrator Guide
Machine Overview
Machine Overview
The Xerox WorkCentre 3315DN/3325DN/3325DNI are multi-function machines which are capable of being used for copying, printing, faxing, scanning and e-mailing. The features and functions available on your machine depend on the model you have purchased.
Product Configurations
Component |
WorkCentre |
WorkCentre |
WorkCentre |
|
3325DNI |
3325DN |
3315DN |
||
|
||||
|
|
|
|
|
Duplex Automatic Document Feeder (50 sheets) |
Standard |
Standard |
Not Applicable |
|
|
|
|
|
|
Automatic Document Feeder (50 sheets) |
Not Applicable |
Not Applicable |
Standard |
|
|
|
|
|
|
Paper Tray 1 (250 sheets) |
Standard |
Standard |
Standard |
|
|
|
|
|
|
Bypass Tray (50 sheets) |
Standard |
Standard |
Standard |
|
|
|
|
|
|
Paper Tray 2 (520 sheets) |
Optional |
Optional |
Optional |
|
|
|
|
|
|
Copy |
Standard |
Standard |
Standard |
|
|
|
|
|
|
Scan to SMB and FTP |
Standard |
Standard |
Not Applicable |
|
|
|
|
|
|
Network Printing |
Standard |
Standard |
Standard |
|
|
|
|
|
|
Standard |
Standard |
Standard |
||
|
|
|
|
|
Scan |
Standard |
Standard |
Standard |
|
|
|
|
|
|
Scan To and Print From USB |
Standard |
Standard |
Standard |
|
|
|
|
|
|
Fax |
Standard |
Standard |
Standard |
|
|
|
|
|
|
USB Memory Device Port |
Standard |
Standard |
Standard |
|
|
|
|
|
|
Memory Expansion (Option) |
512MB |
512MB |
256MB |
|
|
|
|
|
|
Mass Storage Device (HDD) |
2GB |
2GB |
Not applicable |
|
|
|
|
|
|
Wireless Enabled |
Standard |
Not Applicable |
Not Applicable |
|
|
|
|
|
Note The internal Mass Storage Device (HDD) is used on the WorkCentre 3325DN/3325DNI models to support Secure Print, Delayed Print, Proof Print, Spooling of Scan to FTP/SMB jobs and Stored Jobs, and to provide an increased capacity for downloaded fonts.
Xerox WorkCentre 3315DN/3325DN/3325DNI |
11 |
System Administrator Guide |
|

Control Panel Overview
Control Panel Overview
.
1 |
|
9 |
12 |
15 |
|
|
|
|
22 |
2 |
5 |
10 |
13 |
16 |
.com |
17 |
18 |
20 |
21 |
3 |
|
7 |
11 |
|
|
|
|
|
23 |
4 |
6 |
8 |
14 |
|
|
|
|
|
|
|
|
|
|
|
24 |
||||
|
|
|
|
|
|
||||
|
|
|
|
|
|
19 |
|
||
|
|
|
|
|
|
|
|
|
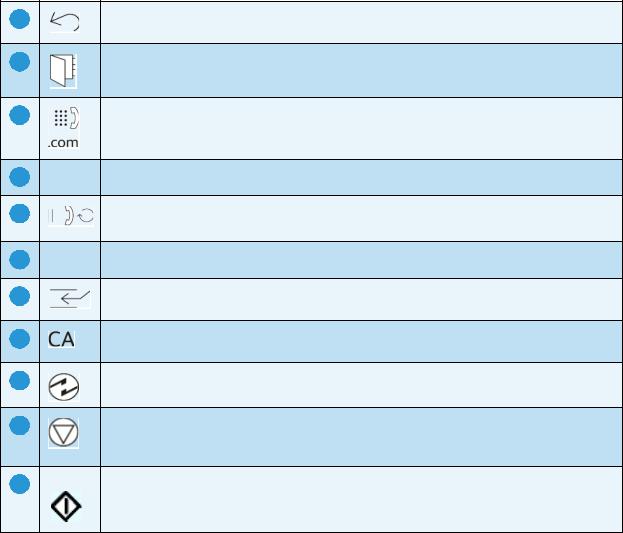
1
2
3
4
5
6
7
8
9
10
11
12
13
Copy: Activates Copy mode.
Scan: Activates Scan mode.
E-mail: Activates E-mail mode.
Fax: Activates Fax mode.
Display Screen: Displays all the available programming features, plus general machine information.
Status / Wireless LED: The color of the LEDs indicates the machine’s current status. For more information refer to the User Guide. (Wireless is supported on the 3325DNI only).
Paper Supply: Used to select a paper tray for the copy job.
2 Sided: Used to select whether your originals are 1 sided or 2 sided, or to produce 1 or 2 sided output.
Job Status: Displays job options for active and saved jobs. You can print or delete active jobs or saved jobs:
Machine Status: Accesses machine information, status information, the machine serial number and various reports to print.
Menu: Enters Menu Mode and enables you to access options and settings.
Arrows: The up/down and left/right arrows are used to scroll through the options available in the selected menu, and to increase or decrease values.
OK: Confirms the selection on the screen.
12Xerox WorkCentre 3315DN/3325DN/3325DNI System Administrator Guide
14
15
16
17
18
19
20
21
22
23
24
Control Panel Overview
Back: Used to go back one level in the menu.
Address Book: Used to search for stored fax numbers or e-mail addresses.
Manual Dial + .com: In Fax mode opens the fax line. In E-mail mode provides access to commonly used e-mail address text, for example .com or .org. The text available can be customized using CentreWare Internet Services.
Keypad: Used to enter alphanumeric characters.
Pause / Redial: In standby mode redials the last number. In edit mode inserts a pause into a fax number.
‘C’ Cancel Entry: Cancels the previous entry made on the keypad.
Interrupt Printing: Interrupts the current job to run a more urgent job. (Not applicable to the 3315DN)
Clear All: Clears the last selections made.
Power Saver: Sends the machine into power saver mode or power down. Press the button again to restart a powered off machine.
Stop: Pressing the Stop button stops the job in progress. Pressing Stop also exits the Menu Mode. If you have logged in to use the machine, pressing Stop will bring up the Log Out option.
Start: Activates a job.
|
Xerox WorkCentre 3315DN/3325DN/3325DNI |
13 |
|
||
|
System Administrator Guide |
|
Control Panel Overview
14Xerox WorkCentre 3315DN/3325DN/3325DNI System Administrator Guide
Machine Connection |
2 |
This chapter shows you how to connect your machine to a network and configure the Ethernet settings and includes:
•Machine Parts and Connection Ports on page 16
•CentreWare Internet Services on page 23
Xerox WorkCentre 3315DN/3325DN/3325DNI |
15 |
System Administrator Guide |
|
Machine Parts and Connection Ports
Machine Parts and Connection Ports
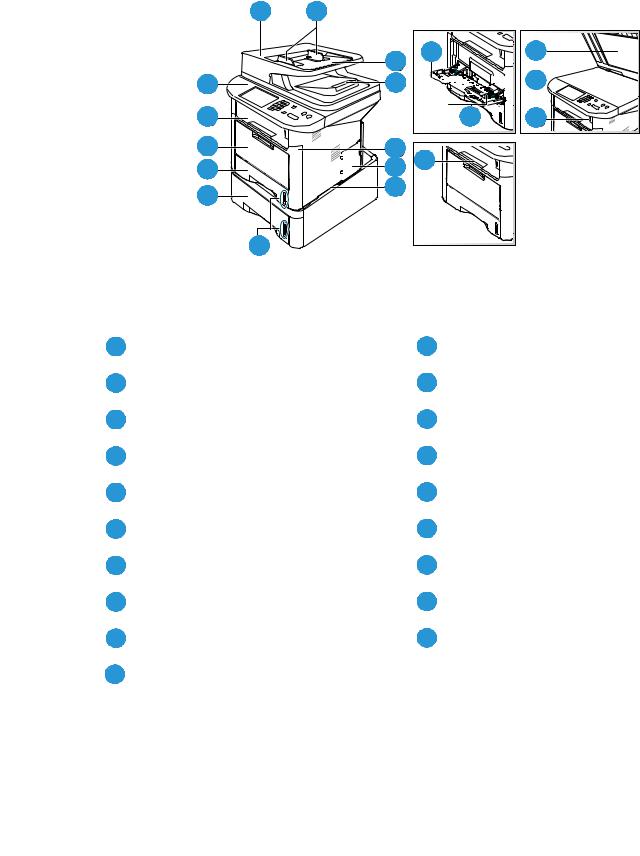
Front View
1 2
13
12
11
10
9
8 |
14 |
17 |
3 |
|
4


 18
18

|
15 |
19 |
5 |
16 |
|
6 |
|
|
|
|
|
7 |
|
|
1 |
Automatic Document Feeder Cover |
11 |
Bypass Tray |
|
|
||
|
|
|
|
2 |
Automatic Document Feeder Width Guides |
12 |
Output Tray |
|
|
||
|
|
|
|
3 |
Automatic Document Feeder Input Tray |
13 |
Control Panel |
|
|
||
|
|
|
|
4 |
Automatic Document Feeder Output Tray |
14 |
Bypass Tray Extension |
|
|
||
|
|
|
|
5 |
Front Cover |
15 |
Bypass Tray Width Guides |
|
|
||
|
|
|
|
6 |
Control Board Cover |
16 |
Output Tray Support |
|
|
||
|
|
|
|
7 |
Handle |
17 |
Document Glass Cover |
|
|
||
|
|
|
|
8 |
Paper level Indicator |
18 |
Document Glass |
|
|
||
|
|
|
|
9 |
Paper Tray 2 (Optional) |
19 |
USB Memory Device Port |
|
|
||
|
|
|
|
10 |
Paper Tray 1 |
|
|
|
|
|
|
|
|
|
|
16Xerox WorkCentre 3315DN/3325DN/3325DNI System Administrator Guide
Machine Parts and Connection Ports
Rear View
1 |
8 |
|
7 |
||
|
||
|
1 |
|
7 |
|
|
2 |
|
|
3 |
|
|
|
6 |
|
4 |
5 |
1 |
Network Port |
5 |
Rear Door |
|
|
||
|
|
|
|
2 |
Power Switch |
6 |
Paper Tray Rear Cover |
|
|
||
|
|
|
|
3 |
Power Receptacles |
7 |
Telephone Line Socket |
|
|
||
|
|
|
|
4 |
Duplex Unit |
8 |
Extension Telephone Socket |
|
|
||
|
|
|
|
Interface Ports
Front
USB Port
This port is provided for connection to a USB flash drive and is used as an input port for printing jobs, storing jobs and performing a software upgrade.
Rear
Network Port
This port is used to connect the machine to the network.
Xerox WorkCentre 3315DN/3325DN/3325DNI |
17 |
System Administrator Guide |
|
Machine Parts and Connection Ports
Telephone Line Socket
This port is used to connect the machine to a telephone or fax line.
Extension Telephone Socket (Ext. Port)
This port is used to allow a handset to be connected to the machine.
Initial Connection
The On/Off switch and the power outlet are at the rear of the machine. Follow these steps to physically connect your machine to the network:
1.Connect the power cord to the machine and a suitable power supply outlet. The power cord must be plugged into a grounded power socket.
2.The WorkCentre 3325DNI will connect to a wireless network, if available, when powered on. Note The machine will not connect to the wireless network while the network cable is attached.
3.Connect the network cable if required.
4.To allow faxing, connect the telephone line to the LINE Connector.
Installation Wizard
1.On initial power on the Installation Wizard runs. The Language menu displays.
2.Press the Up/Down arrow buttons to highlight the required language and press OK.
3.The Format Date menu displays. Press the Up/Down arrow buttons to highlight one of the following and press OK:
•MM/DD/YYYY
•DD/MM/YYYY
•YYYY/MM/DD
4.The Set Date menu displays.
a.Press the buttons on the keypad to enter the date or press the Up/Down arrow buttons to increase or decrease the value shown on the screen.
b.Press the Left/Right arrow buttons to move from one section of the date to another.
c.When you have entered the date press OK.
5.The Format Time menu displays. Press the Up/Down arrow buttons to highlight one of the following and press OK:
•12 Hour
•24 Hour
6.The Set Time menu displays. Press the buttons on the control panel to enter the time and press
OK.
7.The Metric Defaults menu displays. Press the Up/Down arrow buttons to select one of the following and press OK:
•Inches
•mm
8.The Default Paper Size menu displays. Press the Up/Down arrow buttons to select one of the following and press OK:
18Xerox WorkCentre 3315DN/3325DN/3325DNI System Administrator Guide
Machine Parts and Connection Ports
•Letter
•A4
9.The Customer Support menu displays.
a.Press the Up/Down arrow buttons to select Enter Cust. Support #.
b.The Enter Cust. Support # screen displays. Enter the telephone number of your customer support centre.
c.Press OK.
d.The Enter Supplies Order # screen displays.
e.Enter the telephone number to order supplies.
f.Press OK.
10.The Optional Fax Setup menu displays. Press the Up/Down arrow buttons to select one of the following and press OK:
•Continue with Fax Setup
•Skip Fax Setup - go to step 14.
11.The 1/3 Fax Phone Num menu displays. Enter the fax number of the machine and press OK.
12.The 2/3 Fax ID menu displays. Enter the fax id of the machine and press OK.
13.The 3/3 Country menu displays. Press the Up/Down arrow buttons to select the required country and press OK.
14.The machine reboots and the Initializing screen displays.
Administrator Access
Certain features accessed at the machine may require Administrator access to change the settings.
Access to the Feature Defaults, System Setup and Network Settings areas are usually password protected.
1.Press the Machine Status button on the control panel.
2.Press the Up/Down arrow buttons to highlight the required option.
3.Press OK.
4.If required, enter the Administrator Password using the alphanumerical keypad. The default is
1111.
Note After entering a character press the Right arrow button to enable the next character to be entered.
5.Press OK. Once the password is verified, the selected option menu displays.
Wireless Connectivity (WorkCentre 3325DNI)
The WorkCentre 3325DNI is compatible with 802.11 (Wi-Fi®) wireless networks, when used with an external wireless adapter 802.11 Ethernet Bridge. The location where the machine is installed must be covered by an 802.11 wireless network. This is typically provided by a nearby wireless access point or router, which is physically connected to the wired Ethernet that serves the building.
Xerox WorkCentre 3315DN/3325DN/3325DNI |
19 |
System Administrator Guide |
|
Machine Parts and Connection Ports
The machine supports connectivity via a wireless only connection if required. The machine will automatically configure wireless networking when powered on.
Note The machine will not connect to the wireless network while the network cable is attached.
There are several ways to configure Wireless Connectivity:
•At the Machine. For instructions refer to Configure Wireless Connectivity at the Machine: on page 20.
•Using Internet Services. For instructions refer to Configure Wireless Connectivity Using Internet Services (WorkCentre 3325DNI) on page 24.
•With the Wireless Setting Program. For instructions refer to Wireless Setup (WorkCentre 3325DNI) on page 46.
Configure Wireless Connectivity at the Machine:
1.Press the Machine Status button.
2.Press the Up/Down arrow buttons to highlight Network Settings and press OK.
3.Enter the Administrator Password using the alphanumerical keypad. The default is 1111. Refer to Administrator Access on page 19.
4.Press the Up/Down arrow buttons to highlight Wireless and press OK. The options are:
•Wi-Fi ON/OFF - allows you to enable or disable wireless connectivity.
•WPS Settings - allows you to select the Wi-Fi Protected Setup - the options are PBC or PIN.
•WLAN Settings - allows you to use a Wizard to find the wireless network name automatically, or use the Custom feature to enter the SSID (Service Set Identifier) information manually.
•WLAN Default - allows you to restore the default wireless settings.
•WLAN Signal - allows you view the strength of the wireless connection.
4.At the Wireless menu, press the Up/Down arrow buttons to select Wi-Fi ON/OFF and press OK. Ensure that On is selected and press OK.
5.Press the Up/Down arrow buttons to select WLAN Settings and press OK. The options are:
a.Select Wizard - to have the machine find the WPS Settings automatically. If you select this, the Searching WLAN screen displays and the machine searches the wireless network.
• |
Select your wireless network and click OK. |
• |
Enter the wireless security information if requested and click OK. |
• |
Select Yes to apply the changes. |
b. |
Select Custom - to edit the SSID information manually. If you select this option the Edit |
|
SSID screen displays. |
• |
Enter the SSID using the keypad and click OK. |
• |
Select the Operation Mode and click OK. |
• |
Select the Channel and click OK. |
• |
Select the Channel MHz and click OK. |
• |
Select the WLAN Security if required and click OK. |
• |
Select the Authentication if required and click OK. |
• |
Enter the WEP Key if required and click OK. |
• |
Select Yes to apply the changes. |
20Xerox WorkCentre 3315DN/3325DN/3325DNI System Administrator Guide
Machine Parts and Connection Ports
Configure Ethernet Settings
The Ethernet interface will automatically detect the speed of your network. The machine supports hub/switch speeds of:
•Automatic
•10 Mbps Full-Duplex
•100 Mbps Full-Duplex
•10 Mbps Half-Duplex
•100 Mbps Half-Duplex
•1 Gbps Full
Set the Ethernet speed on the machine to match the speed set on your hub or switch:
Setting the Ethernet Speed at the Machine
1.Press the Machine Status button.
2.Press the Up/Down arrow buttons to highlight Network Settings and press OK.
3.Enter the Administrator Password using the alphanumerical keypad. The default is 1111. Refer to Administrator Access on page 19.
4.Press the Up/Down arrow buttons to highlight Ethernet Speed and press OK.
5.Press the Up/Down arrow buttons to highlight one of the following speeds:
•Automatic
•10 Mbps Half
•10 Mbps Full
•100 Mbps Half
•100 Mbps Full
•1 Gbps Full
6.Press OK. The Saved screen displays followed by the Reboot Required message.
To reboot the machine, press the power switch off, wait two seconds and press the power switch back on.
To set the Ethernet Speed using Internet Services, refer to Setting the Ethernet Speed Using Internet Services on page 26.
Print a Configuration Report
The Configuration Report details the machine software versions and network settings configured for the machine.
Print a Configuration Report at the Machine
1.Press the Machine Status button.
2.Press the Up/Down arrow buttons to highlight Information Pages and press OK.
3.Press the Up/Down arrow buttons to highlight Configuration Page and press OK.
Xerox WorkCentre 3315DN/3325DN/3325DNI |
21 |
System Administrator Guide |
|
Machine Parts and Connection Ports
Press the Left/Right arrow buttons to highlight Yes and press OK. The Printing screen displays and the configuration report will print.
You can also print the Configuration Report using Internet Services. Refer to Status on page 143.
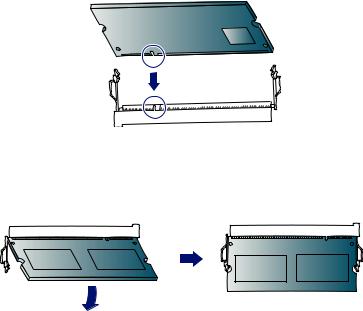
Install the Additional Memory Card
The machine supports memory expansion through the installation of an additional memory card. Memory expansion is an option for the machine.
The machine has a dual in-line memory module (DIMM). Use this memory module slot to install additional memory.
1.Turn the machine off and unplug all cables from the machine.
2.Grasp the control board cover and remove it.
3.Remove the new memory module from its bag.
4.Holding the memory module by the edges, align the memory module on the slot at about a 30degree tilt. Make sure that the notches of the module and the grooves on the slot fit each other.
5.The notches and grooves illustrated above may not match those on an actual memory module and its slot.
6.Press the memory module into the slot with care until you hear a ‘click’.
7.Do not press the memory module strongly or the module may be damaged. If the module does not seem to fit into the slot properly, carefully try the previous procedure again.
8.Replace the control board cover.
9.Reconnect the power cord and machine cable and turn the machine on.
22Xerox WorkCentre 3315DN/3325DN/3325DNI System Administrator Guide
CentreWare Internet Services
CentreWare Internet Services
CentreWare Internet Services (Internet Services) is the embedded HTTP server application that resides in the machine. Internet Services allows an administrator to change network and system settings on the machine from the convenience of their workstation.
Many features available on your machine will need to be set via the machine and CentreWare Internet Services.
System Configuration
To use CentreWare Internet Services, you need to enable both TCP/IP and HTTP on the machine. See Configure Static IPv4 Addressing using the Machine User Interface on page 28, or Configure Dynamic IPv4 Addressing using the Machine User Interface on page 29.
To enable HTTP at the machine:
Note HTTP is enabled by default.
1.Press the Machine Status button.
2.Use the up/down arrows to select Network Settings.
3.Enter the Administrator password.
4.Use the up/down arrows to select HTTP Activate.
5.Select On.
6.Press OK. The Saved screen will appear and then the Reboot Required screen will appear.
7.Press the power switch off, wait two seconds and press the power switch back on.
Administrator User Name and Password
Many of the features available within CentreWare Internet Services will require an Administrator user name and password. The default user name is admin and the default password is 1111.
Internet Services Administrator Access
To access Internet Services Properties and change settings you will need to login as Admininstrator.
1.At your workstation, open the web browser and enter the IP Address of the machine in the Address Bar.
2.Press Enter. The Home page appears.
There are two ways to access Internet Services with the administrator login:
•Select Login at the top of the screen
•Select the Properties icon
3.Enter the Administrator User Name (admin) and Password (1111).
4.Click Login. Click Properties.
Xerox WorkCentre 3315DN/3325DN/3325DNI |
23 |
System Administrator Guide |
|
CentreWare Internet Services
Change the Administrator Password
It is recommended that you change the default administrator password to a more secure password, so this Xerox machine is not compromised.
To change the Administrator password:
1.At your workstation, open the web browser and enter the IP Address of the machine in the Address Bar.
2.Press Enter.
3.Select the Properties icon.
4.If prompted, enter the Administrator User Name (admin) and Password (1111), and select Login.
Click Properties.
5.In the Security link on the left hand side, select System Security.
6.Select the System Administrator link.
7.In the Access Control area:
a.Ensure Web UI Access Control Enable checkbox is selected.
b.In the Login ID field, enter a new login name.
c.Select the Change password box to change the password. In the Password field, enter a new numeric password.
d.Enter the password again in the Confirm Password field.
 CAUTION: Do not forget the password or you could be completely locked out of the system, requiring a service call.
8.Select Apply to save the changes.
9.Select OK when the acknowledgement message displays.
10.Select the Advanced button. The Advanced Access Control screen appears.
11.Select the number of days for the Password Expires In: option.
12.Select Protect Login IPv4 Address to enable this feature if required, and enter an IPv4 Address in the box.
13.Select the required option for the Login Failure Policy, for users who fail to login several times. The options are: Off, 3 times or 5 times.
14.Select the required option for Auto Logout. The options are 5, 10, 15 or 30 minutes.
15.Select Security Settings Reset if required.
16.Select Save to save your changes.
For further information, refer to Administrator Accounts on page 118.
Configure Wireless Connectivity Using Internet Services (WorkCentre 3325DNI)
Note The machine will not connect to the wireless network while the network cable is attached.
1.At your workstation, open the web browser and enter the IP Address of the machine in the Address Bar.
2.Press Enter.
24Xerox WorkCentre 3315DN/3325DN/3325DNI System Administrator Guide
CentreWare Internet Services
3.Select Properties.
4.If prompted, enter the Administrator User Name (admin) and Password (1111), and select Login. Click Properties.
5.In the Network Settings link, select the Wireless link.
6.The Connection Status shows the Link Status of the wireless connection.
7.The Wireless Settings area provides options to configure wireless connectivity. The options are
Easy Wireless Settings and Advanced Settings, and are explained below.
Use the Easy Wireless Settings Wizard
1.Select the Easy Wireless Settings Wizard button to have the machine find the WPS Settings automatically. The SSID screen appears with a list of available wireless networks.
2.Select the required Network Name SSID and click Next.
3.If encryption is required,
a.Enter the WPA Shared Key.
b.Enter the Confirm Network Key and click Next.
4.The Wireless Setup Confirmation screen appears. Click Apply.
Configure Advanced Wireless Settings
1.Select the Advanced Settings Custom button. The Advanced Wireless Setup screen appears.
2.To enable Wireless Radio, select On from the Wireless Radio menu.
3.Select the required option for SSID:
•Select Search List and select the required network from the drop-down menu. Click the Refresh button to update the list of networks available.
•Select Insert New SSID to enter a new wireless network name.
4.Select the required Operation Mode:
•Select Ad Hoc to communicate on the wireless network without a wireless access point. Select the required channel from the Ad-Hoc Channel menu.
•Select Infrastructure to connect to a wireless access point.
5.In the Security Setup area:
a.Select the required method of Authentication.
b.Select the required method of Encryption.
6.Depending on your selections you may be required to enter some or all of the following information for the Network Key Setup.
a.Select the required option for Using Key.
b.The Hexadecimal option may be enabled. Click the Hexadecimal checkbox to deselect if required.
c.Enter the required Network Key and Confirm Network Key.
7.Select Apply to save the changes.
Xerox WorkCentre 3315DN/3325DN/3325DNI |
25 |
System Administrator Guide |
|
CentreWare Internet Services
Setting the Ethernet Speed Using Internet Services
1.At your workstation, open the web browser and enter the IP Address of the machine in the Address Bar.
2.Press Enter.
3.Select Properties.
4.If prompted, enter the Administrator User Name (admin) and Password (1111), and select Login. Click Properties.
5.In the Network Settings link select the General link.
6.Select one of the following speeds from the Ethernet Speed drop-down menu:
•Automatic
•10 Mbps (Half Duplex)
•10 Mbps (Full Duplex)
•100 Mbps (Half Duplex)
•100 Mbps (Full Duplex)
•1 Gbps (Full Duplex)
7.Select on Apply to save the changes.
The change to Ethernet Speed rate will take effect after System Reboot screen appears.
8.Select OK.
9.When the Acknowledgement screen displays, select OK.
10.Reboot the machine.
26Xerox WorkCentre 3315DN/3325DN/3325DNI System Administrator Guide
Network Installation |
3 |
This chapter covers the following topics:
•TCP/IP on page 28
•Unix on page 33
•Cloning on page 41
Xerox WorkCentre 3315DN/3325DN/3325DNI |
27 |
System Administrator Guide |
|
TCP/IP
TCP/IP
These instructions show you how to configure the following via Internet Services:
•TCP/IP v4 and v6
•Domain Name
•DNS
•Zero Configuration Networking
The machine supports TCP/IP versions 4 and 6. IPv6 can be used instead of or in addition to IPv4.
IPv4 and IPv6 settings can be configured directly at the machine user interface, or remotely, via a web browser using Internet Services. To configure TCP/IP settings using Internet Services, refer to Configure TCP/IP Settings using Internet Services on page 30.
Configure Static IPv4 Addressing using the Machine User Interface
Information Checklist
Before starting please ensure that the following items are available and/or the tasks have been performed:
•Existing operational network utilizing the TCP/IP protocol.
•Ensure that the machine is connected to the network.
•Static IP Address for the machine.
•Subnet Mask Address for the machine.
•Gateway Address for the machine.
•Host Name for the machine.
Procedure
Enter a Static IP Address:
1.Press the Machine Status button on the control panel.
2.Press the Up/Down arrow buttons to highlight Network Settings; press OK.
3.Enter the Administrator Password using the alphanumerical keypad. The default is 1111. Refer to Administrator Access on page 19.
4.Press the OK button; the Network Settings menu displays.
5.Press the Up/Down arrow buttons to highlight TCP/IP(IPv4); press OK.
6.Press the Up/Down arrow buttons to highlight Static; press OK.
7.Press the Up/Down arrow buttons to highlight IPv4 Address; press OK.
8.Enter the IP Address using the alphanumerical keypad; press OK.
9.Enter details for Subnet Mask using the alphanumerical keypad; press OK.
10.Enter details for Gateway using the alphanumerical keypad; press OK.
11.The Saved screen will display and return to the Network Settings menu.
28Xerox WorkCentre 3315DN/3325DN/3325DNI System Administrator Guide
TCP/IP
DNS Configuration:
12.From the Network Settings menu, press the Up/Down arrow buttons to highlight TCP/IP(IPv4); press OK.
13.Press the Up/Down arrow buttons to highlight Static; press OK.
14.Press the Up/Down arrow buttons to highlight Primary DNS; press OK.
15.Enter details for Primary DNS using the alphanumerical keypad; press OK. The Saved screen will display and return to the Static menu.
16.Press the Up/Down arrow buttons to highlight Secondary DNS; press OK.
17.Enter details for Secondary DNS using the alphanumerical keypad; press OK. The Saved screen will display and return to the Network Settings menu.
Configure Dynamic IPv4 Addressing using the Machine User Interface
Information Checklist
Before starting please ensure that the following items are available and/or the tasks have been performed:
•Existing operational network utilizing the TCP/IP protocol.
•DHCP or BOOTP Server should be available on the network.
•Ensure that the machine is connected to the network.
Procedure
Installation via DHCP (Dynamic Host Configuration Protocol)
DHCP is enabled on the machine by default. If the machine is connected to the network, the TCP/IP information will be configured when the machine is powered on and no further configuration is required.
1.Print a Configuration Report to verify that the information was assigned correctly. Refer to Print a Configuration Report on page 21.
Installation via BOOTP or DHCP
Ensure your machine is connected to the network with Ethernet cabling.
1.Press the Machine Status button on the control panel.
2.Press the Up/Down arrow buttons to highlight Network Settings; press OK.
3.Enter the Administrator Password using the alphanumerical keypad. The default is 1111. Refer to Administrator Access on page 19.
4.Press the OK button, the Network Settings menu displays.
5.Press the Up/Down arrow buttons to highlight TCP/IP(IPv4); press OK.
6.Press the Up/Down arrow buttons to highlight DHCP; press OK.
7.The Saved screen will display and return to the Network Settings menu.
Xerox WorkCentre 3315DN/3325DN/3325DNI |
29 |
System Administrator Guide |
|
TCP/IP
Configure TCP/IP Settings using Internet Services
IPv4
1.At your workstation, open the web browser and enter the IP Address of the machine in the Address Bar.
2.Press Enter.
3.Select Properties.
4.If prompted, enter the Administrator User Name (admin) and Password (1111), and select Login. Click Properties.
5.In the Network Settings link select TCP/IPv4 from the directory tree. The TCP/IPv4 page displays.
6.In the Assign IPv4 Address menu, select Automatically or Manually.
7.If Manually is selected, in the TCP/IP Settings area enter details of the machine in the following fields:
a.IPv4 Address
b.Subnet Mask
c.Gateway Address
If Automatically is selected, select BOOTP or DHCP.
Notes:
•If BOOTP or DHCP mode is selected, you cannot change the IP Address, Network Mask, or Router/Gateway Address. Select Auto IP if required.
•New settings will not be applied until the machine is rebooted. Changing the machine’s TCP/IP setting may cause you to lose your connection to the machine.
8.In the Domain Name area:
a.Enter a domain name in the Domain Name field.
b.Enter an IP address in the Primary DNS Server and Secondary DNS Server fields.
c.Select the Enabled box to enable Dynamic DNS Registration if required.
Note: If your DNS Server does not support dynamic updates there is no need to select Enabled.
9.In the WINS area select the box to enable WINS and enter details in the following fields:
a.Primary WINS Server
b.Secondary WINS Server
10.Select Apply to save the changes.
11.Select OK when the acknowledgement message displays.
IPv6
1.At your workstation, open the web browser and enter the IP Address of the machine in the Address Bar.
2.Press Enter.
3.Select Properties.
4.If prompted, enter the Administrator User Name (admin) and Password (1111), and select Login. Click Properties.
30Xerox WorkCentre 3315DN/3325DN/3325DNI System Administrator Guide
Loading...