


 Loading...
Version 2.0
July 2008
Xerox 4112 Copier/Printer
Xerox 4127 Copier/Printer
User
Guide
Prepared by: Xerox Corporation
Global Knowledge & Language Services 800 Phillips Road
Building 218
Webster, New York 14580
Translated by:
Xerox
GKLS European Operations
Bessemer Road
Welwyn Garden City
Hertfordshire
AL7 1BU
UK
© Copyright 2008 by Xerox Corporation. All Rights Reserved.
Copyright protection claimed includes all forms and matters of copyrighted material and information now allowed by statutory or judicial law or hereinafter granted, including without limitation, material generated from the software programs that are displayed on the screen such as styles, templates, icons, screen displays, looks, etc.
Xerox®, Omtool™, Equitrac™ and FreeFlow™ SMARTsend™, and all Xerox product names and product numbers mentioned in this publication are trademarks of XEROX CORPORATION. Other company brands and product names may be trademarks or registered trademarks of the respective companies and are also acknowledged.
Microsoft, MS-DOS, Windows, Windows NT, Microsoft Network, and Windows Server are either trademarks or registered trademarks of Microsoft Corporation in the United States and/or other countries. Novell, NetWare, IntranetWare and NDS are registered trademarks of Novell, Inc. in the United States and other countries. Adobe, Acrobat, PostScript, PostScript3, and PostScript Logo are trademarks of Adobe Systems Incorporated. Apple, AppleTalk, EtherTalk, LocalTalk, Macintosh, MacOS and TrueType are trademarks of Apple Computer, Inc., registered in the U.S. and other countries. HP, HPGL, HPGL/2, and HP-UX are registered trademarks of Hewlett-Packard Corporation.
All product/brand names are trademarks or registered trademarks of the respective holders.

Table of contents
1. Product overview |
1-1 |
Machine components . . . . . . . . . . . . . . . . . . . . . . . . . . . . . . . . 1-1 User Interface (UI) . . . . . . . . . . . . . . . . . . . . . . . . . . . . . . . . . . 1-7 Customizing the User Interface. . . . . . . . . . . . . . . . . . . . . . 1-9 Common UI Touch-screen Controls . . . . . . . . . . . . . . . . . . . . 1-10 Power on/off . . . . . . . . . . . . . . . . . . . . . . . . . . . . . . . . . . . . . . 1-13 Powering on . . . . . . . . . . . . . . . . . . . . . . . . . . . . . . . . . . . 1-13 Powering off . . . . . . . . . . . . . . . . . . . . . . . . . . . . . . . . . . . 1-14 About the circuit breaker. . . . . . . . . . . . . . . . . . . . . . . . . . . . . 1-14 Power Saver Mode . . . . . . . . . . . . . . . . . . . . . . . . . . . . . . . . . 1-15 Exiting the Power Saver Mode . . . . . . . . . . . . . . . . . . . . . 1-15 Customer documentation updates . . . . . . . . . . . . . . . . . . . . . 1-16 Additional applications/tools . . . . . . . . . . . . . . . . . . . . . . . . . . 1-16 Xerox Extensible Interface Platform (XEIP) . . . . . . . . . . . 1-16 Meter Assistant . . . . . . . . . . . . . . . . . . . . . . . . . . . . . . . . . 1-17
2. Copy |
2-1 |
Overview. . . . . . . . . . . . . . . . . . . . . . . . . . . . . . . . . . . . . . . . . . 2-1 Copy Procedure . . . . . . . . . . . . . . . . . . . . . . . . . . . . . . . . . . . . 2-1 Loading Documents . . . . . . . . . . . . . . . . . . . . . . . . . . . . . . 2-1 Selecting Copy Features . . . . . . . . . . . . . . . . . . . . . . . . . . 2-4 Entering the Quantity . . . . . . . . . . . . . . . . . . . . . . . . . . . . . 2-6 Cancelling the Copy Job. . . . . . . . . . . . . . . . . . . . . . . . . . . . . . 2-8 Changing the copy quantity . . . . . . . . . . . . . . . . . . . . . . . . . . . 2-8 Interrupting the copy job . . . . . . . . . . . . . . . . . . . . . . . . . . . . . . 2-9 Basic Copying. . . . . . . . . . . . . . . . . . . . . . . . . . . . . . . . . . . . . 2-10 Reduce/Enlarge . . . . . . . . . . . . . . . . . . . . . . . . . . . . . . . . 2-11 Paper Supply . . . . . . . . . . . . . . . . . . . . . . . . . . . . . . . . . . 2-15 2 Sided Copying (Making 2-sided Copies) . . . . . . . . . . . . 2-17 Copy Output . . . . . . . . . . . . . . . . . . . . . . . . . . . . . . . . . . . 2-18 Image Shift . . . . . . . . . . . . . . . . . . . . . . . . . . . . . . . . . . . . 2-19 Original Type. . . . . . . . . . . . . . . . . . . . . . . . . . . . . . . . . . . 2-20 Lighten/Darken . . . . . . . . . . . . . . . . . . . . . . . . . . . . . . . . . 2-20
Image Quality Tab. . . . . . . . . . . . . . . . . . . . . . . . . . . . . . . . . . 2-21 Original Type. . . . . . . . . . . . . . . . . . . . . . . . . . . . . . . . . . . 2-21
Xerox 4112/4127 Copier/Printer User Guide |
i |

Table of contents
Image Options . . . . . . . . . . . . . . . . . . . . . . . . . . . . . . . . . 2-22 Background Suppression . . . . . . . . . . . . . . . . . . . . . . . . . 2-22 Layout Adjustment Tab . . . . . . . . . . . . . . . . . . . . . . . . . . . . . . 2-23 Book Copying . . . . . . . . . . . . . . . . . . . . . . . . . . . . . . . . . . 2-24 2 Sided Book Copying . . . . . . . . . . . . . . . . . . . . . . . . . . . 2-26 Original Size . . . . . . . . . . . . . . . . . . . . . . . . . . . . . . . . . . . 2-27 Edge Erase . . . . . . . . . . . . . . . . . . . . . . . . . . . . . . . . . . . . 2-30 Image Shift . . . . . . . . . . . . . . . . . . . . . . . . . . . . . . . . . . . . 2-30 Image Rotation . . . . . . . . . . . . . . . . . . . . . . . . . . . . . . . . . 2-31 Invert Image (Mirror Image/Negative Image) . . . . . . . . . . 2-32 Original Orientation . . . . . . . . . . . . . . . . . . . . . . . . . . . . . . 2-33
Output Format tab. . . . . . . . . . . . . . . . . . . . . . . . . . . . . . . . . . 2-34 Booklet Creation . . . . . . . . . . . . . . . . . . . . . . . . . . . . . . . . 2-35 Transparency Options. . . . . . . . . . . . . . . . . . . . . . . . . . . . 2-39 Page Layout (Multiple-Up/Repeat Image). . . . . . . . . . . . . 2-41 Poster . . . . . . . . . . . . . . . . . . . . . . . . . . . . . . . . . . . . . . . . 2-43 Folding (optional) . . . . . . . . . . . . . . . . . . . . . . . . . . . . . . . 2-44 Annotations . . . . . . . . . . . . . . . . . . . . . . . . . . . . . . . . . . . . 2-47 Watermark . . . . . . . . . . . . . . . . . . . . . . . . . . . . . . . . . . . . 2-52 Tab Margin Shift . . . . . . . . . . . . . . . . . . . . . . . . . . . . . . . . 2-54 Output Orientation. . . . . . . . . . . . . . . . . . . . . . . . . . . . . . . 2-55 ID Card Copying . . . . . . . . . . . . . . . . . . . . . . . . . . . . . . . . 2-56
Job Assembly tab . . . . . . . . . . . . . . . . . . . . . . . . . . . . . . . . . . 2-57 Build Job . . . . . . . . . . . . . . . . . . . . . . . . . . . . . . . . . . . . . . 2-58 Sample Job. . . . . . . . . . . . . . . . . . . . . . . . . . . . . . . . . . . . 2-60 Combine Original Sets . . . . . . . . . . . . . . . . . . . . . . . . . . . 2-60 Form Overlay . . . . . . . . . . . . . . . . . . . . . . . . . . . . . . . . . . 2-61 Delete Outside/Delete Inside . . . . . . . . . . . . . . . . . . . . . . 2-62
3. Scan |
3-1 |
Overview. . . . . . . . . . . . . . . . . . . . . . . . . . . . . . . . . . . . . . . . . . 3-1
Scan procedure . . . . . . . . . . . . . . . . . . . . . . . . . . . . . . . . . . . . 3-1
Generic Scan Screen Features. . . . . . . . . . . . . . . . . . . . . . 3-2
If You Have More Documents . . . . . . . . . . . . . . . . . . . . . . . 3-5
Cancelling a Scan Job . . . . . . . . . . . . . . . . . . . . . . . . . . . . 3-6
E-mail . . . . . . . . . . . . . . . . . . . . . . . . . . . . . . . . . . . . . . . . . . . . 3-7
E-mail Recipients . . . . . . . . . . . . . . . . . . . . . . . . . . . . . . . . 3-8
Advanced Settings tab . . . . . . . . . . . . . . . . . . . . . . . . . . . 3-13
Layout Adjustment tab . . . . . . . . . . . . . . . . . . . . . . . . . . . 3-18
Email Options tab . . . . . . . . . . . . . . . . . . . . . . . . . . . . . . . 3-22
Scan to Mailbox . . . . . . . . . . . . . . . . . . . . . . . . . . . . . . . . . . . 3-28
Filing Options tab . . . . . . . . . . . . . . . . . . . . . . . . . . . . . . . 3-31
Network Scanning. . . . . . . . . . . . . . . . . . . . . . . . . . . . . . . . . . 3-32
ii |
Xerox 4112/4127 Copier/Printer User Guide |

Table of contents
Filing Options tab . . . . . . . . . . . . . . . . . . . . . . . . . . . . . . . 3-34 Job template . . . . . . . . . . . . . . . . . . . . . . . . . . . . . . . . . . . 3-38 Scan to PC . . . . . . . . . . . . . . . . . . . . . . . . . . . . . . . . . . . . . . . 3-38 Transfer Protocol . . . . . . . . . . . . . . . . . . . . . . . . . . . . . . . 3-39 Address Book . . . . . . . . . . . . . . . . . . . . . . . . . . . . . . . . . . 3-40 Filing Options tab . . . . . . . . . . . . . . . . . . . . . . . . . . . . . . . 3-41 Job template . . . . . . . . . . . . . . . . . . . . . . . . . . . . . . . . . . . 3-46 Optional Color Scanner Kit . . . . . . . . . . . . . . . . . . . . . . . . . . . 3-46 PDF Scan Kit . . . . . . . . . . . . . . . . . . . . . . . . . . . . . . . . . . . . . 3-47 PDF Scan Kit benefits. . . . . . . . . . . . . . . . . . . . . . . . . . . . 3-47 Using the PDF Scan Kit . . . . . . . . . . . . . . . . . . . . . . . . . . 3-52
4. Computer operations |
4-1 |
Network Printing . . . . . . . . . . . . . . . . . . . . . . . . . . . . . . . . . . . . 4-1 Printing with the PS print drivers. . . . . . . . . . . . . . . . . . . . . 4-1 Printing with the PCL print drivers. . . . . . . . . . . . . . . . . . . . 4-2 CentreWare Internet Services. . . . . . . . . . . . . . . . . . . . . . . . . . 4-5 Print a job from CentreWare Internet Services . . . . . . . . . . 4-5 Copying a job with tabs. . . . . . . . . . . . . . . . . . . . . . . . . . . . . . . 4-7 Network tab printing . . . . . . . . . . . . . . . . . . . . . . . . . . . . . . . . 4-11 Network printing on tabs using the PS print drivers . . . . . 4-11 Network printing on tabs using the PCL print drivers . . . . 4-13 E-mail print . . . . . . . . . . . . . . . . . . . . . . . . . . . . . . . . . . . . . . . 4-17 Sending e-mails . . . . . . . . . . . . . . . . . . . . . . . . . . . . . . . . 4-17 Importing scanned data . . . . . . . . . . . . . . . . . . . . . . . . . . . . . 4-18 Importing from a TWAIN-compatible application. . . . . . . . 4-18 Importing from Mailbox Viewer2 . . . . . . . . . . . . . . . . . . . . 4-21
5. Mailbox Management |
5-1 |
Mailbox components. . . . . . . . . . . . . . . . . . . . . . . . . . . . . . . . . 5-1 Create a mailbox. . . . . . . . . . . . . . . . . . . . . . . . . . . . . . . . . . . . 5-2 Editing or deleting an existing mailbox . . . . . . . . . . . . . . . . . . . 5-5 Mailbox backup information . . . . . . . . . . . . . . . . . . . . . . . . . . . 5-7 Send from Mailbox . . . . . . . . . . . . . . . . . . . . . . . . . . . . . . . . . . 5-7
Accessing the Send from Mailbox options . . . . . . . . . . . . . 5-7 Linking a Flow Sheet to a mailbox . . . . . . . . . . . . . . . . . . . . . 5-16
6. Job Flow |
6-1 |
Overview. . . . . . . . . . . . . . . . . . . . . . . . . . . . . . . . . . . . . . . . . . 6-1
Job Flow Procedures . . . . . . . . . . . . . . . . . . . . . . . . . . . . . . . . 6-2
Creating a Job Flow Sheet . . . . . . . . . . . . . . . . . . . . . . . . . 6-2
Xerox 4112/4127 Copier/Printer User Guide |
iii |

Table of contents
Linking a Job Flow Sheet with a Mailbox . . . . . . . . . . . . . 6-10
Starting a Job Flow Manually . . . . . . . . . . . . . . . . . . . . . . 6-16
Job Flow Sheet Filtering . . . . . . . . . . . . . . . . . . . . . . . . . . 6-18
Confirming/Changing Job Flow. . . . . . . . . . . . . . . . . . . . . 6-20
7. Stored Programming |
7-1 |
Stored Programming Overview. . . . . . . . . . . . . . . . . . . . . . . . . 7-1
Storing a Program. . . . . . . . . . . . . . . . . . . . . . . . . . . . . . . . 7-2
Deleting Stored Programs. . . . . . . . . . . . . . . . . . . . . . . . . . 7-7
Naming/Renaming a Stored Program. . . . . . . . . . . . . . . . . 7-8
Stored Program icons . . . . . . . . . . . . . . . . . . . . . . . . . . . . . 7-9
Calling a Stored Program . . . . . . . . . . . . . . . . . . . . . . . . . 7-10
8. Paper and other Media |
8-1 |
Loading Paper into Trays . . . . . . . . . . . . . . . . . . . . . . . . . . . . . 8-1 Guidelines for Loading Paper into Trays. . . . . . . . . . . . . . . 8-1 Loading Paper into Trays . . . . . . . . . . . . . . . . . . . . . . . . . . 8-2 Loading Tab Paper into Trays . . . . . . . . . . . . . . . . . . . . . . 8-12 Change/Confirm the Tray Settings . . . . . . . . . . . . . . . . . . . . . 8-16
Change/confirm the tray settings from the All Services
screen . . . . . . . . . . . . . . . . . . . . . . . . . . . . . . . . . . . . . . . . 8-16
Change/confirm the DEFAULT tray settings (System Administration) . . . . . . . . . . . . . . . . . . . . . . . . . . . . . . . . . 8-20
9. Job Status |
9-1 |
Job Status Overview . . . . . . . . . . . . . . . . . . . . . . . . . . . . . . . . . 9-1
Active Jobs tab . . . . . . . . . . . . . . . . . . . . . . . . . . . . . . . . . . 9-2
Secure Print Jobs & More tab . . . . . . . . . . . . . . . . . . . . . . . 9-5
Sample Set . . . . . . . . . . . . . . . . . . . . . . . . . . . . . . . . . . . . . 9-8
Delayed Print . . . . . . . . . . . . . . . . . . . . . . . . . . . . . . . . . . 9-11
Charge Print . . . . . . . . . . . . . . . . . . . . . . . . . . . . . . . . . . . 9-12
Printing Waiting Print Jobs . . . . . . . . . . . . . . . . . . . . . . . . 9-13
10. Machine Status |
10-1 |
Overview. . . . . . . . . . . . . . . . . . . . . . . . . . . . . . . . . . . . . . . . . |
10-1 |
The Machine Information tab . . . . . . . . . . . . . . . . . . . . . . . . . |
10-2 |
Serial Number. . . . . . . . . . . . . . . . . . . . . . . . . . . . . . . . . . |
10-2 |
Current system software version . . . . . . . . . . . . . . . . . . . |
10-2 |
The IP address of your copier/printer . . . . . . . . . . . . . . . . |
10-2 |
Machine Configuration.... . . . . . . . . . . . . . . . . . . . . . . . . . |
10-3 |
Software Version... . . . . . . . . . . . . . . . . . . . . . . . . . . . . . . |
10-3 |
iv |
Xerox 4112/4127 Copier/Printer User Guide |

|
|
Table of contents |
|
|
|
|
Paper Tray Status.... . . . . . . . . . . . . . . . . . . |
. . . . . . . . . . . 10-4 |
|
Print Reports... . . . . . . . . . . . . . . . . . . . . . . |
. . . . . . . . . . . 10-4 |
|
Overwrite Hard Disk.... . . . . . . . . . . . . . . . . |
. . . . . . . . . . . 10-6 |
|
Print Mode... . . . . . . . . . . . . . . . . . . . . . . . . |
. . . . . . . . . . . 10-7 |
|
The Faults tab. . . . . . . . . . . . . . . . . . . . . . . . . . |
. . . . . . . . . . 10-21 |
|
Current Faults . . . . . . . . . . . . . . . . . . . . . . . |
. . . . . . . . . . 10-21 |
|
Current Messages . . . . . . . . . . . . . . . . . . . |
. . . . . . . . . . 10-22 |
|
Fault History . . . . . . . . . . . . . . . . . . . . . . . . |
. . . . . . . . . . 10-22 |
|
The Supplies tab. . . . . . . . . . . . . . . . . . . . . . . . |
. . . . . . . . . . 10-23 |
|
The Billing Information tab . . . . . . . . . . . . . . . . |
. . . . . . . . . . 10-24 |
|
Accessing Billing Information . . . . . . . . . . . |
. . . . . . . . . . 10-24 |
|
Billing Information . . . . . . . . . . . . . . . . . . . . |
. . . . . . . . . . 10-25 |
|
The Tools tab . . . . . . . . . . . . . . . . . . . . . . . . . . |
. . . . . . . . . . 10-29 |
|
Create Mailbox . . . . . . . . . . . . . . . . . . . . . . |
. . . . . . . . . . 10-29 |
|
Stored Programming. . . . . . . . . . . . . . . . . . |
. . . . . . . . . . 10-29 |
|
Create New Job Flow Sheet . . . . . . . . . . . . |
. . . . . . . . . . 10-29 |
|
Add Address Book Entry. . . . . . . . . . . . . . . |
. . . . . . . . . . 10-30 |
|
Paper Tray Attributes . . . . . . . . . . . . . . . . . |
. . . . . . . . . . 10-30 |
|
11. Maintenance |
11-1 |
|
|
|
Replacing Consumables. . . . . . . . . . . . . . . . . . . . . . . . . . . . . 11-1
Checking the Status of Consumables. . . . . . . . . . . . . . . . 11-2
Handling Consumables. . . . . . . . . . . . . . . . . . . . . . . . . . . 11-2
Storing Consumables . . . . . . . . . . . . . . . . . . . . . . . . . . . . 11-2
Ordering Consumables. . . . . . . . . . . . . . . . . . . . . . . . . . . 11-2
Replacing Toner Cartridges . . . . . . . . . . . . . . . . . . . . . . . 11-3
Replacing the Waste Toner Container . . . . . . . . . . . . . . . 11-5
Replacing the Staple Cartridge . . . . . . . . . . . . . . . . . . . . . 11-9
Replacing the Staple Waste Container on the Basic
Finisher . . . . . . . . . . . . . . . . . . . . . . . . . . . . . . . . . . . . . . 11-11
Replacing the Booklet-Maker Staple Cartridge . . . . . . . . 11-12
Emptying the Punch Scrap Container. . . . . . . . . . . . . . . 11-14
Cleaning the Machine . . . . . . . . . . . . . . . . . . . . . . . . . . . . . . 11-15
Cleaning the Exterior . . . . . . . . . . . . . . . . . . . . . . . . . . . 11-15
Cleaning the Document Cover and Document Glass . . . 11-16
Cleaning the Document Feeder Rollers . . . . . . . . . . . . . 11-20
12. Problem Solving |
12-1 |
Initial Troubleshooting Procedures . . . . . . . . . . . . . . . . . . . . . 12-1
Machine Troubleshooting . . . . . . . . . . . . . . . . . . . . . . . . . . . . 12-3
Image Quality Problems . . . . . . . . . . . . . . . . . . . . . . . . . . . . . 12-8
Copy Troubleshooting. . . . . . . . . . . . . . . . . . . . . . . . . . . . . . 12-13
Xerox 4112/4127 Copier/Printer User Guide |
v |

Table of contents
Unable to Copy . . . . . . . . . . . . . . . . . . . . . . . . . . . . . . . . 12-14 The Copy result is not what was expected . . . . . . . . . . . 12-15 Print Troubleshooting . . . . . . . . . . . . . . . . . . . . . . . . . . . . . . 12-18 Unable to Print . . . . . . . . . . . . . . . . . . . . . . . . . . . . . . . . 12-18 The Printed result is not what was expected. . . . . . . . . . 12-21 Scan Troubleshooting . . . . . . . . . . . . . . . . . . . . . . . . . . . . . . 12-22 Unable to Scan with the Machine . . . . . . . . . . . . . . . . . . 12-22
Unable to import the scanned document into the
computer. . . . . . . . . . . . . . . . . . . . . . . . . . . . . . . . . . . . . 12-23
Unable to send the scanned document over the
network (FTP/SMB) . . . . . . . . . . . . . . . . . . . . . . . . . . . . 12-25 Problems with sending E-mail. . . . . . . . . . . . . . . . . . . . . 12-25 Image is not what was expected. . . . . . . . . . . . . . . . . . . 12-26 Error Codes . . . . . . . . . . . . . . . . . . . . . . . . . . . . . . . . . . . . . 12-28 Other Errors . . . . . . . . . . . . . . . . . . . . . . . . . . . . . . . . . . 12-28 Paper Jams. . . . . . . . . . . . . . . . . . . . . . . . . . . . . . . . . . . . . . 12-45 Paper Jams in Trays 1-4. . . . . . . . . . . . . . . . . . . . . . . . . 12-46 Paper Jams in Transport Unit 4 . . . . . . . . . . . . . . . . . . . 12-47 Paper Jams in Duplex Module 3 . . . . . . . . . . . . . . . . . . . 12-48 Paper Jams in Tray 5 (Bypass). . . . . . . . . . . . . . . . . . . . 12-50
Paper Jams in optional Trays 6 and 7 (High Capacity
Feeder Tray) . . . . . . . . . . . . . . . . . . . . . . . . . . . . . . . . . . 12-51
Paper jams in optional Tray 6 (Oversized High Capacity Feeder) . . . . . . . . . . . . . . . . . . . . . . . . . . . . . . . . . . . . . . 12-52
Paper Jams in Tray 8 (Post-Process inserter) . . . . . . . . 12-52 Paper Jams in Lower Left Cover. . . . . . . . . . . . . . . . . . . 12-53 Paper Jams inside body . . . . . . . . . . . . . . . . . . . . . . . . . 12-54 Paper Jams Inside Finisher Left Cover. . . . . . . . . . . . . . 12-57 Paper Jams Inside Finisher Right Cover . . . . . . . . . . . . 12-60 Paper Jams at Z Folding Unit . . . . . . . . . . . . . . . . . . . . . 12-64 Paper Jams at Output Area of Finisher. . . . . . . . . . . . . . 12-70 Paper Jams at the optional High Capacity Feeder Unit . 12-72
Document jams. . . . . . . . . . . . . . . . . . . . . . . . . . . . . . . . . . . 12-76 Stapler Faults . . . . . . . . . . . . . . . . . . . . . . . . . . . . . . . . . . . . 12-80 Staple jams in the staple cartridge . . . . . . . . . . . . . . . . . 12-81 Curled Output Solutions . . . . . . . . . . . . . . . . . . . . . . . . . . . . 12-84
13. Specifications |
13-1 |
Copy specifications. . . . . . . . . . . . . . . . . . . . . . . . . . . . . . . . . 13-1
Print Specifications . . . . . . . . . . . . . . . . . . . . . . . . . . . . . . . . . 13-4
Scan specifications . . . . . . . . . . . . . . . . . . . . . . . . . . . . . . 13-6
Document feeder specifications . . . . . . . . . . . . . . . . . . . . 13-7
Optional Trays 6 and 7 (HCF) specifications . . . . . . . . . . 13-7
vi |
Xerox 4112/4127 Copier/Printer User Guide |

Table of contents
Tray 6 (1-drawer Oversized High Capacity Feeder) -
optional . . . . . . . . . . . . . . . . . . . . . . . . . . . . . . . . . . . . . . . 13-8 Standard Finisher specifications . . . . . . . . . . . . . . . . . . . . 13-9 Booklet-Maker Finisher specifications . . . . . . . . . . . . . . 13-11 Folding unit (Z and C) specifications. . . . . . . . . . . . . . . . 13-13 Storing paper properly. . . . . . . . . . . . . . . . . . . . . . . . . . . 13-13
Printable Area . . . . . . . . . . . . . . . . . . . . . . . . . . . . . . . . . . . . 13-14 Standard Printing Area . . . . . . . . . . . . . . . . . . . . . . . . . . 13-14 Extended Printing Area. . . . . . . . . . . . . . . . . . . . . . . . . . 13-14 Available Options . . . . . . . . . . . . . . . . . . . . . . . . . . . . . . . . . 13-15 Cautions and Limitations . . . . . . . . . . . . . . . . . . . . . . . . . . . 13-16 Notes and Restrictions on the Use of the Machine. . . . . 13-16
14. Addendum |
14-1 |
Overview. . . . . . . . . . . . . . . . . . . . . . . . . . . . . . . . . . . . . . . . . 14-1 Interface Module (IFM) . . . . . . . . . . . . . . . . . . . . . . . . . . . . . . 14-1 Control Panel . . . . . . . . . . . . . . . . . . . . . . . . . . . . . . . . . . 14-2 Paper path . . . . . . . . . . . . . . . . . . . . . . . . . . . . . . . . . . . . 14-3 Paper curl . . . . . . . . . . . . . . . . . . . . . . . . . . . . . . . . . . . . . 14-3 Jam clearance . . . . . . . . . . . . . . . . . . . . . . . . . . . . . . . . . 14-4 Basic troubleshooting . . . . . . . . . . . . . . . . . . . . . . . . . . . . 14-5 Specifications . . . . . . . . . . . . . . . . . . . . . . . . . . . . . . . . . . 14-6 High Capacity Stacker . . . . . . . . . . . . . . . . . . . . . . . . . . . . . . 14-7 Identifying the Components . . . . . . . . . . . . . . . . . . . . . . . 14-8 Control Panel . . . . . . . . . . . . . . . . . . . . . . . . . . . . . . . . . . 14-9 HCS Trays . . . . . . . . . . . . . . . . . . . . . . . . . . . . . . . . . . . 14-10 Jam Clearance . . . . . . . . . . . . . . . . . . . . . . . . . . . . . . . . 14-12 Loss of power . . . . . . . . . . . . . . . . . . . . . . . . . . . . . . . . . 14-18 Specifications . . . . . . . . . . . . . . . . . . . . . . . . . . . . . . . . . 14-19
Glossary |
Glossary-1 |
Index |
Index-1 |
|
|
Xerox 4112/4127 Copier/Printer User Guide |
vii |

Table of contents
viii |
Xerox 4112/4127 Copier/Printer User Guide |
1.Product overview
KEY POINT: The User Interface (UI) screens shown in this guide
may or may not reflect the screens displayed on your copier/ printer. The UI screens vary from system to system and from marketplace to marketplace. Therefore, the screens provided in this guide are a representation of the type of screens that may be seen on your particular system.
Machine components
WARNING: To prevent personal injury, do not touch any labeled area that indicates High Temperature.
2 |
3 |
|
1
4 5
13
6
7
|
12 |
|
8 |
|
|
|
9 |
|
|
11 |
10 |
|
|
|
|
|
|
|
|
No. |
Component |
|
Function |
|
|
|
|
1 |
DADF |
Duplex Automatic Document Feeder, automatically feeds 1 and 2-sided |
|
|
|
original documents to the Document Glass. |
|
|
|
|
|
2 |
Document cover |
Holds a document in place on the document glass. |
|
|
|
|
|
Xerox 4112/4127 Copier/Printer User Guide |
1-1 |

1. Product overview
No. |
Component |
Function |
|
|
|
3 |
User Interface |
The User Interface (UI) consists of the Control Panel and the Touch Screen. |
|
|
Refer to “User Interface (UI)” on page 1-7. |
|
|
|
4 |
Document glass |
Place a document here in order to copy it. |
|
|
|
5 |
Power switch |
Switches on/off the machine power. |
|
|
|
6 |
Front cover |
Open this cover to clear paper jams and to replace the waste toner bottles. |
|
|
|
7 |
Left Cover |
Open this cover to replace the toner cartridge. |
|
|
|
8 |
Tray 1, 2, 3, 4 |
Contains the media used for copy or print output. |
|
|
|
9 |
Locking casters |
Locks the wheels of the machine. Lock these casters after moving the |
|
|
machine to its installation site. |
|
|
|
10 |
Bottom left cover |
Open this cover to remove paper jams. |
|
|
|
11 |
Front cover for the |
Open this cover to access the bottom left cover.This cover and trays 6 and 7 |
|
optional Trays 6 |
are part of the optional High Capacity Feeder (HCF). |
|
and 7 |
|
|
|
|
12 |
Tray 6, 7 (optional |
Contains the media used for copy or print output. |
|
HCF) |
|
|
|
|
13 |
Tray 5 (Bypass) |
Load nonstandard paper, such as heavy stock or other special media, that |
|
|
cannot be loaded in trays 1-4, or trays 6 and 7. |
|
|
|
1-2 |
Xerox 4112/4127 Copier/Printer User Guide |
1. Product overview
 1
1
No. |
Component |
Function |
|
|
|
1 |
Tray 6 (optional |
Alternative to the 2-drawer HCF, the optional Oversized High Capacity |
|
OHCF) |
Feeder (OHCF) feeds oversized stock up to 13 x 19 in/SRA3 paper. |
|
|
|
Xerox 4112/4127 Copier/Printer User Guide |
1-3 |
1. Product overview
No. |
Component |
Function |
|
|
|
14 |
Left cover |
Open to access the top cover and to remove paper jams. |
|
|
|
15 |
Top cover |
Open to remove paper jams. |
|
|
|
16 |
Confirmation indicator |
This lights when a document is loaded correctly. |
|
|
|
17 |
Document guides |
Use these guides to align the edges of the document. |
|
|
|
18 |
Document feeder tray |
Load documents here. |
|
|
|
19 |
Document output tray |
Retrieve scanned documents here. |
|
|
|
20 |
Document Stopper |
Holds large document, such as 11 x 17 in./A3, in place. When not in |
|
|
use, position it upward. |
|
|
|
21 |
Waste toner container |
Open this cover when removing the waste toner bottle. |
|
cover |
|
|
|
|
22 |
Waste toner container |
Collects used toner. |
|
|
|
23 |
Fuser |
Fuses the printed image on the paper. |
|
|
The Fuser is extremely hot and will cause injury if jam clearing |
|
|
instructions are not followed. |
|
|
|
24 |
Lever |
Use in order to pull out the transfer module. |
|
|
|
25 |
Transfer module |
Copies the image from the drum to the paper. |
|
|
|
26 |
Toner cartridge |
Provides toner for transferring the image to the paper. |
|
|
|
1-4 |
Xerox 4112/4127 Copier/Printer User Guide |
1. Product overview
NOTE: Throughout this guide, Standard Finisher or Booklet Maker
Finisher may be referred to simply as the Finisher.
Finisher
No. |
Component |
Function |
|
|
|
27 |
Post-process inserter |
Load paper for cover or transparency separators. Paper loaded here |
|
(Cover/Transparency |
is not used for copying. (This tray is also known as the Interposer) |
|
separator tray)/Tray 8 |
|
|
|
|
28 |
Decurl button |
When you press this button, it activates a decurling feature for the |
|
|
output material. This applies to lighter weight paper especially |
|
|
|
29 |
Output tray |
Copies are delivered here when specific output features are selected, |
|
|
such as Automatic sorting, Collated, Uncollated, or Normal. |
|
|
|
30 |
Finisher tray |
Receives copies when you select stapled, punched, and Z-folded |
|
|
copies. |
|
|
|
31 |
Booklet output tray |
Receives copies when you select Bi-Fold or Bi-Fold + Stapling. |
|
|
|
32 |
Booklet output tray button |
When you press this button, the booklet output tray is raised so you |
|
|
can retrieve booklets from the output area. |
|
|
|
33 |
Right cover |
Open to clear paper jams, replace staples, clear jammed staples, or |
|
|
remove the scraps from the puncher. |
|
|
|
34 |
Staple cartridges for |
There are two staple cartridge for booklet. Remove this cartridge to |
|
booklet |
replace staples and clear staple jams. |
|
|
|
35 |
Staple cartridge |
Contains staples; remove this cartridge to replace staples and clear |
|
|
staple jams. |
|
|
|
Xerox 4112/4127 Copier/Printer User Guide |
1-5 |

1. Product overview
No. |
Component |
Function |
|
|
|
36 |
Punch scrap container |
Collects the scraps from the puncher. Open to remove the scraps. |
|
|
|
37 |
Tri-Fold output tray |
Receives copies when you select Tri-Fold In or Tri-Fold out. |
|
(optional) |
|
|
|
|
38 |
Tri-Fold output tray button |
Press this button to open tri-Fold output tray. |
|
|
|
39 |
Left cover. |
Open this cover to access the machine and to clear paper jams. |
|
|
|
40 |
Staple cartridge storage |
An extra Staple cartridge for replacement can be stored at this location |
|
space |
(Standard Finisher only). |
|
|
|
Inside the Finisher |
42 |
41 |
43
No. |
Component |
Function |
|
|
|
41 |
Staple cartridge |
Contains staples; remove this cartridge to replace staples and clear |
|
|
staple jams. |
|
|
|
42 |
Staple waste container |
Container for staple waste; remove this cartridge when full (Standard |
|
|
Finisher only). |
|
|
|
43 |
Post-process inserter |
Load paper for cover or transparency separators. Paper loaded here |
|
(Cover/Transparency |
is not used for copying. |
|
separator tray)/Tray 8 |
|
|
|
|
1-6 |
Xerox 4112/4127 Copier/Printer User Guide |

1. Product overview
User Interface (UI)
The User Interface (UI) consists of the Control Panel and Touch Screen.The following describes the names and functions of components on the control panel and Touch Screen.
2
1
|
15 |
|
|
3 |
|
14 |
|
|
4 |
|
|
|
5 |
|
|
|
|
|
6 |
|
13 |
|
|
7 |
|
12 |
|
|
8 |
|
|
|
|
|
|
|
11 |
10 |
9 |
|
|
|
|
|
No. |
Component |
|
|
Function |
|
|
|
||
1 |
Control panel |
Allows keypad selection of features. |
||
|
|
|
||
2 |
Touch Screen |
Allows selections to be made simply by touching the screen. |
||
|
|
|
||
3 |
Job Status |
Use to view the various Job Status feature screens. Press |
||
|
|
this button to confirm or cancel currently running or |
||
|
|
completed jobs or to confirm or print saved documents. |
||
|
|
|
||
4 |
Machine Status |
Use to select the various Machine Status features, such as, |
||
|
|
billing and consumable information. |
||
|
|
|
||
5 |
Energy Saver |
Lights when the machine is in the Power Saver mode. To |
||
|
|
cancel the Power Saver mode, press this button. |
||
|
|
|
|
|
Xerox 4112/4127 Copier/Printer User Guide |
1-7 |
1. Product overview
No. |
Component |
Function |
|
|
|
6 |
Clear All |
Clears all programming and returns the machine to its default |
|
|
settings. |
|
|
|
7 |
Interrupt |
Interrupts the printing or copy process to promote another job |
|
|
a higher priority. The Interrupt indicator lamp lights. Press |
|
|
the Interrupt button after the job is completed to resume the |
|
|
previous operation. |
|
|
|
8 |
Stop |
Press this button to stop the current copy job or |
|
communications. |
|
|
|
|
|
|
|
9 |
Start |
Press this button to start the copy process. |
|
|
|
10 |
Numeric keypad |
Press these buttons to enter the number of copies, password, |
|
and other numerical values. |
|
|
|
|
|
|
|
11 |
Clear |
This keypad button is used to clear an erroneously entered |
|
numerical value, or if instructed to do so by the U I. |
|
|
|
|
|
|
|
12 |
Language |
This button is used to select the machine display language. |
|
|
|
13 |
Log In/Out |
This button is used by the System Administrator to log into |
|
|
the System Administration mode or Login Setup/Auditron |
|
|
Administration mode. |
|
|
|
14 |
Brightness dial |
Adjusts the brightness of the Touch screen. |
|
|
|
|
|
|
15 |
Services |
Press this button to access the various service screens, such |
|
|
as, Copy, Scan to Mailbox, etc. |
|
|
|
1-8 |
Xerox 4112/4127 Copier/Printer User Guide |
1. Product overview
Customizing the User Interface
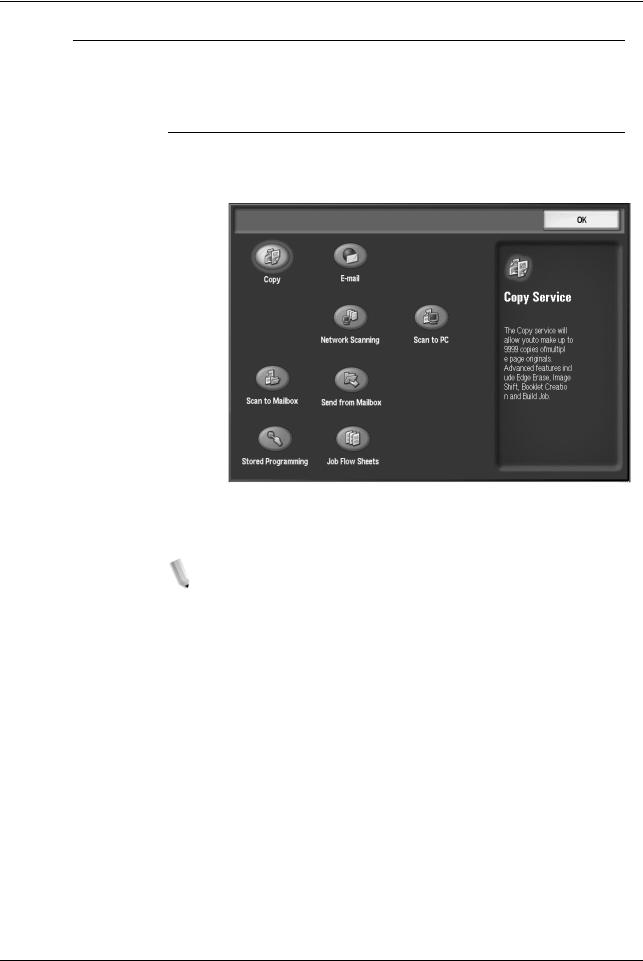
Your System Administrator can customize the buttons and items displayed on the All Services screen.
Customizing the All Services Screen
You can customize the types of features and the location of buttons on the All Services screen. The following illustration shows the factory default settings.
For the procedure to assign features, refer to “Screen Defaults” in the System Administration Guide or ask your System Administrator to make the changes for you.
NOTE: When a feature is not available the button is not displayed. Also, if the feature is unavailable due to hardware problems, the button is grayed out.
Xerox 4112/4127 Copier/Printer User Guide |
1-9 |
1. Product overview
Changing feature screen
You can customize the setting screen for the following features on the All Services screen.
•Copy
•Scan to Mailbox
•Scan to FTP/SMB
For how to change settings, refer to “Copy Mode Settings” and “Scan Mode Settings” in the System Administration Guide.
Common UI Touch-screen Controls
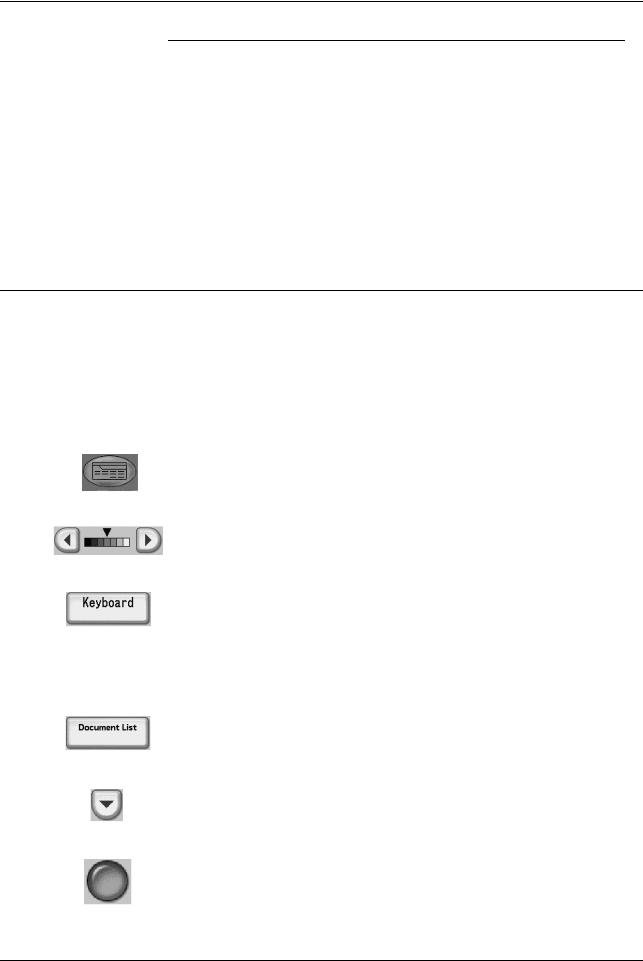
A majority of the Touch Screens use various controls, buttons, text boxes, etc. that are common with other screens The following information describes the names and functions of the various common components on the touch panel screens.
Screen Component/ |
Function |
|
Control |
||
|
||
|
|
|
|
This icon is present on most touch screens, Selecting the icon |
|
|
displays the All Services menu screen. |
|
All Services Icon |
|
|
|
|
|
|
Used to control the image brightness. |
|
Lighten/Darken Control |
|
|
|
|
|
|
Selecting this button, causes the related Keyboard screen. |
|
|
This screen is used for the entry of alphanumeric characters |
|
Keyboard Link Button |
into text fields. |
|
|
||
|
KEY POINT: There are several different keyboard versions |
|
|
utilized in the system and their appearances have minor |
|
|
variations. |
|
|
|
|
|
Selecting this button displays a Document List. Use this list to |
|
|
check or delete stored documents. |
|
Document List Button |
|
|
|
|
|
|
Use this button to decrease a specific value by one increment |
|
|
or to display the next screen in a series of screens, such as a |
|
Decrease/Next |
listing. |
|
|
||
|
|
|
|
Use this button to select and exercise the related option, setting |
|
|
or feature. |
|
Feature Button |
|
|
|
|
1-10 |
Xerox 4112/4127 Copier/Printer User Guide |
1. Product overview
Screen Component/ |
Function |
|
Control |
||
|
||
|
|
|
|
Use this button to increase a specific value by one increment or |
|
|
to display the previous screen in a series of screens, such as a |
|
Increase/Previous |
listing. |
|
|
|
|
|
Use this box to enter and/or display data or text that is |
|
Text-entry Box |
specifically related to a feature or function. |
|
|
||
|
|
|
|
This button cancels the current operation. |
|
Cancel Button |
|
|
|
|
|
|
Selecting this button causes the selected operation or changes |
|
|
to be saved to the machine memory. |
|
Save Button |
|
|
|
|
|
|
Selecting this icon displays the Original Type screen, where |
|
|
you can specify the image type that will yield the best image |
|
Original Type |
quality. |
|
|
||
|
|
|
|
Selecting this icon allows you to specify the copying of either 2, |
|
|
4, or 8 separate images to a single sheet of paper. |
|
Multiple-Up |
|
|
|
|
|
|
This icon allows you to specify the copy output method. |
|
Finishing |
|
|
|
|
|
|
Use the numeric keypad to enter or change a numeric value |
|
|
present on the various screens, such as, quantities, the value |
|
|
for the X and Y coordinates, etc. |
Numeric Keypad
Use this control to enter or change the value for X and Y coordinates. In some instances, the numeric keypad can also be used.
X/Y Controls
This button style is used to navigate to a feature-option screen, which contains options or attributes (as specified by its label) that are directly related to the function.
Feature Settings (Varies)
Xerox 4112/4127 Copier/Printer User Guide |
1-11 |
1. Product overview
Screen Component/ |
Function |
|
Control |
||
|
||
|
|
|
|
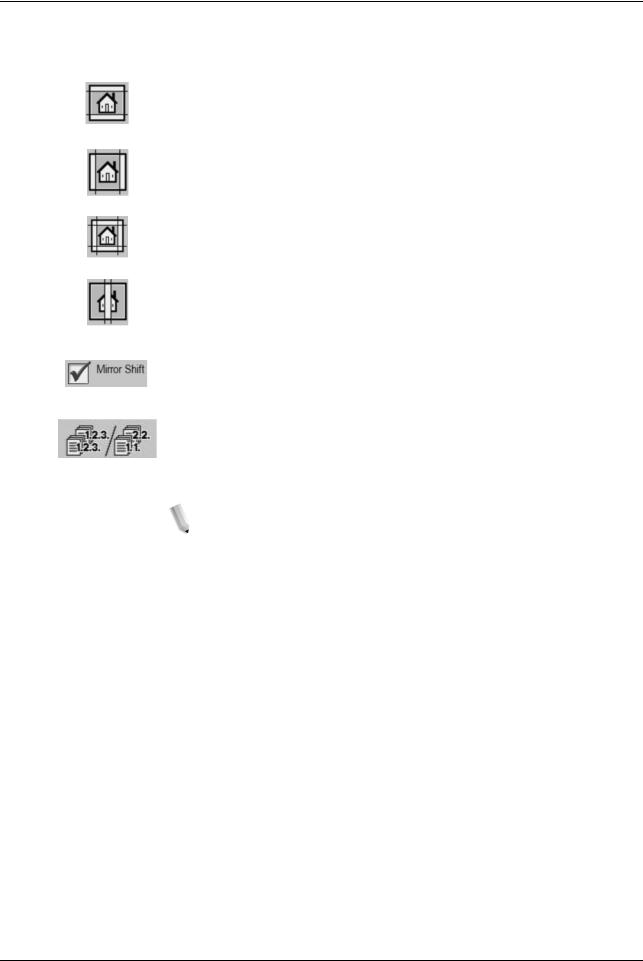
When making copies with the document cover open or from a |
|
|
book, the black shadows that appear along the edges and |
|
Top/Bottom Erase |
center margin of the paper can be erased using the related |
|
controls. Selecting these edge erase icons causes the related |
||
|
screen containing the controls for the function to open. |
|
Edge Erase |
|
|
Edge Erase (4-sides) |
|
|
Center Erase |
|
|
|
|
|
|
Selecting a check box activates the related option/feature. |
|
Check Box (feature) |
(Indicated by a check mark when selected.) |
|
|
||
|
|
|
|
This icon allows you to specify the copy output orientation. |
|
Output Orientation |
|
|
|
|
|
|
NOTE: Individual or special controls are addressed in each |
|
|
instance in their related section. |
1-12 |
Xerox 4112/4127 Copier/Printer User Guide |

1. Product overview
Power on/off
WARNING: Never touch a labeled area indicating High Temperature. Coming in contact with these areas can lead to burns.
After turning the power on, the machine takes approximately 5 minutes to warm up before you can start making copies.
KEY POINT: It is recommended to turn the machine off at the end of the day or when it is not in use for a long period of time. Also, to reduce the power consumption, use the Power Saving feature when the machine is not in use for a while.
For information about Power Saving feature, refer to “Power Saver Mode” on page 1-15.
Powering on
1.Open the cover.
2.Press the power switch to the On ( l ) position.
NOTE: The Please wait... message indicates that the machine is warming up. The machine cannot be used while it is warming up.
Xerox 4112/4127 Copier/Printer User Guide |
1-13 |

1. Product overview
Powering off
CAUTION: Never turn the power off in the following instances:
•While data is being received
•While data is being sent (FTP/SMB/e-mail)
•While jobs are being printed
•While jobs are being copied
•While a scan is being executed
•While data is being imported from a computer
1.Press the power switch to the Off (  ) position.
2.If the power is to be turned off and then back on, verify that the UI display has turned completely off, then turn the machine back on.
KEY POINT: Power-off processing is performed internally on the machine and continues after the power switch is turned off. Therefore, do not unplug the power cord from the power outlet immediately after turning the power switch off.
About the circuit breaker
Off
Position
Normally
On
In the event of a current leakage, the circuit breaker automatically turns off the machine power to prevent any damage or fire.
If the breaker is in the Off ( |
) position, contact your Customer |
Support Center, as some abnormal conditions may exist.
1-14 |
Xerox 4112/4127 Copier/Printer User Guide |

1. Product overview
Power Saver Mode
The Power Saver feature has two modes; Low Power Mode and Sleep Mode.
The machine automatically enters the Low Power Mode after the preset time has elapsed if the machine is left unused for a fixed period of time.
The machine then enters the Sleep Mode if a further preset time elapses.
Here are two examples:
•If Low Power Mode is set to 15 minutes and Sleep Mode is set to 60 minutes, Sleep Mode activates after 60 minutes of total inactivity, not 60 minutes after Low Power Mode begins.
•If Low Power Mode is set to 15 minutes and Sleep mode is set to 20 minutes, Sleep Mode activates 5 minutes after Low Power Mode begins.
Exiting the Power Saver Mode
The Power Saver Mode is exited by pressing the Energy Saver button or when the machine receives print data.
Energy Saver button
Xerox 4112/4127 Copier/Printer User Guide |
1-15 |

1. Product overview
Customer documentation updates
You can get the latest customer documentation updates for your product by going to www.xerox.com. Be sure to periodically check this website for the latest information for your product.
Additional applications/tools
The following applications are available for your machine; for more information, contact your Xerox Representative or go to
www.xerox.com.
Xerox Extensible Interface Platform (XEIP)
Xerox Extensible Interface Platform (XEIP) enables independent software vendors and partners to develop customized programs to access directly from the Xerox device. Users can enter their authentication login at the device and access a set of features and options designed specifically for their business needs. For example:
•A hospital could customize the device to help better manage patient forms.
•By touching an icon on the display, a health-care worker could access the hospital's Web-based document management system and browse a list of patient forms.
Users can quickly scan and capture paper documents, preview thumbnails, and add them to frequently used document storage locations. For example:
•A tutor can scan notes directly to a specific course repository for students to access.
•A student can scan assessment papers to their course folder for their tutor to mark.
Xerox Extensible Interface Platform (XEIP) utilizes web-based Xerox Partner solutions including Omtool™, Equitrac™ and FreeFlow™ SMARTsend™ to enable users to access document repositories at the device display screen. Additional resources may be required on the device depending on the solution.
For further information, go to:
•The System Administration Guide, Chapter 10, Options,
•www.xerox.com and search for Xerox Extensible Interface Platform, and/or
•Contact your Xerox Sales Representative.
1-16 |
Xerox 4112/4127 Copier/Printer User Guide |

1. Product overview
Meter Assistant
The Meter Assistant allows the System Administrator to set up, view, and access the automatic billing meter information by eliminating the manual steps involved in collecting and reporting
meter reads. Meter Assistant is feature of the SMart eSolutionsTM software package.
Once enabled, Meter Assistant provides the device's billing meters to Xerox Billing over the Internet with minimal human interaction.
NOTE: All communications between your Xerox 4112/4127 machine and Xerox Billing is conducted through Secure Socket Layer (SSL) protocols and 128-bit encryption to keep information locked from all unauthorized viewers. By enabling the Meter Assistant feature on your Xerox 4112/4127 device, you are simply allowing your device to automatically submit billing meter information on a periodic basis to Xerox Billing as agreed upon in the "Terms and Conditions" . Xerox is NOT accessing your private data, or probing your device. Only information pertaining to your system's billing meters is actively transferred-no job data or other private information.
Qualified users can implement the Meter Assistant feature based on the following criteria:
•"If your machine has an Integrated/Green Controller ONLY, then all you need to do is sign up for AMR.
•"If you have a third-party controller such as EFI Fiery or Xerox FreeFlow Print Services, you MUST have:
•Two drops/ports for two separate internet connections
•Two IP addresses (one for the machine and one for the controller); Meter Assistant uses the machine's IP address to obtain billing meter information.
NOTE: Existing customers of the Xerox 4112/4127 Family can perform the eligibility test as listed below to see if their equipment is eligable. Customer who recently purchased the Xerox 4112/ 4127 can bypass this process.
Use the Machine Eligibility Test at http://www.xerox.com/
account-management/meter-reading-test/enus.html to determine if you can take advantage of SMart eSolutions capabilities.
NOTE 1: This feature may currently be available only in the U.S.A.
NOTE 2: Ensure that you have an internet connection to your machine.
Xerox 4112/4127 Copier/Printer User Guide |
1-17 |

1. Product overview
Make sure that you have an account on www.xerox.com. Add all devices in inventory that you wish to register for Automatic Meter Readings to your account. For more information on setting up and activating your equipment for meter reads, go to www.xerox.com/ meterreads. This is also supported by Dallas eSupport 888-998- 9922.
To gain a better understanding of the SMart eSolution workflow process, go to www.xerox.com/smartesolutions and click on the link titled "Account Management" and click on the demo link titled "Simplify meter reading submission and reports" to view a short video presentation on SMart eSolutions.
1-18 |
Xerox 4112/4127 Copier/Printer User Guide |
2.Copy
Overview
The User Interface (UI) screens shown in this guide may or may not reflect the screens displayed on your system. The UI screens vary from system to system and from marketplace to marketplace. Therefore, the UI screens in this guide are a representation of the type of screens that may be seen on your particular system.
Copy Procedure
Loading Documents
Document Feeder
The document feeder supports single and multiple-sheet documents. Sizes may range from 140 × 210 mm (A5, 5.5 × 8.5 inches) to a maximum of 297 × 432 mm (A3, 11 × 17 inches).
CAUTION: Place folded or creased documents on the document glass because they may cause paper jams, which could damage originals, if placed in the DADF.
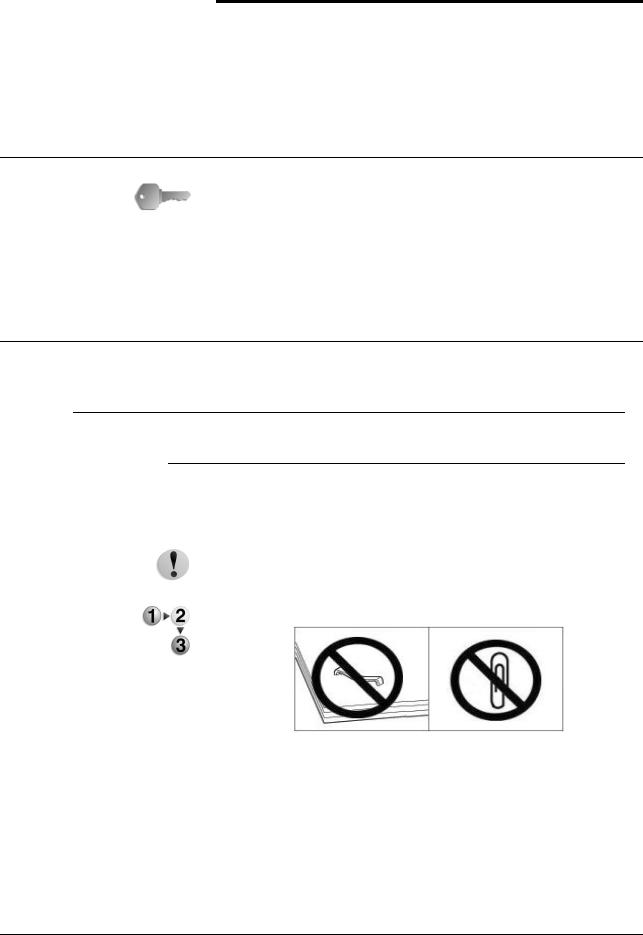
1. Remove any clips and staples before loading the document.
Xerox 4112/4127 Copier/Printer User Guide |
2-1 |
2. Copy
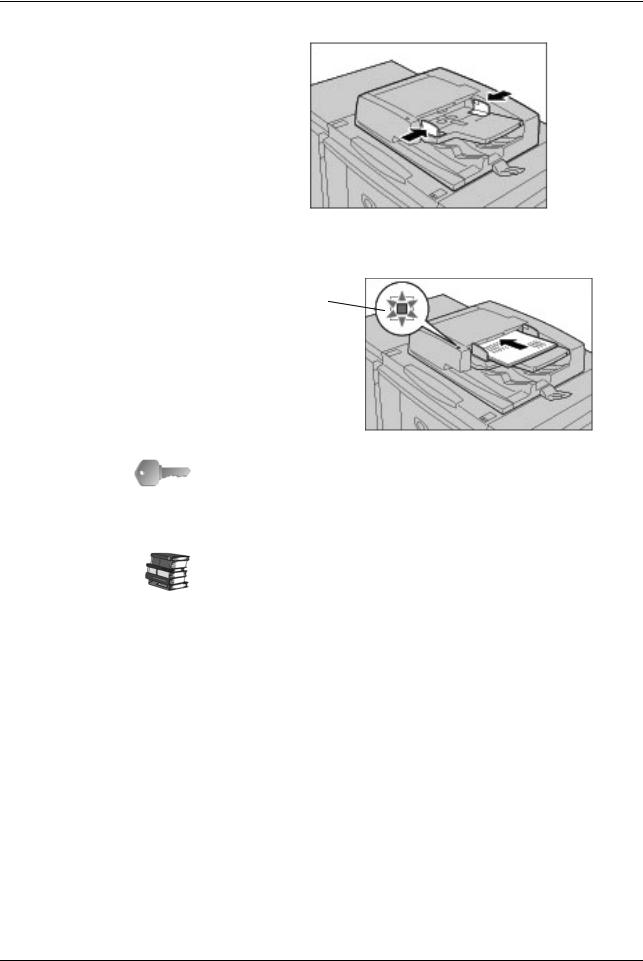
2. Adjust the movable document-guides.
3.Load the document and ensure the Confirmation indicator lights to show that the document is loaded correctly.
Confirmation
Indicator
KEY POINT: The document feeder auto-detects only documents of standard sizes. For documents that are not of a standard size, input the size in the Original Size field. The standard document
sizes that are auto-detected depend upon the Paper Size Settings defined in the System Administration mode.
For more information about entering a custom size, refer to “Original Size” on page 2-27.
2-2 |
Xerox 4112/4127 Copier/Printer User Guide |
Loading...