


4-238-553-11(1)
MiniDisc Deck
Operating Instructions
MDS-JE480
©2002 Sony Corporation
WARNING
To prevent fire or shock hazard, do not expose the unit to rain or moisture.
To prevent fire, do not cover the ventilation of the apparatus with newspapers, table-cloths, curtains, etc. And don’t place lighted candles on the apparatus.
To prevent fire or shock hazard, do not place objects filled with liquids, such as vases, on the apparatus.
Do not install the appliance in a confined space, such as bookcase or built in cabinet.
This appliance is classified as a CLASS 1 LASER product.
This label is located on the rear exterior.
The following caution label is located inside the apparatus.
Don’t throw away the battery with general house waste, dispose of it correctly as chemical waste.
IN NO EVENT SHALL SELLER BE LIABLE FOR ANY DIRECT, INCIDENTAL OR CONSEQUENTIAL DAMAGES OF ANY NATURE, OR LOSSES OR EXPENSES RESULTING FROM ANY DEFECTIVE PRODUCT OR THE USE OF ANY PRODUCT.
About this manual
Controls in these instructions are those on the deck. However, these may be substituted by controls on the supplied remote that are similarly named, or, when different, appear in the instructions within parentheses.
2GB
Table of Contents |
|
List of Button Locations |
|
and Reference Pages |
|
Main unit ................................................. |
4 |
Remote control........................................ |
5 |
Getting Started |
|
Hooking up the audio components ......... |
6 |
Recording to MDs |
|
Recording to an MD................................ |
8 |
Notes on recording .................................. |
8 |
Recording tips |
|
— Recording for long times/Marking |
|
track numbers/Smart Space/Adjusting |
|
the recording level/Checking the |
|
remaining recordable time/Input |
|
monitor.............................................. |
9 |
Starting recording with 6 seconds of |
|
prestored audio data |
|
— Time Machine Recording .......... |
13 |
Synchro-recording with the audio |
|
component of your choice |
|
— Music Synchro-recording .......... |
13 |
Synchro-recording with a Sony CD player |
|
— CD Synchro-recording............... |
13 |
Playing MDs |
|
Loading an MD ..................................... |
15 |
Playing an MD |
|
— Normal Play/Shuffle Play/Repeat |
|
Play ................................................. |
15 |
Creating your own programme |
|
— Programme Play ........................ |
16 |
Editing Recorded MDs |
|
Erasing recordings |
|
— Erase Function........................... |
18 |
Dividing recorded tracks |
|
— Divide Function......................... |
19 |
Combining recorded tracks |
|
— Combine Function ..................... |
20 |
Moving recorded tracks |
|
— Move Function .......................... |
21 |
Naming a track or an MD |
|
— Name Function .......................... |
21 |
Changing the recorded level after |
|
recording |
|
— S.F EDIT ................................... |
23 |
Undoing the last edit |
|
— UNDO ....................................... |
24 |
Other Functions |
|
Fading in and fading out....................... |
25 |
Falling asleep to music |
|
— Sleep Timer ............................... |
25 |
Additional Information |
|
Precautions............................................ |
26 |
Note on MDs ........................................ |
26 |
System limitations ................................ |
26 |
Troubleshooting.................................... |
28 |
Self-diagnosis function ......................... |
28 |
Display messages.................................. |
29 |
Setup menu table .................................. |
30 |
Specifications........................................ |
30 |
3GB
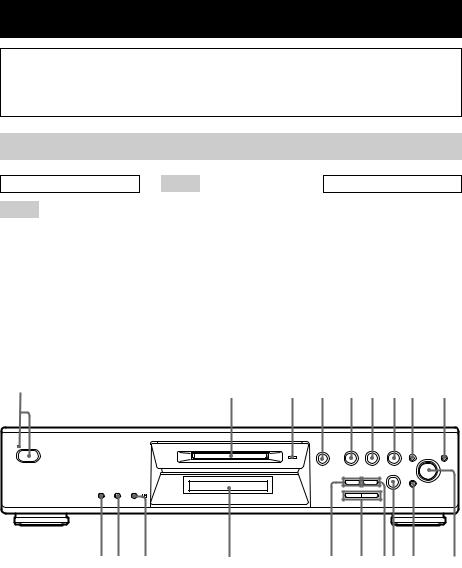
List of Button Locations and Reference Pages
How to use this page |
Illustration number |
r |
Use this page to find the location and buttons and other |
PLAY MODE 0 (15) |
|
parts of the system that are mentioned in the text. |
R |
R |
|
Name of button/part |
Reference page |
Main unit
ALPHABETICAL ORDER
A - M
AMS ql(10) (16) (18) (21) (23) (25)
CLEAR qk(17) (22) Display window qd EJECT A4(8) (16) (17) INPUT qf(8)
LEVEL/DISPLAY/CHAR qs(8) (16) (21)
MD (insertion slot) 2 MDLP (indicator) 3(9) (16)
MENU/NO 8(9) (10) (11) (21)
P - Z
PLAY MODE q;(15) PUSH ENTER ql(10)
REC MODE qh(9) (16) REC zqj(8)
REPEAT qa(15)
STANDBY (indicator) 1(8) (15) YES 9(16)
BUTTON DESCRIPTIONS
?/11(8) (15) (17) H5(8) (15)
X6(8) (16)
x7(8) (16) (17) m/Mqg(16) (18)
1 |
2 |
3 |
4 |
5 6 7 8 |
9 |
MDLP
l AMS L
q; qa |
qs |
qd |
qf |
qg qhqj qk |
ql |
4GB

Remote control
A - L
AyB qs(15)
CD-SYNCHRO STANDBY 7(14) CD-SYNCHRO START 7(14) CD-SYNCHRO STOP 7(14) CLEAR 6(17) (22)
DISPLAY ws (8) (12) FADER 3(25) GROUP ON/OFF 1) ql GROUP SKIP 1) ql INPUT wd(8)
Letter/number buttons 5(22) LEVEL +/– qa (12)
M - Z
MENU/NO w;(10) (17) (18) MUSIC SYNC 8(13) (24) NAME EDIT/SELECT wa(22) PLAY MODE 2(15)
REC MODE wd(9) (16) REPEAT qd(15) SCROLL ws(16) T.REC qj(13)
YES 4(10) (16) (18)
BUTTON DESCRIPTIONS
?/11(8) (15) (17) X9(8) (16)
x0(8) (16) (17) m/Mqf(16) (19)
./>qg(9) (12) (18) zqh(8)
Hqk(8) (15) Awf(8) (16) (17)
` / 1
wf A  1
1

wd |
2 |
ws

 3
3

wa |
4 |
|
w; |
||
|
||
|
5 |
6

7

ql |
GROUP |
|
|
ON/OFF |
SKIP |
8 |
|
qk |
|
|
|
qj |
H |
X |
9 |
|
|
|
|
qh |
z |
x |
0 |
|
|
|
|
qg |
. > |
|
|
qf |
m M |
qa |
|
|
|||
qd

qs

1) These features is not available for this model.
Pages Reference and Locations Button of List
5GB
Getting Started
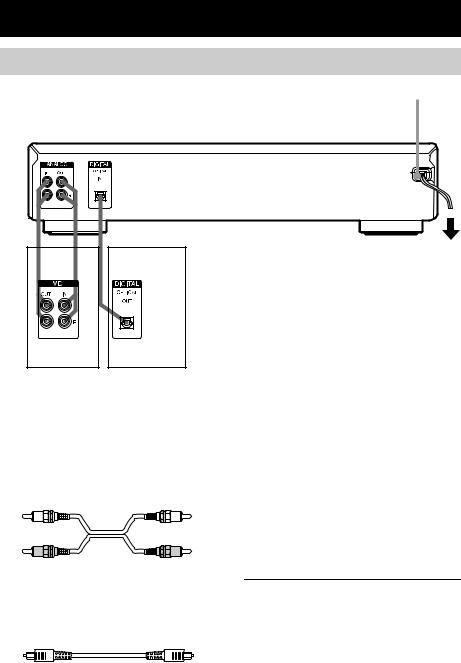
Hooking up the audio components
AC power cord
to a wall outlet
AB
Amplifier, etc. |
CD player, DBS |
|
tuner |
Required cords
A Audio connecting cords (2) (supplied)
When connecting an audio connecting cord, be sure to match the color-coded pins to the appropriate jacks: white (left) to white and red (right) to red.
White (L) |
White (L) |
Red (R) |
Red (R) |
B Optical cables (only one supplied)
•When connecting an optical cable, take the caps off the connectors and insert the cable plugs straight in until they click into place.
•Do not bend or tie the optical cables.
Hookup considerations
•Turn off the power of all components before making any connections.
•Do not connect any AC power cord until all the connections are completed.
•Be sure the connections are firm to prevent hum and noise.
Jacks (connectors) for connecting audio components
Connect |
To the |
Amplifiers |
ANALOG IN/OUT jacks |
|
|
CD players or DBS |
DIGITAL OPTICAL IN |
tuners |
connector |
|
|
6GB
Other connections
To connect the AC power cord
Connect the AC power cord of the deck to a wall outlet.
Note
If you use a timer, connect the AC power cord to the outlet of the timer.
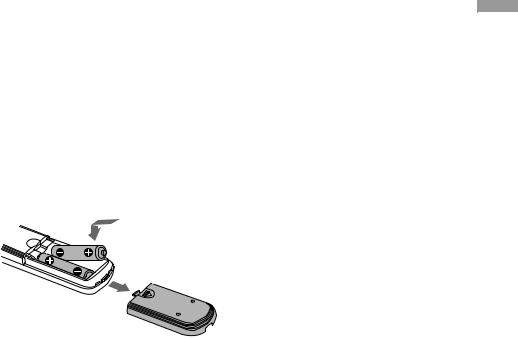
Inserting batteries into the remote
Insert two R6 (size-AA) batteries into the battery compartment with the + and – properly oriented to the markings. When using the remote, point it at the remote sensor  on the deck.
Tip
When the remote no longer operates the deck, replace both batteries with new ones.
Notes
•Do not leave the remote in an extremely hot or humid place.
•Do not drop any foreign object into the remote casing, particularly when replacing the batteries.
•Do not use a new battery with an old one.
•Do not expose the remote sensor to direct sunlight or lighting apparatus. Doing so may cause a malfunction.
•If you don’t use the remote for an extended period of time, remove the batteries to avoid possible damage from battery leakage and corrosion.
Started Getting
7GB

Recording to MDs
Recording to an MD
If the MD has been partially recorded, recording starts after the recorded tracks.
1 Turn on the amplifier and program source, and select the source on the amplifier.
2 Press ?/1 to turn on the deck.
3 Load a recordable MD into the slot (page 15).
4 Press INPUT repeatedly to select the input jacks (connector) connected to the program source.
When the source is |
Set INPUT to |
connected to the |
|
|
|
DIGITAL OPTICAL IN |
D-IN |
connector |
|
|
|
ANALOG IN jacks |
A-IN |
5
6 Adjust the recording level if necessary.
For details, see “Adjusting the recording level” on page 12.
7 Press Hor X.
8
Operations you may want to do during recording
To |
Press |
Stop recording |
x |
|
|
Pause recording |
X |
|
|
Resume recording after |
Hor X |
pausing1) |
|
Eject the MD |
EJECT Aafter stopping |
|
recording |
|
|
1) The track number increases by one.
To change the display while recording
Press LEVEL/DISPLAY/CHAR (or DISPLAY) repeatedly to change the display.
Each time you press the button, the display changes cyclically as follows:
Track number and recorded time of the current track tRemaining recordable time2) on the MD tLevel of the input signal tTrack name3)
2)Time shown in the display differs depending on the setting of REC MODE.
3)“No Name” appears when the track has no name.
Notes on recording
After recording
Press EJECT Ato remove the MD or press ?/1to turn off the deck.
“TOC” or “TOC Writing” starts flashing. The TOC is updated and recording is completed.
Before disconnecting the AC power cord
MD recording is completed when the MD Table of Contents (TOC) is updated. The TOC is updated when you eject the MD or press ?/1to turn off the deck. Do not disconnect the AC power cord before updating the TOC (while “TOC” is lit) or while updating the TOC (while “TOC Writing” is flashing) to ensure a complete recording.
Automatic conversion of digital sampling rates
A built-in sampling rate converter automatically converts the sampling frequency of various digital sources to the 44.1 kHz sampling rate of the MD deck. This allows you to monitor and record sources such as 32 or 48 kHz DAT tape or satellite broadcasts, as well as the CDs and MDs.
8GB
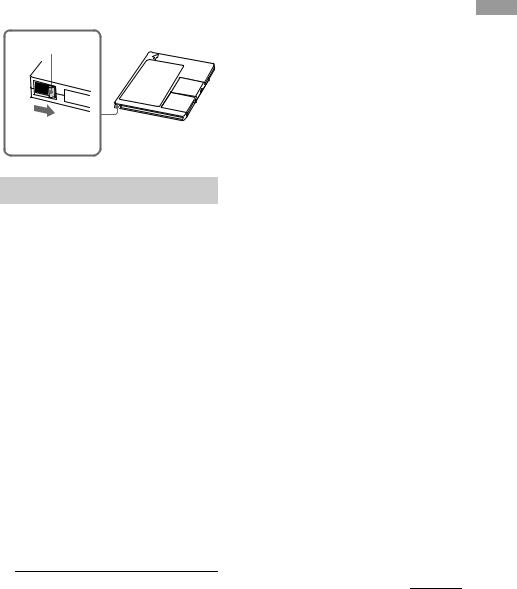
To prevent accidental erasure of the recorded material
To protect an MD recording, slide the recordprotect tab in the direction of the arrow (see illustration below) to open the slot. To enable re-recording, close the slot.
Record-protect tab
Slide in the direction of arrow
Recording tips
— Recording for long times/Marking track numbers/Smart Space/Adjusting the recording level/Checking the remaining recordable time/Input monitor
Recording for long times
This deck has two long time recording modes: LP2 and LP4 (MDLP recording). When recording in LP2 Stereo mode, you can record 2 times the normal recordable time, and in LP4 Stereo mode, you can record 4 times the normal recordable time. In addition, the recordable time for monaural recording is approximately double the stereo recording time.
LP4 Stereo mode (4× long time recording mode) achieves a long stereo recording time by using a special compression system. When placing emphasis on sound quality, Stereo recording or LP2 Stereo recording (2× long time recording mode) is recommended.
1 Do steps 1 to 4 of “Recording to an MD” on page 8.
2 Press REC MODE repeatedly to select the recording mode.
To record in |
Set REC MODE to |
Stereo |
Blank (No indicator) |
|
|
LP2 Stereo |
LP2 |
|
|
LP4 Stereo |
LP4 |
|
|
Monaural |
MONO |
|
|
3 Do steps 5 to 8 of “Recording to an MD” on page 8.
Tips
•The MDLP indicator lights up when you select LP2 or LP4 in step 2 above.
•The deck is factory set to add “LP:” at the beginning of a track name automatically. This indication is displayed when the track is played on a deck that does not support long-time recording.
To turn off this function, do the following procedure.
1While the deck is stopped, playing, or paused, press MENU/NO.
2Turn AMS (or press ./>repeatedly) until “Setup?” appears, then press PUSH ENTER or YES.
3Turn AMS (or press ./>repeatedly) until “LPstamp On” (factory setting) appears, then press PUSH ENTER or YES.
4Turn AMS (or press ./>repeatedly) to select “LPstamp Off”, and then press PUSH ENTER or YES.
5Press MENU/NO.
To add “LP:” automatically again, select “LPstamp On” in step 4 above.
Notes
•The recorded “LP:” is a stamp which appears to indicate that the track cannot be played back when you try to play the track on a system that does not support MDLP mode. It does not appear for systems that support MDLP mode.
•When set to “On”, “LP:” is recorded as the track name, so the number of characters that can be input to an MD is reduced. If you divide an “LP:” track using the Divide function, “LP:” is also added to the latter track.
•The selected recording mode is kept even after recording is completed, so be sure to check the recording mode before recording.
•Tracks recorded in MDLP (LP2 or LP4) Stereo mode cannot be played back on a system that does not support MDLP mode.
•Even if you press REC MODE during recording, you cannot change the recording mode.
•Even if you press REC MODE repeatedly to select MONO, the monitor signal during recording does not become monaural.
•You cannot use S.F Edit and some MD edit functions for tracks recorded in MDLP mode.
continued
MDs to Recording
9GB

Recording tips (continued)
Marking track numbers while recording
— Manual/Automatic Track Marking
You can mark track numbers either manually or automatically while recording. By marking track numbers at specific points, you can easily locate the points later or edit the MD.
Marking track numbers manually (Manual Track Marking)
While recording, press REC z at the point where you want to add a track number.
Marking track numbers automatically (Automatic Track Marking)
When recording from a CD player or MD deck connected to a DIGITAL IN connector, the deck marks track numbers in the same sequence as the source. When recording from other sources connected to the DIGITAL IN connector or a source connected to the ANALOG IN jacks, do the procedure below to mark track numbers automatically. However, you cannot mark track numbers automatically if the sound of the source to be recorded is noisy (e.g., tapes or radio programs).
1 While the deck is stopped, press MENU/ NO.
2 Turn AMS (or press ./> repeatedly) until “Setup?” appears, then press PUSH ENTER or YES.
3 Turn AMS (or press ./> repeatedly) until “T.Mark LSyn” appears, then press PUSH ENTER or YES.
4 Turn AMS (or press ./> repeatedly) to select the setting, then press PUSH ENTER or YES.
To |
Select |
Turn on Automatic |
T.Mark LSyn (factory |
Track Marking |
setting) |
|
|
Turn off Automatic |
T.Mark Off |
Track Marking |
|
|
|
5 Press MENU/NO.
When you set Automatic Track Marking to on, “L.SYNC” lights up.
The deck marks a track number whenever the input signal level drops to –50 dB1) (the trigger level for Automatic Track Marking) or below for at least 1.5 seconds.
1) Factory setting.
To change the trigger level for Automatic Track Marking
Do the procedure below to change the signal level that triggers Automatic Track Marking.
1 While the deck is stopped, press MENU/ NO.
2 Turn AMS (or press ./> repeatedly) until “Setup?” appears, then press PUSH ENTER or YES.
3 Turn AMS (or press ./> repeatedly) until “LS(T)” appears, then press PUSH ENTER or YES.
4 Turn AMS (or press ./> repeatedly) to select the level, then press PUSH ENTER or YES.
You can set the level at any value between
–72 dB and 0 dB, in 2 dB increments (–50 dB is the factory setting).
5 Press MENU/NO.
Tips for automatic track marking
•When recording from a CD player or an MD deck connected to the DIGITAL IN connector, the entire material might be recorded as a single track in the following cases:
—When you consecutively record the same track two or more times using single-track repeat play.
—When you consecutively record two or more tracks with the same track number but from different CDs or MDs.
—When you record tracks from certain CD or multi-disc players.
10GB
 Loading...