


 Loading...
+ |
Operator’s Manual
REF 10379682


 +
+
Operator’s Manual
134798 Rev. A, 2009 07

© 2009 Siemens Healthcare Diagnostics Inc. All rights reserved.
Clinitek, Clinitek Status, Multistix, Multistix PRO, Combistix, Uristix, Labstix, Neostix, Clinitest and Chek-Stix are trademarks of Siemens Healthcare Diagnostics.
Presept and Cidex are trademarks of Johnson & Johnson.
Theracide is a trademark of Lafayette Pharmaceuticals, Inc.
Amphyl is a trademark of Linden Corporation.
Kimwipes is a trademark of Kimberly-Clark.
US Pats 5,408,535; 5,477,326; 5,877,863; 6,239,445; D456,082; D489,816
Origin: UK
Siemens Healthcare Diagnostics Inc.
Tarrytown, NY 10591-5097 USA
Siemens Healthcare Diagnostics Ltd.
Sir William Siemens Sq.
Frimley, Camberley, GU16 8QD, UK
The information in this manual was correct at the time of printing. However, Siemens Healthcare Diagnostics continues to improve products and reserves the right to change specifications, equipment, and maintenance procedures at any time without notice.
If this instrument is used in a manner differently than specified in this manual, the protection provided by the equipment may be impaired.
Table of Contents
A Brief Description............................................................ |
v |
Understanding the Symbols and Display Icons.............. |
vii |
1 Unpacking & Set Up ................................................. |
1-1 |
Unpacking ..................................................................... |
1-1 |
Set Up ........................................................................... |
1-2 |
Analyzer Set Up ............................................... |
1-2 |
Plugging Analyzer In ........................................ |
1-2 |
Installing Batteries ............................................ |
1-2 |
Interfacing to a Computer ................................. |
1-3 |
Inserting Test Strip Table .................................. |
1-3 |
Loading Test Table Insert ................................. |
1-3 |
Interfacing to the Clinitek Status Connector ..... |
1-4 |
Analyzer Software Upgrades ........................... |
1-4 |
Loading the Printer Paper or Label Roll ........... |
1-5 |
Warranty Registration....................................... |
1-6 |
Powering Up.................................................................. |
1-7 |
Powering Down ............................................................. |
1-8 |
2 |
Interacting with the Touch Screen |
.......................... 2-1 |
|
Screens ......................................................................... |
2-1 |
|
Keyboards ..................................................................... |
2-4 |
3 |
Start-Up Wizard ......................................................... |
3-1 |
4 |
Testing ....................................................................... |
4-1 |
|
Quick Tests .................................................................... |
4-1 |
|
Urinalysis Strip Test .......................................... |
4-1 |
|
Cassette Test.................................................... |
4-8 |
|
Full Tests ..................................................................... |
4-13 |
|
Urinalysis Strip Test ........................................ |
4-13 |
|
Cassette Test.................................................. |
4-22 |
iii
5 Instrument Set Up ..................................................... |
5-1 |
Instrument Set Up ......................................................... |
5-1 |
Language Settings ........................................................ |
5-2 |
Password ...................................................................... |
5-3 |
Operator and Patient Information .................................. |
5-4 |
Date and Time Settings ............................................... |
5-14 |
Test Sequence Number............................................... |
5-16 |
Instrument Settings ..................................................... |
5-17 |
Restore Default Settings ............................................. |
5-33 |
Diagnostics.................................................................. |
5-34 |
Sample Interference Notes ......................................... |
5-35 |
System Information ..................................................... |
5-36 |
6 Recall Results ........................................................... |
6-1 |
Patient Results .............................................................. |
6-1 |
Sending Data to a PC ................................................... |
6-3 |
7 Troubleshooting........................................................ |
7-1 |
List of Errors and Advisory Messages ........................... |
7-4 |
Problem Checklist ......................................................... |
7-8 |
8 Quality Control Testing ............................................ |
8-1 |
9 Cleaning and Maintenance............................................... |
9-1 |
Cleaning ........................................................................ |
9-1 |
Changing Batteries........................................................ |
9-7 |
10 Appendices............................................................ |
10-1 |
Appendix A: Local Technical Support Providers |
|
and Distributors ........................................................... |
10-1 |
Appendix B: Tables of Results .................................... |
10-2 |
Appendix C: Specifications ......................................... |
10-8 |
Appendix D: Instrument Default Settings – English .... |
10-10 |
Appendix E: System Overview & Principles .............. |
10-12 |
Appendix F: Training & Educational Materials .......... |
10-18 |
Appendix G: Sample Interference Notes .................. |
10-19 |
Appendix H: Safety Information ................................ |
10-20 |
Appendix I: Clinitek Status®+ Intended Use |
|
and Indications for Use ............................................. |
10-22 |
11 Index..................................................................................... |
11-1 |
iv
A Brief Description
NOTE: Feature availability may vary by geography due to regulatory registration.
NOTE: Due to software changes, some screens on the instrument may appear slightly different from those in this manual.
What does the analyzer do?
Your Clinitek Status®+ analyzer is a portable instrument for reading Siemens Healthcare Diagnostics urinalysis strips and Clinitest® immunoassay cassettes. No special training is needed to use this instrument. Several different Siemens urinalysis strips (e.g., Multistix® 10 SG) can be used with the analyzer as well as the Clinitest hCG Pregnancy Test.
The analyzer can be set up to be as simple or sophisticated as you prefer. You may simply insert a dipped urinalysis strip or a Clinitest cassette into the analyzer and the result will be reported (this is called a Quick Test).
Or, you have the option to enter an Operator Name, Patient Name and Patient ID. This added information will be reported along with the test results (this is called a
Full Test).
The touch screen displays instructions and prompts you through operation of the analyzer. In addition, you enter information through the touch screen.
Do I have to calibrate?
You do not have to do anything to calibrate. The instrument performs a system test each time it is turned on. Then, each time a test is run, the instrument automatically calibrates. The white calibration bar (on the test table) provides NIST traceable calibration.
How does it work?
Testing starts (in the Quick Test mode) when either the Strip Test or Cassette Test is selected on the main menu screen.
Touching the Strip Test key prompts you to adjust the test table to accept a urinalysis strip. Then you touch the START key. You have 8 seconds to dip the test strip, blot the edge of the strip and place it on the test strip table. The table is partially pulled into the instrument for calibration and then pulled completely into the instrument to read the test strip.
Touching the Cassette Test key prompts you to adjust the test table to accept a cassette. Then you touch the START key. You have
8 seconds to draw the sample into a pipette and dispense it into the sample well of the cassette. The analyzer automatically calibrates and then pulls the table completely into the instrument where the cassette is read.
In the Full Test mode for either a
Strip Test or Cassette Test, you are prompted to enter an Operator Name, Patient Name and/or Patient ID prior to running a test.
v

A Brief Description
How do I get results?
Results will be displayed on the touch screen and printed (if desired). The results can also be transferred to a computer using a 9-pin null modem serial cable and the RS-232 serial port on the back of the instrument.
The analyzer stores results from 950 patient tests. You are able to recall past patient test results on the analyzer using the Recall Results function.
How is the analyzer powered?
The analyzer can be plugged into an electrical outlet for use on the bench top, or it can be powered by batteries and freely moved from one testing site to another. The batteries fit into an opening on the bottom of the instrument.
What about this Operator’s Manual?
The Operator’s Manual contains the directions you need to unpack
Bold text identifies a button (touch sensitive area) on the screen.
the analyzer, use it for your daily Siemens urinalysis and Clinitest immunoassay testing and keep it in good working condition.
As you read through the Operator’s Manual, you will find these symbols:
 NOTES: contain useful tips on using the analyzer. Notes appear in italicized type.
 CAUTION: should be followed carefully to ensure your analyzer operates correctly and is not damaged. Cautions appear in bold type.
In the Operator’s Manual, you will notice some text is in bold/italic or bold.
Bold/italic text identifies screen names.
vi

Understanding the Symbols and Display Icons
Instrument and Labeling Symbols
This section describes the symbols that appear on the exterior of the Clinitek Status+ analyzer, the power supply provided with the instrument, the carton in which the instrument was delivered and the supplies of reagent strips and cassettes which you will use with the instrument.
Class 111
Indicates that the input supply is direct current
Identifies that the instrument is type B equipment, which provides a particular degree of protection against electric shock
Identifies that the instrument is class 111 type equipment, which is equipment for connection to SELV (Separated Extra Low Voltage), i.e. a power supply
Double insulated product or transformer may also identify class 2 equipment (power supply only)
Identifies that the instrument is listed by Underwriters Laboratories as meeting U.S. and Canadian requirements for safety
The CE mark identifies that the product complies with the applicable directives of the European Union
Manufacturer
European authorized representative
Indicates a power on/off button
Caution, consult accompanying documents
In vitro diagnostic medical device
Consult instructions for use
vii

Understanding the Symbols and Display Icons
30
18
100
Indicates a serial port
This system contains certain toxic or hazardous substances or elements. The environmental protection use period for this system is 50 years. The system can be used safely during its environmental protection use period. The system should be recycled immediately after its environmental protection use period has expired.
Temperature limitation (18° 30° C)
Contents sufficient for (n) tests (100)
Use by YYYY MM
Catalog number
Serial number
Batch code
Biohazard
Indicates that this equipment is classified as Waste Electrical and Electronic Equipment under the European WEEE Directive. It must be recycled or disposed of in accordance with applicable local requirements.
Printed on recycled materials
Indicates compliance with RESY packaging standards
viii
Understanding the Symbols and Display Icons
Keep this way up
Fragile, handle with care
Keep dry
Keep away from sunlight and heat
VDE Testing and Certification Institute Germany
Manufacturer’s mark (FRIWO) and manufacturing location (Hong Kong)
Manufacturer’s mark (FRIWO) and manufacturing location (Geratebau, Germany)
Encapsulated safety isolating transformer (short circuit proof)
Positive Temperature Coefficient (PTC) A thermistor device used to protect the transformer from short circuits or overload. This is an auto reset device.
Thermal cut out (TCO) This safety device disconnects the supply voltage to the transformer at a specific temperature. The operation temperature is stated below.
Ingress protection rating protected against the entry of solid objects >1 mm but no protection from liquids.
This symbol indicates a risk of electric shock.
ix

Understanding the Symbols and Display Icons
Display Icons
There are seven icons which display in the top left of the display to show the mode of the instrument. They also appear on the selection area for each function. The icons are:
Instrument Set Up
This is displayed when the instrument is being set up to suit the users’ requirements.
Strip Test (e.g., Multistix 10SG)
Shown when a test is being carried out using a reagent strip for urinalysis, and when results are displayed following a strip test.
Cassette Test (e.g., Clinitest hCG)
Displayed when a cassette test is being carried out and when results are shown after a cassette test.
Results recall
Used to show that results are being recalled from the instrument’s memory.
Printer
This icon is displayed when results are being printed.
Data transfer to Personal Computer
Shows that data, including results, is being transferred to a PC.
Alert
Used when an error is being displayed.
There are two icons which may appear in the title bar.
Battery power
This has a maximum of four segments which show the level of battery power. It will be shown in the top right corner of the title bar when the instrument is battery powered.
Paper out
Appears in the top of the title bar when the printer paper/label roll needs replacing.
x
1Unpacking & Set Up
Unpacking
Unpacking
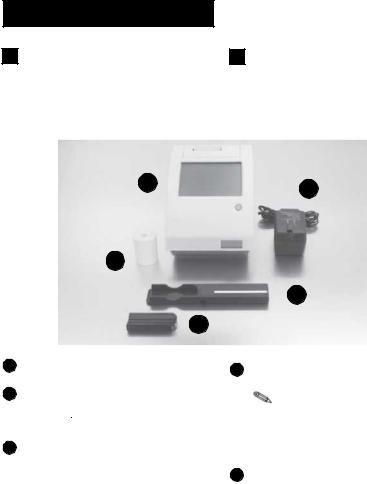
1 Carefully remove the contents of the shipping carton. Check the carton and instrument for visible signs of damage; if seen, immediately contact the carrier.
2 Remove each of the wrappings and check for the following items:
1 |
4 |
|
5
2
3
1Clinitek Status®+ analyzer
2Test table
 Do not touch the white calibration bar.
3Test table insert
 If you are using a reagent strip that has 4 or fewer test pads,
e.g., Uristix® 4, you must use a short test table insert. This has to be ordered separately (for a list of suppliers see Appendix A, Local Technical Support Providers and Distributors).
4 Power Supply
If the power cord is not the style you need, contact your local representative (for a list of contacts see Appendix A, Local Technical Support Providers and Distributors).
5 Paper Roll
Depending on the model you have received, there may also be a Warranty Registration Card, Unpacking/Setup Guide, and/or Quick Reference Guide included.
1-1
1Unpacking & Set Up
Set Up
Set Up
3 Analyzer Set Up
Place the instrument on a level work surface where the temperature and humidity are fairly constant.
4 Plugging Analyzer In
Plug the appropriate end of the power cord into the power inlet socket located on the rear of the Clinitek Status+ analyzer. Plug the other end of the power cord into an AC electrical wall outlet.
 Only use the power supply adapter included with the unit.
 The best temperature for using the instrument is between 22°C and 26°C (72°F and 79°F). Do not place the analyzer outside or near windows, ovens, hot plates, or radiators.
5 Installing Batteries
(Optional)
Place the analyzer on its side and remove the battery cover by pressing down on the tab and pulling out. Place the 6 new alkaline AA-size batteries into the analyzer. Replace the battery cover and turn the instrument back onto its base.
1-2
1Unpacking & Set Up
Set Up
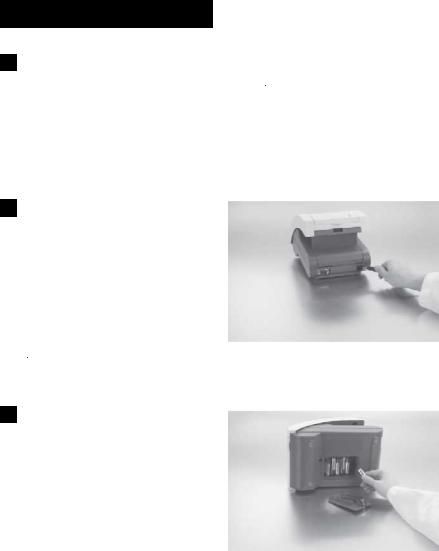
6 Inserting Test Strip Table
Insert the test strip table into the analyzer by holding it by the end opposite the white calibration bar and with the white bar facing up. Push the test table into the analyzer, pushing it in just over halfway.
 Do not push the test table fully into the analyzer as the test table may become jammed and prevent the use of the analyzer.
 Do not touch the white calibration bar.
7 Loading Test Table Insert
The test table insert adapts for use with a Siemens Healthcare Diagnostics urinalysis strip or
Clinitest immunoassay cassette. One side is used for a strip test and the other side is used for a cassette test.
8 Interfacing to a Computer
The instrument can send results to a computer via the serial port located on the back of the analyzer. This requires a 9-pin null modem serial cable that can be purchased separately at an electronics store or from your Siemens Representative (for a list of suppliers see Appendix A, Local Technical Support
Providers and Distributors).
1-3

1Unpacking & Set Up
Set Up
9 Interfacing to the Clinitek Status Connector
The Clinitek Status connector allows for Ethernet or wireless network connectivity, Quality Control, increased security, bar code scanning, and additional features with the Clinitek Status+ analyzer.
This connector provides standard wired and wireless connectivity of the Clinitek Status+ system to your LAN, LIS, HIS, EMR, and allows for centralized control of all satellite Point of Care (POC) Clinitek Status+ analyzers.
Refer to the Clinitek Status Connect System Operator’s Guide.
10 Analyzer Software Upgrades
From time to time Siemens will add new features and make improvements to the Clinitek Status+ instrument software.
These software updates will be available on an electronic memory card which is inserted into the software update socket. This socket is located under the printer cover and is on the left-hand side of the printer when you face the back of the instrument.
Updating the software is a simple procedure. Instructions for updating the software on your instrument will be supplied with the memory card.
1-4
1Unpacking & Set Up
Set Up
11 Loading the Printer Paper or Label Roll
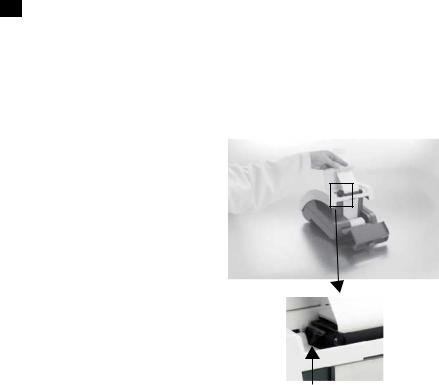
1.Open the printer cover by pulling up on the tab.
2.Open the paper roll compartment cover by pressing down on its tab and pulling out.
3.Lift the paper holding arm into the open, upright position.
4.Place the new paper roll into the printer paper compartment with the paper unrolling from underneath and toward the compartment wall.
5.Feed the paper up along wall and through the printer. Once you have approximately 4 inches (or
10cm) of paper through the printer then feed the edge of the paper through the printer cover.
6.Push the paper holding arm down in to the closed position.
7.Close the printer and paper roll covers by clicking them into position.
 The analyzer is set up to automatically print the results (to turn off the automatic print function see Section 5, Instrument Set Up).
paper holding arm
 The analyzer uses ordinary thermal paper as provided, or label stock (for ordering information see Appendix A, Local Technical Support Providers and Distributors).
1-5

1Unpacking & Set Up
Set Up
12Warranty Registration
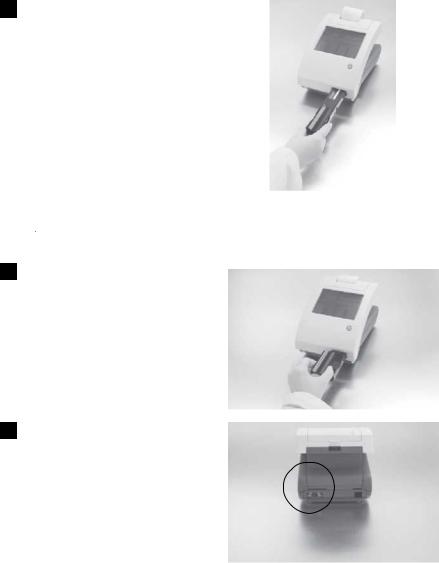
1.Lift the printer cover on the instrument and the serial plate with the instrument’s serial number will be visible.
2.Write the serial number and installation date on the Warranty Registration Card. After the instrument has been successfully installed, complete the information on the Warranty Registration Card and return the card to your local Siemens office (for a contact list see Appendix A, Local Technical Support Providers and Distributors).
1-6
1Unpacking & Set Up
Powering Up
Powering Up
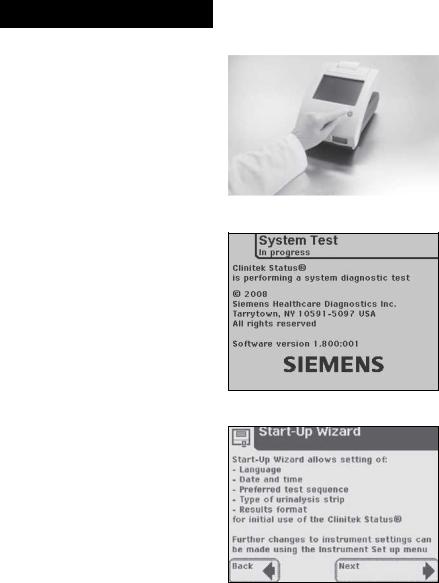
Press the on/off button  located on the front of the instrument.
This is the first screen displayed. The analyzer will run an automatic system diagnostic test each time it is turned on.
If this is the first time you have turned on the analyzer, you will be led through a Start-Up Wizard, a quick set-up procedure. If you require further instruction regarding the Start-Up Wizard see Section 3, page 3-1.
1-7

1Unpacking & Set Up
Powering Down
Powering Down
1.Before turning the analyzer off, always ensure that there is no strip or cassette on the test table and that the table and insert are clean.
2.Press the on/off button  for at least 2 seconds. The test table will retract into the analyzer. If there is no strip or cassette on the test table, the door will close and the analyzer will switch off.
If a strip or cassette is still on the test table, the test table will be pushed out and the analyzer will turn off. The test table will remain out. In order to retract the test table into the analyzer, turn the analyzer on, and then off (without a strip or cassette on the test table).
 Do not push the test table fully into the analyzer as the test table may become jammed and prevent the use of the analyzer.
1-8
2Interacting with the Touch Screen
Screens
Screens
The touch screen will guide you through the operation of the Clinitek Status®+ analyzer. The screen will display messages, instructions and options to which you respond by touching the appropriate area on the screen.
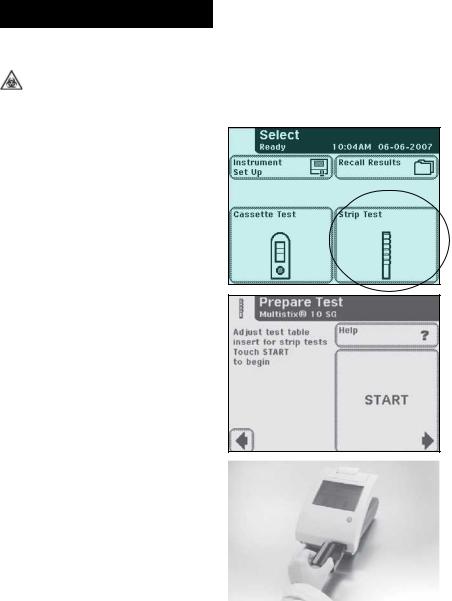
The first main screen you see is the Select screen. It displays the time and date, and indicates the
5 possible actions:
 Instrument Set Up
 Recall Results
 QC Test
 Cassette Test
 Strip Test
Each screen that follows the Select screen has an icon, title bar and touch-sensitive active areas.
In some cases, the screen will also display instructions, messages or error messages.
The icon indicates the main section in which you are working (1 of the
5 sections listed on the main Select screen).
Icon |
Title Bar |
|
|
|
|
|
|
Touch Sensitive Area
2-1
2Interacting with the Touch Screen
Screens
How to Touch the Screens
The screen needs to be touched lightly in the touch-sensitive area to activate a response.
Where to Touch the Screens
There are three types of areas that respond to touching the screen.
•Round Buttons
•Boxed Areas
•Scroll Arrows
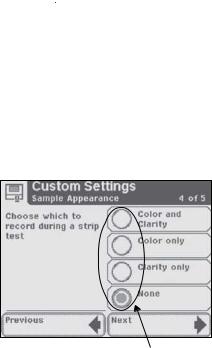
Round Buttons
These buttons typically appear on screens that require a selection among several items. The button with a filled circle is the current selection.
To change your selection, touch an unfilled circle. The newly selected circle (button) will now be highlighted. You then touch the Next button to move to the next screen.
 If a touched area does not respond as expected, slide your finger across the appropriate selection area.
 Use of anything hard or pointed on the touch screen may cause damage.
Round Buttons
 In order to proceed, you will always touch the box with a right pointed arrow labeled Next.
 In order to go back, you will always touch the box with a left pointed arrow. These “back” option boxes vary in title.
2-2
2Interacting with the Touch Screen
Screens
Boxed Areas
These are areas on the screen enclosed in boxes. Simply touch any area within the box to activate that function.
The boxed areas vary in size. The boxes located on the main Select screen are examples of larger areas. Smaller box selections include boxes such as the “Previous” and “Next” boxes found at the bottom of the screen.
Boxed Area |
Unavailable |
|
Option |
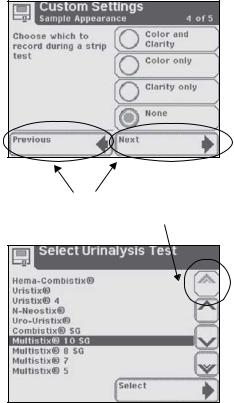
Scroll Arrows
Press the up and down arrows on the right side of the screen to scroll through the list of information on the left side of the screen. Once the information on the left side of the screen is highlighted, touch the
Select button to confirm your selection and move to the next screen.
If there are double arrows on the screen, these arrows (when touched) will take you to the top or bottom of the page.
 When an option can be selected it will be shown with a thick black frame and will respond when touched. If an option is not available, it will be framed with a thin black line and not respond when touched.
2-3

2Interacting with the Touch Screen
Keyboards
Keyboards
Using the Alpha-Numeric
Keyboard
When the screen prompts you to enter information for Operator, Patient’s Name and/or Patient Identification, a keyboard will appear on the screen.
Depending on how your analyzer is set up, either an alphabetic or numeric keyboard will be displayed first. The first keyboard displayed is referred to as “keyboard priority.”
Press to switch to numeric keyboard
Back Space/
Data Entry Box
Erase key
 If you require further instruction regarding how to change keyboard priority see Section 5, Instrument Set Up.
To switch between the keyboards, touch the 123 button to get to the numeric keyboard. Touch the ABC button to get to the alphabetic keyboard.
To type in a name, number, birth date, etc., touch the appropriate button. Your selections will appear in the data entry box.
If you switch between keyboards, all values will be retained in the data entry box on both keyboard screens.
Return to |
Creates |
Confirm |
previous |
blank |
data |
screen |
space |
entries |
Press to switch to alphabetic keyboard
2-4
2Interacting with the Touch Screen
Keyboards
The maximum number of characters allowed is 32. An audible tone will sound when you have exceeded the maximum number of characters.
Once you have finished entering the information, touch Enter (from either keyboard screen).
2-5
2-6

3Start-Up Wizard
The first time your Clinitek Status®+ analyzer is turned on (following an automatic system diagnostic test), it will take you through a quick set up procedure. This procedure will allow you to select the basic functions of the analyzer so you can use the analyzer with your choice of settings.
The Start-Up Wizard will allow you to select the following settings:
 Language
 Date and time
 Preferred test sequence (e.g., Quick Test or Full Test)
 Type of urinalysis strip
  Results format
 If you require further instruction regarding how to change the settings see Section 5, Instrument Set Up.
Once you have selected your choices, the analyzer will display a Confirmation screen which allows you to check that your preferences are correct.
3-1
3-2
4QuickTestingTests
Quick Tests
Urinalysis Strip Test
BIOHAZARD Wear personal protective equipment. Use universal precautions.
Refer to Appendix H for recommended precautions when working with biohazardous materials.
Testing is started from the main Select screen.
 If you require more information regarding use and storage of test strips, please refer to the strip package insert.
Touch Strip Test to conduct a urinalysis strip test.
The next screen that appears is
Prepare Test.
 If you would like the steps for urinalysis testing to be shown on the screen then touch Help.
Make sure the test table insert has the reagent strip holder facing upward.
Also, have the test strip, urine sample and paper towel ready.
Touch the START button.
4-1
4 Testing
Quick Tests
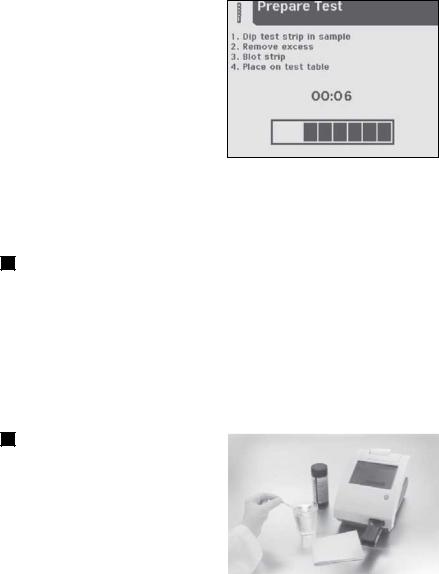
The next screen that appears is another Prepare Test. This screen prompts you through the steps to prepare the test strip.
A timer displays how much time you have remaining to complete the steps.
You have 8 seconds to complete the following four steps:
1 Dip the reagent strip into the urine sample, wetting all pads. Immediately remove the strip from the urine.
NOTE: Do not dip the automatic identification band or color band in the urine sample.
2 Drag the edge of the strip against the side of the sample container as you remove it.
4-2
Loading...