


 Loading...
Clinitek AdvantusTM Analyzer
Operator’s Guide
06635252 (133932 Rev. A), 2007-06

© 2007 Siemens Medical Solutions Diagnostics. All rights reserved.
No part of this manual or the products it describes may be reproduced by any means or in any form without prior consent in writing from Siemens Medical Solutions Diagnostics.
MULTISTIX, MULTISTIX PRO, URO-HEMACOMBISTIX, URO-LABSTIX, CHEK-STIX, Clinitek, and Clinitek Advantus are trademarks of
Siemens Medical Solutions Diagnostics.
Kimwipes is a trademark of Kimberly-Clark.
Cidex is a trademark of Johnson and Johnson.
Theracide is a trademark of Lafayette Pharmaceuticals.
Amphyl is a trademark of Linden Corporation.
IBM is a trademark of International Business Machines.
Lubriplate Super-Lubrication Prevents Wear and Corrosion is a trademark of Fiske Brothers Refining Company.
Origin: UK
The information in this manual was correct at the time of printing. However, Siemens Diagnostics continues to improve products and reserves the right to change specifications, equipment, and maintenance procedures at any time without notice.
If the Clinitek Advantus analyzer is used in a manner differently than specified by Siemens Diagnostics, the protection provided by the equipment may be impaired. Observe all warning and hazard statements.
2 |
Clinitek Advantus Operator’s Guide |

Contents |
|
Using this Guide |
|
Conventions .......................................................................................... |
8 |
1 Overview and Intended Use |
|
Hardware Overview............................................................................. |
10 |
User Interface........................................................................................ |
10 |
Testing and Printing Areas .................................................................... |
10 |
Connections and Power ........................................................................ |
11 |
Memory ................................................................................................. |
12 |
Software Overview.............................................................................. |
13 |
Operating Sequence ........................................................................... |
15 |
2 Operating the System |
|
Overview .............................................................................................. |
17 |
Preparing for a Run............................................................................. |
17 |
Select a Reagent Strip .......................................................................... |
17 |
Check the Strip Loading Station............................................................ |
18 |
Change the Starting Sequence Number ............................................... |
18 |
Change the Technician Identification .................................................... |
18 |
Print Information.................................................................................... |
18 |
Run Controls ......................................................................................... |
19 |
Testing Routine Specimens............................................................... |
19 |
Testing Without a Specimen ID or Loadlist............................................ |
19 |
Using the Specimen ID Without a Loadlist............................................ |
21 |
Using Loadlists ................................................................................... |
21 |
Entering a Loadlist from the Display or Computer Keyboard ................ |
21 |
Entering a Loadlist from a Host or Laboratory/Hospital System ........... |
22 |
Performing a STAT Test ........................................................................ |
24 |
Cancelling a Run................................................................................. |
24 |
Managing Results ............................................................................... |
25 |
End-of-Run Reports .............................................................................. |
25 |
Recalling Results .................................................................................. |
27 |
Printing and Transmitting Results ......................................................... |
28 |
Additional Operating Instructions..................................................... |
30 |
Using a Form Printer ............................................................................. |
30 |
Removing a Jammed Test Strip ............................................................ |
30 |
Thermal Printing.................................................................................... |
30 |
Managing the Printer Paper .................................................................. |
30 |
Clinitek Advantus Operator’s Guide |
3 |
|
Emptying the Waste Bin........................................................................ |
30 |
3 |
Calibration |
|
|
Overview .............................................................................................. |
31 |
|
Confirming a Calibration .................................................................... |
31 |
4 |
Quality Control |
|
|
Testing Control Specimens................................................................ |
34 |
|
Quality Control Errors ........................................................................ |
36 |
5 |
Maintenance |
|
|
General Cleaning................................................................................. |
37 |
|
Performing the Daily Cleaning........................................................... |
37 |
|
Performing a Decontamination.......................................................... |
43 |
|
Lubricating the Push Bar Slide and Shaft ........................................ |
44 |
|
Changing the Paper ............................................................................ |
45 |
|
Replacing the Printer.......................................................................... |
48 |
|
Disconnect the Analyzer ....................................................................... |
48 |
|
Remove the Cover on the Internal Printer............................................. |
48 |
|
Remove the Paper Roll ......................................................................... |
49 |
|
Remove the Printer ............................................................................... |
50 |
|
Install the New Printer ........................................................................... |
53 |
|
Calibrating the Touch Screen ............................................................ |
54 |
6 |
Troubleshooting |
|
|
General Information............................................................................ |
55 |
|
Removing a Jammed Test Strip......................................................... |
55 |
|
Reinstalling the Fixed Platform ......................................................... |
57 |
|
Errors and Corrective Actions........................................................... |
57 |
7 |
File Management |
|
8 |
System Configuration |
|
|
Installation ........................................................................................... |
71 |
|
Overview ............................................................................................... |
71 |
|
Unpacking the Analyzer ........................................................................ |
71 |
|
Installing the Analyzer ........................................................................... |
74 |
|
Installing Connections ........................................................................... |
80 |
|
Installing the Barcode Reader Bracket.................................................. |
81 |
|
Installing a Roll of Printer Paper............................................................ |
81 |
|
Performing the Initial Analyzer Check ................................................... |
82 |
4 |
Clinitek Advantus Operator’s Guide |
Setup Information ............................................................................... |
84 |
Setup Menu 1........................................................................................ |
84 |
Setup Menu 2........................................................................................ |
88 |
Setup Menu 3........................................................................................ |
91 |
Setup Menu 4........................................................................................ |
92 |
Setup Menu 5........................................................................................ |
95 |
Setup Menu 6........................................................................................ |
98 |
Setup Menu 7...................................................................................... |
100 |
Setup Menu 8...................................................................................... |
103 |
Setup Menu 9...................................................................................... |
108 |
Completing Setup................................................................................ |
110 |
Appendix A: Safety Information |
|
Protecting Yourself from Biohazards.............................................. |
111 |
References.......................................................................................... |
112 |
Appendix B: Warranty and Support Information |
|
Legal Information.............................................................................. |
113 |
Siemens Diagnostics Authorized Representative ............................... |
113 |
Warranty Information........................................................................ |
113 |
Installation Details ............................................................................... |
113 |
Manufacturer’s Warranty for U.S. Customers Only............................. |
113 |
Disclaimer of Warranties ..................................................................... |
114 |
Limitations of Liability .......................................................................... |
114 |
Support Information.......................................................................... |
114 |
Contact Information.......................................................................... |
115 |
Pre-service Checklist........................................................................ |
116 |
Appendix C: Orderable Supplies |
|
List of Supplies and Optional Equipment....................................... |
119 |
Siemens Diagnostics Reagent Strips for Urinalysis ............................ |
119 |
CHEK-STIX Positive and Negative Control Strips for Urinalysis......... |
119 |
Clinitek Handheld Barcode Reader..................................................... |
120 |
Installing a Barcode Reader Bracket................................................... |
120 |
Clinitek Advantus Waste Bin Liners .................................................... |
120 |
STAR Form Printer.............................................................................. |
120 |
List of Replacement Parts................................................................ |
121 |
Appendix D: Specifications |
|
System Specifications...................................................................... |
123 |
Safety Certifications ............................................................................ |
123 |
Electromagnetic Compatibility (EMC) ................................................. |
123 |
Clinitek Advantus Operator’s Guide |
5 |
Analyzer Dimensions .......................................................................... |
123 |
Environmental Specifications.......................................................... |
124 |
Electrical Requirements ...................................................................... |
124 |
Tables of Results .............................................................................. |
125 |
English and Chinese, Units—Conventional ........................................ |
125 |
English and Chinese, Units—International (SI)................................... |
126 |
English Nordic, Units—Nordic Plus System........................................ |
127 |
Appendix E: Symbols |
|
System and Packaging..................................................................... |
129 |
User Interface .................................................................................... |
132 |
Appendix F: Barcode Reader |
|
General Information.......................................................................... |
137 |
Installing the Handheld Barcode Reader ........................................ |
137 |
Testing the Barcode Reader ............................................................ |
138 |
Troubleshooting................................................................................ |
138 |
Specifications.................................................................................... |
139 |
Barcode Formats................................................................................. |
139 |
Barcode Symbols and Labels ............................................................. |
139 |
Maintenance ...................................................................................... |
140 |
Appendix G: Computer and Printer Interface |
|
General Information.......................................................................... |
141 |
Cable and Pin Specifications – Computer...................................... |
141 |
Pin Assignments for Interface Cable – Serial Port .............................. |
141 |
Hardware Handshaking....................................................................... |
142 |
Cable and Pin Specifications – Printer ........................................... |
142 |
Pin Assignments for Interface Cable – |
|
DB-25 Male Connector...................................................................... |
143 |
Notes................................................................................................... |
143 |
Index |
|
6 |
Clinitek Advantus Operator’s Guide |

Using this Guide
The Clinitek Advantus Operator’s Guide provides information for clinical laboratory professionals who use the Clinitek Advantus system:
The following table describes how this guide is organized.
If you want to . . . |
Then refer to . . . |
learn about the system principles, |
Section 1, Overview and Intended Use |
the hardware, and the operating |
|
sequence |
|
process samples and manage |
Section 2, Operating the System |
sample results |
|
learn about calibration and how to |
Section 3, Calibration |
print the calibration status |
|
process QC samples |
Section 4, Quality Control |
perform maintenance activities |
Section 5, Maintenance |
investigate and correct system |
Section 6, Troubleshooting |
problems |
|
learn about file and data |
Section 7, File Management |
management |
|
install the system or modify system |
Section 8, System Configuration |
parameters |
|
review additional information such |
Appendices |
as the glossary or the supplies list |
|
Clinitek Advantus Operator’s Guide |
7 |

Conventions
The Clinitek Advantus Operator’s Guide uses the following text and symbol conventions:
Convention |
Description |
|
Biohazard statements alert you to |
BIOHAZARD |
potentially biohazardous conditions. |
|
|
|
Warning statements alert you to conditions |
WARNING |
that may cause personal injury. |
|
 CAUTION NOTE:
Bold
Italic
Caution statements alert you to conditions that may cause product damage or loss of data.
Note statements alert you to important information that requires your attention.
Bold type indicates text or icons on the user interface. For example, if the word save appears as Save, it refers to the Save button on the user interface.
System icons are also indicated by words in bold type. For example, the words
Next Screen refer to the system icon .
A complete list of system icons and their equivalents is in Appendix E, Symbols.
Italic type refers to the title of a document or a section title in this guide.
8 |
Clinitek Advantus Operator’s Guide |

1 Overview and Intended Use
The Clinitek AdvantusTM Urinalysis analyzer is a semi-automated, benchtop analyzer. It is designed to read Siemens Medical Solutions Diagnostics Reagent Strips for Urinalysis, such as, MULTISTIX® 10 SG and Siemens Diagnostics MULTISTIX PRO® Reagent Strips.
The analyzer is a reflectance spectrophotometer that analyzes the color and intensity of the light reflected from the reagent area and reports the results in clinically meaningful units. The analyzer can determine and report the color of the urine. You can enter clarity for each specimen. You are not required to make any calculations. Calibration is performed automatically each time a reagent strip is analyzed.
Figure 1 Clinitek Advantus Analyzer
Siemens Diagnostics Reagent Strips contain reagent areas for testing glucose, bilirubin, ketone (acetoacetic acid), specific gravity, occult blood, pH, protein, urobilinogen, nitrite, and leukocytes. MULTISTIX PRO Reagent Strips also contain protein-low and creatinine reagent areas. A single protein result is reported from the 2 protein tests and this reading is compared to the creatinine result to provide a protein-to-creatinine ratio.
Intended and Overview
Use
Clinitek Advantus Operator’s Guide |
9 |

and Intended |
Use |
Overview |
|
|
|
The Clinitek Advantus system is intended for professional use in a laboratory environment only. Tests performed using the Clinitek Advantus system are intended for in vitro diagnostic use. As with all diagnostic tests, a definitive clinical diagnosis should not be based on the results of a single test, but should only be made by the physician after all clinical and laboratory findings have been evaluated.
Hardware Overview
User Interface
By default, interaction with the Clinitek Advantus analyzer is via an integrated touch screen. Messages, options, and requests for information display, and responses are made by touching the appropriate key symbol on the screen.
CAUTION
Do not use anything hard or pointed on the touch screen. It may damage the screen.
You can also use a computer keyboard or a handheld barcode reader to interact with the analyzer. Some analyzer screens may not accept input from these devices.
Testing and Printing Areas
All testing takes place on the fixed platform.
The fixed platform consists of 3 sections: the strip loading station, the incubation/read station, and the waste bin. Strips are placed on the strip loading station. The push bar moves the strips to the incubation/read station, where they are tested. When testing is complete, the strips drop into the waste bin.
10 |
Clinitek Advantus Operator’s Guide |
When testing is complete, an internal thermal printer prints the test results.
1Display
2Printer
3Waste bin
4Fixed platform
5Incubation/read station
6Strip loading station
7Push bar
Figure 2 User Interface, Testing and Printing Areas
Connections and Power
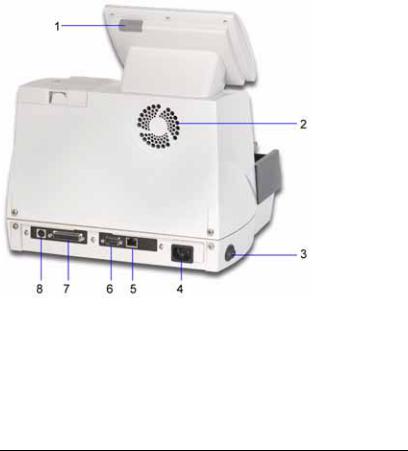
The line cord is connected into the line cord receptacle. Turn the analyzer on by pressing the power switch to the on position. You can connect a computer, printer, ethernet connection, keyboard, and handheld barcode reader to the analyzer using the interface connectors.
Intended and Overview
Use
Clinitek Advantus Operator’s Guide |
11 |
and Intended |
Use |
Overview |
|
|
|
Memory
The analyzer software is stored in internal flash memory. When necessary, you can update the software using an electronic memory card located on the back of the interactive touch display.
The analyzer stores the operating parameters, including those selected by the user, and up to 500 patient results and 200 quality control results. This information is in a RAM with a battery backup, and is held in memory regardless of whether the analyzer power is on or off.
1Memory card slot
2Cooling fan
3Power switch
4Line cord receptacle
5Ethernet interface connector
6Serial interface connector
7Printer interface connector
8Keyboard and barcode reader interface connector
Figure 3 Connections, Power, and Memory
12 |
Clinitek Advantus Operator’s Guide |

Software Overview
The Clinitek Advantus provides an easy-to-navigate and intuitive user interface.
When the analyzer is not in use, the screen saver or the Ready/Run screen displays. If the screen saver displays, touch the screen to access the Ready/ Run screen. You can access all tests through the Ready/Run screen. You can also navigate from this screen to any point in the software.
1Information and instructions area
2Inactive action key
3Active action key
4Inactive cycle key
5Active cycle key
6System status area
Figure 4 Ready/Run Screen
The information and instructions area shows system settings or user input, and provides instructions for the user. The Help, Stop Run, and Return to Ready/Run keys display in this area.
Many options are next to an Action Key. Select this key to select the option.
Some options are next to a Cycle key. Use the cycle key when several options are available. Each time you select the key, a different option displays for the selection.
If an option is active, the key symbol is fully lit. If it is not active, it is dimmed, and a tone will sound when you touch the key.
Intended and Overview
Use
Clinitek Advantus Operator’s Guide |
13 |
and Intended |
Use |
Overview |
|
|
|
The system status area displays only on the Ready/Run screen. It shows the current date and time, and the Technician ID, if Technician IDs are active on your system.
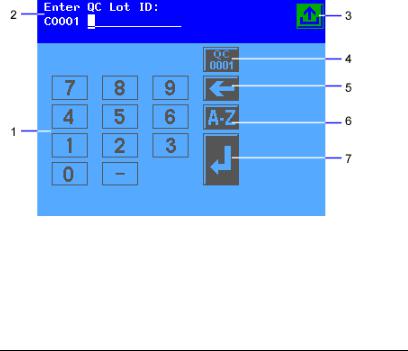
1Numeric keypad
2Information and instructions area
3Return to Ready/Run screen key
4Reset QC Lot ID key
5Move Left key
6Alphabet key
7Enter key
Figure 5 Input Screen
Some options require that you enter information. If selected, a numeric keypad will display. If available, you can select the Alphabet key to access an alphabetic keypad. If a handheld barcode reader or keyboard is connected to the system, you can scan or enter information for some values. The instrument will only recognize keyboard input that is equivalent to the keypads available on the instrument display.
Refer to Appendix E, Symbols for a complete list of key symbols used on the Clinitek Advantus.
14 |
Clinitek Advantus Operator’s Guide |

Operating Sequence
If specimen IDs are not used and color/clarity results are reported and displayed, the analyzer automatically enters the Run mode when you place a strip on the fixed platform. A sensor detects the strip's presence and activates the strip movement and reading cycle.
If the push bar is positioned at the left side of the loading station, the analyzer is ready to accept placement of a strip. If the bar is positioned to the right, the analyzer is not ready and ignores any strip placed on the platform.
If the analyzer is already in the Run mode and you place a strip on the platform, there may be delay of up to 7 seconds before the push bar moves. The amount of delay depends on the status of the timing cycle for the strips currently being analyzed.
The push bar moves the strip along the loading station to the read area. The sequence number increments. A series of pins move the strip across the platform at a rate of about 1.3 cm (1/2 inch) every 7 seconds.
Two readheads, located inside the read area, scan the length of each reagent strip at a specific time in the incubation cycle. The first readhead reads the reagent areas requiring shorter incubation times. The second reads those requiring longer incubation times.
Each of the 2 readheads contains an incandescent lamp and photodiode pack. When a strip moves into position under the readhead, the analyzer performs a calibration cycle. The readhead then scans the entire length of the strip, measuring the light reflectance of each reagent pad. A portion of the light striking the pad is reflected back to the photodiode pack. The light reflected at specific wavelengths from the test pad is dependent upon the degree of color change in the pad and is directly related to the concentration of the particular constituent in the urine.
The photodiode pack contains 4 filters, one each at 400 – 510 nm (blue), 510 – 586 nm (green), 586 – 660 nm (red), and 825 – 855 nm (IR). The light intensity detected by the photodiode pack is converted into electrical impulses, which are processed by the analyzer’s microprocessor and converted into clinically meaningful results.
The pins continue to move the strip along the platform until it drops into the waste bin.
An internal thermal printer prints the test results, if this option is selected. You can also send the results to a computer and a form or 80-column printer.
Intended and Overview
Use
Clinitek Advantus Operator’s Guide |
15 |
and Intended |
Use |
Overview |
|
|
|
16 |
Clinitek Advantus Operator’s Guide |

2 Operating the System
Leave the Clinitek Advantus analyzer on at all times, except during maintenance and cleaning procedures.
Overview
You can test without a loadlist or specimen ID. Put a strip on the analyzer. The analyzer automatically assigns a Sequence Number and begins testing.
You can manually assign specimen IDs to tests. You can enter specimen IDs immediately prior to testing each specimen.
You can enter a loadlist of up to 200 specimen IDs before starting the run. You can enter the IDs from the analyzer display, a computer keyboard, a host computer, or Laboratory or Hospital Information System (LIS/HIS).
You can interrupt processing to run a STAT test when using a loadlist. After the STAT test the analyzer will continue testing specimens from the loadlist.
If necessary, you can stop a run before all readings are complete.
Results transmit to the printer and computer as soon as all reagent areas on the strip are read.
Preparing for a Run
When you place the first strip on the fixed platform the analyzer begins a run. Before starting each run, perform the following procedures.
Select a Reagent Strip
1.Check that the primary and alternative Siemens Diagnostics Reagent Strips for Urinalysis displayed correspond to the strip types you are using.
CAUTION
Do not use a reagent strip other than the selected primary or alternative reagent strip. Only use Siemens Diagnostics brand reagent strips. Use of other strips may cause erroneous results.
2.If required, select the cycle key next to the alternative strip name to use the alternative strip.
3.If the strip names do not agree, change the selected strips before beginning testing.
Select the strips through the Setup Routine.
System the Operating
Clinitek Advantus Operator’s Guide |
17 |

Operating the System
Check the Strip Loading Station
Ensure that the strip loading station and push bar are clean and in the correct position. If contaminants are present, remove and clean the push bar, the platform, and the moving table.
Change the Starting Sequence Number
This number increments with each strip placed onto the analyzer. If necessary, use this procedure to change the number.
1.Select SEQ #.
A numeric keypad displays.
2.Enter the new sequence number. Change individual digits as needed:
a.Select Move Left or Move Right to move the cursor to the digit to change.
b.Enter the correct number.
Select 00001 to reset the number. 3. Select Enter.
Change the Technician Identification
You can activate the Tech ID option during analyzer setup. Refer to Tech ID‚ page 102 for more information.
1.Select Menu.
2.Select Tech ID.
A numeric keypad displays.
3.Enter an identification number of up to 13 digits.
a.Select A-Z to enter alphabetic characters.
b.Select Enter to return to the numeric keypad.
4.Select Enter to save the Tech ID.
Print Information
1.Select Menu.
2.Select Print to print:
•the ID list if a loadlist exists in memory
•confirmation of the last calibration
•a report of the setup parameters
18 |
Clinitek Advantus Operator’s Guide |
Run Controls
At the Set options menu, select QC to run controls before processing patient samples. Refer to Section 4, Quality Control, for more information.
Testing Routine Specimens
Testing Without a Specimen ID or Loadlist
BIOHAZARD
Wear personal protective equipment. Use universal precautions. Refer to Appendix A, Safety Information for recommended precautions when working with biohazardous materials.
1. Select a reagent strip.
CAUTION
Do not use a reagent strip other than the selected primary or alternative reagent strip. Only use Siemens Diagnostics brand reagent strips. Use of other strips may cause erroneous results.
2.If you are entering color or clarity, use the cycle key to set color and clarity for each specimen.
You can also enter the color and clarity by scanning the barcoded symbols provided with the handheld barcode reader.
NOTE: If Use default COL/CLA during run is set to on, the default values of YELLOW and CLEAR display.
Enter the color and clarity of each specimen before dipping the reagent strip.
You can change the color and clarity until the strip moves.
3.Completely immerse all of the reagent pads on a Siemens Diagnostics Reagent Strip in fresh, well-mixed, uncentrifuged urine.
4.Immediately remove the reagent strip.
5.While removing the strip, run the edge against the side of the container. This removes excess liquid.
CAUTION
Do not blot the edge of the strip. This could affect results.
System the Operating
Clinitek Advantus Operator’s Guide |
19 |
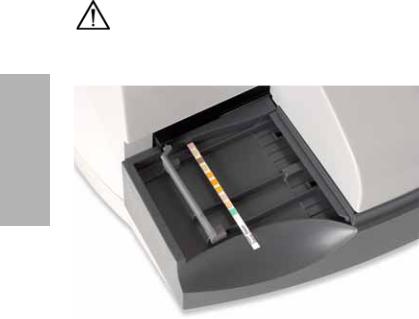
6.Place the reagent strip onto the supports of the strip loading station, with the reagent pads facing up.
Place the strip to the right of and parallel to the push bar. Ensure that the end of the strip is against the back wall of the platform and that it is not touching the bottom of the strip loading station.
CAUTION
Improper placement may cause the analyzer to jam or the strip to incorrectly align under the readheads.
Operating the System
Figure 6 Placement of Reagent Strip
7. Repeat steps 2 to 6 for each specimen.
When the push bar is to the far left of the platform, you can place a new strip on the loading station until the previous strip placed enters the waste bin. When the final strip moves to the waste bin, the run ends, and end of run reports are processed.
Refer to Printing and Transmitting Results‚ page 28 for information on printing and transmitting the results.
20 |
Clinitek Advantus Operator’s Guide |
Using the Specimen ID Without a Loadlist
You can enter Specimen IDs immediately prior to testing each specimen.
NOTE: You can use this procedure only if Enter Sample IDs is On. Refer to Enter Sample IDs‚ page 102 for information on this setting.
1. |
At the Ready/Run screen, select ID. |
|
|
2. |
Enter the ID number for the specimen you are about to test. |
|
|
|
Select A-Z to enter alphabetic characters. |
|
|
|
You can also enter the ID from a computer keyboard, or scan it from a |
|
|
|
barcoded label using the handheld barcode reader. |
|
|
3. |
If needed, enter or scan the color and clarity. |
Operating |
|
4. |
The display changes to allow entry of the next ID number, and the push bar |
||
When this information is correctly entered, select Enter or scan the Enter |
|
||
|
code from the color or clarity card. |
|
|
|
moves to the left so you can place a strip on the loading station. |
the |
|
5. |
Dip and place a reagent strip. |
||
System |
|||
|
NOTE: If another ID is entered without a strip being detected, the analyzer |
||
|
|
||
|
automatically creates a loadlist. |
|
|
6. |
Repeat steps 2 to 5 for each specimen. |
|
|
|
Using Loadlists
You can enter a loadlist of up to 200 specimen IDs before starting the run. You can enter the IDs from the analyzer display, a computer keyboard, a host computer, or Laboratory or Hospital Information System (LIS/HIS).
NOTE: You can use loadlists only if Enter Sample IDs is On. Refer to Enter Sample IDs‚ page 102 for information on this setting.
Entering a Loadlist from the Display or Computer Keyboard
To report color and clarity, enter initial values at the same time as the ID. You can edit color and clarity while running the specimens, immediately prior to dipping each reagent strip.
NOTE: Duplicate ID numbers are allowed by the analyzer.
1.At the Ready/Run screen, select ID.
2.Enter the ID for the first specimen. Select A-Z to enter alphabetic characters.
You can also enter the ID from a computer keyboard, or scan it from a barcoded label using the handheld barcode reader.
NOTE: Do not select or scan Enter from the ID entry screen before entering the color and clarity.
Clinitek Advantus Operator’s Guide |
21 |

Operating the System
3.If needed, enter or scan the color and clarity.
4.Select Enter or scan the Enter code.
5.Repeat steps 2 to 4 for each specimen.
Editing a Loadlist
Use this procedure to make changes to the loadlist when initial entry is complete.
1.Use Move Up and Move Down to select the record to edit.
2.Edit the ID number.
NOTE: You cannot change or delete the ID number during Run mode. Make any changes while the analyzer is in the Ready mode.
3.Select Delete to delete an item from the loadlist.
You can delete only the ID number being displayed or all IDs in memory.
4.Edit the color and clarity.
5.Select Enter to accept the new number, color, and clarity.
Entering a Loadlist from a Host or Laboratory/Hospital System
You can connect the Clinitek Advantus analyzer to a host computer or laboratory system. Refer to Appendix G, Computer and Printer Interface, for more information.
1.Before sending a loadlist from a host or laboratory system, ensure that the following conditions are true:
•The analyzer is at the Ready/Run screen.
•No IDs from an earlier loadlist are still stored in the analyzer. If a loadlist was sent but is no longer needed, you can overwrite the unused IDs with a new loadlist.
•The computer port is set to computer port, ethernet port, or both.
•The computer port options for Baud, Data, and Parity are correct for the computer or LIS/HIS sending the loadlist. Refer to the specifications accompanying the computer or Laboratory/Hospital Information System for information on the required parameters.
•The output format for the computer port is CCS. Refer to Computer Port Options‚ page 104 for more information on setting the computer port.
NOTE: Loadlist data is only transferred if it is formatted correctly. If a loadlist is not transferred, refer to Section 6, Troubleshooting, for possible causes.
22 |
Clinitek Advantus Operator’s Guide |
2. Review or delete a loadlisted number and add a color or clarity description. |
|
||
The loadlist order is indicated by a number to the left of the ID number. The |
|
||
total number of IDs in the loadlist is shown in the lower right corner of the |
|
||
display. |
|
||
a. At the Ready/Run screen, select ID. |
|
||
b. Use Move Up and Move Down to display the ID number. |
|
||
|
Use the loadlist order number to locate the proper location. |
|
|
|
NOTE: You cannot change or delete an ID number transferred from a |
|
|
|
host computer or Laboratory/Hospital Information System. |
|
|
c. Delete the number from the loadlist by selecting Delete. |
|
||
|
You can delete only the ID number being displayed or all IDs in |
Operating |
|
|
memory. |
||
|
|
||
d. If needed, enter or scan the color and clarity. |
|
||
e. Select Enter to accept the new color and clarity. |
|
||
3. Select Print to print the ID list. |
the |
||
4. Select Return to Ready/Run to begin testing specimens. |
|||
System |
|||
You can also print the ID list from the Ready/Run screen. |
|||
|
|||
a. |
Select Menu. |
|
|
b. |
Select Print. |
|
|
|
|||
c. Select ID list.
NOTE: You must make changes to the loadlist before starting testing. To edit remaining IDs in the loadlist, enter a loadlist from the analyzer display or a computer keyboard and then cancel the run. Add new IDs when the run is complete.
5.Test each specimen.
The Ready/Run screen displays each ID number and the color/clarity descriptions in the same order as they were entered into the loadlist.
a.Check that the ID number, color, and clarity descriptions are correct for the specimen you are about to test.
b.Edit the color and clarity, if necessary.
c.Dip and place a reagent strip.
When the strip for the last loadlisted specimen is moved to the read area, you are not allowed to place any additional strips on the table. The push bar stays at the right side and the analyzer completes the run.
Clinitek Advantus Operator’s Guide |
23 |

Operating the System
Performing a STAT Test
Use this procedure to run a STAT test when using a loadlist. After the STAT test the analyzer will continue testing specimens from the loadlist.
1.At the Ready/Run screen, select STAT.
2.Enter an ID for the STAT test.
The SEQ # shown is the next number available after the end of the loadlist.
3.Edit the color and clarity, if necessary.
4.Select a reagent strip.
CAUTION
Do not use a reagent strip other than the selected primary or alternative reagent strip. Only use Siemens Diagnostics brand reagent strips. Use of other strips may cause erroneous results.
5.Dip and place a reagent strip.
The result is printed when the STAT test is complete. The analyzer displays any confirmatory or microscopic flags from the STAT test.
6.Run another STAT test or resume loadlist testing.
The next test is allocated the SEQ # which follows the number used for the STAT test just completed.
Cancelling a Run
Select Stop Run if you need to stop the run before all readings are complete.
You can cancel the entire run or only the last strip placed on the platform.
If the you cancel the entire run, all strips on the platform are moved immediately to the waste bin. No results are reported. No SEQ # is assigned for any strip that was not read at both readheads before Stop Run was selected. You must retest all the specimens for all cancelled strips.
If only the last strip is cancelled, the run continues and you can test a new strip using the same SEQ #.
24 |
Clinitek Advantus Operator’s Guide |

Managing Results
Results are transmitted to the printer and computer as soon as all reagent areas on the strip are read. If a record is flagged for a confirmatory report and Edit flagged results is On, that record is not transmitted until after the end-of- run reports complete.
End-of-Run Reports
The analyzer may display up to 3 end-of-run reports when the run, or a STAT test, is completed. These reports display if you have marked any analytes to flag for confirmatory or microscopic tests, and if Mark positives is On.
To request these reports:
1.Specify 1 or more tests for the Confirmatory Reports A and B or Microscopy Report.
2.In the Setup routine, select On for Edit flagged results.
The Confirmatory and Microscopic Report screens display the SEQ # and ID of the record, and the abbreviation for each positive analyte marked for flagging.
Up to 5 records may be displayed on 1 screen.
3.Use Move Up and Move Down to view additional records.
If both the Confirmatory and Microscopic Reports contain records, the Confirmatory Reports display first.
4.Edit these results before exiting the Confirmatory Report. Refer to Editing Results in the Confirmatory Reports‚ page 25.
5.Select Print to print a report.
6.Select Return to Ready/Run to exit the report screen.
If an error is reported for 1 or more analytes, a report displays after the Confirmatory and Microscopic Reports. This report displays last.
7.Retest any specimens listed.
Editing Results in the Confirmatory Reports
Use this procedure to edit the results of confirmatory testing.
1.During the end of run review, access the Confirmatory Report screens.
2.Select a record from the Confirmatory Report A screen. The flagged positive test results display.
System the Operating
Clinitek Advantus Operator’s Guide |
25 |
|
3. |
Select the cycle key next to the test name to change the displayed result to |
|
|
|
the next available reported result. |
|
|
|
When the cycle key is selected, the result for that test is printed and stored |
|
|
|
with an exclamation point (!) to indicate that it was edited, even if the result |
|
|
|
is reset to its original value. |
|
|
|
If the selected output format is CCS, an E is transmitted with the results. |
|
|
4. |
Select Previous Screen when editing is complete for that record to return to |
|
|
|
the Confirmatory Report. |
|
|
5. |
Repeat Steps 2 to 4 above for each record. |
|
|
6. |
When all editing is complete, select Return to Ready/Run to exit |
|
System |
|||
|
Confirmatory Report A. |
||
|
When you leave a Report, you are not able to edit the report any further. |
||
|
Records for Confirmatory Report B display. |
||
the |
7. |
Repeat Steps 2 to 4 above to edit these records. |
|
|
|||
Operating |
8. |
When all Confirmatory Report editing is complete, select Return to Ready/ |
|
|
Run to exit the Confirmatory Reports. |
||
|
|
||
|
|
NOTE: When you leave the Edit routine, you are not able to edit the run any |
|
|
|
further. |
|
|
|
Records in the Microscopic Report display. |
|
|
|
||
|
After you exit Confirmatory and Microscopic Report screens, results for the |
||
|
records included in Confirmatory Reports A and B are sent to the printer and |
||
|
computer, all other records are printed and transmitted as soon as they are |
||
|
available. |
||
|
Merging Data from Microscopic Testing |
||
|
Use this procedure to add the microscopic test results: |
||
|
This option is only available if you created customized microscopy headings. |
||
|
1. |
At the Ready/Run screen, select Menu. |
|
|
2. |
Select Enter Microscopics results. |
|
|
3. |
Search for the correct test results: |
|
|
|
a. Enter the patient ID. |
|
|
|
b. Select Enter to start the search. |
|
|
|
The patient ID results display with the earliest test displayed first. |
|
|
|
c. Use Move Up and Move Down to select the correct test results. |
|
|
|
d. Select Select Result. |
|
|
4. |
Select the heading where you will add results. |
|
|
5. |
Enter the microscopic test result for the heading. |
|
26 |
Clinitek Advantus Operator’s Guide |

6.Select Enter to enter the data.
7.Repeat this procedure to add all required microscopic test data.
8.Select Print to print the microscopic result data and the results of the patient test on the analyzer.
9.Select Merge to store the microscopic data with the analyzer results.
When the test results are recalled, Microscopics displays on the results display to show that microscopic results are stored with the test results.
Recalling Results
Up to 500 patient records and 200 quality control records are stored in memory. Use the following procedure to recall 1 or more records:
1.At the Ready/Run screen, select Menu.
2.Select Memory.
3.Recall a group of records.
•all patient records
•all QC records
•the last batch of patient results
•stored results by Patient ID
The number of records in memory displays next to the first 2 options.
The last batch of patient results tests are those tests run between the last pause in testing and the latest test. If the latest test is a QC test, it is not recalled.
4.If you selected Search for stored results, enter the patient ID.
5.Select Enter to start the search.
The earliest record of the selected group displays. The date and time the record was stored displays, along with the Technician ID, SEQ #, and ID for the record. All results are then listed. Positive results are flagged with an asterisk (*) and edited results with an exclamation point (!).
6.Locate the first record to review using the movement keys shown on the display.
The next loweror higher-numbered record in memory is recalled when Move Up and Move Down are used. The record 10 higher or lower is recalled when Move Up 10 and Move Down 10 are used.
If microscopic results are merged with the patient test results, Microscopics displays on the patient record.
7.Select Microscopics to view the merged microscopic results.
System the Operating
Clinitek Advantus Operator’s Guide |
27 |

Operating the System
Printing and Transmitting Results
Printing Records from Memory
1.Recall a group of results. Refer to Recalling Results‚ page 27.
2.Select Print to print 1 or more records.
3.Select 1 of the following options:
To... |
Select... |
Print the record displayed, |
Print only this result |
|
The SEQ # and ID of that record continues to |
|
display on the print option menu. |
Specify the beginning and |
Print a group of results |
ending records to print, |
1. Use the movement keys to specify the start |
|
record to print. |
|
2. Select Enter to select the end record to print. |
|
This record must have a SEQ # that is higher |
|
than or the same as the start record. |
|
3. Select Enter to begin printing. |
|
All records in the sequential group print. |
|
NOTE: The results tested using a loadlist may |
|
include STAT tests carried out during the loadlist |
|
testing. |
Print all records that were |
Print all patient (control) results |
recalled, |
|
After printing is complete, the screen returns to the earliest record of the group. If Print a group of results is selected, the display first returns to the screen from which the group was selected.
4. Select Previous Screen as needed to return to the first record.
Resending Records from Memory
Use this procedure to resend 1 or more records to a host computer or LIS:
1.Recall a group of results. Refer to Recalling Results‚ page 27.
2.Select Resend.
28 |
Clinitek Advantus Operator’s Guide |

3. Select 1 of the following options:
To... |
Select... |
Send the record |
Send only this result |
displayed, |
The SEQ # and ID of that record continues to |
|
display on the sent option menu. |
Specify the start and end |
Send a group of results |
records to resend, |
1. Use the movement keys to specify the start |
|
and end records to resend. |
|
2. Select Enter to begin resending. |
|
All records in the sequential group are sent. |
|
NOTE: The results tested using a loadlist may |
|
include STAT tests carried out during the loadlist |
|
testing. |
Send all records that were Send all patient (control) results recalled,
After resending is complete, the screen returns to the earliest record of the group. If Send a group of results is selected, the display first returns to the screen from which the group was selected.
4. Select Previous Screen as needed to return to the first record.
Deleting Results from Memory
To delete all patient or control results from memory:
1.Recall a group of results. Refer to Recalling Results‚ page 27.
2.Select Delete.
3.Confirm the deletion.
4.Select Previous Screen to return to the previous menu, or select Return to Ready/Run to return to the Ready/Run screen.
System the Operating
Clinitek Advantus Operator’s Guide |
29 |

Operating the System
Additional Operating Instructions
Using a Form Printer
While printing results using a form printer, each set of results is stored in memory until you insert a form into the printer. When the analyzer detects a form, the next set of results is sent to the printer.
Check each form immediately after it is printed to ensure that all results are printed and are clearly readable. If the printed form has a problem, immediately reprint the last report.
NOTE: If you are using the Clinitek® Form Printer, use Reprint on the Form Printer. Do not select Reprint last result on the analyzer display.
1.Select Reprint last result.
As long as the checkmark displays in the selection key, the last set of results are reprinted each time a form is inserted into the printer.
2.Insert a new form into the Form Printer.
Do not insert the form before selecting Reprint last result or the last set of results is lost.
3.When the report is printed correctly, select Reprint last result again to remove the checkmark.
4.Insert a new form to print the next set of results.
Removing a Jammed Test Strip
Refer to Section 6, Troubleshooting for more information on this procedure.
Thermal Printing
Thermal print from the internal printer fades with time, especially when exposed to light. The print also fades if covered with transparent tape or when exposed to extremes in temperature or humidity.
Managing the Printer Paper
The analyzer detects when the internal printer is out of paper and retains the results until the printer paper roll is replaced. The last meter of paper on the roll has a pink edge. Change the roll when the pink edge displays. Refer to
Changing the Paper‚ page 45.
Emptying the Waste Bin
Empty the waste bin as it starts to fill. This prevents problems with strips jamming as they leave the read station.
30 |
Clinitek Advantus Operator’s Guide |
Loading...