


20-501
PRO-83 200 Channe compact scanner w/signal stalker search and lighted keypad
Read this user’s guide completely before using your scanner

Contents
The Basics
The FCC wants you to know . . . . . . . . . . . . . . . . 4 powering your scanner . . . . . . . . . . . . . . . . . . . . 5 using rechargeable batteries . . . . . . . . . . . . . . . . 7 using AC power . . . . . . . . . . . . . . . . . . . . . . . . . 10 using vehicle battery power. . . . . . . . . . . . . . . . 11 setting up your scanner . . . . . . . . . . . . . . . . . . . 13 connecting the antenna . . . . . . . . . . . . . . . . . . . 13 connecting an optional antenna . . . . . . . . . . . . 13 connecting an earphone/headphone . . . . . . . . 14 listening safely . . . . . . . . . . . . . . . . . . . . . . . . . . 14 traffic safety . . . . . . . . . . . . . . . . . . . . . . . . . . . . 15 connecting an extension speaker . . . . . . . . . . . 15 attaching the belt clip . . . . . . . . . . . . . . . . . . . . . 16 about your scanner . . . . . . . . . . . . . . . . . . . . . . 17 a look at the keypad . . . . . . . . . . . . . . . . . . . . . . 18 a look at the display . . . . . . . . . . . . . . . . . . . . . . 22 understanding banks . . . . . . . . . . . . . . . . . . . . . 24 service banks . . . . . . . . . . . . . . . . . . . . . . . . . . . 24 channel storage banks . . . . . . . . . . . . . . . . . . . . 24
Beyond the Basics
operating your scanner . . . . . . . . . . . . . . . . . . . 25 turning on the scanner and setting squelch . . . 25 storing known frequencies into channels . . . . . 25 searching for and temporarily storing
active frequencies . . . . . . . . . . . . . . . . . . . . . . 28
©2004. RadioShack Corporation. All rights reserved.
RadioShack and RadioShack.com are trademarks used by RadioShack Corporation.
The Basics |
2 |

service search . . . . . . . . . . . . . . . . . . . . . . . . . . . 28 storing frequencies into channels during
service search. . . . . . . . . . . . . . . . . . . . . . . . . . 29 scanning the stored channels. . . . . . . . . . . . . . . 30 manually selecting a channel . . . . . . . . . . . . . . . 30 signal stalker . . . . . . . . . . . . . . . . . . . . . . . . . . . . 31 setting the signal stalker options . . . . . . . . . . . . 32 using signal stalker . . . . . . . . . . . . . . . . . . . . . . . 35 Skywarn . . . . . . . . . . . . . . . . . . . . . . . . . . . . . . . . 36 about skywarn . . . . . . . . . . . . . . . . . . . . . . . . . . . 36 WX alert . . . . . . . . . . . . . . . . . . . . . . . . . . . . . . . . 38 turning on the weather alert feature. . . . . . . . . . 38 chain search. . . . . . . . . . . . . . . . . . . . . . . . . . . . . 38 chain search mode . . . . . . . . . . . . . . . . . . . . . . . 39 chain search hold mode . . . . . . . . . . . . . . . . . . . 40 storing frequencies found during chain
search into channel memory . . . . . . . . . . . . . . 41 program band select mode . . . . . . . . . . . . . . . . 41 direct entry search . . . . . . . . . . . . . . . . . . . . . . . 42 direct entry search hold mode . . . . . . . . . . . . . . 43 storing frequencies found during direct
entry search into channel memory . . . . . . . . . 44 search skip memory . . . . . . . . . . . . . . . . . . . . . . 45 delay . . . . . . . . . . . . . . . . . . . . . . . . . . . . . . . . . . 47 turning channel-storage banks on and off . . . . . 48 locking out channels . . . . . . . . . . . . . . . . . . . . . . 48 locking out frequencies . . . . . . . . . . . . . . . . . . . 49 priority . . . . . . . . . . . . . . . . . . . . . . . . . . . . . . . . . 50 using keylock. . . . . . . . . . . . . . . . . . . . . . . . . . . . 51 wired programming . . . . . . . . . . . . . . . . . . . . . . 52 using the display/key backlight. . . . . . . . . . . . . . 53
3 |
The Basics |

resetting the scanner . . . . . . . . . . . . . . . . . . . . . 54 frequently asked questions . . . . . . . . . . . . . . . . 55 specifications . . . . . . . . . . . . . . . . . . . . . . . . . . . 58 glossary. . . . . . . . . . . . . . . . . . . . . . . . . . . . . . . . 59 index . . . . . . . . . . . . . . . . . . . . . . . . . . . . . . . . . . 60 warranty . . . . . . . . . . . . . . . . . . . . . . . . . . . . . . . 63
The FCC Wants You to Know
This equipment has been tested and found to comply with the limits for a Class B digital device, pursuant to Part 15 of the FCC Rules. These limits are designed to provide reasonable protection against harmful interference in a residential installation. This equipment generates, uses, and can radiate radio frequency energy and, if not installed and used in accordance with the instructions, may cause harmful interference to radio communications.
However, there is no guarantee that interference will not occur in a particular installation. If this equipment does cause harmful interference to radio or television reception, which can be determined by turning the equipment off and on, the user is encouraged to try to correct the interference by one or more of the following measures:
•Reorient or relocate the receiving antenna.
•Increase the separation between the equipment and receiver.
•Consult your local RadioShack store or an experienced radio/TV technician for help.
•If you cannot eliminate the interference, the FCC requires that you stop using your scanner.
Changes or modifications not expressly approved by RadioShack may cause interference and void the user’s authority to operate the equipment.
You must use shielded interface cables with this equipment.
This device complies with Part 15 of the FCC Rules. Operation is subject to the following two conditions: (1) this device may not cause harmful interference, and (2) this device must accept any interference received, including interference that may cause undesired operation.
The Basics |
4 |

powering your scanner
You can power your scanner from any of three sources:
•internal batteries (not supplied)
•standard AC power (using an optional AC adapter)
•vehicle battery power (using an optional DC adapter)
Before installing batteries, set the switch in the battery compartment to match the type of batteries you will use. Select ALKALINE for non-rechargeable battery types and RECHARGEABLE for rechargeable battery types, including Ni-Cd and Ni-MH. See also “Using Rechargeable Batteries” on Page 7 when you use rechargeable batteries.
X Remove battery cover and set battery switch.
5 |
The Basics |

YInstall 2 AA batteries, matching the polarity symbols (+ -).
Z Replace the cover.
The Basics |
6 |

Warning: Set ALKALINE/RECHARGEABLE to
RECHARGEABLE for use only with nickel cadmium (Ni-Cd) or nickel metal hydride (Ni-MH) rechargeable batteries. Never attempt to recharge nonrechargeable batteries. Non-rechargeable batteries can get hot or explode if you try to recharge them.
Cautions:
•Use only fresh batteries of the required size and recommended type.
•Always remove old or weak batteries. Batteries can leak chemicals that destroy electronic circuits.
•Do not mix old and new batteries, different types of batteries (standard, alkaline, or rechargeable), or rechargeable batteries of different capacities.
When  flashes and the scanner beeps every 15 seconds, replace both batteries.
Warning: Always dispose of old batteries promptly and properly. Do not bury or burn them.
Using Rechargeable Batteries
You can also use two rechargeable batteries to power your scanner. Before you use Ni-Cd or Ni-MH batteries, you must charge them.
7 |
The Basics |

The scanner has a built-in circuit that lets you recharge Ni-Cd or Ni-MH batteries while they are in the scanner. To charge the batteries, set ALKALINE/ RECHARGEABLE inside the battery compartment to RECHARGEABLE, install the batteries in the scanner, and connect an external AC or DC adapter to the scanner's DC 6V jack (see “Using AC Power” on Page 10 or “Using Vehicle Battery Power” on
Page 11). CHArg appears while the scanner is charging the batteries.
Warning: Do not connect either adapter to the scanner if non-rechargeable batteries (such as alkaline batteries) are installed in the scanner and
ALKALINE/RECHARGEABLE is set to
RECHARGEABLE, or if you are unsure of the switch's position. Non-rechargeable batteries will get hot and can even explode if you try to recharge them.
Before you use Ni-Cd or Ni-MH batteries for the first time, charge them for 14 hours to bring them to a full charge.
Discharged batteries take about 14 hours to fully recharge.
Notes:
•Ni-Cd batteries last longer and deliver more power if you occasionally let them fully discharge. To do this, simply use the scanner
The Basics |
8 |

until it beeps every 15 seconds and flashes.
•To prevent damage to Ni-Cd and Ni-MH batteries, never charge them in an area where the temperature is above 113°F (40°C) or below 40°F (4°C).
•If you connect an external power source to the scanner with ALKALINE/RECHARGEABLE set to
ALKALINE, CHArg appears but the scanner does NOT charge the batteries. This is because the scanner's microprocessor unit does not recognize the switch position when you incorrectly connect an external power source. Make sure that you use the correct batteries and set ALKALINE/RECHARGEABLE to the correct position when you connect an external power source.
•If CHArg does not appear, the rechargeable batteries might be completely discharged. Connect the scanner to an AC or DC adapter and wait about 1 minute. Then, unplug the adapter from the scanner for a few seconds then plug it back in.
Important: The EPA certified RBRC Battery Recycling Seal on the rechargeable battery indicates RadioShack is voluntarily participating in an industry program to collect
9 |
The Basics |

and recycle these batteries at the end of their useful life, when taken out of service in the United States or Canada. The RBRC program provides a convenient alternative to placing used rechargeable batteries into the trash or the municipal waste stream, which may be illegal in your area. Please call 1-800-THE-SHACK (1-800-843-7422) for information on rechargeable battery recycling and disposal bans/restrictions in your area. RadioShack's involvement in this program is part of the company's commitment to preserving our environment and conserving our natural resources.
Using AC Power
You can power the scanner using a 6V, 300 mA AC adapter and a size B Adaptaplug™ adapter (neither supplied). Both are available at your local RadioShack store.
Cautions:
•You must use a Class 2 power source that supplies 6V DC and delivers at least 300 mA. Its center tip must be set to positive and its plug must fit the scanner's DC 6V jack. Using an adapter that does not meet these specifications could damage the scanner or the adapter.
•Always connect the AC adapter to the scanner before you connect it to AC power. When you finish, disconnect the adapter from AC power before you disconnect it from the scanner.
The Basics |
10 |
Follow these steps to use the scanner on AC power.
XMake sure the power is turned off.
Y Insert the Adaptaplug into the AC adapter's cord so it reads TIP +. Then, insert the Adaptaplug into the scanner's DC 6V jack.
ZPlug the AC adapter into a standard AC outlet.
Using Vehicle Battery Power
You can power the scanner from a vehicle's 12V power source (such as a cigarette-lighter socket) using a 6V, 300 mA DC adapter and a size B Adaptaplug (neither supplied). Both are available at your local RadioShack store.
Cautions:
•You must use a power source that supplies 6V DC and delivers at least 300 mA. Its center tip must be set to positive and its plug must fit the scanner's DC 6V jack. Using an adapter that does not meet these specifications could damage the scanner or the adapter.
•Always connect the DC adapter to the scanner before you connect it to the power source. When you finish, disconnect the adapter from the power source before you disconnect it from the scanner.
11 |
The Basics |

X Make sure the power is turned off.
YIf the adapter has a voltage switch, set the switch to 6V.
ZInsert the Adaptaplug into the DC adapter's cord so it reads TIP +. Then, insert the Adaptaplug into the scanner's DC 6V jack.
[Plug the other end of the adapter into your vehicle's cigarette-lighter socket.
If rechargeable batteries are installed and
ALKALINE/RECHARGEABLE is set to
RECHARGEABLE, the adapter powers the scanner and recharges the installed batteries at the same time.
Note: If the scanner does not operate properly when you use a DC adapter, unplug the adapter from the cigarette-lighter socket and clean the socket to remove ashes and debris.
The Basics |
12 |
setting up your scanner
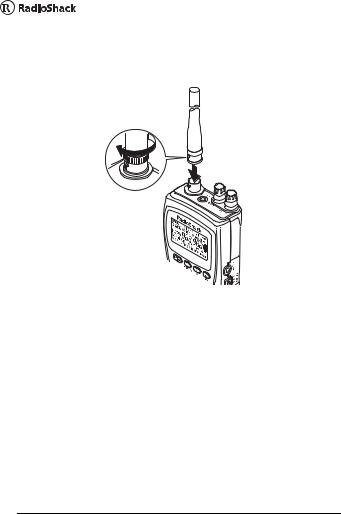
Connecting the Antenna
To attach the supplied flexible antenna to the connector on the top of your scanner, align the slots around the antenna's connector with the tabs on the scanner's BNC connector. Then slide the antenna's connector down over the scanner's connector and rotate the antenna connector's outer ring clockwise until it locks into place.
Connecting an Optional Antenna
The scanner's BNC connector makes it easy to connect a variety of optional antennas, including an external mobile antenna or outdoor base station antenna. Your local RadioShack store sells a wide selection of antennas.
13 |
The Basics |
Note: Always use 50-ohm, RG-58, or RG-8, coaxial cable to connect an outdoor antenna. If the antenna is over 50 feet from the scanner, use RG-8 low-loss dielectric coaxial cable. If your antenna's cable does not have a BNC connector, your local RadioShack store carries a variety of BNC adapters.
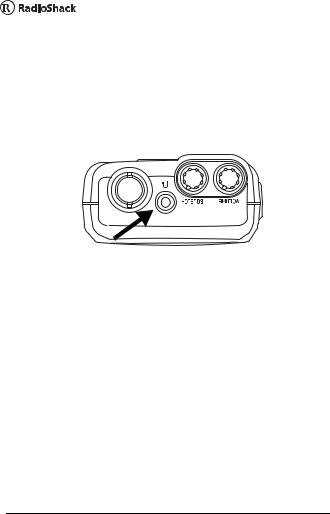
Connecting an Earphone/Headphone
For private listening, you can plug a 1/8-inch
(3.5 mm) mini-plug earphone or mono headphones (not supplied) into the headphone jack on top of your scanner. This automatically disconnects the internal speaker.
Listening Safely
To protect your hearing, follow these guidelines when you use an earphone or headphones.
•Do not listen at extremely high volume levels. Extended high-volume listening can lead to permanent hearing loss.
•Set the volume to the lowest setting before you begin listening. After you begin listening, adjust the volume to a comfortable level.
The Basics |
14 |

•Once you set the volume, do not increase it. Over time, your ears adapt to the volume level, so a volume level that does not cause discomfort might still damage your hearing.
Traffic Safety
Do not use an earphone or headphones with your scanner when operating a motor vehicle in or near traffic. Doing so can create a traffic hazard and could be illegal in some areas.
If you use an earphone or headphones with your scanner, be very careful. Do not listen to a continuous broadcast. Even though some earphones/headphones let you hear some outside sounds when listening at normal volume levels, they still can present a traffic hazard.
Connecting an Extension Speaker
In a noisy area, an optional extension speaker, positioned in the right place, might provide more comfortable listening. Plug the speaker cable's 1/8-inch (3.5-mm) mini-plug into your scanner's headphone jack. Your local RadioShack store carries a selection of suitable speakers.
Warning: If you connect an external speaker to the scanner's headphone jack, never connect the audio output line to a power supply and ground. This might damage the scanner.
15 |
The Basics |

Attaching the Belt Clip
To make your scanner easier to carry when you are on the go, use the supplied belt clip. Use a Phillips screwdriver and the supplied screws to attach the clip to the scanner.
The Basics |
16 |

About Your Scanner
We use a few simple terms in this manual to explain the features of the scanner. Familiarize yourself with these terms and the scanner's features, and you can put the scanner to work for you right away. Simply determine the type of communications you want to receive, then set the scanner to scan those communications.
A frequency, expressed in kHz or MHz, is the tuning location of a station. To find active frequencies, you use the search function or refer to a frequency reference.
Besides searching within a selected frequency range, you can also search your scanner's service banks. Service banks are preset groups of frequencies categorized by the type of services that use those frequencies. For example, many amateur radio frequencies are located in the HAM service bank.
When you search and find a desired frequency, you can store it into a programmable memory location called a channel. Channels are grouped into channel-storage banks. The scanner has 10 channelstorage banks and each bank has 20 channels.
You can scan the channel-storage banks to see if there is activity on the frequencies stored there.
17 |
The Basics |

A Look At the Keypad
Your scanner's keys have various functions labeled on the key tops and below the keys.
To select the function labeled on a key, simply press the key. To select the function labeled below a key, first press FUNC then release it. 
 appears on the display. Then quickly press the next key in the function key sequence while
  appears.

 appears or disappears as you press FUNC.
If your scanner's keys seem confusing at first, the following information should help you understand each key's function.
HOLD/  /
/  :
:
HOLD Holds the scan or the frequency search. Press and hold HOLD to increment channels continuously.
FUNC +  Switches between the three signal stalker modes
The Basics |
18 |

SCAN/SRCH:
SCAN Scans the stored channels.
FUNC+ SRCH Starts chain search or resumes searching.


 /KEYLOCK:
Turns the display and key backlight on or off.
FUNC+ KEYLOCK Locks and unlocks the keypad.
FUNC Lets you use various functions by pressing this key in combination with other keys.
Press and hold for more than 2 seconds to turn the scanner on or off.
1/PRIORITY:
1 Enters a 1.
FUNC + PRIORITY Sets and turns the priority function on or off.
2/  :
:
2 Enters a 2.
FUNC +  Selects the scan or search direction.
19 |
The Basics |

3/SVC:
3 Enters a 3.
FUNC + SVC Lets you search the five service search banks.
4/ALT:
4 Enters a 4.
FUNC + ALT Turns the WX alert function on or off.
5/DLY:
5 Enters a 5.
FUNC + DLY Turns the delay function on or off.
6/B.SLCT:
6 Enters a 6.
FUNC + B.SLCT Goes to program band select mode.
7 Enters a 7.
8/  :
:
8 Enters an 8.
FUNC +  Selects the scan or search direction.
The Basics |
20 |
 Loading...