


62"%JCPPGN"/QDKNG"%$"
YKVJ"&KIKVCN"%QORCUU"CPF"'."$CEMNKV".%&"&KURNC[
21-1706 |
|
|
OWNER’S MANUAL — Please read before using this equipment. |
||
#"+/2146#06"# |
|
Thank you for purchasing a RadioShack 40 Channel Mobile |
|||
If an icon appears at the end of a |
|
CB. Your CB is a great way to communicate with other CB |
|||
|
radio operators. You can mount it in a vehicle for mobile |
||||
paragraph, go to the side head box |
|||||
use, or in your home for use as a base station. |
|||||
on that page with the |
|
||||
corresponding icon for pertinent |
|
To use this CB, you must connect a mobile or base station |
|||
information. |
|
|
|||
Rý— Signifies a |
Warning |
|
antenna. Your local RadioShack store has a wide variety of |
||
|
antennas. For more information, see “Connecting an |
||||
. — Signifies a |
Caution |
|
|||
|
Antenna” on Page 3. |
||||
# — Signifies Important text |
|
||||
%106'065 |
|
#66#%*+0)"6*'"/+%412*10'" |
|||
Attaching the Microphone Holder ........ |
1 |
||||
Mounting the Transceiver ................... |
2 |
*1.&'4 |
|
||
Connecting an Antenna ...................... |
3 |
|
|||
Connecting the Microphone ................ |
4 |
You can attach the microphone holder to the right side of |
|||
Connecting an External Speaker ........ |
4 |
||||
Connecting a CB Speaker .......... |
4 |
the transceiver or to another location in your vehicle. |
|||
Connecting a PA Speaker .......... |
4 |
|
|
||
Connecting the Compass .................... |
4 |
To attach the holder to the transceiver, secure the holder to |
|||
Connecting an Optional |
|
||||
Microphone/Earphone ......................... |
5 |
the right side using the supplied 3 mm machine screws and |
|||
Traffic Safety |
.............................. |
5 |
lock washer. |
|
|
Using Vehicle Battery Power |
5 |
|
|||
|
|
||||
Using the Transceiver |
|
|
|
||
as a Base Station ................................ |
|
6 |
|
|
|
Using Your CB .................................... |
|
6 |
|
|
|
Receiving Transmissions |
|
|
|
||
and Adjusting Squelch .................... |
6 |
|
|
||
Transmitting ..................................... |
|
7 |
|
|
|
Selecting the Emergency Channel .. |
7 |
|
|
||
Using the PA Amplifier ..................... |
7 |
|
|
||
Using Monitor .................................. |
|
8 |
|
|
|
Using the Compass ......................... |
8 |
To attach the holder to another location in the vehicle, such |
|||
Using Memory ................................. |
|
9 |
|||
Using Last Channel Recall (RCL) ... |
9 |
as the dashboard, follow these steps. |
|||
Adjusting the Backlight |
9 |
||||
|
|
||||
Transmission Courtesy .................... |
9 |
1. Using the holder as a |
|||
Using Common 10-Codes ............. |
10 |
||||
Maximum Range ........................... |
11 |
template, mark the |
|||
Troubleshooting ................................ |
|
11 |
positions for the |
||
FCC Information |
|
12 |
|||
|
mounting screw |
||||
Reducing Noise ............................. |
|
13 |
|||
Care .................................................. |
|
14 |
holes at the desired |
||
Service and Repair ........................ |
14 |
location. |
|
||
Replacing the Fuse ....................... |
14 |
|
|||
Specifications .................................... |
|
15 |
2. At each marked |
||
Parts and Accessories ...................... |
16 |
||||
."%#76+10". |
|
position, drill a small |
|||
|
starter hole |
# |
|||
Be careful not to drill into anything |
|||||
|
|
||||
behind the mounting surface. |
|
|
|
||
|
|
|
|
© 2002 RadioShack Corporation. |
|
|
|
|
|
All Rights Reserved. |
|
|
|
|
RadioShack and RadioShack.com are trademarks |
||
|
|
|
|
used by RadioShack Corporation. |
|
Transceiver the Mounting
R"9#40+0)ýR"
•If you use the CB in a vehicle, mount it securely to avoid damage to the CB or vehicle or injury to anyone in the vehicle during sudden starts or stops.
•Do not mount the CB where it could damage or interfere with the operation of any passive restraint safety device (an airbag or seat belt).
."%#76+10".
Be careful not to drill into anything behind the mounting surface.
±"016'"±"
If you cannot reach behind the mounting surface to attach the nuts on the bolts or machine screws, use the supplied plain washers and self-tapping screws.
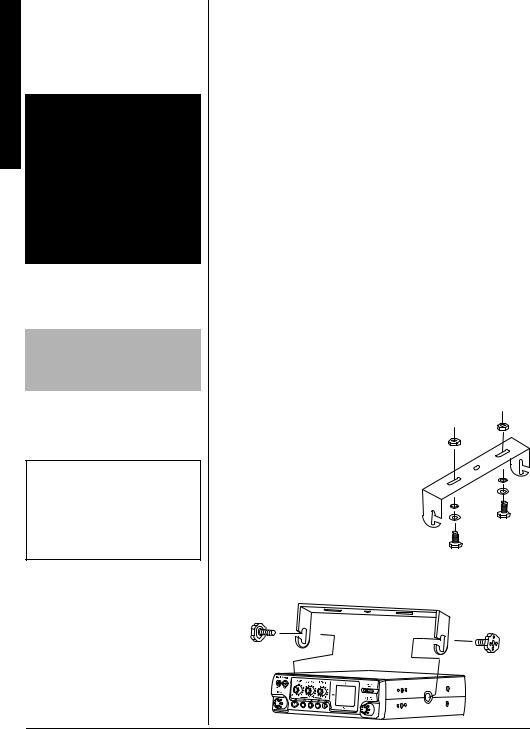
3.Attach the holder at the mounting location using the supplied machine screws, spring washers, plain washers, and nuts.
/1706+0)"6*'"64#05%'+8'4
The most common mounting location for this CB is under a vehicle’s dashboard. However, if you plan to use the CB as a base station, you can place it on a desk, shelf, or table (see “Using the Transceiver as a Base Station” on Page 6).
If you are mounting the CB in a vehicle, choose a location where: Rý
•You can easily reach the CB.
•Wires and cables are clear of the vehicle’s pedals or other moving parts.
•The CB is not directly in front of heating vents.
•All wires and cables can reach their connection points.
Follow these steps to mount the CB using the supplied hardware.
1.Using the mounting bracket as a template, mark the positions for the screw holes on the mounting surface.
2.In each marked location, drill a small starter hole. .#
3.Mount the bracket to the mounting surface with the supplied 5 mm bolts, spring washers, plain washers, and nuts.
4.Peel the backings off the
adhesive on the back of the supplied rubber washers and
attach the washers to the mounting holes on the CB. Then
attach the CB to the mounting bracket using the mounting knobs.
2
%100'%6+0)"#0"#06'00#
There are many different types of CB antennas for mobile CBs. Each type has its own benefits, so choose the one that best meets your needs. Your local RadioShack store sells a wide variety of antennas.
When you choose an antenna, keep in mind that, for the best performance, you should mount the antenna: .#
•as high as possible on the vehicle
•as far as possible from sources of electrical noise
•vertically
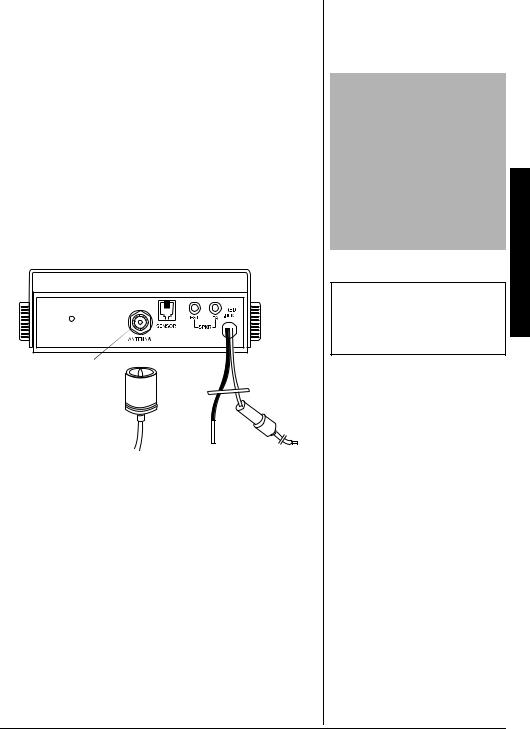
Once you choose an antenna, follow its mounting instructions. Then route the cable to the transceiver and connect the cable to the ANTENNA jack on the back of the transceiver.
Antenna |
To take advantage of your radio’s maximum range, adjust the antenna’s Standing Wave Ratio (SWR) using an SWR meter (not supplied).
Follow the instructions supplied with the SWR meter and antenna to adjust your antenna’s SWR to the lowest possible value. SWR values of 2.0:1 are generally acceptable, with readings of 1.5:1 or lower being more desirable.
."%#76+10".
•Avoid routing the cable next to sharp edges or moving parts, which might damage the cable.
•Do not run the cable next to power cables or other radio antenna cables.
•Do not run the cable through the engine compartment or other areas that produce extreme heat.
±"016'"±"
If you are using this CB as a base station, see “Using the Transceiver as a Base Station” on Page 6.
Connecting an Antenna
3

."%#76+10".
Never pull on the microphone cable.
Connecting |
|
|
|
• When you connect an external |
|
|
|
±"016'"±" |
the |
|
speaker, the CB’s internal |
|
|
|
Microphone |
|
speaker disconnects. |
|
• To avoid acoustic feedback, the |
|
|
|
|
|
|
speaker should be at least 6 |
|
|
feet from the CB. If you |
|
|
experience feedback, avoid |
|
|
keying the microphone until you |
|
||
|
|
have moved the speaker away |
|
|
from the CB. |
|
|
|
%100'%6+0)"6*'" /+%412*10'
1.Align the tab on the side of the supplied microphone’s plug with the notch in the microphone jack (on the side of the transceiver). Then insert the plug into the jack.
2.Slide the microphone onto the microphone holder.
3.To disconnect the microphone from the transceiver,
press the tab on the side of the plug. Then pull out the plug. .#
%100'%6+0)"#0"':6'40#." 52'#-'4
You can connect your transceiver to an external CB speaker, so you can hear an incoming call when you are outside your vehicle, or use the CB as a PA system.
%100'%6+0)"#"%$"52'#-'4
The external speaker you use with the transceiver should have an impedance of 8 ohms and be able to handle 10 watts of power. The speaker cable must have a 1/8-inch plug.
To connect the external speaker to the transceiver, insert the speaker cable’s plug into EXT SPKR on the back of the CB.
%100'%6+0)"#"2#"52'#-'4
The PA speaker should have an impedance of 8 ohms and be able to handle 10 watts of power. The speaker cable must have a 1/8-inch plug.
If your PA speaker meets the other specifications but does not already have a 1/8-inch plug, you can connect it using a phono plug-to-wire cable, available at your local RadioShack store.
To connect the PA speaker to the transceiver, insert the speaker cable’s plug into PA SPKR on the back of the CB.
%100'%6+0)"6*'"%1/2#55
Insert the compass cable’s plug into SENSOR on the back of the CB. Do not place the compass cable near the DC cord or the antenna cable.
4
%100'%6+0)"#0"126+10#." /+%412*10'1'#42*10'
You can connect an optional microphone or earphone with a 3/32-inch (2.5mm) mini plug and a 1/8-inch (3.5mm) plug to the MIC/EAR jacks on the front of the CB. To avoid feedback, do not connect the microphone/earphone’s 3/32- inch (2.5 mm) plug to only the MIC jack in CB mode.
To connect a headset with Voice Activated operation, we recommend you check the response sensitivity of the VOX circuit before installation. Different Voice Activation devices provide different performance results.
64#((+%"5#('6;
Do not use an earphone with your transceiver when operating a motor vehicle in or near traffic. Doing so can create a traffic hazard and could be illegal in some areas.
If you use an earphone with your transceiver be very careful. Do not listen to a continuous broadcast. Even though some earphones/headphones let you hear some outside sounds when listening at normal volume levels, they still can present a traffic hazard.
75+0)"8'*+%.'"$#66'4;" 219'4
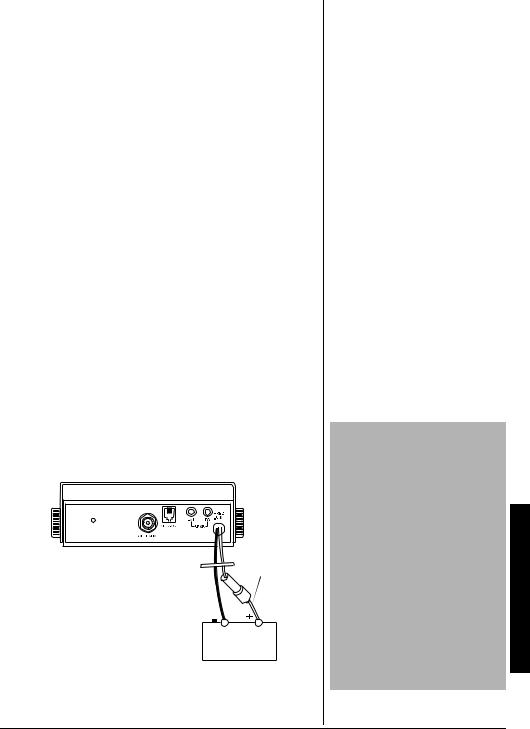
1.Connect the red wire (with the inline fuse holder) on the back of the transceiver to a point in your vehicle’s fuse block that has power only when the ignition is in the ACC (accessory) or ON position.
Red
Black 
2.Connect the black wire to your vehicle battery’s
negative (–) terminal or to a metal part of the vehicle’s frame (chassis ground). .#
."%#76+10".
•Do not connect the black wire to a non-metallic (plastic) part, or to any part insulated from the vehicle’s chassis by a nonmetallic part.
•Most 13.8-volt DC power supplies plug into a standard AC outlet to produce DC power. Before connecting your CB to a 13.8-volt DC power supply, read and follow the instructions included with the power supply.
•To prevent damage to the CB, be sure you connect an antenna and the microphone before you use your CB.
Using Vehicle Battery Power
5
 Loading...