


ULTRASONIC DISTANCE METER KH 2927-1
ULTRASONIC DISTANCE |
ODLEGŁOŚCIOMIERZ |
METER |
ULTRADŹWIĘKOWY |
Operating instructions |
Instrukcja obsługi |
ULTRAHANGOS |
ULTRAZVOČNI |
TÁVOLSÁGMÉRŐ |
MERILNIK RAZDALJE |
Használati utasítás |
Navodila za uporabo |
ULTRAZVUKOVÝ MĚŘIČ |
ULTRAZVUKOVÝ |
VZDÁLENOSTÍ |
PRÍSTROJ NA MERANIE |
Návod k obsluze |
VZDIALENOSTI |
ULTRASCHALL- |
Návod na obsluhu |
|
|
ENTFERNUNGSMESSER |
|
Bedienungsanleitung |
|
|
|
|
|
IAN 77287 |
4 |
|
|
|
Before reading, unfold the page containing the illustrations and familiarise yourself with all functions of the device.
Przed przeczytaniem proszę rozłożyć stronę z ilustracjami, a następnie proszę zapoznać się z wszystkimi funkcjami urządzenia.
Olvasás előtt kattintson az ábrát tartalmazó oldalra és végezetül ismerje meg a készülék mindegyik funkcióját.
Pred branjem odprite stran s slikami in se nato seznanite z vsemi funkcijami naprave.
Před čtením si otevřete stranu s obrázky a potom se seznamte se všemi funkcemi přístroje.
Pred čítaním si odklopte stranu s obrázkami a potom sa oboznámte so všetkými funkciami prístroja.
Klappen Sie vor dem Lesen die Seite mit den Abbildungen aus und machen Sie sich anschließend mit allen Funktionen des Gerätes vertraut.
GB |
Operating instructions |
Page |
1 |
PL |
Instrukcja obsługi |
Strona |
13 |
HU |
Használati utasítás |
Oldal |
25 |
SI |
Navodila za uporabo |
Stran |
37 |
CZ |
Návod k obsluze |
Strana |
49 |
SK |
Návod na obsluhu |
Strana |
61 |
DE / AT / CH |
Bedienungsanleitung |
Seite |
73 |

INDEX |
PAGE |
|
|
Intended Usage |
2 |
Safety instructions |
2 |
Technical data |
4 |
Items supplied |
4 |
Unpacking |
4 |
Device description |
4 |
Inserting the battery |
5 |
Measuring distances |
5 |
Adding distances together |
7 |
Measuring areas |
7 |
Adding areas together |
8 |
Measuring volumes |
8 |
Adding volumes together |
9 |
Displaying the last measurements |
9 |
Temperature Display |
9 |
Battery display |
10 |
Automatic switch-off |
10 |
Cleaning and storage |
10 |
Disposal |
10 |
Service |
11 |
Importer |
11 |
- 1 -
ULTRASONIC DISTANCE METER KH 2927-1
Congratulations on the purchase of your new appliance. You have clearly decided in favour of a quality product. These operating instructions are a part of this product.
They contain important information in regard to safety, use and disposal. Before using the product, familiarise yourself with all of these operating and safety instructions. Use the product only as described and only for the specified areas of application. Retain these instructions for future reference. In addition, pass these documents on, together with the product, to any future owner.
Intended Usage
This appliance is intended for the measuring of distances and for the calculation of areas and volumes. The appliance is intended for domestic use only. Do not use it for commercial purposes.
Safety instructions
Risk of personal injury!
•Do not use the appliance at locations where there is a risk of fire or explosion, e.g. in the vicinity of inflammable liquids or gases.
•This appliance is not intended for use by individuals (including children) with restricted physical, physiological or intellectual abilities or deficiences in experience and/or knowledge unless they are supervised by a person responsible for their safety or receive from this person instruction in how the appliance is to be used.
•Children should be supervised to ensure that they do not play with the appliance.
- 2 -
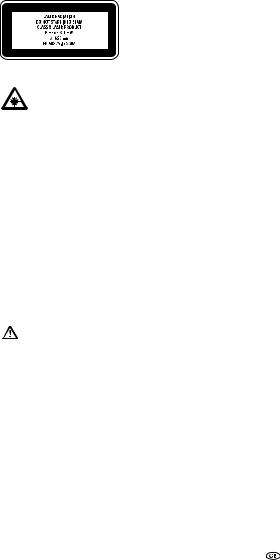
Risk from the laser beam!
This appliance contains a Class 2 laser.
NEVER direct the laser beam at people or animals. NEVER look directly into the laser beam.
The laser beam can cause serious eye damage.
•Do NOT direct the laser beam at strongly reflective material. Reflected laser beams are also dangerous.
•Any adjustment intended to increase the intensity of the laser beam is forbidden. There is also a risk of personal injury!
•No liabilty will be accepted for damage resulting from manipulation to the laser equipment as well as from disregarding these safety instructions.
 Warning against damage to the appliance!
•NEVER subject the appliance to rain.
Do not use the appliance in wet or moist environments.
Interaction with batteries
Risk of explosion!
Do not throw batteries into a fire.
Do not recharge non-rechargeable batteries.
•Never open batteries, never solder or weld batteries. Never short-circuit batteries. The risk of explosions and injuries exists!
•If you do not intend to use the appliance for an extended period remove the battery, otherwise it could leak corrosive acids.
•If the batteries have leaked, put on a pair of protective gloves to avoid the risk of injury through chemical burns. Clean the battery compartment and the battery contacts with a dry cloth.
•Always replace the battery with a battery of the same type.
- 3 -

•Keep batteries away from children. Children can put batteries into their mouths and swallow them. If a battery is swallowed immediately seek medical assistance.
Technical data
Electricity supply: |
9 V Block battery, 6F22/6LR61 |
Measurement range: |
0.6 - 16 m |
Measurement accuracy: |
+/- 1% |
Laser class: |
2 |
Wavelength ( ): |
650 nm |
Output level (P max.): |
< 1mW |
Items supplied
•Ultrasonic Distance Meter
•9 V Block battery
•Operating Instructions
Unpacking
Remove the Ultrasonic Distance Meter from the packaging. Remove all transport restraints and packaging materials. Remove the protective foil from the display w.
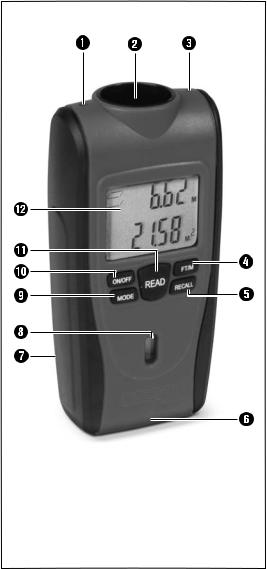
Device description
1 Laser emission opening
2 Ultrasonic sender/receiver
3 Temperature sensor
4 FT/M button
5 RECALL button
6 Measurement point
7 Battery compartment
8 Spirit level
9 MODE button
0 ON/OFF button q READ button
w Display
- 4 -
Inserting the battery
1.Open the battery compartment 7 at the rear of the Ultrasonic Distance Meter.
2.Place the 9 V block battery onto the contacts. Pay heed to the correct polarity.
3.Lay the 9 V block battery into the battery compartment 7.
Warning:
Ensure that the wires are not trapped in any way. This could irreparably damage the appliance.
4.Close the battery compartment 7. The battery compartment lid must audibly engage.
Measuring distances
1.Switch the appliance on by pressing the button ON/OFF 0.
2.If necessary, press the MODE 9 button several times
until the indicator |
L |
(distance measurement) |
|
appears in the display.
3.To switch between metric (Meter M) and Anglo-American (Feet‘/Inch’’) measurement units, press the button FT/M 4.
4.Hold the appliance upright towards the wall to which you wish to measure the distance. The ultrasound sender/ receiver 2 must be at a right-angle to the wall. For this, use the spirit level 8. The bubble in the glass 8 must stand between the marking lines (see Fig.1).
5.Press the button READ q briefly. A laser point is projected and an acoustic signal sounds. Hold the appliance in this position until the measured distance appears in the display w.
Note:
Measurements start at the measurement point 6! Should the measurement lie outside the measurement range, "Err" or
an illogical number appear in the display. The measurement range lies between 0,6 m (ca. 2´) and 16 m (ca. 53´).
- 5 -
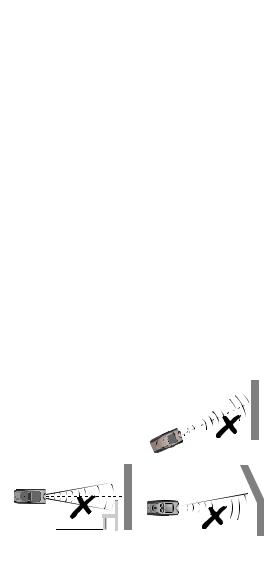
Take note of the following illustrations:
MIN. 0,6 m
Max. 16 m
READ
Fig. 1
|
a = ca. 1,5 m |
a = ca. 3,6 m |
|
|||
|
||||||
|
|
|
|
|
|
|
|
|
|
|
|
|
|
|
|
|
|
|
|
|
|
|
|
|
|
|
|
|
|
|
|
|
|
|
|
|
|
|
|
|
|
|
|
|
|
|
|
|
|
|
|
|
|
|
|
a = ca. 2,4 m a = ca. 4,5 m
Fig. 2
The further you are from the wall, the wider is the area (a) that the Distance Meter must measure by ultrasound (Fig. 2). Therefore, take care to ensure that the Distance Meter is always directed at a right angle towards a level surface (Fig. 1 and 3). Ensure that there are no objects positioned within the measurement area.
False!
Fig. 3
- 6 -
Note:
Inaccurate measurements can also occur because of a weak battery. If the battery is too weak, the battery symbol appears in the display.
Adding distances together
1.Measure an area as described in the chapter "Measuring distances".
2.If necessary, press the MODE 9 button several times
until the indicator |
L |
(distance measurement) |
|
appears in the display w.
3.Press the READ q button to carry out a distance measurement.
4.Press the RECALL 5 button. A "+" appears in the display and the measured distance is transferred to the lower line.
5.Measure the next distance. The newly measured distance is indicated in the upper line. Press the button RECALL 5 to display the sum of the distances in the lower line.
6.Repeat steps 3. to 4. to add further measurement values.
7.If you want to exit the addition mode press the MODE 9 button. All values will be deleted.
Measuring areas
1.Switch the device on by pressing the ON/OFF 0 button.
2.If necessary, press the MODE 9 button several times
until the indicator |
L |
(area measurement) appears |
W |
in the display w. The bar for the first part of the measurement blinks.
3.Press the READ q button to measure the length.
The bar for the second part of the measurement blinks.
4.Press the READ q button to measure the width.
The width is shown in the upper line, the area in square meters (m2), as the sum of both measurements, is shown in the lower line.
- 7 -
Adding areas together
1.Measure an area as described in the section "Measuring areas".
2.Press and hold down the MODE 9 button.
"M+" appears in the display w. The area measured is now saved.
3.Press the MODE 9 button. The device is now ready for the second measurement.
4.Measure the next area.
5.Press the RECALL 5 button. A "+" appears in the display.
6.Press and hold down the RECALL 5 button. In the lower line is shown the result of the first measurement.
7.Press the RECALL 5 button. Both measurements will be added and the result is shown in the lower line.
8.Repeat steps 2. to 7. to add further measurement values.
9.If you want to exit the addition mode press the MODE 9 button. All values will be deleted.
Measuring volumes
1.Switch the device on by pressing the ON/OFF 0 button.
2.If necessary, press the MODE 9 button several times
until the indicator H |
L |
W (volume measurement) appears |
in the display w. The bar for the first part of the measurement blinks.
3.Press the READ q button to measure the length.
The bar for the second part of the measurement blinks.
4.Press the READ q button to measure the width. The bar for the third part of the measurement blinks.
5.Press the READ q button to measure the height. The measured height appears in the upper line.
The height is shown in the upper line, the volume in cubic meters (m3), as the sum of all three measurements, is shown in the lower line.
- 8 -

Adding volumes together
1.Measure a volume as described in the section "Measuring volumes".
2.Press and hold down the MODE 9 button.
"M+" appears in the display w. The volume measured is now saved.
3Press the MODE 9 button. The device is now ready for the second measurement.
4.Measure the next volume.
5.Press the RECALL 5 button. A "+" appears in the display. 6 Press and hold down the RECALL 5 button. In the lower
line is shown the result of the first measurement.
7.Press the button RECALL 5. The two measurements will be added together and the result indicated on the lower line.
8.Repeat the steps 2 to 7 to add together further measurements.
9.Should you wish to depart the addition mode, press the button MODE 9. All values will be erased.
Displaying the last measurements
After the measurement of a total distance, an area or a volume, press the button READ q repeatedly to indicate once again the individual values of the measurements. The beam of the respective measured value blinks and the measurement result is indicated in the upper line of the display w.
Temperature Display
Press and hold down the FT/M 4 button. In the display w the temperature indicator appears in the lower line.
To change between the SI unit system (degrees celcius) and the Angloamerican system (degrees Fahrenheit) press the FT/M 4 button. If you want to exit the temperature indicator press the MODE 9 button.
- 9 -
Battery display
A battery symbol appears in the display w when the battery is weak resp. almost discharged. Replace the battery as soon as possible (see section "Inserting the battery").
If you do not, the measurements will be false.
Automatic switch-off
If a button is not activated for approx. 60 seconds, the appliance switches itself off automatically.
Cleaning and storage
•Store the appliance at a dry and frost-free location.
•If you do not intend to use the appliance for an extended period, remove the battery from the battery compartment.
•Clean the appliance with a soft, dry cloth.
•Do not use chemical or abrasive cleaning agents. These could damage the housing.
Disposal
Do not dispose of the appliance in your normal domestic waste. This product is subject to the provisions of European Directive 2002/96/EC.
Dispose of the appliance through an approved disposal centre or at your community waste facility.
Observe the currently applicable regulations. In case of doubt, please contact your waste disposal centre.
Disposal of batteries / accumulators
Used batteries / rechargeable batteries may not be disposed of in household waste. Every consumer is legally obliged to dispose of batteries at a collection site of his community / city district or at a retail store.
The purpose of this obligation is to ensure that batteries are disposed of in a non-polluting manner. Only dispose of batteries when they are fully discharged.
Dispose of the packaging materials in an environmentally responsible manner.
- 10 -
Service
Service Great Britain
Tel.: 0871 5000 720 (£ 0.10/Min.) E-Mail: kompernass@lidl.co.uk
IAN 77287
Service Ireland
Tel.: 1890 930 034
(0,08 EUR/Min., (peak))
(0,06 EUR/Min., (off peak)) E-Mail: kompernass@lidl.ie
IAN 77287
Importer
KOMPERNASS GMBH BURGSTRASSE 21
44867 BOCHUM, GERMANY www.kompernass.com
- 11 -
- 12 -

SPIS TREŚCI |
STRONA |
|
|
Űytkowanie zgodne z przeznaczeniem |
14 |
Wskazówki dotyczące bezpieczeństwa |
14 |
Dane techniczne |
16 |
Zakres dostawy |
16 |
Rozpakowanie |
16 |
Opis urządzenia |
16 |
Wkładanie baterii |
17 |
Pomiar odległości |
17 |
Funkcja sumowania odległości |
19 |
Pomiar powierzchni |
19 |
Dodawanie powierzchni |
20 |
Pomiar kubatury |
20 |
Dodawanie objętości |
21 |
Wyświetlenie ostatniego pomiaru |
21 |
Wskaźnik temperatury |
21 |
Wskaźnik stanu baterii |
22 |
Automatyczne wyłączanie |
22 |
Przechowywanie i czyszczenie |
22 |
Utylizacja |
22 |
Serwis |
23 |
Importer |
23 |
- 13 -

ODLEGŁOŚCIOMIERZ ULTRADŹWIĘKOWY KH 2927-1
Gratulujemy Ci zakupu naszego urządzenia.
Jest to produkt wysokiej jakości. Instrukcja obsługi stanowi część tego produktu. Zawiera ona ważne wskazówki dotyczące bezpieczeństwa, użytkowania i utylizacji urządzenia. Przed przystąpieniem do użytkowania produktu zapoznaj się z wszystkimi wskazówkami obsługi i bezpieczeństwa. Używaj produkt zgodnie z opisem i w podanych obszarach użytkowania. Instrukcję obsługi przechowuj zawsze w bezpiecznym miejscu. W razie przekazania produktu następnej osobie, nie zapomnij dołączyć również instrukcji obsługi.
Űytkowanie zgodne z przeznaczeniem
Odległościomierz jest przeznaczony do pomiaru odległości oraz obliczania powierzchni i kubatury. To urządzenie jest przeznaczone wyłącznie do użytku prywatnego.
Wykorzystywanie do celów komercyjnych jest zabronione.
Wskazówki dotyczące bezpieczeństwa
 Zagrożenie odniesieniem obrażeń!
•Nie używaj nigdy urządzenia w miejscach, w których występuje zagrożenie pożaru lub wybuchu, np. w pobliżu
łatwopalnych cieczy lub gazów.
•Urządzenie nie jest przeznaczone do użytkowania przez osoby (w tym dzieci) z ograniczoną sprawnością fizyczną, sensoryczną bądź umysłową lub nie posiadające doświadczenia i / lub wiedzy, chyba że będą one przebywały pod opieką osoby odpowiedzialnej za ich bezpieczeństwo lub uzyskają od niej wskazówki dotyczące właściwego używania urządzenia.
•Nie pozwalać dzieciom na zabawę urządzeniem.
- 14 -

Zagrożenie światłem lasera!
Urządzenie jest wyposażone w laser klasy 2. Nigdy nie kieruj strumienia lasera na osoby i
zwierzęta. Nigdy nie patrz bezpośrednio na strumień lasera. Światło lasera może uszkodzić wzrok.
•Nigdy nie kieruj lasera na przedmioty odbijające promienie.
Zagrożenie spowodowane odbitym światłem.
•Nigdy nie próbuj ustawiać lasera w celu zwiększenia siły promieniowania lasera. Zagrożenie odniesienia obrażeń!
•Producent nie ponosi odpowiedzialności za szkody spowodowane manipulowaniem przy laserze, jak również nieprzestrzeganiem wskazówek dotyczących bezpieczeństwa.
 Ostrzeżenie przed uszkodzeniem urządzenia!
•Nie używaj ani nie zostawiaj urządzenia na deszczu. Nie używaj urządzenia w wilgotnym lub mokrym otoczeniu.
Postępowanie z bateriami
 Niebezpieczeństwo wybuchu!
Baterii nie wolno wrzucać do ognia.
Nigdy nie ładować rozładowanych baterii.
•Baterii nie wolno otwierać, lutować ani spawać.Nie wolno zwierać styków baterii. Istnieje niebezpieczeństwo wybuchu i odniesienia obrażeń!
•Przy nieużywaniu urządzenia przez dłuższy czas należy wyjąć baterie, aby nie dopuścić do rozlania elektrolitu.
•Gdy dojdzie do wylania elektrolitu z baterii, należy założyć rękawice ochronne, aby uniknąć oparzenia.
Komorę na baterie i styki baterii należy czyścić tylko suchą szmatką.
•Przy wymianie baterii należy stosować baterie tego samego typu.
- 15 -

•Baterie należy przechowywać w miejscu niedostępnym dla dzieci. Dziecko może wziąć baterię do buzi i połknąć. W wypadku połknięcia baterii należy jak najszybciej udać się do lekarza.
Dane techniczne
Napięcie zasilania: |
Bateria blokowa 9 V, |
|
typ 6F22/6LR61 |
Zakres pomiarowy: |
0,6–16 m |
Dokładność pomiaru: |
+/- 1% |
Klasa lasera: |
2 |
Długość fal ( ): |
650 nm |
Moc wyjściowa (P maks.): |
<1 mW |
Zakres dostawy
•Odległościomierz ultradźwiekowy
•Bateria blokowa 9 V
•Instrukcja obsługi
Rozpakowanie
Wyjmij odległościomierz z opakowania. Usuń zabezpieczenia transportowe i wszystkie elementy opakowania. Zdejmij folię ochronną z wyświetlacza w.
Opis urządzenia
1 Otwór wylotowy promienia lasera
2 Nadajnik/Odbiornik ultradźwięków
3 Czujnik temperatury
4 Przycisk FT/M
5 Przycisk RECALL (Wyświetl ponownie)
6 Punkt pomiarowy
7 Komora na baterie
8 Poziomnica
9 Przycisk MODE (Tryb)
0 Przycisk ON/OFF (Wł./Wył) q Przycisk READ
w Wyświetlacz
- 16 -

Wkładanie baterii
1.Otwórz komorę na baterię 7 umieszczoną z tyłu odległościomierza.
2.Przyłóż baterię blokową 9 V do styków.
Zwróć uwagę na prawidłowe podłączenie biegunów.
3.Włóż baterię blokową 9 V do komory na baterie 7.
 Uwaga!
Uważaj, aby nie zatrzasnąć kabla.
Prowadzi to do uszkodzenia urządzenia, którego nie będzie można naprawić.
4.Zamknij pokrywę komory na baterie 7.
Przy zamknięciu pokrywy musi rozlec się odgłos zamykania.
Pomiar odległości
1.Włącz urządzenie, naciskając przycisk ON/OFF
(Wł./Wył.) 0.
2.Naciśnij kilkakrotnie przycisk MODE (Tryb) 9, aż na
wyświetlaczu pojawi się wskazanie |
L |
(pomiar |
odległości). |
|
|
3.Aby przełączyć między pomiarem w metrach (m) a pomiarem w amerykańskich jednostkach odległości (stopa ‘/ cal’’), naciśnij przycisk FT/M 4.
4.Przytrzymaj urządzenie poziomo przed ścianą, do której chcesz zmierzyć odległość. Nadajnik / odbiornik ultradźwięków 2 należy ustawić pod kątem prostym do ściany. W tym celu skorzystaj z poziomicy 8.
Pęcherzyk powietrza w poziomnicy 8 musi się znajdować między kreskami (patrz rys. 1 na kolejnej stronie).
5.Naciśnij na chwilę przycisk READ (Odczyt) q. Promień laserowy zostanie skierowany na ścianę i rozlegnie się sygnał akustyczny. Urządzenie trzymaj w ustalonym położeniu dotąd, aż na wyświetlaczu w wyświetli się zmierzona odległość.
 Wskazówka:
Pomiar rozpoczyna się od punktu pomiaru 6! Jeśli mierzona odległość jest poza zakresem pomiaru, na wyświetlaczu pojawi się napis „Err” lub nierealna liczba. Zakres pomiaru urządzenia leży między 0,6 m (ok. 2‘) a 16 m (ok. 53‘).
- 17 -
Zwróć uwagę na poniższe rysunki.
MIN. 0,6 m
Max. 16 m
READ
Rys. 1
|
a = ca. 1,5 m |
a = ca. 3,6 m |
|
|||
|
||||||
|
|
|
|
|
|
|
|
|
|
|
|
|
|
|
|
|
|
|
|
|
|
|
|
|
|
|
|
|
|
|
|
|
|
|
|
|
|
|
|
|
|
|
|
|
|
|
|
|
|
|
|
|
|
|
|
a = ca. 2,4 m a = ca. 4,5 m
Rys. 2
Im większa jest odległość od ściany, tym szersza jest powierzchnia
(a) mierzona przez odległościomierz za pomocą ultradźwięków (rysunek 2).Pamiętaj, aby odległościomierz zawsze kierować na płaską powierzchnię i ustawiać do niej pod kątem prostym (rys. 1 i 3).Pamiętaj, aby w zakresie pomiaru nie znajdowały się żadne przedmioty.
Źle!
Rys. 3
- 18 -

 Wskazówka:
Wyczerpana bateria jest powodem uzyskiwania niedokładnych pomiarów. Jeśli bateria będzie za słaba, na wyświetlaczy wyświetla się symbol baterii.
Funkcja sumowania odległości
1.Zmierz odległość, jak opisano w rozdziale „Pomiar odległości”.
2.Naciśnij kilkakrotnie przycisk MODE (Tryb) 9, aż na
wyświetlaczu w pojawi się wskazanie |
L |
(pomiar |
odległości). |
|
|
3.Naciśnij przycisk READ q, aby wykonać pomiar odległości.
4.Naciśnij przycisk RECALL 5. Na wyświetlaczu wyświetla się „+” i na dolny wiersz przechodzi zmierzona odległość.
5.Zmierz następną odległość. Nowa odległość wyświetla się w górnym wierszu. Naciśnij przycisk RECALL 5, by wyświetlić sumę odległości w dolnym wierszu.
6.Powtarzaj czynności od kroku 3. do 4. w celu dodania kolejnych odległości.
7.Po zakończeniu trybu dodawania naciśnij przycisk MODE 9. Usuwane są wszystkie wartości.
Pomiar powierzchni
1.Włącz urządzenie, naciskając przycisk ON/OFF (Wł./Wył.) 0.
2.Naciśnij kilkakrotnie przycisk MODE 9, aż na
wyświetlaczu w pojawi się wskazanie |
L |
W (pomiar |
powierzchni). Zacznie pulsować oznaczenie pierwszej części pomiaru.
3.Naciśnij przycisk READ q, aby zmierzyć długość. Zacznie pulsować oznaczenie drugiej części pomiaru.
4.Naciśnij przycisk READ q, aby zmierzyć szerokość.
Wynik pomiaru szerokości zostanie wyświetlony w górnym wierszu, a powierzchnia w metrach kwadratowych (m2), będąca iloczynem obu pomiarów, zostanie wyświetlona w dolnym wierszu.
- 19 -

Dodawanie powierzchni
1.Zmierz powierzchnię, patrz rozdział
„Pomiar powierzchni”.
2.Naciśnij i przytrzymaj przycisk MODE 9. Na wyświetlaczu w wyświetla się „M+“. Zmierzona powierzchnia zostanie zapisana.
3.Naciśnij przycisk MODE 9. W tym momencie urządzenie jest gotowe do drugiego pomiaru.
4.Zmierz następną powierzchnię.
5.Naciśnij przycisk RECALL 5. Na wyświetlaczu wyświetla się „+“.
6.Naciśnij i przytrzymaj przycisk RECALL 5. W wierszu dolnym wyświetla się wynik pierwszego pomiaru.
7.Naciśnij przycisk RECALL 5. Oba pomiary są dodawane i wynik wyświetla się w dolnym wierszu.
8.Powtarzaj czynności od kroku 2 do 7 w celu dodania kolejnych odległości.
9.Po zakończeniu trybu dodawania naciśnij przycisk
MODE 9. Usuwane są wszystkie wartości.
Pomiar kubatury
1.Włącz urządzenie, naciskając przycisk ON/OFF
(Wł./Wył.) 0.
2.Naciśnij kilkakrotnie przycisk MODE 9, aż na wyś-
|
|
L |
|
wietlaczu w pojawi się wskazanie H |
|
W (pomiar |
|
|
|||
|
|
|
|
kubatury). Zacznie pulsować oznaczenie pierwszej części pomiaru.
3.Naciśnij przycisk READ q, aby zmierzyć długość. Zacznie pulsować oznaczenie drugiej części pomiaru.
4.Naciśnij przycisk READ q, aby zmierzyć szerokość. Zacznie pulsować oznaczenie trzeciej części pomiaru.
5.Naciśnij przycisk READ q, aby zmierzyć wysokość. W wierszu górnym wyświetla się zmierzona wysokość.
Wynik pomiaru wysokości zostanie wyświetlony w górnym wierszu, a kubatura w metrach sześciennych (m3), będąca iloczynem trzech pomiarów, zostanie wyświetlona w dolnym wierszu.
- 20 -

Dodawanie objętości
1.Zmierz objętość, patrz rozdział „Pomiar objętości”.
2.Naciśnij i przytrzymaj przycisk MODE 9.
Na wyświetlaczu w wyświetla się „M+“. Zmierzona objętość zostanie zapisana.
3.Naciśnij przycisk MODE 9. W tym momencie urządzenie jest gotowe do drugiego pomiaru.
4.Zmierz następną objętość.
5.Naciśnij przycisk RECALL 5. Na wyświetlaczu wyświetla się „+“.
6.Naciśnij i przytrzymaj przycisk RECALL 5. W wierszu dolnym wyświetla się wynik pierwszego pomiaru.
7.Naciśnij przycisk RECALL 5. Oba pomiary są sumowane, a wynik wyświetla się w dolnym wierszu.
8.Powtórz kroki 2–7, by zsumować pozostałe wartości pomiarów.
9.By zakończyć pomiar w trybie dodawania, naciśnij przycisk MODE 9. Wszystkie wartości są usuwane.
Wyświetlenie ostatniego pomiaru
Po wykonaniu pomiaru z funkcją sumowania odległości, pomiaru powierzchni lub kubatury naciśnij kilkakrotnie przycisk READ (Wyświetl ponownie) q, aby wyświetlić poszczególne wartości pomiaru.
Wskaźnik odpowiedniego pomiaru zacznie pulsować, a w górnym wierszu wyświetlacza w zostanie wyświetlona wartość pomiaru.
Wskaźnik temperatury
Naciśnij i przytrzymaj przycisk FT/M 4. W dolnym wierszu wyświetlacza w wyświetla się wskazanie temperatury. W celu przełączania między układem SI (stopnie Celsjusza) a układem angloamerykańskim (stopnie Fahrenheita), naciśnij przycisk FT/M 4. Aby wyłączyć wyświetlanie temperatury, naciśnij przycisk MODE 9.
- 21 -

Wskaźnik stanu baterii
Przy niskim poziomie energii w baterii na wyświetlaczu w pojawi się symbol baterii. Jak najszybciej wymień baterię
(patrz rozdział „Wkładanie baterii”). W przeciwnym wypadku rezultaty pomiarów będą nieprawdziwe.
Automatyczne wyłączanie
Jeśli przez ok. 60 sekund nie zostanie naciśnięty dowolny przycisk, urządzenie automatycznie się wyłączy.
Przechowywanie i czyszczenie
•Urządzenie przechowuj w suchym miejscu w dodatniej temperaturze otoczenia.
•Wyjmij baterię jeśli nie zamierzasz przez dłuższy czas używać urządzenia.
•Urządzenie czyść suchą, delikatną szmatką.
•Unikaj chemicznych oraz szorujących środków czyszczących. Mogą ono spowodować uszkodzenie obudowy.
Utylizacja
Urządzenia nie wolno wyrzucać do zwykłych odpadów komunalnych. W odniesieniu do
produktu ma zastosowanie dyrektywa
europejska 2002/96/EC.
Urządzenie należy usuwać poprzez akredytowane lub komunalne zakłady utylizacji odpadów.
Należy przestrzegać aktualnie obowiązujących przepisów. W razie pytań i wątpliwości odnośnie zasad utylizacji należy skontaktować się z miejscowym zakładem utylizacji.
Usuwanie baterii i akumulatorków
Baterii i akumulatorków nie wolno wyrzucać razem ze śmieciami domowymi. Każdy użytkownik jest ustawowo zobowiązany do oddania zużytych baterii i akumulatorków w punkcie zbiorczym swojej gminy, dzielnicy lub w sklepie.
Obowiązek ten wprowadzony został po to, aby baterie i akumulatorki były usuwane w sposób nieszkodliwy dla
środowiska naturalnego. Baterie i akumulatorki należy zawsze zwracaęc w stanie całkowitego rozładowania.
Właściwej utylizacji należy poddać wszystkie elementy opakowania.
- 22 -

Serwis
Serwis Polska
Tel.: 22 397 4996 E-Mail: kompernass@lidl.pl
IAN 77287
Importer
KOMPERNASS GMBH BURGSTRASSE 21
44867 BOCHUM, GERMANY www.kompernass.com
- 23 -
- 24 -
 Loading...