


 Loading...
Owner’s Manual
Blu-ray DiscTM Home Theater Sound System
Model No. SC-BTT770
SC-BTT370
SC-BTT270
SC-BTT273
The illustration shows the image of the unit SC-BTT770.
Dear customer
Thank you for purchasing this product.
For optimum performance and safety, please read these instructions carefully.
Before connecting, operating or adjusting this product, please read the instructions completely.
Please keep this manual for future reference.
If you have any questions contact
U.S.A. and Puerto Rico : 1-800-211-PANA(7262)
Canada : 1-800-561-5505
|
|
|
|
|
VQT3D27-3 |
|
|
P |
PC |
||
|
|
|

THE FOLLOWING APPLIES ONLY IN THE U.S.A. FCC Note:
This equipment has been tested and found to comply with the limits for a Class B digital device, pursuant to Part 15 of the FCC Rules.
These limits are designed to provide reasonable protection against harmful interference in a residential installation. This equipment generates, uses, and can radiate radio frequency energy and, if not installed and used in accordance with the instructions, may cause harmful interference to radio communications.
However, there is no guarantee that interference will not occur in a particular installation. If this equipment does cause harmful interference to radio or television reception, which can be determined by turning the equipment off and on, the user is encouraged to try to correct the interference by one or more of the following measures:
≥Reorient or relocate the receiving antenna.
≥Increase the separation between the equipment and receiver.
≥Connect the equipment into an outlet on a circuit different from that to which the receiver is connected.
≥Consult the dealer or an experienced radio/TV technician for help.
FCC Caution:To assure continued compliance, follow the attached installation instructions and use only shielded interface cables when connecting to peripheral devices. Any changes or modifications not expressly approved by the party responsible for compliance could void the user’s authority to operate this equipment.
This device complies with Part 15 of the FCC Rules.
Operation is subject to the following two conditions:
(1)This device may not cause harmful interference, and
(2)this device must accept any interference received, including interference that may cause undesired operation.
Responsible Party:
Panasonic Corporation of North America
One Panasonic Way
Secaucus, NJ 07094
Support Contact:
Panasonic Consumer Electronics Company
Telephone No.: 1-800-211-PANA (7262)
THE FOLLOWING APPLIES IN THE U.S.A. AND CANADA
This device complies with Part 15 of FCC Rules and RSS-Gen of IC Rules. Operation is subject to the following two conditions:
(1) This device may not cause interference, and (2) this device must accept any interference, including interference that may cause undesired operation of this device.
Contains FCC ID: RYYWYPAEBUX4 Contains IC:4389B-WYPAEBUX4
This transmitter must not be co-located or operated in conjunction with any other antenna or transmitter.
This product is restricted to indoor use due to its operation in the 5.15 to 5.25 GHz frequency range.
FCC and IC require this product to be used indoors for the frequency range 5.15 to 5.25 GHz to reduce the potential for harmful interference to co-channel Mobile Satellite systems. High power radars are allocated as primary users of the 5.25 to 5.35 GHz and 5.65 to 5.85 GHz bands. These radar stations can cause interference with and/or damage this product.
This equipment complies with FCC/IC radiation exposure limits set forth for an uncontrolled environment and meets the FCC radio frequency (RF) Exposure Guidelines in Supplement C to OET65 and RSS-102 of the IC radio frequency (RF) Exposure rules. This equipment has very low levels of RF energy that it deemed to comply without maximum permissive exposure evaluation (MPE). But it is desirable that it should be installed and operated keeping the radiator at least 20cm or more away from person’s body (excluding extremities: hands, wrists, feet and ankles).
[BTT770]
THE FOLLOWING APPLIES ONLY IN THE U.S.A. FCC Note:
This equipment has been tested and found to comply with the limits for a Class B digital device, pursuant to Part 15 of the FCC Rules.
These limits are designed to provide reasonable protection against harmful interference in a residential installation. This equipment generates, uses and can radiate radio frequency energy and, if not installed and used in accordance with the instructions, may cause harmful interference to radio communications.
However, there is no guarantee that interference will not occur in a particular installation. If this equipment does cause harmful interference to radio or television reception, which can be determined by turning the equipment off and on, the user is encouraged to try to correct the interference by one or more of the following measures:
≥Reorient or relocate the receiving antenna.
≥Increase the separation between the equipment and receiver.
≥Connect the equipment into an outlet on a circuit different from that to which the receiver is connected.
≥Consult the dealer or an experienced radio/TV technician for help.
FCC caution: To maintain compliance with FCC regulations, shielded interface cables must be used with this equipment. Operation with non-approved equipment or unshielded cables may result in interference to radio and TV reception. Any changes or modifications not approved by the party responsible for compliance could void the user’s authority to operate this equipment.
This device complies with Part 15 of the FCC Rules.
Operation is subject to the following two conditions:
(1)This device may not cause harmful interference, and
(2)this device must accept any interference received, including interference that may cause undesired operation.
Responsible Party:
Panasonic Corporation of North America
One Panasonic Way, Secaucus, NJ 07094
Support Contact:
Panasonic Consumer Electronics Company
Telephone No.: 1-800-211-PANA (7262)
WARNING:
To satisfy FCC RF exposure requirements for mobile transmitting devices, a separation distance of 20 cm or more should be maintained between the antenna of this device and persons during device operation.
To ensure compliance, operations at closer than this distance is not recommended. The antenna used for this transmitter must not be co-located in conjunction with any other antenna or transmitter.
[BTT770]
THE FOLLOWING APPLIES ONLY IN CANADA.
This Class B digital apparatus complies with Canadian ICES-003.
[BTT770] [BTT370]
THE FOLLOWING APPLIES ONLY IN CANADA. For main unit
Product Identification Marking is located on the bottom of the unit.
[BTT770]
For wireless system
Product Identification Marking is located on the bottom of wireless system.
VQT3D27
2

IMPORTANT SAFETY INSTRUCTIONS
Read these operating instructions carefully before using the unit. Follow the safety instructions on the unit and the applicable safety instructions listed below. Keep these operating instructions handy for future reference.
1Read these instructions.
2Keep these instructions.
3Heed all warnings.
4Follow all instructions.
5Do not use this apparatus near water.
6Clean only with dry cloth.
7Do not block any ventilation openings. Install in accordance with the manufacturer’s instructions.
8Do not install near any heat sources such as radiators, heat registers, stoves, or other apparatus (including amplifiers) that produce heat.
9Do not defeat the safety purpose of the polarized or grounding-type plug. A polarized plug has two blades with one wider than the other.
A grounding-type plug has two blades and a third grounding prong. The wide blade or the third prong are provided for your safety. If the provided plug does not fit into your outlet, consult an electrician for replacement of the obsolete outlet.
10Protect the power cord from being walked on or pinched particularly at plugs, convenience receptacles, and the point where they exit from the apparatus.
11Only use attachments/accessories specified by the manufacturer.
12Use only with the cart, stand, tripod, bracket, or table
specified by the manufacturer, or sold with the apparatus. When a cart is used, use caution when moving the cart/apparatus combination to avoid injury from tip-over.
13 Unplug this apparatus during lightning storms or when unused for long periods of time.
14Refer all servicing to qualified service personnel. Servicing is required when the apparatus has been damaged in any way, such as power-supply cord or plug is damaged, liquid has been spilled or objects have fallen into the apparatus, the apparatus has been exposed to rain or moisture, does not operate normally, or has been dropped.
WARNING
Unit
To reduce the risk of fire, electric shock or product damage,
–Do not expose this unit to rain, moisture, dripping or splashing.
–Do not place objects filled with liquids, such as vases, on this unit.
–Use only the recommended accessories.
–Do not remove covers.
–Do not repair this unit by yourself. Refer servicing to qualified service personnel.
CAUTION
Unit
–This unit utilizes a laser. Use of controls or adjustments or performance of procedures other than those specified herein may result in hazardous radiation exposure.
–Do not place sources of naked flames, such as lighted candles, on this unit.
Placement
To reduce the risk of fire, electric shock or product damage,
–Do not install or place this unit in a bookcase, built-in cabinet or in another confined space. Ensure this unit is well ventilated.
–Do not obstruct this unit’s ventilation openings with newspapers, tablecloths, curtains, and similar items.
CAUTION
RISK OF ELECTRIC SHOCK
DO NOT OPEN
CAUTION: TO REDUCE THE RISK OF ELECTRIC
SHOCK, DO NOT REMOVE SCREWS.
NO USER-SERVICEABLE PARTS
INSIDE.
REFER SERVICING TO QUALIFIED
SERVICE PERSONNEL.
The lightning flash with arrowhead symbol, within an equilateral triangle, is intended to alert the user to the presence of uninsulated “dangerous voltage” within the product’s enclosure that may be of sufficient magnitude to constitute a risk of electric shock to persons.
The exclamation point within an equilateral triangle is intended to alert the user to the presence of important operating and maintenance (servicing) instructions in the literature accompanying the appliance.
(Inside of product)
-If you see this symbol-
Information on Disposal in other Countries outside the European Union
This symbol is only valid in the European
Union.
If you wish to discard this product, please contact your local authorities or dealer and ask for the correct method of disposal.
VQT3D27
3

Table of contents |
|
IMPORTANT SAFETY INSTRUCTIONS ......... |
3 |
Getting started
Radio
Accessory......................................................... |
5 |
Control reference guide.................................... |
6 |
•Remote control................................................................. |
6 |
•Main unit (Front)............................................................... |
7 |
•POWER-SAVING FEATURES .................................. |
7 |
•Main unit (Rear)................................................................ |
7 |
Playable discs/Cards........................................ |
8 |
Unit and media care ......................................... |
9 |
Using the remote control .................................. |
9 |
STEP 1 : Preparing the speakers................... |
10 |
•Assembling the speakers ............................................... |
10 |
•Preparing cables and making connection ...................... |
11 |
STEP 2 : Positioning ...................................... |
12 |
STEP 3: Connections..................................... |
13 |
•Speaker cable connection.............................................. |
13 |
•Connection to a TV ........................................................ |
14 |
•Connection with Set Top Box, etc. ................................. |
16 |
•Radio antenna connection ............................................. |
16 |
•[BTT770] Digital transmitter connection............................ |
17 |
•Connection to a broadband network .............................. |
17 |
STEP 4: |
|
AC power supply cord connection.................. |
18 |
STEP 5: [BTT770] |
|
Preparing the wireless system ....................... |
18 |
STEP 6: Easy setup ....................................... |
19 |
•Network Easy Setting..................................................... |
20 |
•Reprogramming the remote control................................ |
21 |
•Firmware updates........................................................... |
22 |
Inserting or removing media........................... |
22 |
HOME menu .................................................. |
23 |
Enjoying sound effects from all speakers....... |
24 |
•Enjoying surround sound effects.................................... |
24 |
Listening to the Radio..................................... |
29 |
•Presetting stations automatically ................................... |
29 |
•Presetting stations manually.......................................... |
29 |
•Listening/confirming the preset channels ...................... |
30 |
TV |
|
Enjoying TV with unit’s speakers.................... |
30 |
•Surround sound effects.................................................. |
30 |
•Sound modes................................................................. |
30 |
Linked operations with the TV |
|
(VIERA LinkTM “HDAVI ControlTM”).................. |
31 |
•Setting the audio link ..................................................... |
31 |
•Easy control only with VIERA remote control ................ |
32 |
Other devices |
|
Using the iPod/iPhone.................................... |
32 |
•iPod/iPhone Connection ................................................ |
32 |
•iPod/iPhone Playback.................................................... |
33 |
Advanced operations |
|
Enjoying VIERA CASTTM ................................ |
34 |
Playback menu ............................................... |
35 |
Setup menu .................................................... |
37 |
•Speaker settings ............................................................ |
41 |
Optional speaker settings |
|
Speaker installation option ............................. |
42 |
Playback |
|
Playing video contents ................................... |
25 |
•Other operations during play.......................................... |
25 |
•Useful functions.............................................................. |
26 |
•Enjoying BD-Live or picture-in-picture in BD-Video........ |
26 |
Enjoying 3D video .......................................... |
27 |
•3D settings ..................................................................... |
27 |
•Useful functions.............................................................. |
27 |
Playing still pictures........................................ |
28 |
•Useful functions.............................................................. |
28 |
Playing music ................................................. |
29 |
•Playing a track in another folder..................................... |
29 |
Reference |
|
Troubleshooting guide.................................... |
43 |
Messages ....................................................... |
45 |
Supplemental information............................... |
46 |
Specifications ................................................. |
48 |
Limited Warranty (ONLY FOR U.S.A. |
|
AND PUERTO RICO)..................................... |
50 |
Limited Warranty (Only for CANADA) |
............ 51 |
Index................................................. |
Back cover |
VQT3D27
4

≥This Owner’s Manual is applicable to models SC-BTT770, SC-BTT370, SC-BTT270 and SC-BTT273. Unless otherwise indicated, illustrations in this Owner’s Manual are of SC-BTT770.
≥Operations in this Owner’s Manual are described mainly with the remote control, but you can perform the operations on the main unit if the controls are the same.
Indicates features applicable to:
[BTT770]: SC-BTT770 only [BTT370]: SC-BTT370 only [BTT270]: SC-BTT270 only [BTT273]: SC-BTT273 only
System |
SC-BTT770 |
SC-BTT370 |
SC-BTT270 |
SC-BTT273 |
|
Main unit |
SA-BTT770 |
SA-BTT370 |
SA-BTT270 |
SA-BTT273 |
|
Speaker system |
Front speakers |
SB-HF775 |
SB-HF370 |
SB-HF270 |
SB-HF370 |
|
Center speaker |
SB-HC775 |
SB-HC370 |
SB-HC270 |
SB-HC370 |
|
Surround speakers |
SB-HS270 |
SB-HS270 |
SB-HS270 |
SB-HS270 |
Subwoofer |
SB-HW370 |
SB-HW370 |
SB-HW270 |
SB-HW270 |
|
Wireless system (with digital transmitter) |
SH-FX71 |
— |
— |
— |
|
≥Some accessories and external devices mentioned in this Owner’s Manual that are not included with this product may not be on sale in certain regions.
≥Please note that the actual controls and components, menu items, etc. of your Blu-ray Disc Home Theater Sound System may look somewhat different from those shown in the illustrations in this Owner’s Manual.
Accessory
Check the supplied accessories before using this unit.
For accessories of speakers, refer to page 10.
Playback Getting started
Radio
[BTT770] |
[BTT370] |
[BTT270] |
[BTT273] |
|||
∏ 1 Remote control |
∏ 1 |
Remote control |
∏ 1 |
Remote control |
∏ 1 Remote control |
|
(N2QAYB000632) |
|
(N2QAYB000632) |
|
(N2QAYB000629) |
|
(N2QAYB000629) |
∏ 2 Batteries for remote |
∏ 2 |
Batteries for remote |
∏ 2 |
Batteries for remote |
∏ 2 |
Batteries for remote |
control |
|
control |
|
control |
|
control |
∏ 1 Sheet of speaker cable |
∏ 1 Sheet of speaker cable |
∏ 1 Sheet of speaker cable |
∏ 1 Sheet of speaker cable |
|||
sticker |
|
sticker |
|
sticker |
|
sticker |
∏ 1 FM indoor antenna |
∏ 1 |
FM indoor antenna |
∏ 1 |
FM indoor antenna |
∏ 1 |
FM indoor antenna |
(RSAX0002) |
|
(RSAX0002) |
|
(RSAX0002) |
|
(RSAX0002) |
∏ 2 AC power supply cord |
∏ 1 |
AC power supply cord |
∏ 1 |
AC power supply cord |
∏ 1 |
AC power supply cord |
(K2CB2CB00021) |
|
(K2CB2CB00021) |
|
(K2CB2CB00021) |
|
(K2CB2CB00021) |
(RFAX0023) with a |
|
|
|
|
|
|
ferrite core |
|
|
|
|
|
|
∏ 1 Digital transmitter |
|
|
|
|
∏ 1 |
HDMI cable |
(RFAX1012B) |
|
|
|
|
|
(K1HA19DA0005) |
[For_Canada]
The enclosed Canadian French label sheet corresponds to the |
≥ Product numbers provided in this Owner’s Manual correct as of December |
English display on the front and back side of the unit. |
2010. These may be subject to change. |
|
≥ Do not use AC power supply cord with other equipment. |
|
≥ [For_U.S.A._and_Puerto_Rico.]: To order accessories, refer to “Accessory |
|
Purchases (United States and Puerto Rico)” on page 50. |
|
[For_Canada]: To order accessories, call the dealer from whom you have |
|
made your purchase. |
TV
Reference settings Advanced operations Other devices
Optional speaker
VQT3D27
5

Control reference guide
13
1 |
|
|
|
|
|
|
|
|
|
|
|
|
|
|
|
|
|
|
|
|
|
2 |
|
|
|
|
|
|
|
|
|
14 |
|
|
|
|
|
|
|
|
|
|
|
|
|
|
|
|
|
|
|
|
|
15 |
3 |
|
|
|
|
|
|
16 |
|||
|
|
|
|
|
||||||
4 |
|
|
|
|
17 |
|||||
|
|
|
|
|
|
|
|
|||
|
|
|
|
|
|
|||||
5 |
|
|
|
|
|
|
|
|
|
|
|
|
|
|
|
|
|
|
|
|
|
|
|
|
|
|
|
|
|
|
|
|
|
|
|
|
|
|
|
|
|
||
6 |
|
|
|
|
|
|
|
|
|
18 |
|
|
|
|
|
|
|
|
|
19 |
|
|
|
|
|
|
|
|
|
|
|
|
|
|
|
|
|
|
|
|
|
||
|
|
|
|
|
|
|
|
|
|
|
|
|
|
|
|
|
|
|
|
|
|
|
|
|
|
|
|
|
|
|
||
7 |
|
|
|
|
|
|
|
|
20 |
|
|
|
|
|
|
|
|
|
|||
|
|
|
|
|
|
|
||||
|
|
|
|
|
|
|
|
|||
|
|
|
|
|
|
|
|
|
|
|
|
|
|
|
|
|
|
|
|
||
|
|
|
|
|
|
|
|
|
|
|
8 |
|
|
|
|
|
|
|
|
||
|
|
|
|
|
|
|
|
|||
9 |
|
|
|
|
|
|
|
|
|
21 |
10 |
|
|
|
|
|
|
|
|
|
|
11 |
|
|
|
|
|
|
|
|
|
22 |
12 |
|
|
|
|
|
|
|
|
|
23 |
|
|
|
|
|
|
|
|
|
|
|
Remote control
1Turn the unit on and off
2Select title numbers, etc./Enter numbers or characters ( 34)
[CANCEL]: Cancel
3 |
Select the source ( |
22) |
|
4 |
Basic playback control buttons ( |
25) |
|
5 |
Select preset radio stations |
|
|
6 |
Show status messages ( 25) |
|
|
7 |
Display the Home screen of VIERA CAST ( 34) |
||
8 |
Selection/OK, Frame-by-frame ( |
25) |
|
9 |
Show sub menu ( |
26) |
|
10These buttons are used when;
≥ Operating a BD-Video disc that includes JavaTM
|
applications (BD-J). |
|
≥ Operating contents of VIERA CAST ( 34) |
11 |
Set the sound mode ( 24)/Select speaker channel |
|
( 24) |
12 |
Select surround sound effects ( 24)/Set the sleep timer |
1 Press and hold [–SLEEP].
2While “SLEEP ££” is displayed, press [–SLEEP] several times to select the time (in minutes).
≥Timer selection is up to 120 minutes.
≥Select “OFF” when canceling the setting.
≥To confirm the remaining time Press and hold the button again.
13TV operation buttons
[Í]: Turn the television on and off [AV, INPUT]: Switch the input select [i j VOL]: Adjust the volume
14Adjust the volume of the main unit
15Mute the sound
≥“MUTE” flashes on the unit’s display, while the function is on.
≥To cancel, press the button again or adjust the volume.
≥Muting is canceled if the unit is turned off.
16Show NETFLIX screen
17 |
Select radio stations manually ( 29) |
|
18 |
Exit the menu screen |
|
19 |
Show HOME menu ( |
23) |
20 |
Show Pop-up menu/Top menu/Direct Navigator ( 25) |
|
21 |
Return to previous screen |
|
22 |
[BTT770] [BTT370] : Start up a video communication ( 34) |
|
23 |
Show Playback menu ( |
35)/Select audio ( 25) |
VQT3D27
6

Main unit (Front)
1 |
2 |
3 |
POWER |
OPEN/CLOSE |
VOL |
Pull open.
iPod |
SD CARD
|
4 |
5 |
6 |
7 |
|
8 |
9 |
10 |
1 |
Standby/on switch (POWER Í/I) (> 19) |
|
|
|
6 |
Start play (> 25) |
|
|
|
Press to switch the unit from on to standby mode or vice |
|
7 |
SD card slot (> 22) |
|
|||
|
versa. In standby mode, the unit is still consuming a small |
|
8 |
Remote control signal sensor |
|
|||
|
amount of power. |
|
|
|
|
Distance: Within approx. 7 m (23 ft.) |
||
2 |
Open or close the disc tray (> 22) |
|
|
|
|
Angle: Approx. 20o up and down, 30o left and right |
||
3 |
Adjust the volume of the main unit |
|
|
|
9 |
Display |
|
|
4 |
Disc tray |
|
|
|
10 |
Connect iPod/iPhone (> 32) |
|
|
5 |
Stop (> 25) |
|
|
|
|
|
|
|
POWER-SAVING FEATURES
The main unit is designed to conserve its power consumption and save energy.
[BTT770] [BTT370] Wireless system (SH-FX71) does not have this function.
≥ Automatic power-down function |
e.g. |
|
jThere is no audio signal from an external device. |
||
The main unit will automatically switch to standby mode after |
||
30 minutes if the main unit is inactive as follows. |
jDisc playback is stopped/paused. |
|
jiPod/iPhone playback is stopped/paused. |
||
|
||
|
jThe disc menu is displayed and play is not selected. |
|
|
(This function may not work depending on the application |
|
|
type of discs.) |
Getting started
Main unit (Rear)
1 |
2 |
3 |
4 |
5 |
6 |
7 |
8 |
9 |
10 |
11 12 |
13 |
|||||||||||
|
|
|
|
|
|
|
|
|
|
|
|
|
|
|
|
|
|
|
|
|
|
|
|
|
|
|
|
|
|
|
|
|
|
|
|
|
|
|
|
|
|
|
|
|
|
|
|
|
|
|
|
|
|
|
|
|
|
|
|
|
|
|
|
|
|
|
|
|
|
|
|
|
|
|
|
|
|
|
|
|
|
|
|
|
|
|
|
|
|
|
|
6 |
5 |
2 |
1 |
4 |
3 |
COMMUNICATION |
LAN |
|
AUX |
3Ω |
3Ω |
R 3Ω L |
R 3Ω L |
FM ANT |
|||||
SUBWOOFER CENTER FRONT SURROUND |
CAMERA |
|
75 Ω |
|
|||||
1 |
AC IN terminal (> 18) |
9 |
FM radio antenna terminal (> 16) |
2 |
Speaker terminals (> 13) |
10 |
DIGITAL AUDIO IN terminal (> 14 , 15) |
3 |
Cooling fan |
11 |
AUX terminal (> 14) |
4 |
[BTT770] [BTT370] USB port for the Communication Camera |
12 |
VIDEO OUT terminal (> 14) |
|
TY-CC10W (optional) (> 34) |
13 |
[BTT770] Digital transmitter dock for supplied wireless |
5 |
LAN port (> 17) |
|
system (> 17) |
6 |
HDMI AV OUT (ARC) terminal (> 15) |
|
[BTT370] Digital transmitter dock for optional wireless |
7 |
[BTT770] [BTT370] HDMI 1 IN (CABLE/SAT) terminal (> 16) |
|
system (> 12) |
8 |
[BTT770] [BTT370] HDMI 2 IN terminal (> 16) |
|
|
VQT3D27
7

Playable discs/Cards
Type |
Logo |
Type detail |
Playable contents |
||||||
examples |
( 49) |
||||||||
|
|
||||||||
|
|
|
|
|
|
|
BD-Video |
Video |
|
[BD] |
|
|
|
|
|
|
BD-RE |
Video |
|
|
|
|
|
|
|
JPEG/MPO (3D still picture) |
|||
|
|
|
|
|
|
|
|
||
|
|
|
|
|
|
|
BD-R |
Video |
|
|
|
|
|
|
|
|
DVD-Video |
Video |
|
|
|
|
|
|
|
|
|
|
|
|
|
|
|
|
|
|
|
|
|
|
|
|
|
|
|
|
|
|
|
|
|
|
|
|
|
|
DVD-R |
Video |
|
|
|
|
|
|
|
|
|
||
[DVD] |
|
|
|
|
|
|
|
AVCHD |
|
|
|
|
|
|
|
|
|||
|
|
|
|
|
|
|
MP3 |
||
|
|
|
|
|
|
|
|
||
|
|
|
|
|
|
|
DVD-R DL |
JPEG/MPO (3D still picture) |
|
|
|
|
|
|
|
|
|
|
|
|
|
|
|
|
|
|
DVD-RW |
Video |
|
|
|
|
|
|
|
|
|
AVCHD |
|
|
|
|
— |
+R/+RW/+R DL |
|
||||
|
|
|
|
|
|
|
Music CD |
Music [CD-DA] |
|
[CD] |
|
|
|
|
|
|
|
|
|
|
|
|
|
|
|
|
|
||
|
|
|
|
|
|
|
|
||
|
|
— |
CD-R |
Music [CD-DA] |
|||||
|
|
|
|||||||
|
|
|
MP3 |
||||||
|
|
|
CD-RW |
||||||
|
|
|
|
|
|
|
JPEG/MPO (3D still picture) |
||
|
|
|
|
|
|
|
|
||
|
|
|
|
|
|
|
SD Memory Card (8 MB to 2 GB) |
|
|
|
|
|
|
|
|
|
SDHC Memory Card (4 GB to 32 GB) |
MPEG2 |
|
[SD] |
|
|
|
|
|
|
SDXC Memory Card (48 GB, 64 GB) |
AVCHD |
|
|
|
|
|
|
|
|
(Compatible with both mini and micro types) |
JPEG/MPO (3D still picture) |
|
|
|
|
|
|
|
|
(as of December 2010) |
|
|
∫ Discs that cannot be played in this unit
Any other disc that is not specifically supported or previously described.
≥DVD-RAM
≥Super Audio CD
≥Photo CD
≥DVD-Audio
≥Video CD and Super Video CD
≥WMA discs
≥DivX discs
≥PAL discs
≥HD DVD
≥BD-Video discs recorded at a rate of 50 fields/sec
∫ Region management information
BD-Video
This unit plays BD-Video marked with labels containing the region code “A”.
Example:
DVD-Video
This unit plays DVD-Video marked with labels containing the region number “1” or “ALL”.
Example:
1 ALL 124
VQT3D27
8

∫ Finalize
DVD-R/RW/R DL, +R/+RW/+R DL and CD-R/RW recorded by a recorder, etc. needs to be finalized by the recorder to play on this unit. Please refer to the recorder’s instructions.
∫ BD-Video
This unit supports high bit rate audio (Dolby Digital Plus, Dolby TrueHD, DTS-HD High Resolution Audio and DTS-HD Master Audio) adopted in BD-Video.
∫ Music CD
≥Operation and sound quality of CDs that do not conform to CD-DA specifications (copy control CDs, etc.) cannot be guaranteed.
≥The digital audio content side of a DualDisc does not meet the technical specifications of the Compact Disc Digital Audio (CD-DA) format so playback may not be possible.
∫ 3D
≥3D videos and 3D still pictures can be played back when this unit is connected to a 3D compatible TV using a High Speed
HDMI Cable.
≥ 2D video can be enjoyed as 3D virtually. ( 27)
∫ SD card
≥ miniSD Cards, microSD Cards, microSDHC Cards and microSDXC Cards can be used, but must be used with an adaptor card. These are usually supplied with such cards, or otherwise customer provided.
≥ Keep the Memory Card out of reach of children to prevent swallowing.
≥To protect the card’s contents, move the record prevention tab (on the SD card) to “LOCK”.
≥This unit is compatible with SD Memory Cards that meet SD Card Specifications FAT12 and FAT16 formats, as well as SDHC Memory Cards in FAT32 format (Does not support long file name.) and SDXC Memory Cards in exFAT.
≥If the SD card is used with incompatible computers or devices, recorded contents may be erased due to the card being formatted etc.
≥Useable memory may be slightly less than the card capacity.
≥It may not be possible to play the above media in some cases due to the
type of media, the condition of the recording, the recording method and how the files were created.
≥The producers of the disc can control how discs are played. So you may not always be able to control play as described in this Owner’s Manual. Read the disc’s instructions carefully.
Getting started
Unit and media care
∫ Clean this unit with a soft, dry cloth
≥Never use alcohol, paint thinner or benzine to clean this unit.
≥Before using chemically treated cloth, carefully read the instructions that came with the cloth.
∫ Clean the lens
≥ Use the lens cleaner (not supplied) to clean the unit’s lens.
∫ Clean discs
DO |
DO NOT |
Wipe with a damp cloth and then wipe dry.
∫ Disc and card handling precautions
≥Handle discs by the edges to avoid inadvertent scratches or fingerprints on the disc.
≥Do not attach labels or stickers to discs.
≥Do not use record cleaning sprays, benzine, thinner, static electricity prevention liquids or any other solvent.
≥Clean any dust, water, or foreign matter from the terminals on the rear side of the card.
≥Do not use the following discs:
jDiscs with exposed adhesive from removed stickers or labels (rented discs etc).
jDiscs that are badly warped or cracked. jIrregularly shaped discs, such as heart shapes.
∫ To dispose or transfer this unit
The unit may keep the user settings information in the unit. If you discard this unit either by disposal or transfer, then follow the procedure to return all the settings to the factory presets to delete the user settings. ( 43, “To return all settings to the factory preset”)
≥The operation history may be recorded in the memory of this unit.
Using the remote control
Insert so the poles (+ and –) match those in the remote control.
R6/LR6,
(Alkaline or manganese batteries)
Point it at the remote control signal sensor on this unit. ( 7)
Mishandling of batteries can cause electrolyte leakage which can damage items the fluid contacts and may cause a fire.
≥Do not mix old and new batteries or different types at the same time.
≥Do not heat or expose to flame.
≥Do not leave the battery(ies) in a car exposed to direct sunlight for a long period of time with doors and windows closed.
≥Do not take apart or short circuit.
≥Do not attempt to recharge alkaline or manganese batteries.
≥Do not use batteries if the covering has been peeled off.
Remove batteries if the remote control is not going to be used for a long period of time. Store in a cool, dark place.
CAUTION
≥Danger of explosion if battery is incorrectly replaced. Replace only with the type recommended by the manufacturer.
≥When disposing the batteries, please contact your local authorities or dealer and ask for the correct method of disposal.
VQT3D27
9
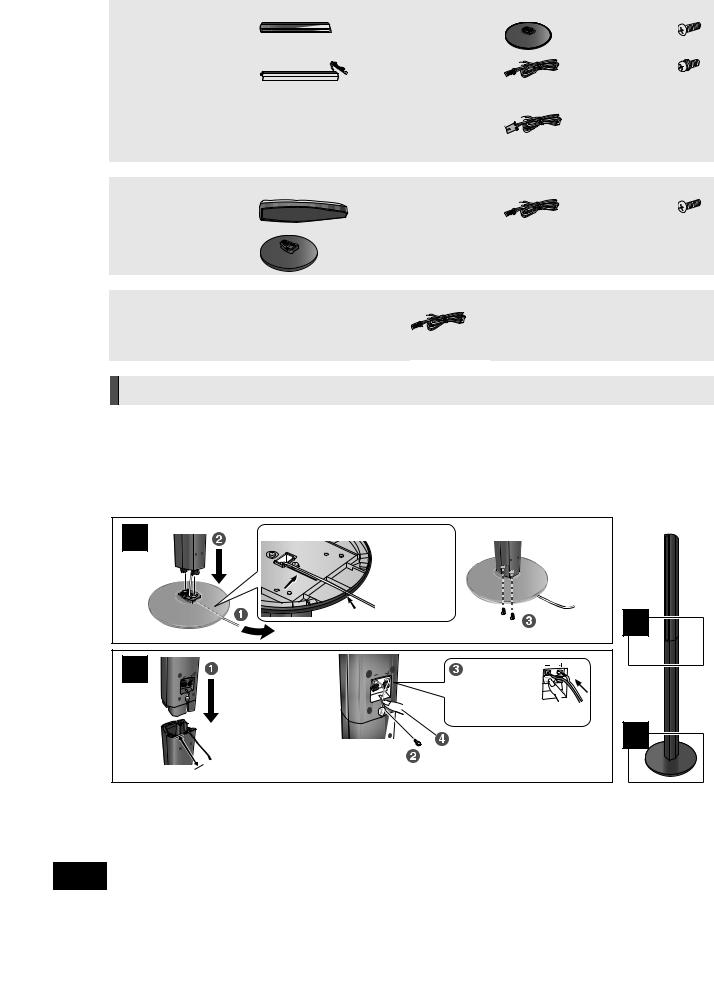
STEP 1 : Preparing the speakers
[BTT770] |
|
|
∏ 2 Front speakers |
∏ 2 Bases |
∏ 4 Screws A |
|
(RYK1610-K1) |
(XTN5i10FFJK) |
∏ 2 Stands (with cables) |
∏ 3 Speaker cables |
∏ 2 Screws B |
(RYK1609E-K: RED) |
(REEX1268: GREEN) |
(XYN5iJ18FJK) |
(RYK1609D-K: WHITE) |
(REEX1269: GRAY) |
|
|
(REEX1270: BLUE) |
|
|
∏ 2 Speaker cables |
|
|
(for SH-FX71) |
|
|
(REEX1155B-1: GRAY) |
|
|
(REEX1156B-1: BLUE) |
|
[BTT370] [BTT273] |
|
|
∏ 2 Front speakers |
∏ 5 Speaker cables |
∏ 2 Screws A |
|
(REEX1266A: RED) |
(XTB4i12GFJK) |
∏ 2 Bases |
(REEX1267A: WHITE) |
|
(REEX1268: GREEN) |
|
|
(RYK1637-K) |
|
|
(REEX1269: GRAY) |
|
|
|
|
|
|
(REEX1270: BLUE) |
|
[BTT270] |
|
|
∏ 5 Speaker cables |
(REEX1269: GRAY) |
|
(REEX1266A: RED) |
|
|
(REEX1267A: WHITE) |
(REEX1270: BLUE) |
|
(REEX1268: GREEN) |
|
|
Assembling the speakers
Caution
≥Do not stand on the base. Be cautious when children are near.
≥When carrying speakers, hold the stand and base parts.
Preparation
≥To prevent damage or scratches, lay down a soft cloth and perform assembly on it.
≥For wall mount, refer to page 42.
≥Keep the screws out of reach of children to prevent swallowing.
[BTT770] |
|
|
1 |
Back of the base |
|
Pull the cable |
|
|
straight along |
|
|
|
|
|
|
the line and |
|
|
slide into the |
|
|
groove. |
|
|
Screw A |
Tighten |
|
securely. |
|
|
|
|
2 |
Insert the wire |
|
fully. |
|
|
|
r: White |
|
|
s: Blue line |
Push! |
|
|
Press into the groove.
Screw B
Tighten securely.
Leave about 80 mm (3 5/32q)
2
1
VQT3D27
10
[BTT370] [BTT273]
Thread the speaker cable through the base.
≥Use cables with a white connector and red connector.
Leave about 110 mm (4 11/32q)
Insert the wire fully. r: White
s: Blue line
Push!
 Press into the groove.
Back of the base
|
Pull the cable |
|
straight along the |
|
line and slide into the |
Tighten securely. |
groove. |
|
Getting started
Preparing cables and making connection
1 Use of the speaker cable stickers is convenient when making cable connections.
e.g. Front speaker (L)
|
|
FRONT |
|
|
Lch |
|
|
|
|
|
|
A Speaker cable sticker (supplied) |
|
|
B Connector |
|
|
Speaker cable sticker |
Color |
|
1 |
FRONT (L) |
WHITE |
2 |
FRONT (R) |
RED |
3 |
SURROUND (L) |
BLUE |
4 |
SURROUND (R) |
GRAY |
5 |
CENTER |
GREEN |
6 |
SUBWOOFER |
PURPLE |
2 Connecting the speaker cables. Insert the wire fully, taking care not to insert beyond the wire insulation.
≥[BTT770] Be sure to use the speaker cables that have a large connector and short cable when you use the wireless system.
e.g. Surround speaker
r: White s: Blue line
Push!
Be sure to match the number on each sticker with the connector color.
≥Be careful not to cross (short-circuit) or reverse the polarity of the speaker wires as doing so may damage the speakers.
≥Don’t use a front speaker as a surround speaker or vice versa. Verify the type of speaker with the label on the rear of the speaker before connecting the appropriate cable.
≥To avoid injury by falling or dropping the speaker, place the speaker cables with care not to stumble or hook.
≥Do not hold the speaker in one hand to avoid injury by dropping the speaker when carrying.
[BTT770] [BTT370] [BTT273]
∫ Preventing the speakers from falling
≥Consult a qualified housing contractor concerning the appropriate procedure when attaching to a concrete wall or a surface that may not have strong enough support. Improper attachment may result in damage to the wall or speakers.
≥Use a string of less than ‰ 2.0 mm (3/32q), which is capable of supporting over 10 kg (22 lbs).
e.g., [BTT770]

|
|
|
|
||
|
AString (not supplied)
Thread from the wall to the speaker and tie tightly.
B Rear of the speaker
C Screw eye (not supplied)
D Wall
E Approx.150 mm (5 29/32q)
VQT3D27
11
STEP 2 : Positioning
Caution
≥The main unit and supplied speakers are to be used only as indicated in this setup. Failure to do so may lead to damage to the amplifier and/or the speakers, and may result in the risk of fire. Consult a qualified service person if damage has occurred or if
you experience a sudden change in performance.
≥ Do not attempt to attach these speakers to walls using methods other than those described in this manual. ≥ Do not touch the front netted area of the speakers. Hold by the sides.
How you set up your speakers can affect the bass and the sound field.
Setup example
Place the front, center and surround speakers at approximately the same distance from the seating position. The angles in the diagram are approximate.
≥Keep your speakers at least 10 mm (13/32z) away from the system for proper ventilation.


60°
120°


ACenter speaker
≥Put on a rack or shelf not to interfere with the TV's various sensors (ambient light, etc.). Vibration caused by the speaker
can disrupt the picture if it is placed directly on the TV. B Front speakers
C Subwoofer
DSurround speakers
≥Place the speakers at the same height or higher than ear level. E [BTT770] Wireless System
≥Place the wireless system within approximately 10 m (33 ft.) from the main unit, and in a horizontal position with the top panel faced upward.
≥To allow for proper ventilation and to maintain good airflow around the wireless system, position it with at least 5 cm (2z) of space on all sides.
≥Do not use the wireless system or the digital transmitter in a metal cabinet or bookshelf.
|
[BTT370] |
You can enjoy surround speaker |
|
|
sound wirelessly when you use the |
|
|
optional Panasonic wireless |
|
|
accessory (SH-FX71). |
|
|
For more details, refer to the operating |
|
|
instructions for the optional wireless system. |
|
|
≥ When using the SH-FX71 (optional), RMS |
|
|
TTL power output is changed. ( 48) |
|
|
|
≥Use only supplied speakers
Using other speakers can damage the unit, and sound quality will be negatively affected.
≥You can damage your speakers and shorten their useful life if you play sound at high levels over extended periods.
≥Positioning speakers in front
It is possible to locate all the speakers in front of the listening position. However, the optimal surround sound effect may not be obtainable.
≥Place speakers on flat secure bases.
≥Placing speakers too close to floors, walls, and corners can result in excessive bass. Cover walls and windows with thick curtains.
VQT3D27 ≥ For optional wall mount, refer to page 42.
∫ If irregular coloring occurs on your TV, turn the TV off for about 30 minutes.
If it persists, move the speakers further away from the TV.
[BTT770]
∫ Wireless system
To avoid interference, maintain the following distances between the wireless system and other electronic devices that use the same radio frequency (2.4 GHz band).
Wireless |
Wireless LAN: |
|
System |
||
approx. 2 m (61/2 ft.) |
Cordless phone and other electronic devices: approx. 2 m (61/2 ft.)
The wireless system will automatically seek a clear channel if any of these other devices interfere with its communication. When this happens, there is a brief interruption in audio coming from the surround speakers.
This is the normal operation of the product working to assure the best possible performance of your home theater system.
If the interference persists, try moving the other devices to another location outside the range of the wireless system or move the wireless system nearer to the main unit.
[BTT770] [BTT370]
∫ Upgrade your system to 7.1-channel system
The main unit is designed to enjoy the 7.1ch surround sound. By connecting 2 units of the Panasonic wireless system SH-FX71 with 4 speakers, more theater-like effect can be available.
Necessary equipment:
[BTT770]
≥1 optional wireless system (SH-FX71)
≥2 additional speakers
[Impedance: 3 ≠ to 6 ≠, Speaker input power: 100 W (Min)]
[BTT370]
≥2 optional wireless systems (SH-FX71)
≥2 additional speakers
[Impedance: 3 ≠ to 6 ≠, Speaker input power: 100 W (Min)]
For more details, refer to the operating instructions for the optional wireless system.
12

STEP 3: Connections
Turn off all equipment before connection and read the appropriate owner’s manual.
Do not connect the AC power supply cord until all other connections are complete.
Speaker cable connection
Connect to the terminals of the same color.
[BTT770]
Connection with the wireless system (SH-FX71)
6 PURPLE |
Subwoofer |
3 BLUE |
Surround speaker (Lch) |
5 GREEN |
Center speaker |
4 GRAY |
Surround speaker (Rch) |
2 RED |
Front speaker (Rch) |
≥ Be sure to use the speaker cables that have a large |
|
1 WHITE |
Front speaker (Lch) |
connector and short cable when you connect the |
|
|
|
surround speakers in this connection. |
|
Main unit
6 |
5 |
2 |
1 |
4 |
3 |
3Ω |
3Ω R 3Ω L |
R 3Ω L |
|||
SUBWOOFER CENTER FRONT SURROUND
Do not connect the surround speaker cables to the main unit when using the wireless system.
|
|
|
|
|
|
|
|
|
|
|
Wireless System |
|
|
SPEAKERS |
|
|
|
|
|
ENCEINTES |
|
|
|
|
|
LS / RB LB / RS |
|
|
|
SURR |
|
|
|
Surround selector |
|
SIDE |
SIDE AMBIOPHONIQUES |
) |
The surround selector switch |
||
L |
R |
SURROUND (3 - 6 |
|
||
must be set in the center position.
Getting started
Connection with the main unit
Main unit
6 |
5 |
2 |
1 |
4 |
3 |
3Ω |
3Ω R 3Ω L |
R 3Ω L |
|||
SUBWOOFER CENTER FRONT SURROUND
6 PURPLE |
Subwoofer |
5 GREEN |
Center speaker |
2 RED |
Front speaker (Rch) |
1 WHITE |
Front speaker (Lch) |
4 GRAY Surround speaker (Rch)
3BLUE Surround speaker (Lch)
≥Be sure to use the speaker cables that have a small connector and long cable when you connect the surround speakers in this connection.
[BTT370] [BTT270] [BTT273]
Main unit
6 |
5 |
2 |
1 |
4 |
3 |
3Ω |
3Ω R 3Ω L |
R 3Ω L |
|||
SUBWOOFER CENTER FRONT SURROUND
6 PURPLE |
Subwoofer |
|
5 GREEN |
Center speaker |
|
2 RED |
Front speaker (Rch) |
|
1 WHITE |
Front speaker (Lch) |
|
4 GRAY |
Surround speaker (Rch) |
|
3 BLUE |
Surround speaker (Lch) |
|
[BTT370] |
|
|
When using the optional wireless system, do not attempt |
|
|
to connect any extra surround or surround back speakers |
VQT3D27 |
|
to the main unit. |
||
13

Connection to a TV
≥The basic connection is shown in the included Easy Setting Guide, however, there are more connection examples to optimize your system setting.
≥Do not make the video connections through the VCR.
Due to copy guard protection, the picture may not be displayed properly. ≥ Turn off all equipment before connection.
∫ OPTICAL IN
≥ After making the digital audio connection, make settings to suit the type of audio from your digital equipment. ( 25)
∫ HDMI
The HDMI connection supports VIERA Link “HDAVI Control” ( 31) when used with a compatible Panasonic TV.
≥Please use High Speed HDMI Cables that have the HDMI logo (as shown on the back cover). It is recommended that you use Panasonic’s HDMI cable. When outputting 1080p signal, please use HDMI cables 5.0 meters (16.4 ft.) or less.
Recommended part number (High Speed HDMI Cable): |
|
|
|
|
RP-CDHS15 (1.5 m/4.9 ft.), RP-CDHS30 (3.0 m/9.8 ft.), RP-CDHS50 (5.0 m/16.4 ft.), etc. |
|
|||
≥ Audio will be output through the system's speakers when “Off” is selected in “HDMI Audio Output”. ( |
39) |
|||
Connection for the standard picture and audio |
|
|
|
|
TV |
VIDEO IN |
|
To enjoy TV audio from this home theater |
|
AUDIO OUT |
AUDIO IN |
|
system’s speakers: |
|
|
|
|
||
L |
L |
|
1 Connect the TV and the main unit with the |
|
|
|
|
||
R |
R |
|
Audio cable (not supplied). |
|
|
|
|
2 Select “AUX” as a source ( |
23). |
|
|
|
||
|
|
|
A Audio cable (not supplied) |
|
AUX |
|
|
|
|
B Video cable (not supplied)
AUX
VIDEO OUT
Connection for the better audio
TV |
VIDEO IN |
OPTICAL
OUT
AUDIO IN
L
R
OPTICAL |
VIDEO OUT |
To enjoy TV audio from this home theater system’s speakers:
1Connect the TV and the main unit with the Optical digital audio cable (not supplied).
2Select “DIGITAL IN” or “D-IN” as a source ( 23).
A Optical digital audio cable (not supplied)
B Video cable (not supplied)
VQT3D27
14
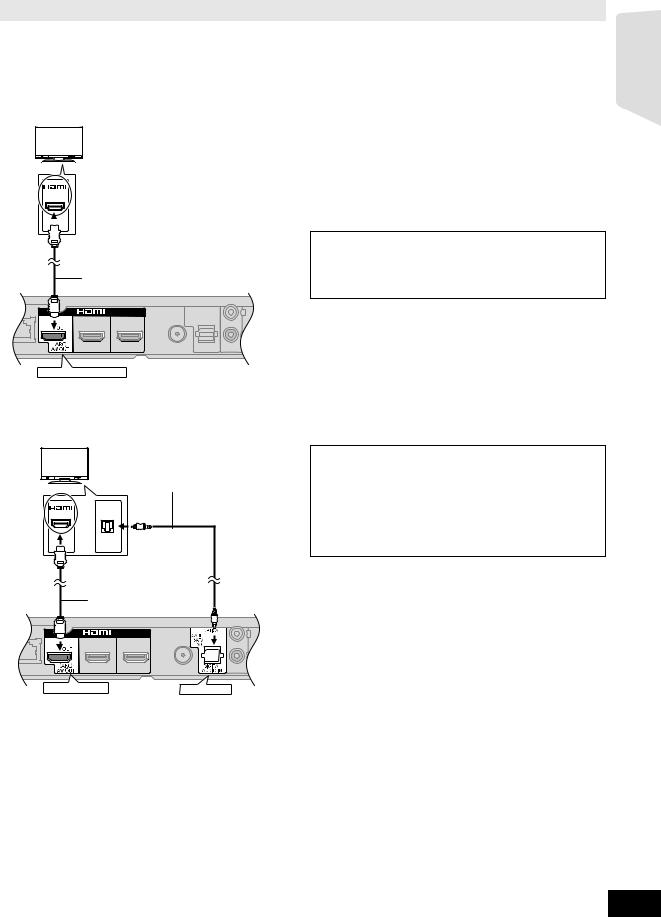
Connection for the best picture and audio
≥When connecting to a TV using an HDMI cable, check the HDMI terminal on the TV. If the HDMI terminal is labeled “HDMI (ARC)”, you can connect the unit simply with a single HDMI cable.
≥It is possible to playback 3D videos and 3D still pictures by connecting this unit with a 3D compatible TV.
≥For details, refer to the operating instructions of your TV.
∫ When the HDMI terminal on the TV is labeled “HDMI (ARC)”
|
|
|
|
|
|
What is ARC? |
|
TV |
|||||
|
|
ARC is an abbreviation of Audio Return Channel, also known |
||||
|
|
|
|
|
|
|
|
|
|
|
|
|
as HDMI ARC. It refers to one of the HDMI functions. When |
|
|
|
|
|
||
|
|
|
|
|
||
|
|
|
|
|
|
you connect the unit to the terminal labeled “HDMI (ARC)”, the |
|
HDMI |
|
optical digital audio cable that is usually required in order to |
|||
|
|
listen to sound from TV is no longer required, and TV pictures |
||||
|
(ARC) |
|
||||
|
|
|
|
|
|
and sound can be enjoyed with a single HDMI cable. |
|
|
|
|
|
|
|
|
|
|
|
|
|
|
Getting started
HDMI AV OUT (ARC)
To enjoy TV audio from this home theater system’s speakers:
Select “ARC” as a source (> 23).
A HDMI cable
[BTT770] [BTT370] [BTT270] : not supplied
[BTT273] : supplied
∫ When the HDMI terminal on the TV is not labeled “HDMI (ARC)”
|
|
TV |
|
To enjoy TV audio from this home theater |
|
|
|
system’s speakers: |
|
|
|
|
|
|
|
|
|
|
|
|
|
|
|
|
|
|
|
|
|
OPTICAL |
1 |
Connect the TV and the main unit with the |
|
|
Optical digital audio cable (not supplied). |
|
HDMI |
OUT |
|
|
|
|
|
|
|
|
2 |
Select “DIGITAL IN” or “D-IN” as a source |
|
|
|
(> 23). |
|
A HDMI cable |
|
|
[BTT770] [BTT370] [BTT270] : not supplied |
|
[BTT273] : supplied |
||
|
||
|
B Optical digital audio cable (not supplied) |
HDMI AV OUT |
OPTICAL |
VQT3D27
15

Connection with Set Top Box, etc.
∫ [BTT770] [BTT370] When the connecting devices have an HDMI terminal
e.g., |
|
|
|
TV |
|||
|
|
||
AV IN |
AV OUT |
AV OUT |
|
(ARC) |
|
|
A HDMI cable (not supplied)
B Set Top Box (Cable/Satellite), etc.
COther devices (Video game, etc.)
≥Make sure that the HDMI cable connection is made to enjoy the videos from the Set Top Box, etc. Futhermore, select “HDMI Input1” or “HDMI Input2” as a source.
|
|
|
HDMI Standby Pass-Through ( 39) |
|
Even if this unit is in standby mode, a device connected with |
||
|
|
|
|
|
|
|
this unit can output videos and sound to the TV. |
|
|
|
Moreover, you can switch the HDMI input terminal by pressing |
|
|
|
[EXT-IN] on the remote control. |
|
|
|
≥ Sound will not be output from this unit's speakers. |
HDMI AV OUT |
|
HDMI IN 2 |
|
HDMI IN 1(CABLE/SAT) |
|
||
(ARC) |
|
||
∫ When the connecting devices do not have an HDMI terminal |
|||
e.g., |
|
|
To enjoy TV audio from this home theater |
TV |
|
|
system’s speakers: |
|
|
|
|
|
|
OPTICAL |
1 Connect the STB and the main unit with the |
|
|
OUT |
Optical digital audio cable (not supplied). |
|
|
|
2 Select “DIGITAL IN” or “D-IN” as a source |
|
|
|
( 23). |
A Refer to the operating instructions of the
respective devices for the optimal connections.
B Optical digital audio cable (not supplied)
C Set Top Box (Cable/Satellite), etc.
OPTICAL
Radio antenna connection
∫ Using an indoor antenna
Main unit |
|
|
|
||
|
|

FM ANT 75Ω
A FM indoor antenna (supplied)
BAdhesive tape
Affix this end of the antenna where reception is best.
VQT3D27
16
∫ Using an outdoor antenna
Use outdoor antenna if FM radio reception is poor.
e.g.,
Main unit


FM ANT 75Ω
AFM outdoor antenna [Using a TV antenna (not supplied)]
The antenna should be installed by a competent technician.
B 75 ≠ coaxial cable (not supplied)
C Antenna plug (not supplied)
Loading...