


 Loading...
Operating Instructions
Blu-ray Disc Player
DMP-BD80
DMP-BD60
DMP-BD601
DMP-BD605
The illustration shows the image of DMP-BD80.
Dear customer
Thank you for purchasing this product.
For optimum performance and safety, please read these instructions carefully.
Before connecting, operating or adjusting this product, please read the instructions completely. Please keep this manual for future reference.
Region management information
BD-Video |
Example: |
This unit plays BD-Video marked with labels containing the region code A. |
|
DVD-Video |
Example: |
|
This unit plays DVD-Video marked with labels containing the region number “1” or “ALL”. |
|
|
1 ALL |
12 |
4 |
|
|
As an ENERGY STAR® Partner, Panasonic has determined that
this product meets the ENERGY STAR® guidelines for energy efficiency.
 For Canada only: The word “Participant” is used in place of the word “Partner”.
If you have any questions contact
[U.S.A.[and[Puerto[Rico]:1-800-211-PANA(7262)
[Canada]:1-800-561-5505
[Only[for[U.S.A.[and[Puerto[Rico]:The warranty can be found on page 46.
[Canada]:The warranty can be found on page 47.
La referencia rápida en español se puede encontrar en la página 49.
|
|
|
|
|
RQT9378-4P |
|
|
P |
PC |
||
|
|
|
|
|
|
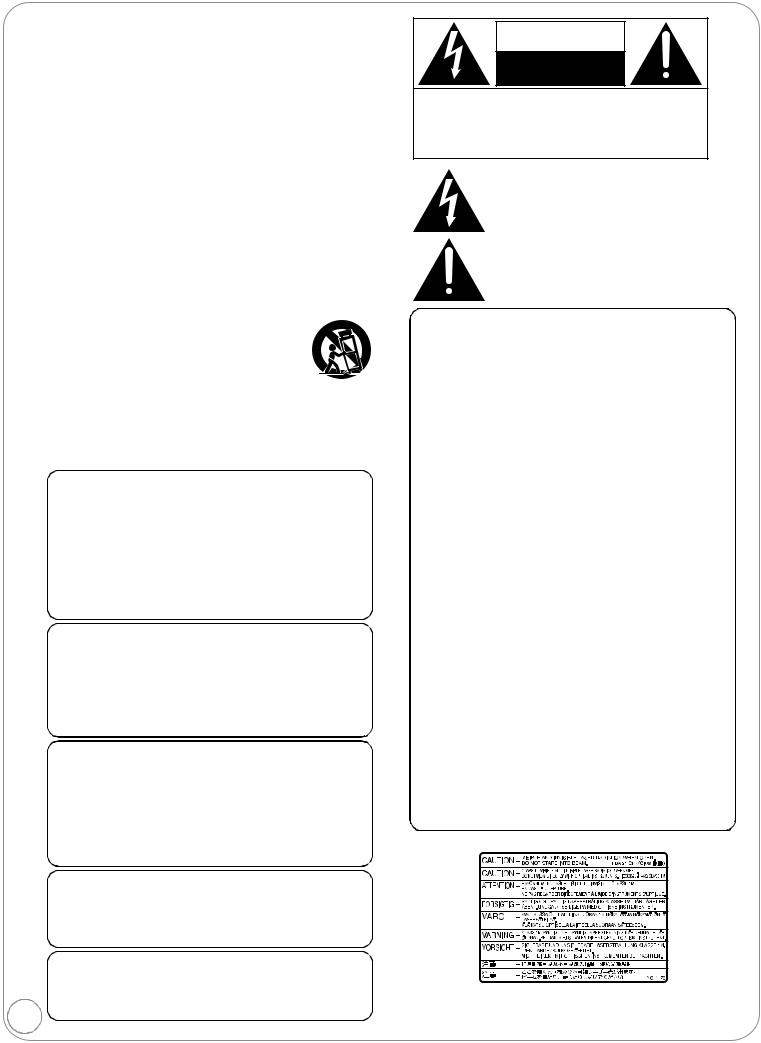
IMPORTANT SAFETY INSTRUCTIONS
Read these operating instructions carefully before using the unit. Follow the safety instructions on the unit and the applicable safety instructions listed below. Keep these operating instructions handy for future reference.
1)Read these instructions.
2)Keep these instructions.
3)Heed all warnings.
4)Follow all instructions.
5)Do not use this apparatus near water.
6)Clean only with dry cloth.
7)Do not block any ventilation openings. Install in accordance with the manufacturer’s instructions.
8)Do not install near any heat sources such as radiators, heat registers, stoves, or other apparatus (including amplifiers) that produce heat.
9)Do not defeat the safety purpose of the polarized or grounding-type plug. A polarized plug has two blades with one wider than the other. A grounding-type plug has two blades and a third grounding prong. The wide blade or the third prong are provided for your safety. If the provided plug does not fit into your outlet, consult an electrician for replacement of the obsolete outlet.
10)Protect the power cord from being walked on or pinched particularly at plugs, convenience receptacles, and the point where they exit from the apparatus.
11)Only use attachments/accessories specified by the manufacturer.
12)Use only with the cart, stand, tripod, bracket, or
table specified by the manufacturer, or sold with the apparatus. When a cart is used, use caution when moving the cart/apparatus combination to avoid injury from tip-over.
13) Unplug this apparatus during lightning storms or when unused for long periods of time.
14)Refer all servicing to qualified service personnel. Servicing is required when the apparatus has been damaged in any way, such as power-supply cord or plug is damaged, liquid has been spilled or objects have fallen into the apparatus, the apparatus has been exposed to rain or moisture, does not operate normally, or has been dropped.
WARNING:
TO REDUCE THE RISK OF FIRE, ELECTRIC SHOCK OR PRODUCT DAMAGE,
≥DO NOT EXPOSE THIS APPARATUS TO RAIN,
MOISTURE, DRIPPING OR SPLASHING AND THAT NO OBJECTS FILLED WITH LIQUIDS, SUCH AS VASES, SHALL BE PLACED ON THE APPARATUS.
≥USE ONLY THE RECOMMENDED ACCESSORIES. ≥DO NOT REMOVE THE COVER (OR BACK); THERE
ARE NO USER SERVICEABLE PARTS INSIDE. REFER SERVICING TO QUALIFIED SERVICE PERSONNEL.
CAUTION!
DO NOT INSTALL OR PLACE THIS UNIT IN A BOOKCASE, BUILT-IN CABINET OR IN ANOTHER CONFINED SPACE. ENSURE THE UNIT IS WELL VENTILATED. TO PREVENT RISK OF ELECTRIC SHOCK OR FIRE HAZARD DUE TO OVERHEATING, ENSURE THAT CURTAINS AND ANY OTHER MATERIALS DO NOT OBSTRUCT THE VENTILATION VENTS.
CAUTION!
THIS PRODUCT UTILIZES A LASER.
USE OF CONTROLS OR ADJUSTMENTS OR PERFORMANCE OF PROCEDURES OTHER THAN THOSE SPECIFIED HEREIN MAY RESULT IN HAZARDOUS RADIATION EXPOSURE.
DO NOT OPEN COVERS AND DO NOT REPAIR YOURSELF. REFER SERVICING TO QUALIFIED PERSONNEL.
CAUTION
Danger of explosion if battery is incorrectly replaced. Replace only with the same or equivalent type recommended by the manufacturer. Dispose of used batteries according to the manufacturer’s instructions.
|
The socket outlet shall be installed near the equipment and |
|
easily accessible. The mains plug of the power supply cord |
|
shall remain readily operable. |
|
To completely disconnect this apparatus from the AC Mains, |
2 |
disconnect the power supply cord plug from AC receptacle. |
|
CAUTION
RISK OF ELECTRIC SHOCK
DO NOT OPEN
CAUTION: TO REDUCE THE RISK OF ELECTRIC
SHOCK, DO NOT REMOVE SCREWS.
NO USER-SERVICEABLE PARTS
INSIDE.
REFER SERVICING TO QUALIFIED
SERVICE PERSONNEL.
The lightning flash with arrowhead symbol, within an equilateral triangle, is intended to alert the user to the presence of uninsulated “dangerous voltage” within the product’s enclosure that may be of sufficient magnitude to constitute a risk of electric shock to persons.
The exclamation point within an equilateral triangle is intended to alert the user to the presence of important operating and maintenance (servicing) instructions in the literature accompanying the appliance.
THE FOLLOWING APPLIES ONLY IN THE U.S.A.
FCC Note:
This equipment has been tested and found to comply with the limits for a Class B digital device, pursuant to Part 15 of the FCC Rules. These limits are designed to provide reasonable protection against harmful interference in a residential installation. This equipment generates, uses, and can radiate radio frequency energy and, if not installed and used in accordance with the instructions, may cause harmful interference to radio communications. However, there is no guarantee that interference will not occur in a particular installation. If this equipment does cause harmful interference to radio or television reception, which can be determined by turning the equipment off and on, the user is encouraged to try to correct the interference by one or more of the following measures:
≥Reorient or relocate the receiving antenna.
≥Increase the separation between the equipment and receiver. ≥Connect the equipment into an outlet on a circuit different from
that to which the receiver is connected.
≥Consult the dealer or an experienced radio/TV technician for help.
FCC Caution: To assure continued compliance, follow the attached installation instructions and use only shielded interface cables when connecting to peripheral devices.
Any changes or modifications not expressly approved by the party responsible for compliance could void the user’s authority to operate this equipment.
This device complies with Part 15 of the FCC Rules. Operation is subject to the following two conditions: (1) This device may not cause harmful interference, and (2) this device must accept any interference received, including interference that may cause undesired operation.
Declaration of Conformity
Trade Name: Panasonic
Model No.:DMP-BD80 DMP-BD60 DMP-BD601 DMP-BD605
Responsible Party:
Panasonic Corporation of North America One Panasonic Way
Secaucus, NJ 07094
Support Contact:
Panasonic Consumer Electronics Company Telephone No.: 1-800-211-PANA (7262)
(Inside of product)
RQT9378

Unit and media care
Disc and card handling
Clean discs
DO |
DO NOT |
Wipe with a damp cloth and then wipe dry.
Disc and card handling precautions
≥Handle discs by the edges to avoid inadvertent scratches or fingerprints on the disc.
≥Do not attach labels or stickers to discs (This may cause disc warping, rendering it unusable). ≥Do not write on the label side with a ball-point pen or other writing instrument.
≥Do not use record cleaning sprays, benzine, thinner, static electricity prevention liquids or any other solvent. ≥Do not use scratch-proof protectors or covers.
≥Clean any dust, water, or foreign matter from the terminals on the rear side of the card. ≥Do not use the following discs:
–Discs with exposed adhesive from removed stickers or labels (rented discs etc).
–Discs that are badly warped or cracked.
–Irregularly shaped discs, such as heart shapes.
Maintenance
Clean this unit with a soft, dry cloth
≥Never use alcohol, paint thinner or benzine to clean this unit.
≥Before using chemically treated cloth, carefully read the instructions that came with the cloth.
Observe the following points to ensure continued listening and viewing pleasure.
Dust and dirt may adhere to the unit’s lens over time, making it impossible to play discs.
Use the lens cleaner (not included) about once every year, depending on frequency of use and the operating environment. Carefully read the lens cleaner’s instructions before use.
Lens cleaner: RP-CL720PP
≥This lens cleaner is sold as specific for DIGA, but can be used without problem on this unit as well.
Getting started
To dispose or transfer this unit
This unit may record information of your operating procedures. If you discard this unit either by disposal or transfer, then follow the procedures to return all the settings to the factory presets to delete the recorded information. (> 42, “To return to the factory preset”)
≥When BD-Video is played back, the operation history may be recorded in the memory of this unit. The recorded contents differ depending on the disc.
3
RQT9378

Table of contents
Getting started |
Settings |
IMPORTANT SAFETY |
|
INSTRUCTIONS ................................ |
2 |
Unit and media care ............................ |
3 |
Accessory information........................ |
5 |
Media (Disc, card and USB device) |
|
information........................................ |
6 |
Audio and video information.............. |
8 |
Connections....................................... |
10 |
Remote control and unit |
|
reference guide............................... |
14 |
Setting ................................................ |
15 |
Broadband network connection....... |
16 |
Firmware updates.............................. |
16 |
Network settings................................ |
17 |
Inserting or removing a media................. |
19 |
Playback |
|
Basic play (Playing video contents) ...... |
19 |
Playing HD Video or SD Video ......... |
21 |
Enjoying BD-Live or BONUSVIEW |
|
in BD-Video ..................................... |
22 |
Chapter playback............................... |
23 |
Playing music .................................... |
23 |
Playing still pictures.......................... |
24 |
Playing DivX® videos......................... |
26 |
Enjoying VIERA CASTTM ................... |
27 |
Linked operations with the TV |
|
(VIERA LinkTM “HDAVI ControlTM”).......... |
28 |
Changing settings with |
|
|
the on-screen menu....................... |
|
30 |
Changing the unit’s settings............ |
32 |
|
Reference |
|
|
About MP3/JPEG/DivX files.............. |
38 |
|
Messages ........................................... |
|
40 |
Troubleshooting guide ..................... |
|
42 |
Specifications.................................... |
|
45 |
Limited Warranty (Only for U.S.A. |
|
|
and Puerto Rico) ............................ |
|
46 |
Limited Warranty |
|
|
(Only for CANADA) ........................ |
|
47 |
Product Service................................. |
|
48 |
Licenses............................................. |
|
48 |
Referencia rápida en español |
|
|
(Spanish Quick Reference) ........... |
49 |
|
Glossary............................................. |
|
50 |
Index.................................... |
Back cover |
|
About descriptions in these operating instructions
≥These operating instructions are applicable to models DMP-BD80, DMP-BD60, DMP-BD601 and DMP-BD605. Unless otherwise indicated, illustrations in these operating instructions are of DMP-BD80.
[BD80] : indicates features applicable to DMP-BD80 only.
[BD60] [BD601] [BD605] : indicate features applicable to DMP-BD60, DMP-BD601 and DMP-BD605, respectively.
4
RQT9378
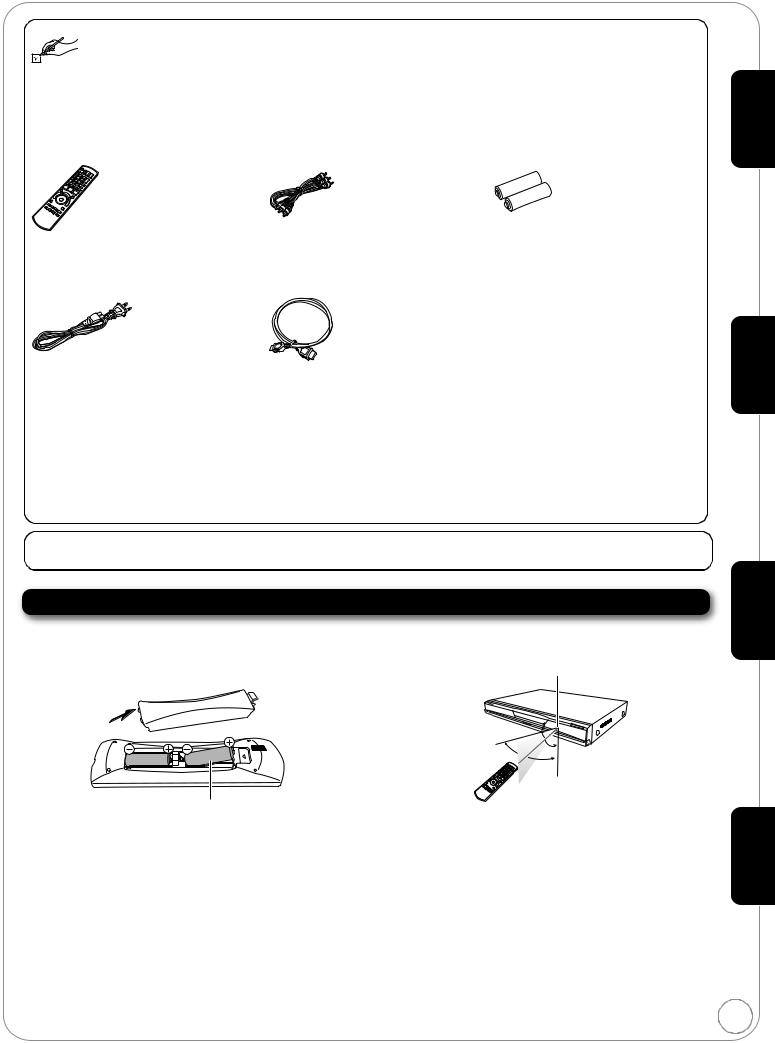
Accessory information
Please check and identify the supplied accessories. Use numbers indicated in parentheses when asking for replacement parts.
(Product numbers correct as of December 2008. These may be subject to change.)
Only for U.S.A. and Puerto Rico: To order accessories, refer to “Accessory Purchases (United States and Puerto Rico)” on page 46.
Only for Canada: To order accessories, call the dealer from whom you have made your purchase.
∏ |
∏ |
∏ |
Getting started
|
|
|
|
|
|
|
|
|
|
|
|
|
|
|
|
|
|
|
|
|
|
|
|
|
|
|
|
|
|
|
|
|
|
|
|
|
|
|
|
1 Remote control |
1 Audio/Video cable |
2 Batteries |
|||||||
|
(N2QAYB000378) |
|
(K2KA6BA00004) |
|
for remote control |
||||
∏ |
∏ |
|
|
|
|||||
|
|
|
|
|
|
|
|
|
|
|
|
|
|
|
|
|
|
|
|
|
|
|
|
|
|
|
|
|
|
|
|
|
|
|
|
|
|
|
|
1 AC power supply cord |
1 HDMI cable |
(K2CB2CB00022) |
(DMP-BD605 only) |
≥For use with this unit only. |
(K1HA19DA0005) |
Do not use it with other equipment. |
|
Also, do not use cords from other |
|
equipment with this unit. |
|
(Only for U.S.A. and Puerto Rico) Product Registration Card
Please complete and return the included product registration card, or register via the Internet at: http://www.prodreg.com/panasonic/
(ONLY FOR CANADA)
The enclosed Canadian French label sheet corresponds to the English display on the front and back side of the unit.
Using the remote control
Batteries |
Use |
Insert so the poles (i and j) match those in the remote control. |
Remote control signal sensor |
When closing the lid, insert it from the j (minus) side. |
Playback
Settings

R6/LR6, AA
≥Use alkaline or manganese batteries. ≥Do not mix old and new batteries.
≥Do not use different types at the same time. ≥Do not heat or expose to flame.
≥Do not leave the battery(ies) in an automobile exposed to direct sunlight for a long period of time with doors and windows closed.
≥Do not take apart or short circuit.
≥Do not attempt to recharge alkaline or manganese batteries. ≥Do not use batteries if the covering has been peeled off. Mishandling of batteries can cause electrolyte leakage which can damage items the fluid contacts and may cause a fire.
Remove batteries if the remote control is not going to be used for a long period of time. Store in a cool, dark place.
|
20˚ |
|
30˚ |
20˚ |
|
30˚ |
||
|
||
|
7 m (23 feet) directly in front |
|
|
of the unit |
If you cannot operate the unit or other equipment using the remote |
Reference |
|
control after changing the batteries, please re-enter the codes |
||
|
||
(> 15, 36). |
|
CAUTION
Do not place objects in front of the unit. The disc tray may collide with objects when it is opened, and this may cause injury.
5
RQT9378
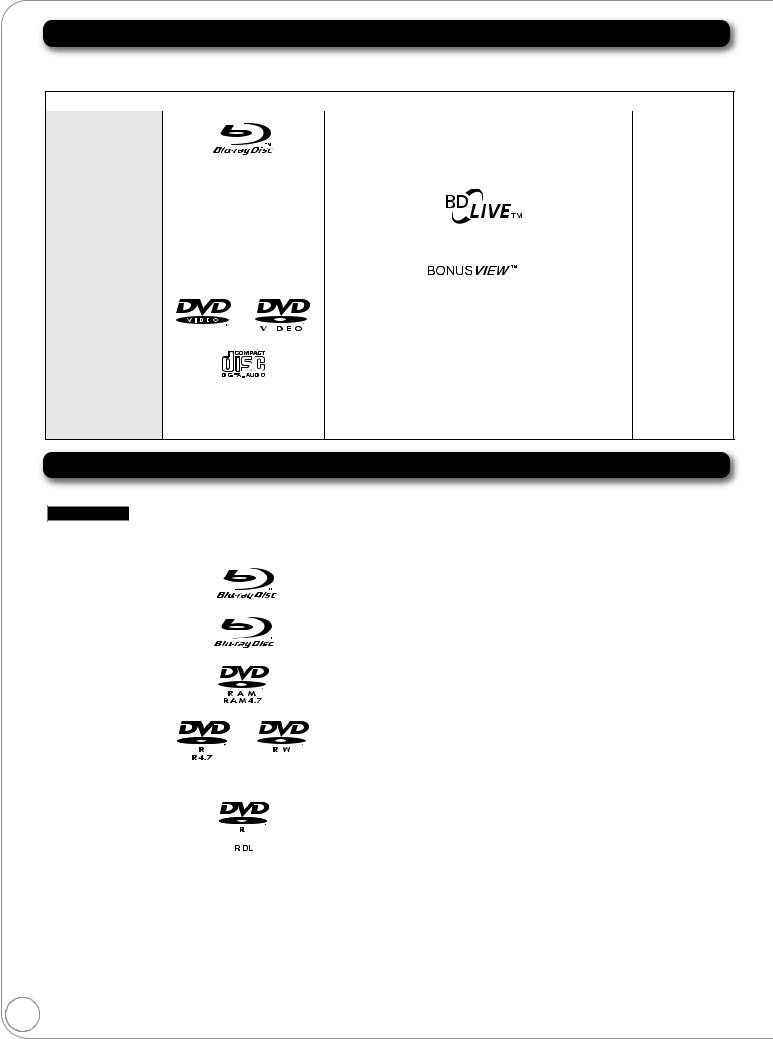
Media (Disc, card and USB device) information
Commercially sold discs
This chart shows the different type of retail/commercial discs you can use, and also includes the industry-standard logos that should appear on the discs and/or packaging.
Type of media |
|
|
Logo |
|
|
|
Features |
Indicated as |
||||||||
|
|
|
|
|
|
|
|
|
|
|
|
|
|
|
|
|
BD-Video |
|
|
|
|
|
|
|
|
|
This format supports High Definition video and audio content |
[BD-V] |
|||||
|
|
|
|
|
|
|
|
|||||||||
|
|
|
|
|
|
|
|
|
|
|
including: |
|
||||
|
|
|
|
|
|
|
|
|
|
|
≥BD-Live (BD-ROM Profile 2). This format provides interactive |
|
||||
|
|
|
|
|
|
|
|
|
|
|
features when this player is connected to the Internet via a |
|
||||
|
|
|
|
|
|
|
|
|
|
|
||||||
|
|
|
|
|
|
|
|
|
|
|
broadband connection. |
|
||||
|
|
|
|
|
|
|
|
|
|
|
|
|
|
|
||
|
|
|
|
|
|
|
|
|
|
|
|
|
|
|
|
|
|
|
|
|
|
|
|
|
|
|
|
≥BONUSVIEW allows picture-in-picture functions to be |
|
||||
|
|
|
|
|
|
|
|
|
|
|
viewed. |
|
||||
|
|
|
|
|
|
|
|
|
|
|
|
|
|
|
|
|
|
|
|
|
|
|
|
|
|
|
|
|
|
|
|
|
|
|
|
|
|
|
|
|
|
|
|
|
|
|
|
|
|
|
DVD-Video |
|
|
|
|
|
|
|
|
|
|
This format supports high quality video and audio playback. |
[DVD-V] |
||||
|
|
|
|
|
|
|
|
|
|
|||||||
|
|
|
|
|
|
|
|
|
|
|
|
|
|
|
|
|
|
|
|
|
|
|
|
|
|
|
|
|
|
|
|
|
|
|
|
|
|
|
|
|
|
|
|
|
|
|
|
|
|
|
CD |
|
|
|
|
|
|
|
|
|
Compact Discs (CD’s) that contain audio and music |
[CD] |
|||||
|
|
|
|
|
|
|
|
|
||||||||
|
|
|
|
|
|
|
|
|
|
|
≥Operation and sound quality of CDs that do not conform to |
|
||||
|
|
|
|
|
|
|
|
|
|
|
CD-DA specifications (copy control CDs, etc.) cannot be |
|
||||
|
|
|
|
|
|
|
|
|
|
|
|
|||||
|
|
|
|
|
|
|
|
|
|
|
|
|||||
|
|
|
|
|
|
|
|
|
|
|
guaranteed. |
|
||||
≥The digital audio content side of a DualDisc does not meet the technical specifications of the Compact Disc Digital Audio (CD-DA) format so play may not be possible.
User recorded media
This chart shows the different type of discs recorded with other devices that you can use.
Finalized This mark means you must finalize the disc with the DVD recorder, etc. before playback. For details about finalizing, refer to the operating instructions for your equipment.
|
Type of media |
|
|
|
|
Logo |
Formats |
Indicated as |
|||||
|
BD-RE |
|
|
|
|
|
|
|
|
|
≥Version 3 of the BD-RE Recording Format |
[BD-V] |
|
|
|
|
|
|
|
|
|
|
|||||
|
|
|
|
|
|
|
|
|
|
|
|
≥JPEG format |
[JPEG] |
|
|
|
|
|
|
|
|
|
|
|
|
|
|
|
|
|
|
|
|
|
|
|
|
|
|
|
|
|
BD-R |
|
|
|
|
|
|
|
|
|
≥Version 2 of the BD-R Recording Format |
[BD-V] |
|
|
|
|
|
|
|
|
|
|
|||||
|
|
|
|
|
|
|
|
|
|
|
|
|
|
|
|
|
|
|
|
|
|
|
|
|
|
|
|
|
DVD-RAM |
|
|
|
|
|
|
|
|
|
≥Version 1.1 of the DVD Video Recording Format |
[DVD-VR] |
|
|
|
|
|
|
|
|
|
|
|||||
|
|
|
|
|
|
|
|
|
|
|
|
≥JPEG format |
[JPEG] |
|
|
|
|
|
|
|
|
|
|
|
|
≥AVCHD format |
[AVCHD] |
|
|
|
|
|
|
|
|
|
|
|
|
|
|
|
|
|
|
|
|
|
|
|
|
|
|
|
|
|
DVD-R/RW |
|
|
|
|
|
|
|
|
|
≥DVD-Video Format |
[DVD-V] |
|
|
|
|
|
|
|
|
|
|
|
||||
|
|
|
|
|
|
|
|
|
|
|
|
≥Version 1.1 of the DVD Video Recording Format |
[DVD-VR] |
|
Finalized |
|
|
|
|
|
|
|
|
|
|
||
|
|
|
|
|
|
|
|
|
|
|
≥AVCHD format |
[AVCHD] |
|
|
|
|
|
|
|
|
|
|
|
|
|
||
|
|
|
|
|
|
|
|
|
|
|
|
≥[BD80]: DivX format (DVD-RW is not supported) |
[DivX] |
|
|
|
|
|
|
|
|
|
|
|
|
≥MP3 format (DVD-RW is not supported) |
[MP3] |
|
|
|
|
|
|
|
|
|
|
|
|
≥JPEG format (DVD-RW is not supported) |
[JPEG] |
|
DVD-R DL |
|
|
|
|
|
|
|
|
|
≥DVD-Video Format |
[DVD-V] |
|
|
|
|
|
|
|
|
|
|
|
||||
|
|
|
|
|
|
|
|
|
|
|
|
≥Version 1.2 of the DVD Video Recording Format |
[DVD-VR] |
|
Finalized |
|
|
|
|
|
|
|
|
|
|
||
|
|
|
|
|
|
|
|
|
|
|
≥AVCHD format |
[AVCHD] |
|
|
|
|
|
|
|
|
|
|
|
|
|
||
|
|
|
|
|
|
|
|
|
|
|
|
≥[BD80]: DivX format |
[DivX] |
|
|
|
|
|
|
|
|
|
|
|
|
≥MP3 format |
[MP3] |
|
|
|
|
|
|
|
|
|
|
|
|
||
|
|
|
|
|
|
|
|
|
|
|
|
≥JPEG format |
[JPEG] |
rR/rRW/rR DL |
|
|
|
|
— |
≥+VR (+R/+RW Video Recording) Format |
[DVD-V] |
||||||
|
|
|
|
|
|
|
≥AVCHD format |
[AVCHD] |
|||||
|
Finalized |
|
|
|
|
|
|||||||
|
|
|
|
|
|
|
|
|
|
|
|
|
|
|
|
|
|
|
|
|
|
|
|
|
|
|
|
|
CD-R/RW |
|
|
|
|
|
|
|
|
|
≥CD-DA format |
[CD] |
|
|
|
|
|
|
|
|
— |
≥MP3 format |
[MP3] |
||||
|
Finalized |
|
|
|
|
|
|||||||
|
|
|
|
|
|
≥JPEG format |
[JPEG] |
||||||
|
|
|
|
|
|
|
|||||||
|
|
|
|
|
|
|
|
|
|
|
|
≥[BD80]: DivX format |
[DivX] |
|
|
|
|
|
|
|
|
|
|
|
|
|
|
≥It may not be possible to play the above discs in some cases due to the type of discs, the condition of the recording, the recording method and how the files were created.
≥When a disc recorded in the AVCHD format is being played, the video may be paused for a few seconds at portions spliced, due to deletion or editing.
6
RQT9378
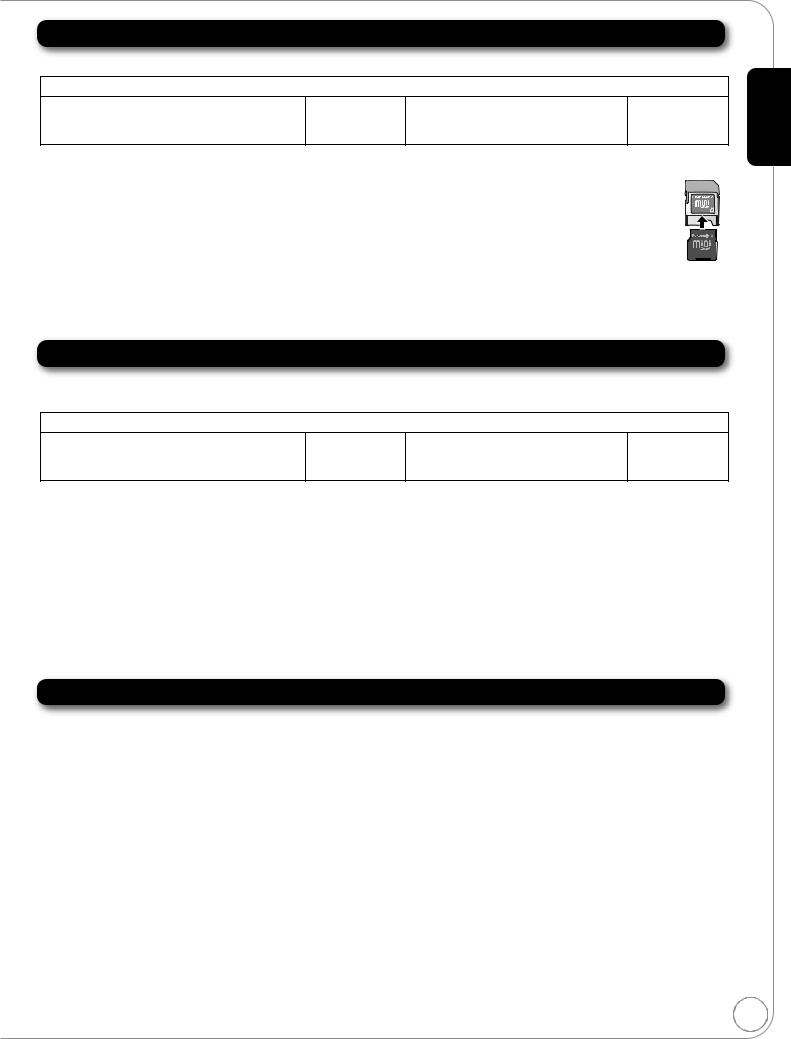
SD cards
This chart shows the different type of cards recorded with other devices that you can use.
Type of media |
Logo |
Formats |
Indicated as |
|
|
|
|
SD Memory Card* (from 8 MB to 2 GB) |
— |
≥JPEG format |
[JPEG] |
SDHC Memory Card (from 4 GB to 32 GB) |
≥AVCHD format |
[AVCHD] |
|
|
|
≥MPEG2 format |
[MPEG2] |
|
|
|
|
* Includes miniSD Card and microSD Card
The card types mentioned above will be referred to as “SD card” in these operating instructions.
≥MiniSD Cards and microSD Cards can be used, but must be used with an adaptor card. These are usually supplied with such cards, or otherwise customer provided.
≥We recommend using a Panasonic SD card. Please confirm the latest information on the following website.
http://panasonic.co.jp/pavc/global/cs |
ADAPTER |
(This site is in English only.) ≥This unit is compatible with SD Memory Cards that meet SD Card Specifications FAT12 and FAT16 formats, as well as SDHC Memory Cards in FAT32 format. ≥When using cards from 4 GB to 32 GB, only SD cards using the SDHC logo can be used.
≥Useable memory is slightly less than the card capacity.
≥If the SD card you are attempting to use was formatted on a PC, it is possible that the card may not work properly. ≥Keep the Memory Card out of reach of children to prevent swallowing.
≥When a card recorded in the AVCHD format is being played, the video may momentarily pause, especially where one recording ends and the next one begins. This is normal and does not indicate a problem.
≥To protect the card’s contents, move the record prevention tab (on the SD card) to “LOCK”.
USB devices
This unit can playback pictures by connecting the USB memory recorded with a PC or similar in following formats, and Panasonic digital cameras connected via USB cable.
Type of media |
Logo |
Formats |
Indicated as |
|
|
|
|
USB devices |
— |
≥MP3 format |
[MP3] |
|
≥JPEG format |
[JPEG] |
|
|
|
≥[BD80]: DivX format |
[DivX] |
|
|
|
|
Compatible USB devices
≥USB devices which are defined as USB mass storage class.
– USB devices that support USB 1.0/1.1 and USB 2.0 Full Speed/High Speed. ≥USB devices of up to 128 GB can be used.
≥USB devices that support bulk only transfer. CBI (Control/Bulk/Interrupt) is not supported.
≥Digital Cameras which require additional program installation when connected to a PC are not supported. ≥MTP (Media Transport Protocol) device is not supported.
≥A multi-port USB card reader is not supported.
File system
≥FAT12, FAT16 and FAT32 file systems are supported. ≥UDF/NTFS/exFAT file system is not supported. ≥Depending on the sector size, some files may not work.
≥Only the first partition on USB devices with multi-partition is supported.
Despite meeting the conditions mentioned above, there may be USB device that cannot be used with this unit.
This unit does not support USB device charging.
Discs that cannot be played in this unit
≥BD-RE discs (with cartridge) ≥2.6 GB and 5.2 GB DVD-RAM
≥DVD-RAM that cannot be removed from cartridge ≥3.95 GB and 4.7 GB DVD-R (Authoring) ≥Version 1.0 DVD-RW
≥DVD-ROM, CD-ROM, CDV, SACD, Photo CD, MV-Disc and PD ≥DVD-Audio
≥Video CD and SVCD ≥WMA discs
≥[BD60] [BD601] [BD605]: DivX discs
≥PAL Discs
≥HD DVD
≥BD-Video discs recorded at a rate of 50 fields/sec ≥Any other disc that is not specifically supported
Getting started
7
RQT9378

Audio and video information
About audio from audio output terminals
Before connecting, read the table below, and confirm the desired audio type and necessary settings (“BD-Video Secondary Audio”, “Dolby D/Dolby D +/Dolby TrueHD” or “DTS/DTS-HD”). (> 9)
≥The number of channels listed is the maximum possible number of output channels.
HDMI AV OUT/DIGITAL AUDIO OUT (Coaxial [BD80]/Optical)
Terminal |
|
HDMI AV OUT |
|
DIGITAL AUDIO OUT |
|||
“Dolby D/Dolby D +/Dolby TrueHD”/ |
“Bitstream”*1 |
“PCM”*3 |
“Bitstream” |
“PCM” |
|||
“DTS/DTS-HD” |
|||||||
|
|
|
|
|
|
||
“BD-Video Secondary Audio” |
“On”*2 |
“Off” |
“On” |
“Off” |
“On”/“Off” |
“On”/“Off” |
|
Dolby Digital/ |
Dolby Digital/ |
Dolby Digital/ |
|
|
Dolby Digital/ |
|
|
Dolby Digital |
5.1ch PCM |
Dolby Digital |
|
||||
Dolby Digital EX*5 |
Dolby Digital EX |
|
|||||
EX*6 |
|
|
EX*6 |
|
|||
Dolby Digital Plus |
|
Dolby Digital |
|
|
|
|
|
Dolby Digital |
Plus |
5.1ch PCM*2 |
7.1ch PCM |
Dolby Digital |
|
||
|
|
||||||
Dolby TrueHD |
|
Dolby TrueHD |
|
|
|
|
|
DTS Digital Surround/ |
DTS Digital |
DTS Digital |
[DVD-V]: 5.1ch PCM |
DTS Digital |
Down-mixed |
||
Surround/ |
Surround/ |
|
|
Surround/ |
|||
DTS-ES*5 |
[BD-V]: 7.1ch PCM*4 |
||||||
DTS-ES*6 |
DTS-ES |
DTS-ES*6 |
2ch PCM |
||||
DTS-HD High Resolution Audio |
|
DTS-HD High |
|
|
|
|
|
DTS Digital |
Resolution |
|
|
DTS Digital |
|
||
|
Audio |
7.1ch PCM*4 |
|
||||
|
Surround |
Surround |
|
||||
DTS-HD Master Audio |
DTS-HD Master |
|
|
|
|||
|
|
|
|
|
|||
|
Audio |
|
|
|
|
||
|
|
|
|
|
|
||
7.1ch LPCM |
Down-mixed |
7.1ch PCM |
Down-mixed |
7.1ch PCM |
Down-mixed |
|
|
5.1ch PCM |
5.1ch PCM*2 |
2ch PCM |
|
||||
AUDIO OUT (Analog) |
|
|
|
|
|
|
|
|
|
|
|
|
|
|
|
Terminal |
7.1ch AUDIO OUT [BD80] |
5.1ch AUDIO |
2ch AUDIO |
|
|
||
OUT [BD80] |
OUT |
|
|
||||
|
|
|
|
|
|||
“BD-Video Secondary Audio” |
“On” |
“Off” |
“On”/“Off” |
“On”/“Off” |
|
|
|
Dolby Digital/ |
5.1ch |
|
|
|
|
||
Dolby Digital EX |
|
|
|
|
|||
|
|
|
|
|
|
||
Dolby Digital Plus |
5.1ch*2 |
7.1ch |
|
|
|
|
|
Dolby TrueHD |
|
|
|
|
|||
|
|
|
|
|
|
||
DTS Digital Surround/ |
[DVD-V]: 5.1ch |
5.1ch |
2ch |
|
|
||
DTS-ES |
[BD-V]: 7.1ch*4 |
|
|
||||
|
|
|
|
||||
DTS-HD High Resolution Audio |
7.1ch*4 |
|
|
|
|
||
DTS-HD Master Audio |
|
|
|
|
|||
|
|
|
|
|
|
||
7.1ch LPCM |
Down-mixed |
7.1ch |
|
|
|
|
|
5.1ch*2 |
|
|
|
|
|||
|
|
|
|
|
|
|
|
≥Also, depending on the specifications or the settings of the amplifier/receiver, the results of the output may vary.
*1 When the connected equipment is not supported with these audio formats, the audio is output as Dolby Digital bitstream, DTS Digital Surround bitstream or down-mixed 2ch PCM (e.g., TV).
*2 [BD-V]: When playing BD-Video without secondary audio or button click sound, the audio is output as the same format as if “BD-Video Secondary Audio” was set to “Off”.
*3 When the connected equipment is not supported with multi channel surround, the audio is output as down-mixed 2ch PCM.
*4 [BD-V]: When the connected equipment is supported with 7.1 channel surround, the audio output is amplified from 5.1ch or 6.1ch to 7.1ch depending on the DTS, Inc. specifications.
*5 With PCM output, Dolby Digital EX becomes PCM audio decoded as Dolby Digital, DTS-ES recorded to DVD-Video becomes PCM audio decoded as DTS Digital Surround, and DTS-ES recorded to BD-Video becomes PCM audio decoded as DTS-ES.
*6 [BD-V]: When “BD-Video Secondary Audio” is set to “On”, Dolby Digital EX is output as Dolby Digital and DTS-ES is output as DTS Digital Surround, however if playing BD-Video without secondary audio or button click sound, the audio is output as the original format.
Enjoying High Bit rate Audio of BD-Video [BD-V]
This unit supports high bit rate audio (Dolby Digital Plus, Dolby TrueHD, DTS-HD High Resolution Audio and DTS-HD Master Audio) adopted in BD-Video. In order to enjoy these audio formats, the following conditions are necessary. (Part shown in the shaded area of table given above)
NECESSARY CONNECTIONS
≥HDMI AV OUT terminal: (> 12)
≥7.1ch AUDIO OUT terminal [BD80]: (> 12)/5.1ch AUDIO OUT terminal [BD80]: (> 13)
NECESSARY SETTINGS (> 9)
≥Set “BD-Video Secondary Audio” to “Off”.
≥HDMI AV OUT terminal: Set “Dolby D/Dolby D +/Dolby TrueHD” or “DTS/DTS-HD” to “Bitstream” or “PCM” . ≥7.1ch AUDIO OUT terminal [BD80]: Set “Analog Audio Output” to “7.1ch”.
≥5.1ch AUDIO OUT terminal [BD80]: Set “Analog Audio Output” to “2ch (Downmix) + 5.1ch”.
8 ≥The button click sound on the menu and audio with secondary video in picture-in-picture mode (> 22) is not output.
RQT9378
Regarding 24p output [BD-V]
Many BD-Video movie contents are recorded in 24 frames/second in accordance with the film materials. However, they will normally be output in 60 frames/second in accordance with the display format.
These can be output in 24p as the original. Therefore, high-quality video can be enjoyed, such as the improved clarity, enhanced perspective, etc.
NECESSARY CONNECTIONS
≥Connect to a TV supporting 1080/24p input via an HDMI cable.
NECESSARY SETTINGS
≥“24p Output”: “On” (> 34)
Necessary settings for audio output
After connecting to the terminals, perform necessary settings.
“BD-Video |
1) |
While stopped |
Secondary Audio” |
|
Press [SETUP]. |
|
2) |
Press [3, 4] to select “Audio” and press [OK]. |
“Dolby D/Dolby D +/ |
3) |
Press [3, 4] to select “Digital Audio Output” and press [OK]. |
Dolby TrueHD” |
4) |
Press [3, 4] to select “Dolby D/Dolby D +/Dolby TrueHD”, “DTS/DTS-HD”, |
“DTS/DTS-HD” |
|
or “BD-Video Secondary Audio” and press [2, 1] to select the option. |
Audio
Dynamic Range Compression |
Off |
Digital Audio Output |
|
PCM Down Conversion |
Off |
Downmix |
Stereo |
High Clarity Sound |
Disable |
OK |
|
RETURN |
|
“Analog Audio |
1) While stopped |
Connection |
|
|
Output” [BD80] |
|
Press [SETUP]. |
HDMI Connection |
|
|
|
|
TV Aspect |
16:9 |
|
2) |
Press [3, 4] to select “TV / Device Connection” and press [OK]. |
Component Video Resolution |
480i |
|
3) |
Press [3, 4] to select “Analog Audio Output” and press [OK]. |
||
|
Analog Audio Output |
2ch + 5.1ch |
||
|
4) |
Press [3, 4] to select the option and press [OK]. |
|
|
|
5) |
Press [OK]. |
|
|
|
≥The channel setting screen is displayed. (> 37) |
OK |
|
|
|
|
|
RETURN |
|
≥For more information about settings, refer to page 33, 34, 37.
≥When using the different terminal at the same time, the sound may not be output with the desired audio if the setting is incorrect. In the following case, set “HDMI Audio Output” to “Off”. (> 34)
–[BD80]: When connecting a compatible amplifier/receiver using 7.1ch AUDIO OUT/5.1ch AUDIO OUT terminals, and connecting a compatible television using HDMI AV OUT terminal
–[BD80]: When connecting a compatible amplifier/receiver using both 7.1ch AUDIO OUT/5.1ch AUDIO OUT terminals and HDMI AV OUT terminal if outputting the audio from analog terminals
–When connecting a compatible amplifier/receiver using DIGITAL AUDIO OUT terminals, and connecting a compatible television using HDMI AV OUT terminal
To return to the previous screen
Press [RETURN].
To exit the screen
Press [SETUP].
Getting started
9
RQT9378
Connections
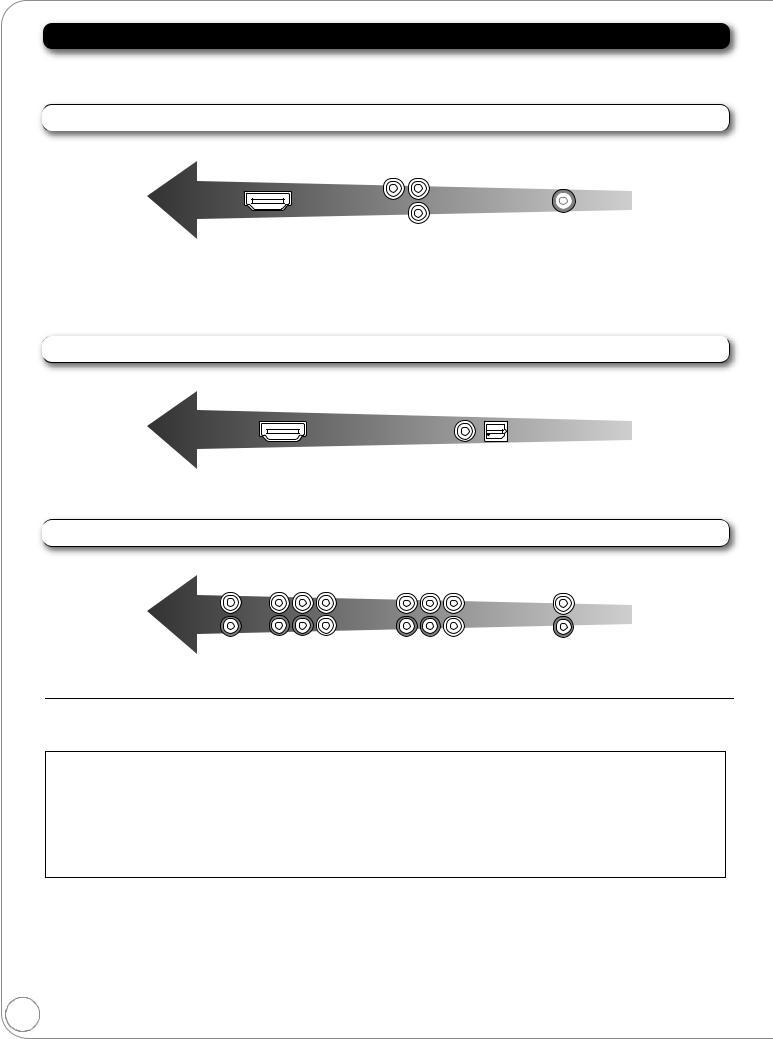
About terminal
≥This unit offers several different types of audio and video connections.
≥Your TV/receiver/amplifier may or may not support all the connections shown.
Video Connections (TV) (> 11)
Highest |
|
Standard |
Quality |
|
Quality |
HDMI AV OUT |
COMPONENT VIDEO OUT |
VIDEO OUT |
480p, 720p, 1080i, |
BD-Video: 480i, 480p, 720p, |
480i |
1080p |
1080i |
|
|
DVD-Video: 480i, 480p |
|
Digital Audio Connections (Receiver/Amplifier) (> 12)
Highest |
Standard |
Quality |
Quality |
HDMI AV OUT |
DIGITAL AUDIO OUT |
|
(COAXIAL [BD80]/OPTICAL) |
Analog Audio Connections (Receiver/Amplifier) (> 12, 13)
Highest |
Standard |
Quality |
Quality |
7.1ch AUDIO OUT [BD80] |
5.1ch AUDIO OUT [BD80] 2ch AUDIO OUT |
≥Do not place the unit on amplifiers/receivers or equipment that may become hot. The heat can damage the unit. ≥Before making any connections we strongly suggest that all units be temporarily disconnected from AC power.
≥Do not connect video signals through a video recorder. Due to copy guard protection the picture may not be displayed properly
≥Non-HDMI-compliant cables cannot be utilized.
≥[BD80] [BD60] [BD601]: Please use High Speed HDMI Cables that have the HDMI logo (as shown on the cover). It is recommended that you use Panasonic’s HDMI cable. When outputting 1080p signal, please use HDMI cables 5.0 meters (16.4 ft) or less.
Recommended part number:
RP-CDHG10 (1.0 m/3.3 ft), RP-CDHG15 (1.5 m/4.9 ft.), RP-CDHG20 (2.0 m/6.6 ft), RP-CDHG30 (3.0 m/9.8 ft.), RP-CDHG50 (5.0 m/16.4 ft.), etc.
≥This unit incorporates HDMI (Deep Color, x.v.ColorTM, High Bit rate Audio) technology. (> 50, 51)
10
RQT9378
Video Connections (TV)
For audio output, refer to pages 12 and 13.
A Connecting to your TV, via HDMI AV OUT |
≥“HDMI Video Mode” and “HDMI Audio |
||
|
|
Output” should be set to “On”. (> 34) |
|
HDMI cable |
|
≥The HDMI connection supports VIERA |
|
HDMI IN |
Link “HDAVI Control” (> 28) when used |
||
(Only included in |
Television |
with a compatible Panasonic TV. |
|
DMP-BD605) |
≥This cable provides both Video and Audio |
||
|
|||
|
|
connections. |
|
Back of the unit
HDMI AV OUT
B Connecting to your TV, via COMPONENT VIDEO OUT |
≥Connect terminals of the same color. |
|
|
|
≥Set the “Black Level Control” to “Darker”. |
|
|
(> 32) |
|
|
≥Using the COMPONENT VIDEO OUT |
|
|
terminal, while playing DVD-Video, the |
Television |
|
video output resolution is limited to |
COMPONENT |
“480p”. |
|
|
VIDEO IN |
≥Be sure your TV supports at least 480p. |
|
|
|
|
|
Set “Component Video Resolution” to |
|
|
“480p”, “720p” or “1080i”. (> 34) |
|
|
≥If this unit is connected to an amplifier/ |
|
Component Video cable |
receiver, etc. via an HDMI cable with |
|
|
“HDMI Video Mode” set to “On” (> 34), |
Back of the unit |
|
the video will be fixed to 480i. |
|
≥[BD80] : Set “High Clarity Sound” on the |
|
|
|
on-screen menu to “Off” (> 31). |
|
|
(Otherwise, the video will not be output.) |
|
|
|
|
|
|
|
|
|
|
|
|
|
|
|
|
|
|
|
|
|
|
|
|
|
|
|
|
|
|
|
|
|
|
|
|
C Connecting to your TV, via VIDEO OUT |
≥Connect terminals of the same color. |
||||||||||
|
|
|
|
|
|
|
|
|
|
|
≥[BD80] : Set “High Clarity Sound” on the |
|
|
|
|
|
|
|
|
|
|
|
on-screen menu to “Off” (> 31). |
|
|
|
|
|
|
|
|
|
|
|
(Otherwise, the video will not be output.) |
|
Television |
|
|
|
AUDIO IN |
|
|||||
|
|
|
|
|
|
|
VIDEO IN |
|
|||
R L |
VIDEO IN |
||||||||||
|
|
||||||||||
|
|
|
|
|
|
|
|
|
|
|
|
|
|
|
|
|
|
|
|
|
|
|
|
|
|
|
|
|
|
|
|
|
|
|
|
|
|
|
|
|
|
|
|
|
|
|
|
|
|
|
|
|
|
|
|
|
|
|
|
|
|
|
|
|
|
|
|
|
|
|
|
Audio/Video cable (included)
Back of the unit
VIDEO OUT
Getting started
11
RQT9378

Connections
Digital Audio Connections
D Connecting to HDMI AV OUT terminal |
|
≥“HDMI Video Mode” and “HDMI Audio Output” |
|
|
|
should be set to “On”. (> 34) |
|
|
|
≥“Digital Audio Output” : Depending on the |
|
Multi channel speakers |
Television |
connected amplifier/receiver. (> 33) |
|
≥The HDMI connection supports VIERA Link |
|||
|
|
||
|
|
“HDAVI Control” (> 28) when used with a |
|
|
|
compatible Panasonic TV. |
|
HDMI OUT |
≥Enjoying High Bit rate Audio of BD-Video |
||
(> 8) |
|||
HDMI IN |
|
||
HDMI IN |
|
||
Amplifier/receiver |
|
||
|
|
||
HDMI cable |
|
|
|
(Only included in DMP-BD605) |
|
||
|
Back of the unit |
|
|
E Connecting to Digital Audio Output terminal |
≥Please set “Digital Audio Output” to the |
||
|
|
connection you will use, coaxial or optical |
|
With COAXIAL ([BD80]) or OPTICAL |
Coaxial cable |
digital. (> 33) |
|
≥When connecting a TV (> 11, A) with HDMI |
|||
Back of the unit |
|
||
|
AV OUT terminal, set “HDMI Audio Output” to |
||
|
COAXIAL IN |
“Off”. (> 34) |
|
|
|
(Otherwise, the sound may not be output with |
|
|
OR |
the desired audio.) |
|
|
|
||
|
|
Amplifier/receiver |
|
|
OPTICAL IN |
|
|
Optical digital audio cable |
|
||
Analog Audio Connections
F Connecting to 7.1ch AUDIO OUT terminal [BD80]
|
Multi channel speakers |
|
|
|
|
|
Connect Audio |
|
|
cables to |
|
|
terminals |
|
corresponding to |
||
|
||
the speakers you |
||
|
have connected. |
|
Back of the unit |
|
Amplifier/receiver
≥“Analog Audio Output” should be set to “7.1ch”. (> 34)
≥Enjoying High Bit rate Audio of BD-Video (> 8)
≥When connecting amplifier/receiver or other devices with HDMI AV OUT terminal, set “HDMI Audio Output” to “Off”. (> 34)
(Otherwise, depending on the specifications of connected devices, the audio from AUDIO OUT terminal may be output as two channels only.)
≥When connecting a TV (> 11, A) with HDMI AV OUT terminal, set “HDMI Audio Output” to “Off”. (> 34)
(Otherwise, the sound may not be output with the desired audio.)
≥Depending on how the disc was recorded, the audio may not be output properly on the number of channels desired.
Cable connections
a Surround back speaker (L/R) b Front speaker (L/R)
c Surround speaker (L/R) d Center speaker
e Subwoofer
12
RQT9378

G Connecting to 5.1ch AUDIO OUT terminal [BD80] |
≥“Analog Audio Output” should be set to “2ch |
||
|
|
(Downmix) + 5.1ch”. (> 34) |
|
|
Multi channel speakers |
≥Enjoying High Bit rate Audio of BD-Video |
|
|
|
(> 8) |
|
|
|
≥Using this connection, 7.1 channel surround |
|
|
|
is mixed down to 5.1 channel audio. |
|
|
|
≥When connecting amplifier/receiver or other |
|
|
devices with HDMI AV OUT terminal, set |
||
|
|
“HDMI Audio Output” to “Off”. (> 34) |
|
|
Connect Audio |
(Otherwise, depending on the specifications |
|
|
of connected devices, the audio from AUDIO |
||
|
cables to |
||
|
terminals |
OUT terminal may be output as two channels |
|
|
corresponding to |
only.) |
|
|
the speakers you |
≥When connecting a TV (> 11, A) with HDMI |
|
have connected. |
AV OUT terminal, set “HDMI Audio Output” to |
||
|
|||
|
“Off”. (> 34) |
||
|
|
(Otherwise, the sound may not be output with |
|
|
|
the desired audio.) |
|
Back of the unit |
|
≥Depending on how the disc was recorded, the |
|
|
audio may not be output properly on the |
||
|
|
number of channels desired. |
|
|
|
|
|
|
|
|
|
|
|
|
|
|
|
|
|
|
|
|
|
|
|
|
|
Cable connections |
|
|
|
|
|
|
|
|
|
|
|
|
|
|
|
|
|
Amplifier/receiver |
|||||||
|
|
|
|
|
|
|
|
|
|
|
|
|
|
|
|
|
a Front speaker (L/R) |
|||||||
|
|
|
|
|
|
|
|
|
|
|
|
|
|
|
|
|
|
|
|
|
|
|
|
|
|
|
|
|
|
|
|
|
|
|
|
|
|
|
|
|
|
|
|
|
|
|
|
|
b Surround speaker (L/R) |
|
|
|
|
|
|
|
|
|
|
|
|
|
|
|
|
|
|
|
|
|
|
|
|
c Center speaker |
|
|
|
|
|
|
|
|
|
|
|
|
|
|
|
|
|
|
|
|
|
|
|
|
d Subwoofer |
|
|
|
|
|
|
|
|
|
|
|
|
|
|
|
|
|
|
|
|
|
|
|
|
|
H Connecting to 2ch AUDIO OUT terminal |
≥“Analog Audio Output” should be set to “2ch |
|||||||||||||||||||||||
|
|
|
|
|
|
|
|
|
|
|
|
|
|
|
|
|
|
|
|
|
|
|
|
(Downmix) + 5.1ch”. (> 34) |
|
|
|
OR |
≥Using the two analog audio channels this |
||||||||||||||||||||
|
|
|
connection provides, you will not be able to |
|||||||||||||||||||||
|
|
|
||||||||||||||||||||||
|
|
|
|
|
|
|
|
|
|
|
|
|
|
|
|
|
|
|
|
|
|
|
|
|
|
|
|
|
|
|
|
|
|
|
|
|
|
|
|
|
|
|
|
|
|
|
|
|
use any surround sound audio modes. |
|
Television |
|
|
|
|
|
|
|
|
|
|
|
|
|
|
|
|
|
|
|
|
|
|
|
AUDIO IN |
|
|||||||||||||||||||||||
|
|
|
|
|||||||||||||||||||||
|
|
|
R L |
VIDEO IN |
|
|
||||||||||||||||||
|
|
|
|
|
|
|
|
|
|
|
|
|
|
|
|
|
|
|
|
|
|
|
|
|
|
|
|
|
|
|
|
|
|
|
|
|
|
|
|
|
|
|
|
|
|
|
|
|
|
|
|
|
|
|
|
|
|
|
|
|
|
|
|
|
Amplifier/receiver |
|
||||||||
|
|
|
|
|
|
|
|
|
|
|
|
|
|
|
||||||||||
|
|
|
|
|
|
|
|
|
|
|
|
|
|
|
|
|
|
|
|
|
|
|
|
|
|
|
|
|
|
|
|
|
|
|
|
|
|
|
|
|
|
|
|
|
|
|
|
|
|
|
|
|
|
|
|
|
|
|
|
|
|
|
|
|
|
|
|
|
|
|
|
|
|
|
|
|
|
|
|
|
|
|
|
|
|
|
|
|
|
|
|
|
|
|
|
|
|
|
|
|
|
|
|
|
|
|
|
|
|
|
|
|
||||||||||||
|
|
|
AUDIO IN |
|
||||||||||||||||||||
|
|
|
|
|
|
|
|
|
|
|
|
|
Audio/Video cable (included) |
|
||||||||||
|
Back of the unit |
|
|
|
|
|
|
|
|
|
|
|
|
|
|
|
|
|
|
|
|
|
|
|
|
|
|
|
|
|
|
|
|
|
|
|
|
|
|
|
|
|
|
|
|
|
|
||
|
|
|
|
|
|
|
|
|
|
|
|
|
|
|
|
|
|
|
|
|
|
|
||
|
|
|
|
|
|
|
|
|
|
|
|
|
|
|
|
|
|
|
|
|
|
|
||
|
|
|
|
|
|
|
|
|
|
|
|
|
|
|
|
|
|
|
|
|
|
|
||
|
|
|
|
|
|
|
|
|
|
|
|
|
|
|
|
|
|
|
|
|
|
|
||
 2ch AUDIO OUT
AC power connection
Cooling fan
Back of the unit
AC power supply cord (included) 

To a household AC outlet
(AC 120 V, 60 Hz)
≥For best results this unit should be connected directly to an AC outlet.
≥This unit consumes a small amount of AC power (“Quick Start”: “Off”, less than 0.5 W) even when turned off. In the interest of power conservation, if you will not be using this unit for an extended period of time, it can be disconnected.
Getting started
13
RQT9378

Remote control and unit reference guide


|
|
|
|
|
|
|
OK |
|
|
|
|
|
|


!Turn the unit on and off (> 15)
@TV operation buttons (> 15)
You can operate the TV through the unit’s remote control.
[Í TV POWER] : Turn the television on and off [INPUT] : Input select
[i j VOL] : Adjust the volume [W X CH] : Channel select
# Open or close the disc tray (> 19)
$Select title numbers, etc./Enter numbers or characters (> 18, 20)
(The character buttons may be used when operating VIERA CAST contents. B 27) [CANCEL] : Cancel
%Basic playback control buttons (> 19, 20)
^Show status messages (> 20)
&Show Pop-up menu (> 19)
* Show Top menu/Direct Navigator (> 19) ( Show sub menu (> 24)
AJ These buttons are used when;
≥Operating a BD-Video disc that includes JavaTM applications (BD-J). For more information about operating this kind of disc, please read the
instructions that came with the disc. ≥Displaying “Title View” and “Album View” screens.
(Only the [R] and [G] buttons, B 24)
≥Operating contents of VIERA CAST. (> 27) AA Show Setup menu (> 32)
AB Switch on/off Secondary Video (Picture-in-picture) (> 22)
AC Transmit the remote control signal
AD Adjust the volume of an amplifier/receiver through the unit’s remote control.
AE Select audio (> 21)
AF Reproduce more natural audio (> 21) AG Show FUNCTIONS menu (> 21)
AH Selection/OK, Frame-by-frame (> 20) AI Show on-screen menu (> 30)
BJ Return to previous screen
BA Select drive (BD/DVD/CD, SD card or USB device) (> 19)
BB Displays the Home screen of the VIERA CAST (> 27)
|
|
|
|
|
|
||||||
|
|
|
|
|
|
|
|
|
|
|
|
|
|
|
|
|
|
|
|
|
|
|
|
|
|
|
|
|
|
|
|
|
|
|
|
|
|
|
|
|
|
|
|
|
|
|
|
|
|
|
|
|
|
|
|
|
|
|
|
SD
CARD
PULL-OPEN
|
|
|
|
|
|
|
|
|
|
|
|
|
|
|
|
|
|
|
|
|
|
|
|
|
|
|
|
|
|
|
|
|
|
||
|
|
|
|
|
|
|
|
|
|
|
|
|
|
|
|||
|
|
|
|
|
|
|
|
|
|
|
|
|
|
|
|||
1 POWER button (POWER Í/I) (> 15) |
5 Remote control signal sensor (> 5) |
||||||||||||||||
Press to switch the unit from on to standby mode or vice versa. In |
6 USB port (> 19) |
||||||||||||||||
standby mode, the unit is still consuming a small amount of power. |
7 SD card slot (> 19) |
||||||||||||||||
2 Display |
|
|
|
|
|
|
8 Open or close the disc tray (> 19) |
||||||||||
|
|
|
|
|
|
|
|
|
|
|
|
|
9 Stop (> 20) |
||||
|
|
|
|
|
|
|
|
|
|
|
|
|
|||||
|
|
|
|
|
|
|
|
|
|
|
|
|
: Pause (> 20) |
||||
|
|
|
|
|
|
|
|
|
|
|
|
|
|||||
Disc indicator |
|
SD card indicator USB device indicator |
; Start play (> 19) |
||||||||||||||
The indicator blinks when reading data from a disc, a card or a USB
device, or writing data to a card. Rear panel terminals (> 10–16) 3 Disc tray (> 19)
4[BD80]: SD Card LED
≥It is possible to set the LED to turn on/off. (> 34, SD Card LED 14 Control)
Pull to flip down the front panel.
RQT9378

Setting
Easy Setting
After connecting your new player and pressing the power button, a screen for the basic settings will appear.
Preparation
Turn on the television and select the appropriate video input on the television.
1 Press [Í POWER]. |
|
≥You can perform this setup anytime by |
|
selecting “Easy Setting” in the Setup |
|
Setup screen appears. |
POWER |
menu. (> 35) |
≥If this unit is connected to a Panasonic TV (VIERA) |
|
≥You can also change these settings |
supporting HDAVI Control 2 or later via an HDMI cable, |
|
|
|
individually. (> 33–35) |
|
then the “On-screen Language” and “TV Aspect” setting |
|
|
information on the TV are captured from the TV. |
OK |
|
2 Follow the on-screen instructions and |
|
|
make the settings with [3, 4] and [OK]. |
|
|
“On-screen Language”, “TV Aspect”, “Analog Audio Output” [BD80] and “Quick Start” are set. (> 33–35)
Getting started
Reprogramming the remote control for TV/amplifier/receiver control
You can operate the TV or amplifier/receiver using the unit’s remote control.
Point the remote control at the television or amplifier/receiver.
1 For televisions
Input the 4-digit code with the numbered buttons while pressing [Í TV POWER].
For amplifiers/receivers
Input the 4-digit code with the numbered buttons while pressing [RECEIVER j VOL].
e.g., 0001: [0] B [0] B [0] B [1]
2 Test by turning on the television or adjusting the volume of the amplifier/receiver.
≥If your television or amplifier/receiver brand has more than one code listed, select the one that allows correct operation.
≥If your television or amplifier/receiver brand is not listed or if the code listed for them does not allow control of your television or amplifier/receiver, this remote control is not compatible with them. Use their remote control.
Brand |
TV Code |
|
Brand |
TV Code |
|
Brand |
Amplifier |
Receiver Code |
|
|
|
Code |
|
||||||
|
|
|
|
|
|
|
|
|
|
|
|
|
|
|
|
|
|
|
|
Panasonic |
0051/0055/0250/0650 |
|
MITSUBISHI |
0014/0019/0093/0098/0150/0155/0178/ |
|
Panasonic |
0308 |
1308/0039/0367/1641/2001/ |
|
ADVENT |
0761/0783/0815/0817/0842 |
|
0331/0358/0836/0868/1250 |
|
2002 |
|
|||
|
|
|
|
|
|
||||
AKAI |
0030/0098/0672/0702/0812 |
|
NORCENT |
0748/0824/1089 |
|
TECHNICS |
0308 |
1308/0039/0208 |
|
AMERICA ACTION 0180 |
|
OPTOMA |
0887 |
|
BOSE |
0674 |
1229/0639/1253/1933 |
|
|
AOC |
0003/0019/0030/0052/0137/0185 |
|
ORION |
0179/0236/0463/1463 |
|
DENON |
|
1360/0004/0121/0273/1142/ |
|
|
|
|
PHILIPS |
0054/0690/1154/1454 |
|
|
1306/1311 |
|
|
APEX DIGITAL |
0748/0765/0767/0879/0890 |
|
|
|
|||||
|
|
|
|
|
|||||
|
|
|
|
|
|
HARMAN |
|
0110/0189/1289/1306 |
|
AUDIOVOX |
0003/0092/0180/0451/0623/0802/0875/ |
|
PHILIPS |
0020/0024/0028/0030/0036/0054/0096/ |
|
|
|||
1937 |
|
0179/0186/0187/0230/0386/0690/0706/ |
|
KARDON |
|
0110/0189/1289/1306 |
|
||
|
|
MAGNAVOX |
|
|
|
||||
|
|
|
0802/1154/1254/1454 |
|
KENWOOD |
|
1313/0027/0042/0077/0186 |
|
|
AXION |
1937 |
|
|
|
|||||
|
|
|
|
|
|||||
|
|
|
PIONEER |
0038/0166/0172/0679/0866 |
|
|
|
|
|
BANG & OLUFSEN0620/1620 |
|
|
KLH |
|
1390/1412/1428 |
|
|||
BROKSONIC |
0003/0236/0463 |
|
POLAROID |
0765/0865/1262/1276/1314/1316/1326/ |
|
LINN |
|
0189 |
|
CASIO |
0611/1205 |
|
|
1327/1328/1341/1498/1523 |
|
MARANTZ |
|
1189/1269/0039/0189/1120/ |
|
|
PROSCAN |
0047/0747/1347/1447 |
|
|
|
||||
|
|
|
|
|
1289 |
|
|||
DAEWOO |
0019/0039/0066/0067/0091/0092/0451/ |
|
|
|
|||||
|
|
|
|
|
|||||
0623/0661/0672/1661 |
|
PROVIEW |
0835/1401/1498 |
|
MCINTOSH |
0251 |
1289 |
|
|
|
|
|
|
0018/0019/0029/0038/0047/0090/0135/ |
|
|
|
|
|
|
0019/0038/0039/0154/0158/0171/0177/ |
|
|
|
NAD |
|
0320 |
|
|
EMERSON |
0178/0179/0180/0181/0182/0183/0185/ |
|
RCA |
0174/0278/0679/0747/1047/1147/1247/ |
|
ONKYO |
|
0135/0380/1298/1320 |
|
|
0236/0270/0280/0282/0463/0623 |
|
|
1347/1447/1547 |
|
|
|
|
|
|
|
|
|
PHILIPS |
|
1189/1269/0189/0391/1120/ |
|
||
|
|
RUNCO |
0017/0030/0251/0497/0603 |
|
|
|
|||
ENVISION |
0030/0813 |
|
|
|
1266/1368 |
|
|||
EPSON |
0833/0840 |
|
SAMPO |
0030/0032/0039/0052/0100/0110/1755 |
|
PIONEER |
0823 |
1023/0150/0244/0531/0630/ |
|
FISHER |
0154/0159 |
|
SAMSUNG |
0019/0030/0032/0056/0060/0178/0329/ |
|
1343/1384 |
|
||
|
|
|
|
|
|||||
|
|
|
0408/0427/0587/0702/0766/0812/0814/ |
|
|
|
|
|
|
FUJITSU |
0179/0186/0683/0809/0853 |
|
|
QUASAR |
|
0039 |
|
||
|
|
1060 |
|
|
|
||||
|
0021/0027/0029/0047/0051/0055/0135/ |
|
|
|
RCA |
0823 |
1023/1609/1254/0054/0530/ |
|
|
|
|
SANSUI |
0463 |
|
|
||||
GE |
0138/0174/0178/0251/0279/0282/0451/ |
|
|
0531/1074/1390/1511 |
|
||||
|
0747/1347/1447 |
|
SANYO |
0088/0107/0146/0154/0159/0232/0484/ |
|
SAMSUNG |
|
1295 |
|
|
|
0799/0893 |
|
|
|
||||
GOLDSTAR |
0019/0030/0032/0106/0178/0317/0409/ |
|
|
|
SANYO |
|
1251/1469/1801 |
|
|
|
|
0039/0093/0153/0157/0165/0220/0281/ |
|
|
|
||||
0442/0457/0700/0856/1178/1265 |
|
SHARP |
|
SHARP |
|
0186/1361 |
|
||
|
|
|
|
|
|||||
|
|
|
|
0386/0398/0491/0688/0818/0851 |
|
|
|
|
|
GO VIDEO |
0886 |
|
|
|
SHERWOOD |
|
0491/0502/1077/1423/1517/ |
|
|
HAIER |
0768/1034 |
|
SONY |
0000/0011/0080/0111/0273/0353/0810/ |
|
|
1653 |
|
|
|
0834/0867/1100 |
|
|
|
|
||||
HANNSPREE |
1348/1351/1352 |
|
|
|
SONY |
0815/ |
1622/0158/0168/0474/1367/ |
|
|
|
SVA |
0587/0748/0768/0865/0870/0871/0872 |
|
|
|||||
HEWLETT |
1088/1089/1101/1494/1502 |
|
|
1126 |
1529/1658/1758 |
|
|||
|
|
0020/0028/0030/0054/0065/0096/0171/ |
|
|
|
||||
PACKARD |
|
SYLVANIA |
|
TEAC |
|
0463/1074/1390 |
|
||
|
|
0381 |
|
|
|
||||
HISENSE |
0748 |
|
|
|
TOSHIBA |
|
0135 |
|
|
|
SYMPHONIC |
0171/0180 |
|
|
|
||||
HITACHI |
0016/0032/0038/0056/0095/0097/0145/ |
|
|
YAMAHA |
0354 |
1023/0176/0186/1331 |
|
||
|
SYNTAX-BRILLIAN 1007/1144/1240/1255/1257/1258/1331 |
|
|
||||||
0151/0173/0227/0279/0409/0413/1145 |
|
|
|
|
|
|
|||
|
|
TATUNG |
0003/0049/0055/0396/1101/1756 |
|
|
|
|
|
|
INFOCUS |
0736/0738/0741/0752/0781/1164/1516 |
|
|
|
|
|
|
||
|
THOMSON |
0209/0210/0047 |
|
|
|
|
|
||
JVC |
0036/0053/0069/0160/0169/0182/0731/ |
|
|
|
|
|
|
||
|
|
0036/0060/0149/0154/0156/0650/0832/ |
|
|
|
|
|
||
1253 |
|
|
|
|
|
|
|
||
|
|
TOSHIBA |
0845/1156/1164/1256/1265/1356/1656/ |
|
|
|
|
|
|
KLH |
0765/0767 |
|
|
|
|
|
|
||
|
|
1704 |
|
|
|
|
|
||
LG |
0019/0030/0032/0106/0178/0317/0409/ |
|
|
|
|
|
|
|
|
|
ULTRA |
0391 |
|
|
|
|
|
||
0442/0457/0700/0856/1178/1265 |
|
|
|
|
|
|
|||
|
|
VIEWSONIC |
0857/0864/0885/1755 |
|
|
|
|
|
|
LOEWE |
0136 |
|
|
|
|
|
|
||
|
WESTINGHOUSE |
0885/0889/0890/1282/1577 |
|
|
|
|
|
||
|
0020/0024/0028/0030/0036/0054/0096/ |
|
|
|
|
|
|
||
|
|
YAMAHA |
0019/0030/0769/0833/0839 |
|
|
|
|
|
|
MAGNAVOX |
0179/0186/0187/0230/0386/0706/0802/ |
|
|
|
|
|
|
||
|
1254/1454 |
|
ZENITH |
0016/0017/0092/0178/0463/1265 |
|
|
|
|
|
MARANTZ |
0030/0054/0444/0704/0854/0855/1154 |
|
|
|
|
|
|
|
15 |
MEMOREX |
0016/0106/0150/0154/0178/0179/0463 |
|
|
|
|
|
|
|
|
|
|
|
|
|
|
|
|
|
|
RQT9378
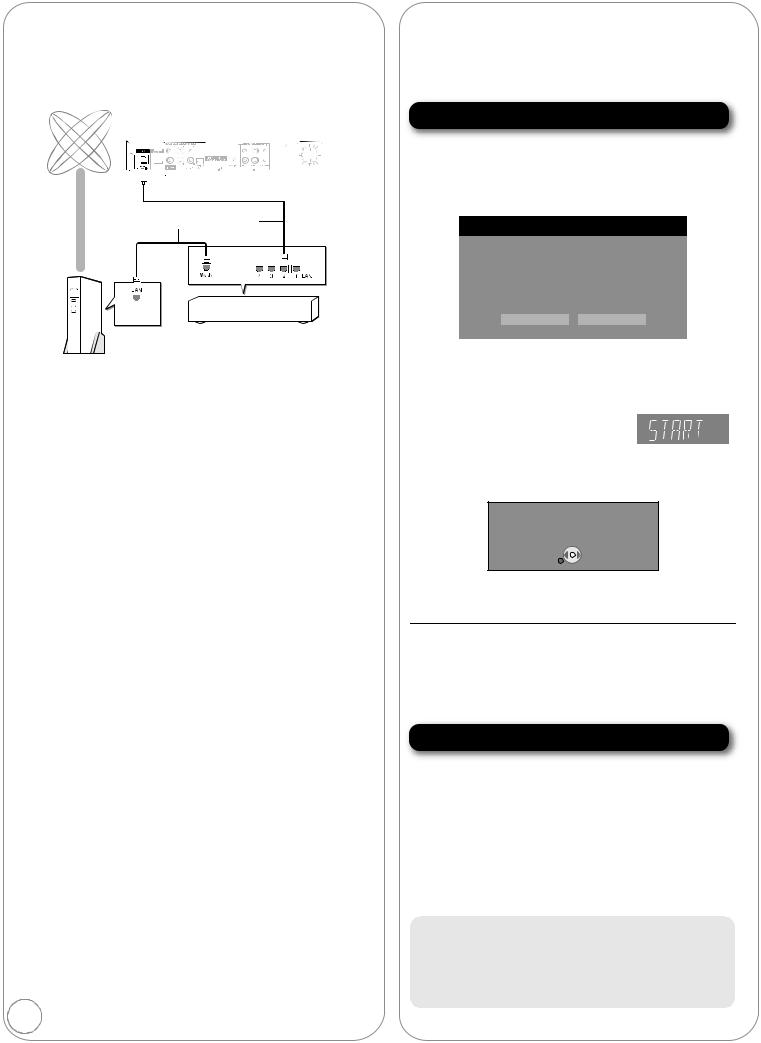
Broadband network connection
The following services can be used when this unit is connected to broadband.
≥Firmware can be updated (B right) ≥You can enjoy the BD-Live (> 22) ≥You can enjoy the VIERA CAST (> 27)
Internet
Back of the unit
Straight LAN cable (not included)
Broadband router, etc.
Telecommunications equipment (modem, etc.)
≥Use shielded LAN cables when connecting to peripheral devices. ≥With installation where your broadband modem is connected
directly to your PC, a router must be installed. ≥Use a router that supports 10BASE-T/100BASE-TX.
≥In case all available connection on your router is being used, a hub or switch can be installed to provide additional connections.
≥When operating the VIERA CAST, use high-speed internet service no less than 1.5 Mbps for SD (Standard Definition) and 6 Mbps for HD (High Definition) picture quality by your local broadband company.
–If using slow Internet connection, the video may not be displayed correctly.
≥After physically connecting this unit to your broadband connection, some configuration is required. (> 17)
≥Inserting any cable other than a LAN cable in the LAN terminal can damage the unit.
16
Firmware updates
Occasionally, Panasonic releases firmware updates for this BD Player. Firmware is embedded software that controls this unit’s microprocessor. These updates may add or improve a feature of this unit. Firmware updates may also be released to correct operating irregularities that are discovered with certain movies. These updates are available at no charge.
Automatically check the firmware
This unit is capable of auto firmware check if it is connected to the Internet via a broadband connection.
When latest firmware version is available, the following screen is displayed.
Select “Yes” or “No”.
Firmware Update
The latest firmware is available. Latest Online Version: x.x Current Installed Version: x.x
Do you want to start firmware update?
For the update information, please visit the following website: http://panasonic.net/support/
Yes |
No |
≥If “Yes” is selected, then follow the on-screen instructions. ≥If “No” is selected, then manually update the firmware later.
(B below)
After the latest firmware is downloaded, the system will be restarted and the firmware will be updated.
When the system is restarted, the screen display disappears and “START” is displayed on the unit’s display.
After the firmware is updated and the system is restarted, the following screen indicates that the firmware update has been completed.
The firmware was updated.
Current Installed Version: x.x
 OK
OK

 RETURN
≥During the update process, no other operations can be performed. Serious damage may occur if you turn the power off and/or press any buttons.
≥Downloading will require several minutes. It may take longer or the Internet may not be connected depending on the connection environment. It is required that you use a broadband connection.
≥When the unit is connected to the Internet, communication charges may be generated.
≥If you do not want to check for the latest firmware version when the unit is turned on, set “Automatic Update Check” to “Off”. (> 36)
Manually updating the firmware
If the firmware update is not carried out when the unit is turned on, a message is displayed when displaying the FUNCTIONS menu.
The latest firmware is available.
Please update firmware in Setup.
1)Press [SETUP].
2)Press [3, 4] to select “Others” and press [OK].
3)Press [3, 4] to select “Firmware Update” and press [OK].
4)Press [3, 4] to select “Update Now” and press [OK].
5)Press [2, 1] to select “Yes” and press [OK].
If downloading on this unit fails or this unit is not connected to the Internet, then you can download the latest firmware from the following website and burn it to a CD-R to update the firmware.
http://panasonic.net/support/
(This site is in English only.)
RQT9378
Loading...