


 Loading...
Owner’s Manual
Blu-ray DiscTM Player
Model No. DMP-BDT210
DMP-BDT110
The illustration shows the image of DMP-BDT210.
Dear customer
Thank you for purchasing this product.
For optimum performance and safety, please read these instructions carefully.
Before connecting, operating or adjusting this product, please read the instructions completely. Please keep this manual for future reference.
If you have any questions contact
U.S.A. and Puerto Rico : 1-800-211-PANA(7262)
Canada : 1-800-561-5505
|
|
|
|
|
VQT3B58 |
|
|
|
|
|
|
|
|
P |
PC |
IMPORTANT SAFETY INSTRUCTIONS
Read these operating instructions carefully before using the unit. Follow the safety instructions on the unit and the applicable safety instructions listed below. Keep these operating instructions handy for future reference.
1Read these instructions.
2Keep these instructions.
3Heed all warnings.
4Follow all instructions.
5Do not use this apparatus near water.
6Clean only with dry cloth.
7Do not block any ventilation openings. Install in accordance with the manufacturer’s instructions.
8Do not install near any heat sources such as radiators, heat registers, stoves, or other apparatus (including amplifiers) that produce heat.
9Do not defeat the safety purpose of the polarized or grounding-type plug. A polarized plug has two blades with one wider than the other. A grounding-type plug has two blades and a third grounding prong. The wide blade or the third prong are provided for your safety. If the provided plug does not fit into your outlet, consult an electrician for replacement of the obsolete outlet.
10Protect the power cord from being walked on or pinched particularly at plugs, convenience receptacles, and the point where they exit from the apparatus.
11Only use attachments/accessories specified by the manufacturer.
12Use only with the cart, stand, tripod, bracket, or table specified by the manufacturer, or sold with the apparatus. When a cart is used, use caution when moving the cart/apparatus combination to avoid injury from tip-over.
13 Unplug this apparatus during lightning storms or when unused for long periods of time.
14Refer all servicing to qualified service personnel. Servicing is required when the apparatus has been damaged in any way, such as power-supply cord or plug is damaged, liquid has been spilled or objects have fallen into the apparatus, the apparatus has been exposed to rain or moisture, does not operate normally, or has been dropped.
WARNING
Unit
To reduce the risk of fire, electric shock or product damage,
–Do not expose this unit to rain, moisture, dripping or splashing.
–Do not place objects filled with liquids, such as vases, on this unit.
–Use only the recommended accessories.
–Do not remove covers.
–Do not repair this unit by yourself. Refer servicing to qualified service personnel.
CAUTION
CAUTION
RISK OF ELECTRIC SHOCK
DO NOTOPEN
CAUTION : TO REDUCE THE RISK OF ELECTRIC
SHOCK, DO NOT REMOVE SCREWS.
NO USER-SERVICEABLE PARTS
INSIDE.
REFER SERVICING TO QUALIFIED
SERVICE PERSONNEL.
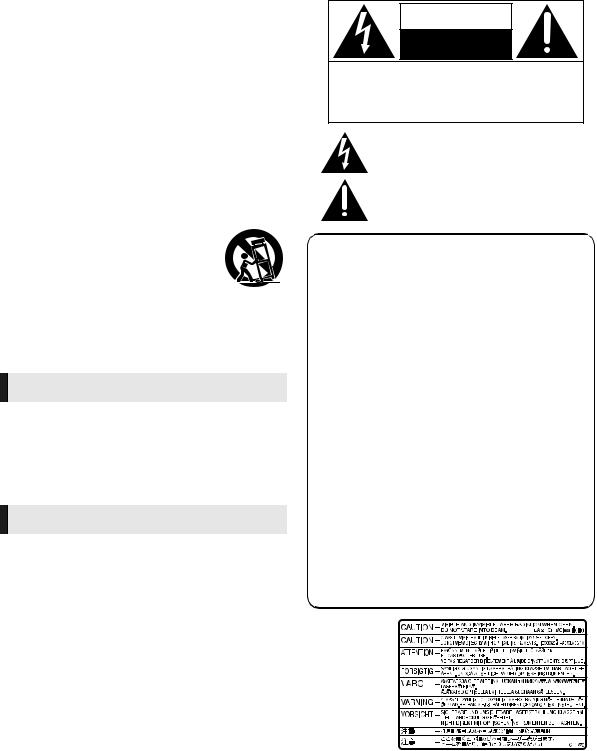
The lightning flash with arrowhead symbol, within an equilateral triangle, is intended to alert the user to the presence of uninsulated “dangerous voltage” within the product’s enclosure that may be of sufficient
magnitude to constitute a risk of electric shock to persons.
The exclamation point within an equilateral triangle is intended to alert the user to the presence of important operating and maintenance (servicing) instructions in the literature accompanying the appliance.
THE FOLLOWING APPLIES ONLY IN THE U.S.A. FCC Note:
This equipment has been tested and found to comply with the limits for a Class B digital device, pursuant to Part 15 of the FCC Rules. These limits are designed to provide reasonable protection against harmful interference in a residential installation. This equipment generates, uses, and can radiate radio frequency energy and, if not installed and used in accordance with the instructions, may cause harmful interference to radio communications. However, there is no guarantee that interference will not occur in a particular installation. If this equipment does cause harmful interference to radio or television reception, which can be determined by turning the equipment off and on, the user is encouraged to try to correct the interference by one or more of the following measures:
≥Reorient or relocate the receiving antenna.
≥Increase the separation between the equipment and receiver.
≥Connect the equipment into an outlet on a circuit different from that to which the receiver is connected.
≥Consult the dealer or an experienced radio/TV technician for help.
FCC Caution: To assure continued compliance, follow the attached installation instructions and use only shielded interface cables when connecting to peripheral devices.
Any changes or modifications not expressly approved by the party responsible for compliance could void the user’s authority to operate this equipment.
This device complies with Part 15 of the FCC Rules. Operation is subject to the following two conditions: (1) This device may not cause harmful interference, and (2) this device must accept any interference received, including interference that may cause undesired operation.
Unit
–This unit utilizes a laser. Use of controls or adjustments or performance of procedures other than those specified herein may result in hazardous radiation exposure.
–Do not place sources of naked flames, such as lighted candles, on this unit.
Placement
To reduce the risk of fire, electric shock or product damage,
–Do not install or place this unit in a bookcase, built-in cabinet or in another confined space. Ensure this unit is well ventilated.
–Do not obstruct this unit’s ventilation openings with newspapers, tablecloths, curtains, and similar items.
Responsible Party:
Panasonic Corporation of North America
One Panasonic Way, Secaucus, NJ 07094
Support Contact:
Panasonic Consumer Electronics Company
Telephone No.: 1-800-211-PANA (7262)
(Inside of product)
2 VQT3B58

Table of contents
Getting started
IMPORTANT SAFETY INSTRUCTIONS . . . . . . . . . . . . . . . . 2
Accessories. . . . . . . . . . . . . . . . . . . . 4
Unit and media care . . . . . . . . . . . . . 4 Control reference guide . . . . . . . . . . 5
Playable discs/Cards/USB devices. . 6
Connections & Settings
STEP 1 : Connecting to a TV . . . . . . 8 STEP 2 : Connecting to an amplifier/
receiver . . . . . . . . . . . . . . . 9
STEP 3 : Connecting to a broadband network . . . . . . . . . . . . . . 10
STEP 4 : Connecting to an AC power source . . . . . . . . . . . . . . . 12
STEP 5 : Settings . . . . . . . . . . . . . . 12
Playback
Inserting or removing media . . . . . . 16 HOME menu . . . . . . . . . . . . . . . . . . 16
Playing video contents . . . . . . . . . . 17
Enjoying 3D video . . . . . . . . . . . . . . 20 Playing still pictures . . . . . . . . . . . . 21 Playing music . . . . . . . . . . . . . . . . . 22 Enjoying VIERA CASTTM. . . . . . . . . 23 Playing contents saved on other equipment . . . . . . . . . . . . . . . . . . . . 24 Linked operations with the TV
(VIERA LinkTM “HDAVI ControlTM”) . . . . . . 26
|
Settings |
|
|
|
|
started |
|
|
|
|
|
|
Getting |
|
|
|
|
|
|
|
|
|
|
Playback menu |
|
27 |
|
||||
. . . . . . . |
|
|
|||||
Setup menu . . . . . . . . . . . . |
. . . . . . . |
29 |
|
|
|||
|
Reference |
|
|
|
|
Settings |
|
|
|
|
|
|
|
||
|
|
|
|
|
|
||
|
|
|
|
|
|
|
|
Troubleshooting guide |
|
34 |
|
||||
. . . . . . . |
& |
|
|||||
. . . . . . . . . . . . . .Messages |
. . . . . . . |
37 |
Connections |
|
|||
.Supplemental information |
. . . . . . . |
38 |
|
|
|||
Specifications . . . . . . . . . . . |
. . . . . . . |
39 |
|
|
|||
Limited Warranty (ONLY FOR U.S.A. |
|
|
|||||
AND PUERTO RICO) . . . . |
. . . . . . . |
41 |
|
|
|||
|
|
|
|||||
Limited Warranty |
|
|
|
|
|
|
|
(Only for CANADA) . . . . . . |
. . . . . . . |
42 |
|
|
|||
Referencia rápida en español |
|
|
|
Playback |
|
||
(Spanish Quick Reference) |
|
43 |
|
||||
. . . . . . . |
|
|
|||||
Index . . . . . . . . . . . . . . . . . |
Back cover |
|
|
||||
|
|
|
|
|
|
||
About descriptions in this Owner’s |
|
|
|
|
|
||
Manual |
|
|
|
|
|
|
|
≥ Instructions for operations are generally described |
|
|
|
|
|
||
using the remote control. |
|
|
|
|
|
|
|
≥ This Owner’s Manual is applicable to models |
|
|
|
|
|
||
|
|
|
|
|
|||
DMP-BDT210 and DMP-BDT110. Unless otherwise |
|
|
|
|
|
||
indicated, illustrations in this Owner’s Manual are of |
|
|
|
|
|
||
DMP-BDT210. |
|
|
|
|
|
|
|
[BDT210] [BDT110] : indicates features applicable to |
|
|
|
|
|
||
DMP-BDT210 and DMP-BDT110, respectively. |
|
|
|
Settings |
|
||
|
|
|
|
|
|||
|
|
|
|
|
|||
About Firmware updates (> 15) |
|
|
|
|
|||
|
|
|
|
|
|
|
|
|
|
|
|
|
|
|
|
Reference
VQT3B58 3

Accessories
Check the supplied accessories before using this unit.
1Remote control
(N2QAYB000574)
2Batteries for remote control
1AC power supply cord
(K2CB2CB00022)
[For_Canada]
The enclosed Canadian French label sheet corresponds to the English display on the front and back side of the unit.
≥Product numbers provided in this Owner’s Manual correct as of December 2010. These may be subject to change.
≥Do not use AC power supply cord with other equipment.
≥[For_U.S.A._and_Puerto_Rico] : To order accessories, refer to
“Accessory Purchases (United States and Puerto Rico)” on page 41. [For_Canada] : To order accessories, call the dealer from whom you
have made your purchase.
Using the remote control
Insert so the poles (i and j) match those in the remote control.
R6/LR6,
(Alkaline or manganese batteries)
Point it at remote control signal sensor on this unit. ( 5)
Mishandling of batteries can cause electrolyte leakage which can damage items the fluid contacts and may cause a fire.
≥Do not mix old and new batteries or different types at the same time.
≥Do not heat or expose to flame.
≥Do not leave the battery(ies) in a car exposed to direct sunlight for a long period of time with doors and windows closed.
≥Do not take apart or short circuit.
≥Do not attempt to recharge alkaline or manganese batteries.
≥Do not use batteries if the covering has been peeled off.
Remove batteries if the remote control is not going to be used for a long period of time. Store in a cool, dark place.
CAUTION
≥Danger of explosion if battery is incorrectly replaced. Replace only with the type recommended by the manufacturer.
≥When disposing the batteries, please contact your local authorities or dealer and ask for the correct method of disposal.
Unit and media care
∫ Clean this unit with a soft, dry cloth
≥Never use alcohol, paint thinner or benzine to clean this unit.
≥Before using chemically treated cloth, carefully read the instructions that came with the cloth.
∫ Clean the lens
≥Use the lens cleaner (not supplied) to clean the unit’s lens.
∫ Clean discs
DO |
DO NOT |
Wipe with a damp cloth and then wipe dry.
∫ Disc and card handling precautions
≥Handle discs by the edges to avoid inadvertent scratches or fingerprints on the disc.
≥Do not attach labels or stickers to discs.
≥Do not use record cleaning sprays, benzine, thinner, static electricity prevention liquids or any other solvent.
≥Clean any dust, water, or foreign matter from the terminals on the rear side of the card.
≥Do not use the following discs:
–Discs with exposed adhesive from removed stickers or labels (rented discs etc).
–Discs that are badly warped or cracked.
–Irregularly shaped discs, such as heart shapes.
∫ To dispose or transfer this unit
The unit may keep the user settings information in the unit. If you discard this unit either by disposal or transfer, then follow the procedure to return all the settings to the factory presets to delete the user settings. ( 34, “To return all settings to the factory preset.”)
≥The operation history may be recorded in the memory of this unit.
4 VQT3B58

Control reference guide |
|
|
|
|||||
|
|
|
9 |
|
1 |
Turn the unit on and off |
||
|
|
|
|
|
2 |
TV operation buttons |
|
|
|
|
|
10 |
|
|
You can operate the Panasonic TV through the unit’s |
||
|
1 |
|
|
|
remote control. (Depending on the TV these buttons |
|||
|
2 |
|
11 |
|
|
may not work.) |
|
|
|
|
|
|
[Í TV POWER] : Turn the television on and off |
||||
|
|
|
|
|
||||
|
|
|
|
|
|
[AV] |
: Switch the input select |
|
|
|
|
12 |
|
|
[i j VOL] : Adjust the volume |
||
|
|
|
|
3 |
Select title numbers, etc./Enter numbers or characters |
|||
|
|
|
|
|
||||
|
3 |
|
13 |
|
|
(> 23) |
|
|
|
|
|
|
|
[CANCEL] : Cancel |
|
||
|
|
|
14 |
|
|
|
||
|
|
|
|
4 |
Basic playback control buttons (> 17) |
|||
|
|
|
15 |
|
5 |
Show status messages (> 17) |
||
|
|
|
|
6 |
Show Pop-up menu/Top menu/Direct Navigator (> 17) |
|||
|
|
|
|
|
||||
|
|
|
|
|
7 |
Show sub menu (> 18) |
||
|
4 |
|
|
|
8 |
These buttons are used when; |
||
|
|
|
|
|
≥ Operating a BD-Video disc that includes JavaTM |
|||
|
|
|
|
|
|
applications (BD-J). |
|
|
|
|
|
|
|
|
≥ Operating contents of VIERA CAST. (> 23) |
||
|
|
|
|
|
9 |
Transmit the remote control signal |
||
|
5 |
|
16 |
|
10 |
Open or close the disc tray (> 16) |
||
|
|
|
17 |
|
|
CAUTION |
|
|
|
|
|
|
|
|
Do not place objects in front of the unit. The disc tray |
||
|
6 |
|
18 |
|
|
may collide with objects when it is opened, and this may |
||
|
|
|
|
|
cause malfunction. |
|
||
|
|
|
19 |
|
11 |
Show Playback menu (> 27) |
||
|
|
|
|
12 |
Start up a video communication (> 23) |
|||
|
|
|
|
|
||||
|
7 |
|
20 |
|
13 |
Setup 3D effects (> 20) |
||
|
|
|
14 |
Select audio (> 17) |
|
|||
|
|
|
|
|
|
|||
|
8 |
|
|
|
15 |
Show NETFLIX screen |
|
|
|
|
|
|
16 |
Exit the menu screen |
|
||
|
|
|
|
|
|
|||
|
|
|
|
|
17 |
Displays the Home screen of the VIERA CAST (> 23) |
||
|
|
|
|
|
18 |
Show HOME menu (> 16) |
||
|
|
|
|
|
19 |
Selection/OK, Frame-by-frame (> 17) |
||
|
|
|
|
|
20 |
Return to previous screen |
||
|
|
|
|
|
11 |
|
|
|
|
|
|
|
|
|
|
|
|
|
|
|
SD CARD |
|
|
|
|
Pull to flip down |
|
|
|
|
|
|
|
|
the front panel. |
|
1 |
2 |
3 |
4 |
5 6 |
7 |
8 9 |
10 |
1 POWER button (POWER Í/I) (> 12) |
|
|
6 |
Remote control signal sensor |
||||
|
Press to switch the unit from on to standby mode or vice |
Distance: Within approx. 7 m (23 feet) |
||||||
|
versa. In standby mode, the unit is still consuming a |
|
Angle: Approx. 20e up and down, 30e left and right |
|||||
|
small amount of power. |
|
|
7 |
Display |
|
||
2 |
Disc tray (> 16) |
|
|
|
8 |
Stop (> 17) |
|
|
3 SD card slot (> 16) |
|
|
9 |
Start play (> 17) |
|
|||
4 |
USB port (> 16) |
|
|
|
10 |
Open or close the disc tray (> 16) |
||
5 |
CALL LED (> 23) |
|
|
11 |
[BDT210] : Touch Free Sensor (> 33) |
|||
|
The LED will light up when this unit receives incoming |
|
The LED will light up when TOUCH-FREE SENSOR is |
|||||
|
call etc. of the video communication. |
|
|
|
activated. |
|
||
|
|
|
|
|
Rear panel terminals (> 8–10, 12) |
|||
Getting started

VQT3B58 5
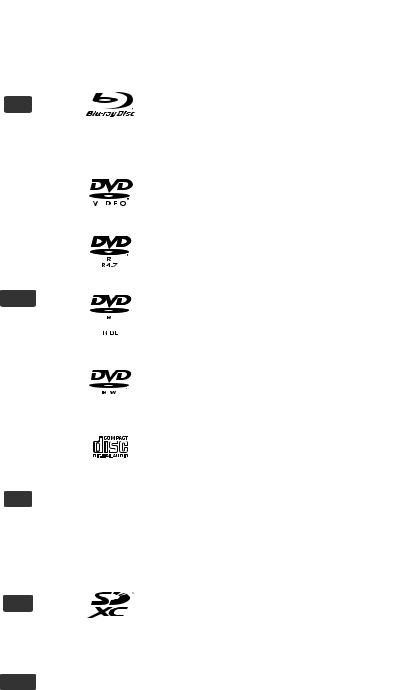
Playable discs/Cards/USB devices
Type |
Logo examples |
Type detail |
Playable contents |
||
( 39) |
|||||
|
|
|
|
||
|
|
|
BD-Video |
Video |
|
|
|
|
BD-RE |
Video |
|
|
|
|
JPEG/ |
||
BD |
|
|
|
MPO (3D still picture) |
|
|
|
|
BD-R |
Video |
|
|
|
|
DivX® [BDT210_for_Canada] |
||
|
|
|
|
MKV |
|
|
|
|
DVD-Video |
Video |
|
|
|
|
|
|
|
|
|
|
|
|
|
|
|
|
DVD-R |
Video |
|
|
|
|
AVCHD |
||
|
|
|
|
DivX® [BDT210_for_Canada] |
|
DVD |
|
|
|
MKV |
|
|
|
|
|||
|
|
DVD-R DL |
MP3 |
||
|
|
|
JPEG/ |
||
|
|
|
|
MPO (3D still picture) |
|
|
|
|
|
|
|
|
|
|
DVD-RW |
Video |
|
|
|
|
|
AVCHD |
|
|
|
— |
+R/+RW/+R DL |
|
|
|
|
|
Music CD |
Music [CD-DA] |
|
|
|
|
|
|
|
|
|
|
|
DivX® [BDT210_for_Canada] |
|
CD |
|
|
CD-R |
MKV |
|
|
|
Music [CD-DA] |
|||
|
|
— |
|||
|
|
CD-RW |
MP3 |
||
|
|
|
|||
|
|
|
|
JPEG/ |
|
|
|
|
|
MPO (3D still picture) |
|
|
|
|
SD Memory Card (from 8 MB to 2 GB) |
MPEG2 |
|
SD |
|
|
SDHC Memory Card (from 4 GB to 32 GB) |
AVCHD |
|
|
|
SDXC Memory Card (48 GB, 64 GB) |
JPEG/ |
||
|
|
|
|||
|
|
|
(Compatible with both mini and micro types) |
MPO (3D still picture) |
|
|
|
|
|
DivX® [BDT210_for_Canada] |
|
|
|
|
USB devices |
MKV |
|
USB |
|
— |
MP3 |
||
|
(up to 2 TB) |
||||
|
|
|
JPEG/ |
||
|
|
|
|
||
|
|
|
|
MPO (3D still picture) |
|
|
|
|
|
|
|
6 VQT3B58

∫ Discs that cannot be played in this unit
Any other disc that is not specifically supported or previously described.
≥DVD-RAM
≥Super Audio CD
≥Photo CD
≥DVD-Audio
≥Video CD and Super Video CD
≥WMA discs
≥[BDT210_for_U.S.A.] [BDT110] : All types of DivX discs [BDT210_for_Canada] : DivX Plus HD discs
≥PAL discs
≥HD DVD
≥BD-Video discs recorded at a rate of 50 fields/sec
∫ Region management information
BD-Video
This unit plays BD-Video marked with labels containing the region code “A”.
Example:
DVD-Video
This unit plays DVD-Video marked with labels containing the region number “1” or “ALL”.
Example:
1ALL 124
∫Finalize
DVD-R/RW/R DL, +R/+RW/+R DL and CD-R/RW recorded by a recorder, etc. needs to be finalized by the recorder to play on this unit. Please refer to the recorder’s instructions.
∫ BD-Video
≥This unit supports high bit rate audio (Dolby Digital Plus, Dolby TrueHD, DTS-HD High Resolution Audio and DTS-HD Master Audio) adopted in BD-Video.
–[BDT110] : If “Dolby D/Dolby D +/Dolby TrueHD” is set to “PCM”, the maximum possible number of Dolby sound is 5.1ch PCM. (> 30)
∫ 3D
≥3D videos and 3D still pictures can be played back when this unit is connected to a 3D compatible TV using a High Speed HDMI Cable.
≥2D video can be enjoyed as 3D virtually. (> 20)
∫ Music CD
≥ Operation and sound quality of CDs that do not conform to |
started |
|
CD-DA specifications (copy control CDs, etc.) cannot be |
||
≥ The digital audio content side of a DualDisc does not meet |
||
guaranteed. |
Getting |
|
the technical specifications of the Compact Disc Digital |
||
|
||
Audio (CD-DA) format so playback may not be possible. |
|
∫ SD card
≥miniSD Cards, microSD Cards, microSDHC
Cards and microSDXC Cards can be used, 
 but must be used with an adaptor card.

These are usually supplied with such cards,  or otherwise customer provided.
≥Keep the Memory Card out of reach of 
 children to prevent swallowing.
≥To protect the card’s contents, move the record prevention tab (on the SD card) to “LOCK”.
≥This unit is compatible with SD Memory Cards that meet SD Card Specifications FAT12 and FAT16 formats, as well as SDHC Memory Cards in FAT32 format (Does not support long file name.) and SDXC Memory Cards in exFAT.
≥If the SD card is used with incompatible computers or devices, recorded contents may be erased due to the card being formatted etc.
≥Useable memory may be slightly less than the card capacity.
∫ USB device
≥This unit does not guarantee connection with all USB devices.
≥This unit does not support USB device charging.
≥When using Communication Camera TY-CC10W or Wireless LAN Adaptor DY-WL10, connect it to the rear terminal of this unit. (> 10, 23)
≥FAT12, FAT16 and FAT32 file systems are supported.
≥This unit supports USB 2.0 High Speed.
≥This unit supports an HDD formatted in FAT32. If the HDD is not recognized the power to the HDD may not be supplied. Supply power from an external source.
≥It may not be possible to play the above media in some cases due to the
type of media, the condition of the recording, the recording method and how the files were created.
≥The producers of the disc can control how discs are played, so you may not always be able to control play as described in this Owner’s Manual. Read the disc’s instructions carefully.
VQT3B58 7

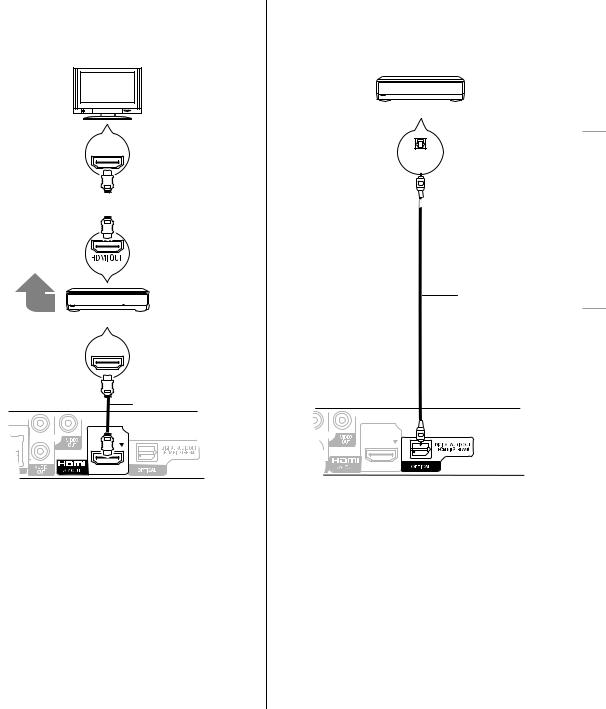
STEP 1 : Connecting to a TV
≥Do not place the unit on amplifiers/receivers or equipment that may become hot. The heat can damage the unit.
≥Before making any connections we suggest you temporarily disconnect all the units from AC power.
≥Do not connect video signals through a video recorder. Due to copy guard protection the picture may not be displayed properly.
≥Please use High Speed HDMI Cables that have the HDMI logo (as shown on the back cover). It is recommended that you use Panasonic’s HDMI cable. When outputting 1080p signal, please use HDMI cables 5.0 meters (16.4 ft.) or less.
Recommended part number (High Speed HDMI Cable): RP-CDHS15 (1.5 m/4.9 ft.), RP-CDHS30 (3.0 m/9.8 ft.), RP-CDHS50 (5.0 m/16.4 ft.), etc.
[BDT110]
COMMUNICATION 10BASE-T/100BASE-TX
CAMERA
WIRELESS LAN
ADAPTOR LAN
Back of the unit
COMMUNICATION
CAMERA
∫Via an HDMI AV OUT terminal (High quality)
–It is possible to play back 3D videos and 3D still pictures by connecting this unit with a 3D compatible TV.
HDMI IN
HDMI cable
E-T/100BASE-TX
LAN
≥Set “HDMI Audio Output” to “On” (> 32).
≥The HDMI connection supports VIERA Link “HDAVI Control” (> 26).
∫ Via a VIDEO OUT terminal (Standard quality)
 Audio/Video cable
COMMUNICATION |
LAN |
CAMERA |
≥Connect terminals of the same color.
8 VQT3B58
STEP 2 : Connecting to an amplifier/receiver
∫Via an HDMI AV OUT terminal
–It is possible to play back 3D videos and 3D still pictures when the connected TV and amplifier/ receiver are 3D compatible.
HDMI IN (ARC)
 HDMI cable
Multi channel speakers
(ARC)
Amplifier/receiver
HDMI IN
HDMI cable
-T/100BASE-TX
LAN
≥Set “HDMI Audio Output” to “On” ( 32).
≥Set “Digital Audio Output” depending on the connected amplifier/receiver ( 30).
≥The HDMI connection supports VIERA Link “HDAVI Control” ( 26).
≥When connecting to a non-3D compatible amplifier/ receiver, connect this unit to a TV via HDMI AV OUT, then connect the TV and the amplifier/receiver, using HDMI cables for the respective connections.
–Please note, however, that the audio can only be up to 5.1ch.
≥When using the TV or amplifier/receiver that does not have the indication of “(ARC)” (non-ARC-compatible) on the HDMI terminal, in order to enjoy TV’s sound by amplifier it is also required to connect the amplifier/ receiver and TV using an optical digital cable.
∫ Via an OPTICAL terminal
Amplifier/receiver
OPTICAL IN
Optical cable
≥ When connecting a TV ( 8) with HDMI AV OUT terminal, set “HDMI Audio Output” to “Off” ( 32).
≥ Set “Digital Audio Output” depending on the used terminal and connected amplifier/receiver ( 30).
Connections & Settings

VQT3B58 9

STEP 3 : Connecting to a broadband network
The following services can be used when this unit is
connected to broadband. |
|
≥Firmware can be updated ( |
15) |
≥You can enjoy BD-Live ( 19) |
|
≥You can enjoy VIERA CAST ( |
23) |
≥You can access other devices (Home Network) ( 24)
∫ LAN cable connection
|
|
|
10BASE-T/100BASE-TX |
|||
|
|
|
|
|
|
|
COMMUNICATION |
|
|
|
|
||
CAMERA |
|
LAN |
||||
|
|
|
|
|
|
|
|
|
|
|
|
|
|
|
|
|
|
|
|
|
LAN Cable
Broadband router, etc.
LAN Cable
Modem (Broadband) *Provided by ISP
≥Use category 5 or above straight LAN cables (STP) when connecting to peripheral devices.
≥Inserting any cable other than a LAN cable in the LAN terminal can damage the unit.
For details about connection method, refer to the instructions supplied with the connected equipment.
∫Wireless LAN connection
–[BDT210] : Wireless LAN is built in. (There is no need to connect a Wireless LAN Adaptor.)
–[BDT110] : Connect the Wireless LAN Adaptor DY-WL10 (optional).
[BDT110]
COMMUNICATION
CAMERA
WIRELESS LAN |
LAN |
ADAPTOR |
Wireless LAN Adaptor
Wireless router, etc.
LAN Cable 
Modem (Broadband) *Provided by ISP
≥[BDT110] : Only the Wireless LAN Adaptor DY-WL10 (optional) can be used.
≥[BDT110] : Read the operating instructions for the Wireless LAN Adaptor DY-WL10 (optional) thoroughly when using it.
≥For up to date compatibility information on your Wireless router refer to
http://panasonic.jp/support/global/cs/ (This site is in English only.)
For additional information about this unit refer to http://www.panasonic.com/consumer/support (For U.S.A.)
≥The unit is not compatible with public wireless LAN services provided in airports, stations, cafes etc.
≥[BDT110] : To simultaneously connect the Wireless LAN Adaptor DY-WL10 (optional) and a LAN cable, use the extension cable supplied with the DY-WL10.
10 VQT3B58
Precautions of Wireless LAN connection
The following limits are in place regarding the usage of this unit or Wireless LAN adaptor. You must be aware of these limits before using these devices.
Panasonic will in no way be responsible for any incidental damage which may arise due to a failure to obey these limits, or to any condition of use or disuse of these devices.
≥Data transmitted and received over radio waves may be intercepted and monitored.
≥This unit or Wireless LAN adaptor contain delicate electronic components.
Please use these devices in the manner in which it was intended and follow the following points:
–Do not expose these devices to high temperatures or direct sunlight.
–Do not bend, or subject these devices to strong impacts.
–Keep these devices away from moisture.
–Do not disassemble or alter the device in any way.
[BDT210]
THE FOLLOWING APPLIES IN THE U.S.A. AND CANADA
This device complies with Part 15 of FCC Rules and RSS-Gen of IC Rules.
Operation is subject to the following two conditions:
(1) This device may not cause interference, and (2) this device must accept any interference, including interference that may cause undesired operation of this device.
Contains FCC ID: VPY-LBSJ Contains IC:772C-LBSJ
This transmitter must not be co-located or operated in conjunction with any other antenna or transmitter.
This product is restricted to indoor use due to its operation in the 5.15 to 5.25 GHz frequency range.
FCC and IC require this product to be used indoors for the frequency range 5.15 to 5.25 GHz to reduce the potential for harmful interference to co-channel Mobile Satellite systems. High power radars are allocated as primary users of the 5.25 to 5.35 GHz and 5.65 to 5.85 GHz bands. These radar stations can cause interference with and/or damage this product.
This equipment complies with FCC/IC radiation exposure limits set forth for an uncontrolled environment and meets the FCC radio frequency (RF) Exposure Guidelines in Supplement C to OET65 and RSS-102 of the IC radio frequency (RF) Exposure rules. This equipment has very low levels of RF energy that it deemed to comply without maximum permissive exposure evaluation (MPE). But it is desirable that it should be installed and operated keeping the radiator at least 20cm or more away from person’s body (excluding extremities: hands, wrists, feet and ankles).
THE FOLLOWING APPLIES ONLY IN THE U.S.A. FCC Note:
This equipment has been tested and found to comply with the limits for a Class B digital device, pursuant to Part 15 of the FCC Rules. These limits are designed to provide reasonable protection against harmful interference in a residential installation. This equipment generates, uses and can radiate radio frequency energy and, if not installed and used in accordance with the instructions, may cause harmful interference to radio communications.
However, there is no guarantee that interference will not occur in a particular installation. If this equipment does cause harmful interference to radio or television reception, which can be determined by turning the equipment off and on, the user is encouraged to try to correct the interference by one or more of the following measures:
≥Reorient or relocate the receiving antenna.
≥Increase the separation between the equipment and receiver.
≥Connect the equipment into an outlet on a circuit different from that to which the receiver is connected.
≥Consult the dealer or an experienced radio/TV technician for help.
FCC caution: To maintain compliance with FCC regulations, shielded interface cables must be used with this equipment. Operation with non-approved equipment or unshielded cables may result in interference to radio and TV reception. Any changes or modifications not approved by the party responsible for compliance could void the user’s authority to operate this equipment.
This device complies with Part 15 of the FCC Rules. Operation is subject to the following two conditions:
(1)This device may not cause harmful interference, and
(2)this device must accept any interference received, including
interference that may cause undesired operation.
Responsible Party:
Panasonic Corporation of North America One Panasonic Way
Secaucus, NJ 07094
Support Contact:
Panasonic Consumer Electronics Company Telephone No.: 1-800-211-PANA (7262)
THE FOLLOWING APPLIES ONLY IN CANADA.
This Class B digital apparatus complies with Canadian ICES-003.
Connections & Settings

VQT3B58 11
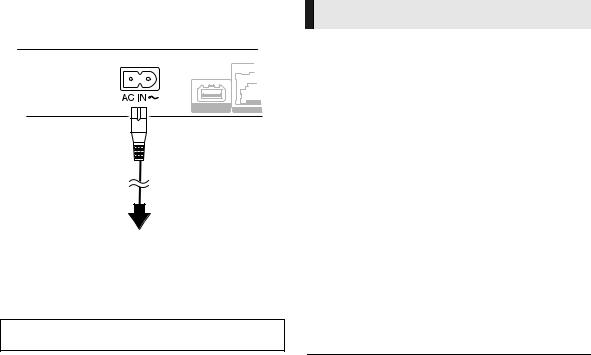
STEP 4 : Connecting to an AC power source
|
10BASE-T/100BA |
COMMUNICATION |
LAN |
CAMERA |
 AC power supply cord (supplied)
To a household AC outlet
≥This unit consumes a small amount of AC power (“Quick Start”: “Off”, approx. 0.1 W) even when turned off. In the interest of power conservation, if you will not be using this unit for an extended period of time, it can be disconnected.
Install this unit so that the power cord can be unplugged from the socket outlet immediately if any problem occurs.
STEP 5 : Settings
Easy Setting
After connecting your new player for the 1st time and pressing the power button, a screen for the basic settings will appear.
Preparation
Turn on the television and select the appropriate video input on the television.
1 Press [Í POWER].
Setup screen appears.
If this unit is connected to a Panasonic TV (VIERA) supporting HDAVI Control 2 or later via an HDMI cable, then setting information on the TV such as “On-screen Language” is acquired by this unit.
2 Follow the on-screen instructions and
make the settings with [3, 4] and press
[OK].
After completing “Easy Setting”, you can perform “Network Easy Setting”.
≥ You can perform this setup anytime by selecting “Easy Setting” in the Setup menu. ( 33)
Touch Free Sensor [BDT210]
By setting “Sensor” in “Touch Free Sensor” to “On”, you can open or close the tray just by waving your hand over the TOUCH-FREE SENSOR on the upper side of the unit. (This will also work when in stand-by.)
≥Be aware that the TOUCH-FREE SENSOR may function unintentionally in the following cases:
–When your hand or arm, an object, a small child, or a small animal comes close to the upper part of the unit
–When an object is placed on top of the unit and vibration is applied
–When connecting a cable etc. to the rear of the unit
≥Reactive distance of the sensor is automatically set in accordance with the installation conditions at the time of power supply connection and when the open/close button is pressed. To prevent an incorrect setting, do not place your hands or objects above the unit at these times.
≥Depending on the usage conditions, the TOUCH-FREE SENSOR may stop working or the reactive distance may become shorter. In such cases, press the tray open/close button once.
12 VQT3B58

Network Easy Setting
The configuration of your network is about to begin. If you failed to make the settings, refer to page 14.
Wired connection
Select “Wired” and press [OK].
[BDT210]
Network Easy Setting
Select a connection mode.
Current setting : Wired
LAN cable connection:
Connect a LAN cable to the unit and select "Wired."
Wireless LAN connection:
Select "Wireless."
Wired
Wireless
 OK
OK
 RETURN
Follow the on-screen instructions to make your connection settings.
Wireless connection
Preparation
≥Obtain your network name ( 15, SSID).
≥If your wireless connection is encrypted please be sure that you know your encryption key.
≥[BDT110] : If “Wireless LAN Adaptor is not connected.” is displayed, check that the Wireless LAN Adaptor is fully inserted. Alternatively, disconnect and reconnect it. If there is still no change in the display, consult your dealer for advice.
1 Select “Wireless” and press [OK].
2 Select “Search for wireless network” or
“WPS (PUSH button method)” and press [OK] then follow the on-screen instructions and make the settings.
Wireless Settings
Select a connection method.
Please refer to the operating instructions of your wireless access point about connection methods.
Search for wireless network
WPS (PUSH button method)
∫ “WPS (PUSH button method)”
If you are using a Wireless router that supports WPS (Wi-Fi Protected Setup), you can easily perform the settings.
∫ “Search for wireless network”
The available wireless networks will be displayed.
1Select your network name and press [OK].
≥If your network name is not displayed search again by pressing the [R] button on the remote control. Stealth SSID will not be displayed, in this case enter manually.
Wireless Settings
Select a wireless network for connection.
Network name (SSID) |
|
Reception |
|
||
XXXXXXXXXX |
|
|
|
|
|
XXXXXXXXXX |
|
|
|
|
|
XXXXXXXXXX |
|
|
|
|
|
XXXXXXXXXX |
|
|
|
|
|
XXXXXXXXXX |
|
|
|
|
|
XXXXXXXXXX |
|
|
|
|
|
XXXXXXXXXX |
|
|
|
Settings& |
|
When your wireless network is encrypted |
|||||
SUB |
OK |
R Search again |
G B Y |
|
|
MENU |
RETURN |
|
|
|
|
|
|
|
Connections |
||
2 Press [OK] to select “Encryption Key”. |
|||||
|
|||||
Wireless Settings |
|
|
|
||
Enter the encryption key of the wireless network. |
|
|
|||
Encryption Key |
|
|
|
||
|
|
Set |
|
|
|
3 Enter your encryption key.
Encryption Key
_
1 
 1
1 
 2
2 
 3
3 
 4
4 
 5
5 
 6
6 
 7
7 
 8
8 
 9
9 
 0 2
0 2 
 A
A 
 B
B 
 C
C


 a
a 
 b
b
 c
c
 +
+ 
 -
- 
 *
*
|
3 |
D |
E |
F |
d |
e |
f |
/ |
= |
% |
Delete |
4 |
G |
H |
I |
g |
h |
i |
# |
$ |
& |
5 |
J |
K |
L |
j |
k |
l |
< |
> |
@ |
|
Finish |
6 |
M |
N |
O |
m |
n |
o |
[ |
] |
_ |
7 
 P
P 
 Q
Q
 R
R
 S
S 
 p
p 
 q
q 
 r
r 
 s
s 
 (
( 
 ) 8
) 8 
 T
T 
 U
U 
 V
V 


 t
t 
 u
u 
 v
v 
 {
{ 
 }
} 
 ~
~
|
|
|
|
|
9 |
|
W |
|
X |
|
Y |
|
Z |
|
w |
|
x |
|
y |
|
z |
|
\ |
|
I |
|
|
|
|
|
|
|
|
|
|
|
|
|
|
|
|
|
|
|
|
|
|
|
|
|
|
|
|
OK |
|
|
|
|
0 |
|
. |
, |
? |
! |
“ |
’ |
: |
; |
` |
^ |
|
|||||||||
RETURN |
0 |
- |
9 |
|
|
|
|
|
|
|
|
|
|
Space |
|
|
|
|||||||||
|
|
|
|
|
|
|
|
|
|
|
|
|
|
|
|
|
|
|
|
|
|
|
|
|
|
|
To enter SSID manually
If your SSID is not displayed in step 1, follow these steps.
1 |
To display SSID input screen : |
|
|
||
|
Press [HOME] |
select “Setup” |
select “Player |
||
|
Settings” |
select “Network” |
[OK] |
select “Network |
|
|
Settings” |
[OK] |
select “Wireless Settings” [OK] |
||
|
select “Connection Setting” [OK] |
select “Manual |
|||
|
setting” |
[OK] |
|
|
|
2 |
Press [OK] to select “SSID” and enter your SSID. |
||||
Wireless Settings
Enter your network name (SSID) to connect.
SSID
Set
≥ If your wireless network is encrypted, go to step 2.
VQT3B58 13

When you experience problems with settings
Wireless Settings
Wireless Settings
Failed to complete.
A conflict with another device occurred.
Do you want to configure wireless network connection setting again ?
Yes |
No |
OK |
|
Display |
Check the following |
|
A conflict with another |
≥ Please wait a few moments, |
|
device occurred. |
and then try again. |
|
|
≥ Setting of the Wireless router |
|
A time out error |
for MAC Address etc. |
|
≥ The signal may be weak. |
||
occurred. |
||
[BDT110] : Using the USB |
||
|
extension cable supplied with |
|
|
the Wireless LAN Adaptor, |
|
|
||
|
adjust the position of the |
|
An authentication error |
Wireless LAN Adaptor. |
|
≥ The SSID ( 15) and the |
||
or a time out error |
encryption key of the Wireless |
|
occurred. |
router. |
|
|
≥ Please wait a few moments, |
|
|
and then try again. |
|
|
≥ [BDT110] : Connection of |
|
|
Wireless LAN Adaptor |
|
A device error occurred. |
≥ Contact our Customer |
|
|
Service Center or your |
|
|
nearest dealer. |
Network Easy Setting
(Home Network Connection Check)
Network Easy Setting (Home Network Connection Check)
Complete. |
|
|
1. |
LAN cable connection |
: Fail |
2. |
IP address setting |
: Fail |
3. |
Connection to gateway |
: Fail |
|
|
|
LAN cable is not connected. |
|
|
Please check the connection. |
|
|
Select “Yes” and press [OK] to check network |
||
connection again. Select “No” and press [OK] |
||
to finish Network Easy Setting. |
|
|
|
|
|
|
Yes |
No |
|
|
|
OK |
|
|
|
|
|
|
|
|
|
Display |
|
Check the |
|
|
|
following |
||
|
|
|
||
1. |
LAN cable connection or |
: Fail |
≥ Connection of |
|
Wireless setting |
the LAN |
|||
|
||||
2. |
IP address setting |
: Fail |
cables ( 10) |
|
3. |
Connection to gateway |
: Fail |
|
|
1. |
LAN cable connection or |
: Pass |
≥ Connection |
|
Wireless setting |
and settings |
|||
|
||||
2. |
IP address setting |
: Fail |
of the hub |
|
3. |
Connection to gateway |
: Fail |
and router |
|
≥ Settings of |
||||
1. |
LAN cable connection or |
|
||
: Pass |
“IP Address/ |
|||
Wireless setting |
||||
|
DNS |
|||
|
|
: Pass or |
||
|
|
Settings” |
||
2. |
IP address setting |
Home |
( 32) |
|
network |
|
|||
|
|
|
||
|
|
available |
|
|
3. |
Connection to gateway |
: Fail |
|
|
Network Easy Setting (Internet Connection Check)
Network Easy Setting (Internet Connection Check)
Complete.
- Connection to the Internet : Fail(Error code: B019)
Failed the connection test.
Cannot find the server.(Error code: B019)
Please refer to the owner's manual for the cause of the error and the solution for it.
Press [OK].
 OK
OK
Display |
Check the following |
|
Cannot find the |
≥ “Primary DNS” and “Secondary |
|
server. |
DNS” settings of “IP Address/ |
|
(Error code: B019) |
DNS Settings” ( 32) |
|
|
≥ The server may be busy or the |
|
Failed to connect to |
service may have been |
|
suspended. Please wait a few |
||
the server. |
||
moments, and then try again. |
||
(Error code: B020) |
||
≥ Settings of “Proxy Server |
||
|
||
|
Settings” ( 32) and the router |
14 VQT3B58
Loading...