


 Loading...

Table of Contents |
|
1. Disclaimer .................................................................................................................. |
1 |
2. Welcome to TRAKTOR KONTROL S3 ......................................................................... |
2 |
2.1. Document Conventions ..................................................................................... |
2 |
3. Setting up TRAKTOR KONTROL S3 ............................................................................ |
3 |
3.1. Connecting to the Computer .............................................................................. |
3 |
3.2. Connecting an Amplification System .................................................................. |
3 |
3.3. Connecting Monitors for DJ Booth ..................................................................... |
4 |
3.4. Connecting Headphones ................................................................................... |
4 |
3.5. Connecting to the Power Supply ........................................................................ |
4 |
3.6. Final Preparation .............................................................................................. |
4 |
3.7. Importing Music into the Track Collection ........................................................... |
6 |
4. TRAKTOR KONTROL S3 Overview ............................................................................. |
7 |
4.1. Decks .............................................................................................................. |
8 |
4.1.1. Browse Controls ..................................................................................... |
9 |
4.1.2. Pad Section ......................................................................................... |
10 |
4.2. Mixer ............................................................................................................. |
10 |
4.2.1. Mixer Channel ...................................................................................... |
13 |
5. Tutorials ................................................................................................................... |
15 |
5.1. Mixing Your First Tracks using Sync ................................................................. |
16 |
5.1.1. Prerequisites ........................................................................................ |
16 |
5.1.2. Loading the First Track into Deck A ....................................................... |
16 |
5.1.3. Starting Playback of Deck A .................................................................. |
17 |
5.1.4. Loading the Second Track into Deck B ................................................... |
18 |
5.1.5. Syncing the Track Tempos .................................................................... |
18 |
5.1.6. Starting Playback of the Second Track ................................................... |
19 |
5.1.7. Mixing in the Audio Signal ..................................................................... |
19 |
5.2. Browsing and Loading Tracks .......................................................................... |
20 |
5.3. Controlling Track Playback .............................................................................. |
21 |
5.4. Previewing Tracks using the Cue Channel ....................................................... |
22 |
5.5. Adjusting Volume Levels ................................................................................. |
22 |
5.6. Using the Equalizer to Tweak Your Sound ........................................................ |
23 |
5.7. Adjusting Track Tempo .................................................................................... |
23 |
5.8. Locking the Key of Tracks ............................................................................... |
24 |
5.9. Playing with Mixer Effects ................................................................................ |
24 |
5.10. Playing with Cue Points ................................................................................. |
25 |
5.11. Playing with Loops ........................................................................................ |
26 |
5.12. Mixing Tracks Using Jog Wheels ................................................................... |
27 |
5.12.1. Prerequisites ...................................................................................... |
27 |
5.12.2. Loading the First Track into Deck A ...................................................... |
27 |
5.12.3. Starting Playback of Deck A ................................................................ |
28 |
5.12.4. Loading the Second Track into Deck B ................................................. |
29 |
5.12.5. Syncing Tracks Manually ..................................................................... |
30 |

5.12.6. Cuing the Next Track using the Jog Wheels ......................................... |
33 |
5.12.7. Mixing in the Next Track ...................................................................... |
34 |
5.13. Using Flux and Reverse Modes ..................................................................... |
34 |
5.14. Working with the Preparation List ................................................................... |
35 |
5.15. Correcting Beatgrids of Tracks ....................................................................... |
35 |

Disclaimer
1. DISCLAIMER
The information in this document is subject to change without notice and does not represent a commitment on the part of Native Instruments GmbH. The software described by this document is subject to a License Agreement and may not be copied to other media. No part of this publication may be copied, reproduced or otherwise transmitted or recorded, for any purpose, without prior written permission by Native Instruments GmbH, hereinafter referred to as Native Instruments.
“Native Instruments”, “NI” and associated logos are (registered) trademarks of Native Instruments GmbH.
Mac, macOS, iPad, Logic and iTunes are registered trademarks of Apple Inc., registered in the U.S. and other countries.
Windows and DirectSound are registered trademarks of Microsoft Corporation in the United States and/or other countries.
All other trademarks are the property of their respective owners and use of them does not imply any affiliation with or endorsement by them.
Document authored by: Native Instruments
Software version: 3.3 (12/2019)
Hardware version: TRAKTOR KONTROL S3
Special thanks to the Beta Test Team, who were invaluable not just in tracking down bugs, but in making this a better product.
1

Welcome to TRAKTOR KONTROL S3
2. WELCOME TO TRAKTOR KONTROL S3
Thank you for choosing TRAKTOR KONTROL S3, it is because of customers like you that we can continue developing groundbreaking music software and hardware. TRAKTOR KONTROL S3 is a fully integrated hardware and software DJ performance system tailored for both TRAKTOR PRO 3 and TRAKTOR DJ 2.
This documentation provides you with all the information you need to get started mixing, syncing and looping. If you are already familiar with TRAKTOR, this guide will also help you use the more advanced features of TRAKTOR KONTROL S3.
In addition to this manual, we have provided you with a collection of other learning resources:
To get to know TRAKTOR PRO 3 in detail, check out the manual.
To get a quick introduction to 4-channel mixing and tips from the pros read this blog post.
To learn how to use TRAKTOR DJ on iPad visit this guide.
2.1. Document Conventions
This document uses particular formatting to point out special facts and to warn you of potential issues. The icons introducing the following notes let you see what kind of information can be expected:
The speech bubble icon indicates a useful tip that may help you to solve a task more efficiently.
The exclamation mark icon highlights important information that is essential for the given context.
The warning icon warns you of serious issues and potential risks that require your full attention.
Furthermore, the following formatting is used:
▪Paths to locations on your hard disk or other storage devices are printed in italics.
▪Important names and concepts are printed in bold.
▪Square brackets are used to reference keys on a computer’s keyboard, e.g., Press [Shift] + [Enter].
2

Setting up TRAKTOR KONTROL S3
3. SETTING UP TRAKTOR KONTROL S3
To configure the S3 for use, you should have already installed TRAKTOR PRO 3 software using NATIVE ACCESS. If this is not the case, follow the instructions under this link Registering and Installing a Native Instruments Product using NATIVE ACCESS.
This section describes how to set up the TRAKTOR KONTROL S3. When all devices are connected your setup will look like a typical setup as depicted in the following illustration:
TRAKTOR KONTROL S3 setup.
3.1. Connecting to the Computer
To connect the TRAKTOR KONTROL S3 to your computer:
1.Connect the device end of the included USB cable to the USB socket on the rear panel of your S3.
2.Connect the computer end of the USB cable to an available USB 2.0 port (or later) on your computer.
3.2. Connecting an Amplification System
To connect your power amplifier system to the TRAKTOR KONTROL S3:
•Connect the MAIN OUT XLR or RCA outputs on the rear panel of the TRAKTOR KONTROL S3 to the inputs of your amplification system using the appropriate cables.
3

Setting up TRAKTOR KONTROL S3
3.3. Connecting Monitors for DJ Booth
To connect your monitor speakers or a second power amplifier to the TRAKTOR KONTROL S3 for use in a DJ booth:
•Connect the BOOTH OUT outputs on the rear panel of the TRAKTOR KONTROL S3 to the inputs of your monitoring system using appropriate cables.
3.4. Connecting Headphones
To connect headphones to the TRAKTOR KONTROL S3:
•Connect your headphones to the PHONES OUT socket on the front panel of the TRAKTOR KONTROL S3 using a 1/4" or a 1/8" connector.
3.5. Connecting to the Power Supply
To connect the Power supply to the TRAKTOR KONTROL S3:
1.Connect the device end of the power supply cable to the power socket on the rear panel of your S3.
2.Connect the power supply unit to a power outlet.
3.6. Final Preparation
After successfully setting up the TRAKTOR KONTROL S3 system, you need to complete the final steps before you can start using your S3. First, switch on your devices and then configure the TRAKTOR software to be used with your S3.
Switching on Devices and Starting TRAKTOR
You can now switch on the devices. We recommended that you follow the order in the instructions below:
1.On your S3 turn down the volume controls to the minimum position by using the MASTER knob, the BOOTH knob, and the VOL knob.
2.Switch on your amplification system.
3.Switch on your computer.
4.Switch on your S3.
5.Start TRAKTOR by double-clicking the TRAKTOR application icon on your desktop. The TRAKTOR software opens.
Importing Data from Your Previous TRAKTOR Version
When you start TRAKTOR for the first time, TRAKTOR checks if a previous version of TRAKTOR is installed on your system. In this case, TRAKTOR asks if you want to import your previous data from the existing user content into a new folder in your user folder. Your previous data will not be changed if you import it to the new default folder.
If you want to import data from your previous TRAKTOR installation:
4

Setting up TRAKTOR KONTROL S3
•Click Yes to confirm. The data is imported.
Switching to TRAKTOR Default Settings
When you start TRAKTOR with the S3 for the first time, TRAKTOR asks if you want to switch Mixer FX selection and the Tempo fader range to the default setting. This is necessary to get the intended user experience of your S3:
•Click Yes to switch to the default settings.
The Mixer FX and the TEMPO fader range are set to default settings.
Configuring TRAKTOR using the Setup Wizard
The Setup Wizard dialog appears automatically when you start TRAKTOR for the first time after installation. The Setup Wizard helps you to configure the software to your needs only with a few clicks. To configure TRAKTOR to be controlled with your S3 controller, perform the following actions:
1.On the WELCOME page of the Wizard, click Next to proceed.
2.On the DECK LAYOUT page select the Deck setup to control with your S3, for example, 2 Track Decks + 2 Remix Decks.
3.Click Next to proceed.
The SUMMARY page shows you the configuration of TRAKTOR.
4.Click Finish to confirm your configuration.
The TRAKTOR window now appears in the Essential layout.
5

Setting up TRAKTOR KONTROL S3
3.7. Importing Music into the Track Collection
You can import your music into TRAKTOR's Track Collection in several ways. You can drag and drop your music files from your computer into the Track Collection, you can use the context menu in the Browser tree to import the music from your local music folders, and you can use the context menu to import Remix Sets.
Importing Music using Drag and Drop
To import your music files into your Track Collection using drag and drop:
•Drag the music files from the location on your computer and drop them in the Track Collection folder in TRAKTOR's Browser tree.
TRAKTOR now analyzes the music files and imports the metadata into the Track Collection.
Importing Music Folders using the Context Menu
To import your music from your local music folders into the Track Collection:
1.Right-click the Track Collection root folder in the folder tree to open the context menu.
2.Select Import Music Folders.
TRAKTOR now analyzes the music files in the local music folders and imports the metadata into the Track Collection.
The local music folders can be added to the File Management Page in the Preferences.
6
TRAKTOR KONTROL S3 Overview
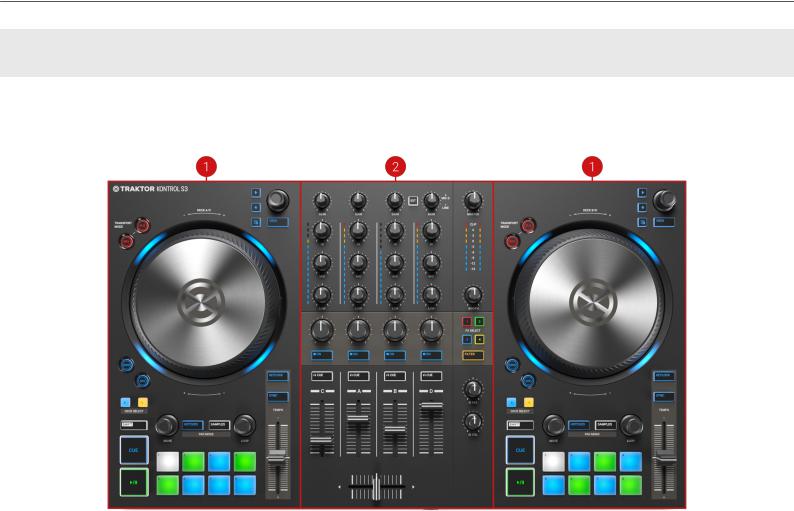
4. TRAKTOR KONTROL S3 OVERVIEW
This section introduces you to the TRAKTOR KONTROL S3 and all its control elements and connectors.
(1) Decks: You can use the Decks to control tracks and Samples, similar to DJ turntables or CD players but with additional features. TRAKTOR controls four virtual Decks and each of them can be operated in several Deck Types.
TRAKTOR provides you with four virtual decks. The two Decks on your S3 hardware controller allow you to control the four software Decks A, B, C and D in TRAKTOR: the left Deck on your S3 controls Decks A and C in the software. The right Deck on your S3 controls Decks B and D in the software. For more information on the Deck control elements, refer to Decks.
(2) Mixer: You can use the Mixer to mix the audio signals coming from the Decks. The Mixer sits in the middle of the TRAKTOR software as well as on your TRAKTOR KONTROL S3 controller. On the S3, the Mixer consists of the four Mixer channels A, B, C, and D which receive the individual audio signals from the corresponding Decks. Each Mixer channel contains controls to modulate the audio signal and to adjust the outgoing volume before the audio signal is sent to the MASTER output. Furthermore, the Mixer provides a crossfader to let you fade between the audio signals in the Mixer channels.
For more information on the Mixer control elements, refer to Mixer.
7
TRAKTOR KONTROL S3 Overview
4.1. Decks
TRAKTOR KONTROL S3 provides you with two physical Decks to control the TRAKTOR Decks. Each Deck provides you with the following control elements:
(1) Browse controls: Allow you to scroll through the Track Collection to find and load tracks, as well as previewing tracks and preparing playlists.
(2) Jog Wheel: The Jog Wheel provides advanced control over track transport. As with a conventional CD player or turntable, you can manually hold playback, nudge and bend, and start scratching by touching and turning the Jog Wheel and the outer rim. Furthermore, you can manually correct the tracks' Beatgrids.
(3) KEYLOCK button: Lock the track's current key value. When you then move the TEMPO fader up or down, you change the track tempo but the track's key remains at the locked value.
(4) SYNC (Lock): Syncs the Deck to the Tempo Master. Using SHIFT and SYNC (Lock) locks the TEMPO fader for the Deck.
(5) TEMPO fader: Lets you manually adjust the track tempo on that Deck. The TEMPO fader can be operated in Absolute mode and in Relative mode. If the Deck is synced to the Tempo Master, the TEMPO fader has no effect. When the Deck is playing at the original track tempo, the LED lights up blue independently from the current TEMPO fader position. When the Deck tempo is faster or slower than the original tempo, the LED is unlit. When the tempo is locked for the Deck, the LED lights up red.
8
TRAKTOR KONTROL S3 Overview
(6) Pad section: You can use the Pads to store and trigger Cue Points and Loops, and to control Samples and STEM Files. The individual function depends on the selected Pad mode and on the selected Deck Type.
(7) Play/Pause: Lets you start or pause the track playback on that Deck. The button brightly lights up green during playback.
(8) CUE: Lets you start track playback from the Floating Cue Point when the Deck is stopped. Moves the playback position back to the Cue point during playback.
(9) SHIFT: When you hold SHIFT, you are provided with the secondary functions of some control elements on the S3.
(10) DECK SELECT buttons: Allow you to switch between TRAKTOR Decks A and C on the left Deck, and between TRAKTOR Decks B and C on the right Deck.
(11) JOG button: Enables JOG mode (Jog Wheel mode) for the Jog Wheel.
(12) GRID button: Enables GRID mode to manually correct the beatgrid for the current track using the Jog Wheel.
(13) MOVE encoder: Allows you to jump within the track. When looping is enabled, the MOVE encoder allows you to move the Loop forward and backward in the track.
(14) PAD MODE: Determines whether you are triggering and saving cue points and loops or controlling samples with Pads.
(15) LOOP encoder: Allows you to enable/disable Looping as well as changing the Loop size.
(16) REV button: Plays back the track in reverse when in Flux mode. When you press the REV button, this automatically enables Flux mode as long as the REV button is pressed.
(17) FLX button: Enables Flux mode for that Deck.
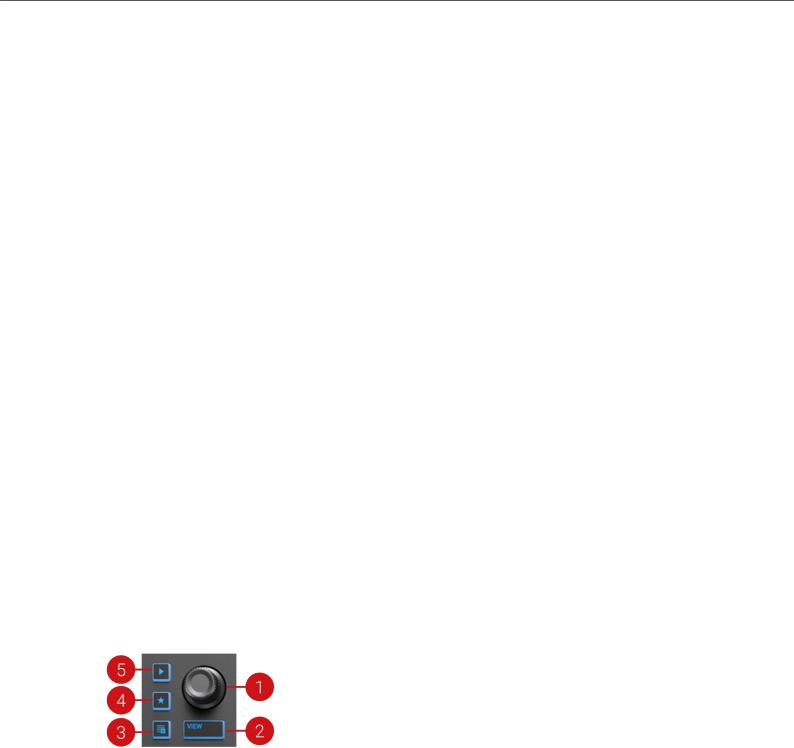
4.1.1. Browse Controls
The Browse controls let you browse the Track Collection to find and load tracks as well as preview tracks and prepare playlists.
(1) Browse encoder: You select tracks in the Track List by turning the Browse encoder and you can load the selected track into the Deck by pressing the Browse encoder. You can also use the Browse encoder to seek within the track that is playing in the Preview Player.
(2) VIEW button: Maximizes or minimizes the Browser view in the TRAKTOR software.
(3) Preparation List button: Assigns a track to the Preparation List.
(4) Star button: When this button is held the Browse encoder then selects favorites.
(5) Preview Player: Loads a track into the Preview Player in TRAKTOR's Browser and plays it back.
9
Loading...