


POD xt Pro
Table of contents
 Loading...
Line 6 POD xt Pro, Vetta II Combo, Vetta II HD, POD X3, POD X3 Live Reference Manual
...
MIDI Co n t I n u o u s Co n t r o l l e r re f e r e n C e
For Line 6 Hardware & GearBox Software
Mac
®
OS X, Windows
®
XP
®
& Windows
®
Vista
®

Table of Contents
Line 6 Products and MIDI .....................................................................1•1
What’s MIDI? .................................................................................................................. 1•2
MIDI In & Out ............................................................................................................... 1•2
USB ................................................................................................................................. 1•2
MIDI Channel ................................................................................................................ 1•2
Making the connection .................................................................................................. 1•2
GearBox SysEx Control .................................................................................................. 1•6
GuitarPort Online Player Transport Control ................................................................. 1•7
MIDI Channel Selection ................................................................................................ 1•7
MIDI CC Reference Tables ......................................................................2•1
Line 6 Hardware MIDI CC Reference Table ................................................................. 2•2
GearBox Software MIDI CC Reference Table ............................................................. 2•14
MIDI CC Range Reference - Model Tables .............................................3•1
Pocket POD Model Tables ............................................................................................. 3•1
Floor POD Model Tables ............................................................................................... 3•3
POD 2.0 Model Tables.................................................................................................... 3•5
PODx t Model Tables ...................................................................................................... 3•7
Bass PODx t Model Tables ............................................................................................ 3•11
POD X3 Model Tables .................................................................................................. 3•13
Flextone III Model Tables............................................................................................. 3•17
HD 147 Model Tables ................................................................................................... 3•19
Vetta II Model Tables ................................................................................................... 3•21
GearBox Software Model Tables .................................................................................. 3•23
Effects Model Tables (All Line 6 Products) ................................................................. 3•29
Line 6, POD, POD 2.0, Bass PODxt, POD X3, PODxt, Vetta, Flextone, HD 147, GuitarPort Online and GearBox are
trademarks of Line 6, Inc. All other product names, trademarks, and artists’ names are the property of their respective own-
ers, which are in no way associated or affiliated with Line 6.
Copyright © 2009 Line 6, Inc.

MIDI CC Reference - Line 6 Products & MIDI
1•1
lI n e 6 Pr o D u C t s a n D MIDI
This document describes the setup of Line 6 devices for MIDI communication and includes reference tables for the products’ MIDI controllers.
Many Line 6 products allow their parameters to be tweaked remotely by 3rd party, external MIDI controller hardware units, and/or software
MIDI sequencers. These items communicate with Line 6 products by sending MIDI Continuous Controller (MIDI CC), Program Change and/
or MIDI System Exclusive (SysEx) commands. A MIDI CC is the most common type of message used for this task, and what is used for accessing
most functions on Line 6 products. A MIDI CC message consists of a “controller” number followed by a data value. When you access a button,
slider, knob or pedal on your MIDI controller device, or when you configure your MIDI sequencing software to output MIDI control data, this
MIDI CC command is what is transmitted, which makes it possible to do things such as remotely control the Volume or other parameters of your
Line 6 hardware or software in real-time! Likewise, some Line 6 products’ functions, (such as Monitor levels in the Line 6 GearBox software),
can be remotely accessed using MIDI SysEx commands. Additionally, these same Line 6 products are also capable of transmitting MIDI control
data. This makes it possible to control another software or hardware device’s parameters in real-time via your Line 6 product.
The key to all this communication is the MIDI CC and SysEx mapping. The following pages include MIDI CC master tables for both Line
6 hardware and GearBox
TM
software, as well as model tables for each product to serve as a reference document of MIDI assignments for the
parameters of several Line 6 products. With this information you can set the MIDI CC values for your controller device to match the Line 6
parameters to be controlled. References for MIDI SysEx commands can be found in the GearBox SysEx Control section. The Line 6 products
included in this reference are:
Pocket POD•
®
, Firmware Version 1.x
Floor POD•
®
Plus, Firmware Version 1.x
POD•
®
2.0, POD
®
Pro, Firmware Version 2.3 and later
POD•
®
x t , POD
®
x t Pro & POD
®
x t Live, USB Firmware Version 1.12, Flash Memory Version 3.01
Bass POD•
®
x t , Bass POD
®
x t Pro & Bass POD
®
x t Live, Firmware Version 2.14
POD•
®
X3 Live, POD
®
X3 Pro, USB Firmware Version 1.02, Flash Memory Version 1.15
Flextone•
TM
III, Firmware Version 1.10
HD147•
®
, Firmware Version 1.x
Vetta•
TM
II & VettaT
M
II HD, Firmware Version 2.5
TonePort•
®
UX1, UX2, UX8, KB37, GX, D.I.
POD Studio•
®
UX1, UX2, UX8, KB37
GearBox•
TM
Software, Version 3.5 and later (please visit the line6.com Software Downloads page to get the latest GearBox version)

MIDI CC Reference - Line 6 Products & MIDI
1•2
What’s MIDI?
MIDI (Musical Instrument Digital Interface) is a communications protocol designed to allow various music-making machines exchange
information. It allows one device to control another, and several devices to all be used together in coordination. To follow are details on the
MIDI connections for your Line 6 Device.
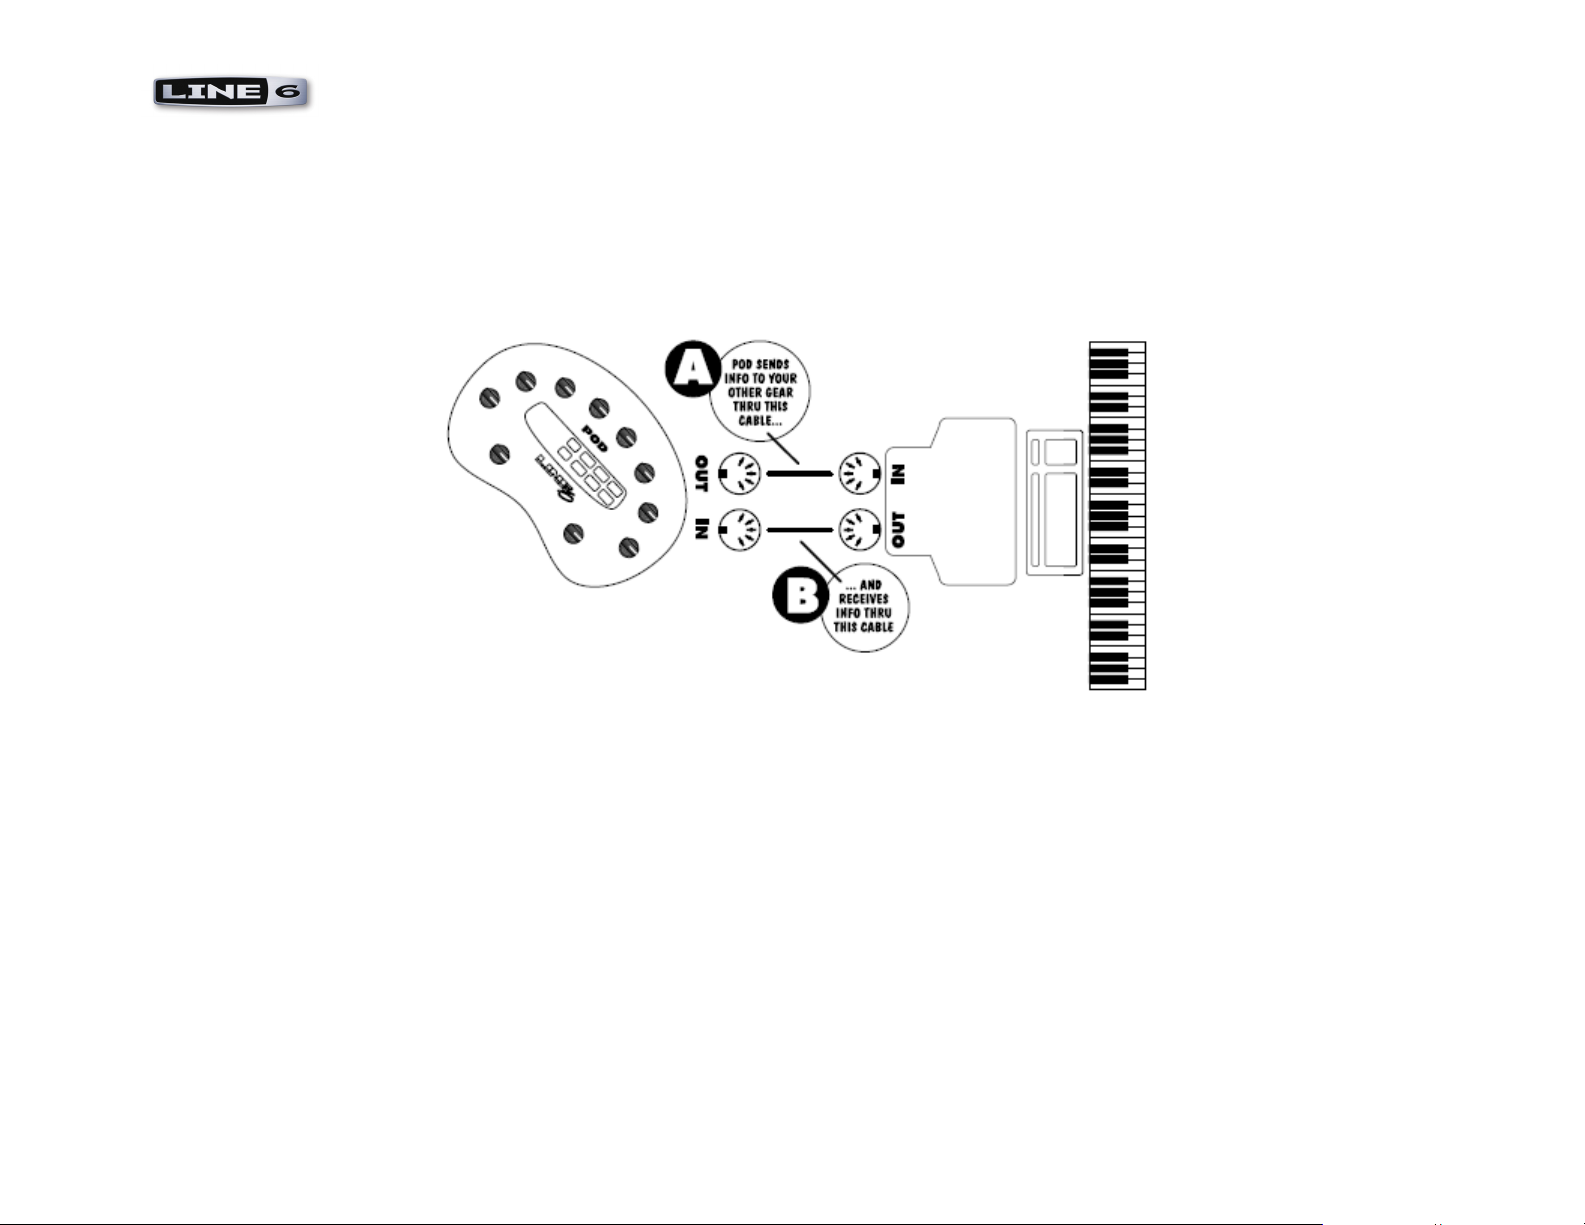
MIDI In & Out
Hardware devices commonly use standard 5-pin MIDI cables, which are always connected from the MIDI Out jack of the sending device to the
MIDI In jack of the receiving device. Each connection is a one-way street: information flows from the OUT of one device to the IN of another
device. To allow information to flow back, you must connect a second cable, from IN to OUT. Several of the Line 6 hardware devices include
MIDI jacks and can be connected to other MIDI devices in this manner.
USB
If you are using a Windows® or Mac® computer in your setup, then you can exchange MIDI data via USB rather than via a 5-pin MIDI cable
connection. Many computer-based Line 6 products such as PODx t , BASS PODx t , TonePort, and POD Studio devices include drivers that
establish Line 6 USB MIDI “ports” on your computer, allowing them to be connected to the MIDI ports of other computer-based hardware and
MIDI software. Pocket POD needs no drivers to establish MIDI “ports” on your computer.
MIDI Channel
MIDI allows sixteen different channels of information to be transmitted and received through one MIDI port. (The MIDI channel is independent
of, and has nothing to do with, your Line 6 device’s channels for storing individual Tones). You tune your Line 6 POD, Amplifier or GearBox
software in to listen to a particular MIDI channel (like choosing a channel on a TV or a station on a radio), and make sure the device that you
want your Line 6 device to listen to is transmitting on that same MIDI Channel.
Making the connection
To follow are details for connecting your Line 6 product to other devices for MIDI communication.
POD X3 Live/Pro, Floor POD Plus, POD 2.0, POD Pro, Flextone III, HD 147 and Vetta II
Each of these Line 6 devices includes two MIDI cable connections: MIDI In & MIDI Out. You connect to other MIDI devices by plugging
MIDI cables to these In & Out jacks. As mentioned above, be sure to use two MIDI cables, and connect between the MIDI Out of one device
MIDI CC Reference - Line 6 Products & MIDI
1•3
to the MIDI In of the other, and vice-versa. If you are connecting a 3rd party external MIDI Controller device to your Line 6 POD or Amplifier,
then you can typically connect the controller directly to the Line 6 device with two MIDI cables this way. If you are connecting to a computer,
then you’ll need a MIDI Interface device that offers at least one physical MIDI port (one MIDI In and one MIDI Out jack). Then go into the
MIDI software’s MIDI Preferences or Control Panel dialog and choose the 3rd party MIDI Interface’s MIDI In and MIDI Out port to allow the
software to communicate to your connected Line 6 device. MIDI Interface units are relatively inexpensive and can be found at most music
shops. Most modern MIDI Interface units connect to your computer via USB.
Connecting to a computer MIDI Interface with MIDI cables
Pod X3, PODx t , Bass PODx t , TonePort, POD Studio & Pocket POD
POD X3 Live & Pro devices include 5-Pin MIDI In and Out jacks, and it is necessary for you to use these connections to recieve and send
MIDI data. (The POD X3 bean, Live & Pro USB connections do not carry MIDI data). POD X3 Live and Pro can be controlled by receiving
MIDI messages coming into the 5-Pin MIDI Input. POD X3 Live and Pro also transmits MIDI data out through the 5-Pin MIDI Output jack,
allowing you to control or communicate other MIDI hardware and software.
All PODx t and Bass PODx t family devices include both USB and 5-pin MIDI jacks. It is recommended to use the USB connection for
your MIDI connectivity with these devices when connecting to your computer. Alternatively, you can use a 5-Pin MIDI cable connection as
described above if it is the only way to connect to your other MIDI device.
MIDI CC Reference - Line 6 Products & MIDI
1•4
TonePort & POD Studio family devices include a USB MIDI driver that allows other Windows
®
or Mac
®
software applications to access
“virtual” USB Line 6 MIDI In and Out ports. This allows you to send and receive MIDI control data between Line 6 GearBox and 3rd party
MIDI software.
Pocket POD has a mini USB jack, which provides MIDI connectivity to your computer.
When connected to your computer via USB cable, the Line 6 driver will expose “virtual” MIDI ports that are accessible to other computer-
connected MIDI hardware and MIDI software. Pocket POD requires no drivers to expose its “virtual” MIDI ports. For example, if you are using
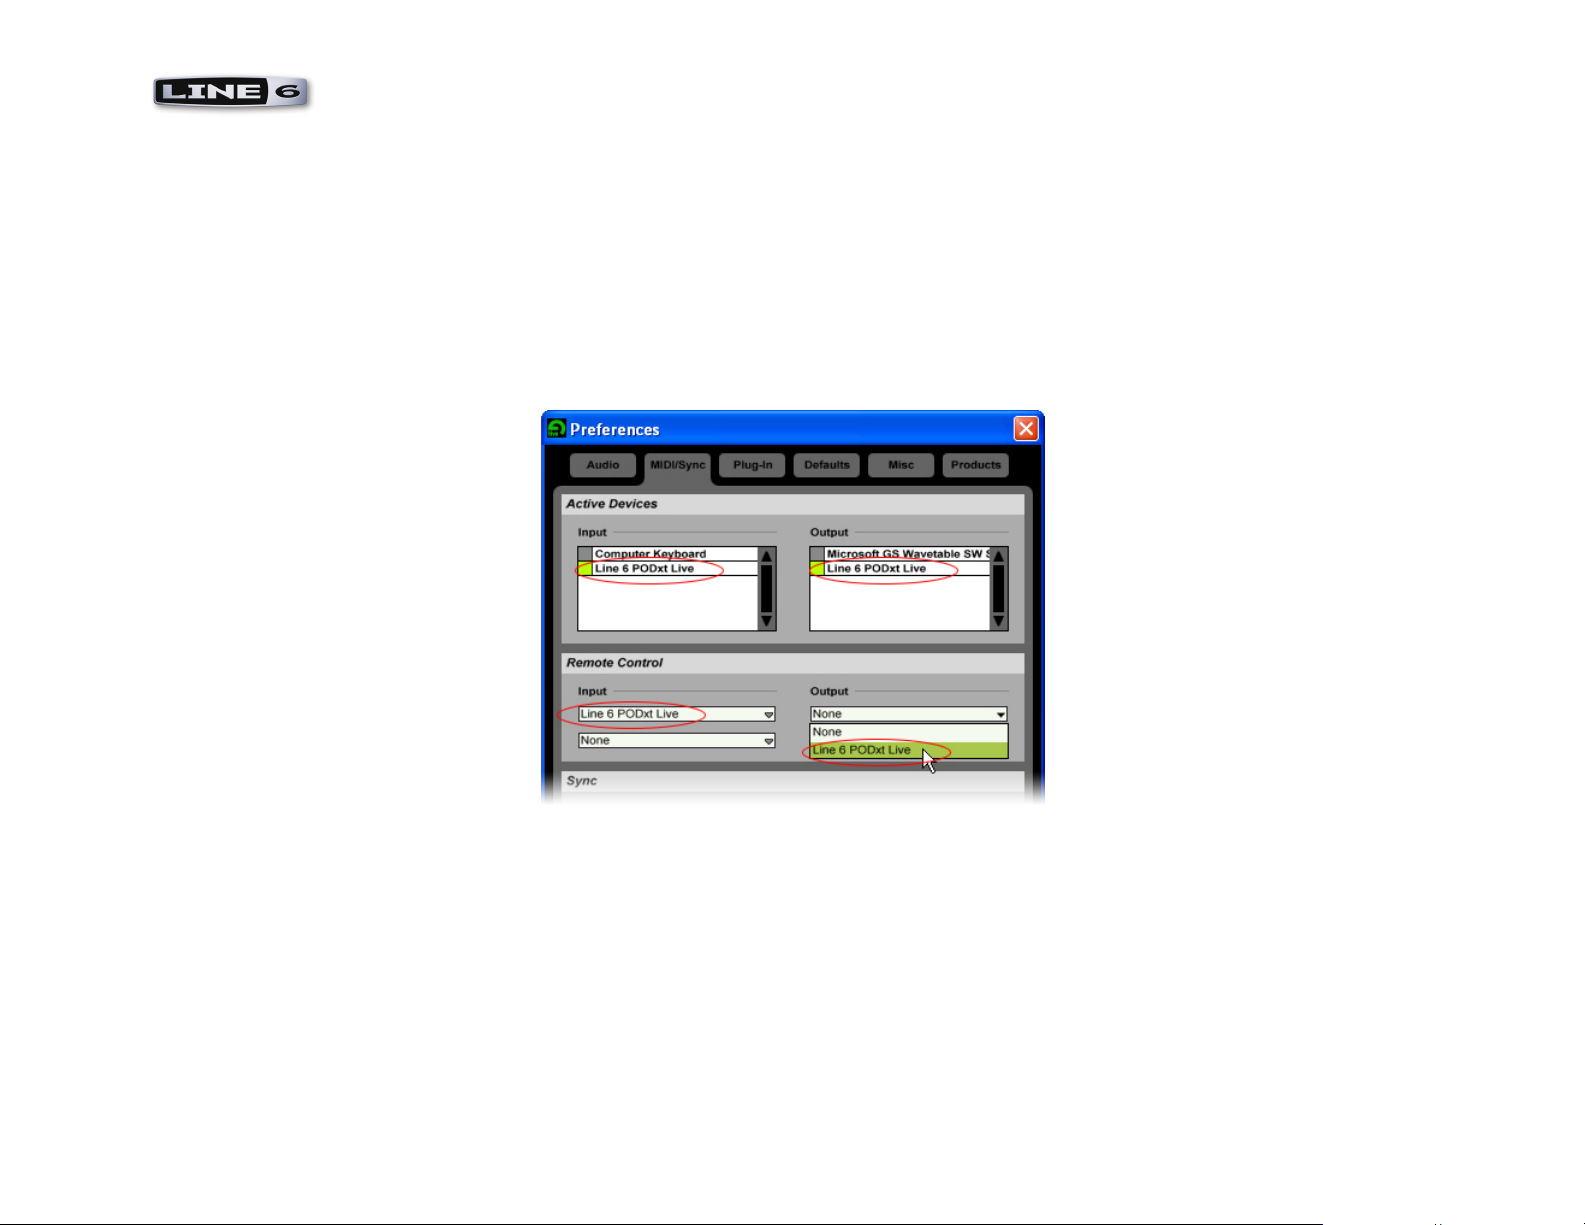
a MIDI sequencing software, you should be able to go into that software’s MIDI control panel and access the Line 6 MIDI In and PODxt MIDI
out ports, such as within the Ableton Live Lite Line 6 Edition’s MIDI Preferences dialog shown here:
The MIDI Preferences panel window in Ableton Live. The Line 6 MIDI “ports” are selectable for any of Live’s MIDI In or Out functions
Once the Line 6 MIDI port is configured in the MIDI software, you can then choose it for any MIDI track and/or MIDI control options within
your sequencing projects in the software. This allows you to use your POD’s on-board knobs & pedal to control parameters in the software. Or,
this also allows you to have existing MIDI control data within a MIDI track of the sequencer send that data out to your POD to control one of
its parameters. Check your sequencing software’s documentation fore more specifics on its MIDI capabilities.
Note that if you are connecting your Line 6 device to your computer using MIDI cables to and from a MIDI Interface (such as an M-Audio
MIDISport, MOTU Express, etc.) then the MIDI Interface is the “MIDI Device” that will be visibly selectable in your MIDI software’s control
panel. However, your Line 6 device will transmit and receive MIDI data through this device and allow you to use it to control the software, or
to be controlled from the software.
MIDI CC Reference - Line 6 Products & MIDI
1•5
Line 6 GearBox Software
Much like the Line 6 hardware devices discussed above, the Line 6 GearBox software can also have it’s on-screen knobs, buttons, sliders and
model selections controlled remotely via a hardware MIDI controller device, or via MIDI software. Most GearBox functions can be controlled
via MIDI CC – please refer to the Line 6 GearBox MIDI CC Reference chart and Model Tables for the MIDI CC mapping. Likewise, GearBox
can also output MIDI CC data whenever most of its functions are operated, which allows the remote control of other hardware or software
products that are capable of responding to MIDI CC messages. Some additional GearBox functions can be controlled via MIDI SysEx commands
– please see the following GearBox SysEx Control section.
To configure GearBox to receive MIDI data from a 3rd party controller:
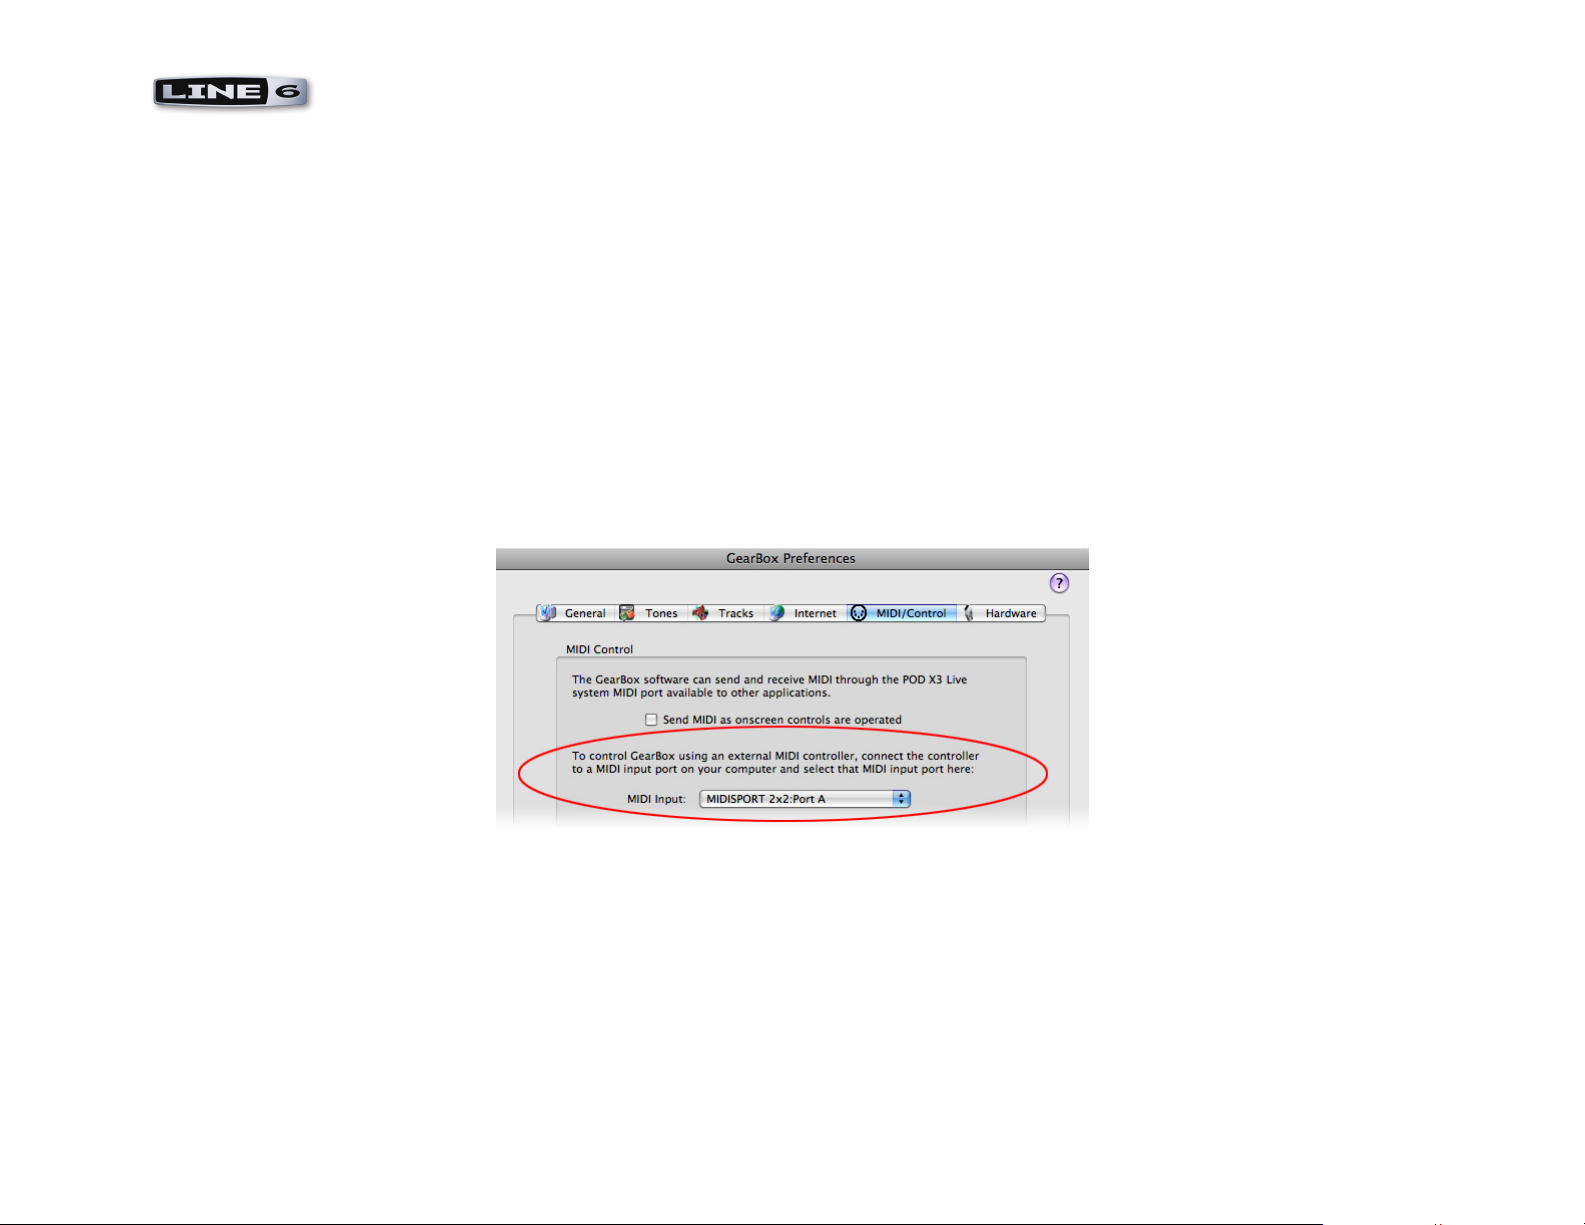
Connect your external MIDI controller device to your computer (either via 5-pin MIDI cables to a MIDI Interface, or via USB if your controller
offers it). Next, go to the GearBox Preferences dialog and choose the MIDI/Control tab. To receive MIDI data from a 3rd party external MIDI
controller, access the MIDI Input selector, where you can choose the MIDI device or port from which you want GearBox to receive MIDI
controller data:
GearBox Preferences – MIDI/Control tab, Mac OS X
If you are using Windows, the options are the same within the GearBox Preferences > MIDI/Control tab. As shown in the above example, we’ve
selected to receive MIDI Input from a connected M-Audio MIDISPORT 2x2 MIDI Interface – GearBox will receive MIDI data from any MIDI
controller connected into the “Port A” MIDI Input jack of the MIDISPORT.
GearBox will automatically receive MIDI data on MIDI Channel 1 from the connected Line 6 USB source hardware, regardless of the above
MIDI Input selector’s setting (supported by TonePort, POD Studio, POD X3 and PODx t family devices). Therefore, to control GearBox from a
3rd party MIDI sequencing software you can simply set the MIDI sequencer application’s MIDI Out to be the MIDI In port of your source Line
6 USB device.

MIDI CC Reference - Line 6 Products & MIDI
1•6
Note – When using a PODxt family device as your USB source device for GearBox, then the PODxt hardware is already a “fixed” MIDI Input
device into GearBox, therefore, the Preferences-MIDI/Control tab appears blank. You can plug an external controller into PODxt’s 5-Pin MIDI
In, or set your MIDI software to use the PODxt USB MIDI In port to route MIDI data into GearBox.
To configure GearBox to send MIDI data - In the same MIDI/Control tab, simply check the box for “Send MIDI as on-screen controls are
operated” (this box is unchecked by default).
MIDI data is automatically routed out the USB MIDI Out of the connected Line 6 USB source device.
GearBox SysEx Control
Some GearBox and GuitarPort Online (GPO) functions, such as Monitor & Send Levels, can be controlled via MIDI by using SysEx commands.
GearBox SysEx messages take on the following format:
F0 00 01 0C 08 <opcode> <data> … F7
Where:
<opcode> is a single byte opcode (00 – 7F)
Number of bytes in <data> depends on the opcode.
The following table lists the opcodes implemented in GearBox 3.5 and later:
Function Opcode Data Size (bytes) Data Description
Bypass 00 1 Byte 1: 00 for bypass off; 01 for bypass on
Monitor Mute 01 2
Byte 1: Audio stream, 00 = Send 1/2, 01 = Send 3/4 ... 7F = all
Byte 2: 01 is mute on; 00 is mute off
Next/Previous Tone 02 1 Byte 1: 01 for next tone; 00 for previous tone
Record Send Level 03 2
Byte 1: Audio stream, 00 = Send 1/2, 01 = Send 3/4 ...7F = all
Byte 2: Gain scale, 00-7F (00 = 0.0 to 7F = 1.0)

MIDI CC Reference - Line 6 Products & MIDI
1•7
Monitor Level 04 2
Byte 1: Audio stream, 00 = Send 1/2, 01 = Send 3/4 ...7F = all
Byte 2: Gain scale, 00-7F (00 = 0.0 to 7F = 1.0)
GPO Track Level 05 1 Byte 1: Gain scale, 00-7F (00 = 0.0 to 7F = 1.0)
GPO Player Half Speed 06 1 Byte 1: 01 = enable half speed; 0x00 = disable half speed
GPO Player Loop Enable 07 1 Byte 1: 01 = loop enable; 00 = loop disable
GuitarPort Online Player Transport Control
In addition, the following MIDI events are recognized for the Guitar Port Online (GPO) Player transport control. These 3 byte MIDI short
messages (not SysEx) are based on the Mackie control specification.
GPO Track Play 90 5E 7F
GPO Track Stop 90 5D 7F
GPO Track FWD Start 90 5C 7F
GPO Track FWD Stop 90 5C 00
GPO Track REW Start 90 5B 7F
GPO Track REW Stop 90 5B 00
MIDI Channel Selection
Typically, you can use the default MIDI Channel settings on your Line 6 POD or Amplifier for most setups. But if you have problems with
communication between devices, or if you need to use a specific MIDI channel, then you can change the specific MIDI Channel your Line 6
device uses for receiving and transmitting.
Floor POD Plus
To set Floor POD Plus’ MIDI Channel, hold the Manual button and press Save to enter MIDI channel mode. The display will indicate the
current MIDI transmit/receive channel. Use the Bank Up/Down footswitches to change the MIDI transmit/receive channel. Selecting “All”
places the unit into Omni mode - In Omni mode the unit receives MIDI on all channels and transmits only on channel 1. Press the Manual
button to save the MIDI channel selection and exit MIDI channel mode.
MIDI CC Reference - Line 6 Products & MIDI
1•8
POD 2.0, POD Pro
To set POD’s MIDI Channel, press the MIDI button (which will light up). The single-digit display will show you the current channel POD is
tuned in to – the default is Channel 1. Use the Up and Down arrows to select a different MIDI channel from 1 thru 16. POD displays channels
10 through 16 by lighting up the decimal point to the right of the single digit. So “2.” means channel 12. You can also set POD to listen to all
channels (Omni mode) by selecting “A” (A for all) for the MIDI channel. When in Omni mode, POD transmits on channel 1.
PODx t and Bass PODx t
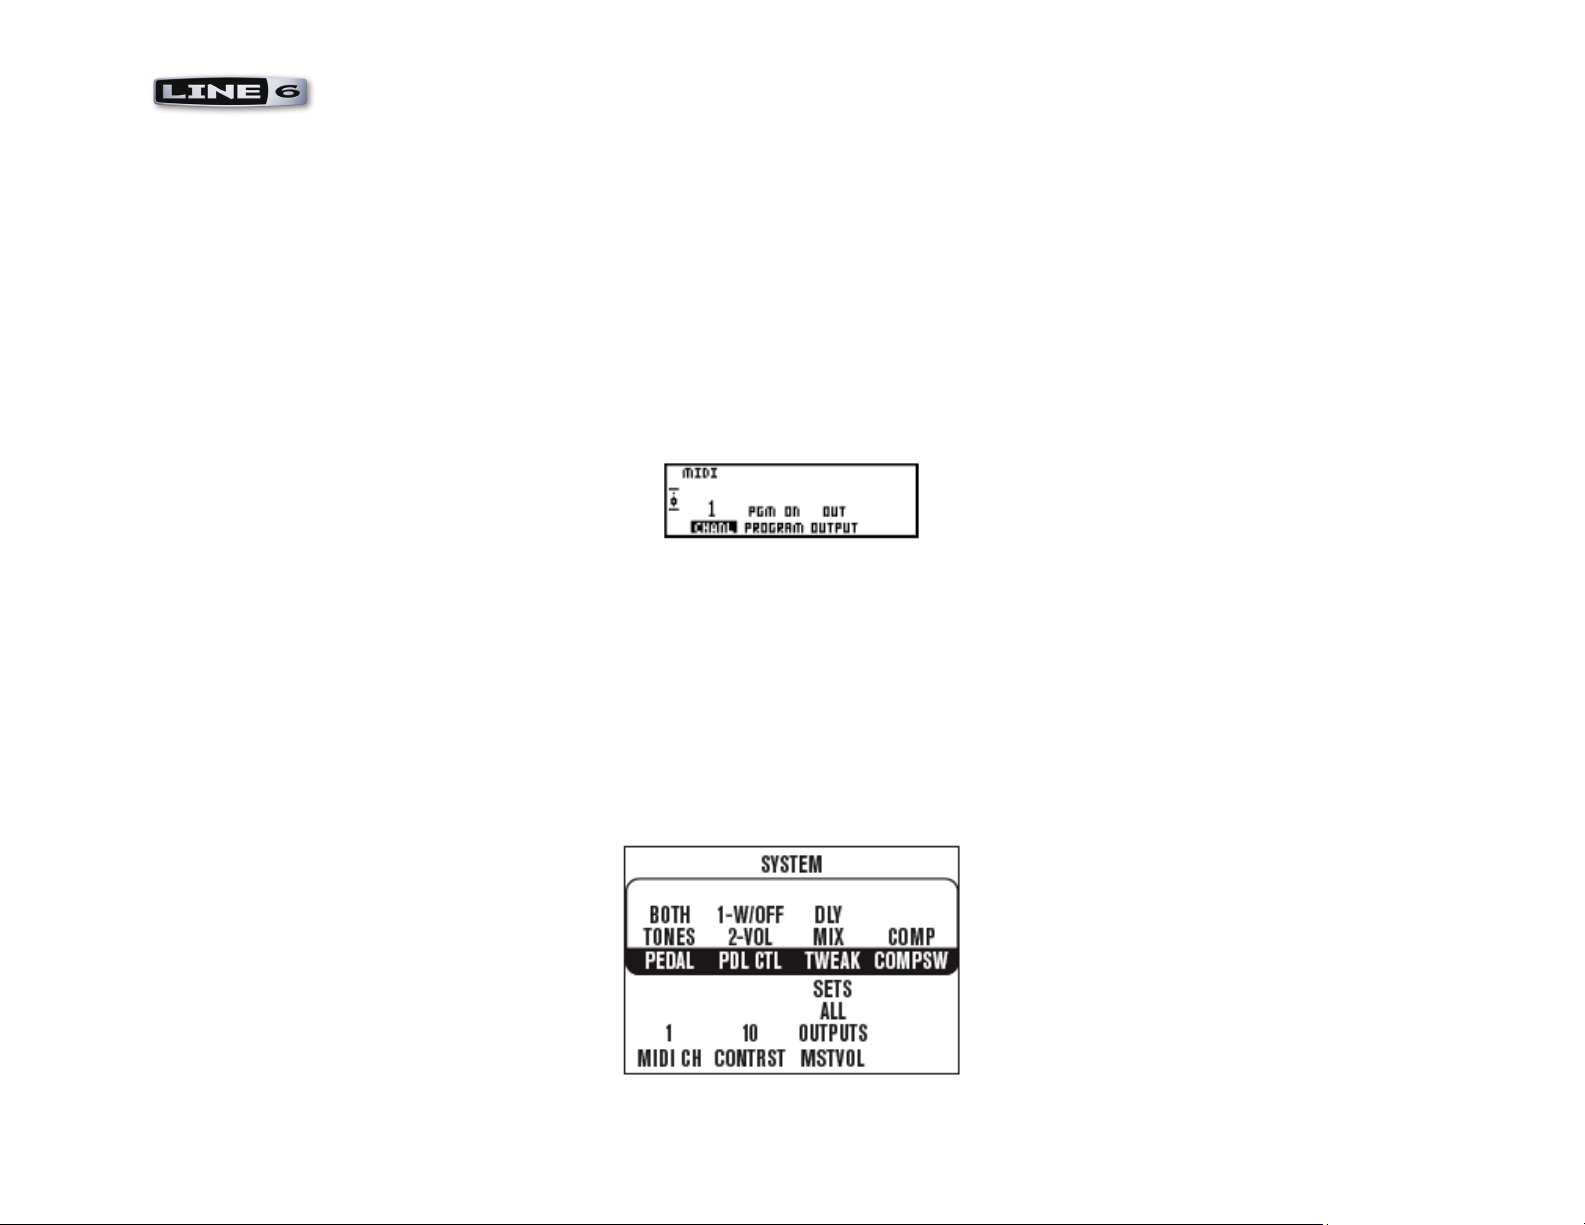
To set the MIDI Channel on PODx t , PODx t Pro, Bass PODx t or Bass PODx t Pro, press the TUNE/SYSTEM button (which will light up). For
PODx t Live or Bass PODx t Live, press the OUTPUT MODE/SYSTEM button so that it lights up. Then, for any of these units, use the Select
knob to find the MIDI page that looks like this:
PODxt/Bass PODxt MIDI options
Press the button under CHANL and start spinning the EFFECT TWEAK knob to change the MIDI Channel. You can choose channels 1
thru 16, or OMNI (Omni means PODx t will ‘listen’ on all MIDI channels, which is fine if it’s your only connected MIDI device). PODxt/
Bass PODxt always accepts SysEx data on any channel, so if you are only working with SysEx data, this channel setting is only important to
determine what channel your PODx t /Bass PODx t will send on.
POD X3 Live, POD X3 Pro
To set the MIDI Channel on POD X3, press and hold the Outputs/Hold for System button for 2 seconds to go to the SYSTEM page:
The POD X3 System page
MIDI CC Reference - Line 6 Products & MIDI
1•9
Choose from MIDI Channel 1-16, or select Omni to have POD X3 respond to all MIDI channels, while transmitting on Channel 1. When
MIDI Program Change messages 0-127 are received, POD X3 Live will recall User Presets 01A-32D, and it will send those same program
changes as presets are selected from the POD X3. It also echoes all Program Change messages it receives to the MIDI Out, so they can be
connected “thru” to another MIDI device.
Vetta II and Vetta II HD
To set the MIDI Channel on a Vetta II Combo or HD amplifier, press the SYSTEM SETUP button (which will light up), then turn the PAGE
knob until the LCD displays page 3. Select the knob directly beneath the MIDI CHAN item in the display and adjust it to the desired channel
number (1-16).
Flextone III, HD 147, and Pocket POD
Flextone III, HD 147, and Pocket POD always communicate on MIDI Channel 1 as a fixed setting.
GearBox Software
GearBox receives and sends MIDI data on Channel 1 as a fixed setting.
Looking for more control? The Line 6 FBV Series Foot Controllers are designed to work with most Line 6 POD and amp products right out of
the box. Also check out the Line 6 Product Manuals page to grab more info on Line 6 gear, recording, computer optimizations and more!

MIDI CC Reference - Line 6 Hardware & Software Reference Tables
2•1
MIDI CC re f e r e n C e ta b l e s
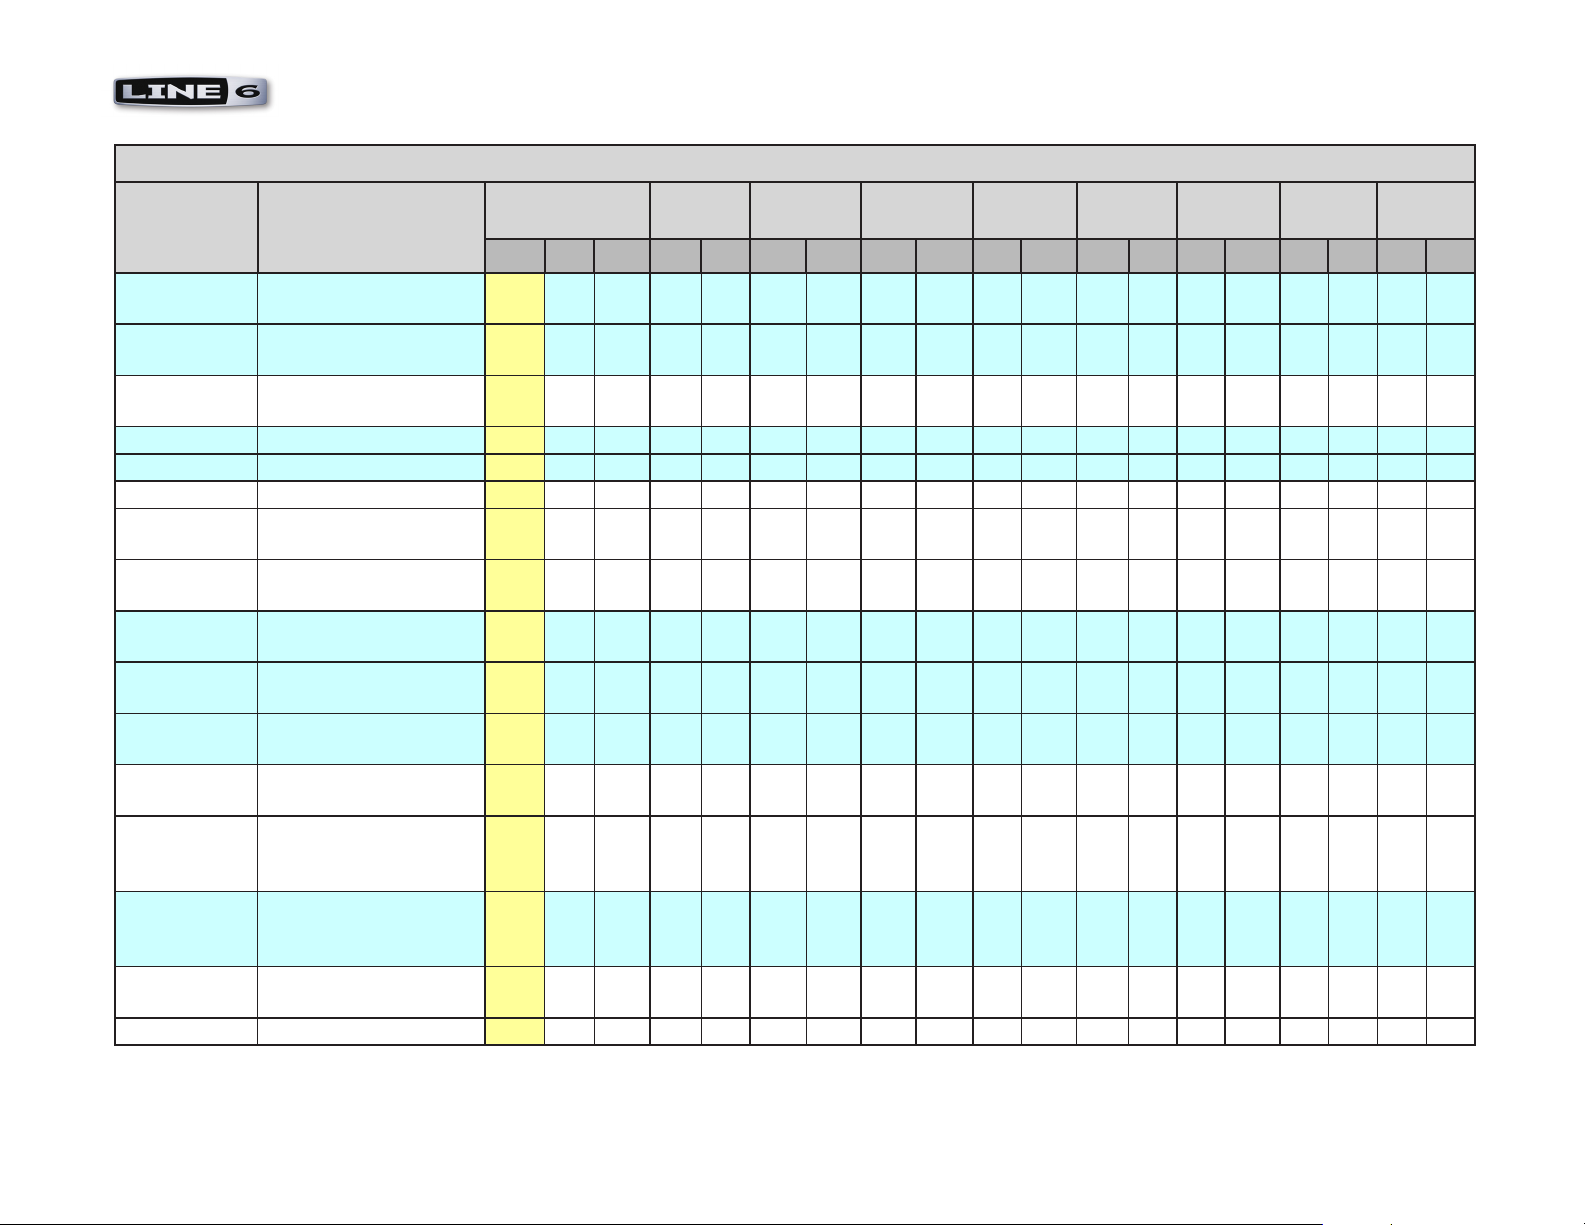
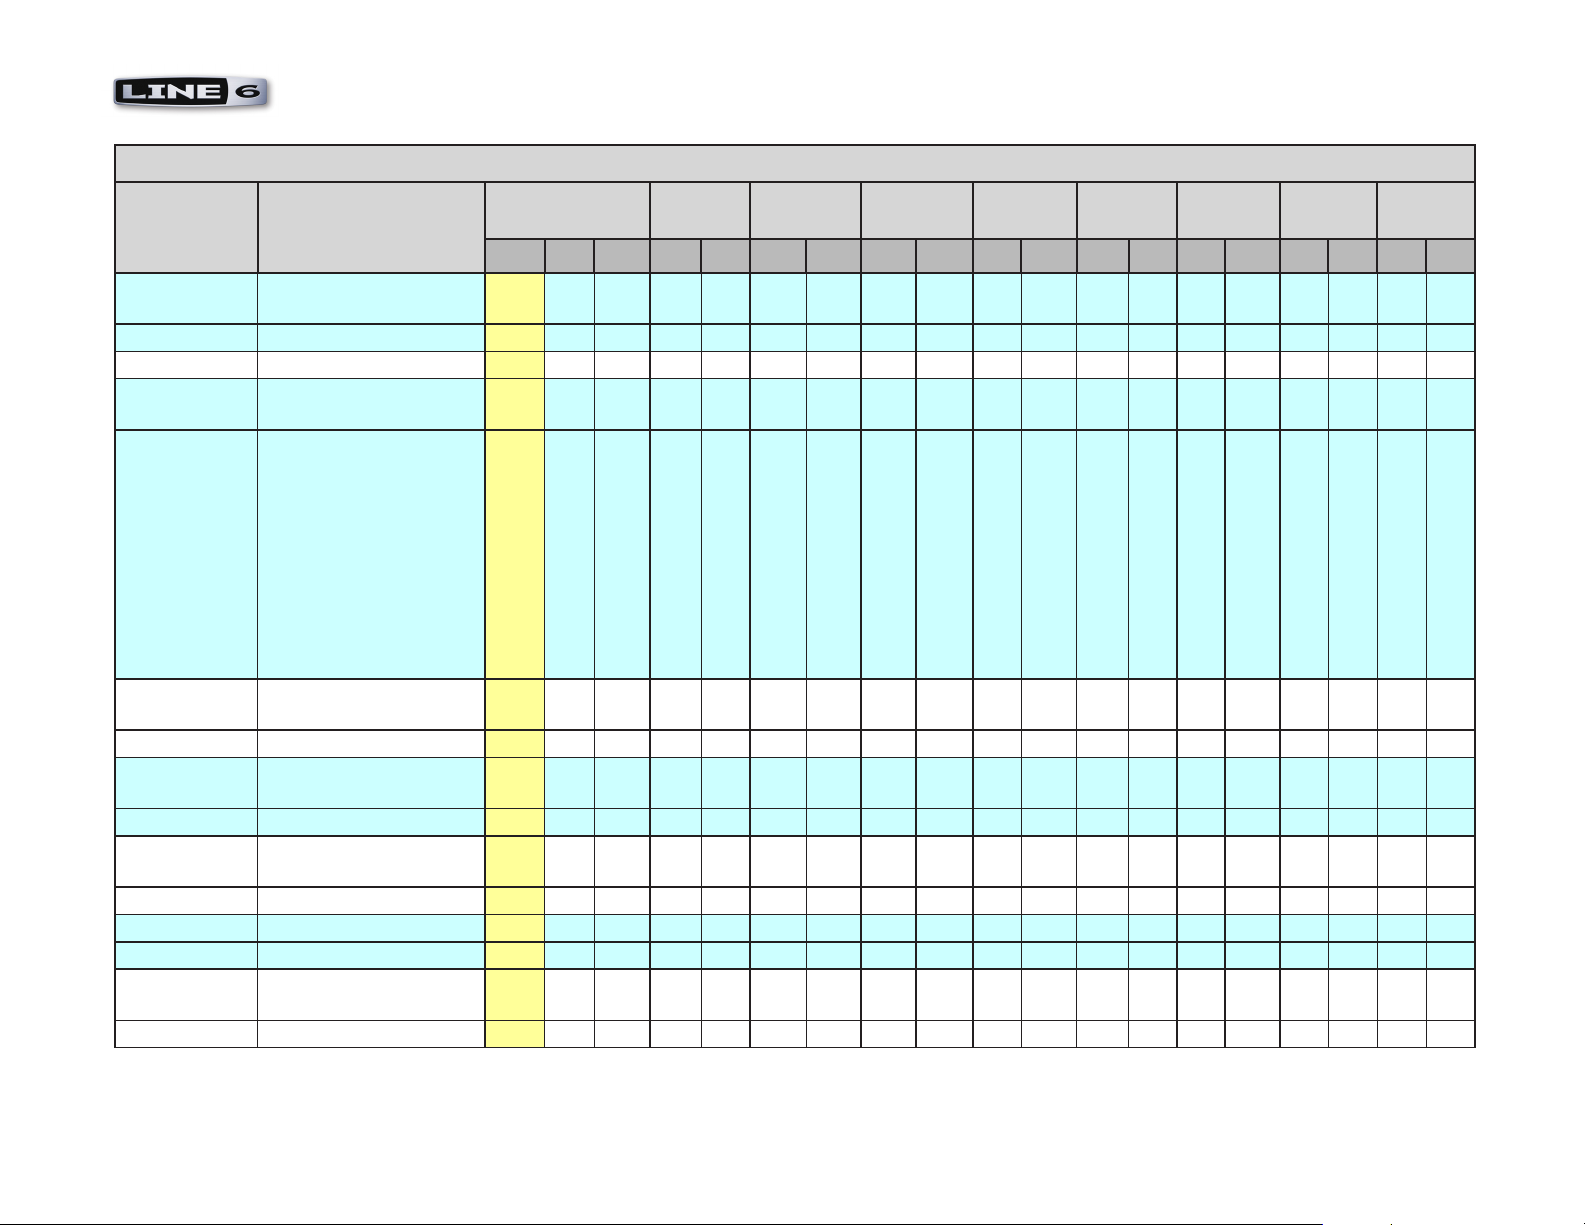
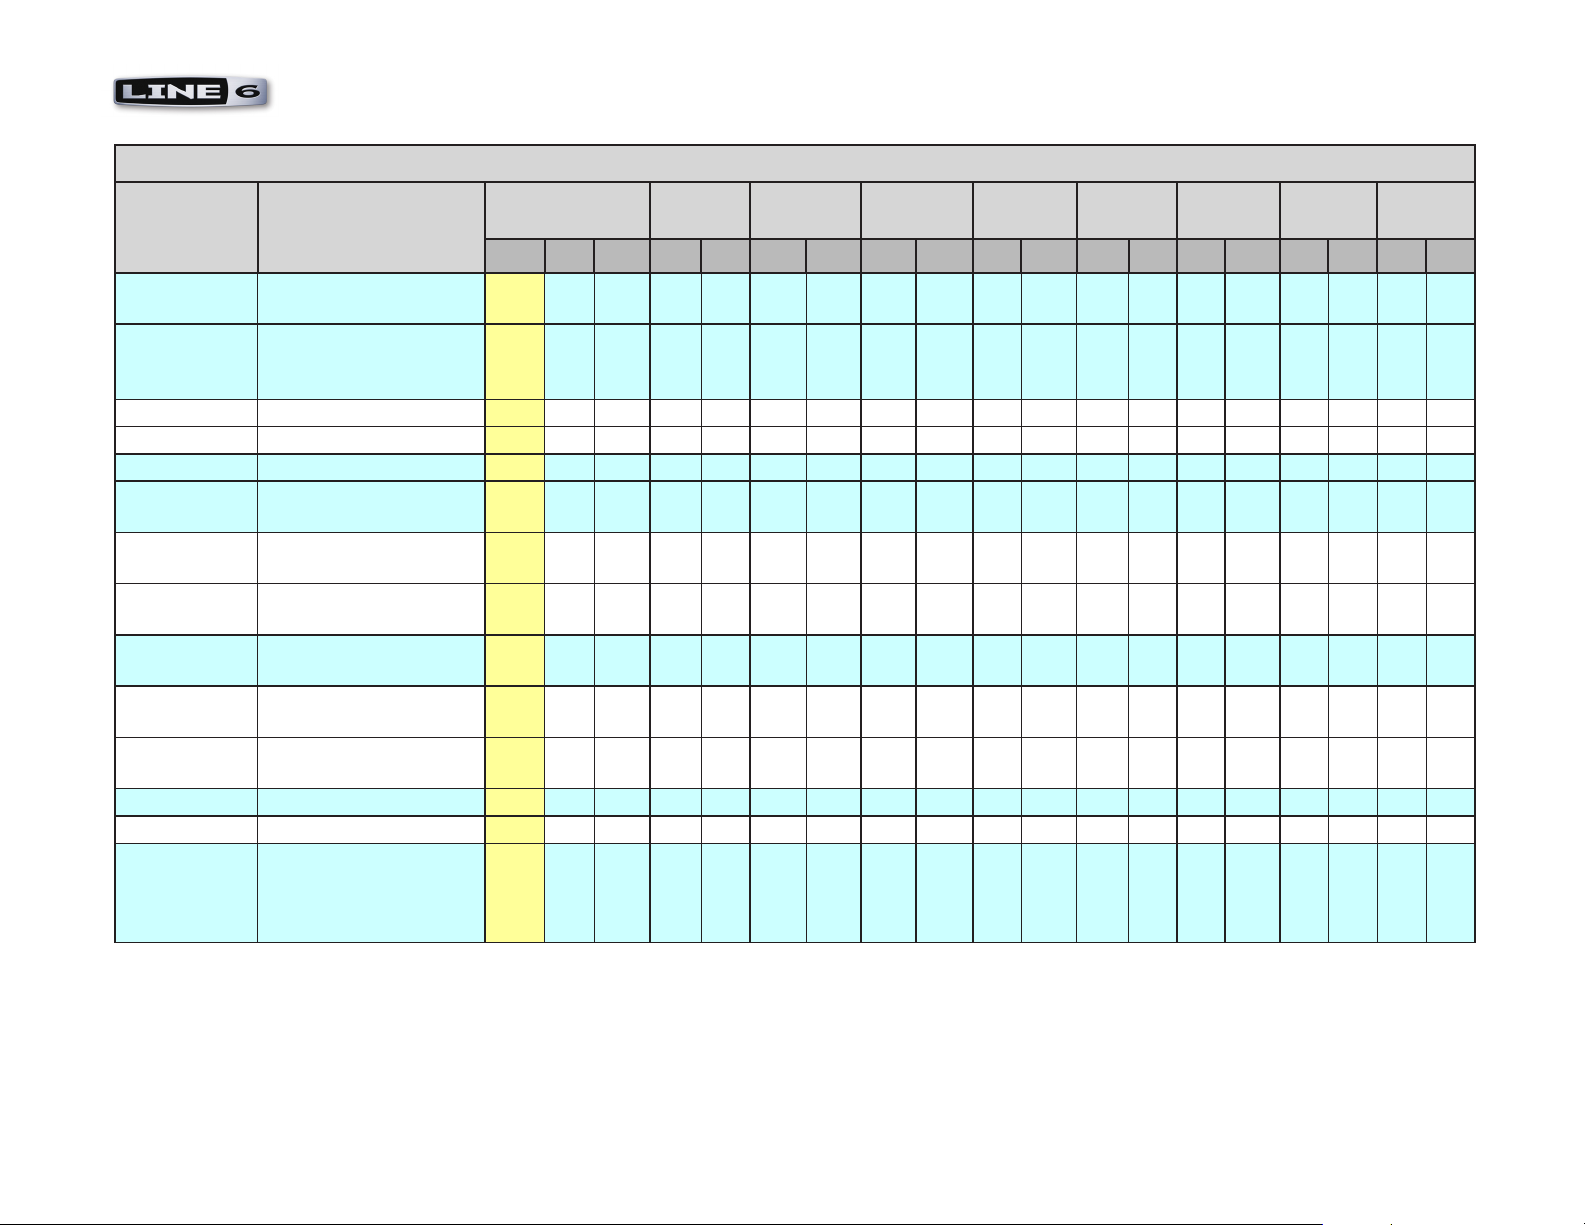
The following sections include MIDI reference tables. The first MIDI CC refrence table is specifically for Line 6 hardware devices, followed by a table
for the Line 6 GearBox software. These tables list all controllable parameters, the MIDI CC controller number and values assigned to each parameter,
as well as descriptions for what is being controlled. To follow are descriptions of the columns shown in the Line 6 Hardware and GearBox MIDI CC
tables.
Parameter - The table lists all parameters that can be remotely controlled by MIDI CC’s, and you can see that many parameters are common to several
Line 6 hardware devices.
Notes - Some Parameters may not be too obvious by name alone, or have some special behaviors for how their data value ranges are applied, so this
column is where to look for this info.
Product Columns - (Line 6 Hardware chart) There are 5 sets of paired columns that refer to the 5 product types. Note that PODx t and Bass PODx t
are each one paired column set – these each include all PODx t and Bass PODx t products (XT, XT Pro and XT Live), unless otherwise noted. Each has
a column for “TX” (transmit) and “RX” (receive). A check mark in the slot means that the control of the parameter via MIDI CC is supported for the
product type.
MIDI CC# and Range - This set of columns lists the assigned MIDI CC controller number, and the range for the data values supported. You can see that
most CCs offer a range from 0 to 127, which typically map to a knob or slider. If the parameter is a simple on/off type, then usually values from 0 to 63
will all set that parameter to “off” and 64 to 127 will set the parameter to “on”. Some parameters, such as the various “Model Select” items, will number
only from 0 up to a number less than 127, since each value represents each Model that is available – all higher values have no related function (see the
Model Tables section*). Check the Notes column to see if other behaviors apply.
*The Model Tables section provide the detailed breakdown of MIDI CC range values that are assigned to the individual Amp, Cabinet and Effects
Models and Effect parameters. These are the available Model types for each Amp/Cab/Effect Model Select parameter, and each Model is recalled using
the specific range value for the assigned MIDI CC.
MIDI CC Reference - Line 6 Hardware & Software Reference Tables
2•2
Line 6 Hardwaere MIDI CC Refrence Table
Parameter Notes MIDI CC # and
Range
POD 2.0
PODx t Bass
PODx t
Flex III
HD147
Vetta II Floor
POD Plus
Pocket
POD
POD X3
Live /Pro
CC# Min Max TX RX TX RX TX RX TX RX TX RX TX RX TX RX TX RX
Tweak 1 0 127 √ √ √ √ √ √ √ √ √ √ √ √
Pedal 1 1 0 127 √ √
Delay Tweak 2 0 127 √ √
Tweak 2 2 0 127 √ √
Pedal 2 2 0 127 √ √
Modulation
Tweak
3 0 127
√ √
Wah Position 4 0 127 √ √ √ √ √ √ √ √ √ √ √ √ √ √ √
Compressor
Gain
5 0 127
√ √ √ √ √ √
Split/Blend 0=Blend/Blend, 1=Split/
Blend, 2=Blend/Split,
3=Split/Split
6 0 3
Volume Pedal Realtime (not saved in
Channel or Setup)
7 0 127
√ √ √ √ √ √ √ √ √ √ √ √ √ √ √
Amp 2 Pan 0=Full Left, 64=Center,
127=Full Right
8 0 127
Compression
Threshold
9 0 63
√ √ √ √ √ √
Amp 1/Studio
Pan
0=Full Left, 64=Center,
127=Full Right
10 0 127
√ √ √ √
Amp 1 Model
w/ Amp
defaults
Loads Amp with Amp
Defaults. Range depends
on device (see model
tables)
11 0 -
√ √ √ √ √ √ √ √
Line 6 Hardware MIDI CC Reference Table
MIDI CC Reference - Line 6 Hardware & Software Reference Tables
2•3
Line 6 Hardwaere MIDI CC Refrence Table
Parameter Notes MIDI CC # and
Range
POD 2.0
PODx t Bass
PODx t
Flex III
HD147
Vetta II Floor
POD Plus
Pocket
POD
POD X3
Live /Pro
CC# Min Max TX RX TX RX TX RX TX RX TX RX TX RX TX RX TX RX
Amp 1 Model
w/out Amp
defaults
Loads Amp Model
without Amp Model
Defaults. Range depends
on device (see model
tables)
12 0 -
√ √ √ √
Amp 1 Model
w/ Amp
defaults
Loads Amp Model
without Amp Model
Defaults. Range depends
on device (see model
tables)
12 0 -
√ √ √ √ √ √ √ √
Amp 1 Drive 13 0 127 √ √ √ √ √ √ √ √ √ √ √ √ √ √ √ √
Mic Pre Amp
Param 0
13 0 127
Amp 1 Bass 14 0 127 √ √ √ √ √ √ √ √ √ √ √ √ √ √ √ √
Mic Pre Amp
Param 1
14 0 127
Amp 1 Mid 15 0 127 √ √ √ √ √ √ √ √ √ √ √ √ √ √
Mic Pre Amp
Param 2
15 0 127
Low Mid 15 0 127 √ √
Amp 1 Treble 16 0 127 √ √ √ √ √ √ √ √ √ √ √ √ √ √
Mic Pre Amp
Param 3
16 0 127
High Mid 16 0 127 √ √
Amp 1
Channel
Volume
17 0 127
√ √ √ √ √ √ √ √ √ √ √ √ √ √ √ √
Mic Pre Amp
Param 4
17 0 127
Reverb Level 18 0 127 √ √ √ √ √ √ √ √ √ √ √ √

MIDI CC Reference - Line 6 Hardware & Software Reference Tables
2•4
Line 6 Hardwaere MIDI CC Refrence Table
Parameter Notes MIDI CC # and
Range
POD 2.0
PODx t Bass
PODx t
Flex III
HD147
Vetta II Floor
POD Plus
Pocket
POD
POD X3
Live /Pro
CC# Min Max TX RX TX RX TX RX TX RX TX RX TX RX TX RX TX RX
Effect Model Range depends on device
(see model tables)
19 0 -
√ √
Effect Setup 19 0 63 √ √ √ √ √ √ √ √
Drive 2 (Only
if Amp Type =
Layer)
Non-linear mapping 20 0 127
√ √ √ √ √ √ √ √ √ √
EQ Freq 1 (low
shelving)
Non-linear mapping 20 0 127
√ √ √ √ √ √
EQ Freq 1 (low
shelving)
Non-linear mapping 20 0 127
√ √
Amp 1
Presence
21 0 127
√ √ √ √ √ √ √ √ √ √ √
Mic Pre Amp
Param 5
21 0 127
Treble 21 0 127 √ √
Noise Gate
Enable
0~63=Off ; 64~127=On 22 0 127
√ √ √ √ √ √ √ √ √ √ √ √ √ √ √ √
Gate
Threshold
0<>31=-96dB,
32=-96dB...127=0dB
23 32 127
√ √ √ √ √ √ √ √ √ √ √ √ √
Gate Decay 0=.1msec; 127=3000msec 24 0 127 √ √ √ √ √ √ √ √ √ √ √ √
Stomp Enable 0~63=Off ; 64~127=On 25 0 127 √ √ √ √ √ √ √ √ √ √
Drive/Boost 0~63=Off ; 64~127=On 25 √ √
Comp Enable 0~63=Off ; 64~127=On 26 0 127 √ √ √ √ √ √ √ √ √ √ √ √ √ √
Volume Boost 0~63=Off ; 64~127=On 26 0 127 √ √
Stomp Param 1
MSB
Not currently in use 27 0 127
Presence Boost 0~63=Off ; 64~127=On 27 0 127 √ √ √
Delay Enable 0~63=Off ; 64~127=On 28 0 127 √ √ √ √ √ √ √ √ √ √ √ √ √ √ √ √
Modulation
Param 1
29 0 127
√ √ √ √ √ √ √
MIDI CC Reference - Line 6 Hardware & Software Reference Tables
2•5
Line 6 Hardwaere MIDI CC Refrence Table
Parameter Notes MIDI CC # and
Range
POD 2.0
PODx t Bass
PODx t
Flex III
HD147
Vetta II Floor
POD Plus
Pocket
POD
POD X3
Live /Pro
CC# Min Max TX RX TX RX TX RX TX RX TX RX TX RX TX RX TX RX
Delay Param 1
MSB
30 0 127
√ √ √ √ √ √ √ √ √ √ √
Delay Param 1
Note value
1=Whole, 2=Dotted
Half, 3=Half, 4=Half
Triplet, 5=Dotted
Quarter, 6=Quarter,
7=Quarter Triplet,
8=Dotted Eighth,
9=Eighth, 10=Eighth
Triplet, 11=Dotted
Sixteenth, 12=Sixteenth,
13=Sixteenth Triplet
31 0 127
√ √ √ √ √ √ √ √
EQ Freq 2
(peaking)
Non-linear mapping 32 0 127
√ √
Delay
Regeneration
32 0 127
√ √ √ √
Delay Param 2 33 0 127 √ √ √ √ √ √ √ √ √
Delay Mix 34 0 127 √ √ √ √ √ √ √ √ √ √ √
Delay Param 3 35 0 127 √ √ √ √ √ √ √
Reverb Enable 0~63=Off ; 64~127=On 36 0 127 √ √ √ √ √ √ √ √ √ √ √ √ √
Reverb Model Range depends on device
(see model tables)
37 0 127
√ √ √ √ √ √ √ √
Reverb Decay 38 0 127 √ √ √ √ √ √ √ √ √
Reverb Tone 39 0 127 √ √ √ √ √ √ √ √
Reverb
Diffusion
40 0 127
√ √ √ √ √
Reverb Pre-
Delay
40 0 127
√ √ √
Reverb Density 41 0 127 √ √ √
Reverb Pre/
Post
0~63 = Pre-Amp Model,
64~127 = Post-Amp
Model
41 0 127
√ √ √ √ √ √
MIDI CC Reference - Line 6 Hardware & Software Reference Tables
2•6
Line 6 Hardwaere MIDI CC Refrence Table
Parameter Notes MIDI CC # and
Range
POD 2.0
PODx t Bass
PODx t
Flex III
HD147
Vetta II Floor
POD Plus
Pocket
POD
POD X3
Live /Pro
CC# Min Max TX RX TX RX TX RX TX RX TX RX TX RX TX RX TX RX
Compression
Ratio
42 0 127
√ √ √
EQ Freq 2
(peaking)
Non-linear mapping 42 0 127
√ √ √ √
EQ Freq 3
(peaking)
Non-linear mapping 42 0 127
√ √
Wah Enable 0~63=Off ; 64~127=On 43 0 127 √ √ √ √ √ √ √ √ √ √ √ √
Pedal 1 Enable 0~63=Off ; 64~127=On 43 0 127 √ √
Wah Model 44 0 127 √ √
Modulation
lo-cut
44 0 127
√ √
Wah Bottom
Frequency
44 0 127
√ √
Wah Top
Frequency
45 0 127
√ √ √
Delay/Reverb
lo-cut
45 0 127
√ √
Volume Pedal
Maximum
45 0 127
√ √
Volume Pedal
Minimum
46 0 127
√ √ √ √ √ √ √ √ √
EQ Pre/Post 0~63 = Pre-Amp Model,
64~127 = Post-Amp
Model
46 0 127
√ √
Volume Pre/
Post
0~63 = Pre-Amp Model,
64~127 = Post-Amp
Model
47 0 127
√ √ √ √ √ √ √ √ √ √
Volume Swell
Enable
48 0 127
√ √
D.I.>Model 48 0 127 √ √
MIDI CC Reference - Line 6 Hardware & Software Reference Tables
2•7
Line 6 Hardwaere MIDI CC Refrence Table
Parameter Notes MIDI CC # and
Range
POD 2.0
PODx t Bass
PODx t
Flex III
HD147
Vetta II Floor
POD Plus
Pocket
POD
POD X3
Live /Pro
CC# Min Max TX RX TX RX TX RX TX RX TX RX TX RX TX RX TX RX
Vol Swell
Ramp Time
49 0 127
√ √ √
D.I. Delay 49 0 127 √ √
Mod Enable 0~63=Off ; 64~127=On 50 0 127 √ √ √ √ √ √ √ √ √ √ √ √ √ √ √ √
Chorus/Flange
Speed
51 0 127
√ √ √
Modulation
Param 1 Note
value
1=Whole, 2=Dotted
Half, 3=Half, 4=Half
Triplet, 5=Dotted
Quarter, 6=Quarter,
7=Quarter Triplet,
8=Dotted Eighth,
9=Eighth, 10=Eighth
Triplet, 11=Dotted
Sixteenth, 12=Sixteenth,
13=Sixteenth Triplet
51 0 13
√ √ √ √ √ √ √
Chorus/Flange
Depth
52 0 127
√ √ √
Mod Param 2 52 0 127 √ √ √ √ √ √ √
Chorus/Flange
Regen.
53 0 127
√ √ √
Mod Param 3 53 0 127 √ √ √ √ √ √ √
Chorus
PreDelay
54 0 127
√ √ √
Mod Param 4 54 0 127 √ √ √ √ √ √ √
Rotary Speed 55 0 127 √ √ √
Mod Param 5 55 0 127 √ √ √ √
Rotary Max
Speed
56 0 127
√ √ √
Mod Mix 56 0 127 √ √ √ √ √ √ √
MIDI CC Reference - Line 6 Hardware & Software Reference Tables
2•8
Line 6 Hardwaere MIDI CC Refrence Table
Parameter Notes MIDI CC # and
Range
POD 2.0
PODx t Bass
PODx t
Flex III
HD147
Vetta II Floor
POD Plus
Pocket
POD
POD X3
Live /Pro
CC# Min Max TX RX TX RX TX RX TX RX TX RX TX RX TX RX TX RX
Rotary Min
Speed
57 0 127
√ √ √
Mod Pre/Post 0~63 = Pre-Amp Model,
64~127 = Post-Amp
Model
57 0 127
√ √ √ √ √ √ √
Tremolo Speed 58 0 127 √ √ √
Mod Model 58 0 - √ √ √ √ √ √ √ √
Tremolo Depth 59 0 127 √ √ √
Stomp Param
1 LSB
Not currently in use 59 0 127
√ √
EQ Freq 3
(peaking)
Non-linear mapping 60 0 127
√ √ √ √
EQ Freq 4
(peaking)
Non-linear mapping 60 0 127
√ √
Mod Param 1
LSB
61 0 127
√ √ √ √ √ √ √
Delay Time
(Dbl Precision)
62 0 127
√ √ √ √
Delay Param 1
LSB
62 0 127
√ √ √ √ √ √ √
EQ Enable 0~63=Off ; 64~127 63 0 127 √ √ √ √ √ √ √ √
Tap Tempo 64-127 = a Tap 64 0 127 √ √ √ √ √ √ √ √ √ √ √ √ √ √ √ √
Pedal Assign 0~41 = Wah/Off -
Volume; 42~85 = Tweak-
Volume; 86~127 = Wah/
Vol - Tweak
65 0 127
√ √ √ √ √ √
Loading...