


KD-R335/KD-R336
 /
/ 

 /
/ 
ENGLISH
РУCCKИЙ
KD-R336/KD-R335
CD RECEIVER / РЕСИВЕР С ПРОИГРЫВАТЕЛЕМ КОМПАКТ-ДИСКОВ /
For canceling the display demonstration, see page 4. / Информацию об отмене демонстрации функций дисплея см. на стр. 4. /


For installation and connections, refer to the separate manual.
Указания по установке и выполнению соединений приводятся в отдельной инструкции.
INSTRUCTIONS
ИНСТРУКЦИИ ПО ЭКСПЛУАТАЦИИ
EN, RU, TH, AR, PE |
|
GET0761-001A |
© 2011 JVC KENWOOD Corporation |
0811DTSMDTJEIN |
[U] |

Thank you for purchasing a JVC product.
Please read all instructions carefully before operation, to ensure your complete understanding and to obtain the best possible performance from the unit.
IMPORTANT FOR LASER PRODUCTS
1.CLASS 1 LASER PRODUCT
2.CAUTION: Do not open the top cover. There are no user serviceable parts inside the unit; leave
all servicing to qualified service personnel.
3.CAUTION: Visible and/or invisible class 1M laser radiation when open. Do not view directly with optical instruments.
4.REPRODUCTION OF LABEL: CAUTION LABEL, PLACED OUTSIDE THE UNIT.
[European Union only]
WARNING:
Stop the car before operating the unit.
Caution:
Adjust the volume so that you can hear sounds outside the car. Driving with the volume too high may cause an accident.
Caution on volume setting:
Discs produce very little noise compared with other sources. Lower the volume before playing a disc to avoid damaging the speakers by the sudden increase of the output level.
Caution for DualDisc playback:
The Non-DVD side of a “DualDisc” does not comply with the “Compact Disc Digital Audio” standard. Therefore, the use of Non-DVD side of a DualDisc on this product may not be recommended.
2ENGLISH

How to attach/detach the control panel
How to reset your unit
Your preset adjustments will also be erased.
How to forcibly eject a disc
[Hold]
•Be careful not to drop the disc when it ejects.
•If this does not work, reset your unit.
Maintenance
Cleaning the unit
Wipe off the dirt on the panel with a dry silicon or soft cloth. Failure to observe this precaution may result in damage to the monitor or unit.
Cleaning the connector
Wipe off dirt on the connector of the unit and panel. Use a cotton swab or cloth.
CONTENTS
3How to attach/detach the control panel
3How to reset your unit
3How to forcibly eject a disc
3Maintenance
4Canceling the display demonstration
4Setting the clock
5Preparing the remote controller
5About discs
6Basic operations
7 Listening to the radio
8Listening to a disc
9Connecting the other external components
9Listening to the other external components
10 Selecting a preset sound mode
10 Menu operations
13Troubleshooting
14Using Bluetooth® devices
15Specifications
Condensation : When the car is airconditioned, moisture may collect on the laser lens. This may cause disc read errors. In this case, remove the disc and wait for the moisture to evaporate.
Temperature inside the car : If you have parked the car for a long time in hot or cold weather, wait until the temperature in the car becomes normal before operating the unit.
ENGLISH 3

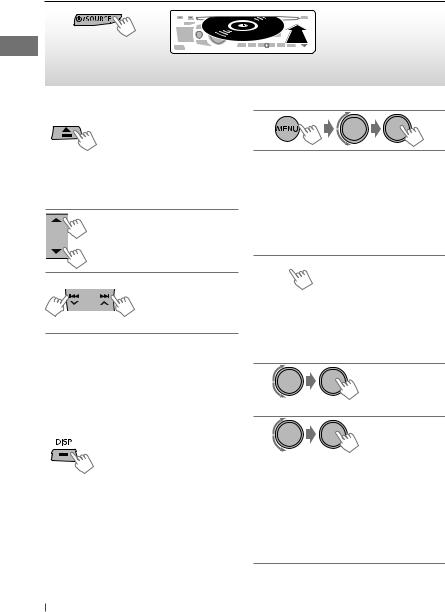
Canceling the display demonstration
1 |
Turn on the power. |
4 |
Select <DEMO OFF>. |
|
[Hold] |
|
|
2 |
[Hold] |
5 |
|
|
(Initial setting) |
|
|
3 |
|
6 |
Finish the procedure. |
|
(Initial setting) |
|
|
Setting the clock
1Turn on the power.
 [Hold]
2 

 [Hold]
(Initial setting)
3 Select <CLOCK>.
4 Select <CLOCK SET>.
5 Adjust the hour.
(Initial setting)
6 Adjust the minute.
7 Finish the procedure.
4ENGLISH
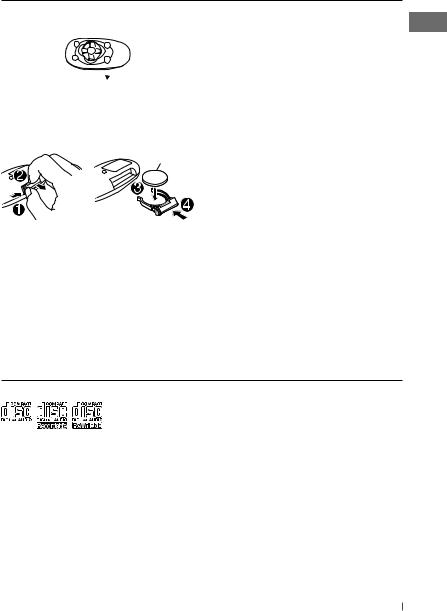
Preparing the remote controller
When you use the remote controller for the first time, pull out the insulation sheet.
Insulation sheet 

If the effectiveness of the remote controller decreases, replace the battery.
Replacing the lithium coin battery
CR2025
Caution:
•Danger of explosion if battery is incorrectly replaced. Replace only with the same or equivalent type.
•Battery shall not be exposed to excessive heat such as sunshine, fire, or the like.
Warning (to prevent accidents and damage):
•Do not install any battery other than CR2025 or its equivalent.
•Do not leave the remote controller in a place (such as dashboards) exposed to direct sunlight for a long time.
•Store the battery in a place where children cannot reach.
•Do not recharge, short, disassemble, heat the battery, or dispose of it in a fire.
•Do not leave the battery with other metallic materials.
•Do not poke the battery with tweezers or similar tools.
•Wrap the battery with tape and insulate when throwing away or saving it.
About discs
This unit can only play the CDs with:
Discs that cannot be used:
•Discs that are not round.
•Discs with coloring on the recording surface or discs that are dirty.
•You cannot play a Recordable/ReWritable disc that has not been finalized. (For the finalization process refer to your disc writing software, and your disc recorder instruction manual.)
•8 cm CD cannot be used. Attempt to insert using an adapter can cause malfunction.
Handling discs:
•Do not touch the recording surface of the disc.
•Do not stick tape etc. on the disc, or use a disc with tape stuck on it.
•Do not use any accessories for the disc.
•Clean from the center of the disc and move outward.
•Clean the disc with a dry silicon or soft cloth. Do not use any solvents.
•When removing discs from this unit, pull them out horizontally.
•Remove the rims from the center hole and disc edge before inserting a disc.
ENGLISH 5

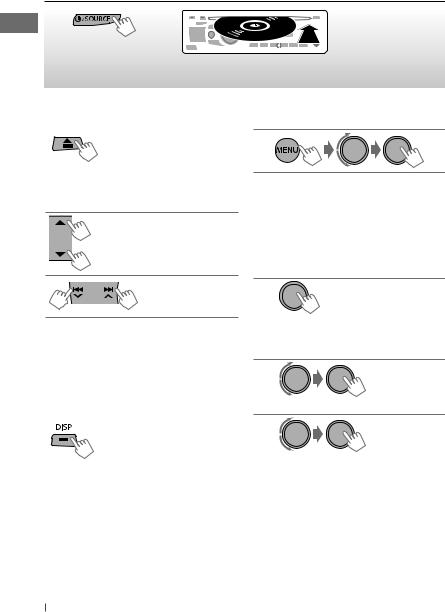
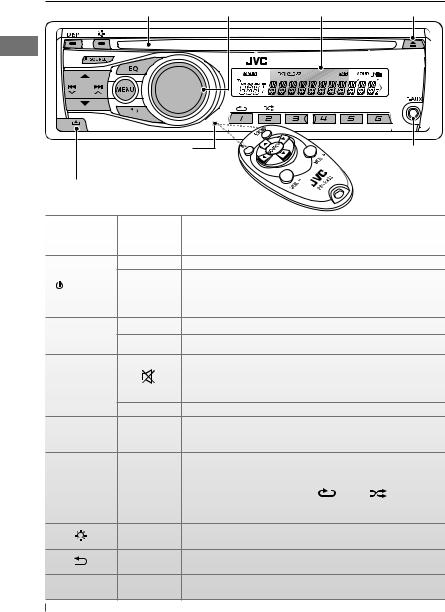
Basic operations
|
|
|
|
Loading slot |
Control dial |
Display window |
Ejects the disc |
||||||||
|
|||||||||||||||
|
|
|
|
|
|
|
|
|
|
|
|
|
|
|
|
|
|
|
|
|
|
|
|
|
|
|
|
|
|
|
|
|
|
|
|
|
|
|
|
|
|
|
|
|
|
|
|
|
|
|
|
|
|
|
|
|
|
|
|
|
|
|
|
|
|
|
|
|
|
|
|
|
|
|
|
|
|
|
|
|
|
|
|
|
|
|
|
|
|
|
|
|
|
|
|
|
|
|
|
|
|
|
|
|
|
|
|
|
|
|
|
Remote sensor |
Front auxiliary input jack |
• DO NOT expose to |
|
bright sunlight. |
|
Detaches the panel
When you press or hold the following button(s)...
|
Main unit |
Remote |
General operation |
|||
|
controller |
|||||
|
|
|
|
|
||
|
|
— |
Turns on/off [Hold]. |
|
|
|
|
/ SOURCE |
SOURCE |
Selects the sources (FM, CD, F-AUX, BT AUDIO or R-AUX or |
|||
|
||||||
|
BT PHONE, AM). |
|
|
|||
|
|
|
|
|||
|
|
|
• “CD” is selectable only when a disc is loaded. |
|||
Control dial |
VOL – / + |
Adjusts the volume level. |
|
|
||
|
(turn) |
— |
Selects items. |
|
|
|
|
|
|
Mutes the sound during playback. If the source is “CD,” playback |
|||
Control dial |
|
pauses. |
|
|
||
|
(press) |
|
• Press the button again to cancel muting or resume playback. |
|||
|
|
— |
Confirms selection. |
|
|
|
|
|
|
Selects the sound mode. |
|
|
|
|
EQ |
SOUND |
• Hold the EQ button on the main unit to enter tone level |
|||
|
|
|
adjustment directly. (page 10) |
|
||
|
|
|
• Selects preset stations. |
|
|
|
|
Number |
— |
• Stores the current station into the selected number button [Hold]. |
|||
buttons (1 – 6) |
• Press number button 1 ( |
) or 2 ( |
) to enter REPEAT/ |
|||
|
||||||
|
|
|
RANDOM setting directly. (page 8) |
|
||
|
|
— |
Enters <BRIGHTNESS> menu directly. (page 11) |
|||
|
|
|
|
|
||
|
|
— |
• Returns to the previous menu. |
|
||
|
|
• Exit from the menu [Hold]. |
|
|
||
|
|
|
|
|
||
|
DISP |
— |
• Changes the display information. |
|
||
|
• Scrolls the display information [Hold]. |
|
||||
|
|
|
|
|||
6ENGLISH

Listening to the radio
~ 
] “FM” or “AM”
Ÿ |
• [Press] Searches for stations automatically. |
|
• [Hold] Searches for stations manually. |
||
|
||
|
“M” flashes, then press the button |
|
|
repeatedly. |
“ST” lights up when receiving an FM stereo broadcast with sufficient signal strength.
Improving the FM reception
1
[Hold]
2
] <TUNER> ] <MONO> ] <MONO ON> Reception improves, but stereo effect will be lost.
To restore the stereo effect, repeat the same procedure to select <MONO OFF>.
Automatic presetting (FM)—
SSM (Strong-station Sequential Memory)
You can preset up to 18 stations for FM.
While listening to a station...
1 
[Hold]
2 
] <TUNER> ] <SSM> ] <SSM 01 – 06 / 07 – 12 / 13 – 18>
“SSM” flashes and local stations with the strongest signal are searched and stored automatically.
To preset another 6 stations, repeat the above procedure by selecting one of the other SSM setting ranges.
Changing the display information
Frequency j Clock
Manual presetting (FM/AM)
You can preset up to 18 stations for FM and 6 stations for AM.
1
] Tune in to a station you want to preset.
2
[Hold]
“PRESET MODE” flashes.
3
] Selects preset number.
Preset number flashes and “MEMORY” appears.
•Pressing and holding the number buttons
(1 – 6) can also store the current station to the selected number buttons (1 – 6).
Selecting a preset station
1
or 2
•Pressing the number buttons (1 – 6) can also select the preset stations (1 – 6).
Using the remote controller
5/∞ : Changes the preset stations.
2/3 : [Press] Searches for stations automatically.
[Hold] Searches for stations manually.
ENGLISH 7
Listening to a disc
~ |
Ÿ |
Playback starts |
|
|
|
|
] “CD” |
automatically. |
|
|
|
|
|
All tracks will be played repeatedly until you change the source |
|
|
or eject the disc. |
Stopping playback and ejecting the disc
If the ejected disc is not removed within 15 seconds, it is automatically inserted into the loading slot.
Selecting a track/folder
Selects folder of the MP3/WMA
[Press]Selects track. [Hold] Fast-forwards or reverses the track.
Using the remote controller
5/∞ : Selects folder of the MP3/WMA.
2/3 : [Press] Selects track.
[Hold] Fast-forwards or reverses the track.
Changing the display information
Disc title/Album name/performer (folder name)* = Track title (file name)* = Current track number with the elapsed playing time = Current track number with the clock time = (back to the beginning)
*“NO NAME” appears for conventional CDs or if not recorded.
8ENGLISH
Selecting a track/folder from the list
•If the MP3/WMA disc contains many tracks, you can fast search (±10, ±100) through the disc by turning the control dial quickly.
•To return to the previous menu, press  .
.
Selecting the playback modes
You can use only one of the following playback modes at a time.
1
[Hold]
•Pressing number button 1 ( ) or 2 (
 ) can enter REPEAT/RANDOM setting directly. Then, perform step 3.
2
] “REPEAT” j “RANDOM”
3
REPEAT 
TRACK RPT : Repeats current track FOLDER RPT : Repeats current folder
RANDOM 
FOLDER RND : Randomly plays all tracks
|
of current folder, then |
|
tracks of next folders |
ALL RND |
: Randomly plays all tracks |
To cancel repeat play or random play, select “RPT OFF” or “RND OFF.”

Connecting the other external components
You can connect an external component to the auxiliary input jack on the control panel (F-AUX) and/or on the rear side of the unit (R-AUX).
Summary of using the external components through the auxiliary input jacks:
|
Auxiliary |
Preparation |
Source |
Connecting |
|||
External component |
Menu setting |
Sub- |
|
cable/device |
|||
input jack |
Setting |
name |
|||||
|
|
item |
item |
|
|
(not supplied) |
|
Portable audio |
Front |
SRC SELECT |
F-AUX |
ON |
F-AUX |
See below. |
|
player |
Rear |
SRC SELECT |
R-AUX |
ON |
R-AUX |
||
|
|||||||
Bluetooth device |
Rear |
SRC SELECT |
R-AUX |
BT ADAPTER |
BT AUDIO/ |
KS-BTA100 |
|
|
|
|
|
|
BT PHONE* |
(page 14) |
|
* ”BT PHONE” appears when a Bluetooth phone is in use.
On the control panel (F-AUX): |
On the rear panel (R-AUX): |
|
|
3.5 mm stereo mini plug |
|
3.5 mm stereo mini |
(with “L” shaped connector) |
|
(not supplied) |
||
plug (not supplied) |
||
|
Portable audio player, etc.
Portable audio player, etc.
Recommended to use a 3-terminal plug head stereo mini plug for optimum audio output.
Listening to the other external components
For details, refer also to the instructions supplied with the external components.
~ |
Ÿ Turn on the connected component and |
|
start playing the source. |
|
] “F-AUX” or “R-AUX” |
ENGLISH 9
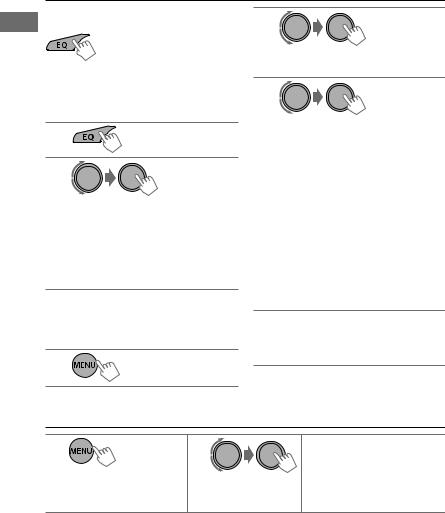
Selecting a preset sound mode
You can select a preset sound mode suitable for the music genre.
FLAT = NATURAL = DYNAMIC = VOCAL BOOST = BASS BOOST = USER = (back to the beginning)
While listening, you can adjust the subwoofer and tone level of the selected sound mode.
1 |
[Hold] |
2
Adjust the level: SUB.W* : 00 to 08
BASS/ MID/ TRE : –06 to +06
The sound mode is automatically stored and changed to “USER.”
*Subwoofer level is adjustable only when <L/O MODE> is set to <SUB.W>. (page 11)
Storing your own sound mode
You can store your own adjustments in memory.
1
[Hold]
2
] <PRO EQ> ] <BASS/ MIDDLE/ TREBLE>
3
Adjust the sound elements of the selected tone.
BASS [Initial: 80 Hz, 00, Q1.0]
Frequency: |
60/ 80/ 100/ 200 Hz |
Level: |
–06 to +06 |
Q: |
Q1.0/ 1.25/ 1.5/ 2.0 |
MIDDLE [Initial: 1.0 kHz, 00, Q1.25] |
|
Frequency: |
0.5/ 1.0/ 1.5/ 2.5 kHz |
Level: |
–06 to +06 |
Q: |
Q0.75/ 1.0/ 1.25 |
TREBLE [Initial: 10.0 kHz, 00, Q FIX] |
|
Frequency: |
10.0/ 12.5/ 15.0/ 17.5 kHz |
Level: |
–06 to +06 |
Q:Q FIX
4Repeat steps 2 and 3 to adjust other tones.
The adjustments made is automatically stored and changed to “USER.”
Menu operations
1 |
2 |
|
[Hold] |
If no operation is done for about 60 seconds, the
operation will be canceled.
3Repeat step 2 if necessary.
•To return to the previous menu, press  .
.
•To exit from the menu, press
MENU.
|
|
Menu item |
Selectable setting, [Initial: Underlined] |
|
|
DEMO |
ON : Display demonstration will be activated automatically if no operation is done for |
|
|
|
about 20 seconds. / OFF : Cancels. (page 4) |
|
|
|
|
|
|
CLOCK |
For settings, see page 4. |
|
|
|
|
10 |
|
ENGLISH |
|
|
|
|
Menu item |
Selectable setting, [Initial: Underlined] |
|
|
||
|
|
|
|
|
|
|
|
|
DIMMER SET |
AUTO : Changes the display and button illumination between the Day/Night |
|
||
|
|
|
adjustments in <BRIGHTNESS> setting when you turn off/on the car headlights. *1 / |
|
||
|
|
|
|
|||
DIMMER |
|
|
ON : Selects the Night adjustments in <BRIGHTNESS> setting for the display and button |
|
||
|
|
|
||||
|
|
illumination. / OFF : Selects the Day adjustments in <BRIGHTNESS> setting for the |
|
|||
|
|
display and button illumination. |
|
|||
|
|
BRIGHTNESS |
DAY [ 31 ] / NIGHT [ 15 ] : Selects the display and button illumination brightness |
|
||
|
|
|
level [00 — 31] for day and night. |
|
||
|
|
|
|
|
|
|
DISPLAY |
|
SCROLL *2 |
ONCE : Scrolls the displayed information once. / AUTO : Repeats scrolling (at 5-second |
|
||
|
|
intervals). / OFF : Cancels. |
|
|||
|
|
|
|
|||
|
|
|
(Pressing DISP for more than one second can scroll the display regardless of the setting.) |
|
|
|
|
|
TAG DISPLAY |
ON : Shows the Tag information while playing MP3/WMA tracks. / OFF : Cancels. |
|
||
|
|
|
|
|
||
PRO EQ |
See page 10. |
|
||||
|
|
|
|
|
|
|
|
|
FADER *3, *4 |
R06 — F06 [ 00 ] : Adjusts the front and rear speaker output balance. |
|
|
|
|
|
BALANCE *4 |
L06 — R06 [ 00 ] : Adjusts the left and right speaker output balance. |
|
|
|
|
|
LOUD |
ON : Boost low and high frequencies to produce a well-balanced sound at a low volume |
|
||
|
|
|
level. / OFF : Cancels. |
|
||
|
|
|
|
|
|
|
|
|
VOL ADJUST |
–05 — +05 [ 00 ] : Presets the volume adjustment level of each source (except |
|
||
|
|
|
“FM”), compared to the FM volume level. The volume level will automatically increase or |
|
||
|
|
|
decrease when you change the source. Before adjustment, select the source you want to |
|
||
|
|
|
adjust. (“VOL ADJ FIX” appears on the display if “FM” is selected as the source.) |
|
|
|
AUDIO |
|
L/O MODE |
SUB.W : Selects if the REAR/SW terminals are used for connecting a subwoofer (through |
|
||
|
|
an external amplifier). / REAR : Selects if the REAR/SW terminals are used for connecting |
|
|||
|
|
the speakers (through an external amplifier). |
|
|||
|
|
|
|
|
|
|
|
|
SUB.W LPF*5 |
LOW 55Hz / LOW 85Hz / LOW 120Hz : Frequencies lower than |
|
||
|
|
|
55 Hz/85 Hz/120 Hz are sent to the subwoofer. |
|
||
|
|
|
|
|
|
|
|
|
SUB.W LEVEL*5 |
00 — 08 [ 04 ] : Adjusts the subwoofer output level. |
|
|
|
|
|
HPF |
ON : Activates the High Pass Filter. Low frequency signals are cut off from the front/rear |
|
||
|
|
|
speakers. / OFF : Deactivates (all signals are sent to the front/rear speakers). |
|
||
|
|
|
|
|
|
|
|
|
BEEP |
ON / OFF : Activates or deactivates the keypress tone. |
|
||
|
|
|
|
|
|
|
|
|
TEL MUTING*6 |
ON : Mutes the sounds while using the cellular phone (not connected through |
|
||
|
|
|
KS-BTA100). / OFF : Cancels. |
|
||
|
|
|
|
|
||
*1 The illumination control lead connection is required. (See “Installation/Connection Manual.”) This setting may not work |
|
|||||
correctly on some vehicles (particularly on those having a control dial for dimming). In this case, change the setting to |
|
|||||
any other than <DIMMER AUTO>. |
|
|||||
*2 Some characters or symbols will not be shown correctly (or will be blanked) on the display. |
|
|||||
*3 If you are using a two-speaker system, set the fader level to “00.” |
|
|||||
*4 This adjustment will not affect the subwoofer output. |
|
|||||
*5 Displayed only when <L/O MODE> is set to <SUB.W>. |
|
|||||
*6 This setting does not work if <BT ADAPTER> is selected for <R-AUX> of the <SRC SELECT>. |
|
|||||
|
|
|
Continued... |
|
||
|
|
|
ENGLISH |
|
|
11 |
|
|
|
|
|||

|
|
|
Menu item |
Selectable setting, [Initial: Underlined] |
|
|
|
|
|
|
|
|
|
AUDIO |
|
AMP |
LOW POWER : VOLUME 00 – VOLUME 30 (Selects if the maximum power |
|
|
|
GAIN*7 |
of each speaker is less than 50 W to prevent damaging the speakers.) / |
|
|
|
||||
|
|
|
|
||
|
|
|
|
|
HIGH POWER : VOLUME 00 – VOLUME 50 |
|
|
|
|
|
|
|
|
|
|
|
|
|
|
|
|
SSM *8 |
See page 7. |
|
|
TUNER |
|
MONO *8 |
See page 7. |
|
|
|
IF BAND |
AUTO : Increases the tuner selectivity to reduce interference noises between adjacent |
|
|
|
|
|
||
|
|
|
|
|
stations. (Stereo effect may be lost.) / WIDE : Subject to interference noises from adjacent |
|
|
|
|
|
stations, but sound quality will not be degraded and the stereo effect will remain. |
|
|
|
|
|
|
|
|
SELECT |
|
AM*9 |
ON / OFF : Enable or disable “AM” in source selection. |
|
|
|
F-AUX*9 |
ON / OFF : Enable or disable “F-AUX” in source selection. |
|
|
|
|
|
||
|
|
SRC |
|
R-AUX*9 |
ON / OFF : Enable or disable “R-AUX” in source selection. / BT ADAPTER*10 : Selects if |
|
|
|
|
||
|
|
|
|
|
the rear auxiliary input jack is connected to the Bluetooth adapter, KS-BTA100. (page 9) |
|
|
|
|
|
|
*7 The volume level automatically changes to “VOLUME 30” if you change to <LOW POWER> with the volume level set higher than “VOLUME 30.”
*8 Displayed only when the source is “FM.”
*9 Displayed only when any source other than “AM/ F-AUX/ R-AUX/ BT AUDIO” is selected separately. *10When <BT ADAPTER> is selected, source name is changed to “BT AUDIO” from “R-AUX.”
Additional information
• This unit can play back multi-session discs; however, |
• The search function works but search speed is not |
|
unclosed sessions will be skipped while playing. |
constant. |
|
• This unit can play back files with the extension code |
• The maximum number of characters for file/folder |
|
<.mp3> or <.wma> (regardless of the letter |
names vary depending on the disc format used (includes |
|
case—upper/lower). |
4 extension characters—<.mp3> or <.wma>). |
|
• This unit can play back the files meeting the conditions |
ISO 9660 Level 1 and 2, Romeo: 64 characters, Joliet: 32 |
|
below: |
|
characters, Windows long file name: 64 characters |
– Bit rate: MP3: 8 kbps — 320 kbps |
• This unit can play back files recorded in VBR (variable |
|
|
WMA: 32 kbps — 192 kbps |
bit rate). (Files recorded in VBR have a discrepancy in |
– Sampling frequency: |
elapsed time indication.) |
|
MP3: |
48 kHz, 44.1 kHz, 32 kHz |
• This unit cannot play back the following files: |
|
24 kHz, 22.05 kHz, 16 kHz |
– MP3 files: encoded in MP3i and MP3 PRO format; an |
|
12 kHz, 11.025 kHz, 8 kHz |
inappropriate format; layer 1/2. |
WMA: |
48 kHz, 44.1 kHz, 32 kHz, 22.05 kHz |
– WMA files: encoded in lossless, professional, and |
• This unit can show WMA Tag and ID3 Tag Version |
voice format; not based upon Windows Media® |
|
1.0/1.1/2.2/2.3/2.4 (for MP3). |
Audio; copy-protected with DRM. |
|
|
|
– Files which have data such as AIFF, ATRAC3, etc. |
12 ENGLISH

Troubleshooting
|
Symptom |
Remedy/Cause |
|
|
|
|
|||
|
Sound cannot be heard from the speakers. |
Adjust the volume to the optimum level. / Make sure the unit is |
|
|
|
|
|||
|
|
not muted/paused. (page 6) / Check the cords and connections. |
|
|
|
“MISWIRING CHK WIRING THEN RESET |
Check to be sure the terminals of the speaker leads are covered |
|
|
|
UNIT” / “WARNING CHK WIRING THEN |
with insulating tape properly, then reset the unit. (page 3) |
|
|
General |
RESET UNIT” appears on the display and no |
If the message does not disappear, consult your JVC car audio |
|
|
operations can be done. |
dealer or a company supplying kits. |
|
|
|
|
|
|||
|
The unit does not work at all. |
Reset the unit. (page 3) |
|
|
|
“F-AUX” or “R-AUX” cannot be selected. |
Check the <SRC SELECT> = <F-AUX / R-AUX> setting. |
|
|
|
|
(page 12) |
|
|
|
Sound is sometimes interrupted while |
Check to be sure the recommended stereo mini plug is used for |
|
|
|
listening to an external component |
connection. (page 9) |
|
|
|
connected to the auxiliary input jack. |
|
|
|
FM/AM |
SSM automatic presetting does not work. |
Store stations manually. |
|
|
Static noise while listening to the radio. |
Connect the antenna firmly. |
|
|
|
|
|
|||
|
“AM” cannot be selected. |
Check the <SRC SELECT> = <AM> setting. (page 12) |
|
|
|
Disc cannot be played back. |
Insert the disc correctly. |
|
|
|
CD-R/CD-RW cannot be played back and |
Insert a finalized CD-R/CD-RW (finalize with the component |
|
|
playback |
track cannot be skipped. |
which you used for recording). |
|
|
Disc sound is sometimes interrupted. |
Stop playback while driving on rough roads. / Change the disc. / |
|
||
|
|
|||
|
|
Check the cords and connections. |
|
|
Disc |
“NO DISC” appears on the display. |
Insert a playable disc into the loading slot. |
|
|
“PLEASE” and “EJECT“ appear alternately |
Press 0, then insert a disc correctly. |
|
||
|
on the display. |
|
|
|
|
“IN DISC” appears on the display. |
The disc cannot be ejected properly. Make sure nothing is |
|
|
|
|
blocking the loading slot. |
|
|
|
Disc cannot be played back. |
• Use a disc with MP3/WMA tracks recorded in a format |
|
|
|
|
compliant with ISO 9660 Level 1, Level 2, Romeo, or Joliet. |
|
|
|
|
• Add the extension code <.mp3> or <.wma> to the file |
|
|
playback |
|
names. |
|
|
Noise is generated. |
Skip to another track or change the disc. |
|
|
|
|
|
|||
|
“READING” keeps flashing on the display. |
A longer readout time is required. Do not use too many |
|
|
MP3/WMA |
|
hierarchical levels and folders. |
|
|
Tracks do not play back in the order you |
The playback order is determined when the files are recorded. |
|
||
|
|
|||
|
have intended them to play. |
|
|
|
|
The elapsed playing time is not correct. |
This sometimes occurs during playback. This is caused by how |
|
|
|
|
the tracks are recorded on the disc. |
|
|
|
The correct characters are not displayed |
This unit can only display letters (upper case), numbers, and a |
|
|
|
(e.g. album name). |
limited number of symbols. |
|
|
ENGLISH 13

Using Bluetooth® devices
For Bluetooth operations, it is required to connect the Bluetooth adapter, KS-BTA100 (not supplied) to the auxiliary input jack (R-AUX/BT ADAPTER) on the rear of the unit. (page 9)
•For details, refer also to the instructions supplied with the Bluetooth adapter and the Bluetooth device.
•Operations may be different according to the connected device.
Preparation
1 Register (pair) a Bluetooth device with KS-BTA100.
Refer to the instructions manual supplied with KS-BTA100.
2 Change the <SRC SELECT> settings of this unit.
] <SRC SELECT> ] <R-AUX> ]
[Hold]
<BT ADAPTER>
Using the Bluetooth mobile phone
|
Adjusting the microphone volume |
(Low) |
(High) Volume level: High/ Normal (initial)/ Low |
|
• Receiving a call |
|
When a call comes in... |
KS-BTA100 |
• Making a call |
Making a call to the last connected number from |
|
|
your phone. |
•Switching between handsfree and phone
While talking...
Microphone |
|
• Ends/rejects call |
|
|
|
|
|
• Voice dialing |
|
[Hold] |
Voice dialing is available only when the connected |
|
mobile phone has the voice recognition system. |
|
|
|
Using the Bluetooth audio device
1 


 2
2 
] “BT AUDIO”
(CD receiver)
If playback does not start, operate the Bluetooth audio player to start playback.
[Press] Selects track.
[Hold] Fast-forwards or reverses the track.
About microphone volume:
• When you turn off the power of the CD receiver, the volume level changes to Normal.
14 ENGLISH

Specifications
AUDIO AMPLIFIER SECTION
Maximum Power Output : 50 W per channel Continuous Power Output (RMS) : 20 W per channel into 4 Ω, 40 Hz to 20 000 Hz at no more than 1% total harmonic distortion.
Signal-to-Noise Ratio : 70 dB
Load Impedance : 4 Ω (4 Ω to 8 Ω allowance)
Frequency Response : 40 Hz to 20 000 Hz Line-Out or Subwoofer-Out Level/
Impedance : 2.5 V/20 kΩ load (full scale)
Output Impedance : ≤ 600 Ω
Other Terminal : Antenna input, Front auxiliary input jack, Rear auxiliary/Bluetooth adapter input jack
TUNER SECTION
Frequency Range :
FM : 87.5 MHz to 108.0 MHz AM : 531 kHz to 1 611 kHz
FM Tuner :
Usable Sensitivity : 9.3 dBf (0.8 μV/75 Ω) 50 dB Quieting Sensitivity : 16.3 dBf
(1.8 μV/75 Ω)
Alternate Channel Selectivity (400 kHz) :
65 dB
Frequency Response : 40 Hz to 15 000 Hz Stereo Separation: 40 dB
AM Tuner :
Sensitivity/Selectivity : 20 μV/40 dB
CD PLAYER SECTION
Type : Compact disc player
Signal Detection System : Non-contact optical pickup (semiconductor laser)
Number of Channels : 2 channels (stereo) Frequency Response : 5 Hz to 20 000 Hz Signal-to-Noise Ratio : 98 dB
Wow and Flutter : Less than measurable limit
MP3 Decoding Format (MPEG1/2 Audio Layer 3) : Max. Bit Rate: 320 kbps
WMA (Windows Media® Audio) Decoding Format : Max. Bit Rate: 192 kbps
GENERAL
Power Requirement : Operating Voltage : DC 14.4 V (11 V to 16 V allowance)
Grounding System : Negative ground Allowable Operating Temperature :
0°C to +40°C
Dimensions (W × H × D) : (approx.)
–Installation Size :
182 mm × 52 mm × 158 mm
–Panel Size :
188 mm × 59 mm × 9 mm
Mass : 1.2 kg (excluding accessories)
Subject to change without notice.
Microsoft and Windows Media are either registered trademarks or trademarks of Microsoft Corporation in the United States and/or other countries.
Having TROUBLE with operation?
Please reset your unit
Refer to page of How to reset your unit
ENGLISH 15
Благодарим Вас за приобретение изделия JVC.
Перед тем, как приступать к эксплуатации, пожалуйста, внимательно прочитайте все инструкции с тем, чтобы полностью изучить и обеспечить оптимальную работу этого устройства.
ВАЖНО ДЛЯ ЛАЗЕРНОЙ АППАРАТУРЫ
1.ЛАЗЕРНАЯ АППАРАТУРА КЛАССА 1
2.ПРЕДУПРЕЖДЕНИЕ: Не открывайте верхнюю крышку. Внутри устройства нет частей,
которые пользователь может отремонтировать. Ремонт должен осуществляться квалифицированным обслуживающим персоналом.
3.ПРЕДУПРЕЖДЕНИЕ: В открытом состоянии происходит видимое и/или невидимое излучение лазера класса 1M. Не смотрите непосредственно в оптические инструменты.
4.ЭТИКЕТКА: ПРЕДУПРЕЖДАЮЩАЯ ЭТИКЕТКА, РАЗМЕЩЕННАЯ НА НАРУЖНОЙ СТОРОНЕ УСТРОЙСТВА.
[только Европейсий Союз]
ПРЕДУПРЕЖДЕНИЯ:
Остановите автомобиль перед началом работы с устройством.
Предостережение:
Отрегулируйте громкость таким образом, чтобы слышать звуки за пределами автомобиля. Слишком высокая громкость во время вождения может стать причиной аварии.
Предостережение, касающееся настройки громкости:
По сравнению с другими источниками звука диски создают незначительный шум. Уменьшите громкость перед воспроизведением диска, чтобы
предотвратить повреждение динамиков изза внезапного повышения уровня громкости на выходе.
Предостережение для воспроизведения дисков DualDisc:
Сторона диска DualDisc, отличная от DVD, не совместима со стандартом “Compact Disc Digital Audio”. Поэтому не рекомендуется использовать сторону диска DualDisc, отличную от DVD, на данном устройстве.
2РУCCKИЙ

Подключение и отключение панели управления
Как перенастроить Ваше устройство
Запрограммированные настройки будут также удалены.
Принудительное извлечение диска
[Удерживать]
•Будьте осторожны, не уроните диск при извлечении.
•Если это не поможет, попробуйте перенастроить приемник.
Обслуживание
Очистка устройства
В случае загрязнения протрите панель сухой силиконовой или иной мягкой тканью. Несоблюдение данной меры предосторожности может привести к повреждению монитора или устройства.
Очистка разъемов
В случае загрязнения очищайте разъемы устройства и панели. с помощью хлопчатобумажной ткани или салфетки.
CОДЕРЖАНИЕ
3Подключение и отключение панели управления
3Как перенастроить Ваше устройство
3Принудительное извлечение диска
3Обслуживание
4Отмена демонстрации функций дисплея
4Настройка часов
5Подготовка пульта дистанционного управления
5Информация о дисках
6 Основные операции
7 Прослушивание радио
8Прослушивание с диска
9Подключение других внешних устройств
9Прослушивание с других внешних устройств
10Выбор запрограммированного режима звучания
10 Операции с меню
13Устранение проблем
14Использование устройств Bluetooth®
15Технические характеристики
Конденсация : Если автомобиль оборудован установкой для кондиционирования воздуха, возможна конденсация влаги на оптической линзе. Это может приводить к ошибкам при чтении диска. В этом случае извлеките диск и дождитесь испарения влаги.
Температура внутри автомобиля : Если Вы припарковали Ваш автомобиль на длительное время в жаркую или холодную погоду, перед тем, как включать это устройство, подождите до тех пор, пока температура в автомобиле не придет в норму.
РУCCKИЙ 3

Отмена демонстрации функций дисплея
1 Включение питания. |
4 Выберите <DEMO OFF>. |
[Удерживать] |
|
2 
3 
5
[Удерживать] (Начальная настройка)
6 Завершите процедуру.
(Начальная настройка)
Настройка часов
1Включение питания.
 [Удерживать]
2 


[Удерживать] (Начальная настройка)
3 Выберите <CLOCK>.
4 Выберите <CLOCK SET>.
5 Установите час.
(Начальная настройка)
6 Установите минуты.
7 Завершите процедуру.
4РУCCKИЙ

Подготовка пульта дистанционного управления
При использовании пульта дистанционного управления в первый раз снимите изоляционный материал.
Изоляционный 
 материал
При уменьшении эффективности пульта дистанционного управления замените батарею.
Замена литиевой батареи-таблетки
CR2025
Предостережение:
•При неправильной замене аккумуляторных батарей существует опасность взрыва. При замене следует использовать батареи того же типа или их эквиваленты.
•Батарейки необходимо предохранять от чрезмерного нагревания, например, воздействия лрямого солнечного света, открытого огня и проч.
Предупреждение (предотвращение несчастных случаев и повреждений):
•Устанавливайте только аккумуляторную батарею CR2025 или эквивалентную ей.
•Не оставляйте пульт дистанционного управления в местах, подверженных длительному воздействию прямых солнечных лучей (например на приборной панели).
•Храните аккумуляторную батарею в недоступном для детей месте.
•Не перезаряжайте, не укорачивайте, не разбирайте и не нагревайте батарею, а также не подвергайте ее воздействию огня.
•Не оставляйте аккумуляторную батарею рядом
сдругими металлическими материалами.
•Не разбирайте аккумуляторную батарею
спомощью пинцета или аналогичного инструмента.
•При утилизации батареи или помещении ее на хранение оберните батарею изоляционной лентой и изолируйте ее полюса.
Информация о дисках
Данное устройство обеспечивает воспроизведение только компактдисков, имеющих следующие отметки:
Диски, которые нельзя использовать:
•Диски некруглой формы.
•Диски, записанная поверхность которых окрашена, или диски со следами загрязнений.
•Воспроизведение записываемых и перезаписываемых дисков, которые не были финализированы, невозможно. (Информацию о финализации см. в руководстве по программе записи на диски и в руководстве по эксплуатации записывающего устройства.)
•Использование компакт-дисков диаметром 8 см запрещено. Попытка вставки диска с помощью адаптера может привести к неисправности устройства.
Обращение с дисками:
•Не касайтесь записанной поверхности диска.
•Не приклеивайте на диск клейкую ленту и т. п. и не используйте диск с приклеенной на него лентой.
•Не используйте никакие дополнительные принадлежности для диска.
•Проводите чистку по направлению от центра диска к его краю.
•Для очистки диска используйте сухую силиконовую или иную мягкую ткань. Не используйте какие-либо растворители.
•При извлечении дисков из устройства держите их горизонтально.
•Перед установкой диска устраните любые неровности центрального отверстия или внешнего края диска.
РУCCKИЙ 5
|
Основные операции |
|
|
|
||
|
Загрузочный отсек |
Диск управления |
Окно дисплея |
Извлеките диск |
||
|
Телеметрический датчик |
|
Дополнительный |
|||
|
• НЕ подвергайте его воздействию |
|
||||
|
|
входной разъем на |
||||
|
прямых солнечных лучей. |
|
||||
|
|
передней панели |
||||
|
Отсоединение панели |
|
|
|||
|
|
|
|
|
||
|
При нажатии и удерживании следующих кнопок... |
|
|
|
||
|
Основной |
Пульт |
|
|
|
|
|
дистанционного |
Общие операции |
|
|||
|
блок |
|
||||
|
управления |
|
|
|
|
|
|
|
|
|
|
|
|
|
|
— |
Включение/выключение [Удерживать]. |
|
||
|
/ SOURCE |
|
Выбор источников (FM, CD, F-AUX, BT AUDIO или R-AUX или |
|||
|
SOURCE |
BT PHONE, AM). |
|
|
|
|
|
|
• Источник “CD” доступен для выбора только в том случае, |
||||
|
|
|
||||
|
|
|
если диск загружен. |
|
|
|
|
Диск |
VOL – / + |
Настройка уровня звука. |
|
|
|
|
управления |
— |
Выбор элементов. |
|
|
|
|
(переверните) |
|
|
|
||
|
|
|
Отключение звука во время воспроизведения. Если источник |
|||
|
Диск |
|
звучания — “CD”, воспроизведение приостанавливается. |
|||
|
управления |
|
• Нажмите кнопку еще раз для включения звука или |
|||
|
(Нажмите) |
|
возобновления воспроизведения. |
|
|
|
|
|
— |
Подтверждение выбора. |
|
|
|
|
EQ |
SOUND |
Осуществляет выбор режима звучания. |
|
||
|
• Удерживайте кнопку EQ на главном устройстве для перехода |
|||||
|
|
|
непосредственно к настройке уровня тона. (стр. 10) |
|||
|
|
|
• Выбор запрограммированных радиостанций. |
|||
|
|
|
• Сохранение текущей радиостанции на выбранную |
|||
|
Нумерованные |
— |
цифровую кнопку [Удерживать]. |
|
|
|
|
кнопки (1 – 6) |
• Нажмите цифровую кнопку 1 ( |
) или 2 ( |
) для |
||
|
|
|||||
|
|
|
перехода непосредственно к настройке повторного/ |
|||
|
|
|
произвольного воспроизведения REPEAT/RANDOM. (стр. 8) |
|||
|
|
— |
Переход непосредственно в меню настройки <BRIGHTNESS>. |
|||
|
|
(стр. 11) |
|
|
|
|
|
|
|
|
|
|
|
|
|
— |
• Возврат к предыдущему меню. |
|
|
|
|
|
• Выйдите из меню [Удерживать]. |
|
|
||
|
|
|
|
|
||
|
DISP |
— |
• Изменение отображаемой информации. |
|
||
|
• Прокрутка отображаемой информации [Удерживать]. |
|||||
|
|
|
||||
6 |
РУCCKИЙ |
|
|
|
|
|
Прослушивание радио
~ |
Ÿ |
• [Нажмите] Автоматический поиск |
радиостанций. |
||
|
|
• [Удерживать] Поиск радиостанций |
|
] “FM” или “AM” |
вручную. |
|
|
После того как замигает надпись “M”, |
|
|
повторно нажимайте кнопку. |
Индикатор “ST” загорается при приеме стереосигнала FM-трансляции достаточного уровня.
Улучшение качества приема FM
1 
[Удерживать]
2 
] <TUNER> ] <MONO> ] <MONO ON> Прием улучшается, но стереоэффект будет потерян.
Для восстановления стереоэффекта повторите те же действия и выберите <MONO OFF>.
Автоматическое программирование
(FM)—SSM (Strong-station Sequential Memory — последовательная память для радиостанций с устойчивым сигналом)
Можно запрограммировать до 18 радиостанций FM.
При прослушивании радиостанции...
1 
[Удерживать]
2 
] <TUNER> ] <SSM> ] <SSM 01 – 06 / 07 – 12 / 13 – 18>
Мигает надпись “SSM”, и осуществляется автоматический поиск и сохранение локальных радиостанций с наиболее сильным уровнем сигнала.
Для программирования других 6 FMрадиостанций повторите описанную выше процедуру, выбрав один из других диапазонов настроек SSM.
Изменение информации на дисплее
Частота j Часы
Программирование вручную (FM/AM)
Можно сохранить 18 FM-радиостанций и 6 AM-радиостанций.
1
] Настройтесь на радиостанцию, которую необходимо запрограммировать.
2
[Удерживать]
Мигает надпись “PRESET MODE”.
3
] Выбор запрограммированного номера. Запрограмированный номер мигает, и отображается надпись “MEMORY”.
•С помощью нажатия и удерживания нажатыми цифровых кнопок (1 – 6) можно также сохранять текущую радиостанцию на выбранных цифровых кнопках (1 – 6).
Выбор запрограммированной радиостанции
1 
или 2
•С помощью нажатия цифровых
кнопок (1 – 6) можно также выбирать запрограммированные радиостанции (1 – 6).
Использование пульта дистанционного управления
5/∞ : Смена запрограммированных радиостанций.
2/3 : [Нажмите] Автоматический поиск радиостанций. [Удерживать] Поиск радиостанций вручную.
РУCCKИЙ 7
Прослушивание с диска
~ |
Ÿ |
Воспроизведение |
|
|
начинается автоматически. |
|
] “CD” |
|
|
Все дорожки будут воспроизводиться последовательно до тех пор, |
|
|
пока не произойдет смена источника или не будет извлечен диск. |
|
Остановка воспроизведения и |
Выбор папки/дорожки в списке |
|
извлечение диска |
|
|
Если в течение 15 секунд извлеченный диск не будет вынут, он автоматически помещается обратно в загрузочный отсек.
Выбор дорожки или папки
Выбор папки MP3/WMA
[Нажмите] Выберите дорожку. [Удерживать] Быстрая перемотка дорожки вперед или назад.
Использование пульта дистанционного управления
5/∞ : Выбор папки MP3/WMA
2/3 : [Нажмите] Выберите дорожку. [Удерживать] Быстрая перемотка дорожки вперед или назад.
Изменение информации на дисплее
Название диска/Название альбома/ исполнитель (имя папки)* = Название дорожки (имя файла)* = Номер текущей дорожки и истекшее время воспроизведения = Номер текущей дорожки и часы = (возврат в начало)
*Надпись “NO NAME” появляется для обычных компакт-дисков или компактдисков без записи.
8РУCCKИЙ
•Если на диске MP3/WMA содержится много дорожек, можно выполнить быстрый поиск (±10, ±100) по диску, быстро вращая диск управления.
•Для возврата в предыдущее меню нажмите  .
.
Выбор режимов воспроизведения
В одно и то же время возможна работа только в одном из следующих режимов воспроизведения.
1 
[Удерживать]
•При нажатии цифровой кнопки 1( ) или 2 (
 ) выполняется переход непосредственно к настройке повторного/произвольного воспроизведения REPEAT/RANDOM. Затем выполните действие 3.
2
] “REPEAT” j “RANDOM”
3
REPEAT 
TRACK RPT : Повтор текущей дорожки FOLDER RPT : Повтор текущей папки
RANDOM 
FOLDER RND : Произвольное
воспроизведение всех дорожек текущей папки, а затем дорожек других папок
ALL RND : Произвольное воспроизведение всех дорожек
Чтобы отключить повторное или произвольное воспроизведение,
выберите “RPT OFF” или “RND OFF”.
 Loading...