


CD/SD RECEIVER
RECEPTEUR CD/SD
KD-LHX552/KD-LHX551
FRANÇAIS ENGLISH
MENU |
DISP |
For canceling the display demonstration, see page 8.
Pour annuler la démonstration des affichages, référez-vous à la page 8.
For installation and connections, refer to the separate manual.
Pour l’installation et les raccordements, se référer au manuel séparé.
INSTRUCTIONS
MANUEL D’INSTRUCTIONS
GET0284-003A
[EX/EU]

ENGLISH
Thank you for purchasing a JVC product.
Please read all instructions carefully before operation, to ensure your complete understanding and to obtain the best possible performance from the unit.
IMPORTANT FOR LASER PRODUCTS
1.CLASS 1 LASER PRODUCT
2.CAUTION: Do not open the top cover. There are no user serviceable parts inside the unit; leave all servicing to qualified service personnel.
3.CAUTION: Visible and invisible laser radiation when open and interlock failed or defeated. Avoid direct exposure to beam.
4.REPRODUCTION OF LABEL: CAUTION LABEL, PLACED OUTSIDE THE UNIT.
Warning:
If you need to operate the receiver while driving, be sure to look ahead carefully or you may be involved in a traffic accident.
Cautions:
•Do not operate the touch panel using a ball-point pen or a similar tool with the sharp tip (it may damage the touch panel).
•If the temperature inside the car is below 0°C, the movement of animation and text scroll will be halted on the display to prevent the display from being blurred.  appears on the display.
When the temperature increases, and the operating temperature is resumed, these functions will start working again.
How to reset your unit
This will reset the microcomputer. Your preset adjustments will also be erased.
How to forcibly eject a disc
If a disc cannot be recognized by the receiver or cannot be ejected, ejects the disc as follows.
•If an SD card is inserted, ejects the SD card first (see page 18).
•If this does not work, reset your receiver.
•Be careful not to drop the disc when it ejects.
Note: Only for [EX] model users in UK and European countries
For security reasons, a numbered ID card is provided with this receiver, and the same ID number is imprinted on the receiver’s chassis. Keep the card in a safe place, as it will help the authorities to identify your receiver if stolen.
2

Contents
How to reset your unit ........................... |
2 |
How to forcibly eject a disc................... |
2 |
How to read this manual........................ |
4 |
How to change the display pattern |
|
during playback.................................. |
4 |
Control panel |
|
— KD-LHX552/KD-LHX551.......... |
5 |
Parts identification................................. |
5 |
Remote controller |
|
— RM-RK300 .......................... |
6 |
Main elements and features ................... |
6 |
Getting started....................... |
7 |
Basic operations.................................. |
7 |
Canceling the display demonstrations ... |
8 |
Setting the clock .................................... |
8 |
Radio operations ................... |
9 |
Listening to the radio........................... |
9 |
Storing stations in memory.................... |
10 |
Listening to a preset station ................... |
11 |
FM RDS operations................. |
12 |
Searching for your favorite FM RDS |
|
programme ....................................... |
12 |
Storing your favorite programmes......... |
13 |
Using the standby receptions................. |
13 |
Tracking the same programme |
|
—Network-Tracking Reception ........ |
14 |
Using the message service |
|
—RDS Radiotext (RT) ...................... |
15 |
Disc/SD card operations......... |
16 |
Playing a disc in the receiver................ |
16 |
Playing discs in the CD changer ............ |
17 |
Playing an SD card .............................. |
18 |
Other main functions ............................. |
20 |
Selecting the playback modes................ |
23 |
*For safety.... |
|
•Do not raise the volume level too much, as this will block outside sounds, making driving dangerous.
•Stop the car before performing any complicated operations.
Sound adjustments ................ |
24 |
Setting the basic sound selection |
|
menu—SEL ..................................... |
24 |
Selecting preset sound modes |
|
(i-EQ: intelligent equalizer) ............... |
25 |
Storing your own sound modes ............. |
25 |
Graphic displays .................... |
26 |
Basic procedure ................................... |
26 |
Downloading the files............................ |
26 |
Deleting the files.................................... |
27 |
Activating the downloaded files ............ |
29 |
General settings — PSM ......... |
30 |
Basic procedure ..................................... |
30 |
Selecting the dimmer mode ................... |
35 |
Changing the display color .................... |
35 |
Other main functions ............. |
37 |
Assigning titles to the sources ............... |
37 |
Changing the control panel angle .......... |
38 |
Detaching the control panel................... |
38 |
External component |
|
operations........................... |
39 |
DAB tuner operations............. |
40 |
Listening to the DAB tuner ................... |
40 |
Storing DAB services in memory.......... |
42 |
Tuning in to a preset DAB service ........ |
42 |
Using the standby reception .................. |
43 |
Tracing the same programme |
|
—Alternative Reception .................... |
44 |
Maintenance .......................... |
45 |
More about this receiver ........ |
46 |
Troubleshooting ..................... |
50 |
Specifications ......................... |
53 |
*Temperature inside the car.... |
|
If you have parked the car for a long time in hot or cold weather, wait until the temperature in the car becomes normal before operating the unit.
ENGLISH
3
ENGLISH
How to read this manual
The following methods are used to made the explanations simple and easy-to-understand:
•Some related tips and notes are explained in “More about this receiver” (see pages
46 – 49).
•Button and touch panel operations are mainly explained with the illustrations as follows:
Press briefly.
Press repeatedly.
Press either one.
Press and hold until your desired response begins.
Press and hold both buttons at the same time.
The following marks are used to indicate...
 : Built-in CD player operations.
 : External CD changer operations.
: SD player operations.
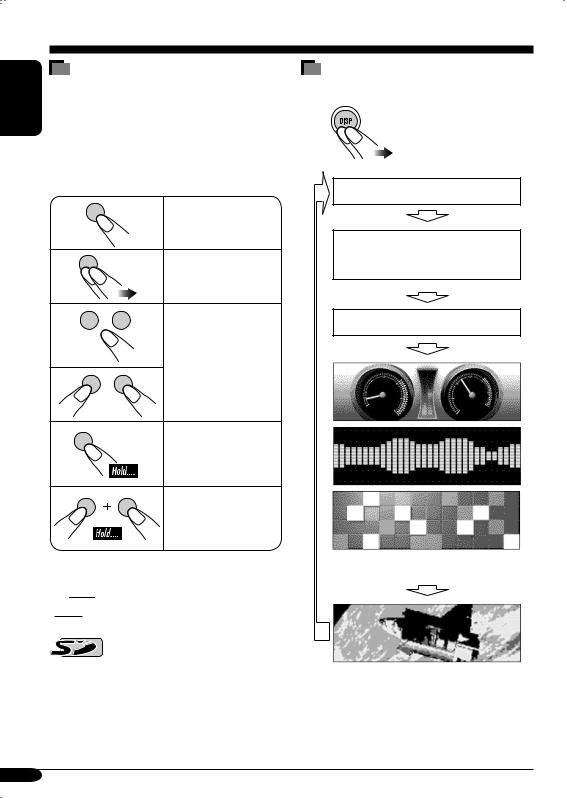
How to change the display pattern during playback
Source operation screen
RDS Radiotext (RT) or DLS screen is shown when the source is “TUNER” or “DAB” (see pages 15 and 44)*.
Clock time is enlarged.
Audio Level Meters*
(see “Theme” on page 32)
Graphic screen* appears only after you have downloaded a file, see pages 26 – 29.
*These screens will be temporarily canceled when you operate the receiver.
4

Control panel — KD-LHX552/KD-LHX551
Parts identification
ENGLISH
|
|
|
|
|
|
|
|
|
|
|
|
|
|
|
|
|
|
|
|
|
|
|
|
|
|
|
|
|
|
|
|
|
|
|
|
|
|
|
|
|
|
|
|
|
|
|
|
|
|
|
|
1 |
|
|
(standby/on attenuator) button |
5 |
0 (eject) button |
|||||||
|
||||||||||||
|
||||||||||||
2 |
Remote sensor |
6 |
T/P (traffic programme/programme type) |
|||||||||
|
• DO NOT expose the remote sensor to |
|
button |
|||||||||
|
strong light (direct sunlight or artificial |
7 |
MENU button |
|||||||||
|
lighting). |
8 |
Reset button |
|||||||||
3 |
VOLUME + / – button |
9 |
(control panel release) button |
|||||||||
4 |
Touch panel |
p DISP (display) button |
||||||||||
Main touch panels
• Make sure to touch the area inside the key icon boundary when operating the touch panel.
Source Selection Screen |
Main Menu |
Either “CD-CH” or “EXTIN” appears depending on the “Ext Input” setting (see page 34).
If the source is not ready, you cannot select the source. Key icon appears as negative pattern.
Not displayed when the source is “LINE-IN” or “EXT-IN” (external component).
Displayed only when playing an audio CD or when the source is “LINE-IN” or “EXTIN.”
•To return to the previous screen, press “BACK” (if shown). See also page 46.
5
ENGLISH
Remote controller — RM-RK300
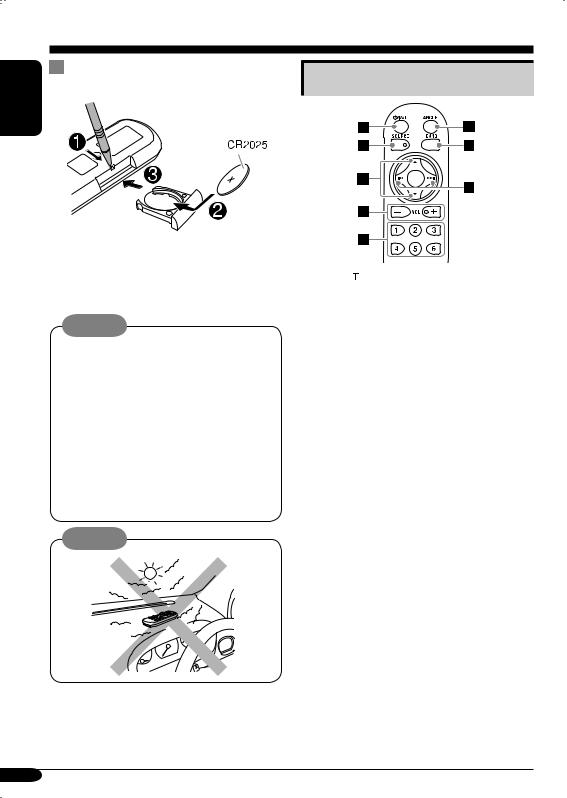
Installing the lithium coin battery |
Main elements and features |
(CR2025) |
•When operating, aim the remote controller directly at the remote sensor on the receiver. Make sure there is no obstacle in between.
Warning:
•Store the battery in a place where children cannot reach to avoid risk of accident.
•To prevent the battery from over-heating, cracking, or starting a fire:
–Do not recharge, short, disassemble, or heat the battery or dispose of it in a fire.
–Do not leave the battery with other metallic materials.
–Do not poke the battery with tweezers or similar tools.
–Wrap the battery with tape and insulate when throwing away or saving it.
Caution:
The receiver is equipped with the steering wheel remote control function.
•See the Installation/Connection Manual (separate volume) for connection.
1 
 (standby/on/attenuator) button
•Turns on and off the power and also attenuates the sound.
2SOURCE button
• Selects the source.
35 (up) / ∞ (down) buttons
•Changes the preset stations.
•Changes the services for DAB.
•Changes the MP3/WMA folders. 4 VOL (volume) + / – buttons
•Adjusts the volume level.
5Number buttons
•Selects the preset station (or service) if pressed, or store a station (or a service) if pressed and held.
•Selects the tracks while playing an audio CDs or CD Text.
•Selects the folders while playing MP3/WMA discs or an SD card.
•Selects the discs while operating the CD changer.
6ANGLE button
•Adjusts the control panel angle. 7 BAND button
•Selects the band for FM/AM and DAB. 8 4 / ¢ buttons
•Searches for stations (or ensembles) if pressed, or skips frequencies after pressed and held.
•Changes the tracks of the disc or of the SD card if pressed.
•Fast-forwards or reverses the track if pressed and held.
6
Getting started
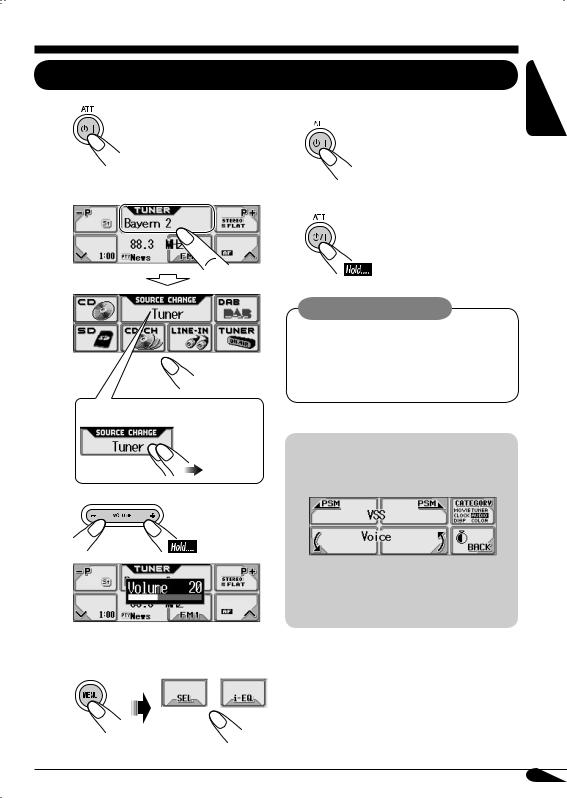
Basic operations
~
Ÿ Select the source.
You can also select the source by....
To drop the volume in a moment (ATT)
To restore the sound, press it again.
To turn off the power
Caution on volume setting:
Discs produce very little noise compared with other sources. Lower the volume before playing a disc to avoid damaging the speakers by the sudden increase of the output level.
Voice support system (VSS)
You can select either “Beep” or “Voice” for the VSS.
!
If “Voice” is selected, the language used for VSS changes to the selected language— English, German, or French.
To change the VSS setting, see page 34.
⁄Adjust the sound as you want. (See pages 24 and 25.)
ENGLISH
7
ENGLISH
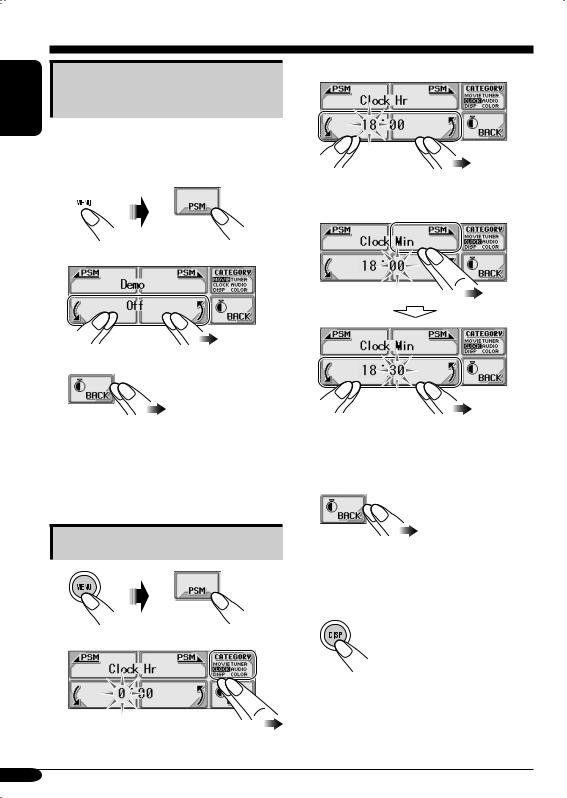
Canceling the display demonstrations
If no operations are done for about 20 seconds, display demonstration starts.
[Initial: Interval]—see page 30.
1 
2 Select “Off.”
3 Exit from the setting.
To activate the display demonstration
In step 2 above, select “All Time” or “Interval.” For more details, see page 30.
3 Adjust the hour.
4Select “Clock Min” (minute), then adjust the minute.
5Select “24H/12H,” then select “24Hours” or “12Hours.”
6Exit from the setting.
Setting the clock
1
To check the current clock time when the power is turned off
2
8
Radio operations
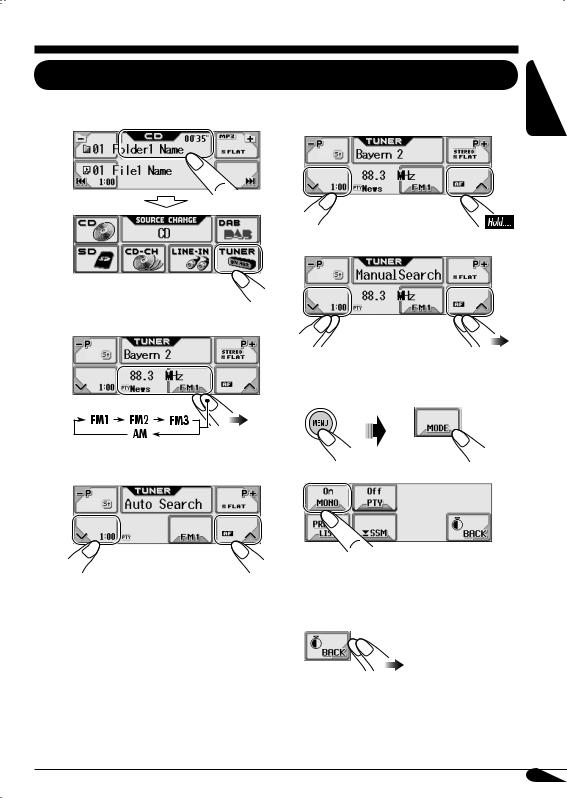
Listening to the radio
~
Ÿ
Select “TUNER.”
Select the band (FM/AM).
To tune in to a station manually
In step ! on the left...
1
2 Select the desired station frequencies.
When an FM stereo broadcast is hard to receive
1
! Start searching for a station. |
2 Select “MONO On.” |
|
Reception improves, but stereo effect will |
When a station is received, searching |
be lost. |
stops. |
|
To stop searching, press the same icon |
3 Exit from the setting. |
again. |
|
|
To restore the stereo effect, repeat the same |
|
procedure and select “MONO Off” in step 2. |
ENGLISH
9
ENGLISH
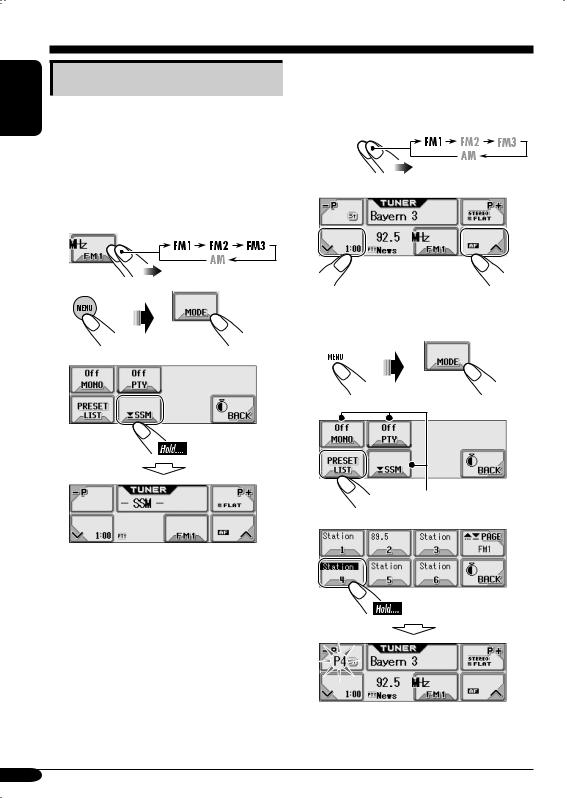
Storing stations in memory
You can preset six stations for each band.
 FM station automatic presetting— SSM (Strong-station Sequential Memory)
1Select the FM band (FM1 – FM3) you want to store into.
2 
3
 Manual presetting
Ex.: Storing FM station of 92.5 MHz into preset number 4 of the FM1 band.
1 
2
•Holding  or
or  can display the Preset Station List (see step 5 below).
3 
4
Appears only for FM.
5
Local FM stations with the strongest signals are searched and stored automatically in the FM band.
10
Listening to a preset station
1
2Select a preset station (1 – 6) you
want.
•Holding  or
or  can display the Preset Station List (see below).
To select a preset station using the Preset Station List
1 
2 
3
Preset Station List
The lists show either the station frequency or PS name (the first 8 characters).
Appears only for FM.
ENGLISH
Appears only for FM.
4 Select a preset number.
11

FM RDS operations
ENGLISH
Searching for your favorite FM RDS programme
You can tune in to a station broadcasting your favorite programme by searching for a PTY code.
•To store your favorite programme, see page 13.
~
Ÿ 
! Select a PTY code.
*
What you can do with RDS
RDS (Radio Data System) allows FM stations to send an additional signal along with their regular programme signals.
By receiving the RDS data, this receiver can do the following:
•Programme Type (PTY) Search (see the left column)
•Temporarily switches to Traffic Announcement —TA Standby Reception. (See page 13.)
•Temporarily switches to your favorite programme—PTY Standby Reception. (See pages 14 and 33.)
•Tracing the same programme automatically —Network-Tracking Reception (see page 14)
•Programme Search (see page 33)
•Receiving the message service—RDS Radiotext (RT) (see page 15)
PTY codes
News, Affairs, Info, Sport, Educate, Drama, Culture, Science, Varied, Pop M (music), Rock M (music), Easy M (music), Light M (music), Classics, Other M (music), Weather, Finance, Children, Social, Religion, Phone In, Travel, Leisure, Jazz, Country, Nation M (music), Oldies, Folk M (music), Document
If there is a station broadcasting a programme of the same PTY code as you have selected, that station is tuned in.
*Press to go to the next list; hold to go back to the previous list.
12
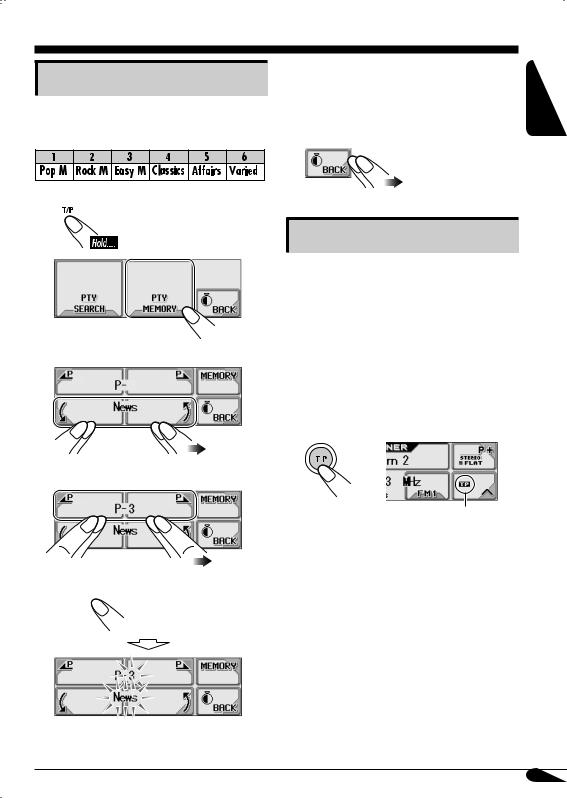
Storing your favorite programmes
You can store six favorite programme types.
Preset programme types:
1 
2
3 Select a PTY code.
4Select a preset number.
5
Selected PTY code is stored in the selected preset number.
6 |
Repeat steps 3 to 5 to store other |
ENGLISH |
|
PTY codes into other preset |
|
|
|
|
|
numbers. |
|
7 |
Exit from the setting. |
|
Using the standby receptions
 TA Standby Reception
TA Standby Reception allows the receiver to switch temporarily to Traffic Announcement (TA) from any source other than AM.
•If a station starts broadcasting a traffic announcement, “Traffic News” appears on the display, and this receiver temporarily tunes in to the station. The volume changes to the preset TA volume level (see page 33).
To activate TA Standby Reception
TP indicator appears.
•If the TP indicator lights up, TA Standby Reception is activated.
•If the TP indicator flashes, TA Standby Reception is not yet activated. (This occurs when you are listening to an FM station without the RDS signals required for TA Standby Reception.)
To activate TA Standby Reception, tune in to another station (or service) providing these signals. The TP indicator will stop flashing and remain lit.
To be continued....
13

ENGLISH
To deactivate the TA Standby Reception
The TP indicator goes off.
 PTY Standby Reception
PTY Standby Reception allows the receiver to switch temporarily to your favorite PTY programme from any source other than AM.
•This function also takes effect for the DAB tuner.
To select your favorite PTY code for PTY Standby Reception, see page 33.
The PTY indicator either lights up or flashes.
To activate the PTY Standby Reception
1 
2 Select one of the PTY codes.
•If the PTY indicator lights up, PTY Standby Reception is activated.
•If the PTY indicator flashes, PTY Standby Reception is not yet activated.
To activate PTY Standby Reception, tune in to another station (or service) providing these signals. The PTY indicator will stop flashing and remain lit.
To deactivate the PTY Standby Reception
Select “PTY Off” in step 2.
The PTY indicator goes off.
Tracking the same programme— Network-Tracking Reception
When driving in an area where FM reception is not sufficient enough, this receiver automatically tunes in to another FM RDS station of the same network, possibly
broadcasting the same programme with stronger signals (see the illustration below).
When shipped from the factory, NetworkTracking Reception is activated.
To change the Network-Tracking Reception setting, see “AF-Regn’l” on page 33.
Programme A broadcasting on different frequency areas (01 – 05)
3 Exit from the setting.
PTY indicator appears.
14

Using the message service— RDS Radiotext (RT)
What is RDS Radiotext
RDS Radiotext is part of the RDS data signal to transmit various text information (e.g. programme information, phone numbers, e-mail and web addresses, artist/title information and news headlines). The text service is part of the RDS broadcast.
One message may contain up to 64 characters.
The message service is an optional service and is not supported by all broadcasters.
Once you tuned in to a station that supports the message service, the service is automatically received.
To use the text message service, select the Radiotext (RT) screen (see page 4).
To show the RDS Radiotext (RT) information
While listening to a station that supports
RT....
Radiotext screen is shown.
It takes time to load data. While loading, “Loading” appears.
If text message is unavailable, the text screen will automatically change to source operation screen. The text screen will automatically appear again when the text service is available.
ENGLISH
15
Disc/SD card operations
ENGLISH
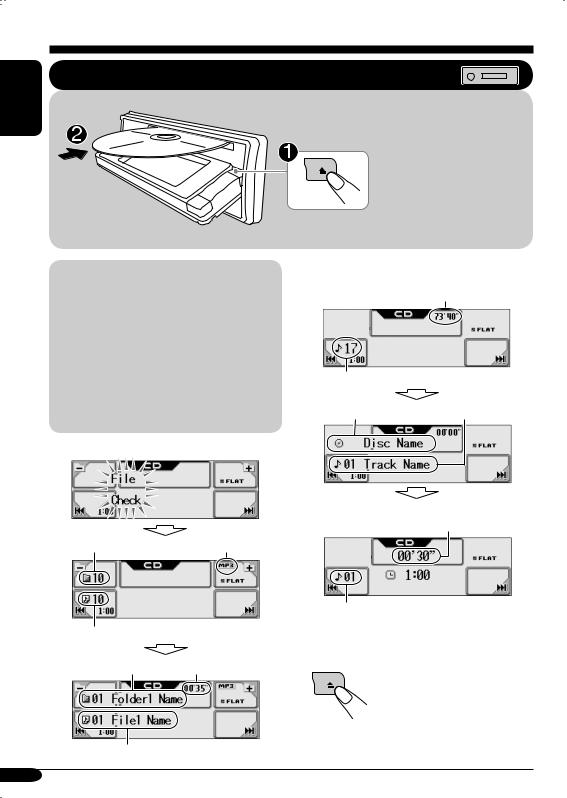
Playing a disc in the receiver
About MP3 and WMA tracks
MP3 and WMA (Windows Media® Audio) “tracks” (words “file” and “track” are used interchangeably) are recorded in “folders.”
•When an MP3 or a WMA folder includes an image <jll> file edited by Image Converter (Wide Ver 1.2)—supplied in the CD-ROM, you can show the image on the display while the tracks in the folder are played back—ImageLink. (See pages 18, 30, and 48 for details.)
•When inserting an MP3 or a WMA disc:
Total folder number |
File type |
Total track number
Current folder*1 Elapsed playing time
Current track*1
All tracks will be played repeatedly until you change the source or eject the disc.
• When inserting an audio CD or a CD Text disc:
Total playing time
Total track number
Disc name*2 |
Track name*2 |
If no name is assigned to an audio CD:
Elapsed playing time
Current track number
To stop play and eject the disc
To return the control panel to its previous position, press it again.
16
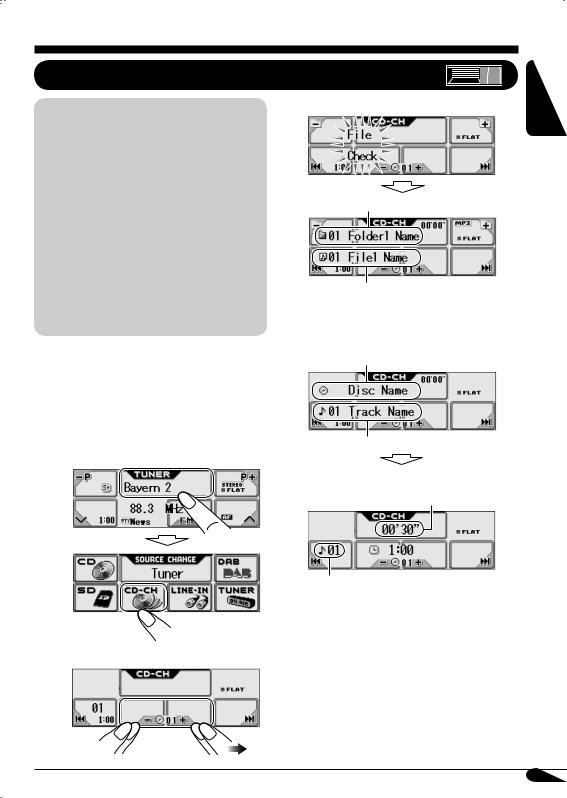
Playing discs in the CD changer
About the CD changer
It is recommended to use the JVC MP3compatible CD changer with your receiver.
•You can also connect other CH-X series CD changers (except CH-X99 and CH-X100). However, they are not compatible with MP3 discs, so you cannot play back MP3 discs.
•You cannot use the KD-MK series CD changers with this receiver.
•Disc text information recorded in the CD Text can be displayed when a JVC CD Text compatible CD changer is connected.
•You cannot control and play any WMA disc in the CD changer.
All tracks of the inserted discs in the magazine will be played repeatedly until you change the source or eject the magazine from the CD changer.
• When the current disc is an MP3 disc:
Current folder*1
Current track*1
•When the current disc is an audio CD or a CD Text disc:
Disc name*2
ENGLISH
~
Ÿ
Track name*2
Select “CD-CH.”
If no name is assigned to an audio CD:
*1
Select a disc.
*2
Elapsed playing time
Current track number
The album name/performer with  indicator and the track title with
  indicator will appear if “Tag” is set to “On” (see page 32).
Appear only for CD Texts and CDs if it has been assigned or recorded. (“No Name” appears for a while if no name is recorded or assigned to an audio CD.)
17

ENGLISH
Playing an SD card
About the SD card
You can play back MP3/WMA tracks recorded on the SD card and show the stored image on the display during playback— ImageLink. (See pages 16, 30, and 48 for details.)
The required SD recording format is FAT 12/16 and the recommended storage type is 8 MB to 512 MB.
•You cannot use MMC or mini SD with this receiver.
Before detaching the control panel, turn off the power.
~ Detach the control panel.
Ÿ
SD loading slot
SD card
Press in the SD card until you hear a clicking sound.
To eject the SD card, press the SD card again.
! Attach the control panel.
⁄ |
• The control panel goes |
|
back to the previous |
|
position (see page 38). |
Total folder number |
File type |
Total track number
|
Elapsed playing |
Current folder* |
time |
Current track*
Playback starts automatically if tracks are recorded.
18

If an SD card has been loaded.... |
Operation screens used for the following |
|
|
|
operations is of MP3 playback in the |
|
receiver. |
|
|
To fast-forward or reverse the track
To go to the next or previous tracks
To go to the next or previous folders (only for MP3 and WMA tracks)
For MP3 tracks: 

For WMA tracks: 

* The album name/performer with indicator and the track title with  indicator will appear if “Tag” is set to “On” (see page 32).
•If you hold the icon, the Folder List will appear on the display (see page 20).
To be continued....
ENGLISH
19
ENGLISH |
To select a disc during playback |
|
•If you hold the icon, the Disc List will appear on the display (see the right column).
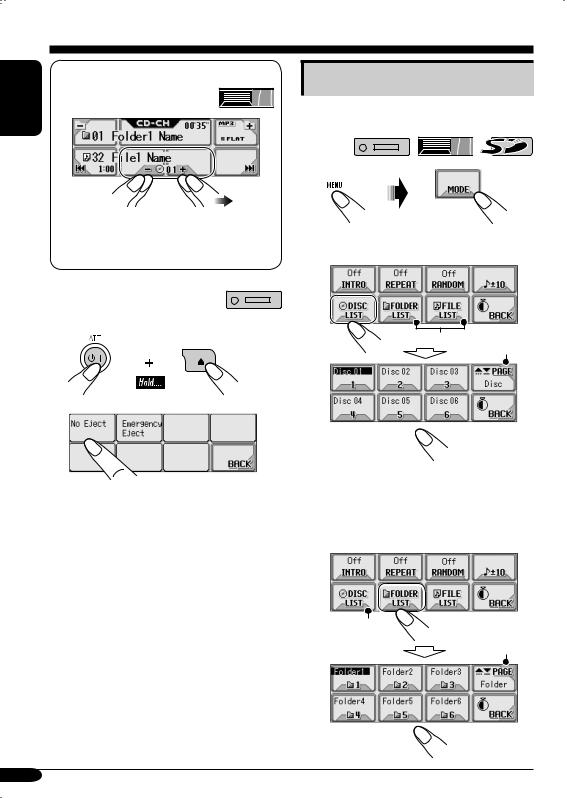
 Prohibiting disc ejection
You can lock a disc in the loading slot.
1
2 
“No Eject” flashes, and the disc cannot be ejected.
To cancel the prohibition
In step 2 above, press “Eject OK.” “Eject OK” flashes for a while.
Other main functions
 Selecting a disc/folder/track on the list
1 
2• Select a disc (only for the CD changer).
*1
*2
If the selected disc is an MP3/WMA disc, its Folder List appears.
•Select a folder (only for MP3/WMA disc or SD card).
*3
*2
20
If you select the current folder (highlighted on the screen), its File List appears.
•Select a track (only for MP3/WMA disc or SD card).
*3
File List of the current folder appears.
*2
*1 Appears only if the current disc is an MP3 discs.
*2 Press to go to the next list; hold to go to the previous list.
*3 Displayed only when the source is “CD-CH.”
When using the remote controller....
•To directly select a disc in the CD changer
•To directly select a track of an audio CD or CD Text
•To directly select a folder of an MP3/WMA disc or an SD card
To select a number from 1 – 6:
To select a number from 7 (1) – 12 (6):
It is required that folders are assigned with 2-digit numbers at their beginning of their names—01, 02, 03, and so on.
ENGLISH
21

ENGLISH
 Skipping a track quickly during play
For audio CD/CD Text: 

For MP3 tracks: 

For WMA tracks: 

For MP3 or WMA tracks, you can skip a track within the same folder.
Ex.: To select track 32 while playing track 6 in the CD changer
1 
2 |
* |
|
|
|
|
3
(3 times)
First time you press “+10” or “–10,” the track skips to the nearest higher or lower track with a track number of multiple ten (ex. 10th, 20th, 30th).
Then each time you press the button, you can skip 10 tracks.
•After the last track, the first track will be selected and vice versa.
4
5
(Twice)
*If the source is “CD-CH”: Works only when JVC MP3 compatible CD changer (CH-X1500) is connected.
22

Selecting the playback modes
You can use only one of the following playback modes at a time.
1 
2 Select your desired playback mode.
Intro play |
Mode |
Plays the beginning 15 seconds of ... |
|
|
Track: |
All tracks of the current disc or the SD card. |
|
|
|
• While playing, |
lights up. |
Folder*1: First tracks of all folders of the current disc or the SD card.
•While playing,  lights up. Disc*2: First tracks of all the inserted discs.
•While playing,  lights up. Off: Cancels.
Repeat play |
Mode |
Plays repeatedly |
Track: The current track.
• While playing,  lights up. Folder*1: All tracks of the current folder.
•While playing,  lights up. Disc*2: All tracks of the current disc.
•While playing,  lights up. Off: Cancels.
Random play |
Mode |
Plays at random |
All tracks of the current folder, then tracks of the next folder and so on.
• While playing,  lights up.
Disc or SD: All tracks of the current disc or the SD card.
• While playing,  or
or  lights up. All tracks of all inserted discs.
• While playing,  lights up. Cancels.
 /
/  /
/  ) or WMA (
  /
/  )
)
*2 Only while playing discs in the CD changer (  ).
).
3 Exit from the setting.
ENGLISH
23

Sound adjustments
ENGLISH
~
Ÿ
!
Setting the basic sound selection menu—SEL
B To select the cutoff frequency to the subwoofer.
Select a setting item.
AB
|
55Hz: Frequencies higher than |
|
55 Hz are cut off. |
|
|
|
85Hz: Frequencies higher than |
C |
85 Hz are cut off. |
|
|
|
115Hz: Frequencies higher than |
Adjust the selected item. |
115 Hz are cut off. |
|
|
|
|
A To adjust the speaker output |
|
balance between the front and rear |
Adjust the subwoofer output level. |
speakers—FAD (fader). |
|
F6 (Front |
00 (min.) to |
08 (max.) |
|
only) to R6 |
|
(Rear only) |
C To adjust the input level of each |
|
source (except FM). |
To adjust the speaker output balance |
Adjust to match the input level to the |
between the left and right speakers— |
FM sound level. |
BAL (balance). |
|
L6 (Left |
–05 (min.) to |
|
+05 (max.) |
||
only) to R6 |
||
⁄ Exit from the setting. |
||
(Right only) |
24
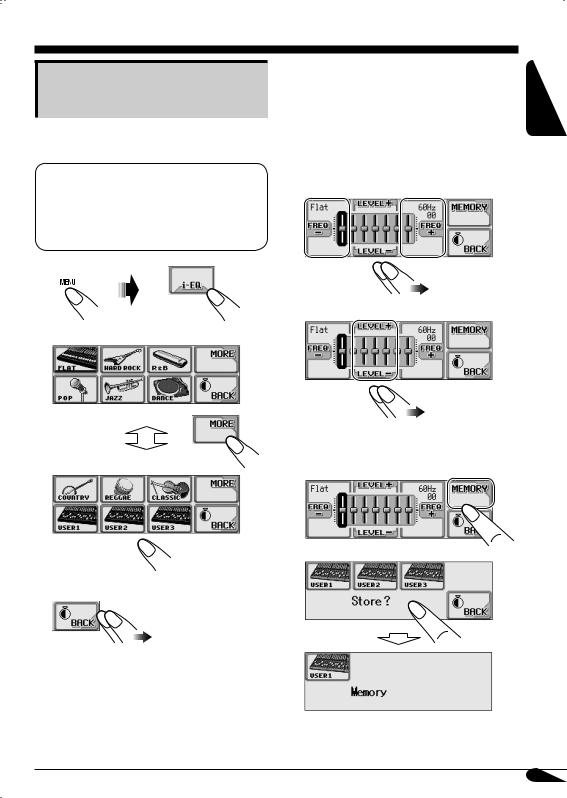
Selecting preset sound modes (i-EQ: intelligent equalizer)
You can select a sound mode suitable to the music genre.
Available sound modes
FLAT (No sound mode is applied),
HARD ROCK, R & B, POP, JAZZ, DANCE, COUNTRY, REGGAE, CLASSIC, USER 1, USER 2, USER 3
1 
2 Select a sound mode.
3 Exit from the setting.
1 |
Select “FLAT” (see left column). |
ENGLISH |
|
Storing your own sound modes |
|
Ex.: To adjust “FLAT” |
|
|
2 |
Select the frequency band—60Hz, |
|
|
150Hz, 400Hz, 1kHz, 2.4kHz, 6kHz, |
|
|
12kHz. |
|
3 Adjust the level of the selected band.
–05 (min.) to +05 (max.)
4Repeat steps 2 and 3 to adjust the other frequency bands.
5
6
Ex.: When “USER1” is selected
25

ENGLISH
Graphic displays
Basic procedure
Before starting the following procedure, prepare a CD-R or an SD card including still images (pictures) and animations (movies).
•With Image Converter (Wide Ver 1.2) included in the supplied CD-ROM, you can create your own images and animations. (Samples are included in the CD-ROM.)
~Insert a CD-R, an SD card, or supplied CD-ROM.
•CD-R/supplied CD-ROM
•SD card
IMPORTANT:
•Refer also to Image Converter PDF files included in the “Manual” folder of the supplied CD-ROM.
•Still images (pictures) should have <jll>, and animations (movies) should have <jla> as their extension code in their file names.
•Before you download or delete the files, observe the following:
–Do not download a file while driving.
–Do not turn off the ignition key of the car while downloading or deleting a file.*
–Do not detach the control panel while downloading or deleting a file.*
*If you do so, the file download or deletion will not be done correctly.
Ÿ
!
•To download the file(s):
\Downloading the files (see page 26)
•To delete the file(s):
\Deleting the files (see page 27)
•To activate the file(s):
\Activating the downloaded files
(see pages 29)
Downloading the files
•OPENING: Opening screen
To download/delete an animation (30 frames at maximum) which will be shown after the receiver is turned on.
•ENDING: Ending screen
To download/delete an animation (30 frames at maximum) which will be shown before the receiver is turned off.
•PICTURE: Graphic screen
To download/delete still images (30 still images at maximum) which will be shown while playing a source.
•MOVIE: Graphic screen
To download/delete an animation (90 frames at maximum) which will be shown while playing a source.
26
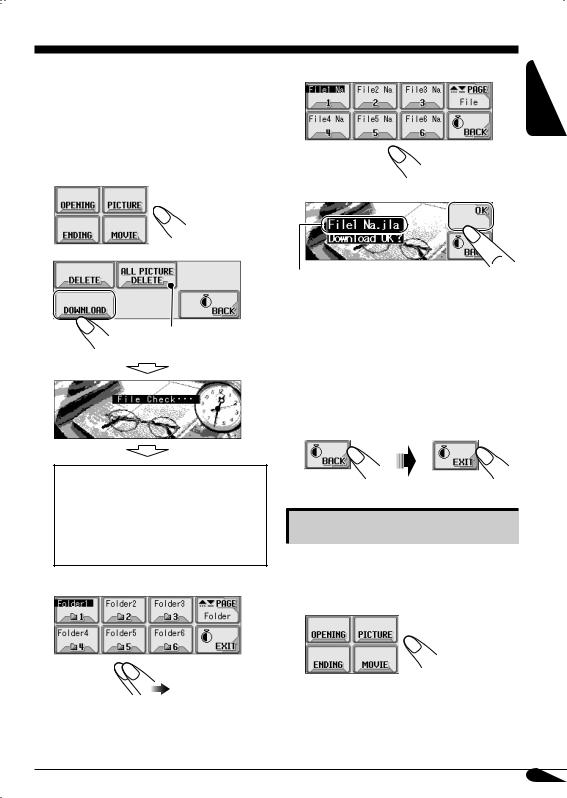
 Downloading an animation or pictures
•It takes a long time to download an animation. For details, see page 49.
•To activate the downloaded files, see page 29.
1 In step ! on page 26....
2
Appears only if “PICTURE” is selected.
•If “OPENING,” “ENDING,” or “MOVIE” is selected, only the folders including the <jla> files are shown.
•If “PICTURE” is selected, only the folders including the <jll> files are shown.
3 Select a folder.
(once for the currently selected; twice for the others)
4 Select a file. |
ENGLISH |
|
5
File name appears.
6• To download more pictures from the same folder, repeat steps 4 and
5.
•To download more pictures from another folder, press BACK. Then, repeat steps 3 to 5.
7Exit from the setting.
Deleting the files
 Deleting the stored animation and pictures
1 In step ! on page 26....
To be continued....
27

ENGLISH
2 |
Deleting all the stored animation and |
|
pictures |
1 
Appears only if “PICTURE” is selected.
2 • To delete all the stored files
3 • To delete the stored animation
File name appears.
• To delete the stored pictures
• To delete all the stored pictures
File name appears.
4Repeat step 3 to delete more pictures.
5 Exit from the setting.
3 Exit from the setting.
28

Activating the downloaded files
1 
2• To activate the animations stored for opening and ending screens
1 Select “Opening” or “Ending.”
2 Select a setting you want.
Default: Factory-preset animation is used.
User: Your own edited animation is used.
•To activate the graphic screen using either picture or movie
1 Select “Graphics.”
2 Select a setting you want. |
ENGLISH |
|
UserMovie: Your edited animation stored in “MOVIE” is activated.
UserSlide: Your edited still images stored in “PICTURE” are activated and shown in sequence.
UserPict.: One of your edited still images stored in “PICTURE” is activated.
•To select a still image for “UserPict.”
If “UserPict.” is not selected for “Graphics,” you cannot select “UserPict.” (see page 30).
1 Select “UserPict.”
2 Select a file you want.
3 Exit from the setting.
29

ENGLISH
General settings — PSM
Basic procedure
You can change PSM (Preferred Setting Mode) items listed in the table that follows.
1 
2 Select a PSM category.
You can move to a different category by simply changing the PSM items.
3 Select a PSM item.
4 Adjust the PSM item selected.
5Repeat steps 2 to 4 to adjust the other PSM items if necessary.
6Exit from the setting.
Indications |
Selectable settings, [reference page] |
MOVIE
Demo |
All Time: Display demonstration (animation) appears. |
|
Display demonstration |
ImageLink: To show a still image while playing back an MP3/ |
|
|
|
WMA track, [16, 18, 48]. |
|
Interval: |
[Initial]; Display demonstration (animation) and |
|
|
playback source indication appears alternately. |
|
Off: |
Cancels. |
|
• These graphics appear if no operation is done for about |
|
|
20 seconds. |
|
|
|
|
Graphics |
You can activate the graphic screen using either movie or picture, |
|
Graphics |
[29]. |
|
|
UserMovie: Your edited animation stored in “MOVIE” is |
|
|
|
activated. |
|
UserSlide: |
Your edited still images stored in “PICTURE” are |
|
|
activated and shown in sequence. |
|
UserPict.: |
[Initial]; One of your edited still images stored in |
|
|
“PICTURE” is activated. |
30
 Loading...