


00
062728
WLAN-Repeater |
N300 |
300 Mbps, 2,4GHz
Operating Instructions |
GB |
Bedienungsanleitung |
D |
Signal 
WLAN 
Power 
WPS 
LAN 
WPS

G User manual |
WLAN 300 Mbps Repeater |
|
|
Contents
1. Explanation of Warning Symbols and Notes: . . . . . . . . . . . . . . . . . . . . . . . . . . . . . . . . . . . 3 2. Package Contents: . . . . . . . . . . . . . . . . . . . . . . . . . . . . . . . . . . . . . . . . . . . . . . . . . . . . . . . . . 3
3.Safety Instructions: . . . . . . . . . . . . . . . . . . . . . . . . . . . . . . . . . . . . . . . . . . . . . . . . . . . . . 4
4.System Requirements: . . . . . . . . . . . . . . . . . . . . . . . . . . . . . . . . . . . . . . . . . . . . . . . . . . . 4
|
4.1 |
Operating systems |
. . . . . . . . . . . . . . . . . . . . . . . . . . . . . . . . . . . . . . . . . . . . . . . . . . . . . |
4 |
|
|
4.2 |
Hardware . . . |
. . . . . . . . . . . . . . . . . . . . . . . . . . . . . . . . . . . . . . . . . . . . . . . . . . . . |
4 |
|
5. |
Controls and Displays: |
. . . . . . . . . . . . . . . . . . . . . . . . . . . . . . . . . . . . . . . . . . . . . . . . . . . . . . |
5 |
||
6. |
Start-Up |
. . . . |
. . . . . . . . . . . . . . . . . . . . . . . . . . . . . . . . . . . . . . . . . . . . . . . . . . . . . . 7 |
||
|
6.1 |
Using WPS (WiFi protected setup) . . . . . . . . . . . . . . . . . . . . . . . . . . . . . . . . . . . . . . . . . . |
7 |
||
|
6.2 |
Using a browser |
. . . . . . . . . . . . . . . . . . . . . . . . . . . . . . . . . . . . . . . . . . . . . . . . . . . |
8 |
|
7. |
Explanation of Special Options . . . . . . . . . . . . . . . . . . . . . . . . . . . . . . . . . . . . . . . . . . . . 13 |
||||
|
7.1 |
WPS option: . . . |
. . . . . . . . . . . . . . . . . . . . . . . . . . . . . . . . . . . . . . . . . . . . . . . . . . . . . . 13 |
||
7.2Advanced option: . . . . . . . . . . . . . . . . . . . . . . . . . . . . . . . . . . . . . . . . . . . . . . . . . . . . 14
7.2.1Access control function: . . . . . . . . . . . . . . . . . . . . . . . . . . . . . . . . . . . . . . . . 15
7.2.2 WLAN settings function: . . . . . . . . . . . . . . . . . . . . . . . . . . . . . . . . . . . . . . . . . . . 16
7.2.3LAN settings function: . . . . . . . . . . . . . . . . . . . . . . . . . . . . . . . . . . . . . . . . 17
7.2.4Password setting function: . . . . . . . . . . . . . . . . . . . . . . . . . . . . . . . . . . . . . . . 18
7.2.5LED settings function: . . . . . . . . . . . . . . . . . . . . . . . . . . . . . . . . . . . . . . . . 19
7.2.6Time zone function: . . . . . . . . . . . . . . . . . . . . . . . . . . . . . . . . . . . . . . . . . . 20
7.2.7WLAN timer function: . . . . . . . . . . . . . . . . . . . . . . . . . . . . . . . . . . . . . . . . . . 21
7.3Status option . . . . . . . . . . . . . . . . . . . . . . . . . . . . . . . . . . . . . . . . . . . . . . . . . . . . . 23
7.4Tool option: . . . . . . . . . . . . . . . . . . . . . . . . . . . . . . . . . . . . . . . . . . . . . . . . . . . . . . . . . 24
7.4.1 System settings function: . . . . . . . . . . . . . . . . . . . . . . . . . . . . . . . . . . . . . . . . . . . . 25
7.4.2Update firmware function: . . . . . . . . . . . . . . . . . . . . . . . . . . . . . . . . . . . . . . . 26
7.4.3Reset function & Restore factory settings function: . . . . . . . . . . . . . . . . . . . . . . 27
8.Care and Maintenance: . . . . . . . . . . . . . . . . . . . . . . . . . . . . . . . . . . . . . . . . . . . . . . . 28
9.Disclaimer: . . . . . . . . . . . . . . . . . . . . . . . . . . . . . . . . . . . . . . . . . . . . . . . . . . . . . . . . . . . . 28
10.Service and Support: . . . . . . . . . . . . . . . . . . . . . . . . . . . . . . . . . . . . . . . . . . . . . . . . . . 28
11. Specifications: . . . . . . . . . . . . . . . . . . . . . . . . . . . . . . . . . . . . . . . . . . . . . . . . . . . . . . . . . . 28
2
WLAN 300 Mbps Repeater
Thank you for choosing a Hama product.
Take your time and read the following instructions and information completely. Keep these operating instructions in a safe place for future reference.
The Hama WLAN repeater allows you to nearly double the range of your existing WLAN network quickly and easily.
1. Explanation of Warning Symbols and Notes:
 Warning
►This symbol is used to indicate safety instructions or to draw your attention to specific hazards and risks.
 Note
Note
►This symbol is used to indicate additional information or important notes.
2.Package Contents:
Before you start setting up your Hama WLAN repeater, make sure that you have all the components:
•1 Hama WLAN repeater, 300 Mbps
•1 network cable for setup
•1 printed quick-start guide
•1 resource CD-ROM with these operating instructions
Hama GmbH & Co KG reserves the right to modify the scope of delivery without prior notice.
3

WLAN 300 Mbps Repeater
3.Safety Instructions:
•This product is intended for private, non-commercial use only. (1.1.1)
•Only use the product for the intended purpose. (1.1.3)
•Protect the product from dirt, moisture and overheating, and only use it in a dry environment. (1.2.1)
•Do not use the product in the immediate vicinity of heaters or other heat sources or in direct sunlight. (1.2.2)
•Lay all cables so that they do not pose a tripping hazard. (3.2.2)
•Do not drop the product and do not expose it to any major shocks. (3.2.5)
•The product may only be operated with the type of power supply network described on the name plate. (2.1.8)
•Only connect the product to a socket that has been approved for the device. The electrical socket must always be easily accessible. (3.1.1)
•Dispose of packaging material immediately according to locally applicable regulations. (3.2.9)
•Do not modify the product in any way. Doing so voids the warranty. (3.6.1)
 Warning
►Do not open the product. Do not continue to operate the product if it is damaged, which may be indicated by smoke, odours or loud noises. Contact your dealer or our service department immediately (see Service and Support). (3.4.4)
4.System Requirements:
4.1 Operating systems
Windows Vista, Windows 7, Windows 8/8.1, Linux Kernel 3.2 or later, Mac OS X 10.6 or later.
4.2 Hardware
Note that your computer or the wireless device in question must be equipped with a WLAN network card/USB stick or an integrated network adapter with an RJ45 LAN interface.
4
WLAN 300 Mbps Repeater
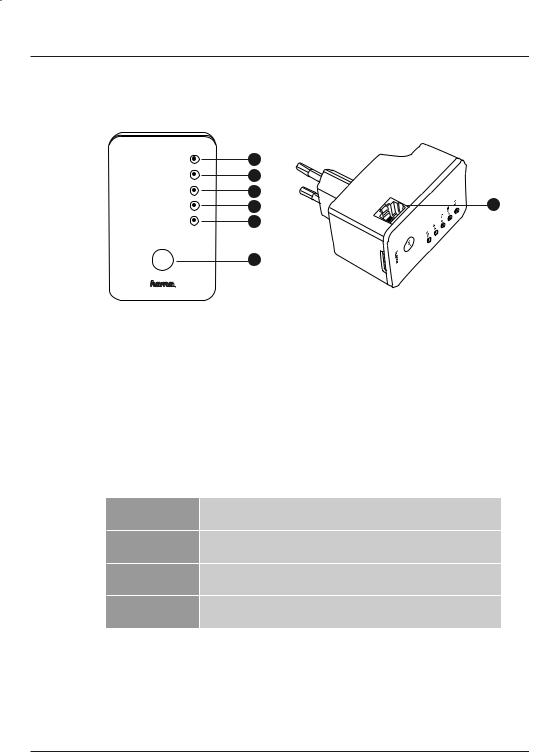
5. Controls and Displays:
Signal |
1 |
|
|
WLAN |
2 |
|
|
Power |
3 |
|
|
4 |
7 |
||
WPS |
|||
5 |
|
||
LAN |
|
||
WPS |
6 |
|
1.Signal LED
2.WLAN LED
3.Power LED
4.WPS LED
5.LAN LED
6.WPS button
7.Network port
LED indicator
The housing features symbols that flash or light up to indicate the connection status in your network. The following figure explains the meaning of the symbols.
Steady green light |
The WLAN repeater is optimally connected to your WLAN router (max. |
|
data transfer rate possible) |
||
|
||
Slowly flashing |
The WLAN repeater is connected to your WLAN router (good data |
|
green light |
transfer rates possible) |
|
Quickly flashing |
The WLAN repeater is connected to your WLAN router (adequate data |
|
green light |
transfer rates possible) |
|
Off |
The WLAN repeater is unplugged or is not connected to your WLAN |
|
router |
||
|
5

WLAN 300 Mbps Repeater
 Note - Data rate
►Max. data transfer rate: The connection to your WLAN router is stable and the max. data transfer rate available via WLAN/WiFi can be achieved.
►Good data transfer rate: The connection to your WLAN router is not optimal but is still sufficient; the max. data transfer rate available cannot always be achieved.
►Adequate data transfer rate: The connection to your WLAN router is active but only barely. You cannot be sure that the connection will not be interrupted. The data transfer rate drops to the minimum. We recommend moving the WLAN repeater nearer to your WLAN router until the LED indicates a “good” data transfer rate. (Note that the repeater may require approximately 2 minutes until the new location is indicated by the signal LED.)
WLAN LED (2): |
|
|
Steady blue light |
The WLAN repeater is ready for operation. |
|
Flashing blue |
The WLAN repeater is starting or linking via WPS is currently taking |
|
place. |
||
|
||
Off |
The WLAN repeater is unplugged. |
|
Power LED (3): |
|
|
Steady blue light |
The WLAN repeater is ready for operation. |
|
Flashing blue |
Data transfer |
|
Blue light is off |
The WLAN repeater is unplugged. |
|
WPS LED (4): |
|
|
Steady blue light |
WPS is activated. |
|
Flashing blue |
Linking via WPS is currently taking place. |
|
Blue light is off |
WPS is deactivated. |
|
LAN LED (5): |
|
|
Steady blue light |
A cable connection to the WLAN repeater has been established. |
|
|
A network cable has not been connected to the WLAN repeater, or the |
|
Blue light is off |
device that is connected via a cable to the WLAN repeater is switched |
|
|
off. |
WPS button (6)
This button can be used to connect/link the repeater to your WLAN router using WPS; it can also be used to reset the repeater to the factory settings in case of a malfunction. To make a connection/link using WPS, please read the section Start-Up Using WPS.
6

WLAN 300 Mbps Repeater
Restoring the factory settings:
If a connection to the configuration program cannot be established, reset the device to the factory settings by pressing the WPS button for approx. 15 seconds.
Network port (7)
You can connect your PC or console to this network port in order to provide these devices access to your WLAN network device.
6. Start-Up:
6.1 Using WPS (WiFi protected setup)
Configuration using WPS is the fastest and easiest way to integrate the repeater into your WLAN network.
Requirements:
In order for you to use WPS, your existing WLAN router must support configuration using WPS. In addition, your WLAN router must be currently using the WPA or WPA2 WLAN encryption standard, and the SSID (WLAN network name) of the WLAN router must be set to visible.
 Note
Note
►Note that some manufacturers use designations other than WPS. Please read the instructions for your WLAN router to determine whether and how you can activate linking via a hardware button (WPS) on your WLAN router.
To set up the Hama repeater using WPS, proceed as follows:
•Plug in the Hama repeater in the immediate vicinity of your WLAN repeater (we recommend starting up the device in the same room in which your WLAN router is located) and wait until its power LED (3) illuminates and the WLAN LED (2) flashes.
•Press the WPS button on the top of the Hama repeater for 5 seconds; the WPS LED (4) will begin to flash.
•Press the WPS or QSS button on your WLAN router within the next 2 minutes and according to the instructions in your WLAN router manual. (Consult the instructions for your WLAN router to determine how long to hold the button.)
•Wait for approx. 3 minutes until the connection between the WLAN router and the repeater is established.
•The connection has been successfully established when the WPS LED (4) on the repeater goes out and the green signal LED (1) on the repeater lights up/flashes.
•Place the Hama repeater in the location you have selected. When checking the signal strength, consult the information in the section on signal strength.
The WPS connection procedure is thus completed, and a secure connection has been established between the repeater and the WLAN router. If necessary, you can access the repeater from a browser on your computer/notebook.
If the signal LED (1) on the repeater does not light up as described, the connection could not be established. Please consult the following information in order to fix the problem.
7

WLAN 300 Mbps Repeater
•Check the location in which you installed the repeater; we recommend plugging in the repeater for configuration in the immediate vicinity of your WLAN router.
•Check whether the WPS function is activated in the firmware on your WLAN router or whether your WLAN router supports this procedure at all.
•Check whether your WLAN network is using a hidden SSID; we recommend not hiding the SSID for the initial setup.
•Check whether your WLAN network is using the 2.4 GHz band. The Hama repeater only supports the 2.4 GHz band.
6.2Using a browser
To manually connect the repeater to your WLAN router using a browser, the following requirements must be met:
Your computer/notebook must be equipped with a network port that automatically obtains an IP address from your WLAN router.
The following description applies to users with Windows 8; the specific steps may differ for users with older Windows versions, Linux or Mac OS X.
•Plug in the WLAN repeater in the immediate vicinity of your notebook/PC and wait until the power LED lights up.
•Start up your PC/notebook with Windows 8; switch from the tile view to the desktop.
•Connect your computer to the Hama repeater using the included network cable.
•Start your Internet browser and enter the following in the address bar: Hama.repeater or 192.168.2.254 (you may need to enter http:// in some browsers).
•Confirm the input by pressing Enter.
 Note
Note
►The factory settings of the WLAN repeater are such that in case of a “standard installation”, you can easily access the repeater from Windows, MAC OS X or Linux. If you are performing a custom installation, problems may arise when you attempt to start up the device from a browser.
►If you cannot access the repeater by entering Hama.repeater or 192.168.2.254, check whether your operating system is set up to automatically obtain the IP address (= standard installation; consult the instructions or help manual for your operating system).
8

WLAN 300 Mbps Repeater
The following screen is now displayed.
•Enter admin in the “User name” box.
•Enter hama in the “Password” box.
•Click OK to log onto the repeater.
The configuration program (start screen) of the repeater is shown once you have successfully logged on.
All WLANs found by the repeater are shown in the table. Select your WLAN and then click Next to continue.
If your WLAN has not been found, first click on Refresh. This causes the repeater to search again for WLANs. If your network is still not shown, check whether your network meets the following requirements.
9

WLAN 300 Mbps Repeater
•Your WLAN (the SSID) is visible. (Consult the manual for your WLAN router if necessary.)
•Your WLAN router and the WLAN function are switched on.
•Your WLAN router is transmitting in the 2.4 GHz range. (Consult the manual for your WLAN router if necessary.)
•The current location is suitable for receiving WLAN signals from your WLAN router. (Move to a location nearer to your WLAN router if necessary.)
If you have set your WLAN to “invisible” for security reasons, you must manually select your network by first activating the Set up repeater manually option and then entering the name of your “invisible” WLAN in the box labelled SSID. Then click Next to continue.
On the next screen, you will be asked for your WLAN key.
Enter the current WLAN key for your router in the box labelled Key and then click Next.
The WLAN key entered is now checked and compared with the key for your WLAN router. If the key you entered is correct, the following success message is displayed (see next figure).
If your entry was incorrect, you are prompted to check and correct the key you entered. Enter the corrected key to have it checked again by the system.
If the repeater still will not accept the key even after several corrections, we recommend setting a new WLAN key on your router, one without special characters or German umlauts. (If necessary, consult the manual for your WLAN router for how to set a new WLAN key.)
10
WLAN 300 Mbps Repeater
The key has been successfully verified. Click Next to continue.
In the next step, you are prompted to replace the default password, hama, with your own password. To change the password, enter “hama” (without the “”) in the box labelled “Current Password”. Enter your new password twice, once in the “New Password” box and once in the “ReEnter Password” box, making sure they are identical. Click Next to continue.
If you receive an error message, the new entries are not identical. Please check your entries and then re-enter the correct password in both boxes.
If you wish to keep the default password, you will receive this security notification from the system. If you wish to change the default password now, click Cancel. If you want to keep the default password, click OK.
11

WLAN 300 Mbps Repeater
In the next step, you will specify the time zone and the time server that your repeater will use. With this option, your repeater is supplied with the exact time by a selected time server; it is important for the WLAN timer option.
You can change the time zone for your current location using the Time zone drop-down menu. It is set to GMT + 00.00 Greenwich Mean Time by default. If you are using the device in Germany, for example, you should set the time zone to GMT + 01:00 Amsterdam, Berlin.
In the Time server address input screen, you can specify an NTP (Network Time Protocol) server by entering either the IP address or the domain name.
 Note – NTP
►Since Hama GmbH & Co KG does not operate its own NTP server, you must first do some research on the Internet to determine which servers are offered free to the public.
Finally, click Restart to save the settings and restart the device. The repeater will restart and will need about 2-3 minutes before it is ready for operation again.
12

WLAN 300 Mbps Repeater
7. Explanation of Special Options
Requirements:
The Hama WLAN repeater should already be fully configured and successfully connected to your WLAN router.
The following options are not all necessary for operating the repeater; they should be considered optional. Note that some of these options require advanced knowledge about network technology and should therefore only be changed by experts.
In any case, be sure to save the current settings and create a backup so that you can return to this original state in case of a configuration error, without having to redo all the settings. (Consult section 6.3 of this manual, under the items -> Tool option -> Tool function.)
 Note
Note
►Note that you must restart the repeater at least once in order for altered settings to be applied.
7.1WPS option:
•Start the repeater’s configuration program in Internet Explorer, as described in 6.2.
•On the left, select the WPS radio button.
 Note – WPS
►The WPS option contains the settings for establishing a link (connection) between the router and the repeater using WPS. You can start the linking procedure using the hardware button (sec. 6.1) or here in the configuration program.
13
WLAN 300 Mbps Repeater
The WPS option is always activated by default. You can deactivate WPS by removing the check from the Enable WPS checkbox. Once the repeater is restarted, linking is not possible using the hardware button or the configuration program until this option is enabled again.
If you wish to start WPS from the configuration program, ensure that Enable WPS is checked and the configuration mode is set to Registrar. Then click Start PBC. You now have 2 minutes to enable WPS on your router in order for the linking procedure to take place. The PBC button indicates the remaining time in which to enable WPS on your router.
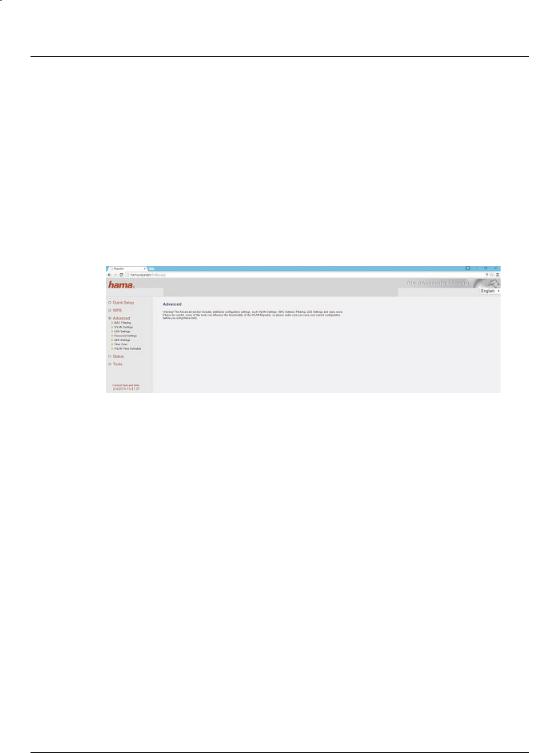
7.2 Advanced option:
The Advanced option contains various functions that can be optionally enabled for the repeater, such as access control, LAN settings or the WLAN timer.
14
WLAN 300 Mbps Repeater
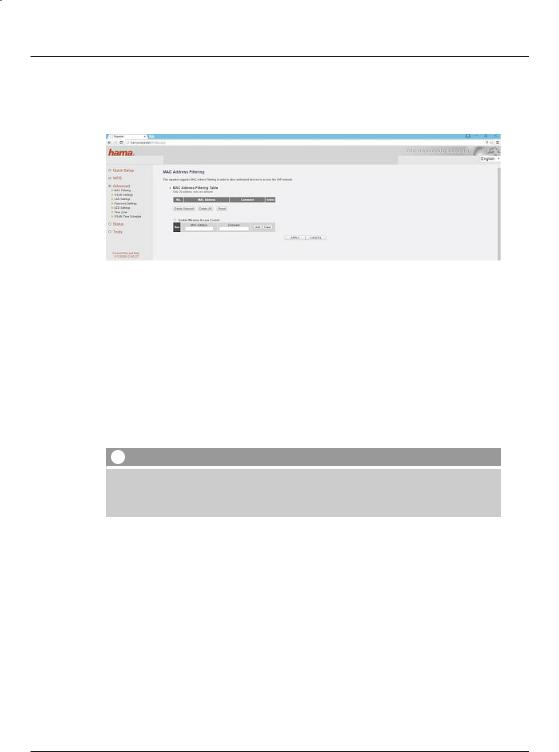
7.2.1 Access control function:
The Access control option contains the settings required for setting up a MAC address filter. This filter allows you to explicitly define which WLAN devices may and may not use the repeater.
If, for security reasons, you wish to define which WLAN devices may log onto the repeater and thus onto your network, you must have detailed knowledge of MAC addresses. This manual does not tell you how and where to find MAC addresses; it only explains how to set up this option on the repeater.
•Activate access control by adding a check in the Enable access control checkbox.
•Enter all previously noted MAC addresses in the MAC address box, one after another.
•After each entry, click Add before continuing with the next MAC address. You can add notes in the comment box to keep better track of the different MAC addresses. For instance, you might enter “Tablet” if the MAC address belongs to a tablet or “Living room” if the device with this MAC address is installed in the living room.
 Note – MAC address
►Information on entering the MAC address: You must enter the address without “-” or “:”.
►Please note that no more than 20 entries (20 devices) are possible.
Once you have entered the MAC addresses, you will find them displayed in the MAC address filter table. If you wish to remove individual entries or all entries, highlight the particular entries and click Remove selected or Remove all. Clicking Reset also removes all the entries you have selected.
To save the settings, click Apply. The next window confirms that the settings have been saved.
15
WLAN 300 Mbps Repeater
 Note
Note
►Note that you must restart the repeater at least once in order for altered settings to be applied.
You can now restart the repeater or make further settings.
•If you wish to restart the repeater, click Apply.
•To make additional settings, click Continue.
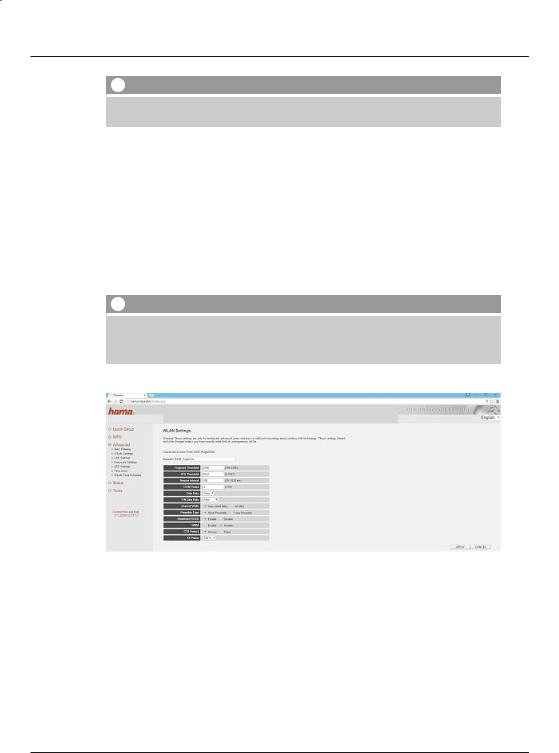
7.2.2WLAN settings function:
The WLAN settings option contains the settings for the integrated WLAN module. On this screen, you can assign a different SSID to the repeater or make changes to the performance of the WLAN module.
 Note – WLAN settings
►Note that advanced knowledge of WLANs/networks is required to predict the results of changing these settings.
►If you are unsure, seek help from an expert before making changes.
This window displays the SSID currently used by your router and by the repeater. To ensure that a WLAN device only logs onto your WLAN network via the repeater, you can change the SSID of the repeater and then select the same SSID on your WLAN device.
16

WLAN 300 Mbps Repeater
 Note – SSID
►All WLAN devices on which the old SSID is still saved will attempt to log directly onto your router instead of the repeater, since the router has the old SSID. You must therefore provide the new SSID to all devices that are to use the WLAN.
►Please also note that older WLAN devices may not recognize SSIDs with special characters or German umlauts. You should therefore avoid using these characters.
The remaining settings are only intended for expert users. We recommend keeping the default settings, since these were already configured at the factory to achieve maximum data transfer rates and compatibility. These settings should therefore only be changed in very special cases.
To save the settings, click Apply. All settings will otherwise be lost. The next window confirms that the settings have been saved.
 Note
Note
►Note that you must restart the repeater at least once in order for altered settings to be applied.
You can now restart the repeater or make further settings.
•f you wish to restart the repeater, click Apply.
•To make additional settings, click Continue.
7.2.3LAN settings function:
The LAN settings option contains the settings for automatic assignment of IP addresses. During normal repeater operation, the DHCP server is deactivated and the IP address is assigned by the router.
 Note – LAN settings
►We recommend leaving the integrated DHCP server deactivated if you wish to use the device as a repeater. Activating the server is only necessary in very special cases and should only be carried out by experts.
►Activating two DHCP servers can lead to unforeseeable complications in the network.
17

WLAN 300 Mbps Repeater
To save the settings, click Apply. All settings will otherwise be lost. The next window confirms that the settings have been saved.
 Note
Note
►Note that you must restart the repeater at least once in order for altered settings to be applied.
You can now restart the repeater or make further settings.
•If you wish to restart the repeater, click Apply.
•To make additional settings, click Continue.
7.2.4Password setting function:
The Password setting option allows you to replace the default password, hama, with your own password. For security reasons, we recommend choosing a different password.
18
 Loading...