


00054238
(DIT2006BT)
Digital Hi-Fi Tuner |
QUICK GUIDE |
|
|
Digital-HiFi-Tuner |
KURZANLEITUNG |
Quick Guide |
GB |
Kurzanleitung |
D |
Notice d’utilisation |
F |
Instrucciones breves |
E |
Краткое руководство |
RUS |
Istruzioni brevi |
I |
Beknopte bedieningsinstructies |
NL |
Σύντομες οδηγίες |
GR |
Krótka instrukcja obsługi |
PL |
Rövid útmutató |
H |
Stručný návod |
CZ |
Stručný návod |
SK |
Instruções resumidas |
P |
Kısa kullanım kılavuzu |
TR |
Instrucțiuni scurte |
RO |
Snabbguide |
S |
Lyhyt ohje |
FIN |
Kort vejledning |
DK |
Kortveiledning |
N |
Technical Data
Technische Daten
Display |
2.8" (7.11cm) Color TFT |
|
|
320 x 240 px |
|
||
|
|
||
|
|
|
|
Power Supply |
100-240 V ~ 50/60 Hz |
|
|
Stromversorgung |
|
||
|
|
|
|
|
|
|
|
Supported Languages |
English, German, Danish, Dutch, Finnish, French, Italian, Norwegian, Polish, Portuguese, Spanish, |
||
Unterstützte Sprachen |
Swedish, Turkish, Czech, Slovak |
|
|
|
|
|
|
Packaging Content |
Hama DIT2006BT, Power Cord, Remote GB-RC001, 2x AAA Batteries, Quick Start Manual, Telescope |
||
Verpackungsinhalt |
Antenna Coaxial, WiFi Antenna, RCA Audio Cable |
|
|
|
|
|
|
|
|
|
|
Connectivity |
|
|
|
Konnektivität |
|
|
|
|
|
|
|
Ethernet |
LAN (10/100) |
|
|
|
|
|
|
WiFi |
2.4GHz (b/g/n) / 5GHz (a/n) |
|
|
|
|
|
|
Bluetooth |
Receiver (RX): 4.2, class 1, A2DP, AVRCP |
|
|
|
|
|
|
USB |
Charge: 5V / 1A |
|
|
(FAT32 File System) |
Playback: MP3, WMA, M4A, ADTS, FLAC, WAV |
|
|
|
|
|
|
|
|
|
|
Audio Connectors |
|
|
|
Audio Anschlüsse |
|
|
|
|
|
|
|
Inputs |
AUX In 3.5mm |
|
|
|
|
|
|
Outputs |
Headphone 3.5mm, Digital Optical, Digital Coaxial, RCA L/R, |
|
|
Line Out 3.5mm |
|
||
|
|
||
|
|
|
|
|
|
|
|
Sources |
|
|
Presets |
Quellen |
|
|
Favoriten |
|
|
|
|
DAB/DAB+ |
ü |
|
30 |
(174.928 - 239.2 MHz) |
|
||
|
|
|
|
|
|
|
|
FM |
ü |
|
30 |
(87.5 - 108 MHz) |
|
||
|
|
|
|
|
|
|
|
Internet Radio |
ü |
|
30 |
|
|
|
|
Spotify Connect |
ü |
|
10 |
|
|
|
|
Further information and features are available on /
Weitere Informationen und Features finden Sie hier
www.hama.com -> 00054238
A
1 |
3 |
5 |
7 |
8 |
10 |
12 |
16 |

 13
13
2 |
4 |
6 |
15 |
9 |
11 |
14 |
B
21 |
23 |
17 |
18 |
20 |
22 |
24 |
19 |

1 |
2 |
3 |
|
4 |
5 |
6 |
7 |
8 |
|
9 |
|
10 |
11 |
12 |
13 |
14 |
15 |
16 |
17 |
18 |
19 |

Spotify Connect
GUse your phone, tablet or computer as a remote control for Spotify. Go to spotify.com/connect to learn how.
DVerwende dein Smartphone, Tablet oder deinen Computer als Fernbedienung für Spotify. Auf spotify.com/ connect erfährst du mehr.
FUtilisez votre téléphone, votre tablette ou votre ordinateur comme une télécommande pour contrôler Spotify. Accédez à spotify.com/connect pour en savoir plus.
EUsa tu teléfono, tu tablet o tu computadora como control remoto de Spotify. Para más información, entra a spotify.com/connect.
IUsa il tuo cellulare, tablet o computer come telecomando remoto per Spotify. Vai su spotify.com/ connect per scoprire come.
NGebruik je telefoon, tablet of computer als een afstandsbediening voor Spotify. Ga naar spotify.com/ connect om te leren hoe je dat doet
JΧρησιμοποίησε το τηλέφωνο, το τάμπλετ ή τον υπολογιστή σου ως τηλεχειριστήριο για το Spotify. Πήγαινε στο spotify.com/connect για να μάθεις πώς.
PWykorzystuj telefon, tablet lub komputer jako pilota, aby sterować aplikacją Spotify. Wejdź na spotify.com/ connect, aby dowiedzieć się, jak to zrobić.
8

Spotify Connect
HHasználd a telefont, táblagépet vagy számítógépet a Spotify távirányítójaként. További tudnivalókat a spotify. com/connect oldalon olvashatsz.
CHudbu ze Spotify můžeš ovládat na dálku přes telefon, tablet nebo počítač. Na stránce spotify.com/ connect najdeš, jak na to.
OUsa o teu telemóvel, tablet ou computador como comando do Spotify. Vai a spotify.com/connect para saberes como
TTelefon, tablet veya bilgisayarını Spotify için uzaktan kumanda olarak kullan. Nasıl yapacağını öğrenmek için spotify.com/connect adresine
SAnvänd din telefon, surfplatta eller dator som fjärrkontroll för Spotify. Gå till spotify.com/connect för att ta reda på hur.
LKäytä puhelinta, tablettia tai tietokonetta Spotifyn kaukosäätimenä. Katso tarkemmat tiedot osoitteesta spotify.com/connect.
KBrug din telefon, tablet eller computer som fjernbetjening til Spotify. Gå til spotify.com/connect for at finde ud af, hvordan du gør.
VBruk telefonen, nettbrettet eller datamaskinen som en fjernkontroll for Spotify. Gå til spotify.com/connect for å lære hvordan.
9

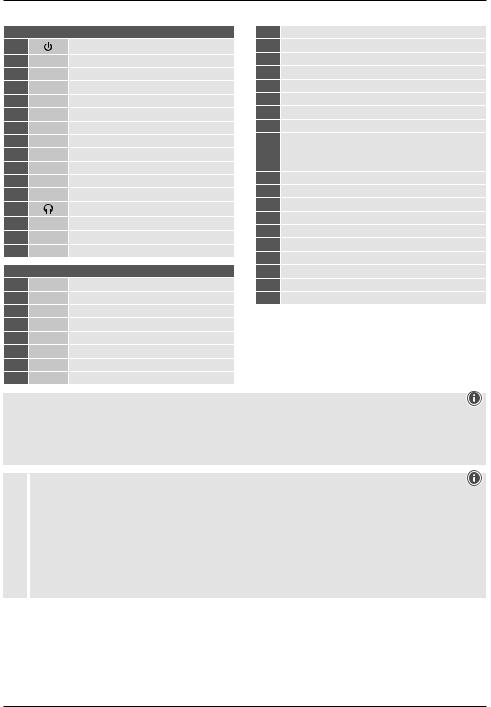
GQuick Reference Guide
Controls and Displays |
Remote Control |
|||
|
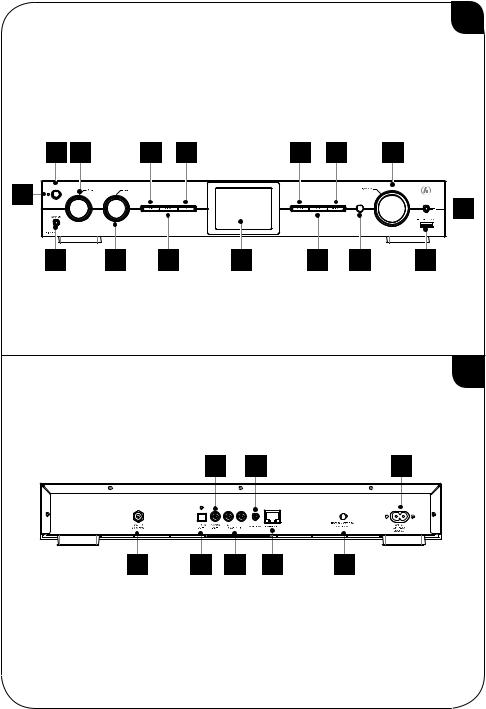
A: Radio Front |
1 |
[POWER] Button |
|
1 |
[POWER] Button |
2 |
[MUTE] Button |
|
2 |
AUX-In Socket |
3 |
[PRESET] Direct Button (1-4) |
|
3 |
[VOLUME] +/- |
4 |
[EQUALIZER] Button |
|
4 |
[PRESET] Wheel |
5 |
[PRESET] List Button |
|
5 |
[MODE] Button |
6 |
[MENU] Button |
|
6 |
[ALARM] Button |
7 |
[SOURCE] Button |
|
7 |
[EQUALIZER] Button |
8 |
[OK] Button |
|
8 |
[MENU] Button |
|
[NAVIGATION] Button |
|
9 |
[INFO] Button |
9 |
▲ Up ▼ Down |
|
10 |
[BACK] Button |
10 |
◄ Left ► Right |
|
11 |
IR Sensor |
[VOL-] Button |
||
11 |
[VOL+] Button |
|||
12 |
[Navigation] |
|||
12 |
[HOME] Button |
|||
13 |
Headphone Socket |
|||
13 |
[BACK] Button |
|||
14 |
USB connection |
|||
14 |
[INFO] Button |
|||
15 |
2.8" Colour Display |
|||
15 |
[BACKLIGHT] Button |
|||
16 |
LED |
|||
16 |
[PAUSE] Button |
|||
|
|
|||
|
B: Radio Rear |
17 |
[PLAY] Button |
|
17 |
Mains Power Supply |
18 |
[PREVIOUS] Button |
|
18 |
Antenna* |
19 |
[NEXT] Button |
|
19WiFi/Bluetooth Antenna
20Optical OUT
21Coaxial OUT
22Stereo Chinch l/R out
23Line OUT (3.5mm)
24LAN (10 / 100 Mbit) Connection
Note
*"DIT2006BT" has a changeable antenna. You can use an active or passive antenna equipped with a coaxial connection.
**The rotary knob has a dual function. Turning the controller allows you to change the volume or navigate through the menu structure. Pressing this rotary knob puts the device in standby mode or confirms a selection.
Important information - Quick-reference guide
•This quick-reference guide contains the most important basic information, such as safety instructions and the steps
!necessary to operate the product.
•To help protect the environmental and conserve valuable raw materials, Hama does not issue a printed manual and instead makes this available exclusively as a PDF download.
•The full text of the manual is available at the following internet address: www.hama.com -> 00054238 -> Downloads
•Save the manual on your computer for reference and print them out if possible.
2

1. Explanation of Warning Symbols and Notes
Risk of electric shock
This symbol indicates a risk of electric shock from touching product parts carrying hazardous voltage.
Warning
This symbol is used to indicate safety instructions or to draw your attention to specific hazards and risks.
Note
This symbol is used to indicate additional information or important notes.
2. Package Contents
•Digital-HiFi-Tuner DIT2006BT
•RCA cable (for stereo L/R RCA output)
•Remote control
•2x AAA batteries
•Quick guide
3. Safety Instructions
•The product is intended for private, non-commercial use only.
•Do not use the product in areas in which electronic products are not permitted.
•Protect the product from dirt, moisture and overheating and use it in dry rooms only.
•As with all electrical products, this device should be kept out of the reach of children.
•Do not drop the product and do not expose it to any major shocks.
•Do not operate the product outside the power limits specified in the technical data.
•Keep the packaging material out of the reach of children due to the risk of suffocation.
•Dispose of packaging material immediately in accordance with the locally applicable regulations.
•Do not modify the device in any way. Doing so voids the warranty.
•Use the product only for the intended purpose.
•Do not use the product in the immediate vicinity of heaters, other heat sources or in direct sunlight.
•Do not use the product in a damp environment and avoid splashing water.
•Only use the article under moderate climatic conditions.
Risk of electric shock
•Do not open the device or continue to operate it if it becomes damaged.
•Do not use the product if the
AC adapter, the adapter cable or the mains cable are damaged.
•Do not attempt to service or repair the product yourself. Leave any and all service work to qualified experts.
Warning – Batteries
•When inserting batteries, note the correct polarity (+ and - markings) and insert the batteries accordingly. Failure to do so could result in the batteries leaking or exploding.
•Only use batteries (or rechargeable batteries) that match the specified type.
•Before you insert the batteries, clean the battery contacts and the polar contacts.
•Do not allow children to change batteries without supervision.
•Do not mix old and new batteries, or batteries of different types or from different manufacturers.
•Remove the batteries from products that are not being used for an extended period (unless these are being kept ready for an emergency).
•Do not short-circuit batteries.
•Do not charge batteries.
•Do not burn batteries.
•Keep batteries out of the reach of children.
•Never open, damage or swallow batteries or allow them to enter the environment. They can contain toxic, environmentally harmful heavy metals.
•Remove spent batteries from the product and dispose of them without delay.
•Avoid storing, charging or using the device in extreme temperatures and extremely low atmospheric pressure (for example, at high altitudes).
4.Before First Use
Note
A detailed description of the UNDOK app and all of its functions can be found in our UNDOK guide at:
www.hama.com -> 00054238 -> Downloads
3

Notes on use
•The [OK] button and ►on the remote control correspond to the [POWER/VOLUME/ENTER/ NAVIGATE] button (11) on the front of the radio.
•The ◄button on the remote control corresponds to the [ ] button on the front of the radio
•The ▲▼buttons on the remote control correspond to turning the navigation controller to the left and right on the front of the radio.
Preparing the remote control for use
Open the cover on the battery compartment. This can be found on the back of the remote control and can be opened by sliding in the direction indicated.
The extent of delivery includes two AAA batteries which must be inserted into the battery compartment for the remote control to work. When inserting the batteries, ensure that they are inserted with the correct polarity. The relevant polarity (+ / -) is marked inside the battery compartment.
Setting up a network connection 4.1 LAN (wired network)
•Connect the LAN connection of your router to the LAN connection on your radio. You will require an Ethernet cable, which is not included in the delivery, to do this.
•Make sure that the router is on and working properly, and that you have an Internet connection.
•See the operating instructions for your router regarding a properly functioning LAN connection.
•Then proceed as described in point 5, “Getting Started”.
4.2 WLAN (wireless network)
•Ensure that the router is switched on, is functioning correctly and that there is a connection to the internet.
•Activate the WLAN function of your router.
•Follow your router‘s operating instructions as regards the correct functioning of the WLAN connection.
•Then proceed directly as described under section 5 ‚Getting started‘.
5. Getting Started
Note - optimising reception
"DIT2006BT" has an antenna connection for external antennas with a coaxial connection. A suitable telescopic antenna that allows DAB, DAB+ and FM reception is included in the extent of delivery. Alternatively, you
can use an active or passive antenna to improve the reception or to adapt it to your requirements.
Please note:
•Always pull the antenna out completely.
•We recommend you adjust the antenna vertically to ensure optimal reception.
5.1 General Notes on Use 5.1.1 Switch On / Off / Standby
•Press [POWER/VOLUME/ENTER/NAVIGATE] (11) to switch on the radio.
•Press and hold [POWER/VOLUME/ENTER/NAVIGATE] (11) for 3 seconds to switch the radio off (standby).
•To completely switch off the device, disconnect it from the power supply.
5.1.2 Navigation and Control
•After pressing a shortcut button, navigate through the menu items using.
•Select the individual menu items by turning [POWER/ VOLUME/ENTER/NAVIGATE] (11).
•Confirm the selection by pressing [POWER/VOLUME/ ENTER/NAVIGATE] (11).
5.1.3 Volume Adjustment
•Turn the volume up (right) or down (left) by turning [POWER/VOLUME/ENTER/NAVIGATE] (11) accordingly.
4
5.2 Switching ON
Warning
•Only operate the product from a socket that has been approved for the device. The socket must be installed close to the product and must be easily accessible.
•Disconnect the product from the power supply using the On/Off switch – if this is not available, unplug the power cord from the socket.
•If using a multi-socket power strip, make sure that the total power consumption of all connected devices does not exceed the power strip's maximum throughput rating.
•If you will not be using the product for a prolonged period, disconnect it from mains power.
•Connect the power supply to the mains connection (1) on the back of the radio.
•Connect the network cable to a properly installed and easily accessible network socket.
•Wait until the radio has initialised fully.
•Press [POWER/VOLUME/ENTER/NAVIGATE] (11) to switch on the radio.
Note – switching on for the first time
•The Setup Wizard starts up automatically when the radio is turned on for the first time.
•The default used language is English.
•You can skip the Wizard and start it up again later in German.
5.3 Language
The first time it is used, the radio's default language is English. To change radio's menu language, proceed as follows:
•Press [ ] (7) to access the Settings menu.
•Use [POWER/VOLUME/ENTER/NAVIGATE] (11) to navigate to the "Settings" menu item.
•Confirm the selection by pressing [POWER/VOLUME/ ENTER/NAVIGATE] (11).
•Use [POWER/VOLUME/ENTER/NAVIGATE] (11) to navigate to the "Language" menu item. Confirm the selection by pressing [POWER/VOLUME/ENTER/ NAVIGATE] (11).
•Use [POWER/VOLUME/ENTER/NAVIGATE] (11) to select your preferred system language.
•The language setting currently selected is marked with an asterisk (*).
Note
•The following languages are available:
English, Danish, French, German, Italian, Norwegian, Finnish, Swedish, Turkish, Polish, Dutch, Portuguese, Spanish
6.Care and Maintenance
•Only clean this product with a slightly damp, lint-free cloth and do not use aggressive cleaning agents.
•If you do not plan to use the product for a prolonged period, turn off the device and disconnect it from the power supply. Store it in a clean, dry place away from direct sunlight.
7. Warranty Disclaimer
Hama GmbH & Co KG assumes no liability and provides no warranty for damage resulting from improper installation/ mounting, improper use of the product or from failure to observe the operating instructions and/or safety notes.
8. Service and Support
Please contact Hama Product Consulting if you have any questions about this product.
Hotline: +49 9091 502-115 (German/English)
Further support information can be found here: www.hama.com
The full text of the manual is available at the following internet address:
www.hama.com -> 00054238 -> Downloads
5
9. Recycling Information
Note on environmental protection:
After the implementation of the European Directives 2012/19/EU and 2006/66/EU in the
national legal system, the following applies:
 electrical and electronic devices as well as batteries must not be disposed of with household waste. Consumers are obliged by law to return electrical and electronic devices as well as batteries to the designated public collection points or to the point of sale at the end of their service lives. Detailed information on this topic is defined in the national laws of the respective country. This presence of the above symbol on the product, operating instructions or package indicates that the product is subject to these regulations. By recycling, reusing the materials or other forms of utilising old devices/batteries, you are making an important contribution to protecting our environment.
10. Declaration of Conformity
Hama GmbH & Co KG hereby declares that the radio equipment type [00054238] is in compliance with Directive 2014/53/EU. The full text of the EU
declaration of conformity is available at the following internet address:
www.hama.com -> 00054238 -> Downloads
Frequency band(s) |
Maximum radio-frequency |
|
power transmitted |
||
|
||
Bluetooth: 2.402 – 2.480 GHz |
6.5 dBm (EIRP) |
|
WiFi: 2.400 – 2.480 GHz |
15.5 dBm (EIRP) |
|
WiFi: 5.150 – 5.350 GHz |
16.5 dBm (EIRP) |
|
WiFi: 5.470 – 5.725 GHz |
16.5 dBm (EIRP) |
|
WiFi: 5.725 – 5.850 GHz |
11 dBm (EIRP) |
Restrictions or Requirements in
Belgium, Bulgaria, Czech Republic, Denmark, Germany, Estonia, Ireland, Greece, Spain, France, Croatia, Italy, Cyprus, Latvia, Lithuania, Luxembourg, Hungary, Malta, the Netherlands, Austria, Poland, Portugal, Romania, Slovenia, Slovakia, Finland, Sweden, United Kingdom
Note
If channels 36-64 (channels of frequency
5150 MHz - 5350 MHz) are used, the device may only be used in closed rooms.
To limit exposure to electromagnetic fields
This device is intended for use at a distance of at least 20 cm from the body of the user or persons nearby. This device must not be worn or carried on the body.
6

DSchnellstartanleitung
Bedienungselemente und Anzeigen
|
A: Radio Frontseite |
1 |
[POWER]-Taste |
2AUX-In Buchse
3[VOLUME] +/-
4[PRESET] Rad
5[MODE]-Taste
6[ALARM]-Taste
7[EQUALIZER] Taste
8[MENU]-Taste
9[INFO] Taste
10[BACK] (Zurück)-Taste
11Infrarotempfänger
12[Navigation]
13 |
Kopfhörer Buchse |
14USB-Anschluss
152.8" Farbdisplay
16LED
B:Radio Rückseite
17Netzzuleitung
18Antenne*
19WiFi/Bluetooth Antenne
20Optischer Ausgang
21Coaxial Ausgang
22Stereo Cinch L/R Ausgang
23Line-OUT (3.5mm)
24LAN (10 / 100 Mbit) Anschluss
Hinweis
Fernbedienung
1[POWER]-Taste
2[MUTE]-Taste
3[PRESET]-Direkttasten (1-4)
4[EQUALIZER]-Taste
5[PRESET]-Listenansichttaste
6[MENU]-Taste
7 [SOURCE]-Taste
8[OK]-Taste
[NAVIGATIONS]-Tasten
9▲ Hoch▼ Runter ◄ Links ► Rechts
10[VOL-]-Taste
11[VOL+]-Taste
12[HOME]-Taste
13[BACK]-Taste
14[INFO]-Taste
15[BACKLIGHT]-Taste
16[PAUSE]-Taste
17[PLAY]-Taste
18[PREVIOUS]-Taste
19[NEXT]-Taste
*"DIT2006BT" verfügt über eine wechselbare Antenne. Sie können eine aktive oder passive Antenne verwenden, welche über einen Koaxial-Anschluss verfügt.
**Der Drehregler verfügt über eine Doppelfunktion. Durch Drehen des Reglers ändern Sie die Lautstärke oder navigieren durch die Menüstruktur. Durch Drücken dieses Drehreglers wird das Gerät in den Standby-Modus versetzt bzw. eine Auswahl bestätigt.
Wichtiger Hinweis - Kurzanleitung
•Dies ist eine Kurzanleitung, die Sie mit den wichtigsten Basis-Informationen wie Sicherheitshinweisen und der
!Inbetriebnahme Ihres Produktes versorgt.
•Aus Gründen des Umweltschutzes und der Einsparung wertvoller Rohstoffe verzichtet die Firma Hama auf eine gedruckte Langanleitung und bietet diese ausschließlich als PDF-Download an.
•Die vollständige Langanleitung ist unter der folgenden Internetadresse verfügbar: www.hama.com -> 00054238 -> Downloads
•Speichern Sie die Langanleitung zum Nachschlagen auf Ihrem Computer und drucken Sie diese nach Möglichkeit aus.
7
1. Erklärung von Warnsymbolen und Hinweisen
Gefahr eines elektrischen Schlages
Dieses Symbol weist auf eine Berührungsgefahr mit nicht isolierten Teilen des Produktes hin, die möglicherweise eine gefährliche Spannung von solcher Höhe führen, dass die Gefahr eines elektrischen Schlags besteht.
Warnung
Wird verwendet, um Sicherheitshinweise zu kennzeichnen oder um Aufmerksamkeit auf besondere Gefahren und Risiken zu lenken.
Hinweis
Wird verwendet, um zusätzlich Informationen oder wichtige Hinweise zu kennzeichnen.
2. Packungsinhalt
•Digitaltuner DIT2006BT
•Cinchkabel (für Stereo Cinch L/R Ausgang)
•Fernbedienung
•2x AAA Batterien
•Kurzanleitung
3. Sicherheitshinweise
•Das Produkt ist für den privaten, nicht-gewerblichen Haushaltsgebrauch vorgesehen.
•Benutzen Sie das Produkt nicht in Bereichen, in denen elektronische Produkte nicht erlaubt sind.
•Schützen Sie das Produkt vor Schmutz, Feuchtigkeit und Überhitzung und verwenden Sie es nur in trockenen Räumen.
•Dieses Produkt gehört, wie alle elektrischen Produkte, nicht in Kinderhände!
•Lassen Sie das Produkt nicht fallen und setzen Sie es keinen heftigen Erschütterungen aus.
•Betreiben Sie das Produkt nicht außerhalb seiner in den technischen Daten angegebenen Leistungsgrenzen.
•Halten Sie Kinder unbedingt von dem Verpackungsmaterial fern, es besteht Erstickungsgefahr.
•Entsorgen Sie das Verpackungsmaterial sofort gemäß den örtlich gültigen Entsorgungsvorschriften.
•Nehmen Sie keine Veränderungen am Gerät vor. Dadurch verlieren sie jegliche Gewährleistungsansprüche.
•Verwenden Sie das Produkt ausschließlich für den dazu vorgesehenen Zweck.
•Betreiben Sie das Produkt nicht in unmittelbarer Nähe der Heizung, anderer Hitzequellen oder in direkter Sonneneinstrahlung.
•Verwenden Sie das Produkt nicht in einer feuchten Umgebung und vermeiden Sie Spritzwasser.
•Verwenden Sie den Artikel nur unter moderaten klimatischen Bedingungen.
Gefahr eines elektrischen Schlages
•Öffnen Sie das Produkt nicht und betreiben Sie es bei Beschädigungen nicht weiter.
•Verwenden Sie das Produkt nicht, wenn der AC-Adapter, das Adapterkabel oder die Netzleitung beschädigt sind.
•Versuchen Sie nicht, das Produkt selbst zu warten oder zu reparieren. Überlassen Sie jegliche Wartungs-arbeit dem zuständigen Fachpersonal.
Warnung – Batterien
•Beachten Sie unbedingt die korrekte Polarität (Beschriftung + und -) der Batterien und legen Sie diese entsprechend ein. Bei Nichtbeachtung besteht die Gefahr des Auslaufens oder einer Explosion der Batterien.
•Verwenden Sie ausschließlich Akkus (oder Batterien), die dem angegebenen Typ entsprechen.
•Reinigen Sie vor dem Einlegen der Batterien die Batteriekontakte und die Gegenkontakte.
•Gestatten Sie Kindern nicht ohne Aufsicht das Wechseln von Batterien.
•Mischen Sie alte und neue Batterien nicht, sowie Batterien unterschiedlichen Typs oder Herstellers.
•Entfernen Sie Batterien aus Produkten, die längere Zeit nicht benutzt werden (außer diese werden für einen Notfall bereit gehalten).
•Schließen Sie die Batterien nicht kurz.
•Laden Sie Batterien nicht.
•Werfen Sie Batterien nicht ins Feuer.
•Bewahren Sie Batterien außerhalb der Reichweite von Kindern auf.
•Batterien nie öffnen, beschädigen, verschlucken oder in die Umwelt gelangen lassen. Sie können giftige und umweltschädliche Schwermetalle enthalten.
•Entfernen und entsorgen Sie verbrauchte Batterien unverzüglich aus dem Produkt.
•Vermeiden Sie Lagerung, Laden und Benutzung bei extremen Temperaturen und extrem niedrigem Luftdruck (wie z.B. in großen Höhen).
8
4. Vor der Inbetriebnahme
Hinweis
Eine ausführliche Beschreibung der UNDOK-App und des vollen Funktionsumfangs finden Sie in unserem UNDOK-Guide unter:
www.hama.com -> 00054238 -> Downloads
Bedienungshinweise
•Die Taste [OK] sowie ►auf der Fernbedienung entspricht der Taste [POWER/VOLUME/ENTER/ NAVIGATE] (11) auf der Frontseite des Radios.
•Die Taste ◄auf der Fernbedienung entspricht der Taste [ ] auf der Frontseite des Radios
•Die Tasten ▲▼auf der Fernbedienung entsprechen dem Drehen nach links und rechts des Navigationsreglers auf der Front des Radios.
Fernbedienung in Betrieb nehmen
Öffnen Sie die Abdeckung des Batteriefachs. Diese befindet sich auf der Rückseite der Fernbedienung und kann
durch Schieben in die gekennzeichnete Richtung geöffnet werden.
Zum Lieferumfang gehören zwei AAA-Batterien, welche Sie für die Inbetriebnahme in das Batteriefach einlegen müssen. Achten Sie beim Einlegen darauf, dass die Batterien mit der richtigen Polarität eingelegt werden. Die vorgegebene Polarität (+ / -) ist im Batteriefach gekennzeichnet.
Netzwerkverbindung einrichten
4.1 LAN (kabelgebundenes Netzwerk)
•Verbinden Sie einen LAN Anschluss Ihres Routers mit dem Ihres Radios. Sie benötigen dafür ein EthernetKabel, welches nicht zum Lieferumfang gehört.
•Stellen Sie sicher, dass der Router eingeschaltet ist, korrekt funktioniert und Verbindung zum Internet besteht.
•Beachten Sie bezüglich einer korrekten Funktion der LAN-Verbindung die Bedienungsanleitung ihres Routers.
•Gehen Sie dann wie unter Punkt 5. „Inbetriebnahme“ beschrieben direkt weiter vor.
4.2 WLAN (kabelloses Netzwerk)
•Stellen Sie sicher, dass der Router eingeschaltet ist, korrekt funktioniert und Verbindung zum Internet besteht.
•Aktivieren Sie die WLAN Funktion ihres Routers.
•Beachten Sie bezüglich einer korrekten Funktion der WLAN-Verbindung die Bedienungsanleitung ihres Routers.
•Gehen Sie dann wie unter Pkt. 5 „Inbetriebnahme“ beschrieben weiter vor.
5. Inbetriebnahme
Hinweis – optimaler Empfang
"DIT2006BT" verfügt über einen Antennenanschluss für externe Antennen mit Coaxial-Anschluss. Im Lieferumfang ist bereits eine passende Teleskopantenne enthalten, welche Ihnen den Empfang über DAB, DAB+ und FM ermöglicht. Alternativ können Sie
eine aktive oder passive Antenne verwenden, um die Empfangsleistung zu verbessern oder Ihren Anforderungen anzupassen.
Beachten Sie:
•Ziehen Sie die Antenne immer vollständig aus.
•Für einen optimalen Empfang empfehlen wir die Antenne vertikal auszurichten.
5.1 Allgemeine Hinweise zur Bedienung 5.1.1 Ein- /Ausschalten/ Standby
•Drücken Sie [POWER/VOLUME/ENTER/NAVIGATE] (11), um das Radio einzuschalten.
•Drücken und halten Sie [POWER/VOLUME/ENTER/ NAVIGATE] (11) für ca. 3 Sekunden, um das Radio auszuschalten (Standby).
•Trennen Sie das Gerät von der Stromversorgung, um es vollständig auszuschalten.
5.1.2 Navigation und Steuerung
•Navigieren Sie nach Druck auf eine Kurzwahltaste durch die angebotenen Menüpunkte.
•Durch Drehen von [POWER/VOLUME/ENTER/ NAVIGATE] (11) wählen Sie einzelne Menüpunkte aus.
•Durch Drücken von [POWER/VOLUME/ENTER/ NAVIGATE] (11) bestätigen Sie die Auswahl.
5.1.3 Lautstärke anpassen
•Durch Drehen von [POWER/VOLUME/ENTER/ NAVIGATE] (11) wird die Lautstärke erhöht (rechts) oder reduziert (links).
9
5.2 Einschalten
Warnung
•Betreiben Sie das Produkt nur an einer dafür zugelassenen Steckdose. Die Steckdose muss in der Nähe des Produktes angebracht und leicht zugänglich sein.
•Trennen Sie das Produkt mittels des Ein-/Ausschalters vom Netz – wenn dieser nicht vorhanden ist, ziehen Sie die Netzleitung aus der Steckdose.
•Achten Sie bei Mehrfachsteckdosen darauf, dass die angeschlossenen Verbraucher die zulässige Gesamtleistungsaufnahme nicht überschreiten.
•Trennen Sie das Produkt vom Netz, wenn Sie es längere Zeit nicht benutzen.
•Schließen Sie das Netzteil an der Netzzuleitung (1) auf der Rückseite des Radios an.
•Verbinden Sie das Netzkabel mit einer ordnungsgemäß installierten und leicht zugänglichen Netzsteckdose.
•Warten Sie, bis die Initialisierung des Radios abgeschlossen ist.
•Drücken Sie die [POWER/VOLUME/ENTER/NAVIGATE] (11), um das Radio einzuschalten.
Hinweis – beim ersten Einschalten
•Beim ersten Start wird automatisch der Einrichtungsassistent (Setup Wizard) gestartet.
•Der Einrichtungsassistent wird in englischer Sprache ausgeführt.
•Sie können den Assistenten überspringen und später in deutscher Sprache erneut aufrufen.
5.3 Sprache
Bei Erstinbetriebnahme ist als Standardsprache des Radios Englisch eingestellt. Um die eingestellte Menüsprache des Radios zu ändern, gehen Sie wie folgt vor:
•Drücken Sie [ ] (7), um in das Einstellungsmenü zu gelangen.
•Navigieren Sie mit Hilfe von [POWER/VOLUME/ENTER/ NAVIGATE] (11) zum Menüpunkt „Settings“.
•Bestätigen Sie die Auswahl durch Drücken von [POWER/ VOLUME/ENTER/NAVIGATE] (11).
•Navigieren Sie mit Hilfe von [POWER/VOLUME/ ENTER/NAVIGATE] (11) zum Menüpunkt „Language“. Bestätigen Sie die Auswahl durch Drücken von [POWER/ VOLUME/ENTER/NAVIGATE] (11).
•Wählen Sie mit Hilfe von [POWER/VOLUME/ENTER/ NAVIGATE] (11) Ihre gewünschte Systemsprache aus.
•Die aktuell gewählte Spracheinstellung wird mit * gekennzeichnet.
Hinweis
•Folgende Sprachen stehen zur Auswahl:
Englisch, Dänisch, Französisch, Deutsch, Italienisch, Norwegisch, Finnisch, Schwedisch, Türkisch, Polnisch, Niederländisch, Portugiesisch, Spanisch
6.Wartung und Pflege
•Reinigen Sie dieses Produkt nur mit einem fusselfreien, leicht feuchten Tuch und verwenden Sie keine aggressiven Reiniger.
•Sollten Sie das Produkt längere Zeit nicht nutzen, schalten Sie das Gerät aus und trennen es von der Stromversorgung. Lagern Sie es an einem sauberen, trockenen Ort ohne direkte Sonneneinstrahlung.
7. Haftungsausschluss
Die Hama GmbH & Co KG übernimmt keinerlei Haftung oder Gewährleistung für Schäden, die aus unsachgemäßer Installation, Montage und unsachgemäßem Gebrauch des Produktes oder einer Nichtbeachtung der Bedienungsanleitung und/oder der Sicherheitshinweise resultieren.
8. Service und Support
Bitte wenden Sie sich bei Fragen zum Produkt gerne an die Hama-Produktberatung.
Hotline: +49 9091 502-115 (Deu/Eng)
Weitere Supportinformationen finden sie hier: www.hama.com
Die vollständige Langanleitung ist unter der folgenden Internetadresse verfügbar:
www.hama.com -> 00054238 -> Downloads
10

9. Entsorgungshinweise Hinweis zum Umweltschutz:
Ab dem Zeitpunkt der Umsetzung der europäischen Richtlinien 2012/19/EU und
2006/66/EG in nationales Recht gilt folgendes:
 Elektrische und elektronische Geräte sowie Batterien dürfen nicht mit dem Hausmüll entsorgt werden. Der Verbraucher ist gesetzlich verpflichtet, elektrische und elektronische Geräte sowie Batterien am Ende ihrer Lebensdauer an den dafür eingerichteten, öffentlichen Sammelstellen oder an die Verkaufsstelle zurückzugeben. Einzelheiten dazu regelt das jeweilige Landesrecht. Das Symbol auf dem Produkt, der Gebrauchsanleitung oder der Verpackung weist auf diese Bestimmungen hin. Mit der Wiederverwertung, der stofflichen Verwertung oder anderen Formen der Verwertung von Altgeräten/Batterien leisten Sie einen wichtigen Beitrag zum Schutz unserer Umwelt.
10. Konformitätserklärung
Hiermit erklärt die Hama GmbH & Co KG, dass der Funkanlagentyp [00054238] der Richtlinie 2014/53/EU entspricht. Der vollständige Text der
EU-Konformitätserklärung ist unter der folgenden Internetadresse verfügbar:
www.hama.com -> 00054238 -> Downloads
Frequenzband/ |
Abgestrahlte maximale |
Frequenzbänder |
Sendeleistung |
Bluetooth: 2.402 – 2.480 GHz |
6.5 dBm (EIRP) |
WiFi: 2.400 – 2.480 GHz |
15.5 dBm (EIRP) |
WiFi: 5.150 – 5.350 GHz |
16.5 dBm (EIRP) |
WiFi: 5.470 – 5.725 GHz |
16.5 dBm (EIRP) |
WiFi: 5.725 – 5.850 GHz |
11 dBm (EIRP) |
Beschränkungen oder Anforderungen in
Belgien, Bulgarien, Tschechische Republik, Dänemark, Deutschland, Estland, Irland, Griechenland, Spanien, Frankreich, Kroatien, Italien, Zypern, Lettland, Litauen, Luxemburg, Ungarn, Malta, Niederlande, Österreich, Polen, Portugal, Rumänien, Slowenien, Slowakei, Finnland, Schweden, Vereinigtes Königreich
Hinweis
Wenn Kanal 36-64 (Kanäle der Frequenz
5150 MHz - 5350 MHz) verwendet wird, darf das Gerät nur in geschlossenen Räumen verwendet werden.
Zur Begrenzung der Exposition gegen elektromagnetische Felder
Dieses Gerät ist vorgesehen für die Verwendung in einem Abstand von mindestens 20 cm zum Körper des Benutzers oder Personen in der Nähe. Dieses Gerät darf nicht am Körper getragen werden.
11
FGuide de démarrage rapide
Éléments de commande et d'affichage |
Télécommande |
|||
|
A: Radio Face avant |
1 |
Touche [POWER] |
|
1 |
Touche [POWER] |
2 |
Touche [MUTE] |
|
2 |
Prise AUX IN |
3 |
Touches Directes [PRESET] (1-4) |
|
3 |
[VOLUME] +/- |
4 |
Touche [EQUALIZER] |
|
4 |
Molette [PRESET] |
5 |
Touche [PRESET] |
|
5 |
Touche [MODE] |
6 |
Touche [MENU] |
|
6 |
Touche [ALARM] |
7 |
Touche [SOURCE] |
|
7 |
Touche [EQUALIZER] |
8 |
Touche [OK] |
|
8 |
Touche [MENU] |
|
Touche [NAVIGATIONS] |
|
9 |
Touche [INFO] |
9 |
▲ Haut ▼ Bas |
|
10 |
Touche [BACK] (retour) |
10 |
◄ Reculer ► Avancer |
|
11 |
Récepteur infrarouge |
Touche [VOL-] |
||
11 |
Touche [VOL+] |
|||
12 |
[Navigation] |
|||
12 |
Touche [HOME] |
|||
13 |
Prise casque |
|||
13 |
Touche [BACK] |
|||
14 |
Connexion USB |
|||
14 |
Touche [INFO] |
|||
15 |
Écran couleur 2.8" |
|||
15 |
Touche [BACKLIGHT] |
|||
16 |
LED |
|||
16 |
Touche [PAUSE] |
|||
|
|
|||
|
B: Face arrière |
17 |
Touche [PLAY] |
|
17 |
Alimentation |
18 |
Touche [PREVIOUS] |
|
18 |
Antenne* |
19 |
Touche [NEXT] |
|
19Antenne WiFi/Bluetooth
20Sortie optique
21Sortie coaxiale
22Sortie stéréo RCA L/R
23Prise LINE OUT
24Connexion LAN (10 / 100 Mbit)
Remarque
*"DIT2006BT" dispose d’une antenne remplaçable. Vous pouvez utiliser une antenne active ou passive dotée d’une connexion coaxiale.
**Le bouton rotatif dispose d’une double fonction. Tournez le bouton pour modifier le volume ou naviguer à travers la structure des menus. Tournez ce bouton rotatif pour mettre l’appareil en mode de veille ou confirmer un choix.
Remarque importante - Guide rapide
•ceci est un guide rapide qui vous fournit les informations de base les plus importantes relatives aux consignes de
!sécurité et à la mise en service de votre produit.
•Pour des raisons de protection de l’environnement et de préservation de précieuses matières premières, la société Hama renonce à l’impression d’un mode d’emploi complet et met celui-ci à disposition exclusivement sous forme de fichier PDF.
•Le mode d’emploi complet est disponible à l’adresse Internet suivante : www.hama.com -> 00054238 -> Téléchargements
•Sauvegardez ce mode d’emploi complet pour le consulter sur votre ordinateur et imprimez-le si nécessaire.
12

1.Explication des symboles d’avertissement et des remarques
Risque d’électrocution
Ce symbole indique un risque de contact avec des parties non isolées du produit susceptibles de conduire un courant électrique capable de provoquer une électrocution.
Avertissement
Ce symbole est utilisé pour indiquer des consignes de sécurité ou pour attirer votre attention sur des dangers et risques particuliers.
Remarque
Ce symbole est utilisé pour indiquer des informations supplémentaires ou des remarques importantes.
2. Contenu de l’emballage
•Digitaltuner DIT2006BT
•Câble RCA (pour sortie stéréo RCA L/R)
•Télécommande
•2 piles LR03/AAA
•Notice d’utilisation
3. Consignes de sécurité
•Ce produit est destiné à un usage privé et non commercial.
•N’utilisez pas le produit dans des zones où les produits électroniques ne sont pas autorisés.
•Protégez le produit de toute saleté, humidité, surchauffe et utilisez-le uniquement dans des locaux secs.
•Cet appareil, comme tout appareil électrique, doit être gardé hors de portée des enfants !
•Protégez le produit des secousses violentes et évitez tout choc ou toute chute.
•N’utilisez pas le produit en dehors des limites de puissance indiquées dans les caractéristiques techniques.
•Tenez les emballages d’appareils hors de portée des enfants, risque d’étouffement.
•Recyclez les matériaux d’emballage conformément aux prescriptions locales en vigueur.
•N’apportez aucune modification à l’appareil. Toute modification vous ferait perdre vos droits de garantie.
•L’emploi du produit est exclusivement réservé à sa fonction prévue.
•N’utilisez pas l’appareil à proximité immédiate d’un chauffage, d’autres sources de chaleur ou à la lumière directe du soleil.
•N’utilisez pas l’appareil dans un environnement humide et évitez les projections d’eau.
•Utilisez l’article dans des conditions climatiques modérées uniquement.
Risque d’électrocution
•Ne tentez pas d’ouvrir le produit en cas de détérioration et cessez de l’utiliser.
•N’utilisez pas l’appareil si
l’adaptateur secteur, le câble de l’adaptateur ou le cordon d’alimentation est endommagé.
•Ne tentez pas de réparer l’appareil vous-même ni d’effectuer des travaux d’entretien. Déléguez les travaux d’entretien à des techniciens qualifiés.
Avertissement – Piles
•Respectez impérativement la polarité des piles (indications + et -) lors de leur insertion dans le boîtier. Risques d’écoulement et d’explosion des piles si tel n’est pas le cas.
•Utilisez exclusivement des batteries (ou des piles) du type indiqué.
•Avant d’insérer les piles, nettoyez-en les contacts, ainsi que les contacts d’accouplement.
•N’autorisez pas des enfants à remplacer les piles d’un appareil sans surveillance.
•N’utilisez pas simultanément des piles usagées et des piles neuves ou des piles de différents types.
•Retirez les piles des produits que vous ne comptez pas utiliser pendant un certain temps (à l’exception de ceux qui peuvent être utilisés en cas d’urgence).
•Ne court-circuitez pas les piles.
•Ne tentez pas de recharger les piles.
•Ne jetez pas de piles au feu.
•Conservez les piles hors de portée des enfants.
•Ne tentez pas d’ouvrir les piles, faites attention à ne pas les endommager, les jeter dans l’environnement et à ce que des jeunes enfants ne les avalent pas. Les piles sont susceptibles de contenir des métaux lourds toxiques et nocifs pour l’environnement.
•Retirez les piles usagées immédiatement du produit et mettez-les au rebut immédiatement.
•Évitez de stocker, charger et utiliser le produit à des températures extrêmes et à une pression
atmosphérique extrêmement basse (à haute altitude, par exemple).
13

4. Avant la mise en service
Remarque
Vous trouverez une description détaillée de notre application UNDOK et de toutes les fonctionnalités dans notre
guide UNDOK à l’adresse :
www.hama.com -> 00054238 -> Téléchargements
Consignes d’utilisation
•Les touches [OK] et ►de la télécommande correspondent à la touche [POWER/VOLUME/ ENTER/NAVIGATE] (11) sur la face avant de la radio.
•La touche ◄de la télécommande correspond à la touche [ ] sur la face avant de la radio
•Les touches ▲▼de la télécommande correspondent à une rotation vers la gauche et vers la droite du bouton de navigation de la face avant de la radio.
Mise en service de la télécommande
Ouvrez le couvercle du compartiment des piles. Celui-ci se trouve à l’arrière de la télécommande et peut être ouvert en le faisant glisser dans le sens indiqué.
La livraison comprend deux piles AAA que vous devez insérer dans le compartiment des piles pour la mise en service. Lors de l’insertion des piles, veillez à ce qu’elles soient insérées avec la polarité correcte. La polarité préréglée (+ / -) est indiquée dans le compartiment des piles.
Établissement des la connexion réseau 4.1 Réseau local (LAN)
•Branchez la radio à une connexion réseau local (LAN) de votre routeur. Vous aurez besoin d‘un câble Ethernet pour effectuer cette connexion ; ce câble n‘est pas livré avec le produit.
•Veuillez contrôler que le routeur est bien sous tension, qu‘il fonctionne normalement et que la connexion internet est bien établie.
•Veuillez consulter le mode d‘emploi de votre routeur pour toute question concernant la connexion LAN (réseau local).
•Continuez à l‘étape 5 « Mise en service ».
4.2 WiFi (réseau sans fil)
•Veuillez contrôler que le routeur est bien sous tension, qu'il fonctionne normalement et que la connexion internet est bien établie.
•Activez la fonction WiFi de votre routeur.
•Veuillez consulter le mode d'emploi de votre routeur pour toute question concernant la connexion WiFi (réseau sans fil).
•Continuez à l'étape 5 « Mise en service ».
5. Mise en service
Remarque – Réception optimale
"DIT2006BT" dispose d’un connecteur d’antenne pour des antennes externes avec connecteur coaxial. Une antenne télescopique adaptée est livrée avec le produit ; cette antenne permet une réception DAB, DAB+ et FM. Sinon, vous pouvez utiliser une antenne active ou passive afin d’améliorer la réception ou de l’ajuster en fonction de vos besoins.
Veillez à
•déployer l’antenne entièrement.
•Nous vous recommandons de placer l’antenne à la verticale afin de garantir une réception optimale.
5.1 Remarques générales concernant la commande 5.1.1 Mise sous/hors tension/Veille
•Appuyez sur [POWER/VOLUME/ENTER/NAVIGATE] (11) pour allumer la radio.
•Maintenez appuyé [POWER/VOLUME/ENTER/ NAVIGATE] (11) pendant environ 3 secondes pour éteindre la radio (Veille).
•Coupez l’alimentation de l’appareil pour l’éteindre complètement.
5.1.2 Navigation et commande
•Après avoir appuyé sur une touche rapide, naviguez dans les entrées de menu proposées avec le bouton.
•En tournant [POWER/VOLUME/ENTER/NAVIGATE] (11), vous sélectionnerez les entrées du menu.
•En appuyant sur [POWER/VOLUME/ENTER/NAVIGATE] (11), vous confirmerez votre sélection.
5.1.3 Réglage du volume
•Tourner le bouton [POWER/VOLUME/ENTER/ NAVIGATE] (11) pour augmenter (droite) ou réduire (gauche) le volume.
14
5.2 Mise sous tension Avertissement
•Branchez l’appareil uniquement à une prise de courant appropriée. La prise de courant doit être située à proximité de l’appareil et doit être facilement accessible.
•Coupez l’appareil du secteur à l’aide de l’interrupteur - débranchez la prise de courant en cas d’absence d’interrupteur.
•En cas de prises multiples, veillez à ce que les appareils consommateurs branchés ne dépassent pas la puissance absorbée totale admissible.
•Débranchez l’appareil si vous ne l’utilisez pas sur une période prolongée.
•Branchez l’adaptateur secteur au cordon d’alimentation
(1) à l’arrière de la radio.
•Branchez le cordon d’alimentation à une prise de courant conformément installée et facile d’accès.
•Attendez que l’initialisation de la radio soit terminée.
•Appuyez sur [POWER/VOLUME/ENTER/NAVIGATE] (11), pour allumer la radio.
Remarque – à la première mise en service
•Un assistant de configuration (Setup Wizard) démarre automatiquement lors du premier démarrage.
•L’assistant de configuration est en anglais.
•Vous pouvez ignorer l’assistant, puis le lancer ultérieurement dans la langue française.
5.3 Langue
L’anglais est la langue par défaut de la radio lors de sa première mise en service. Pour modifier la langue du menu de la radio procédez comme suit :
•Appuyez sur [ ] (7) pour allumer vous rendre au menu Paramètres.
•À l’aide de [POWER/VOLUME/ENTER/NAVIGATE] (11), naviguez vers l’entrée de menu "Settings".
•Confirmez la sélection appuyant sur [POWER/VOLUME/ ENTER/NAVIGATE] (11).
•Naviguez à l’aide de [POWER/VOLUME/ENTER/ NAVIGATE] (11) vers le point de menu "Language". Confirmez la sélection appuyant sur [POWER/VOLUME/ ENTER/NAVIGATE] (11).
•Sélectionnez votre langue préférée à l’aide de [POWER/ VOLUME/ENTER/NAVIGATE] (11).
•Le réglage de langue actuellement sélectionné est indiqué par *.
Remarque
•Vous pouvez choisir entre les langues suivantes : anglais, danois, français, allemand, italien, norvégien, finnois, suédois, turc, polonais, dutch, portoguese, spanish
Pour limiter l’exposition aux champs électromagnétiques
Cet appareil est prévu pour être utilisé à une distance d’au moins 20 cm du corps de l’utilisateur ou des personnes se trouvant à proximité. Cet appareil ne doit pas être porté près du corps.
6. Maintenance et entretien
•Nettoyez ce produit uniquement à l’aide d’un chiffon non fibreux légèrement humide ; évitez tout détergent agressif.
•Si vous deviez ne pas utiliser le produit pendant une période prolongée, éteignez l’appareil et débranchez-le de l’alimentation électrique. Stockez-le à un endroit propre et sec et évitez toute exposition directe au soleil.
7. Exclusion de garantie
La société Hama GmbH & Co KG décline toute responsabilité en cas de dommages causés par une installation, un montage ou une utilisation non conforme du produit ou encore par un non-respect du mode d’emploi et/ou des consignes de sécurité.
8. Service clientèle et assistance
En cas de question concernant le produit, veuillez vous adresser au service de conseil produits de Hama. Ligne téléphonique directe : +49 9091 502-115 (allemand/anglais)
Vous trouverez des informations d’assistance complémentaires ici :
www.hama.com
Le mode d’emploi complet est disponible à l’adresse Internet suivante :
www.hama.com -> 00054238 -> Téléchargements
15
9. Consignes de recyclage
Remarques concernant la protection de l’environnement :
Conformément aux directives européennes 2012/19/UE et 2006/66/CE, les règles suivantes
doivent être appliquées dans le droit national : les
 appareils électriques et électroniques ainsi que les piles ne doivent pas être éliminés avec les déchets ménagers. Le consommateur est tenu par la loi de retourner les produits électriques et électroniques ainsi que les piles usagés aux points de collecte publics prévus à cet effet ou il peut les rapporter dans un point de vente. Les détails à ce sujet sont régis par la législation de chaque pays. Le pictogramme "picto" présent sur le produit, son manuel d’utilisation ou son emballage indique que le produit est soumis à cette réglementation. En permettant le recyclage des matériaux et des piles ou toute autre forme de valorisation d’anciens appareils, le consommateur apporte une contribution importante à la protection de notre environnement.
10. Déclaration de conformité
La Hama GmbH & Co KG, déclare par la présente que l’équipement radioélectrique du type [00054238] est conforme à la directive 2014/53/
UE. Le texte complet de la déclaration UE de conformité est disponible à l’adresse internet suivante : www.hama.com -> 00054238 -> Téléchargements
Bandes de fréquences |
Puissance de |
|
radiofréquence maximale |
||
|
||
Bluetooth: 2.402 – 2.480 GHz |
6.5 dBm (EIRP) |
|
WiFi: 2.400 – 2.480 GHz |
15.5 dBm (EIRP) |
|
WiFi: 5.150 – 5.350 GHz |
16.5 dBm (EIRP) |
|
WiFi: 5.470 – 5.725 GHz |
16.5 dBm (EIRP) |
|
WiFi: 5.725 – 5.850 GHz |
11 dBm (EIRP) |
Restrictions ou exigences en
Belgique, Bulgarie, République tchèque, Danemark, Allemagne, Estonie, Irlande, Grèce, Espagne, France, Croatie, Italie, Chypre, Lettonie, Lituanie, Luxembourg, Hongrie, Malte, Pays-Bas, Autriche, Pologne, Portugal, Roumanie, Slovénie, Slovaquie, Finlande, Suède, Royaume-Uni
Remarque
Si les canaux 36 - 64 (fréquence
5 150 MHz – 5 350 MHz) sont employés, ce produit ne doit être utilisé que dans des espaces fermés.
Pour limiter l’exposition aux champs électromagnétiques
Cet appareil est prévu pour être utilisé à une distance d’au moins 20 cm du corps de l’utilisateur ou des personnes se trouvant à proximité. Cet appareil ne doit pas être porté près du corps.
16

EGuía de inicio rápido
Elementos de manejo e indicadores |
Mando a distancia |
|||
|
A: Radio Lado frontal |
1 |
Tecla [POWER] |
|
1 |
Tecla [POWER] |
2 |
Tecla [MUTE] |
|
2 |
Conector hembra AUX-In |
3 |
Teclas Directas [PRESET] (1-4) |
|
3 |
[VOLUME] +/- |
4 |
Tecla [EQUALIZER] |
|
4 |
Rueda [PRESET] |
5 |
Tecla [PRESET] |
|
5 |
Tecla [MODE] |
6 |
Tecla [MENU] |
|
6 |
Tecla [ALARM] |
7 |
Tecla [SOURCE] |
|
7 |
Tecla [EQUALIZER] |
8 |
Tecla [OK] |
|
8 |
Tecla [MENU] |
|
Teclas [NAVIGATIONS] |
|
9 |
Tecla [INFO] |
9 |
▲ ARRIBA ▼ ABAJO |
|
10 |
Tecla [BACK] (volver) |
10 |
◄ RETROCESO ► AVANCE |
|
11 |
Receptor de infrarrojos |
Tecla [VOL-] |
||
11 |
Tecla [VOL+] |
|||
12 |
[Navigation] |
|||
12 |
Tecla [HOME] |
|||
13 |
Entrada para auriculares |
|||
13 |
Tecla [BACK] |
|||
14 |
Puerto USB |
|||
14 |
Tecla [INFO] |
|||
15 |
Pantalla a color de 2.8" |
|||
15 |
Tecla [BACKLIGHT] |
|||
16 |
LED |
|||
16 |
Tecla [PAUSE] |
|||
|
|
|||
|
B: Radio Parte posterior |
17 |
Tecla [PLAY] |
|
17 |
Cable de corriente |
18 |
Tecla [PREVIOUS] |
|
18 |
Antena* |
19 |
Tecla [NEXT] |
|
19Antena WiFi/Bluetooth
20Salida óptica
21Salida coaxial
22Salida L/R RCA estéreo
23Conector hembra Line-Out
24Puerto LAN (10 / 100 Mbit)
Nota
*"DIT2006BT" tiene una antena intercambiable. Puede utilizar una antena activa o pasiva que disponga de una conexión coaxial.
**El regulador giratorio tiene una función doble. Girando el regulador podrá modificar el volumen o desplazarse por la estructura del menú. Pulsando el regulador giratorio, el dispositivo pasa al modo standby o se confirma una selección.
Nota importante sobre la guía de inicio rápido
!• Este documento es una guía de inicio rápido que recoge la información básica más importante, como indicaciones de seguridad o cómo poner en funcionamiento el producto.
•Por motivos de protección medioambiental y con el fin de ahorrar materias primas valiosas, la empresa Hama prescinde de un manual de instrucciones impreso, ofreciéndolo exclusivamente en formato PDF descargable.
•El manual de instrucciones íntegro está disponible en la siguiente dirección de Internet: www.hama.com -> 00054238 -> Downloads
•Guarde el manual de instrucciones en su ordenador para consultarlo cuando sea necesario e imprímalo si es posible.
17
1.Explicación de los símbolos de aviso y de las indicaciones
Peligro de sufrir una descarga eléctrica
Este símbolo hace referencia al peligro de contacto con partes no aisladas del producto que pueden conducir una tensión peligrosa de una intensidad tal que puede provocar una descarga eléctrica.
Aviso
Se utiliza para indicar indicaciones de seguridad o para llamar la atención sobre peligros y riesgos especiales.
Nota
Se utiliza para indicar información adicional o indicaciones importantes.
2. Contenido del paquete
•Digital-HiFi-Tuner DIT2006BT
•Cable RCA (para salida L/R RCA estéreo)
•Mando a distancia
•2 pilas AAA
•Guía de inicio rápido
3. Indicaciones de seguridad
•Este producto está previsto para usarlo en el ámbito privado y no comercial del hogar.
•No utilice el producto en áreas donde no se permitan aparatos electrónicos.
•Proteja el producto de la suciedad, la humedad y el sobrecalentamiento y utilícelo solo en espacios secos.
•Este producto, como todos los productos eléctricos, no debe estar en manos de los niños.
•No deje caer el producto ni lo someta a sacudidas fuertes.
•No utilice el producto fuera de los límites de potencia indicados en los datos técnicos.
•Mantenga el material de embalaje fuera del alcance de los niños, ya que existe peligro de asf xia.
•Deseche el material de embalaje de conformidad con las normativas locales vigentes en materia de eliminación de desechos.
•No realice cambios en el aparato; ello conllevaría la pérdida de todos los derechos de garantía.
•Utilice el producto exclusivamente para el f ni previsto.
•No utilice el producto junto a sistemas de calefacción, otras fuentes de calor ni expuesto a la luz solar directa.
•No utilice el producto en entornos húmedos y evite el contacto con las salpicaduras de agua.
•Use el artículo únicamente cuando las condiciones climáticas sean moderadas.
Peligro de sufrir una descarga eléctrica
•No abra el producto ni siga utilizándolo en caso de presentar daños.
•No use el producto si el
adaptador de CA, el cable del adaptador o el cable de alimentación están dañados.
•No intente mantener ni reparar el producto por cuenta propia. Encomiende cualquier trabajo de mantenimiento al personal especializado competente en la materia.
Aviso sobre las pilas
•Asegúrese siempre de que la polaridad de las pilas sea correcta (inscripciones + y −) y colóquelas según
corresponda. La no observación de lo anterior conlleva el riesgo de derrame o explosión de las pilas.
•Utilice exclusivamente baterías (o pilas) del tipo especificado.
•Antes de colocar las pilas, limpie los contactos y los contracontactos de las mismas.
•No permita a los niños cambiar las pilas sin la supervisión de una persona adulta.
•No mezcle pilas viejas y nuevas ni tampoco pilas de tipos o fabricantes diferentes.
•Retire las pilas de aquellos productos que no vayan a usarse durante un tiempo prolongado (a no ser que estos deban permanecer operativos para casos de emergencia).
•No cortocircuite las pilas.
•No cargue las pilas.
•No arroje las pilas al fuego.
•Mantenga las pilas fuera del alcance de los niños.
•Nunca abra, dañe ni ingiera pilas ni tampoco las deseche en el medioambiente. Pueden contener metales pesados tóxicos y dañinos para el medioambiente.
•Retire y deseche de inmediato las pilas gastadas del producto.
•Evite almacenar, cargar y utilizar el despertador a temperaturas extremas y con presiones de aire
exageradamente bajas (p. ej. bajas temperaturas).
18

4. Antes de la puesta en funcionamiento
Nota
Encontrará una descripción detallada de la aplicación UNDOK y de todas las funcionalidades en nuestra
guía de UNDOK, a la que podrá acceder en la página web indicada abajo:
www.hama.com -> 00054238 -> Downloads
Instrucciones de manejo
•Tanto el botón [OK] como el botón ►del mando a distancia se corresponden con el botón [POWER/
VOLUME/ENTER/NAVIGATE] (11) de la parte frontal de la radio.
•El botón ◄del mando a distancia se corresponde con el botón [ ] de la parte frontal de la radio.
•Los botones ▲▼del mando a distancia se corresponden con un giro hacia la izquierda y la derecha del regulador de navegación, ubicado en la parte frontal de la radio.
Puesta en funcionamiento del mando a distancia
Abra la cubierta del compartimento de las pilas. La cubierta está ubicada en la parte trasera del mando a distancia y puede abrirse deslizándola en la dirección indicada.
En el volumen de suministro se incluyen dos pilas AAA, que deberá colocar en el compartimento de las pilas para poner el mando en funcionamiento. Al colocarlas, asegúrese de que la polaridad sea correcta (la polaridad [+/-] está indicada en el interior del compartimento de las pilas).
Configurar la conexión de red 4.1 LAN (red alámbrica)
•Conecte el puerto LAN de su router con el de su radio. Para ello necesitará un cable Ethernet, que no se incluye en el volumen de suministro.
•Asegúrese de que el router está encendido, que funciona correctamente y de que hay establecida una conexión a Internet.
•En lo referente al correcto funcionamiento de la conexión LAN, observe las instrucciones de manejo de su router.
•Continúe entonces directamente según se indica en el punto 5.«Puesta en funcionamiento».
4.2 WLAN (red inalámbrica)
•Asegúrese de que el router está encendido, que funciona correctamente y de que hay establecida una conexión a Internet.
•Active la función NFC de su router.
•En lo referente al correcto funcionamiento de la conexión WLAN, observe las instrucciones de manejo de su router.
•Continúe entonces directamente según se indica en el punto 5.«Puesta en funcionamiento».
5. Puesta en funcionamiento
Nota sobre una recepción óptima
"DIT2006BT" incorpora una conexión de antena para antenas externas con conexión coaxial. El volumen de suministro incluye una antena telescópica adecuada para recibir radio DAB, DAB+ y FM. También puede usar una antena activa o pasiva para mejorar la capacidad de recepción o adaptarse a sus necesidades específicas.
Tenga en cuenta lo siguiente:
•Siempre extraiga la antena por completo.
•Para que la recepción sea óptima, le recomendamos orientar la antena verticalmente.
5.1 Notas generales sobre el manejo 5.1.1. Encendido, apagado y standby
•Pulse [POWER/VOLUME/ENTER/NAVIGATE] (11) para encender la radio.
•Pulse y mantenga presionado [POWER/VOLUME/ ENTER/NAVIGATE] (11) durante unos tres segundos para apagar la radio (modo standby).
•Desconecte el aparato de la alimentación de corriente para apagarlo totalmente.
5.1.2 Navegación y control
•Tras pulsar un botón de marcación abreviada, navegue por las opciones de menú que se ofrecen.
•Girando [POWER/VOLUME/ENTER/NAVIGATE] (11) podrá seleccionar elementos de menú concretos.
•Pulsando [POWER/VOLUME/ENTER/NAVIGATE] (11) podrá confirmar la selección.
5.1.3 Ajuste del volumen
•Girando [POWER/VOLUME/ENTER/NAVIGATE] (11) se sube el volumen (derecha) o se baja (izquierda).
19
5.2 Encendido
Aviso
•Utilice el producto solo conectado a una toma de corriente autorizada. La toma de corriente debe estar colocada cerca del producto; asimismo, debe ser fácilmente accesible.
•Desconecte el producto de la red eléctrica mediante el interruptor de encendido y apagado (de no existir este, desenchufe el cable de alimentación de la toma de corriente).
•Si dispone de tomas de corriente múltiples, asegúrese de que los aparatos eléctricos conectados no sobrepasen el consumo total de potencia admisible.
•Desconecte el producto de la red si no va a utilizarlo durante un tiempo prolongado.
•Conecte la fuente de alimentación al cable de alimentación (1) situado en el lado posterior de la radio.
•Conecte el cable de corriente con una toma de corriente correctamente instalada y fácilmente accesible.
•Espere hasta que finalice la inicialización de la radio.
•Pulse [POWER/VOLUME/ENTER/NAVIGATE](11) para encender la radio.
Nota: al encender el aparato por primera vez
•Cuando se enciende por primera vez, se inicia automáticamente el asistente de configuración (Setup Wizard).
•El asistente de configuración se ejecuta en el idioma inglés.
•Puede saltarse el asistente y abrirlo posteriormente en español.
5.3 Idioma
Al poner en funcionamiento la radio por primera vez, el idioma predeterminado es el inglés. Para modificar el idioma de menú establecido, proceda como se describe a continuación:
•Pulse [ ] (7) para acceder al menú de ajustes.
•Use [POWER/VOLUME/ENTER/NAVIGATE] (11) para desplazarse hasta el elemento de menú «Settings».
•Confirme la selección pulsando [[POWER/VOLUME/ ENTER/NAVIGATE] (11).
•Use [POWER/VOLUME/ENTER/NAVIGATE] (11) para desplazarse hasta el elemento de menú «Language». Confirme la selección pulsando [[POWER/VOLUME/ ENTER/NAVIGATE] (11).
•Use [POWER/VOLUME/ENTER/NAVIGATE] (11) para seleccionar el idioma que quiera establecer en el sistema.
•El ajuste de idioma seleccionado actualmente se indicará con un asterisco (*).
Nota
•Pueden seleccionarse los siguientes idiomas:
inglés, danés, francés, alemán, italiano, noruego, finés, sueco, turco, polaco, holandés, portugués, español
6.Mantenimiento y cuidado
•Limpie este producto solo con un paño ligeramente humedecido que no deje pelusas y no utilice detergentes agresivos.
•Si no va a utilizar el producto durante un periodo prolongado de tiempo, apague el aparato y desconéctelo de la alimentación de corriente. Guárdelo en un lugar limpio y seco que no esté expuesto a la radiación directa del sol.
7. Exclusión de responsabilidad
La empresa Hama GmbH & Co KG no se responsabiliza ni concede garantía alguna por los daños que se deriven de una instalación, montaje o manejo incorrectos del producto o por la inobservancia de las instrucciones de uso o de las indicaciones de seguridad.
8. Servicio y asistencia
Si tiene alguna pregunta sobre el producto, puede ponerse en contacto con el departamento de asesoramiento de productos de la empresa Hama.
Línea directa: +49 9091 502-115 (alemán e inglés)
Encontrará más información sobre el servicio de asistencia en el siguiente sitio web:
www.hama.com
El manual de instrucciones íntegro está disponible en la siguiente dirección de Internet:
www.hama.com -> 00054238 -> Downloads
20

9. Instrucciones para desecho y reciclaje Nota sobre la protección medioambiental:
Desde la implementación de la Directiva europea 2012/19/UE y 2006/66/CE en el sistema legislativo
nacional, se aplica lo siguiente: Los aparatos
 eléctricos y electrónicos, así como las pilas y los acumuladores, no se deben eliminar junto con la basura doméstica. El usuario está legalmente obligado a llevar los aparatos eléctricos y electrónicos, así como las pilas y los acumuladores a los puntos de recogida públicos o a devolverlos al punto de venta donde los adquirió al final de su vida útil. Las particularidades al respecto están estipuladas en las distintas legislaciones nacionales. El símbolo ubicado sobre el producto, en las instrucciones de uso o en el embalaje hace referencia a las disposiciones legales mencionadas. Gracias al reciclaje, la recuperación de materiales u otras formas de recuperación de residuos de aparatos eléctricos y electrónicos y pilas y acumuladores usados, usted contribuye de manera importante a la protección de nuestro medio ambiente.
10. Declaración de conformidad
Por la presente, la empresa Hama GmbH & Co KG declara que el tipo de equipo radioeléctrico [00054238] es conforme con la Directiva 2014/53/
UE. El texto completo de la declaración UE de conformidad está disponible en la siguiente dirección de Internet: www.hama.com -> 00054238 -> Downloads
Banda o bandas de |
Potencia máxima de |
frecuencia |
radiofrecuencia |
WiFi: 2.400 – 2.480 GHz |
15.5 dBm (EIRP) |
WiFi: 5.150 – 5.350 GHz |
16.5 dBm (EIRP) |
WiFi: 5.470 – 5.725 GHz |
16.5 dBm (EIRP) |
WiFi: 5.725 – 5.850 GHz |
11 dBm (EIRP) |
Restricciones o Requisitos en
Bélgica, Bulgaria, República Checa, Dinamarca, Alemania, Estonia, Irlanda, Grecia, España, Francia, Croacia, Italia, Chipre, Letonia, Lituania, Luxemburgo, Hungría, Malta, Países Bajos, Austria, Polonia, Portugal, Rumanía, Eslovenia, Eslovaquia, Finlandia, Suecia, Reino Unido
Nota
Si se usa cualquier canal entre el 36 y el 64 (canales de frecuencia de
5150 MHz-5350 MHz), solo se permite usar el dispositivo en espacios cerrados.
Para limitar la exposición a los campos electromagnéticos
Este aparato está destinado a ser utilizado a una distancia mínima de 20 cm del cuerpo del usuario o de las personas que se encuentren en las proximidades. Este aparato no debe llevarse en el cuerpo.
21

RКраткое руководство по запуску
Органы управления и индикации |
Пульт дистанционного управления |
|||
|
A: Радиоприемник Передняя панель |
1 |
Кнопка [ПИТАНИЕ] |
|
1 |
Кнопка [POWER] |
2 |
Кнопка [ВЫКЛЮЧИТЬ МИКРОФОН] |
|
2 |
Разъем AUX-In |
3 |
Кнопки [ПРЕСЕТ] (1-4) |
|
3 |
[VOLUME] +/- |
4 |
Кнопка [ЭКВАЛАЙЗЕР] |
|
4 |
Переключатель [PRESET] |
5 |
Кнопка [ПРЕСЕТ] |
|
5 |
Кнопка [MODE] |
6 |
Кнопка [МЕНЮ] |
|
6 |
Кнопка [ALARM] |
7 |
Кнопка [ИСТОЧНИК] |
|
7 |
Кнопка [EQUALIZER] |
8 |
Кнопка [OK] |
|
8 |
Кнопка [MENU] |
|
Кнопки [НАВИГАЦИЯ] |
|
9 |
Кнопка [INFO] |
9 |
▲ Вверх ▼ Вниз |
|
10 |
Кнопка [BACK] (Назад) |
10 |
◄ Назад ► Вперед |
|
11 |
ИК-приемник |
Кнопка [ГРОМКОСТЬ-] |
||
11 |
Кнопка [ГРОМКОСТЬ+] |
|||
12 |
[Navigation] |
|||
12 |
Кнопка [ГЛАВНАЯ] |
|||
13 |
Разъем для наушников |
|||
13 |
Кнопка [НАЗАД] |
|||
14 |
Разъем USB |
|||
14 |
Кнопка [ИНФО] |
|||
15 |
Цветной дисплей 2.8" |
|||
15 |
Кнопка [ПОДСВЕТКА] |
|||
16 |
LED |
|||
16 |
Кнопка [ПАУЗА] |
|||
|
|
|||
|
Задняя панель |
17 |
Кнопка [ВОСПРОИЗВЕДЕНИЕ] |
|
17 |
Провод питания |
18 |
Кнопка [ПРЕДЫДУЩИЙ] |
|
18 |
Антенна* |
19 |
Кнопка [СЛЕДУЮЩИЙ] |
|
19антенна WiFi/Bluetooth
20Оптический выход
21Коаксиальный выход
22Стерео, разъем «тюльпан», выход Л/П
23Разъем Line-Out
24Разъем LAN (10 / 100 Mbit)
Примечание
*"DIT2006BT" оснащено сменной антенной. Можно использовать активную или пассивную антенну с коаксиальным разъемом.
**Поворотный регулятор выполняет двойную функцию. Поворачивая его, можно изменять громкость или осуществлять навигацию по меню. Нажатием на него устройство можно переводить в режим ожидания или подтверждать тот или иной выбор.
Важное указание. Краткое руководство
•Это краткое руководство содержит основную информацию: указания по технике безопасности и вводу
!изделия в эксплуатацию.
•С целью охраны окружающей среды и экономии ценного сырья Hama отказывается от подробного руководства по эксплуатации в печатном виде и предлагает его исключительно для загрузки в формате PDF.
•С полным текстом подробного руководства по эксплуатации можно ознакомиться здесь: www.hama.com -> 00054238 -> Скачать
•Сохраните данное руководство по эксплуатации для просмотра на вашем компьютере и по возможности распечатайте его.
22

1.Пояснения к предупреждающим знакам и указаниям
Опасность поражения электрическим током
Данный символ указывает на опасность соприкосновения с неизолированными частями изделия под напряжением, которое может привести к поражению электрическим током.
Предупреждение
Используется для обозначения указаний по технике безопасности или для акцентирования внимания на особых опасностях и рисках.
Примечание
Используется для дополнительного обозначения информации или важных указаний.
2. Комплект поставки
•Digital-HiFi-Tuner DIT2006BT
•Кабель с разъемом «тюльпан», (для стереовыхода Л/П)
•Пульт дистанционного управления
•2 батареи ААА
•Краткое руководство пользователя
3. Указания по технике безопасности
•Изделие предназначено для домашнего, непромышленного применения.
•Не применяйте в запретных зонах.
•Защищайте изделие от загрязнения, влаги и перегрева, используйте его только в сухих помещениях.
•Данное изделие, как и все электрические приборы, следует беречь от детей!
•Избегайте падения изделия и не подвергайте его сильным вибрациям.
•Не используйте изделие при превышении значения предела мощности, указанного в технических характеристиках.
•Не допускайте детей к упаковочному материалу, существует угроза удушения.
•Сразу утилизируйте упаковочный материал согласно действующим местным предписаниям по утилизации.
•Не вносите в прибор конструктивные изменения. В результате этого любые гарантийные обязательства теряют свою силу.
•Используйте изделие исключительно в предусмотренных целях.
•Не используйте изделие в непосредственной близости от систем отопления, других источников тепла или под прямыми солнечными лучами.
•Не используйте изделие во влажной среде, избегайте брызг.
•Используйте изделие только при приемлемых климатических условиях.
Опасность поражения электрическим током
•Не открывайте изделие и не используйте его при наличии повреждений.
•Не используйте изделие при повреждении адаптера переменного тока, кабеля адаптера или сетевого кабеля.
•Не пытайтесь самостоятельно выполнять техническое обслуживание или ремонт изделия. Любые работы по техническому обслуживанию должны выполнять лица с соответствующей подготовкой и разрешением на данный вид деятельности.
Предупреждение. Батареи
•Соблюдайте полярность батарей (+ и –). Несоблюдение полярности может стать причиной взрыва батарей.
•Разрешается применять аккумуляторы (или батареи) только указанного типа.
•Перед загрузкой батарей почистите контакты.
•Детям запрещается заменять батареи без присмотра взрослых.
•Не используйте различные типы или новые и старые батареи вместе.
•В случае большого перерыва в эксплуатации удалите батареи из устройства (кроме случаев, когда изделие применяется в качестве аварийного).
•Не закорачивайте контакты батарей.
•Не заряжайте обычные батареи.
•Не бросайте батареи в огонь.
•Храните батареи в безопасном месте и не давайте их детям.
•Не открывайте, не разбирайте, не глотайте и не утилизируйте батареи с бытовым мусором. В батареях могут содержаться вредные тяжелые металлы.
•Использованные батареи немедленно вынимайте из прибора и утилизируйте.
•Избегайте хранения, зарядки и использования при экстремальных температурах и экстремально низком атмосферном давлении (например, на большой высоте).
23

4. Перед вводом в эксплуатацию
Указание
Подробное описание приложения UNDOK и всех функций можно найти в UNDOK guide по ссылке:
www.hama.com -> 00054238 -> Скачать
Указания по эксплуатации
•Кнопки [OK] и ►на пульте дистанционного управления соответствуют кнопке [POWER/ VOLUME/ENTER/NAVIGATE] (11) на фронтальной стороне радио.
•Кнопка ◄на пульте дистанционного управления соответствует кнопке [ ] на фронтальной стороне радио.
•Кнопкам ▲▼на пульте дистанционного управления соответствуют повороты влево и вправо переключателя настроек навигации, расположенного на фронтальной стороне радио.
Ввод в эксплуатацию пульта дистанционного управления
Откройте крышку отсека для батареек. Она находится на обратной стороне пульта дистанционного управления. Ее можно открыть, сдвинув в указанном направлении.
В комплект поставки входят две батарейки ААА, которые необходимо вставить в отсек для батареек для ввода пульта в эксплуатацию. При вставке следите за правильной полярностью батареек. Нужная полярность (+/−) отмечена в отсеке для батареек.
Создание сетевого соединения 4.1 LAN (проводная сеть)
•Соедините кабелем разъем LAN маршрутизатора с аналогичным разъемом радиоприемника. Для этого необходимо использовать кабель Ethernet, который не входит в комплект поставки.
•Убедитесь, что маршрутизатор включен, правильно работает и есть подключение к интернету.
•Для обеспечения правильной работы соединения LAN соблюдайте руководство по эксплуатации маршрутизатора.
•Затем непосредственно переходите к выполнению действий, описанных в разделе 5. «Ввод в эксплуатацию».
4.2 WLAN (беспроводная сеть)
•Убедитесь, что маршрутизатор включен, правильно работает и есть подключение к интернету.
•Активируйте функцию WLAN маршрутизатора.
•Для обеспечения правильной работы соединения WLAN соблюдайте руководство по эксплуатации маршрутизатора.
•Затем переходите к выполнению действий, описанных в разделе 5. «Ввод в эксплуатацию».
5. Ввод в эксплуатацию
Указание — оптимальный прием сигналов
"DIT2006BT" имеет гнездо для подключения внешней антенны с коаксиальным разъемом. В комплект поставки уже включена соответствующая телескопическая антенна, позволяющая осуществлять прием радиосигналов через DAB, DAB+ и FM. В качестве альтернативы можно использовать активную или пассивную антенну для большей мощности приема или соответствия Вашим требованиям.
Внимание:
•Раскладывайте мачту антенны полностью.
•Для оптимального сигнала приема рекомендуется установить антенну вертикально.
5.1 Общие указания по использованию 5.1.1 Включение/выключение/режим ожидания
•Нажмите кнопку [POWER/VOLUME/ENTER/ NAVIGATE] (11), чтобы включить радио.
•Нажмите и удерживайте кнопку [POWER/VOLUME/ ENTER/NAVIGATE] (11) ок. 3 секунд, чтобы выключить радио (режим ожидания).
•Для полного выключения отключите прибор от электропитания.
5.1.2 Навигация и управление
•Для выбора необходимого пункта меню нажимайте кнопку быстрого выбора.
•Путем вращения кнопки [POWER/VOLUME/ENTER/ NAVIGATE] (11) выполняется выбор отдельных пунктов меню.
•Подтвердите выбор нажатием кнопки [POWER/ VOLUME/ENTER/NAVIGATE] (11).
5.1.3 Регулировка громкости
•Вращением кнопки [POWER/VOLUME/ENTER/ NAVIGATE] (11) можно повышать (вправо) или понижать (влево) громкость.
24
 Loading...