


00
183361
“LED6S” 6000 mAh Power Pack
Operating Instructions |
GB |
Bedienungsanleitung |
D |
Mode d‘emploi |
F |
Instrucciones de uso |
E |
Руководство по эксплуатации |
RUS |
Gebruiksaanwijzing |
NL |
Instrukcja obsługi |
PL |
Návod k použití |
CZ |
Návod na použitie |
SK |
Manual de instruçõe |
P |
Manual de utilizare |
RO |
100
 100
100
5
1 |
2 |
4 |
3 |
6

GOperating instruction
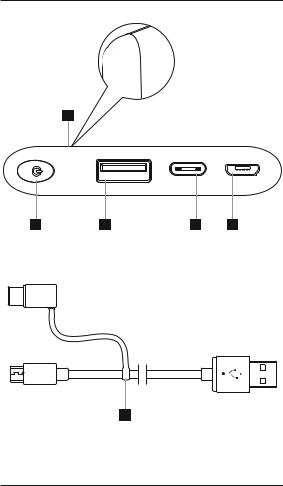
Controls and Displays
1.On/Off button
2.USB port
3.Micro USB port
4.USB Type-C port
5.LED capacity indicator
6.2-in-1 cable
Thank you for choosing a Hama product.
Take your time and read the following instructions and information completely. Please keep these instructions in a safe place for future reference. If you sell the device, please pass these operating instructions on to the new owner.
1. Explanation of Warning Symbols and Notes
Warning
This symbol is used to indicate safety instructions or to draw your attention to specific hazards and risks.
Note
This symbol is used to indicate additional information or important notes.
2. Package Contents
•Power pack with LED capacity display, 6000 mAh
•2-in-1 charging cable
•These operating instructions
3. Safety Notes
•The product is intended for private, non-commercial use only.
•Protect the product from dirt, moisture and overheating, and only use it in a dry environment.
•Keep this product, as all electrical products, out of the reach of children!
•Do not drop the product and do not expose it to any major shocks.
•Do not operate the product outside the power limits given in the specifications.
•Do not open the device or continue to operate it if it becomes damaged.
•Dispose of packaging material immediately according to locally applicable regulations.
•Since the battery is integrated and cannot be removed, you will need to dispose of the product as a whole. Do this in compliance with the legal requirements.
•Do not modify the product in any way. Doing so voids the warranty.
4. Operation
4.1 Charging the Power Pack
•Begin charging the power pack by connecting the included 2-in-1 charging cable to the power pack’s Micro-USB (IN 5V/2A) input and to a suitable USB charger. Alternatively, you can also charge the power pack using the USB Type-C input (IN 5V/2A). Please refer to the operating instructions for the USB charger used.
•Charging begins and ends automatically.
•Charge the Power Pack fully before using it for the first time.
2

Note – Capacity
•The capacity is always shown when the Power Pack is charging.
•The LED capacity display gives the current charge level as a percentage. The capacity display flashes during charging.
•If the capacity display shows a constant 100%, the power pack is fully charged.
•Press the button of the Power Pack to switch it on and to check its current capacity.
•To switch off the power pack, press and hold the button until the LED display goes out.
Warnung – Battery
•Only use suitable charging devices or USB connections for charging.
•As a rule, do not charge devices or USB connections that are defective and do not try to repair them yourself.
•Do not overcharge the product or allow the battery to completely discharge.
•Avoid storing, charging or using batteries in extreme temperatures.
•When stored over a long period of time, batteries should be charged regularly (at least every three months).
4.2 Charging terminal devices
•Connect the included 2-in-1 charging cable to the power pack’s USB connection (see 8. Technical Data) and to the Micro-USB or USB Type-C connection of your terminal device (mobile phone, smartphone, etc.).
•The included charging/connection cable may not be suitable for the USB port of your terminal device. In this case, use the USB cable that was included with your terminal device.
•Charging begins automatically. The LED capacity display shows the remaining capacity of the power pack when charging.
•The current battery status of your terminal device will appear on this device.
•Press the button on the power pack and hold it for approximately 2 seconds to stop charging and to switch the power pack off. The LED display goes out.
•The Power Pack will automatically switch off if it is not connected to a terminal device.
Warning – Connecting terminal devices
•Before connecting a terminal device, check whether the power output of the charger can supply sufficient power for the device.
•Ensure that the total power consumption of the connected terminal device does not exceed the limit value (see point 8. Technical Data).
•Please refer to the instructions in the operating manual of your terminal device.
•It is essential that you observe these specifications and the safety instructions regarding the power supply of your devices.
•The power pack must not be charged and discharged at the same time!
Note – Optimised charging
•Optimised charging means that the Power Pack recognises the connected terminal device and supplies it with the optimal current to minimise charging time.
Warning
•Never connect the charging cable of the Power Pack to both the input and the output of the Power Pack at the same time. This could damage the battery.
•Do not connect any terminal devices while the Power Pack is charging. This could damage the Power Pack and the connected device.
3

5. Care and Maintenance
Only clean this product with a slightly damp, lint-free cloth and do not use aggressive cleaning agents.
6. Warranty Disclaimer
Hama GmbH & Co KG assumes no liability and provides no warranty for damage resulting from improper installation/mounting, improper use of the product or from failure to observe the operating instructions and/or safety notes.
7. Service and Support
Please contact Hama Product Consulting if you have any questions about this product. Hotline: +49 9091 502-115 (German/English)
Further support information can be found here: www.hama.com
8. Technical Data |
|
|
|
|
|
Micro-USB input |
5 V |
|
|
2 A |
|
|
|
||||
USB Type-C input |
5 V |
|
|
2 A |
|
|
|
||||
USB Type-C output |
5 V |
|
|
3 A |
|
|
|
||||
USB output |
5 V |
|
|
2,4 A |
|
|
|
||||
Output total |
3 A (max.) |
||||
Battery type |
3.7 V / Li-Po |
||||
Min. capacity |
5795 mAh / 21.44 Wh |
||||
Typ. capacity |
6000 mAh / 22.2 Wh |
||||
9. Recycling Information
Note on environmental protection:
After the implementation of the European Directive 2012/19/EU and 2006/66/EU in the
national legal system, the following applies: Electric and electronic devices as well as
batteries must not be disposed of with household waste. Consumers are obliged by law to return electrical and electronic devices as well as batteries at the end of their service lives to the public collecting points set up for this purpose or point of sale. Details to this are
defined by the national law of the respective country. This symbol on the product, the instruction manual or the package indicates that a product is subject to these regulations. By recycling, reusing the materials or other forms of utilising old devices/Batteries, you are making an important contribution to protecting our environment.
4

DBedienungsanleitung
Bedienungselemente und Anzeigen
1.Ein/Ausschalter
2.USB-Anschluss
3.Micro-USB-Anschluss
4.USB Type-C-Anschluss
5.LED-Kapazitätsanzeige
6.2in1-Kabel
Vielen Dank, dass Sie sich für ein Hama Produkt entschieden haben!
Nehmen Sie sich Zeit und lesen Sie die folgenden Anweisungen und Hinweise zunächst ganz durch. Bewahren Sie diese Bedienungsanleitung anschließend an einem sicheren Ort auf, um bei Bedarf darin nachschlagen zu können. Sollten Sie das Gerät veräußern, geben Sie diese Bedienungsanleitung an den neuen Eigentümer weiter.
1. Erklärung von Warnsymbolen und Hinweisen
Warnung
Wird verwendet, um Sicherheitshinweise zu kennzeichnen oder um Aufmerksamkeit auf besondere Gefahren und Risiken zu lenken.
Hinweis
Wird verwendet, um zusätzlich Informationen oder wichtige Hinweise zu kennzeichnen.
2. Packungsinhalt
•Power Pack mit LED-Kapazitätsanzeige, 6000mAh
•2in1-Ladekabel
•diese Bedienungsanleitung
3. Sicherheitshinweise
•Das Produkt ist für den privaten, nicht-gewerblichen Haushaltsgebrauch vorgesehen.
•Schützen Sie das Produkt vor Schmutz, Feuchtigkeit und Überhitzung und verwenden Sie es nur in trockenen Umgebungen.
•Dieses Produkt gehört, wie alle elektrischen Produkte, nicht in Kinderhände!
•Lassen Sie das Produkt nicht fallen und setzen Sie es keinen heftigen Erschütterungen aus.
•Betreiben Sie das Produkt nicht außerhalb seiner in den technischen Daten angegebenen Leistungsgrenzen.
•Öffnen Sie das Produkt nicht und betreiben Sie es bei Beschädigungen nicht weiter.
•Entsorgen Sie das Verpackungsmaterial sofort gemäß den örtlich gültigen Entsorgungsvorschriften.
•Der Akku ist fest eingebaut und kann nicht entfernt werden, entsorgen Sie das Produkt als Ganzes gemäß den gesetzlichen Bestimmungen.
•Nehmen Sie keine Veränderungen am Produkt vor. Dadurch verlieren Sie jegliche Gewährleistungsansprüche.
4. Betrieb
4.1. Laden des Power Pack
•Starten Sie den Ladevorgang des Power Packs, indem Sie das beiliegende 2in1-Ladekabel an den Micro-USB-Eingang des Power Packs (IN 5V/2A) und an ein geeignetes USB-Ladegerät
anschließen. Alternativ können Sie das Power Pack auch über den USB Type-C-Eingang (IN 5V/2A) laden. Beachten Sie hierzu die Bedienungsanleitung des verwendeten USB-Ladegeräts.
•Der Ladevorgang startet und endet automatisch.
•Laden Sie vor dem ersten Gebrauch das Power Pack zunächst einmal vollständig auf.
5 |
5 |

Hinweis – Kapazität
•Während des Ladevorgangs des Power Packs wird die Kapazität dauerhaft angezeigt.
•Die LED-Kapazitätsanzeige zeigt dabei den aktuellen Ladezustand in Prozent. Während des Aufladens blinkt die Kapazitätsanzeige.
•Zeigt die Kapazitätsanzeige konstant 100%, ist das Power Pack voll geladen.
•Drücken Sie die Taste des Power Packs, um dieses einzuschalten und die aktuelle Kapazität des Power Packs zu erfahren.
•Drücken und halten Sie die Taste bis die LED-Anzeige erlischt, um das Power Pack auszuschalten.
Warnung – Akku
•Verwenden Sie nur geeignete Ladegeräte oder USB-Anschlüsse zum Aufladen.
•Verwenden Sie defekte Ladegeräte oder USB-Anschlüsse generell nicht mehr und versuchen Sie nicht, diese zu reparieren.
•Überladen oder tiefentladen Sie das Produkt nicht.
•Vermeiden Sie Lagerung, Laden und Benutzung bei extremen Temperaturen.
•Laden Sie bei längerer Lagerung regelmäßig (mind. vierteljährig) nach.
4.2. Laden von Endgeräten
•Verbinden Sie das beiliegende 2in1-Ladekabel mit dem USB-Anschluss des Power Packs (siehe 8. Technische Daten) und mit dem Micro-USB-Anschluss oder USB Type-C-Anschluss Ihres Endgerätes (Handy, Smartphone, etc.).
•Unter Umständen ist das beiliegenden Lade-/ Verbindungskabel für den endgeräteseitigen USBAnschluss unpassend. Verwenden Sie dann das USB-Kabel des Endgerätes.
•Der Ladevorgang startet automatisch. Während des Ladevorgangs zeigt die LED-Kapazitätsanzeige die noch verfügbare Kapazität des Power Packs an.
•Der aktuelle Akku-Ladestatus Ihres Endgerätes wird auf diesem angezeigt.
•Beenden Sie den Ladevorgang und schalten Sie das Power Pack aus, indem Sie die Taste des Power Packs ca. 2 Sekunden drücken. Die LED-Anzeige erlischt.
•Für den Fall, dass kein Endgerät angeschlossen wird, schaltet sich das Power Pack automatisch ab.
Warnung – Anschluss von Endgeräten
•Prüfen Sie vor Anschluss eines Endgerätes, ob dieses mit der Stromabgabe des Power Packs ausreichend versorgt werden kann.
•Stellen Sie sicher, dass die gesamte Stromaufnahme des angeschlossenen Endgerätes nicht überschritten wird (siehe 8. Technische Daten).
•Beachten Sie die Hinweise in der Bedienungsanleitung Ihres Endgerätes.
•Beachten Sie unbedingt die dort aufgeführten Angaben und Sicherheitshinweise zur Stromversorgung Ihrer Geräte.
•Das Power Pack darf nicht gleichzeitig geladen und entladen werden!
Hinweis – Optimiertes Laden
•Optimiertes Laden bedeutet, dass das Power Pack das angeschlossene Endgerät erkennt, mit der optimalen Stromstärke versorgt und dadurch die Ladezeit auf ein Minimum reduziert.
6 |
6 |

Warnung
•Schließen Sie das Ladekabel des Power Packs nie an dessen Einund Ausgang gleichzeitig an. Der Akku kann dadurch beschädigt werden.
•Schließen Sie während des Ladevorgangs des Power Packs keine Endgeräte an. Dadurch können das Power Pack und die angeschlossenen Endgeräte beschädigt werden.
5.Wartung und Pflege
Reinigen Sie dieses Produkt nur mit einem fusselfreien, leicht feuchten Tuch und verwenden Sie keine aggressiven Reiniger.
6. Haftungsausschluss
Die Hama GmbH & Co KG übernimmt keinerlei Haftung oder Gewährleistung für Schäden, die aus unsachgemäßer Installation, Montage und unsachgemäßem Gebrauch des Produktes oder einer Nichtbeachtung der Bedienungsanleitung und/oder der Sicherheitshinweise resultieren.
7. Service und Support
Bitte wenden Sie sich bei Fragen zum Produkt gerne an die Hama-Produktberatung. Hotline: +49 9091 502-115 (Deu/Eng)
Weitere Supportinformationen finden sie hier: www.hama.com
8. Technische Daten |
|
|
|
|
|
Micro-USB Eingang |
5 V |
|
|
2 A |
|
|
|
||||
USB Type-C Eingang |
5 V |
|
|
2 A |
|
|
|
||||
USB Type-C Ausgang |
5 V |
|
|
3 A |
|
|
|
||||
USB-Ausgang |
5 V |
|
|
2,4 A |
|
|
|
||||
Ausgang gesamt |
3 A (max.) |
||||
Batterietyp |
3,7 V / Li-Po |
||||
Min. Kapazität |
5795 mAh / 21,44 Wh |
||||
Typ. Kapazität |
6000 mAh / 22,2 Wh |
||||
9. Entsorgungshinweise Hinweis zum Umweltschutz:
Ab dem Zeitpunkt der Umsetzung der europäischen Richtlinien 2012/19/EU und 2006/66/
EG in nationales Recht gilt folgendes: Elektrische und elektronische Geräte sowie
Batterien dürfen nicht mit dem Hausmüll entsorgt werden. Der Verbraucher ist gesetzlich verpflichtet, elektrische und elektronische Geräte sowie Batterien am Ende ihrer Lebensdauer an den dafür eingerichteten, öffentlichen Sammelstellen oder an die
Verkaufsstelle zurückzugeben. Einzelheiten dazu regelt das jeweilige Landesrecht. Das Symbol auf dem Produkt, der Gebrauchsanleitung oder der Verpackung weist auf diese Bestimmungen hin. Mit der Wiederverwertung, der stofflichen Verwertung oder anderen Formen der Verwertung von Altgeräten/Batterien leisten Sie einen wichtigen Beitrag zum Schutz unserer Umwelt.
7

FMode d‘emploi
Éléments de commande et d'affichage
1.Interrupteur ON/OFF
2.Port USB
3.Port micro USB
4.Port USB Type-C
5.LED d'affichage de la capacité
6.Câble 2 en 1
Nous vous remercions d’avoir choisi un produit Hama.
Veuillez prendre le temps de lire l‘ensemble des remarques et consignes suivantes. Veuillez conserver ce mode d‘emploi à portée de main afin de pouvoir le consulter en cas de besoin. Transmettez-le au nouveau propriétaire avec l’appareil le cas échéant.
1. Explication des symboles d‘avertissement et des remarques
Avertissement
Ce symbole est utilisé pour indiquer des consignes de sécurité ou pour attirer votre attention sur des dangers et risques particuliers.
Remarque
Ce symbole est utilisé pour indiquer des informations supplémentaires ou des remarques importantes.
2. Contenu de l‘emballage
•Bloc d'alimentation avec LED d'affichage de la capacité, 6000 mAh
•Câble de charge 2 en 1
•Mode d‘emploi
3. Consignes de sécurité
•Ce produit est destiné à une installation domestique non commerciale.
•Protégez le produit de toute saleté, humidité, surchauffe et utilisez-le uniquement dans des locaux secs.
•Cet appareil, comme tout appareil électrique, doit être gardé hors de portée des enfants !
•Protégez le produit des secousses violentes et évitez tout choc ou toute chute.
•N‘utilisez pas le produit en dehors des limites de puissance indiquées dans les caractéristiques techniques.
•Ne tentez pas d‘ouvrir le produit en cas de détérioration et cessez de l’utiliser.
•Recyclez les matériaux d’emballage conformément aux prescriptions locales en vigueur.
•La batterie est installée de façon permanente et ne peut pas être retirée ; recyclez le produit en bloc conformément aux directives légales.
•N’apportez aucune modification à l’appareil. Des modifications vous feraient perdre vos droits de garantie.
4. Fonctionnement
4.1 Charge de la batterie
•Démarrez la charge du bloc d'alimentation en connectant le câble de charge 2 en 1 fourni au port micro USB du bloc d'alimentation (IN 5V/2A) et à un chargeur USB adapté. Vous pouvez également charger le bloc d'alimentation à l’aide d’un port USB Type-C (IN 5V/2A). Veuillez également consulter le mode d’emploi du chargeur USB utilisé.
•Le cycle de charge commence et se termine automatiquement.
•Veuillez charger entièrement le bloc d‘alimentation lors de la première utilisation.
8

Remarque – Capacité
•La capacité du bloc d‘alimentation apparaît en permanence pendant le cycle de charge.
•Les voyants LED d'affichage de la capacité indiquent le pourcentage de la charge actuelle. L'affichage de la capacité clignote pendant la charge.
•Le bloc d'alimentation est entièrement chargé dès que l'affichage de capacité indique 100 % en permanence.
•Appuyez sur la touche du bloc d‘alimentation afin de vérifier la capacité actuelle du bloc d‘alimentation.
•Maintenez la touche enfoncée jusqu’à extinction de l'affichage de capacité afin de mettre le bloc d'alimentation hors tension.
Avertissement – concernant les batteries
•Utilisez exclusivement un chargeur approprié ou une connexion USB lors de la recharge.
•Cessez d‘utiliser tout chargeur défectueux ou toute connexion USB défectueuse et ne tentez pas de réparer ces derniers.
•Ne surchargez ou ne déchargez pas totalement le produit.
•Évitez un stockage, une charge ou une utilisation à des températures extrêmes.
•Rechargez régulièrement le produit (au moins une fois par trimestre) en cas de longue période de stockage.
4.2 Charge d'appareils
•Branchez le câble de charge 2 en 1 fourni au port USB du bloc d’alimentation (voir 8. Caractéristiques techniques) et au port micro USB ou USB Type-C de votre appareil (téléphone portable, smartphone, etc.).
•Il est possible que le câble de connexion / de charge fourni ne soit pas compatible avec le port USB de votre appareil. Utilisez, dans ce cas, le câble USB de votre appareil.
•Le cycle de charge commence automatiquement. Les voyants LED d'affichage de la capacité indiquent la capacité disponible du bloc d'alimentation pendant la charge.
•L‘état actuel de charge de la batterie de votre appareil apparaît sur ce dernier.
•Appuyez sur la touche du bloc d'alimentation pendant env. 2 secondes pour terminer le cycle de charge et mettre le bloc d'alimentation hors tension. L’affi chage LED de capacité s’éteint.
•Le bloc d’alimentation se met automatiquement hors tension lorsqu’aucun appareil n’est branché.
Avertissement concernant la connexion‚ d‘appareils
•Avant de raccorder un appareil, veuillez contrôler que le débit de courant du bloc d‘alimentation est suffisant pour ce type d‘appareil.
•Assurez-vous de ne pas dépasser la consommation totale de courant de l’appareil branché (voir
8. Caractéristiques techniques).
•Veuillez respecter les consignes du mode d‘emploi de votre appareil.
•Veuillez impérativement respecter les indications et les consignes de sécurité mentionnées concernant l‘alimentation en électricité de vos appareils.
•Ne chargez et déchargez pas simultanément le bloc d’alimentation.
Remarque – Optimised charging
•Une optimisation de la charge signifie que le bloc d’alimentation reconnaît l’appareil connecté, l’alimente avec la puissance électrique optimale et réduit ainsi le temps de charge au maximum.
9
Avertissement
•Ne branchez en aucun cas le câble de charge du bloc d‘alimentation simultanément à son entrée et à sa sortie. Risque de détérioration de la batterie.
•Ne connectez aucun appareil pendant le cycle de charge du bloc d‘alimentation. Risque de détérioration du bloc d‘alimentation et des appareils connectés.
5.Soins et entretien
Nettoyez le bloc d‘alimentation uniquement à l’aide d’un chiffon non fibreux légèrement humide ; évitez tout détergent agressif.
6. Exclusion de garantie
La société Hama GmbH & Co KG décline toute responsabilité en cas de dommages provoqués par une installation, un montage ou une utilisation non conformes du produit ou encore provoqués par un non respect des consignes du mode d‘emploi et/ou des consignes de sécurité.
7. Service et assistance
En cas de question concernant le produit, veuillez vous adresser au service après-vente de Hama. Ligne téléphonique directe : +49 9091 502-115 (allemand/anglais)
Vous trouverez ici de plus amples informations concernant l‘assistance : www.hama.com
8. Caractéristiques techniques |
|
|
|
|
|
Entrée micro USB |
5 V |
|
|
2 A |
|
|
|
||||
Entrée USB Type-C |
5 V |
|
|
2 A |
|
|
|
||||
Sortie USB Type-C |
5 V |
|
|
3 A |
|
|
|
||||
Sortie USB |
5 V |
|
|
2,4 A |
|
|
|
||||
Sortie complète |
3 A (max.) |
||||
Type de pile |
3,7 V / Li-Po |
||||
Min capacité |
5795 mAh / 21,44 Wh |
||||
Type capacité |
6000 mAh / 22,2 Wh |
||||
9. Consignes de recyclage
Remarques concernant la protection de l’environnement:
Conformément à la directive européenne 2012/19/EU et 2006/66/CE, et afin d‘atteindre
un certain nombre d‘objectifs en matière de protection de l‘environnement, les règles
suivantes doivent être appliquées: Les appareils électriques et électroniques ainsi que les batteries ne doivent pas être éliminés avec les déchets ménagers. Le pictogramme “picto” présent sur le produit, son manuel d‘utilisation ou son emballage indique que le produit
est soumis à cette réglementation. Le consommateur doit retourner le produit/la batterie usager aux points de collecte prévus à cet effet. Il peut aussi le remettre à un revendeur. En permettant enfin le recyclage des produits ainsi que les batteries, le consommateur contribuera à la protection de notre environnement. C‘est un acte écologique.
10
 Loading...