


Gateway DC-T50 User Manual
FCC STATEMENT
FCC declaration of conformity
Responsible party: Gateway Companies, Inc.
610 Gateway Drive, North Sioux City, SD 57049
(605) 232-2000 Fax: (605) 232-2023
This device complies with Part 15 of the FCC Rules. Operation is subject to the following two conditions:
(1)This device may not cause harmful interference, and
(2)This device must accept any interference received, including interference that may cause undesired operation.
Note:
This equipment has been tested and found to comply with the limits for Class B digital devices, pursuant to Part 15 of the FCC rules. These limits are designed to provide reasonable protection against harmful interference in a residential installation. This equipment generates, uses and can radiate radio frequency energy and, if not installed and used in accordance with the instructions, may cause harmful interference to radio communications. However, there is no guarantee that interference will not occur in a particular installation. If this equipment does cause harmful interference to radio or television reception, which can be determined by turning the equipment off and on, the user is encouraged to try to correct the interference by one or more of the following measures:
Reorient or relocate the receiving antenna
Increase the separation between the equipment and receiver
Connect the equipment into an outlet on a circuit different from that to which the receiver is connected
Consult the dealer or an experienced radio/TV technician for help
1

Use of shielded cable is required to comply with Class B limits in Subpart B of Part 15 of the FCC rules.
Do not make any changes or modifications to the equipment unless otherwise specified in the manual. If such changes or modifications should be made, you could be required to stop operation of the equipment.
Canada
Industry Canada (IC)
Unintentional emitter per ICES-003/NMB-003
This digital apparatus does not exceed the Class B limits for radio noise emissions from digital apparatus as set out in the radio interference regulations of Industry Canada.
Le present appareil numerique n’emet pas de bruits radioelectriques depassant les limites applicables aux appareils numeriques de Classe B prescrites dans le reglement sur le brouillage radioelectrique edicte par Industrie Canada.
2

TRADEMARK INFORMATION
c 2003 Gateway, Inc. All rights reserved. Gateway, Gateway Country, the Gateway stylized logo, and the black-and-white spot design are trademarks or registered trademarks of Gateway, Inc. in the United States and other countries. All other brands and product names are trademarks or registered trademarks of their respective companies.
READ THIS FIRST
Notice:
1.Product design and specifications are subject to change without notice. This includes primary product specifications, software, software drivers, and user’s manual. This User Manual is a general reference guide for the product.
2.Gateway assumes no liability for any errors or discrepancies in this user manual.
3

WARNINGS
Do not use the camera if it is emitting smoke, unusual odor or noise, becoming unusually hot to the touch, or if it is in any other abnormal state. Operating the camera in any of these circumstances may cause a fire or an electrical shock. Stop using the camera immediately, turn the camera off, and then disconnect the power source. After checking that smoke is no longer being emitted, contact Gateway for repairs. Never attempt to repair this camera by yourself, as this is dangerous.
Do not use the camera if any foreign objects have entered the camera. Turn the camera off and then disconnect the power source. Contact Gateway. Do not continue to use the camera as this may cause a fire or an electrical shock.
Do not place the camera in any unstable locations such as on a wobbly table or slopping surface where the camera may fall or tip over and cause damage.
If the camera has been dropped or if the camera case has been damaged, turn the camera off and then disconnect the power source . Then contact Gateway. Do not continue to use the camera as this may cause a fire or an electrical shock.
Do not expose the camera to moisture and avoid getting water into the camera. Take particular care when using the camera under extreme weather conditions such as rain or snow, or when operating the camera at the beach or near water. Water in the camera may cause a fire or an electrical shock.
Do not attempt to modify the camera. This may cause a fire or an electrical shock.
Do not remove the camera casing. This may cause an electrical shock. Internal inspection, maintenance and repairs should only be carried out by Gateway.
4

CAUTIONS
Do not place the camera in damp or dusty locations. This may cause a fire or an electrical shock.
Do not place the camera in a location affected by oil fumes or steam, such as near a cooking stove or humidifier. This may cause a fire or an electrical shock.
Do not cover or wrap the camera with a cloth or quilt. This may cause heat to build up, distort the case and cause a fire. Always use the camera and its accessories in well-ventilated locations.
Handle the camera carefully and do not bump the camera into any hard object. Handling the camera roughly may cause a malfunction.
When leaving the camera unused for long periods, such as during a vacation, always unplug the camera from the power source for safety. Failure to do so could result in a fire.
Do not use a battery other than those specified for use with the camera. The use of unsuitable battery may result in the battery splitting or leaking and causing a fire, injury, or soiling of the battery compartment.
When fitting the battery into the camera, check the polarity markings on the battery (- and +) to ensure that you insert the battery correctly. Incorrect battery polarity may result in the battery splitting or leaking and causing a fire, injury, or soiling of the battery compartment.
Remove the battery if the camera will not be used for an extended period of time. The battery may leak and cause a fire, injury or soiling of the battery compartment. If the battery leak, clean and wipe the battery compartment carefully and install new battery. Wash your hands carefully if you touch the battery fluid.
5

CONTENTS |
|
INTRODUCTION----------------------------------------------------------------------- |
10 |
Overview------------------------------------------------------------------------------ |
10 |
Package Contents---------------------------------------------------------------- |
11 |
Optional Accessories------------------------------------------------------------ |
11 |
GETTINGTOKNOWTHECAMERA------------------------------------------ |
12 |
Front View--------------------------------------------------------------------------- |
12 |
Rear View---------------------------------------------------------------------------- |
13 |
Mode Dial---------------------------------------------------------------------------- |
14 |
Viewfinder LED Indicator-------------------------------------------------------- |
15 |
LCD Monitor Information ------------------------------------------------------- |
16 |
GETTINGSTARTED---------------------------------------------------------------- |
18 |
Installing the Battery-------------------------------------------------------------- |
18 |
Using an AC Power Adapter-------------------------------------------------- |
19 |
Charging the Battery------------------------------------------------------------- |
20 |
Inserting an SD Memory Card------------------------------------------------ |
21 |
Attaching the Strap---------------------------------------------------------------- |
22 |
TAKINGPHOTOGRAPHS-------------------------------------------------------- |
23 |
Photography in the Auto Capture Mode [ ]--------------------------- |
23 |
Using the Viewfinder---------------------------------------------------------- |
23 |
Using the LCD Monitor------------------------------------------------------- |
24 |
LCD Monitor Display (Capture Mode)----------------------------------- |
24 |
6
Using the Optical Zoom--------------------------------------------------------- |
|
25 |
Using the Digital Zoom----------------------------------------------------------- |
|
26 |
Using the Self-timer--------------------------------------------------------------- |
|
27 |
Using the Flash--------------------------------------------------------------------- |
|
28 |
Changing the Focus-------------------------------------------------------------- |
|
30 |
Changing the Exposure Compensation------------------------------------ |
31 |
|
Setting the Image Size and Quality------------------------------------------ |
|
33 |
Photography in the Program Mode [ P ]------------------------------------ |
35 |
|
Photography in the Shutter Speed-priority Mode [ Tv ]--------------- |
35 |
|
Photography in the Aperture-priority Mode [ Av ]---------------------- |
36 |
|
Photography in the Full Manual Mode [ M ]-------------------------------- |
37 |
|
Photography in the Portrait Mode [ |
]----------------------------------- |
37 |
Photography in the Sports Mode [ |
]------------------------------------- |
38 |
Photography in the Night Scene Mode [ ]------------------------------ |
38 |
|
Making Movies [ ]------------------------------------------------------------- |
|
39 |
CHANGING THE PRESET CONDITIONS (IN CAPTURE MODE)-------- |
40 |
|
Picture setting--------------------------------------------------------------------- |
|
41 |
Size---------------------------------------------------------------------------------- |
|
41 |
Quality------------------------------------------------------------------------------- |
|
41 |
Sharpness-------------------------------------------------------------------------- |
|
42 |
Contrast--------------------------------------------------------------------------- |
|
42 |
Color--------------------------------------------------------------------------------- |
|
42 |
Function setting--------------------------------------------------------------------- |
|
43 |
Capture Mode---------------------------------------------------------------------- |
|
43 |
Voice Memo------------------------------------------------------------------------ |
|
43 |
LCD Brightness-------------------------------------------------------------------- |
|
44 |
Digital Zoom------------------------------------------------------------------------ |
|
44 |
7

Preview------------------------------------------------------------------------------ |
44 |
Interval /Count--------------------------------------------------------------------- |
45 |
AE/AWB setting------------------------------------------------------------------ |
45 |
White Balance---------------------------------------------------------------------- |
45 |
Metering----------------------------------------------------------------------------- |
46 |
ISO----------------------------------------------------------------------------------- |
47 |
Manual WB------------------------------------------------------------------------ |
47 |
PLAYING BACK IMAGES [ ]------------------------------------------------ |
48 |
Playing Back Photographed images |
|
(Single-Frame Playback)-------------------------------------------------------- |
48 |
Voice Record----------------------------------------------------------------------- |
49 |
Playing Back Movies------------------------------------------------------------ |
50 |
Thumbnail Display---------------------------------------------------------------- |
52 |
Zoom Playback--------------------------------------------------------------------- |
53 |
Slideshow Display---------------------------------------------------------------- |
54 |
DPOF (Digital Print Order Format)------------------------------------------- |
55 |
Protect--------------------------------------------------------------------------------- |
56 |
LCD Brightness-------------------------------------------------------------------- |
57 |
LCD Monitor Display (Playback Mode)------------------------------------ |
57 |
ERASINGIMAGES[ ]----------------------------------------------------------- |
58 |
ErasingSingleImage-------------------------------------------------------- |
58 |
ErasingAllImages------------------------------------------------------------- |
58 |
8

ErasingSelectedImage------------------------------------------------------ |
59 |
SET-UP MODE----------------------------------------------------------------------- |
60 |
BasicSetting-------------------------------------------------------------------------- |
60 |
Card Information----------------------------------------------------------------- |
60 |
Frame Number Reset----------------------------------------------------------- |
61 |
Format------------------------------------------------------------------------------ |
61 |
Sound-------------------------------------------------------------------------------- |
62 |
Beep--------------------------------------------------------------------------------- |
62 |
Auto Power Off------------------------------------------------------------------- |
63 |
Custom Setting--------------------------------------------------------------------- |
64 |
Date/Time--------------------------------------------------------------------------- |
64 |
System Reset-------------------------------------------------------------------- |
64 |
Language--------------------------------------------------------------------------- |
65 |
Video Output----------------------------------------------------------------------- |
65 |
System Information--------------------------------------------------------------- |
66 |
TRANSFERRING RECORDED IMAGES/MOVIES TO YOUR |
|
COMPUTER----------------------------------------------------------------------------- |
67 |
Step 1: Installing the USB Driver-------------------------------------------- |
68 |
Step 2: Connecting the Camera to Your Computer-------------------- |
68 |
Step 3: Downloading Images/Movies--------------------------------------- |
68 |
INSTALLING PHOTOSUITE---------------------------------------------------- |
70 |
INSTALLING PHOTOVISTA---------------------------------------------------- |
71 |
CONNECTING THE CAMERA TO OTHER DEVICES------------------- |
72 |
CAMERA SPECIFICATIONS----------------------------------------------------- |
73 |
9

INTRODUCTION
Overview
Your new digital camera delivers high quality, 2560 x 1920 resolution images using a 5.25 Megapixels CCD imager. Using either the optical viewfinder or the 1.5” TFT color image LCD monitor, you can compose images and then examine them in detail. An auto-flash sensor automatically detects the shooting (lighting) conditions and determines whether the flash should be used. This feature helps ensure that your images turn out right.
An SD Memory Card is a storage medium for saving images that you have photographed. Even if the camera’s power is turned OFF, the images saved on the SD Memory Card are not erased. The SD Memory Card can be read from and written to repeatedly.
Images you have taken can be downloaded to your computer using the USB cable (USB driver required for Win 98 and Mac OS 8.6). You can enhance and retouch your images on your computer by using the provided editing software, or image editing software you may already own. You may share your images with your friends via e-mail, in a report, or on a website.
Note:
The memory card testing results for 512MB are based on Toshiba, Panasonic and Sandisk SD Memory Card.
10
Package Contents
Carefully unpack your camera and ensure that you have the following items. In the event that any item is missing or if you find any mismatch or damage, promptly contact Gateway.
|
Digital camera |
|
Software CD-ROM |
|
|
||
|
A/V cable |
|
Camera strap |
|
|
||
|
User’s manual |
|
Camera pouch |
|
|
||
|
USB cable |
|
SD starter memory card |
|
|
||
|
LI-100 battery (rechargeable) |
|
AC-106 charger |
|
|
11
GETTING TO KNOW THE CAMERA
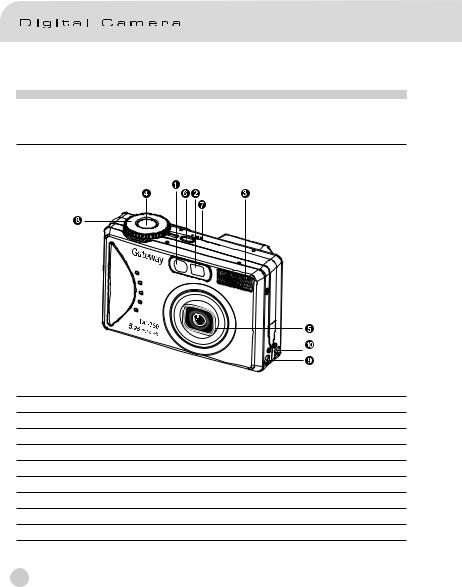
Front View
1.Self-timer/AF support LED
2.Optical viewfinder
3.Built-in flash
4.Shutter button
5.Lens/lens cover
6.POWER Power button
7.MIC Microphone
8.Mode dial
9.DC IN 5V terminal
10.USB/A/V OUT terminal
12
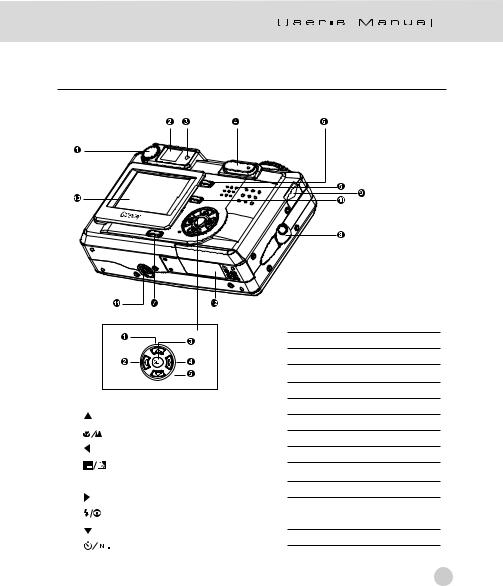
Rear View
1. |
|
|
Arrow button (up) |
|
|
|
|
|
|
|
Focus button/macro |
|
|
|
|
2. |
|
|
Arrow button (left) |
|
|
|
|
|
|
|
Exposure/back light |
|
|
|
|
3. |
SET |
Set button |
|
4. |
|
|
Arrow button (right) |
|
|
|
|
|
|
|
Flash button |
|
|
|
|
5. |
|
|
Arrow button (down) |
|
|
|
|
|
|
|
Self-timer button/interval |
|
|
|
|
|
|
|
|
1.Diopter adjustment dial
2.Viewfinder
3.Viewfinder LED
4. /
/ 
 Zoom button
5.Speaker
6.

 Menu button
7.

 Display button
8.Strap attachment
9.Command dial
10. Delete button
11.Tripod socket
12.Battery/ SD Memory Card cover
13.LCD monitor
13
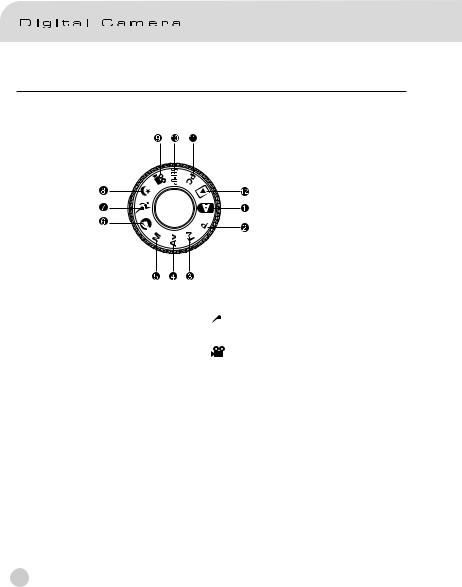
Mode Dial
1. Auto mode
2.P Program mode
3.Tv Tv (Shutter Speed priority)
4.Av Av (Aperture priority)
5.M Manual mode
6. Portrait mode
7.  Sports mode
8.  Night scene mode
9. Movie mode
10.

 Set-up mode
11.PC PC mode
12. Playback mode
14

Viewfinder LED Indicator
Color |
State |
|
Description |
|
||
Photography Mode |
Setup Mode |
PC Mode |
Battery |
|||
|
|
|||||
|
|
Charge Mode |
||||
|
|
|
|
|
||
|
|
AEor AFlocked with |
In standby |
In communication |
|
|
Green |
On |
the Shutter button |
mode. |
to PC. (SD |
Charging |
|
held half doen. |
|
Memory Card is |
||||
|
|
|
|
|||
|
|
|
|
inserted.) |
|
|
|
|
|
|
|
|
|
|
|
Writing to SD Memory |
Accessing of |
In connecting to |
|
|
|
On |
Card in progress. |
SD Memory |
PC. (SD Memory |
Error |
|
|
|
Card in |
Card is inserted. |
|||
Red |
|
|
|
|||
|
|
progress |
|
|
||
|
|
|
|
|
|
|
|
Flashing |
When the image is |
--- |
--- |
Interval timer |
|
|
not in focus |
standing by |
||||
|
|
|
|
|||
|
|
|
|
|
|
|
|
|
Processing images |
|
USB cable not |
|
|
|
|
|
connected. (SD |
|
||
|
On |
Charging of flash in |
--- |
No battery |
||
|
Memory Card is |
|||||
Orange |
|
progress |
|
|
||
|
|
inserted.) |
|
|||
|
|
|
|
|||
|
|
|
|
|
|
|
|
Flashing |
Hardware malfunction |
SD Memory Card |
--- |
||
|
is not inserted. |
|||||
|
|
|
|
|
||
|
|
|
|
|
|
|
15

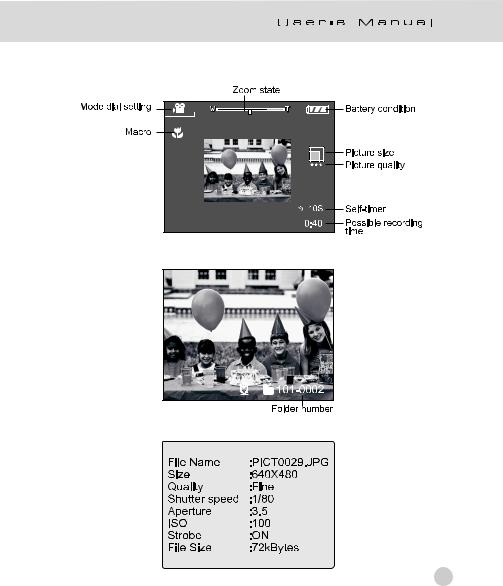
LCD Monitor Information
AUTO capture mode
Program/Tv/Av/Manual/Portrait/Sports/Night scene mode
Mode dial setting |
Battery condition |
Macro |
Flash light status |
Preset white |
Picture size |
balance |
|
Metering |
Picture quality |
|
|
Exopsure |
|
compensation |
Self-timer |
|
Possible number |
Shutter speed |
of shots |
Aperture |
16
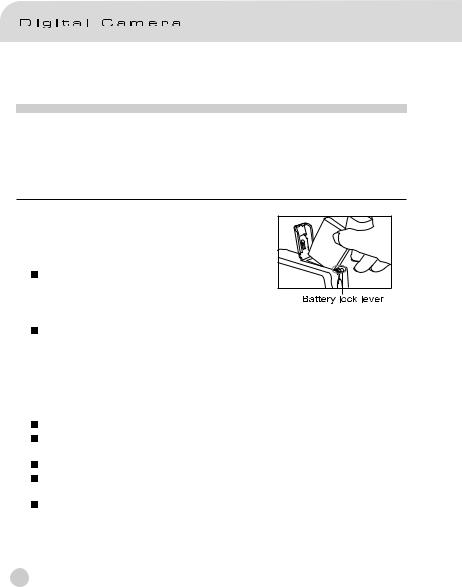
Movie mode
Playback mode (Standard)
Playback mode (Detailed information)
17
GETTING STARTED
You can use either a Lithium Ion battery or an AC power adapter (5 V) to power on the camera. Battery power is convenient for capturing images or video clips while an AC adapter power is useful when transferring images to your computer.
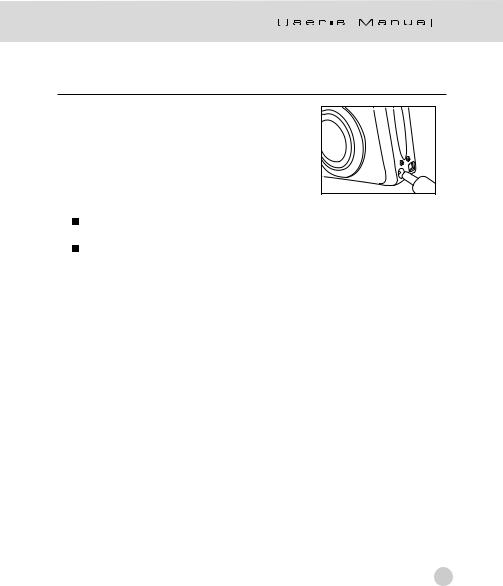
Installing the Battery(Optional)
1.Make sure the camera power is off.
2.Open the battery/SD Memory Card cover.
3.Insert the battery in the correct orientation
shown.
Tilt the battery lock lever toward the strap attachment and then insert the battery following the orientation of the arrow on the battery’s label.
Insert the battery as far as it can go.
4.Close the battery/SD Memory Card cover.
 To remove the battery:
Open the battery/SD Memory Card cover and then release the battery lock lever. After the battery is slightly ejected, pull out the battery slowly.
Note:
Use only the specified battery type (Lithium Ion).
If you are not going to use the battery for an extended period of time, remove it from the camera to prevent leakage or corrosion.
Never use different type of battery.
Avoid using the battery in extremely cold environments as low temperatures can shorten the battery life and reduce the camera performance.
A Duracell Non-rechargeable Lithium battery is possible to use in an emergency, but the camera performance can not be guaranteed.
18
Using an AC Power Adapter(Optional)
1.Make sure the camera power is off.
2.Connect one end of the AC power adapter to the DC IN 5V terminal.
3.Connect the other end of the AC power adapter to a power outlet.
Note:
Make sure to use only the AC power adapter specified for the camera. Damage caused by the use of an incorrect adapter is not covered under the warranty.
Use the AC power adapter while transferring images to your computer in order to prevent unexpected automatic power off of the camera.
19

Charging the Battery
1.Make sure the camera power is off.
2.Slide the battery/SD Memory Card cover into the direction of the [OPEN] arrow.
3.Insert the battery, noting correct polarity (+ and -).
4.Slide the battery lock lever to adjust the battery.
5.Close the battery/SD Memory Card cover firmly.
6.Connect one end of the AC power adapter to the DC IN 5V terminal.
7.Connect the other end of the AC power adapter to a power outlet. Charging start: Green indicator
Charging end: Indicator off Stand by: Orange indicator
Replace a new battery: Red indicator
Note:
Make sure to use only the AC power adapter specified for the camera. Damage caused by the use of an incorrect adapter is not covered under the warranty.
When the charging is not started even if proceeding the operation above, press power button on at any mode after LCD indication appears, then turn the power off.
Never use the battery unspecified for the camera.
Do not place the camera in hot temperature. Use it at room temperature.
20
Inserting an SD Memory Card(Optional)
All images and video clips taken by the camera can be stored in an SD (Secure Digital) Memory Card. Even if the camera’s power is OFF, the images saved in the SD Memory Card are not erased. An SD Memory Card can be repeatedly read and written. You may also expand the memory capacity up to 512MB so that you can store additional images and video clips.
1.Make sure the camera is off.
2.Slide the battery/SD Memory Card cover in the direction of the [OPEN] arrow.
3.Insert an SD Memory Card :
 The front side of the memory card (printed arrow) should face towards the front side of the camera.
 If the card cannot be inserted, check the
orientation. 4. Close the battery/SD Memory Card cover.
 To remove the SD Memory Card, make sure
the camera is off. Open the battery/SD Memory Card card cover. Press lightly on the edge of the memory card and it will eject.
Note:
If the camera is powered-on without the card, the “NO CARD” message appears on the LCD monitor.
To prevent valuable data from being accidentally
erased from an SD Memory Card you can slide the write-protected tab (on the side of the SD Memory
Card) to “LOCK”.
To save, edit or erase data on an SD Memory Card,
you must unlock the card. MultiMedia Card (MMC) can not be used.
You need to format an SD Memory Card before using it in this camera.
21
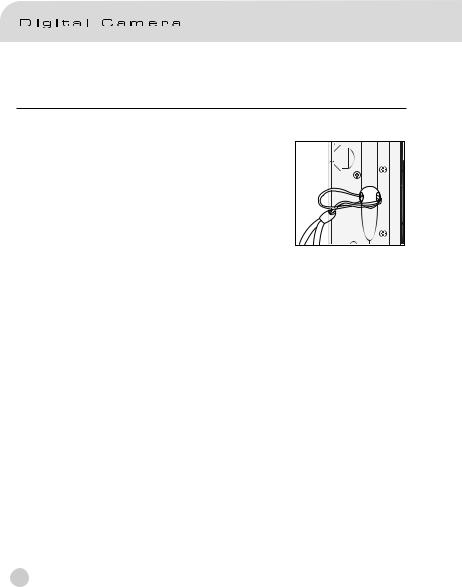
Attaching the Strap
To prevent accidental slippage during use, always use the strap. Attach the hand strap as follows: 
 1. Thread the small loop of the hand strap through

the strap eyelet on the camera. 2. Pull the large loop through the small loop until the
strap is firmly secured.
22
 Loading...