

Gateway E-6610Q, E-6610D Owner's Manual

BTX Pro
USERGUIDE
®


www.gateway.com
Contents
Chapter 1: Getting Help. . . . . . . . . . . . . . . . . . . . . . . . . . . . . . . . . . . . . . . . . . . 1
Thank you for purchasing our computer! . . . . . . . . . . . . . . . . . . . . . . . . . . . . . . . . 2
Using the Gateway Web site . . . . . . . . . . . . . . . . . . . . . . . . . . . . . . . . . . . . . . . . . . 2
Using Help and Support . . . . . . . . . . . . . . . . . . . . . . . . . . . . . . . . . . . . . . . . . . . . . . 3
Searching for a topic . . . . . . . . . . . . . . . . . . . . . . . . . . . . . . . . . . . . . . . . . . 3
Getting help for Windows Media Center . . . . . . . . . . . . . . . . . . . . . . . . . . . 3
Using online help . . . . . . . . . . . . . . . . . . . . . . . . . . . . . . . . . . . . . . . . . . . . . . . . . . . . 4
Finding your model and serial number . . . . . . . . . . . . . . . . . . . . . . . . . . . . . . . . . . 4
Microsoft Certificate of Authenticity . . . . . . . . . . . . . . . . . . . . . . . . . . . . . . . . . . . . 4
Chapter 2: Setting Up and Getting Started . . . . . . . . . . . . . . . . . . . . . . . . . . . 5
Front . . . . . . . . . . . . . . . . . . . . . . . . . . . . . . . . . . . . . . . . . . . . . . . . . . . . . . . . . . . . . . 6
Back . . . . . . . . . . . . . . . . . . . . . . . . . . . . . . . . . . . . . . . . . . . . . . . . . . . . . . . . . . . . . . 7
Working safely and comfortably . . . . . . . . . . . . . . . . . . . . . . . . . . . . . . . . . . . . . . 10
Reducing eye strain . . . . . . . . . . . . . . . . . . . . . . . . . . . . . . . . . . . . . . . . . . 10
Setting up your computer desk and chair . . . . . . . . . . . . . . . . . . . . . . . . . 10
Sitting at your computer . . . . . . . . . . . . . . . . . . . . . . . . . . . . . . . . . . . . . . 11
Avoiding discomfort and injury from repetitive strain . . . . . . . . . . . . . . . 11
Preparing power connections . . . . . . . . . . . . . . . . . . . . . . . . . . . . . . . . . . . . . . . . 11
Protecting from power source problems . . . . . . . . . . . . . . . . . . . . . . . . . 11
Checking the voltage selection . . . . . . . . . . . . . . . . . . . . . . . . . . . . . . . . . . 12
Connecting to a broadband modem or network . . . . . . . . . . . . . . . . . . . . . . . . . 12
Connecting a dial-up modem . . . . . . . . . . . . . . . . . . . . . . . . . . . . . . . . . . . . . . . . . 12
Starting your computer . . . . . . . . . . . . . . . . . . . . . . . . . . . . . . . . . . . . . . . . . . . . . 13
Waking up your computer . . . . . . . . . . . . . . . . . . . . . . . . . . . . . . . . . . . . . 13
Turning off your computer . . . . . . . . . . . . . . . . . . . . . . . . . . . . . . . . . . . . . . . . . . . 13
Restarting (rebooting) your computer . . . . . . . . . . . . . . . . . . . . . . . . . . . . . . . . . . 14
Using the keyboard . . . . . . . . . . . . . . . . . . . . . . . . . . . . . . . . . . . . . . . . . . . . . . . . . 14
Premium multimedia keyboard features . . . . . . . . . . . . . . . . . . . . . . . . . . 14
Elite multimedia keyboard features . . . . . . . . . . . . . . . . . . . . . . . . . . . . . . 16
Using the mouse . . . . . . . . . . . . . . . . . . . . . . . . . . . . . . . . . . . . . . . . . . . . . . . . . . . 17
Adjusting the volume . . . . . . . . . . . . . . . . . . . . . . . . . . . . . . . . . . . . . . . . . . . . . . . 18
Configuring the audio jacks . . . . . . . . . . . . . . . . . . . . . . . . . . . . . . . . . . . . . . . . . . 19
Installing a printer, scanner, or other device . . . . . . . . . . . . . . . . . . . . . . . . . . . . 20
Chapter 3: Using Windows Vista. . . . . . . . . . . . . . . . . . . . . . . . . . . . . . . . . . . 21
Using the Windows desktop . . . . . . . . . . . . . . . . . . . . . . . . . . . . . . . . . . . . . . . . . . 22
Using the Start menu . . . . . . . . . . . . . . . . . . . . . . . . . . . . . . . . . . . . . . . . . 23
Adding icons to the desktop . . . . . . . . . . . . . . . . . . . . . . . . . . . . . . . . . . . 24
Identifying window items . . . . . . . . . . . . . . . . . . . . . . . . . . . . . . . . . . . . . . 24
Working with files and folders . . . . . . . . . . . . . . . . . . . . . . . . . . . . . . . . . . . . . . . . 25
Viewing drives . . . . . . . . . . . . . . . . . . . . . . . . . . . . . . . . . . . . . . . . . . . . . . . 25
Creating folders . . . . . . . . . . . . . . . . . . . . . . . . . . . . . . . . . . . . . . . . . . . . . . 26
Copying and moving files and folders . . . . . . . . . . . . . . . . . . . . . . . . . . . . 26
i

Contents
Deleting files and folders . . . . . . . . . . . . . . . . . . . . . . . . . . . . . . . . . . . . . . 27
Searching for files . . . . . . . . . . . . . . . . . . . . . . . . . . . . . . . . . . . . . . . . . . . . . . . . . . 28
Using the Windows Search . . . . . . . . . . . . . . . . . . . . . . . . . . . . . . . . . . . . . 28
Browsing for files and folders . . . . . . . . . . . . . . . . . . . . . . . . . . . . . . . . . . 29
Working with documents . . . . . . . . . . . . . . . . . . . . . . . . . . . . . . . . . . . . . . . . . . . . 29
Creating a new document . . . . . . . . . . . . . . . . . . . . . . . . . . . . . . . . . . . . . 30
Saving a document . . . . . . . . . . . . . . . . . . . . . . . . . . . . . . . . . . . . . . . . . . . 30
Opening a document . . . . . . . . . . . . . . . . . . . . . . . . . . . . . . . . . . . . . . . . . 30
Printing a document . . . . . . . . . . . . . . . . . . . . . . . . . . . . . . . . . . . . . . . . . . 31
Shortcuts . . . . . . . . . . . . . . . . . . . . . . . . . . . . . . . . . . . . . . . . . . . . . . . . . . . . . . . . . 32
Chapter 4: Using the Internet . . . . . . . . . . . . . . . . . . . . . . . . . . . . . . . . . . . . . 33
Learning about the Internet . . . . . . . . . . . . . . . . . . . . . . . . . . . . . . . . . . . . . . . . . . 34
Setting up an Internet account . . . . . . . . . . . . . . . . . . . . . . . . . . . . . . . . . . . . . . . 35
Accessing your Internet account . . . . . . . . . . . . . . . . . . . . . . . . . . . . . . . . 35
Using the World Wide Web . . . . . . . . . . . . . . . . . . . . . . . . . . . . . . . . . . . . . . . . . . . 35
Connecting to a Web site . . . . . . . . . . . . . . . . . . . . . . . . . . . . . . . . . . . . . . 36
Downloading files . . . . . . . . . . . . . . . . . . . . . . . . . . . . . . . . . . . . . . . . . . . . 37
Using e-mail . . . . . . . . . . . . . . . . . . . . . . . . . . . . . . . . . . . . . . . . . . . . . . . . . . . . . . . 37
Sending e-mail . . . . . . . . . . . . . . . . . . . . . . . . . . . . . . . . . . . . . . . . . . . . . . . 38
Checking your e-mail . . . . . . . . . . . . . . . . . . . . . . . . . . . . . . . . . . . . . . . . . 38
Chapter 5: Sending and Receiving Faxes . . . . . . . . . . . . . . . . . . . . . . . . . . . .39
Using Windows Fax and Scan . . . . . . . . . . . . . . . . . . . . . . . . . . . . . . . . . . . . . . . . . 40
Sending a Fax . . . . . . . . . . . . . . . . . . . . . . . . . . . . . . . . . . . . . . . . . . . . . . . . . . . . . 40
Setting up your cover page template . . . . . . . . . . . . . . . . . . . . . . . . . . . . 43
Faxing a scanned document or from programs . . . . . . . . . . . . . . . . . . . . 43
Canceling a fax . . . . . . . . . . . . . . . . . . . . . . . . . . . . . . . . . . . . . . . . . . . . . . 44
Receiving and viewing a fax . . . . . . . . . . . . . . . . . . . . . . . . . . . . . . . . . . . . . . . . . 44
Chapter 6: Using Your Hardware. . . . . . . . . . . . . . . . . . . . . . . . . . . . . . . . . . . 45
Using the diskette drive . . . . . . . . . . . . . . . . . . . . . . . . . . . . . . . . . . . . . . . . . . . . 46
Using the CD or DVD drive . . . . . . . . . . . . . . . . . . . . . . . . . . . . . . . . . . . . . . . . . . . 46
Identifying drive types . . . . . . . . . . . . . . . . . . . . . . . . . . . . . . . . . . . . . . . . 46
Inserting a CD or DVD . . . . . . . . . . . . . . . . . . . . . . . . . . . . . . . . . . . . . . . . . 47
Using the memory card reader . . . . . . . . . . . . . . . . . . . . . . . . . . . . . . . . . . . . . . . 48
Memory card types . . . . . . . . . . . . . . . . . . . . . . . . . . . . . . . . . . . . . . . . . . . 48
Using a memory card . . . . . . . . . . . . . . . . . . . . . . . . . . . . . . . . . . . . . . . . . 48
Configuring the audio jacks . . . . . . . . . . . . . . . . . . . . . . . . . . . . . . . . . . . . . . . . . . 49
Connecting a projector or monitor . . . . . . . . . . . . . . . . . . . . . . . . . . . . . . . . . . . . 49
Connecting a television . . . . . . . . . . . . . . . . . . . . . . . . . . . . . . . . . . . . . . . . . . . . . . 50
Modifying television settings . . . . . . . . . . . . . . . . . . . . . . . . . . . . . . . . . . . 51
Connecting a video camera . . . . . . . . . . . . . . . . . . . . . . . . . . . . . . . . . . . . . . . . . . 51
Chapter 7: Using Your Software . . . . . . . . . . . . . . . . . . . . . . . . . . . . . . . . . . .53
Playing music and movies . . . . . . . . . . . . . . . . . . . . . . . . . . . . . . . . . . . . . . . . . . . 54
Playing audio and video files . . . . . . . . . . . . . . . . . . . . . . . . . . . . . . . . . . 54
ii

www.gateway.com
Playing optical discs . . . . . . . . . . . . . . . . . . . . . . . . . . . . . . . . . . . . . . . . . . 55
Creating audio files and music libraries . . . . . . . . . . . . . . . . . . . . . . . . . . . . . . . . . 57
Creating music files . . . . . . . . . . . . . . . . . . . . . . . . . . . . . . . . . . . . . . . . . . . 57
Building a music library . . . . . . . . . . . . . . . . . . . . . . . . . . . . . . . . . . . . . . . 59
Editing track information . . . . . . . . . . . . . . . . . . . . . . . . . . . . . . . . . . . . . . 59
Creating music CDs and video DVDs . . . . . . . . . . . . . . . . . . . . . . . . . . . . . . . . . . . 60
Creating a music CD . . . . . . . . . . . . . . . . . . . . . . . . . . . . . . . . . . . . . . . . . . 60
Creating a video DVD . . . . . . . . . . . . . . . . . . . . . . . . . . . . . . . . . . . . . . . . . 61
Creating and copying data discs . . . . . . . . . . . . . . . . . . . . . . . . . . . . . . . . . . . . . . 63
Creating a data disc . . . . . . . . . . . . . . . . . . . . . . . . . . . . . . . . . . . . . . . . . . 63
Using Windows Media Center . . . . . . . . . . . . . . . . . . . . . . . . . . . . . . . . . . . . . . . . . 64
Starting Windows Media Center . . . . . . . . . . . . . . . . . . . . . . . . . . . . . . . . . 64
Using the Media Center remote control . . . . . . . . . . . . . . . . . . . . . . . . . . 65
Chapter 8: Customizing Windows. . . . . . . . . . . . . . . . . . . . . . . . . . . . . . . . . . 67
Changing screen settings . . . . . . . . . . . . . . . . . . . . . . . . . . . . . . . . . . . . . . . . . . . . 68
Changing color depth and screen resolution . . . . . . . . . . . . . . . . . . . . . . 68
Changing the appearance of windows and backgrounds . . . . . . . . . . . . 69
Selecting a screen saver . . . . . . . . . . . . . . . . . . . . . . . . . . . . . . . . . . . . . . . 70
Changing gadgets . . . . . . . . . . . . . . . . . . . . . . . . . . . . . . . . . . . . . . . . . . . . 71
Setting up multiple monitors . . . . . . . . . . . . . . . . . . . . . . . . . . . . . . . . . . . 73
Changing system sounds . . . . . . . . . . . . . . . . . . . . . . . . . . . . . . . . . . . . . . . . . . . . 74
Changing mouse settings . . . . . . . . . . . . . . . . . . . . . . . . . . . . . . . . . . . . . . . . . . . . 75
Adding and modifying user accounts . . . . . . . . . . . . . . . . . . . . . . . . . . . . . . . . . . 76
Changing power-saving settings . . . . . . . . . . . . . . . . . . . . . . . . . . . . . . . . . . . . . . 77
Changing the power scheme . . . . . . . . . . . . . . . . . . . . . . . . . . . . . . . . . . . 77
Changing accessibility settings . . . . . . . . . . . . . . . . . . . . . . . . . . . . . . . . . . . . . . . . 79
Using the Ease of Access Center . . . . . . . . . . . . . . . . . . . . . . . . . . . . . . . . 79
Using voice recognition . . . . . . . . . . . . . . . . . . . . . . . . . . . . . . . . . . . . . . . 80
Chapter 9: Networking Your Computer . . . . . . . . . . . . . . . . . . . . . . . . . . . . . 81
Introduction to Networking . . . . . . . . . . . . . . . . . . . . . . . . . . . . . . . . . . . . . . . . . . 82
Making sure your broadband connection works . . . . . . . . . . . . . . . . . . . 82
Networking terms you should know . . . . . . . . . . . . . . . . . . . . . . . . . . . . . 82
Wired Ethernet networking . . . . . . . . . . . . . . . . . . . . . . . . . . . . . . . . . . . . . . . . . . 82
Ethernet, Fast Ethernet, or Gigabit Ethernet . . . . . . . . . . . . . . . . . . . . . . . 82
Using a router . . . . . . . . . . . . . . . . . . . . . . . . . . . . . . . . . . . . . . . . . . . . . . . 82
Setting up wired Ethernet network hardware . . . . . . . . . . . . . . . . . . . . . 84
Wireless Ethernet networking . . . . . . . . . . . . . . . . . . . . . . . . . . . . . . . . . . . . . . . . 85
Wireless Ethernet standards . . . . . . . . . . . . . . . . . . . . . . . . . . . . . . . . . . . . 85
Using an access point . . . . . . . . . . . . . . . . . . . . . . . . . . . . . . . . . . . . . . . . . 86
Setting up wireless Ethernet network hardware . . . . . . . . . . . . . . . . . . . 87
Setting up your network connection . . . . . . . . . . . . . . . . . . . . . . . . . . . . . . . . . . . 87
Naming the computers and the workgroup . . . . . . . . . . . . . . . . . . . . . . . 87
Configuring the TCP/IP protocol . . . . . . . . . . . . . . . . . . . . . . . . . . . . . . . . 88
Connecting to a wireless Ethernet network . . . . . . . . . . . . . . . . . . . . . . . 88
Wireless security . . . . . . . . . . . . . . . . . . . . . . . . . . . . . . . . . . . . . . . . . . . . . 90
iii

Contents
Testing your network . . . . . . . . . . . . . . . . . . . . . . . . . . . . . . . . . . . . . . . . . . . . . . . 90
Adding a printer to your network . . . . . . . . . . . . . . . . . . . . . . . . . . . . . . . . . . . . . 91
Sharing resources . . . . . . . . . . . . . . . . . . . . . . . . . . . . . . . . . . . . . . . . . . . . . . . . . . 91
Sharing drives and printers . . . . . . . . . . . . . . . . . . . . . . . . . . . . . . . . . . . . 91
Using the network . . . . . . . . . . . . . . . . . . . . . . . . . . . . . . . . . . . . . . . . . . . . . . . . . 92
Viewing shared drives and folders . . . . . . . . . . . . . . . . . . . . . . . . . . . . . . . 93
Creating a shortcut to a network drive . . . . . . . . . . . . . . . . . . . . . . . . . . . 93
Opening files across the network . . . . . . . . . . . . . . . . . . . . . . . . . . . . . . . 93
Copying files across the network . . . . . . . . . . . . . . . . . . . . . . . . . . . . . . . . 93
Printing files across the network . . . . . . . . . . . . . . . . . . . . . . . . . . . . . . . . 94
Chapter 10: Protecting your computer . . . . . . . . . . . . . . . . . . . . . . . . . . . . . .95
Hardware security . . . . . . . . . . . . . . . . . . . . . . . . . . . . . . . . . . . . . . . . . . . . . . . . . . 96
Kensington lock slot . . . . . . . . . . . . . . . . . . . . . . . . . . . . . . . . . . . . . . . . . . 96
Data security . . . . . . . . . . . . . . . . . . . . . . . . . . . . . . . . . . . . . . . . . . . . . . . . . . . . . . 96
Startup and hard drive password . . . . . . . . . . . . . . . . . . . . . . . . . . . . . . . 96
Windows user accounts . . . . . . . . . . . . . . . . . . . . . . . . . . . . . . . . . . . . . . . 96
Protecting your computer from viruses . . . . . . . . . . . . . . . . . . . . . . . . . . 97
Using McAfee SecurityCenter . . . . . . . . . . . . . . . . . . . . . . . . . . . . . . . . . . . 98
Using Windows Security Center . . . . . . . . . . . . . . . . . . . . . . . . . . . . . . . . 101
Security updates . . . . . . . . . . . . . . . . . . . . . . . . . . . . . . . . . . . . . . . . . . . . . . . . . . 102
Windows Update . . . . . . . . . . . . . . . . . . . . . . . . . . . . . . . . . . . . . . . . . . . . 102
BigFix . . . . . . . . . . . . . . . . . . . . . . . . . . . . . . . . . . . . . . . . . . . . . . . . . . . . . 104
Chapter 11: Maintaining Your Computer . . . . . . . . . . . . . . . . . . . . . . . . . . .105
Setting up a maintenance schedule . . . . . . . . . . . . . . . . . . . . . . . . . . . . . . . . . . . 106
Caring for your computer . . . . . . . . . . . . . . . . . . . . . . . . . . . . . . . . . . . . . . . . . . . 106
Cleaning your computer . . . . . . . . . . . . . . . . . . . . . . . . . . . . . . . . . . . . . . . . . . . . 107
Cleaning the exterior . . . . . . . . . . . . . . . . . . . . . . . . . . . . . . . . . . . . . . . . 107
Cleaning the keyboard . . . . . . . . . . . . . . . . . . . . . . . . . . . . . . . . . . . . . . . 107
Cleaning the monitor . . . . . . . . . . . . . . . . . . . . . . . . . . . . . . . . . . . . . . . . 107
Cleaning the mouse . . . . . . . . . . . . . . . . . . . . . . . . . . . . . . . . . . . . . . . . . 108
Cleaning optical discs . . . . . . . . . . . . . . . . . . . . . . . . . . . . . . . . . . . . . . . . 108
Recovering your system . . . . . . . . . . . . . . . . . . . . . . . . . . . . . . . . . . . . . . . . . . . . 108
System recovery options . . . . . . . . . . . . . . . . . . . . . . . . . . . . . . . . . . . . . . . . . . . 108
Recovering specific files and software . . . . . . . . . . . . . . . . . . . . . . . . . . 108
Recovering your system using Microsoft System Restore . . . . . . . . . . . 109
Recovering your system using the Windows DVD . . . . . . . . . . . . . . . . . 110
Updating Windows . . . . . . . . . . . . . . . . . . . . . . . . . . . . . . . . . . . . . . . . . . . . . . . . 110
Using BigFix . . . . . . . . . . . . . . . . . . . . . . . . . . . . . . . . . . . . . . . . . . . . . . . . . . . . . . 110
Managing hard drive space . . . . . . . . . . . . . . . . . . . . . . . . . . . . . . . . . . . . . . . . . 111
Checking hard drive space . . . . . . . . . . . . . . . . . . . . . . . . . . . . . . . . . . . . 111
Deleting unnecessary files . . . . . . . . . . . . . . . . . . . . . . . . . . . . . . . . . . . . 112
Checking the hard drive for errors . . . . . . . . . . . . . . . . . . . . . . . . . . . . . 113
Defragmenting the hard drive . . . . . . . . . . . . . . . . . . . . . . . . . . . . . . . . . 114
Backing up files . . . . . . . . . . . . . . . . . . . . . . . . . . . . . . . . . . . . . . . . . . . . . 115
Scheduling maintenance tasks . . . . . . . . . . . . . . . . . . . . . . . . . . . . . . . . . . . . . . . 116
iv

www.gateway.com
Moving from your old computer . . . . . . . . . . . . . . . . . . . . . . . . . . . . . . . . . . . . . 116
Transferring files and settings with Windows Easy Transfer . . . . . . . . . 116
Transferring files and settings manually . . . . . . . . . . . . . . . . . . . . . . . . . 117
Chapter 12: Adding and Replacing Components . . . . . . . . . . . . . . . . . . . . . 119
Preventing static electricity discharge . . . . . . . . . . . . . . . . . . . . . . . . . . . . . . . . . 120
Opening the case . . . . . . . . . . . . . . . . . . . . . . . . . . . . . . . . . . . . . . . . . . . . . . . . . 120
Removing the side panel . . . . . . . . . . . . . . . . . . . . . . . . . . . . . . . . . . . . . 120
Removing the front bezel . . . . . . . . . . . . . . . . . . . . . . . . . . . . . . . . . . . . . 122
Closing the case . . . . . . . . . . . . . . . . . . . . . . . . . . . . . . . . . . . . . . . . . . . . . . . . . . 123
Replacing the front bezel . . . . . . . . . . . . . . . . . . . . . . . . . . . . . . . . . . . . . 123
Replacing the side panel . . . . . . . . . . . . . . . . . . . . . . . . . . . . . . . . . . . . . . 123
Installing memory . . . . . . . . . . . . . . . . . . . . . . . . . . . . . . . . . . . . . . . . . . . . . . . . . 124
Replacing the system battery . . . . . . . . . . . . . . . . . . . . . . . . . . . . . . . . . . . . . . . . 125
Replacing a CD, DVD, or diskette drive, or a memory card reader . . . . . . . . . . 126
Adding or replacing a hard drive . . . . . . . . . . . . . . . . . . . . . . . . . . . . . . . . . . . . . 128
Replacing the front fan . . . . . . . . . . . . . . . . . . . . . . . . . . . . . . . . . . . . . . . . . . . . . 129
Replacing the rear fan . . . . . . . . . . . . . . . . . . . . . . . . . . . . . . . . . . . . . . . . . . . . . 131
Replacing the power supply . . . . . . . . . . . . . . . . . . . . . . . . . . . . . . . . . . . . . . . . . 132
Replacing the heat sink and processor . . . . . . . . . . . . . . . . . . . . . . . . . . . . . . . . 133
Replacing the I/O panel . . . . . . . . . . . . . . . . . . . . . . . . . . . . . . . . . . . . . . . . . . . . 135
Adding or replacing an expansion card . . . . . . . . . . . . . . . . . . . . . . . . . . . . . . . . 136
Replacing the system board . . . . . . . . . . . . . . . . . . . . . . . . . . . . . . . . . . . . . . . . . 137
Chapter 13: Troubleshooting. . . . . . . . . . . . . . . . . . . . . . . . . . . . . . . . . . . . . 143
Safety guidelines . . . . . . . . . . . . . . . . . . . . . . . . . . . . . . . . . . . . . . . . . . . . . . . . . . 144
First steps . . . . . . . . . . . . . . . . . . . . . . . . . . . . . . . . . . . . . . . . . . . . . . . . . . . . . . . 144
Troubleshooting . . . . . . . . . . . . . . . . . . . . . . . . . . . . . . . . . . . . . . . . . . . . . . . . . . 144
Audio . . . . . . . . . . . . . . . . . . . . . . . . . . . . . . . . . . . . . . . . . . . . . . . . . . . . . 144
CD or DVD drives . . . . . . . . . . . . . . . . . . . . . . . . . . . . . . . . . . . . . . . . . . . . 145
Diskette drive . . . . . . . . . . . . . . . . . . . . . . . . . . . . . . . . . . . . . . . . . . . . . . 146
DVD drives . . . . . . . . . . . . . . . . . . . . . . . . . . . . . . . . . . . . . . . . . . . . . . . . . 146
Ethernet . . . . . . . . . . . . . . . . . . . . . . . . . . . . . . . . . . . . . . . . . . . . . . . . . . . 147
Expansion cards . . . . . . . . . . . . . . . . . . . . . . . . . . . . . . . . . . . . . . . . . . . . 147
File management . . . . . . . . . . . . . . . . . . . . . . . . . . . . . . . . . . . . . . . . . . . . 147
Hard drive . . . . . . . . . . . . . . . . . . . . . . . . . . . . . . . . . . . . . . . . . . . . . . . . . 148
Internet . . . . . . . . . . . . . . . . . . . . . . . . . . . . . . . . . . . . . . . . . . . . . . . . . . . 148
Keyboard . . . . . . . . . . . . . . . . . . . . . . . . . . . . . . . . . . . . . . . . . . . . . . . . . . 149
Media Center . . . . . . . . . . . . . . . . . . . . . . . . . . . . . . . . . . . . . . . . . . . . . . . 149
Memory . . . . . . . . . . . . . . . . . . . . . . . . . . . . . . . . . . . . . . . . . . . . . . . . . . . 151
Memory card reader . . . . . . . . . . . . . . . . . . . . . . . . . . . . . . . . . . . . . . . . . 151
Modem (cable or DSL) . . . . . . . . . . . . . . . . . . . . . . . . . . . . . . . . . . . . . . . . 151
Modem (dial-up) . . . . . . . . . . . . . . . . . . . . . . . . . . . . . . . . . . . . . . . . . . . . 152
Monitor . . . . . . . . . . . . . . . . . . . . . . . . . . . . . . . . . . . . . . . . . . . . . . . . . . . 154
Mouse . . . . . . . . . . . . . . . . . . . . . . . . . . . . . . . . . . . . . . . . . . . . . . . . . . . . 154
Networks . . . . . . . . . . . . . . . . . . . . . . . . . . . . . . . . . . . . . . . . . . . . . . . . . . 155
Passwords . . . . . . . . . . . . . . . . . . . . . . . . . . . . . . . . . . . . . . . . . . . . . . . . . 155
v

Contents
Power . . . . . . . . . . . . . . . . . . . . . . . . . . . . . . . . . . . . . . . . . . . . . . . . . . . . . 155
Printer . . . . . . . . . . . . . . . . . . . . . . . . . . . . . . . . . . . . . . . . . . . . . . . . . . . . 155
Sound . . . . . . . . . . . . . . . . . . . . . . . . . . . . . . . . . . . . . . . . . . . . . . . . . . . . . 156
Telephone support . . . . . . . . . . . . . . . . . . . . . . . . . . . . . . . . . . . . . . . . . . . . . . . . 157
Before calling Gateway Customer Care . . . . . . . . . . . . . . . . . . . . . . . . . . 157
Telephone numbers . . . . . . . . . . . . . . . . . . . . . . . . . . . . . . . . . . . . . . . . . 157
Self-help . . . . . . . . . . . . . . . . . . . . . . . . . . . . . . . . . . . . . . . . . . . . . . . . . . . 158
Tutoring . . . . . . . . . . . . . . . . . . . . . . . . . . . . . . . . . . . . . . . . . . . . . . . . . . . 158
Training . . . . . . . . . . . . . . . . . . . . . . . . . . . . . . . . . . . . . . . . . . . . . . . . . . . 158
Appendix A: Legal Notices . . . . . . . . . . . . . . . . . . . . . . . . . . . . . . . . . . . . . . . . . . . . 159
Index . . . . . . . . . . . . . . . . . . . . . . . . . . . . . . . . . . . . . . . . . . . . . . . . . . . . . . . 165
vi

CHAPTER 1
Getting Help
• Thank you for purchasing our computer!
• Using the Gateway Web site
• Using Help and Support
• Using online help
• Finding your model and serial number
• Microsoft Certificate of Authenticity
1
CHAPTER 1: Getting Help
Thank you for purchasing our computer!
You have made an excellent decision choosing Gateway. We are sure that you will be pleased
with the outstanding quality, reliability, and performance of your new computer. Each and every
Gateway computer uses the latest technology and passes through the most stringent quality
control tests to ensure that you are provided with the best product possible.
Please read this manual carefully to familiarize yourself with our range of services and support.
We have highlighted some basic care and safety information to help you keep your computer
in good operating condition.
Gateway stands behind our value proposition to our customers—to provide best-of-class service
and support in addition to high-quality, brand-name components at affordable prices. If you ever
have a problem, our knowledgeable, dedicated customer service department will provide you
with fast, considerate service.
We sincerely hope that you will receive the utmost satisfaction and enjoyment from your new
Gateway computer for years to come.
Thanks again, from all of us at Gateway.
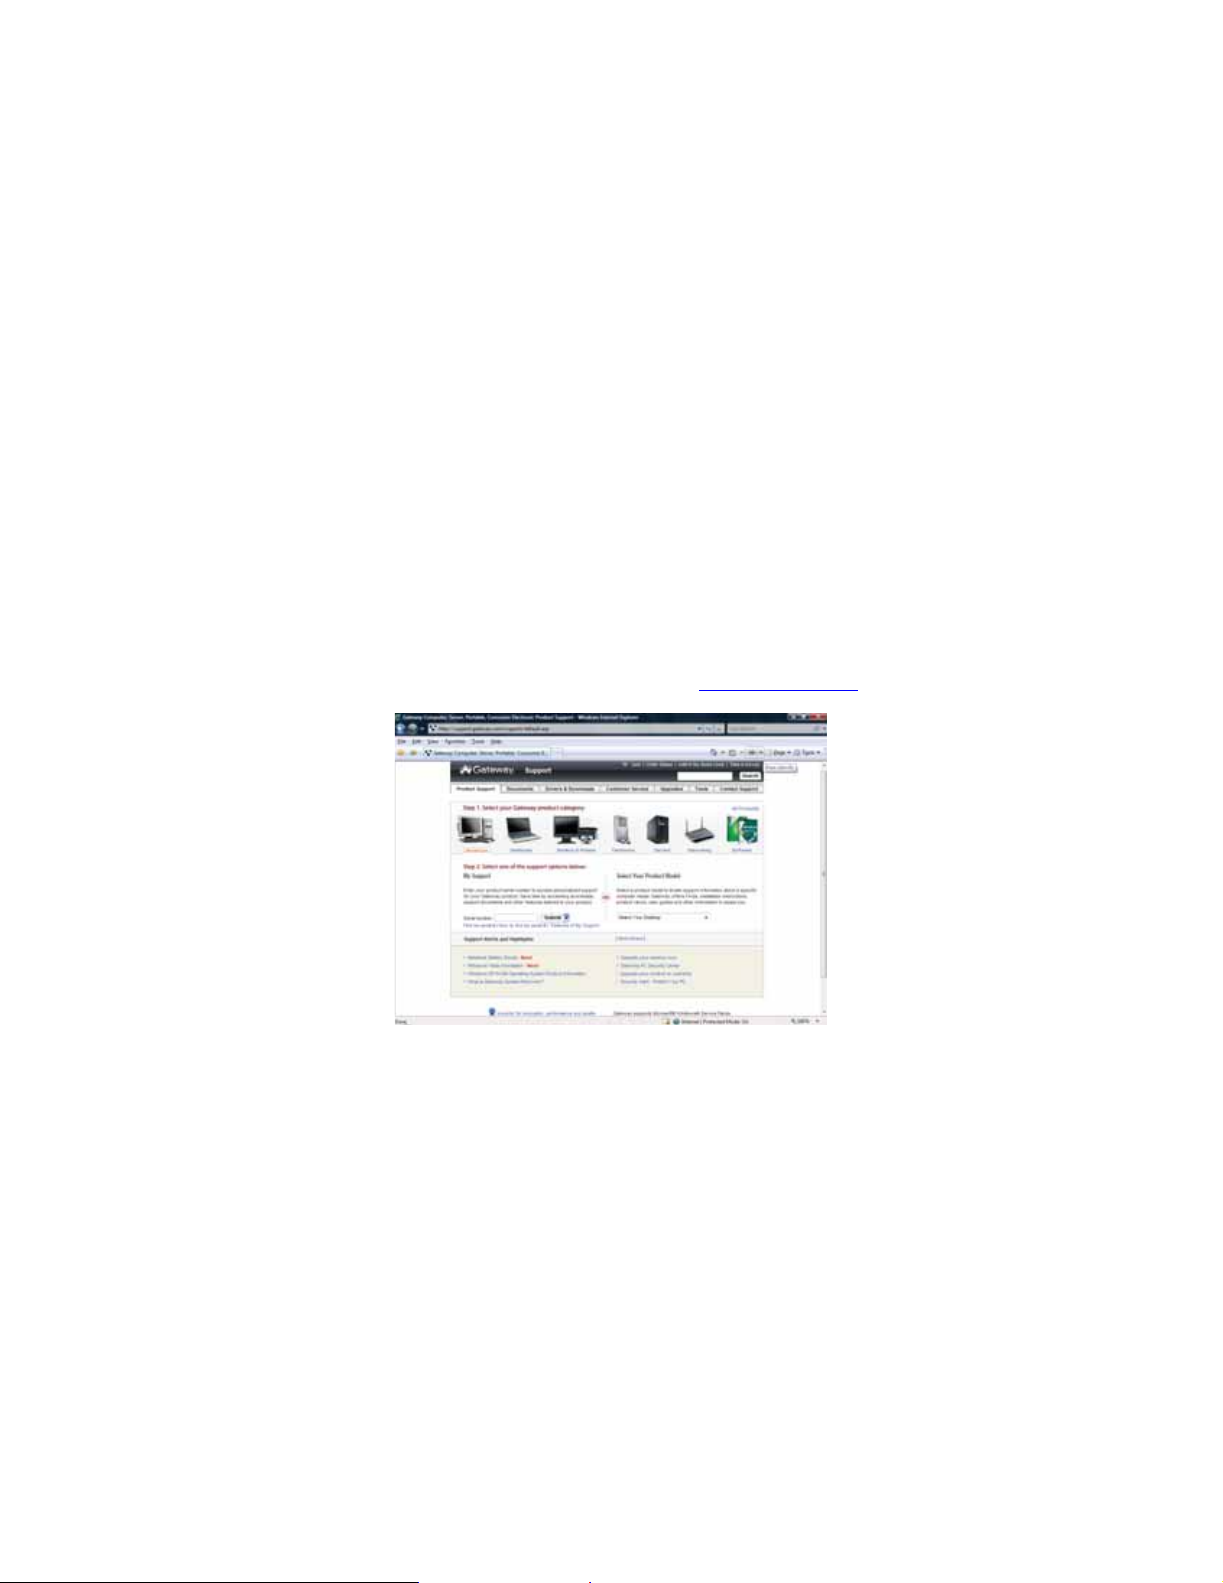
Using the Gateway Web site
Gateway’s online support is available 24 hours per day, 7 days per week and provides the most
current drivers, product specifications, tutorials, and personalized information about your
computer. Visit the Gateway Support Web site at www.gateway.com
.
2
www.gateway.com
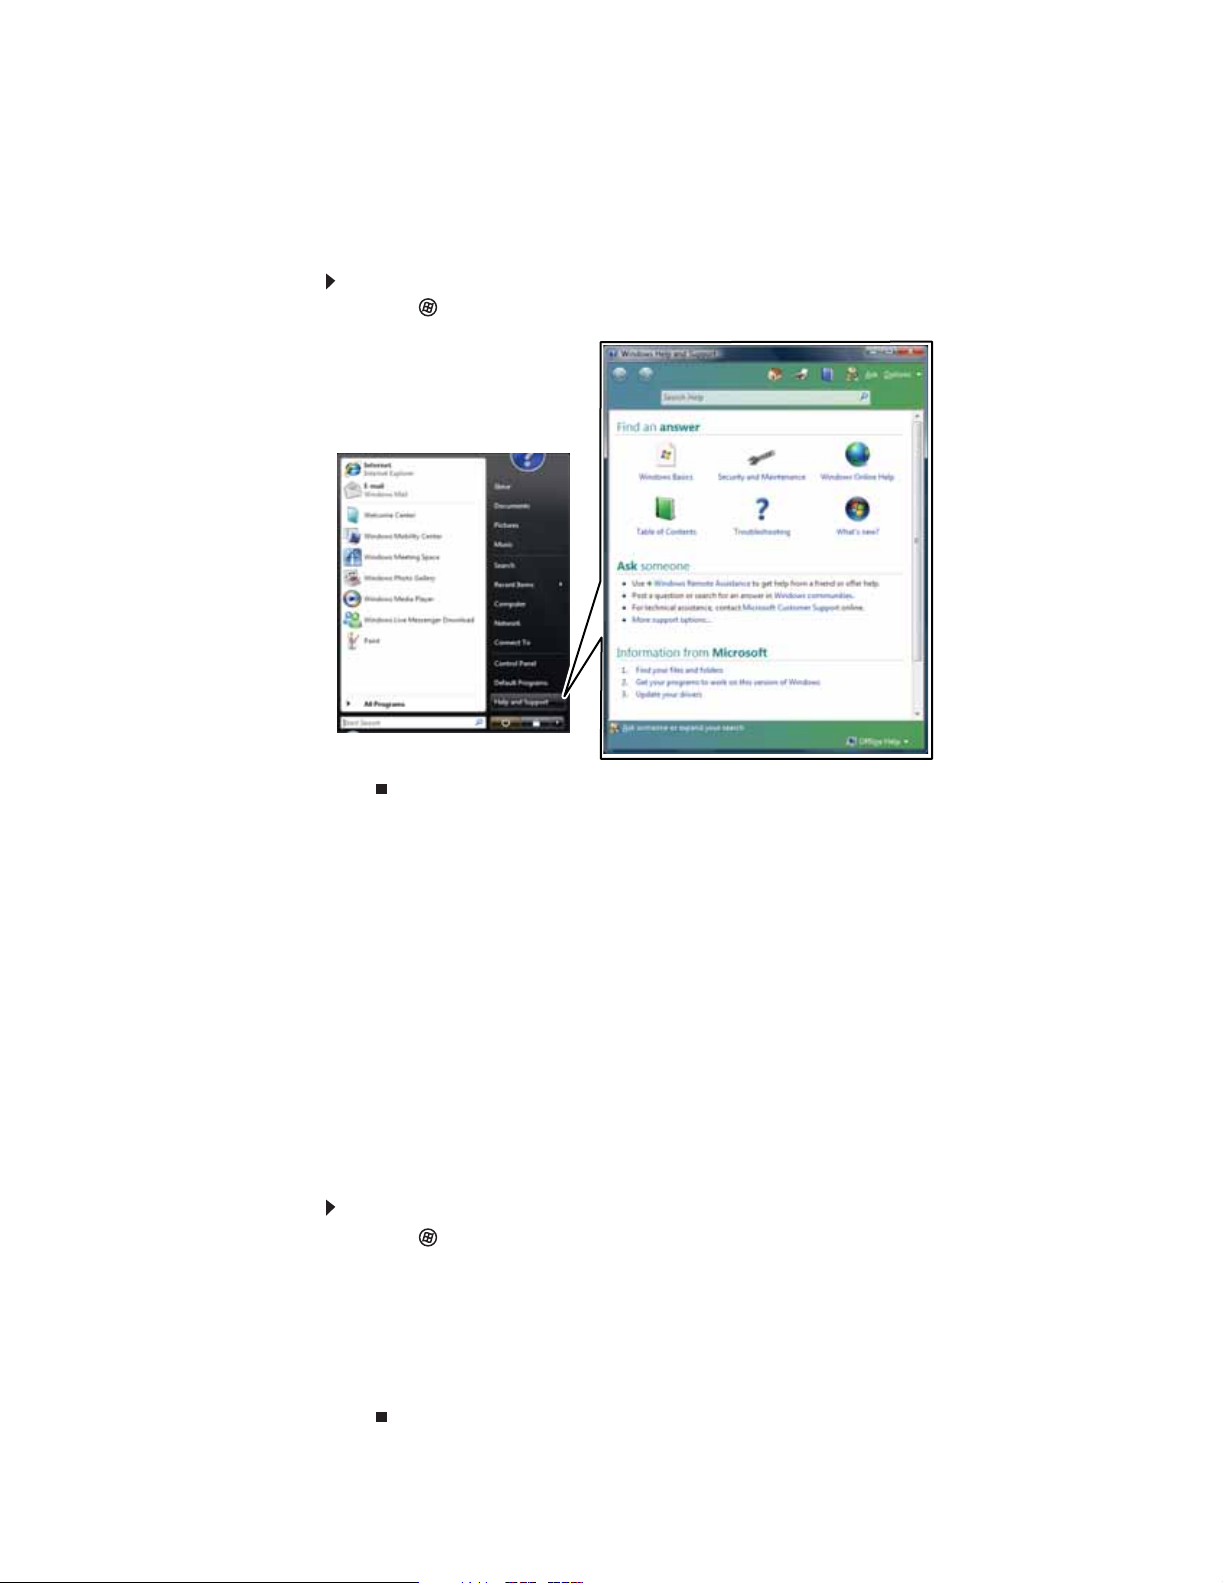
Using Help and Support
Your computer includes Help and Support, an easily accessible collection of help information,
troubleshooters, and automated support. Use Help and Support to answer questions about
Windows and to help you quickly discover and use the many features of your Gateway computer.
To start Help and Support:
• Click (Start), then click Help and Support. Help and Support opens.
You can find help information by clicking a general topic under Find an answer, selecting an
option under Ask someone, or picking a catagory from Information from Microsoft. You can
also search for a topic.
Searching for a topic
To search for a topic in Help and Support, type a word or phrase (keyword) in the Search Help
box located at the top of any Help and Support screen, then press ENTER.
For each search, you receive a list of suggested topics. To find the answer, click the result that
most closely matches your question. Additional results may be available if the first list does not
address your question.
Getting help for Windows Media Center
If your computer has Windows Vista Media Center Edition, you can access help for information
on how to use it.
To access Media Center help:
1 Click (Start), then click Help and Support. Help and Support opens.
2 In the Help and Support window, type Windows Media Center in the Search Help box,
then press E
-OR-
If you are connected to the Internet, you can click Windows Online Help, then type
Windows Media Center in the Search Help For box.
NTER. The Media Center Help window opens.
3
CHAPTER 1: Getting Help
Using online help
If you are connected to the Internet, many programs provide information online so you can
research a topic or learn how to perform a task while you are using the program. You can access
most online help information by selecting a topic from a Help menu or by clicking the Help button
on the menu bar and selecting Online Support from the list.
Available information depends on the particular Help site to which you are taken. Many provide
FAQs (Frequently Asked Questions), a search feature, articles about their software, tutorials, and
forums where problems and issues are discussed.
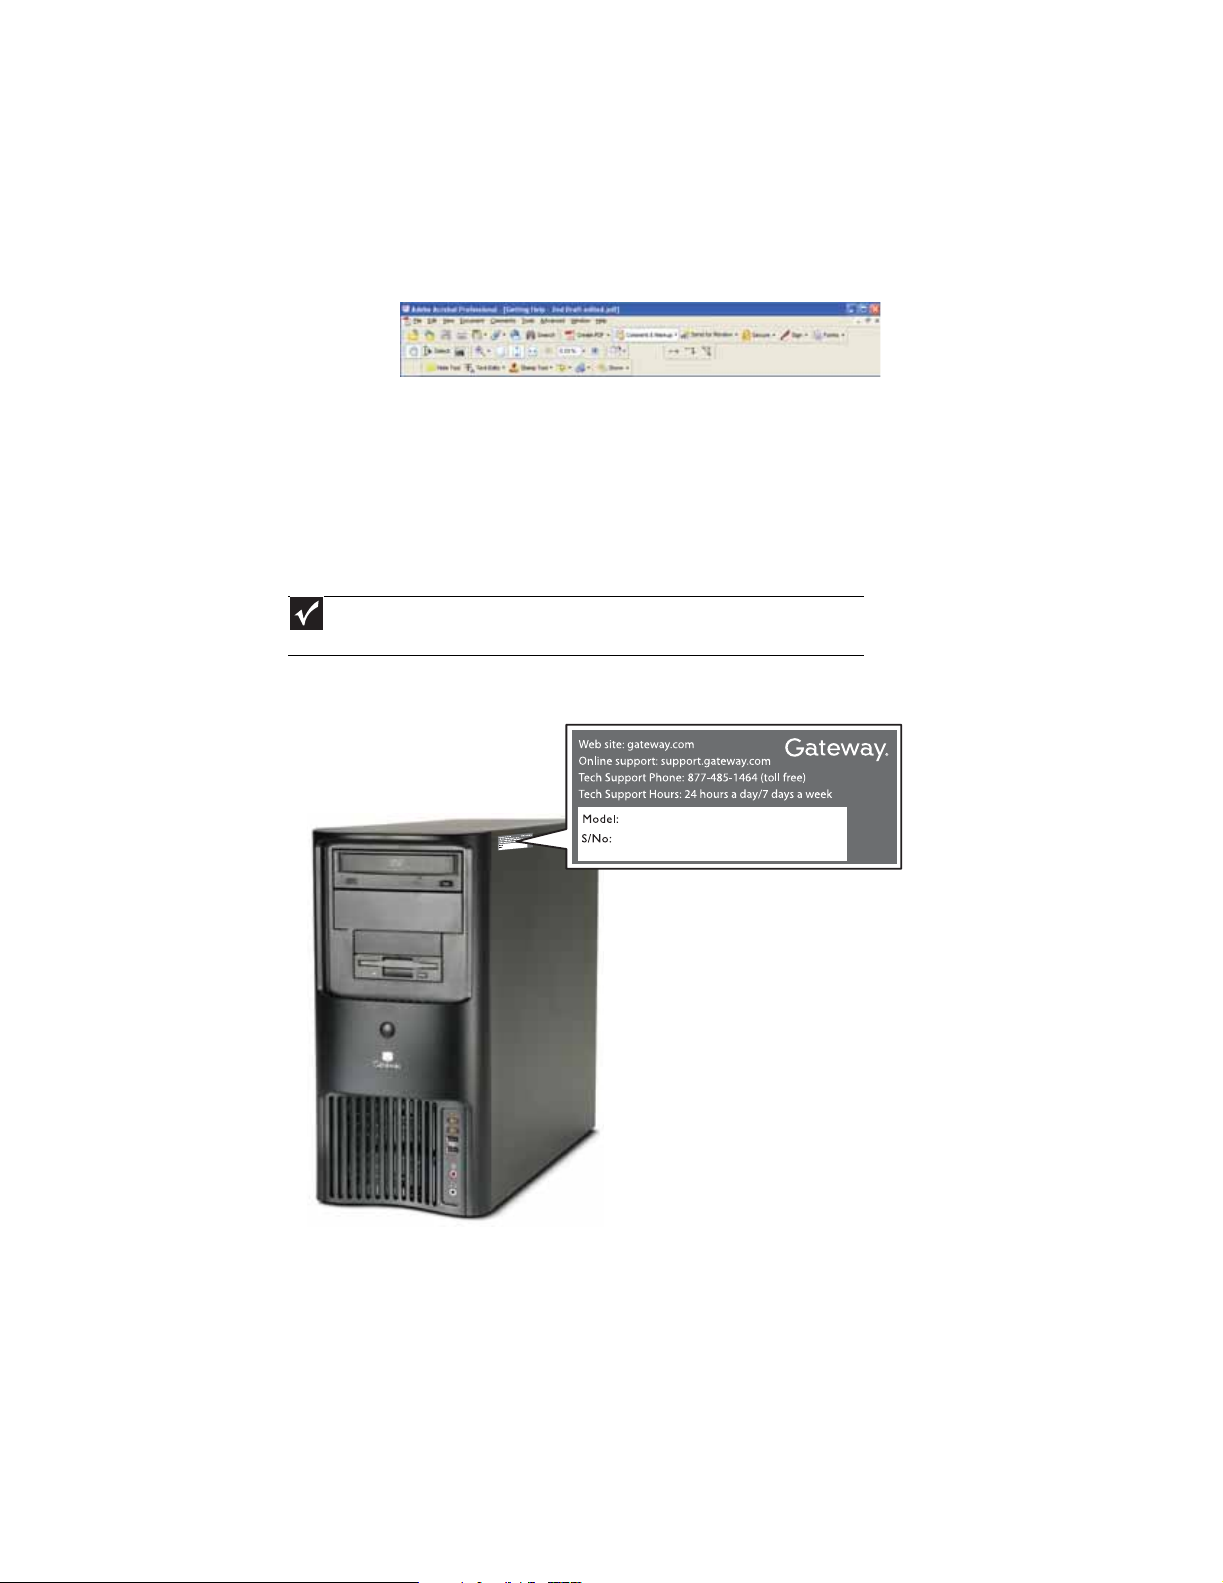
Finding your model and serial number
Important
The labels shown in this section are for informational purposes only. Label
information varies by model, features ordered, and location.
The label on the side of your computer case includes your computer serial number. Gateway
Customer Care will need this information if you call for assistance.
Microsoft Certificate of Authenticity
The Microsoft Certificate of Authenticity label found on the back or side of your computer includes
the product key code for your operating system. If you ever reinstall Windows Vista from the
installation DVD, you will need to enter these numbers to activate it.
4

CHAPTER 2
Setting Up and Getting Started
• Front
• Back
• Working safely and comfortably
• Preparing power connections
• Connecting to a broadband modem or network
• Connecting a dial-up modem
• Starting your computer
• Turning off your computer
• Restarting (rebooting) your computer
• Using the keyboard
• Using the mouse
• Adjusting the volume
• Configuring the audio jacks
• Installing a printer, scanner, or other device
5
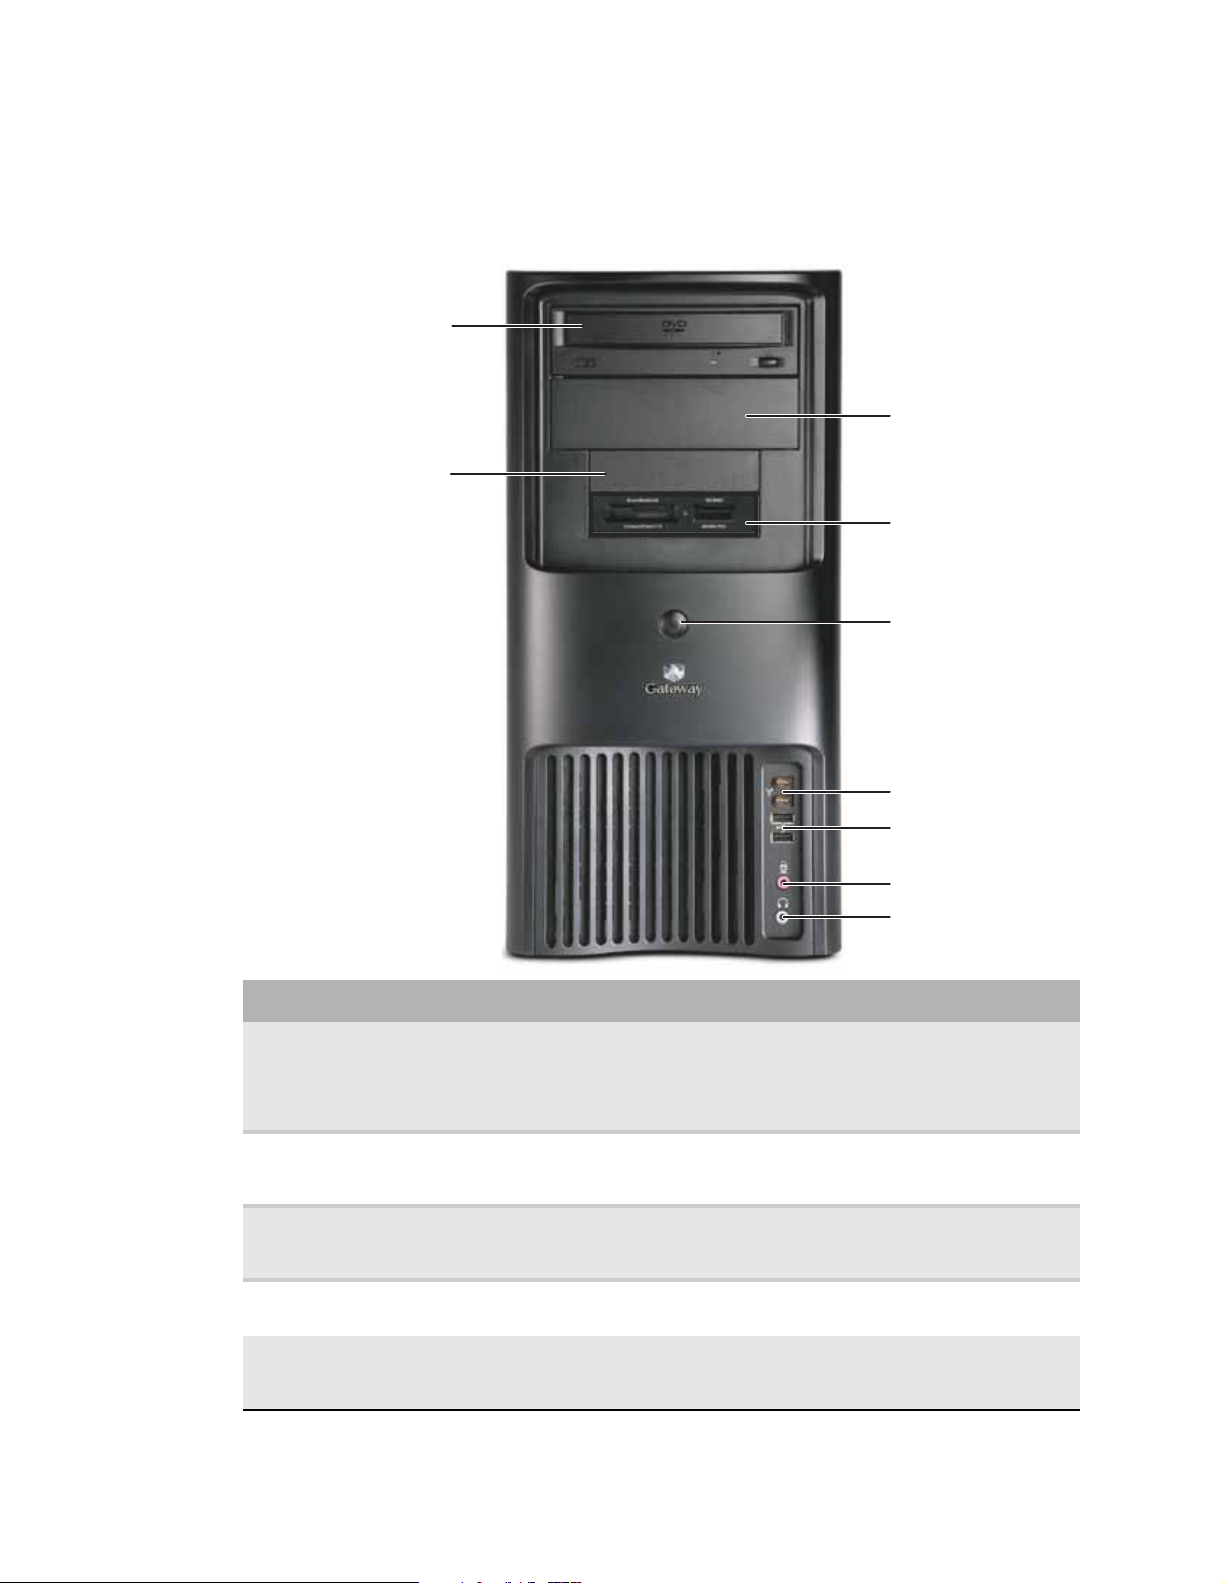
Front
CHAPTER 2: Setting Up and Getting Started
Your computer includes the following components (your computer may differ from the computer
shown below).
DVD/CD drive
Spare 5.25-inch drive bay
Spare 3.5-inch drive bay
Memory card reader
(optional). This bay can also
hold an optional diskette
drive.
Power button/power indicator
IEEE 1394 ports (optional on
some models)
USB ports
Headphone jack
Microphone jack
Component Icon Description
DVD/CD drive Use this drive to listen to audio CDs, install games and programs, watch DVDs,
Spare 3.5-inch
external drive
bay
Spare 5.25-inch
external drive
bay
Memory card
reader (optional)
Power
button/Power
indicator
and store large files onto recordable discs (depending on drive type).
This drive may be a CD, recordable CD, DVD, or recordable DVD drive. To
identify your drive type and for more information about your drive, see
“Identifying drive types” on page 46.
Use this drive bay for a memory card reader or other 3.5-inch drive.
Use this drive bay for an additional CD or DVD drive.
Insert a variety of memory cards into this optional memory card reader. For
more information, see “Using the memory card reader” on page 48.
Press this button to turn the power on or off. You can also configure the power
button to operate in Standby/Resume mode or Hibernate mode.
The button lights when the computer is turned on.
6
www.gateway.com
Component Icon Description
Back
IEEE 1394 ports Plug an IEEE 1394 (also known as Firewire® or i.Link®) device (such as a digital
USB ports Plug a USB (Universal Serial Bus) device (such as a printer, scanner, camera,
Microphone jack Plug a microphone into this jack. This jack is color-coded red or pink.
Headphone jack Plug powered, analog front speakers, an external amplifier, or headphones
camcorder) into these 4-pin IEEE 1394 ports. For more information, see
“Installing a printer, scanner, or other device” on page 20.
keyboard, or mouse) into these ports. For more information, see “Installing a
printer, scanner, or other device” on page 20.
into this jack. This jack is color-coded green.
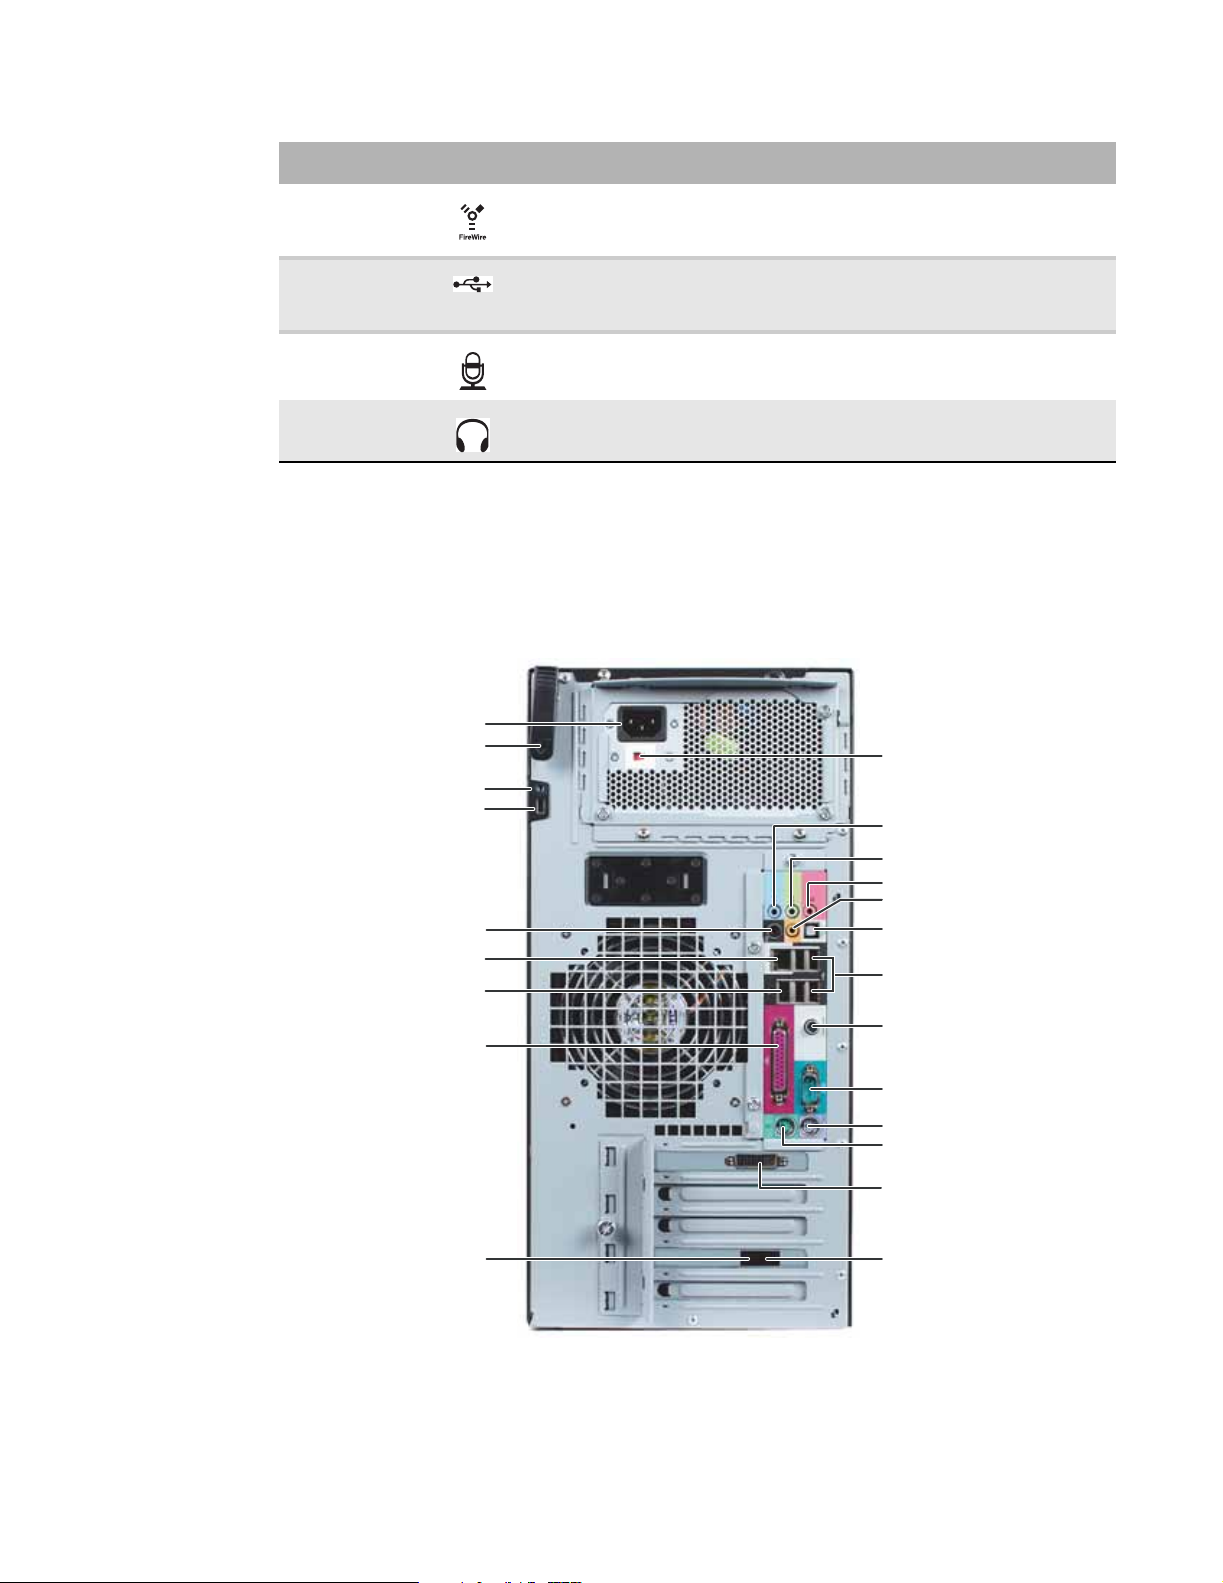
Your computer includes the following components (your computer may differ from the computer
shown below).
Power connector
Cover release lever
Case cover thumbscrew
Kensington lock slot
Rear speaker jack
(optional)
Ethernet (network) jack
IEEE 1394 port
Parallel port
Voltage switch
Audio in/side speaker jack
Headphone/front speaker jack
Microphone jack
Center/subwoofer jack (optional)
S/PDIF optical audio jack (optional)
USB ports
Digital coaxial audio jack (E-6610).
Video port (not shown) on E-6300 and
E-6500 models.
Modem jack (optional)
Serial port
PS/2 keyboard port
PS/2 mouse port
DVI video port (standard on E-6610,
optional on E-6300 and E-6500).
Telephone jack (optional)
7
CHAPTER 2: Setting Up and Getting Started
Component Icon Description
Power connector Plug the power cord into this connector.
Cover release lever Press toward the side of the case to open the computer cover.
Case cover
thumbscrew
Kensington lock slot Attach a cable lock to this slot, then attach the cable to a solid object
Rear speaker jack
(black plug)
(optional)
Ethernet (network)
jack
IEEE 1394 port
(optional)
Parallel port Plug a parallel device (such as a printer) into this port. For more
Modem jack
(optional)
Voltage switch Before turning on your computer, make sure that this switch is in
Remove this screw before opening the case.
like a desk or table to prevent your computer from being stolen.
Dual-purpose audio jack. Plug your rear right and left speakers into
this optional jack.
For information on configuring this jack, see “Configuring the audio
jacks” on page 49.
Plug a 10/100 Ethernet network cable or a device (such as a DSL
or cable modem for a broadband Internet connection) into this jack.
For more information, see “Networking Your Computer” on page 81.
Plug an IEEE 1394 (also known as Firewire® or i.Link®) device (such
as a digital camcorder) into this 4-pin IEEE 1394 port. For more
information, see “Installing a printer, scanner, or other device” on
page 20.
information, see “Installing a printer, scanner, or other device” on
page 20.
Plug a modem cable into this jack.
the correct position for the correct power available. The switch is
preset at the factory with the correct voltage for your area.
In the United States, the utility power is supplied at a nominal 115
volts at 60 Hz. The power supply should always be set to this when
your computer is operating in the United States. In other areas of
the world, such as Europe, the utility power is supplied at 230 volts
at 50 Hz. If your computer is operating in an environment such as
this, the voltage switch should be moved to 230.
8
Audio input (Line
in)/side speaker jack
(blue)
Headphone/analog
speakers jack (green)
-ORFront speakers jack
Microphone jack (red
or pink)
If the back of your computer has five audio jacks, this jack is user
configurable for one of the following:
Stereo in: Plug an external audio input source (such as a stereo)
into this jack so you can record sound on your computer (Default).
Stereo out: Plug your side left and right speakers into this jack.
For information on configuring this jack, see “Configuring the audio
jacks” on page 49.
If the back of your computer has three audio jacks, this jack is the
audio input (line in) jack. Plug an external audio input source (such
as a stereo) into this jack so you can record sound on your computer.
If the back of your computer has five audio jacks, this jack is user
configurable for one of the following:
Headphone: Plug headphones or amplified speakers into this jack
(Default).
Stereo out: Plug your front left and right speakers into this jack.
For information on configuring this jack, see “Configuring the audio
jacks” on page 49.
If the back of your computer has three audio jacks, this jack is the
headphone/analog speaker (line out) jack. Plug powered speakers,
an external amplifier, or headphones into this jack.
Plug a microphone into this jack.
www.gateway.com
Component Icon Description
Center/subwoofer
jack
(orange plug)
(optional)
S/PDIF optical audio
jack (optional)
USB ports Plug USB (Universal Serial Bus) devices (such as a printer, scanner,
Digital coaxial audio
port (E-6610), or
Video port (E-6300
and E-6500)
Serial port Plug a serial device into this port. For more information, see
PS/2 keyboard port Plug a PS/2 mouse into this port.
PS/2 mouse port Plug a Personal System/2
DVI video port Plug a digital monitor into this port (E-6610). Optional on some
Telephone jack
(optional)
Dual-purpose audio jack. Plug your center speaker and subwoofer
into this optional jack.
For information on configuring this jack, see “Configuring the audio
jacks” on page 49.
Plug a single Toslink™ optical fiber connector into this jack for
digital audio. S/PDIF (Sony/Phillips Digital Interface) provides digital
audio output from a CD or DVD.
camera, keyboard, or mouse) into these ports. For more
information, see “Installing a printer, scanner, or other device” on
page 20.
Plug a single digital coaxial audio connector into this jack for digital
audio. Provides digital audio output from a CD or DVD (E-6610)
Plug a monitor into this port (E-6300 and E-6500).
“Installing a printer, scanner, or other device” on page 20.
®
(PS/2) keyboard into this port.
models (E-6300 and E-6500).
Plug a telephone cable into this jack.
9
CHAPTER 2: Setting Up and Getting Started
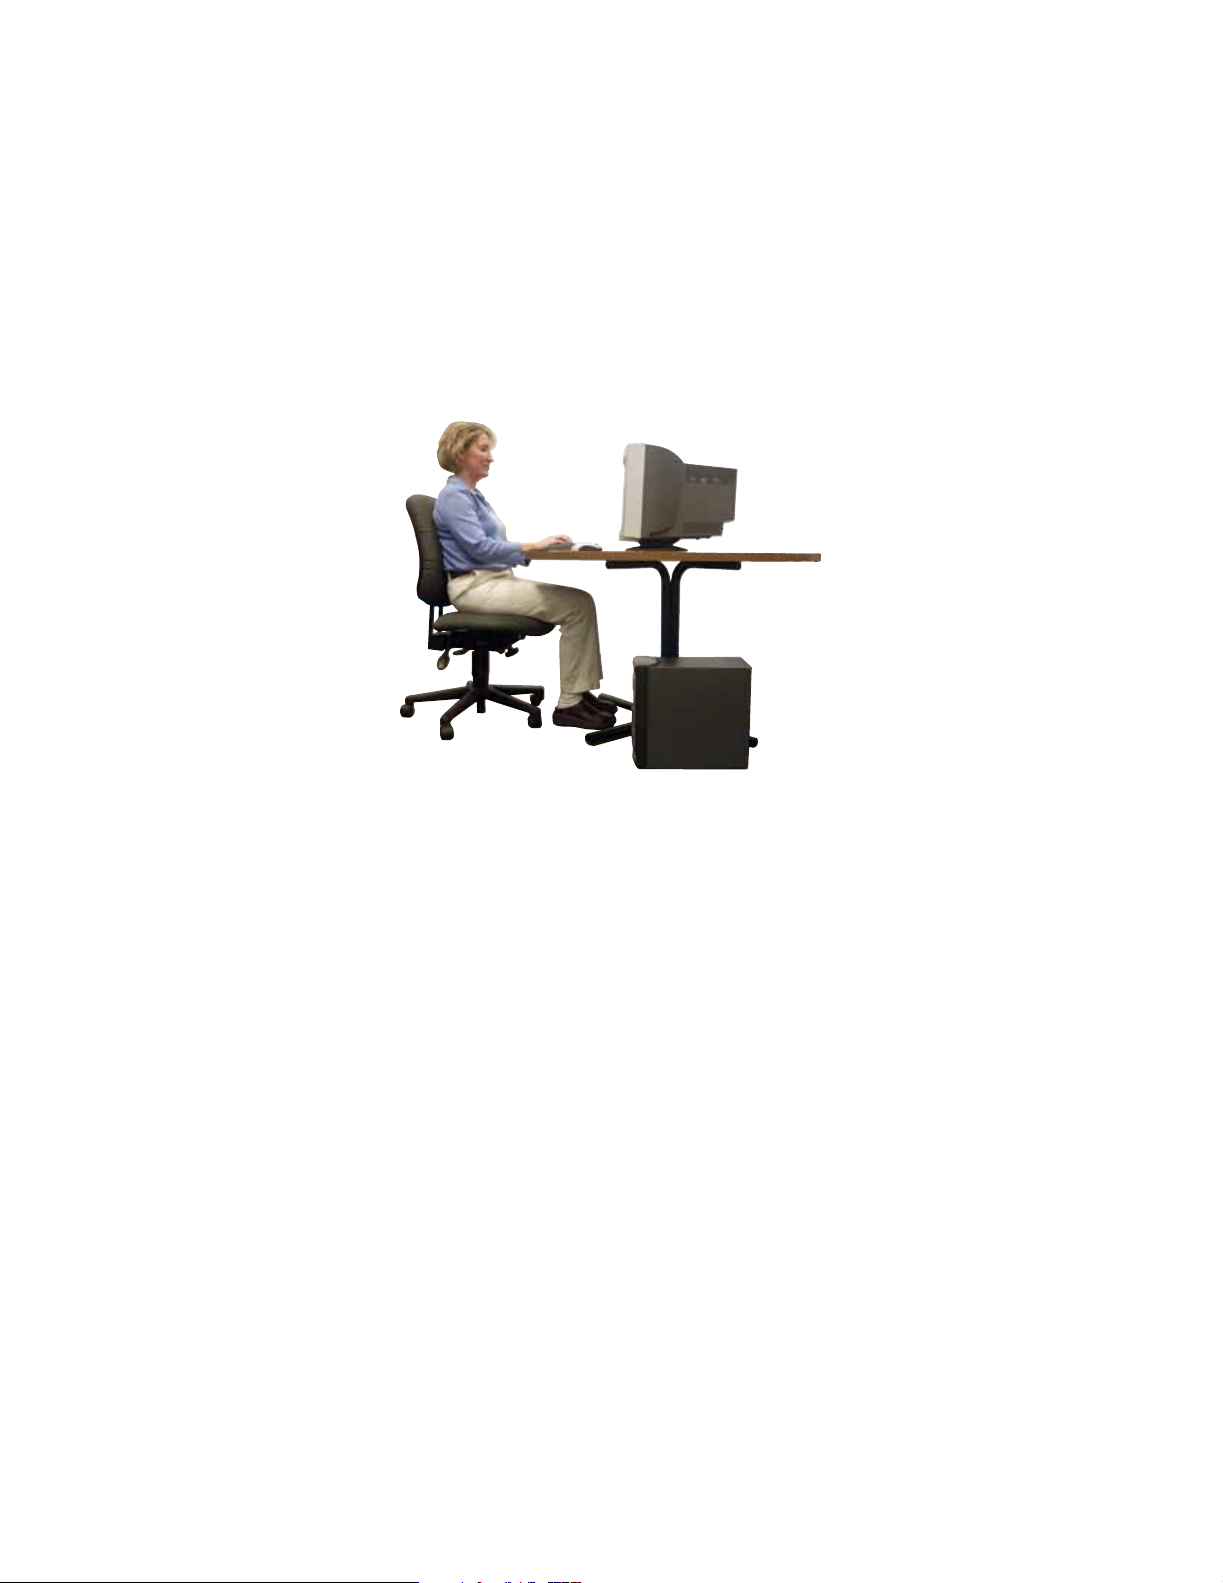
Working safely and comfortably
Before using your computer, follow these general guidelines for setting up a safe and comfortable
work area and avoiding discomfort and strain:
• Keep hands and arms parallel to the floor.
• Adjust the screen so it is perpendicular to your line of sight, and the top of the screen is
no higher than eye leve.
• Place your feet flat on the floor or on a footrest.
• Keep ventilation openings clear of obstructions.
Top of screen is not
higher than eye level
Hands and arms are
parallel to the floor
Screen is perpendicular to
your line of sight
Feet are flat on the floor
Reducing eye strain
Sunlight or bright indoor lighting should not reflect on the monitor screen or shine directly into
your eyes.
• Position the computer desk and screen so you can avoid glare on your screen and light
shining directly into your eyes. Reduce glare by installing shades or curtains on windows,
and by installing a glare screen filter.
• Use soft, indirect lighting in your work area. Do not use your computer in a dark room.
• Set paper holders at the same height and distance as the monitor.
• Avoid focusing your eyes on your computer screen for long periods of time. Every 10 or
15 minutes, look around the room, and try to focus on distant objects.
Setting up your computer desk and chair
When you are setting up your computer desk and chair, make sure that the desk is the appropriate
height and the chair helps you maintain good posture.
10

• Select a flat surface for your computer desk.
• Adjust the height of the computer desk so your hands and arms are positioned parallel to
the floor when you use the keyboard and touchpad. If the desk is not adjustable or is too
tall, consider using an adjustable chair to control your arm’s height above the keyboard.
• Use an adjustable chair that is comfortable, distributes your weight evenly, and keeps your
body relaxed.
• Position your chair so the keyboard is at or slightly below the level of your elbow. This
position lets your shoulders relax while you type.
• Adjust the chair height, adjust the forward tilt of the seat, or use a footrest to distribute
your weight evenly on the chair and relieve pressure on the back of your thighs.
• Adjust the back of the chair so it supports the lower curve of your spine. You can use a
pillow or cushion to provide extra back support.
Sitting at your computer
• Avoid bending, arching, or angling your wrists. Make sure that they are in a relaxed position
when you type.
• Do not slouch forward or lean far back. Sit with your back straight so your knees, hips,
and elbows form right angles when you work.
• Take breaks to stand and stretch your legs.
• Avoid twisting your torso or neck.
www.gateway.com
Avoiding discomfort and injury from repetitive strain
• Vary your activities to avoid excessive repetition.
• Take breaks to change your position, stretch your muscles, and relieve your eyes.
• Find ways to break up the work day, and schedule a variety of tasks.
Preparing power connections
Protecting from power source problems
War ning
High voltages can enter your computer through both the power cord
and the modem connection. Protect your computer by using a surge protector.
If you have a telephone modem, use a surge protector that has a modem jack.
If you have a cable modem, use a surge protector that has an antenna/cable
TV jack. During an electrical storm, unplug both the surge protector and the
modem.
During a power surge, the voltage level of electricity coming into your computer can increase
to far above normal levels and cause data loss or system damage. Protect your computer and
peripheral devices by connecting them to a surge protector, which absorbs voltage surges and
prevents them from reaching your computer.
An uninterruptible power supply (UPS) supplies battery power to your computer during a power
failure. Although you cannot run your computer for an extended period of time with a UPS, a
UPS lets you run your computer long enough to save your work and shut down your computer
normally.
11

CHAPTER 2: Setting Up and Getting Started
Checking the voltage selection
Caution
If you set the voltage selection switch incorrectly, your system will be
damaged. Make sure this switch is set correctly for your location before turning
on your computer. In the United States, the utility power is supplied at a nominal
115 volts at 60 Hz. The power supply should always be set to this when your
computer is operating in the United States. In other areas of the world, such
as Europe, the utility power is supplied at 230 volts at 50 Hz. If your computer
is operating in an environment such as this, the voltage switch should be moved
to 230.
The power supply, a component built into your computer, provides power to the system board,
add-in cards, and peripheral devices. The power supply’s voltage selection for your location is
typically set at the factory, but you can change it to match the electrical service available in your
usage area (such as while in another country). Use the power selection switch on the back of
your computer to set the voltage to 115V or 230V. To verify that your system has the correct
setting for your area, check the voltage selection switch.
To set the voltage selection switch:
1 Disconnect your computer’s power cable.
2 Use a tool such as an opened paper clip to slide the voltage selection switch to the correct
voltage position. The switch is located on the back of your computer, near the power cable
connector.
Connecting to a broadband modem or network
Important
Your computer may be equipped with a built-in Ethernet port. For
information about setting up a wired or wireless Ethernet network, see
“Networking Your Computer” on page 81.
You can connect your computer to a cable or DSL modem or to a wired Ethernet network.
To connect to a broadband modem or to an Ethernet network:
1 Insert one end of the network cable into the network jack on the back of your computer.
2 Insert the other end of the network cable into a cable modem, DSL modem, or network jack.
Connecting a dial-up modem
War ning
To reduce the risk of fire, use only No. 26 AWG or larger
telecommunications line cord.
Your computer may have a 56K modem add-in card that you can use with a standard telephone
line to connect to the internet or fax documents.
To connect the modem:
1 Insert one end of the modem cable into the modem jack on the modem expansion card
at the back of your computer.
2 Insert the other end of the modem cable into a telephone wall jack. (The modem will not
work with digital or PBX telephone lines.)
3 If you want, you can connect a telephone to the PHONE jack on the modem expansion
card at the back of your computer.
12
www.gateway.com
Starting your computer
To start your computer:
1 Connect the power, network, mouse, and keyboard cables to your computer according to
the setup poster.
2 Press the power button on the front of your computer. If your computer does not turn
on, check the power cable connections.
Important
Your computer has a built-in variable speed fan. In addition, your
computer uses a powerful processor which produces heat. Both the
system fan and processor can run at different speeds at times to ensure
proper system cooling. You may notice an increase in the fan noise
when the fan is running at high speed and a decrease in the fan noise
when it switches to normal speed.
3 If you are starting your computer for the first time, follow the on-screen instructions to
select the language, time zone, and to create your first user account.
4 Attach and turn on any USB or audio peripheral devices, such as printers, scanners, and
speakers. See the documentation that came with each device for its setup instructions. If
you need to attach a peripheral device to the parallel or serial ports, turn off your computer
first.
5 To open your computer’s main menu, click (Start). From that menu, you can run
programs and search for files. For more information on using your computer’s menus, see
“Using Windows Vista” on page 21, and “Customizing Windows” on page 67.
Waking up your computer
Tip
For more information about changing the power button mode, see
“Changing power-saving settings” on page 77.
When you have not used your computer for several minutes, it may enter a power-saving mode
called Sleep. While in Sleep mode, the power indicator on the power button flashes.
If your computer is in Sleep mode, move the mouse, press a key on the keyboard, or press the
power button to “wake” it up.
Turning off your computer
War ning
When you turn off your computer, certain components in the power
supply and system board remain energized. In order to remove all electrical
power from your computer, unplug the power cord and modem cable from
the wall outlets. We recommend disconnecting the power cord and modem
cable when your computer will not be used for long periods.
Important
If for some reason you cannot use the Turn Off Computer option in
Windows to turn off your computer, press and hold the power button for about
five seconds, then release it.
Putting your computer into Sleep mode is the easiest way to power down your computer.
Although it does not turn your computer completely off, it does turn off or slow down most
system operations to save power, and saves your desktop layout so the next time you restore
power, the programs are laid out just as you left them. Waking your computer from a Sleep state
is much faster than turning on your computer after it has been turned completely off.
13
CHAPTER 2: Setting Up and Getting Started
To put your computer to sleep:
1 Click (Start), then click (power). The computer saves your session and partially shuts
down to save power.
2 To “wake” your computer, move the mouse, press a key on the keyboard, or press the
power button.
To turn off your computer:
1 Click (Start), click the arrow next to the power icon, then click Turn Off. The computer
turns off.
2 To completely disconnect all power (such as for servicing internal components), also
disconnect the power cord.
Restarting (rebooting) your computer
If your computer does not respond to keyboard or mouse input, you may need to restart (reboot)
your computer.
To restart your computer:
1 Click (Start), click the arrow next to the power icon, then click Restart. Your computer
turns off, then turns on again.
2 If your computer does not turn off, press and hold the power button until the computer
turns off (about five seconds), then press it again to turn the computer back on.
Using the keyboard
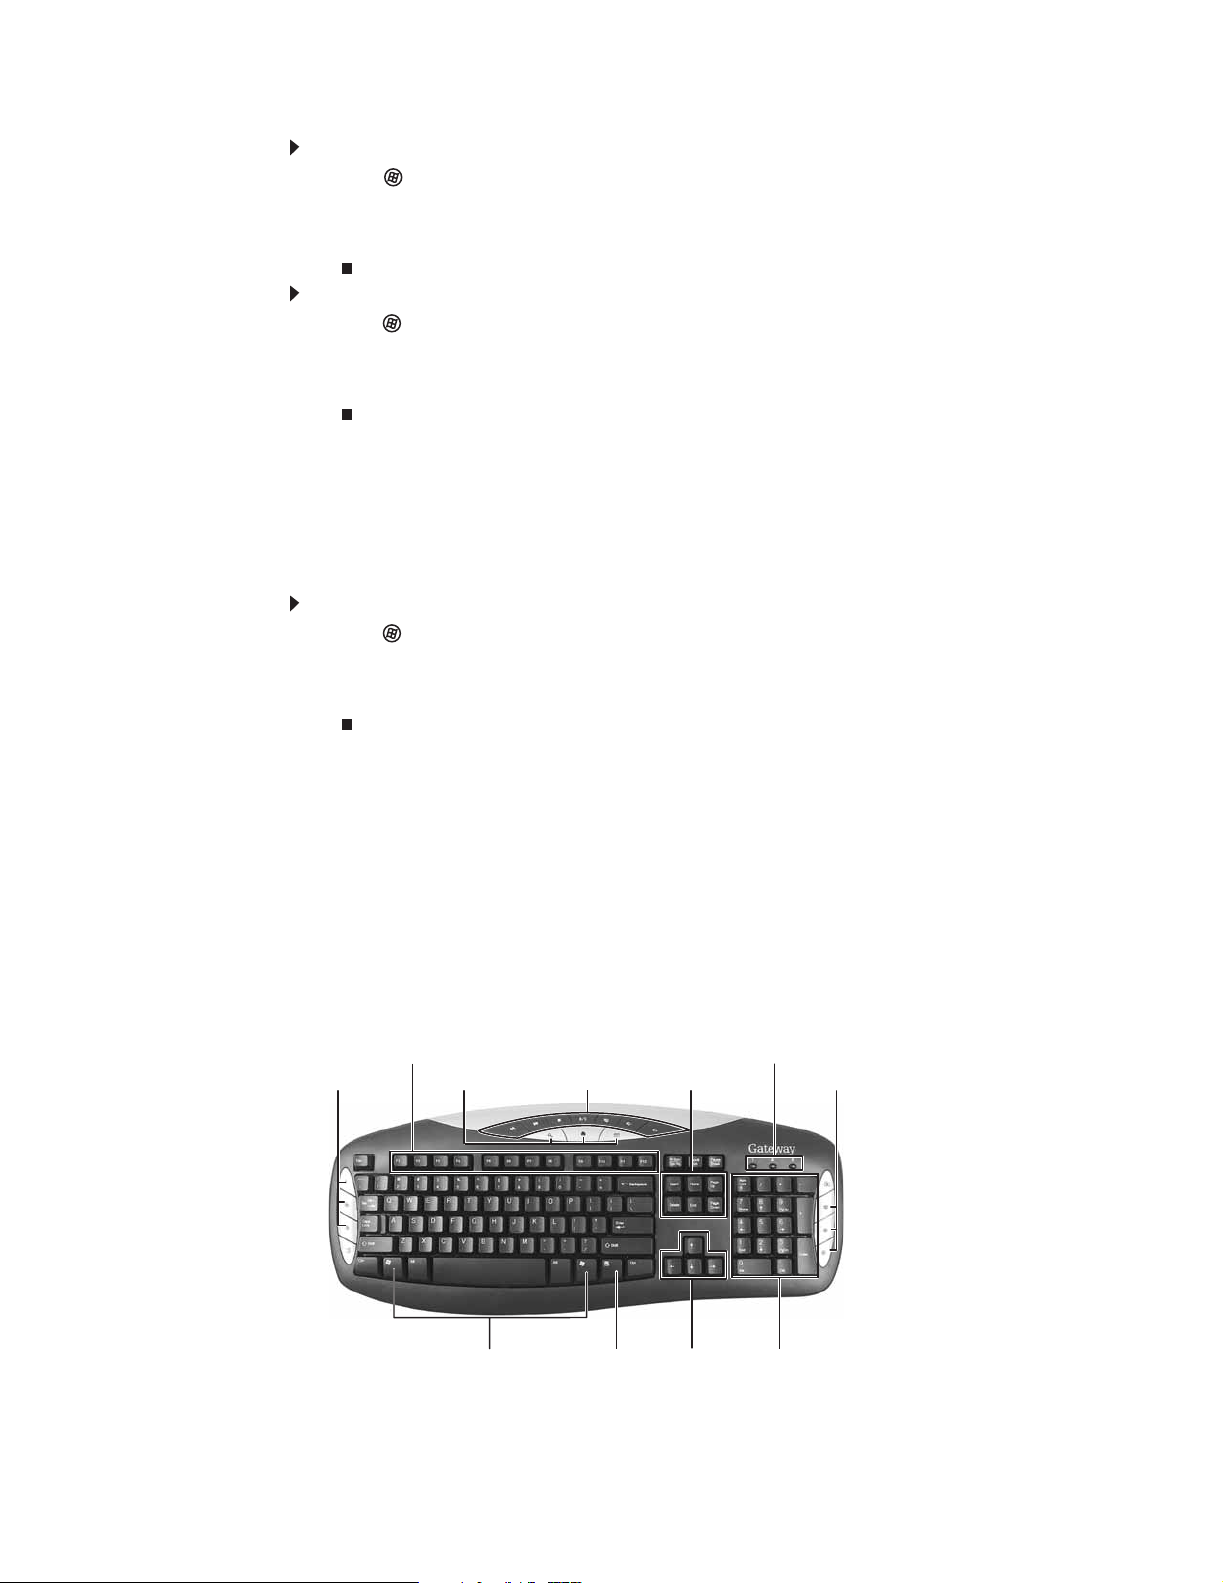
Premium multimedia keyboard features
The keyboard has several different types of keys and buttons. Your keyboard also has status
indicators that show which keyboard feature is active.
Function keys
Editing buttons
Internet
buttons
Windows keys
Audio playback buttons
Application
key
Navigation keys
Directional keys
Indicators
Internet buttons
Numeric keypad
14

www.gateway.com
Feature Icon Description
Editing buttons Press these buttons to copy, cut, and paste.
Function keys Press these keys to start program actions. Each
Internet buttons Press these buttons to launch your Internet
Audio playback
buttons
Navigation keys Press these keys to move the cursor to the
Indicators Show if your N
Windows keys Press one of these keys to open the Windows
Application key Press this key to access shortcut menus and help
Directional keys Press these keys to move the cursor up, down,
program uses different function keys for
different purposes. See the program
documentation to find out more about the
function key actions.
home page, search, or e-mail programs.
Press these buttons to play your audio files and
to adjust the volume.
beginning of a line, to the end of a line, up the
page, down the page, to the beginning of a
document, or to the end of a document.
UM LOCK, CAPS LOCK, or
SCROLL LOCK keys are activated. Press the
corresponding key to activate the function.
Start menu. These keys can also be used in
combination with other keys to open utilities like
F (Search utility), R (Run utility), and E (Explorer
utility).
assistants in Windows.
right, or left.
Numeric keypad Press these keys to type numbers when the
numeric keypad (NUM LOCK) is turned on.
15
CHAPTER 2: Setting Up and Getting Started
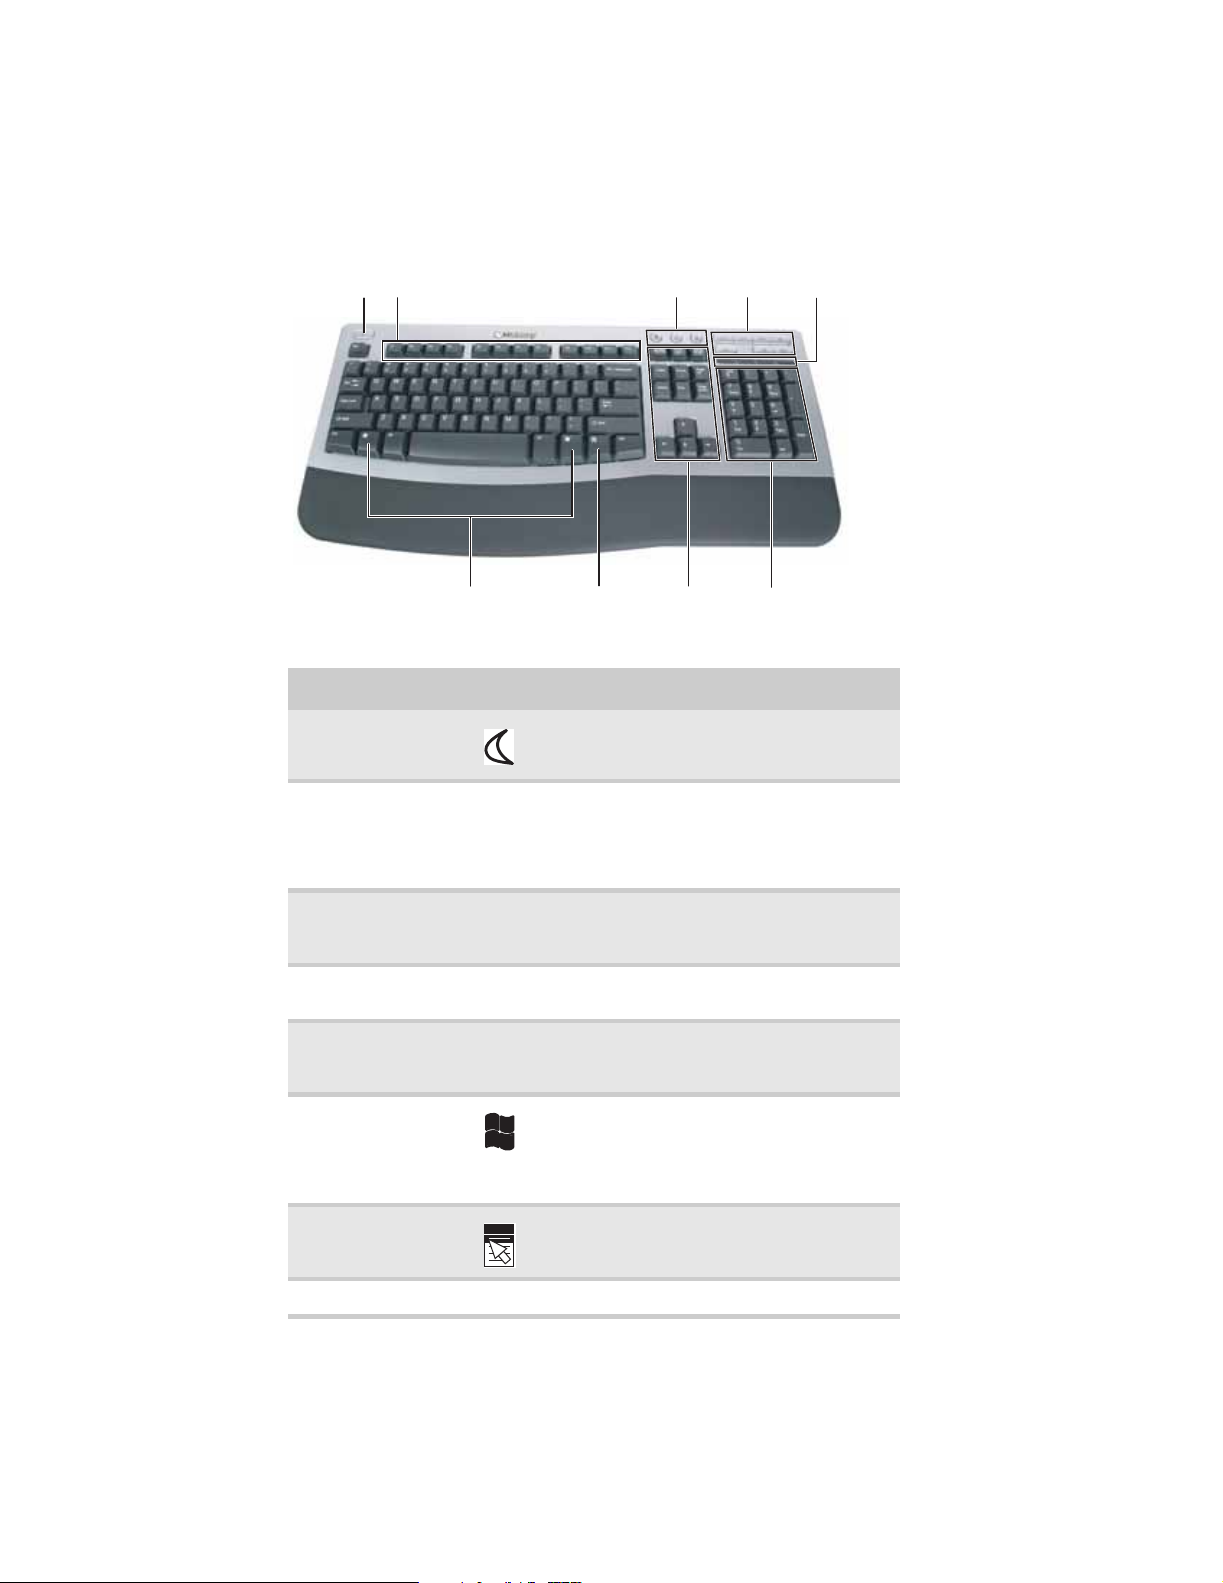
Elite multimedia keyboard features
The keyboard has several different types of keys and buttons. Your keyboard also has status
indicators that show which keyboard feature is active.
Sleep button
Function keys
Internet buttons
Audio
playback
buttons
Indicators
Windows
keys
Application key
Navigation
keys
Numeric
keypad
Feature Icon Description
Sleep button Press this button to activate your computer’s
Function keys Press these keys to start program actions.
Application buttons Press these buttons to launch your Internet
Audio playback
buttons
Indicators Show if your NUM LOCK, CAPS LOCK, or
Windows keys Press one of these keys to open the Windows
Sleep (power-saving) mode.
Each program uses different function keys for
different purposes. See the program
documentation to find out more about the
function key actions.
home page, search for files, or launch the
calculator program.
Press these buttons to play your audio files
and to adjust the volume.
CROLL LOCK keys are activated. Press the
S
corresponding key to activate the function.
Start menu. These keys can also be used in
combination with other keys to open utilities
like F (Search utility), R (Run utility), and
E (Explorer utility).
16
Application key Press this key to access shortcut menus and
help assistants in Windows.
Editing buttons Press these buttons to copy, cut, and paste.
www.gateway.com
Feature Icon Description
Navigation keys Press these keys to move the cursor to the
Numeric keypad Press these keys to type numbers when the
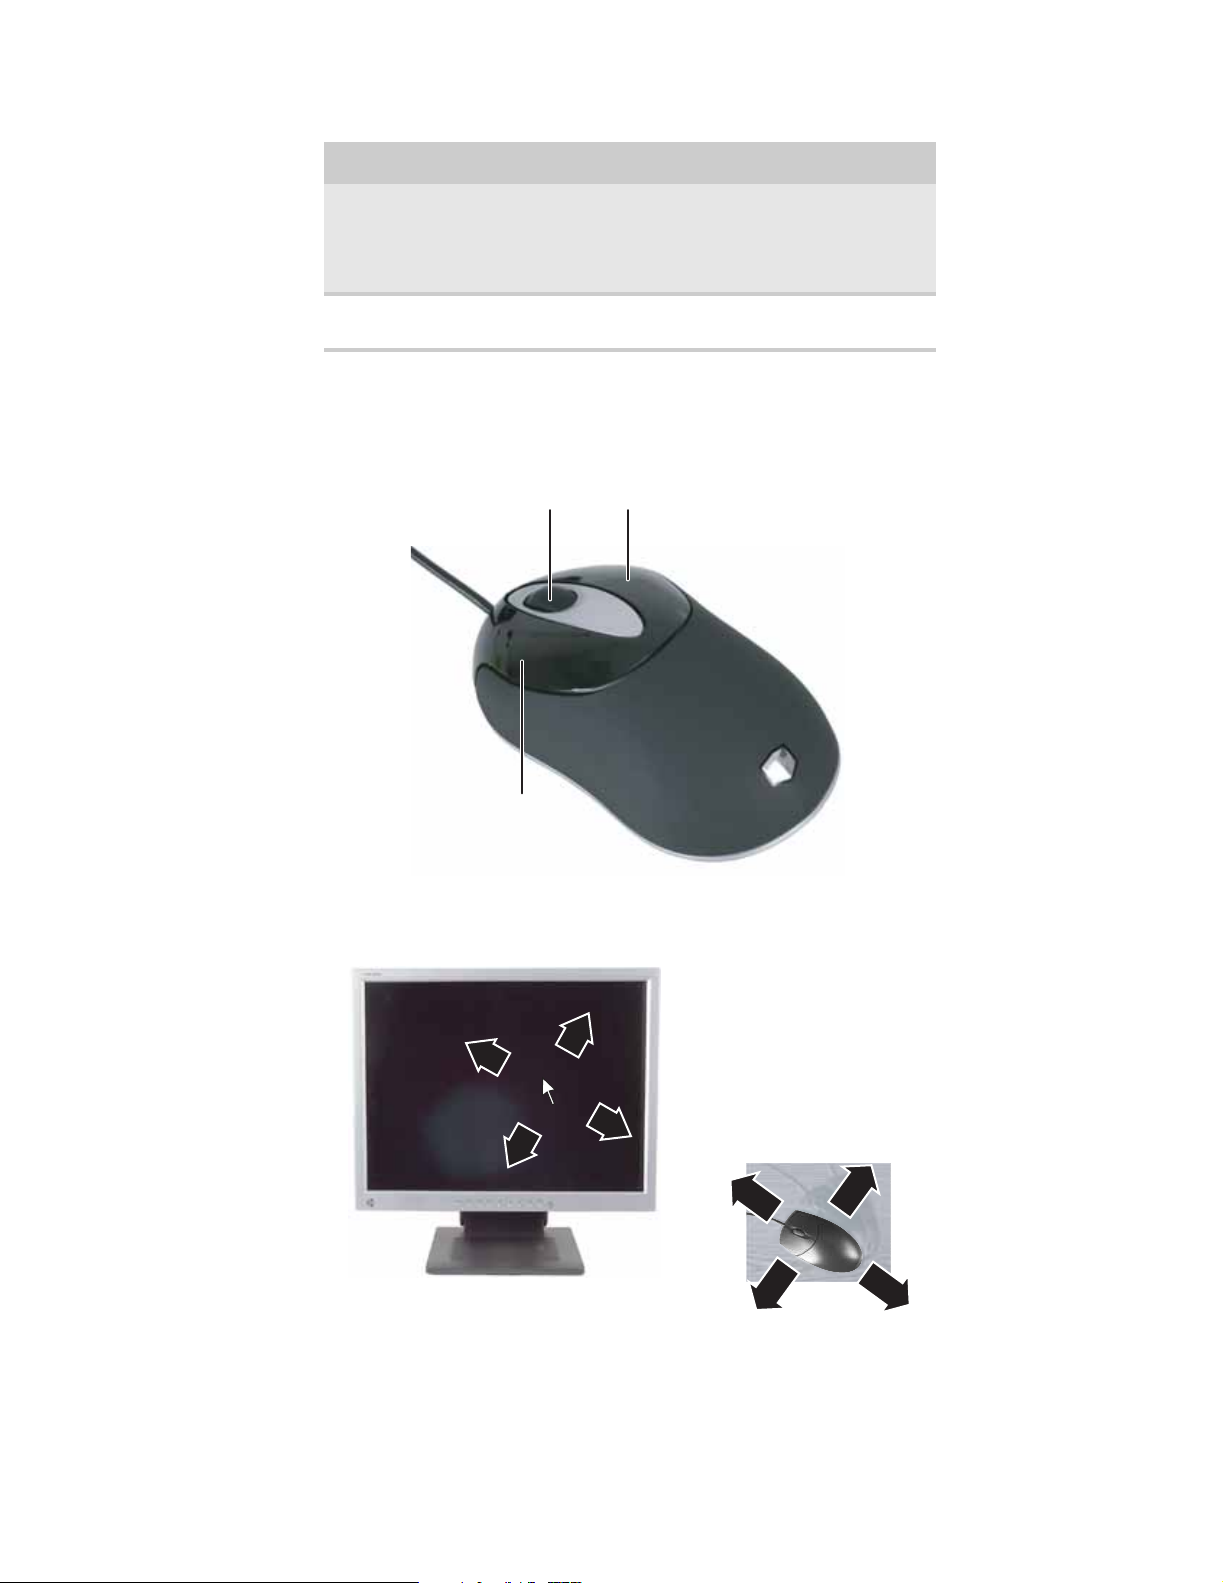
Using the mouse
Scroll wheel
beginning of a line, to the end of a line, up the
page, down the page, to the beginning of a
document, or to the end of a document. Press
the arrow keys to move the cursor.
numeric keypad (N
Right button
UM LOCK) is turned on.
Left button
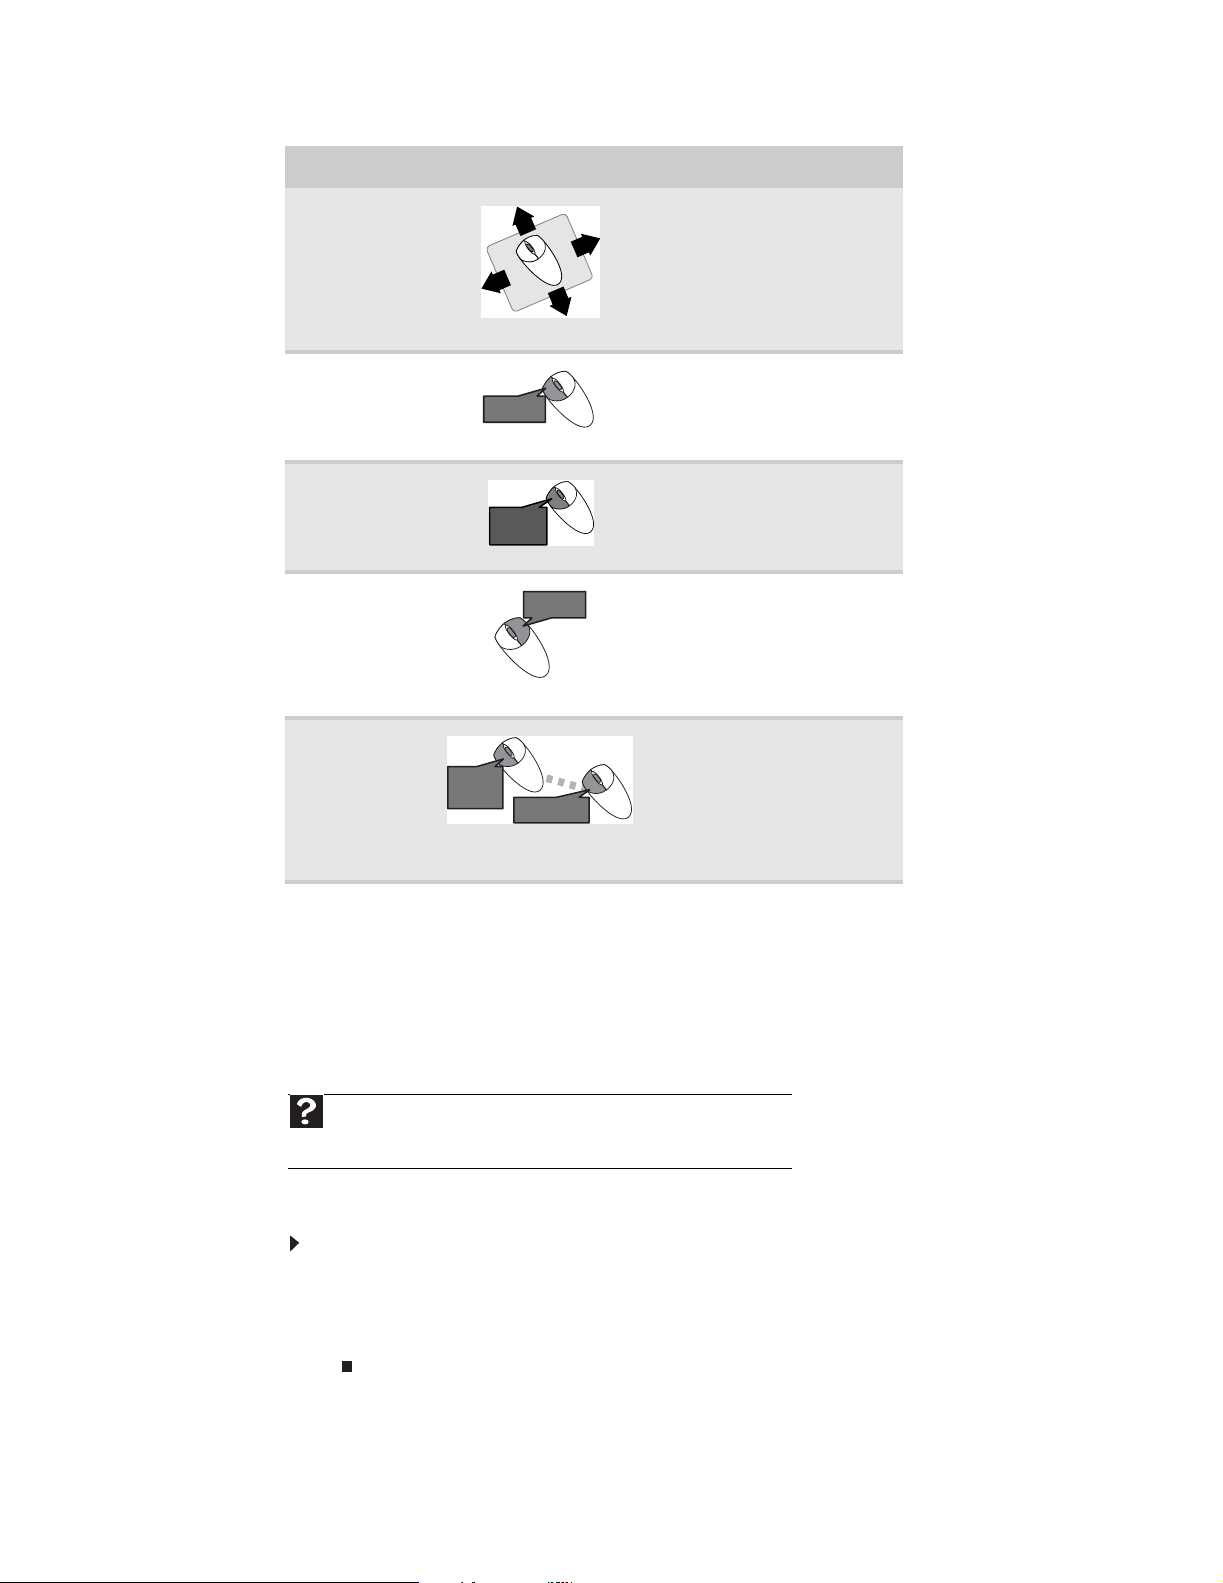
The mouse is a device that controls the pointer movement on the computer display. This
illustration shows the standard mouse.
As you move the mouse, the pointer (arrow) on the display moves in the same direction.
You can use the left and right buttons on the mouse to select objects on the display.
You can use the scroll wheel on the mouse to move through a document. This feature is not
available in all programs.
17
CHAPTER 2: Setting Up and Getting Started
To... Do this...
Move the
pointer on the
computer
display
Select an object
on the computer
display
Start a program
or open a file or
folder
Access a
shortcut menu
or find more
information
about an object
on the computer
display.
Move an object
on the computer
display.
click
click
(hold)
click
click
click,
click,
click
click
and drag
and drag
click
Move the mouse around on the
mouse pad. If you run out of
space on your mouse pad and
need to move the pointer
farther, pick up the mouse, set
it down in the middle of the
mouse pad, then continue
moving the mouse.
Position the pointer over the
object. Quickly press and
release the left mouse button
once. This action is called
clicking.
Position the pointer over the
object. Quickly press and
release the left mouse button
twice. This action is called
double-clicking.
Position the pointer over the
object. Quickly press and
release the right mouse button
once. This action is called
right-clicking.
Position the pointer over the
object. Press the left mouse
button and hold it down. Move
(drag) the object to the
appropriate part of the
computer display. Release the
button to drop the object
where you want it.
For more information about how to adjust the double-click speed, pointer speed, right-hand or
left-hand configuration, and other mouse settings, see “Changing mouse settings” on page 75.
For instructions on how to clean the mouse, see “Cleaning the mouse” on page 108.
Adjusting the volume
Help
For more information about adjusting the volume, click Start, then click
Help and Support. Type adjusting volume in the Search help box, then
press E
NTER.
You can adjust volume using your speakers’ controls or the Windows volume controls. You can
also adjust the volume of specific sound devices in your computer.
To adjust the overall volume using hardware controls:
• If you are using external speakers, turn the knob on the front of the speakers.
-OR-
Use the mute and volume control buttons on the keyboard. For more information, see
“Using the keyboard” on page 14.
18

www.gateway.com
To adjust the volume from Windows:
1 Click (Volume) on the taskbar. The volume control slider opens.
2 Click and drag the slider up to increase volume and down to decrease volume.
3 To mute the volume, click (Mute). To restore volume, click it again.
4 To adjust device volume levels, click Mixer. The Volume Mixer dialog box opens, where
you can click and drag sliders for individual devices.
Tip
Adjust the Windows Sounds slider to change system sounds volume
independently of general volume (such as the volume used for music and game
sounds).
5 Click X in the top-right corner of the window to close it.
Configuring the audio jacks
If the back of your computer has five audio jacks, they are universal jacks. This means that they
can be used for more than one purpose. For example, the blue jack on the computer can be a
stereo in jack or a stereo out jack. For more information on how each jack can be used, see your
hardware reference. To use the audio jacks for something other than the default audio device,
you need to configure the audio jacks.
To configure the audio jacks:
Shortcut
Start Ö Control Panel Ö Sounds and Audio Devices Ö Advanced.
1 Connect your audio device(s) to the computer audio jack(s).
2 Click (Start), then click Control Panel. The Control Panel window opens.
19

CHAPTER 2: Setting Up and Getting Started
3 Click Hardware and Sound, Sound, the Playback tab, then click Configure.
-OR-
If your computer has the Realtek Sound Effect Manager installed, double-click the Sound
Effect Manager icon on the taskbar. The Realtek dialog box opens.
4 Follow the on-screen instructions to configure the audio jacks for your speaker setup.
Installing a printer, scanner, or other device
Important
Before you install a printer, scanner, or other peripheral device, see the
device documentation and installation instructions.
Your computer has one or more of the following ports: IEEE 1394 (also known as Firewire® or
i.Link®), Universal Serial Bus (USB), serial, and parallel. You use these ports to connect peripheral
devices such as printers, scanners, and digital cameras to your computer. For more information
about port locations, see your hardware reference.
IEEE 1394 and USB ports support plug-and-play and hot-swapping, which means that your
computer will usually recognize such a device whenever you plug it into the appropriate port.
When you use an IEEE 1394 or USB device for the first time, your computer will prompt you to
install any software the device needs. After doing this, you can disconnect and reconnect the
device at any time.
Help
For more information about installing peripheral devices, click Start, then
click Help and Support. Type installing devices in the Search box, then
press Enter.
Parallel and serial port devices are not plug-and-play. See the device documentation for detailed
information and installation instructions.
20

CHAPTER 3
Using Windows Vista
• Using the Windows desktop
• Working with files and folders
• Searching for files
• Working with documents
• Shortcuts
21
CHAPTER 3: Using Windows Vista
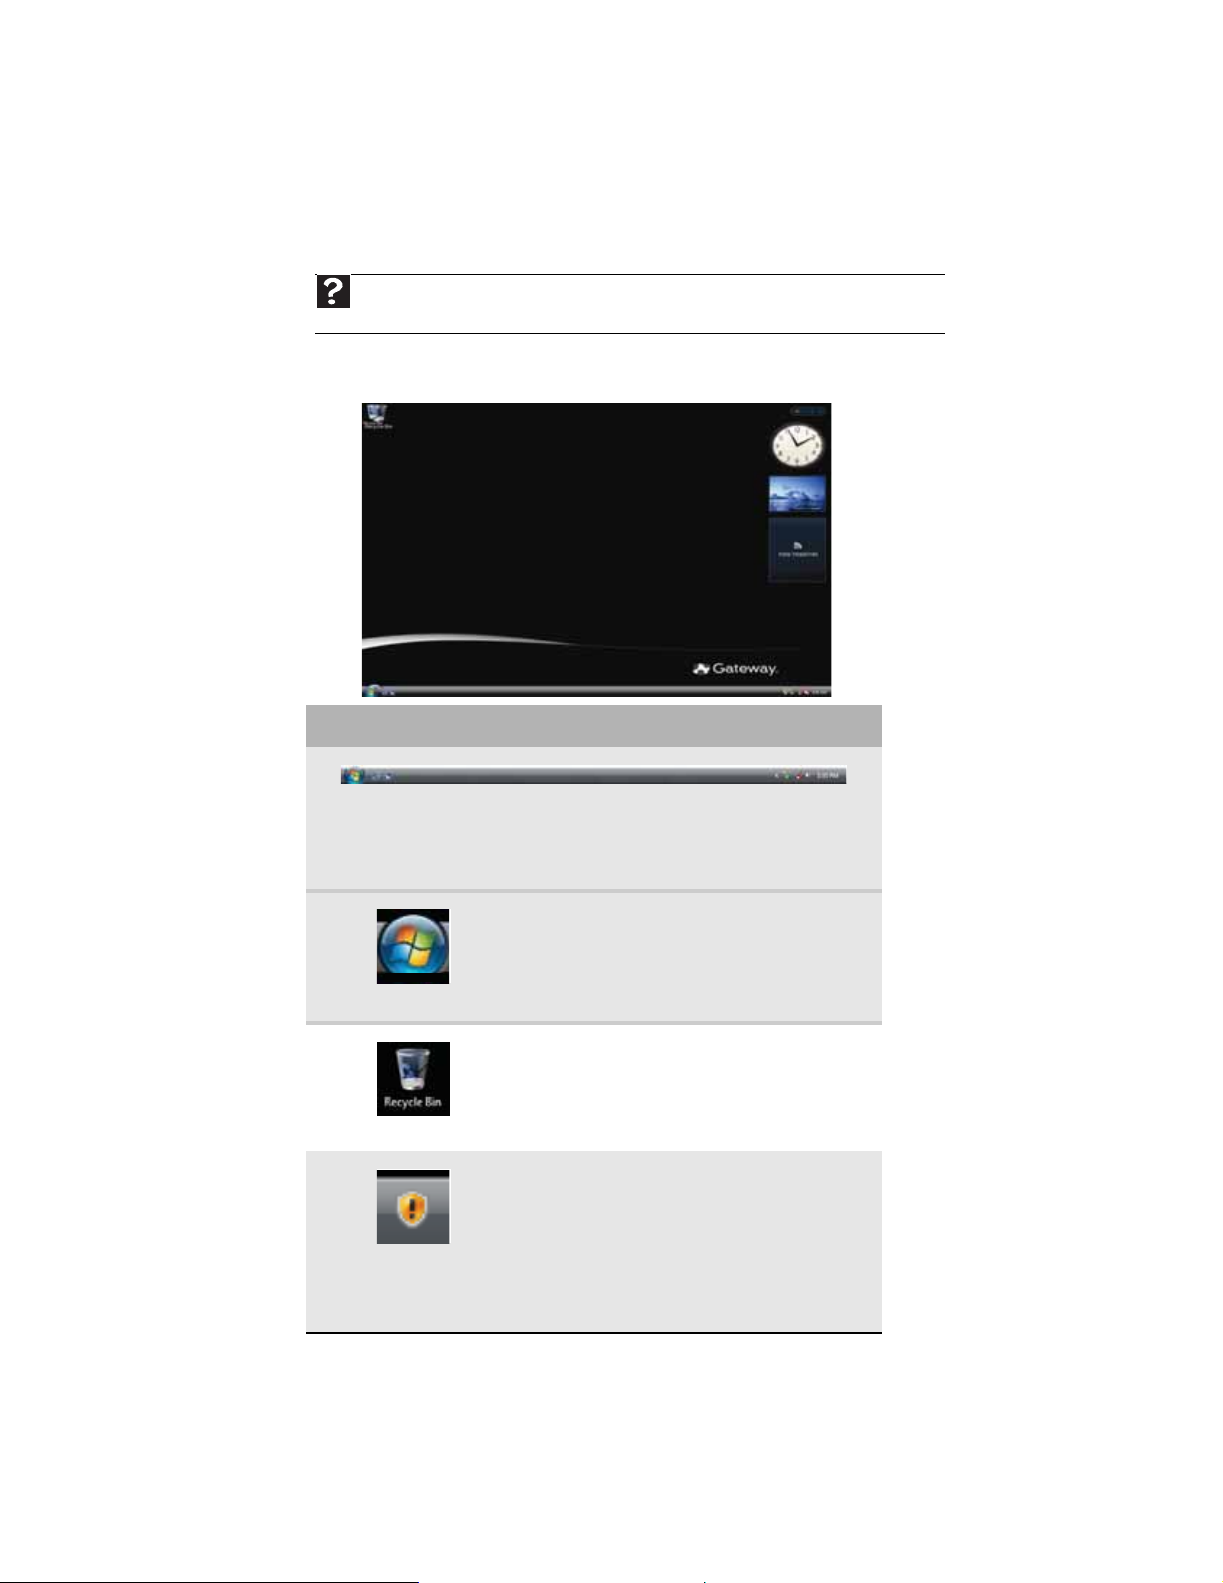
Using the Windows desktop
After your computer starts, the first screen you see is the Windows desktop. The desktop is like
the top of a real desk. Think of the desktop as your personalized work space where you open
.
programs and perform other tasks.
Help
For more information about the Windows desktop, click Start, then click Help and Support.
Type the phrase Windows desktop in the Search Help box, then click the magnifying glass.
Your desktop may be different from this example, depending on how your computer is set up.
The desktop contains the taskbar, the Start button, and the Recycle Bin icon.
Desktop elements Description
The taskbar is the bar at the bottom of the computer display containing
the Start button on the left and a clock on the right. Other buttons on the
taskbar represent programs that are running.
Click a program’s button on the taskbar to open the program’s window.
The Start button provides access to programs,
files, help for Windows and other programs,
and computer tools and utilities.
Click the Start button, then open a file or
program by clicking an item on the menu that
opens.
The Recycle Bin is where files, folders, and
programs that you discarded are stored. You
must empty the Recycle Bin to permanently
delete them from your computer. For
instructions on how to use the Recycle Bin,
see “Deleting files and folders” on page 27.
The Windows Security Center icon may
appear on the taskbar near the clock. The icon
changes appearance to notify you when the
security settings on your computer are set
below the recommended value or when
updates are available. Double-click this icon to
open the Windows Security Center. For more
information, see “Modifying security settings”
on page 101.
22
 Loading...