


Gateway EC14, EC14D, EC18, EC38, EC54 Owner's Manual
...
Gateway Notebook
USERGUIDE
®


Contents
Chapter 1: Getting Help . . . . . . . . . . . . . . . . . . . . . . . . . . . . . . . . . . . . . . . . 1
Thank you for purchasing our notebook! . . . . . . . . . . . . . . . . . . . . . . . . 2
Using the Gateway Web site . . . . . . . . . . . . . . . . . . . . . . . . . . . . . . . . . . . 2
Using Help and Support . . . . . . . . . . . . . . . . . . . . . . . . . . . . . . . . . . . . . . . 2
Contacting Gateway . . . . . . . . . . . . . . . . . . . . . . . . . . . . . . . . . . . . . 3
Getting help for Windows Media Center . . . . . . . . . . . . . . . . . . . 3
Using online help . . . . . . . . . . . . . . . . . . . . . . . . . . . . . . . . . . . . . . . . . . . . 4
Chapter 2: Using Windows . . . . . . . . . . . . . . . . . . . . . . . . . . . . . . . . . . . . . . 5
Using the Windows desktop . . . . . . . . . . . . . . . . . . . . . . . . . . . . . . . . . . . 6
Using the Start menu . . . . . . . . . . . . . . . . . . . . . . . . . . . . . . . . . . . . 7
Adding icons to the desktop . . . . . . . . . . . . . . . . . . . . . . . . . . . . . . 8
Identifying window items . . . . . . . . . . . . . . . . . . . . . . . . . . . . . . . . 8
Working with files and folders . . . . . . . . . . . . . . . . . . . . . . . . . . . . . . . . . 9
Viewing drives . . . . . . . . . . . . . . . . . . . . . . . . . . . . . . . . . . . . . . . . . 9
Creating folders . . . . . . . . . . . . . . . . . . . . . . . . . . . . . . . . . . . . . . . 10
Copying and moving files and folders . . . . . . . . . . . . . . . . . . . . . 10
Deleting files and folders . . . . . . . . . . . . . . . . . . . . . . . . . . . . . . . 11
Searching for files . . . . . . . . . . . . . . . . . . . . . . . . . . . . . . . . . . . . . . . . . . . 12
Using the Windows Search . . . . . . . . . . . . . . . . . . . . . . . . . . . . . . 12
Browsing for files and folders . . . . . . . . . . . . . . . . . . . . . . . . . . . . 13
Using Tablet PC . . . . . . . . . . . . . . . . . . . . . . . . . . . . . . . . . . . . . . . . . . . . . 13
Calibrating your tablet . . . . . . . . . . . . . . . . . . . . . . . . . . . . . . . . . . 14
Using gestures . . . . . . . . . . . . . . . . . . . . . . . . . . . . . . . . . . . . . . . . . 15
Using the digital pen . . . . . . . . . . . . . . . . . . . . . . . . . . . . . . . . . . . 15
Using the Tablet Input Panel (TIP) . . . . . . . . . . . . . . . . . . . . . . . . 16
Working with documents . . . . . . . . . . . . . . . . . . . . . . . . . . . . . . . . . . . . . 17
Creating a new document . . . . . . . . . . . . . . . . . . . . . . . . . . . . . . . 17
Saving a document . . . . . . . . . . . . . . . . . . . . . . . . . . . . . . . . . . . . . 17
Opening a document . . . . . . . . . . . . . . . . . . . . . . . . . . . . . . . . . . . 18
Printing a document . . . . . . . . . . . . . . . . . . . . . . . . . . . . . . . . . . . 18
Shortcuts . . . . . . . . . . . . . . . . . . . . . . . . . . . . . . . . . . . . . . . . . . . . . . . . . . 19
Chapter 3: Using the Internet and Faxing. . . . . . . . . . . . . . . . . . . . . . . . . 21
Learning about the Internet . . . . . . . . . . . . . . . . . . . . . . . . . . . . . . . . . . 22
Setting up an Internet account . . . . . . . . . . . . . . . . . . . . . . . . . . . . . . . . 22
Accessing your Internet account . . . . . . . . . . . . . . . . . . . . . . . . . . 23
Using the World Wide Web . . . . . . . . . . . . . . . . . . . . . . . . . . . . . . . . . . . 23
Connecting to a Web site . . . . . . . . . . . . . . . . . . . . . . . . . . . . . . . 24
Downloading files . . . . . . . . . . . . . . . . . . . . . . . . . . . . . . . . . . . . . 24
Using e-mail . . . . . . . . . . . . . . . . . . . . . . . . . . . . . . . . . . . . . . . . . . . . . . . . 25
Sending e-mail . . . . . . . . . . . . . . . . . . . . . . . . . . . . . . . . . . . . . . . . 25
Checking your e-mail . . . . . . . . . . . . . . . . . . . . . . . . . . . . . . . . . . . 25
Using Windows Fax and Scan . . . . . . . . . . . . . . . . . . . . . . . . . . . . . . . . . 26
Sending a Fax . . . . . . . . . . . . . . . . . . . . . . . . . . . . . . . . . . . . . . . . . 26
Setting up your cover page template . . . . . . . . . . . . . . . . . . . . . 29
Faxing a scanned document or faxing from programs . . . . . . . . 31
i

Contents
Canceling a fax . . . . . . . . . . . . . . . . . . . . . . . . . . . . . . . . . . . . . . . . 31
Receiving and viewing a fax . . . . . . . . . . . . . . . . . . . . . . . . . . . . . 31
Chapter 4: Playing and Creating Media Files. . . . . . . . . . . . . . . . . . . . . . . 33
Playing music and movies . . . . . . . . . . . . . . . . . . . . . . . . . . . . . . . . . . . . 34
Playing audio and video files . . . . . . . . . . . . . . . . . . . . . . . . . . . . 34
Playing optical discs . . . . . . . . . . . . . . . . . . . . . . . . . . . . . . . . . . . . 35
Creating audio files and music libraries . . . . . . . . . . . . . . . . . . . . . . . . . 37
Creating music files . . . . . . . . . . . . . . . . . . . . . . . . . . . . . . . . . . . . 37
Building a music library . . . . . . . . . . . . . . . . . . . . . . . . . . . . . . . . . 38
Editing track information . . . . . . . . . . . . . . . . . . . . . . . . . . . . . . . 39
Creating music CDs and video DVDs . . . . . . . . . . . . . . . . . . . . . . . . . . . . 39
Creating a music CD . . . . . . . . . . . . . . . . . . . . . . . . . . . . . . . . . . . 39
Creating a video DVD . . . . . . . . . . . . . . . . . . . . . . . . . . . . . . . . . . 40
Creating and copying data discs . . . . . . . . . . . . . . . . . . . . . . . . . . . . . . . 43
Creating a data disc . . . . . . . . . . . . . . . . . . . . . . . . . . . . . . . . . . . . 43
Using Windows Media Center . . . . . . . . . . . . . . . . . . . . . . . . . . . . . . . . . 43
Starting Windows Media Center . . . . . . . . . . . . . . . . . . . . . . . . . 44
Chapter 5: Networking Your Notebook. . . . . . . . . . . . . . . . . . . . . . . . . . . 45
Introduction to Networking . . . . . . . . . . . . . . . . . . . . . . . . . . . . . . . . . . 46
Networking terms you should know . . . . . . . . . . . . . . . . . . . . . . 46
Ethernet networking . . . . . . . . . . . . . . . . . . . . . . . . . . . . . . . . . . . . . . . . 46
Wired Ethernet networking . . . . . . . . . . . . . . . . . . . . . . . . . . . . . 46
Wireless Ethernet networking . . . . . . . . . . . . . . . . . . . . . . . . . . . 49
Establishing your Ethernet network connection . . . . . . . . . . . . . 51
Testing your network . . . . . . . . . . . . . . . . . . . . . . . . . . . . . . . . . . 54
Adding a printer to your network . . . . . . . . . . . . . . . . . . . . . . . . 54
Sharing resources . . . . . . . . . . . . . . . . . . . . . . . . . . . . . . . . . . . . . . 54
Using the network . . . . . . . . . . . . . . . . . . . . . . . . . . . . . . . . . . . . . 56
Bluetooth networking . . . . . . . . . . . . . . . . . . . . . . . . . . . . . . . . . . . . . . . 57
Chapter 6: Protecting Your Notebook . . . . . . . . . . . . . . . . . . . . . . . . . . . . 59
Hardware security . . . . . . . . . . . . . . . . . . . . . . . . . . . . . . . . . . . . . . . . . . . 60
Kensington lock slot . . . . . . . . . . . . . . . . . . . . . . . . . . . . . . . . . . . 60
Data security . . . . . . . . . . . . . . . . . . . . . . . . . . . . . . . . . . . . . . . . . . . . . . . 60
Startup and hard drive password . . . . . . . . . . . . . . . . . . . . . . . . . 60
Windows user accounts . . . . . . . . . . . . . . . . . . . . . . . . . . . . . . . . . 60
Protecting your notebook from viruses . . . . . . . . . . . . . . . . . . . . 61
How to scan for and remove Internet threats . . . . . . . . . . . . . . 61
Using Windows Security Center . . . . . . . . . . . . . . . . . . . . . . . . . . 64
Security updates . . . . . . . . . . . . . . . . . . . . . . . . . . . . . . . . . . . . . . . . . . . . 65
Windows Update . . . . . . . . . . . . . . . . . . . . . . . . . . . . . . . . . . . . . . 65
Traveling securely . . . . . . . . . . . . . . . . . . . . . . . . . . . . . . . . . . . . . . . . . . . 66
Chapter 7: Customizing Windows. . . . . . . . . . . . . . . . . . . . . . . . . . . . . . . . 67
Changing screen settings . . . . . . . . . . . . . . . . . . . . . . . . . . . . . . . . . . . . . 68
ii

www.gateway.com
Changing color depth and screen resolution . . . . . . . . . . . . . . . 68
Changing the appearance of windows and backgrounds . . . . . 69
Selecting a screen saver . . . . . . . . . . . . . . . . . . . . . . . . . . . . . . . . . 70
Changing gadgets . . . . . . . . . . . . . . . . . . . . . . . . . . . . . . . . . . . . . 71
Changing system sounds . . . . . . . . . . . . . . . . . . . . . . . . . . . . . . . . . . . . . . 73
Changing mouse, touchpad, or pointing device settings . . . . . . . . . . . 74
Changing mouse settings . . . . . . . . . . . . . . . . . . . . . . . . . . . . . . . . 74
Changing touchpad or pointing device settings . . . . . . . . . . . . . 75
Adjusting tablet, digital pen, and input panel settings . . . . . . . 76
Adding and modifying user accounts . . . . . . . . . . . . . . . . . . . . . . . . . . . 77
Changing accessibility settings . . . . . . . . . . . . . . . . . . . . . . . . . . . . . . . . . 78
Using the Ease of Access Center . . . . . . . . . . . . . . . . . . . . . . . . . . 78
Using voice recognition . . . . . . . . . . . . . . . . . . . . . . . . . . . . . . . . . 79
Using the Windows Mobility Center . . . . . . . . . . . . . . . . . . . . . . . . . . . . 80
Setting up parental controls . . . . . . . . . . . . . . . . . . . . . . . . . . . . . . . . . . 82
Filtering Internet access . . . . . . . . . . . . . . . . . . . . . . . . . . . . . . . . . 82
Scheduling notebook and Internet use . . . . . . . . . . . . . . . . . . . . 83
Restricting game access . . . . . . . . . . . . . . . . . . . . . . . . . . . . . . . . . 83
Restricting specific programs . . . . . . . . . . . . . . . . . . . . . . . . . . . . . 85
Creating activity reports . . . . . . . . . . . . . . . . . . . . . . . . . . . . . . . . 85
Chapter 8: Maintaining Your Notebook . . . . . . . . . . . . . . . . . . . . . . . . . . 87
Setting up a maintenance schedule . . . . . . . . . . . . . . . . . . . . . . . . . . . . 88
Updating Windows . . . . . . . . . . . . . . . . . . . . . . . . . . . . . . . . . . . . . . . . . . 88
Managing hard drive space . . . . . . . . . . . . . . . . . . . . . . . . . . . . . . . . . . . 89
Checking hard drive space . . . . . . . . . . . . . . . . . . . . . . . . . . . . . . . 89
Deleting unnecessary files . . . . . . . . . . . . . . . . . . . . . . . . . . . . . . . 90
Checking the hard drive for errors . . . . . . . . . . . . . . . . . . . . . . . . 90
Defragmenting the hard drive . . . . . . . . . . . . . . . . . . . . . . . . . . . 91
Backing up files . . . . . . . . . . . . . . . . . . . . . . . . . . . . . . . . . . . . . . . 92
Scheduling maintenance tasks . . . . . . . . . . . . . . . . . . . . . . . . . . . . . . . . . 93
Moving from your old computer . . . . . . . . . . . . . . . . . . . . . . . . . . . . . . . 93
Transferring files and settings with Windows Easy Transfer . . . 93
Transferring files and settings manually . . . . . . . . . . . . . . . . . . . 94
iii

Contents
iv

CHAPTER 1
•
Using the Gateway Web site
•
Using Help and Support
•
Using online help
Getting Help
1

CHAPTER 1: Getting Help
Thank you for purchasing our notebook!
You have made an excellent decision choosing Gateway. We are sure that you will
be pleased with the outstanding quality, reliability, and performance of your new
notebook. Each and every Gateway notebook uses the latest technology and passes
through the most stringent quality control tests to ensure that you are provided with
the best product possible. Please read this manual carefully to familiarize yourself
with your notebook’s software features.
Gateway stands behind our value proposition to our customers—to provide
best-of-class service and support in addition to high-quality, brand-name components
at affordable prices. If you ever have a problem, our knowledgeable, dedicated
customer service department will provide you with fast, considerate service.
We sincerely hope that you will receive the utmost satisfaction and enjoyment from
your new Gateway notebook for years to come.
Thanks again, from all of us at Gateway.
Using the Gateway Web site
Gateway’s online support is available 24 hours per day, 7 days per week and provides
the most current drivers, product specifications, tutorials, and personalized
information about your notebook. Visit the Gateway Support Web site at
www.gateway.com
.
Using Help and Support
Your notebook includes
information, troubleshooters, and automated support. Use Help and Support to
answer questions about Windows and to help you quickly discover and use the many
features of your Gateway notebook.
Help and Support
, an easily accessible collection of help
2
www.gateway.com
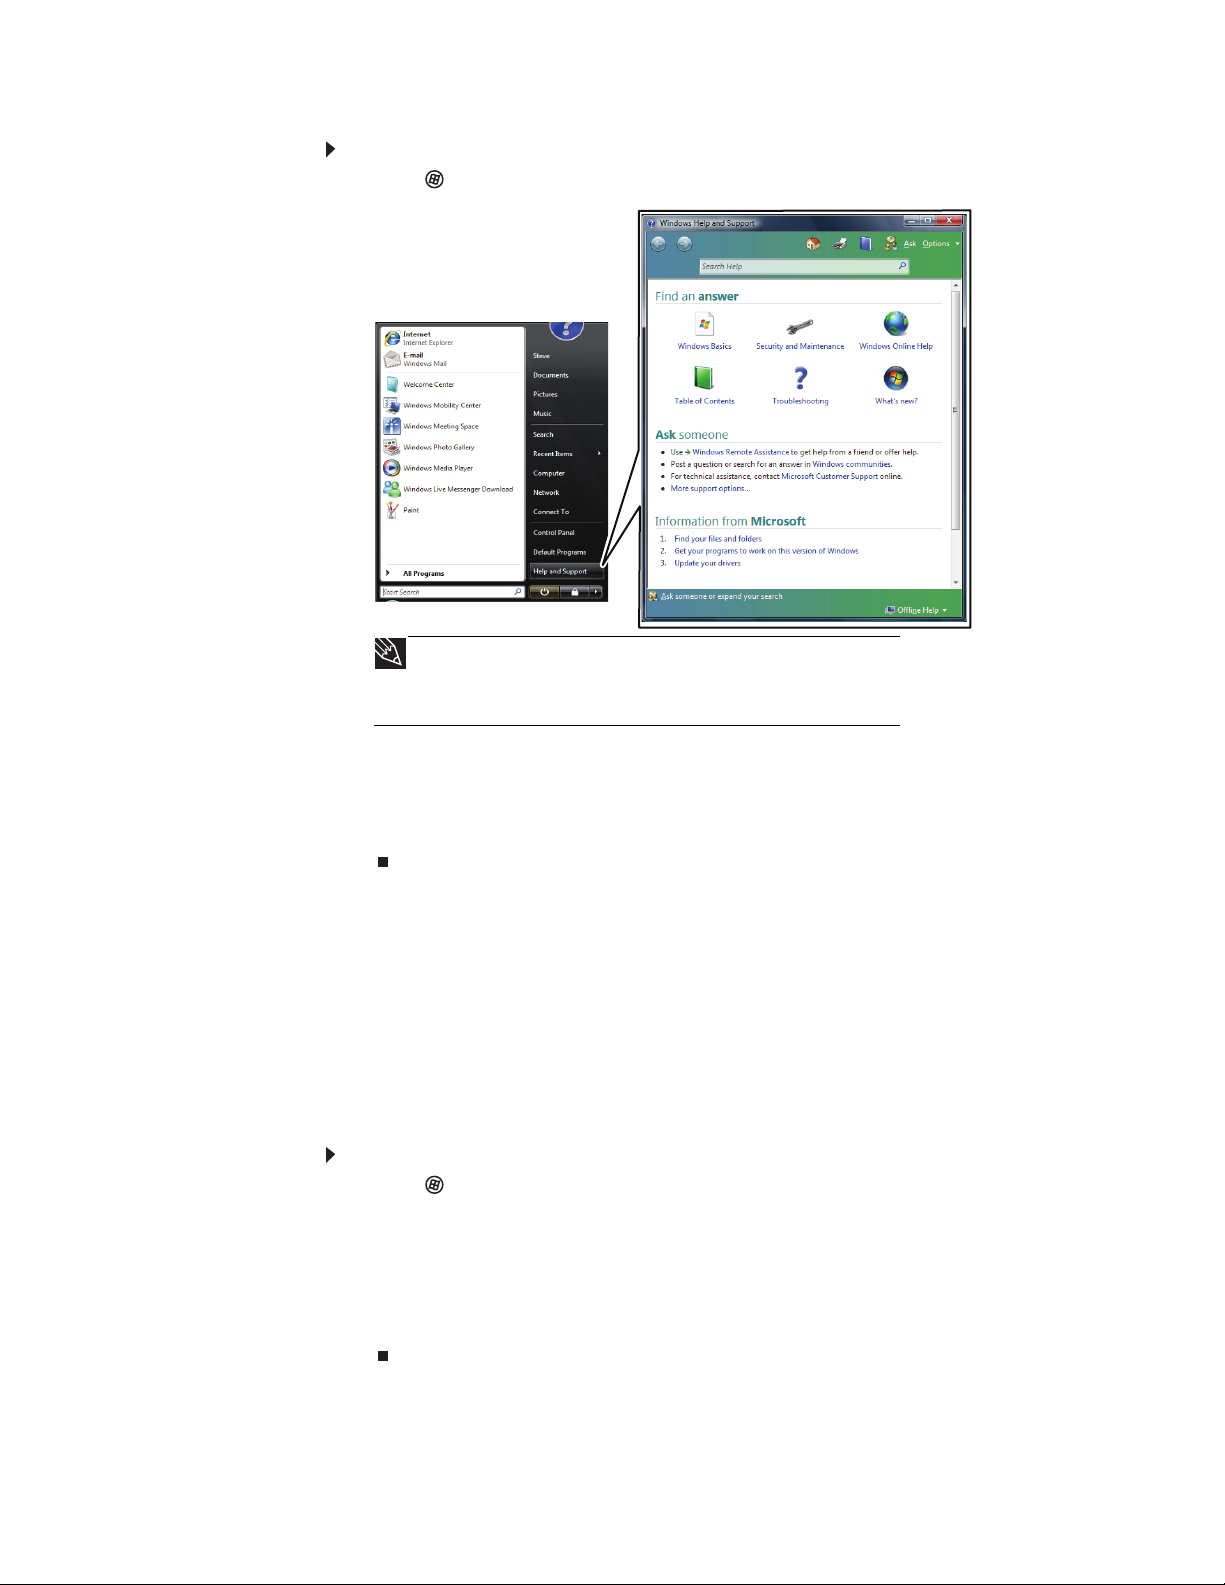
To search for a topic:
1 Click (Start), then click Help and Support. Help and Support opens.
Tip
You can find help information by clicking a general topic under
Find an answer, selecting an option under Ask someone, or picking a
category from Information from Microsoft. You can also search for a
topic.
2 Type a word or phrase (keyword) in the Search Help box located at the top of
any Help and Support screen, then press E
For each search, you receive a list of suggested topics. To find the answer, click
the result that most closely matches your question. Additional results may be
available if the first list does not address your question.
Contacting Gateway
The label on your notebook contains information that identifies your notebook model
and serial number. Gateway Customer Care will need this information if you call for
help.
Getting help for Windows Media Center
If your notebook has Windows Media Center, you can access help for information
on how to use Windows Media Center.
To access Media Center help:
1 Click (Start), then click Help and Support. Help and Support opens.
2 In the
Help box, then press E
-ORIf you are connected to the Internet, click Windows Online Help, then type
Windows Media Center in the Search Help For box.
Help and Support
NTER. The
window, type Windows Media Center in the Search
Media Center Help
NTER.
window opens.
3

CHAPTER 1: Getting Help
Using online help
If you are connected to the Internet, many programs provide information online so
you can research a topic or learn how to perform a task while you are using the
program. You can access most online help information by selecting a topic from a
Help menu or by clicking the Help button on the menu bar and selecting Online
Support from the list.
Available information depends on the particular Help site to which you are taken.
Many provide FAQs (Frequently Asked Questions), a search feature, articles about
their software, tutorials, and forums where problems and issues are discussed.
4

CHAPTER 2
Using Windows
•
Using the Windows desktop
•
Working with files and folders
•
Searching for files
•
Using Tablet PC
•
Working with documents
•
Shortcuts
5
CHAPTER 2: Using Windows
Using the Windows desktop
After your notebook starts, the first screen you see is the Windows
desktop
. The
desktop is like the top of a real desk. Think of the desktop as your personalized work
space where you open programs and perform other tasks.
Help
For more information about the Windows desktop, click Start, then click
Help and Support. Type Windows desktop in the Search Help box, then press
E
NTER.
Your desktop may be different from this example, depending on how your notebook
is set up.
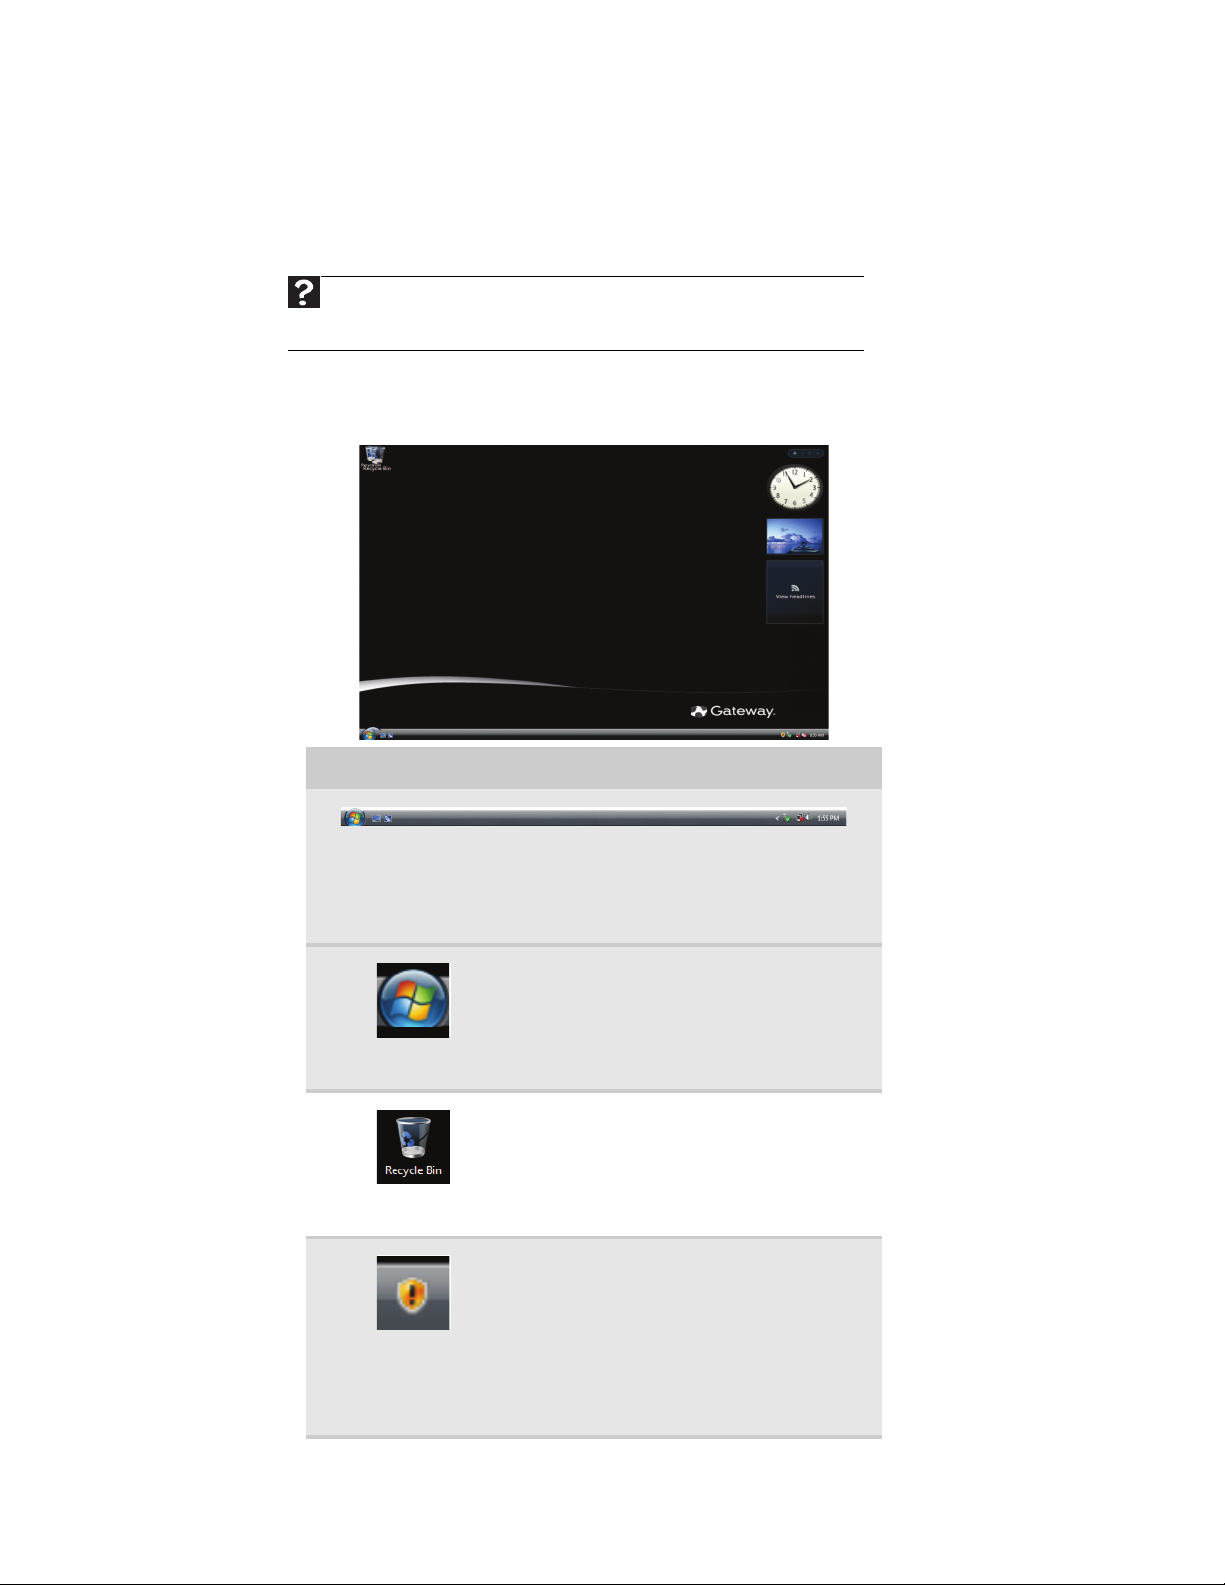
The desktop contains the taskbar, the Start button, and the Recycle Bin icon.
Desktop elements Description
The
taskbar
containing the Start button on the left and a clock on the right.
Other buttons on the taskbar represent programs that are
running.
Click a program’s
window.
is the bar at the bottom of the notebook display
button
on the taskbar to open the program’s
The
Start button
programs, files, help for Windows and
other programs, and notebook tools
and utilities.
Click the Start button, then open a file
or program by clicking an item on the
menu that opens.
The
Recycle Bin
and programs that you discarded are
stored. You must empty the Recycle Bin
to permanently delete them from your
notebook. For instructions on how to
use the Recycle Bin, see “Deleting files and
folders” on page 11.
The Windows Security Center icon may
appear on the taskbar near the clock.
The icon changes appearance to notify
you when the security settings on your
notebook are set below the
recommended value or when updates
are available. Double-click this icon to
open the Windows Security Center. For
more information, see “Using Windows
Security Center” on page 64.
provides access to
is where files, folders,
6

Using the Start menu
Help
For more information about the Windows Start menu, click Start, then
click Help and Support. Type Windows Start menu in the Search Help box,
then press E
You can start programs, open files, customize your system, get help, search for files
and folders, and more using the Start menu.
To use the Start menu:
1 Click (Start) on the lower left of the Windows desktop. The Start menu opens,
NTER.
Shortcut
Start Á All Programs Á
showing you the first level of menu items.
www.gateway.com
2 Click All Programs to see all programs, files, and folders in the Start menu. If
you click an item with a folder icon, the programs, files, and
3 Click a file or program to open it.
subfolders
appear.
7
CHAPTER 2: Using Windows
Adding icons to the desktop
Help
For more information about the desktop icons, click Start, then click
Help and Support. Type desktop icons in the Search Help box, then press E
You may want to add an icon (shortcut) to the desktop for a program that you use
frequently.
To add icons to the desktop:
Shortcut
Start Á All Programs Á right-click program Á Send To Á
Desktop (create shortcut)
1 Click (Start), then click All Programs.
2 Right-click (press the right touchpad button) the program that you want to add
to the desktop.
3 Click Send To, then click Desktop (create shortcut). A shortcut icon for that
program appears on the desktop.
Identifying window items
NTER.
Help
For more information about windows, click Start, then click Help and
Support. Type window in the Search Help box, then press E
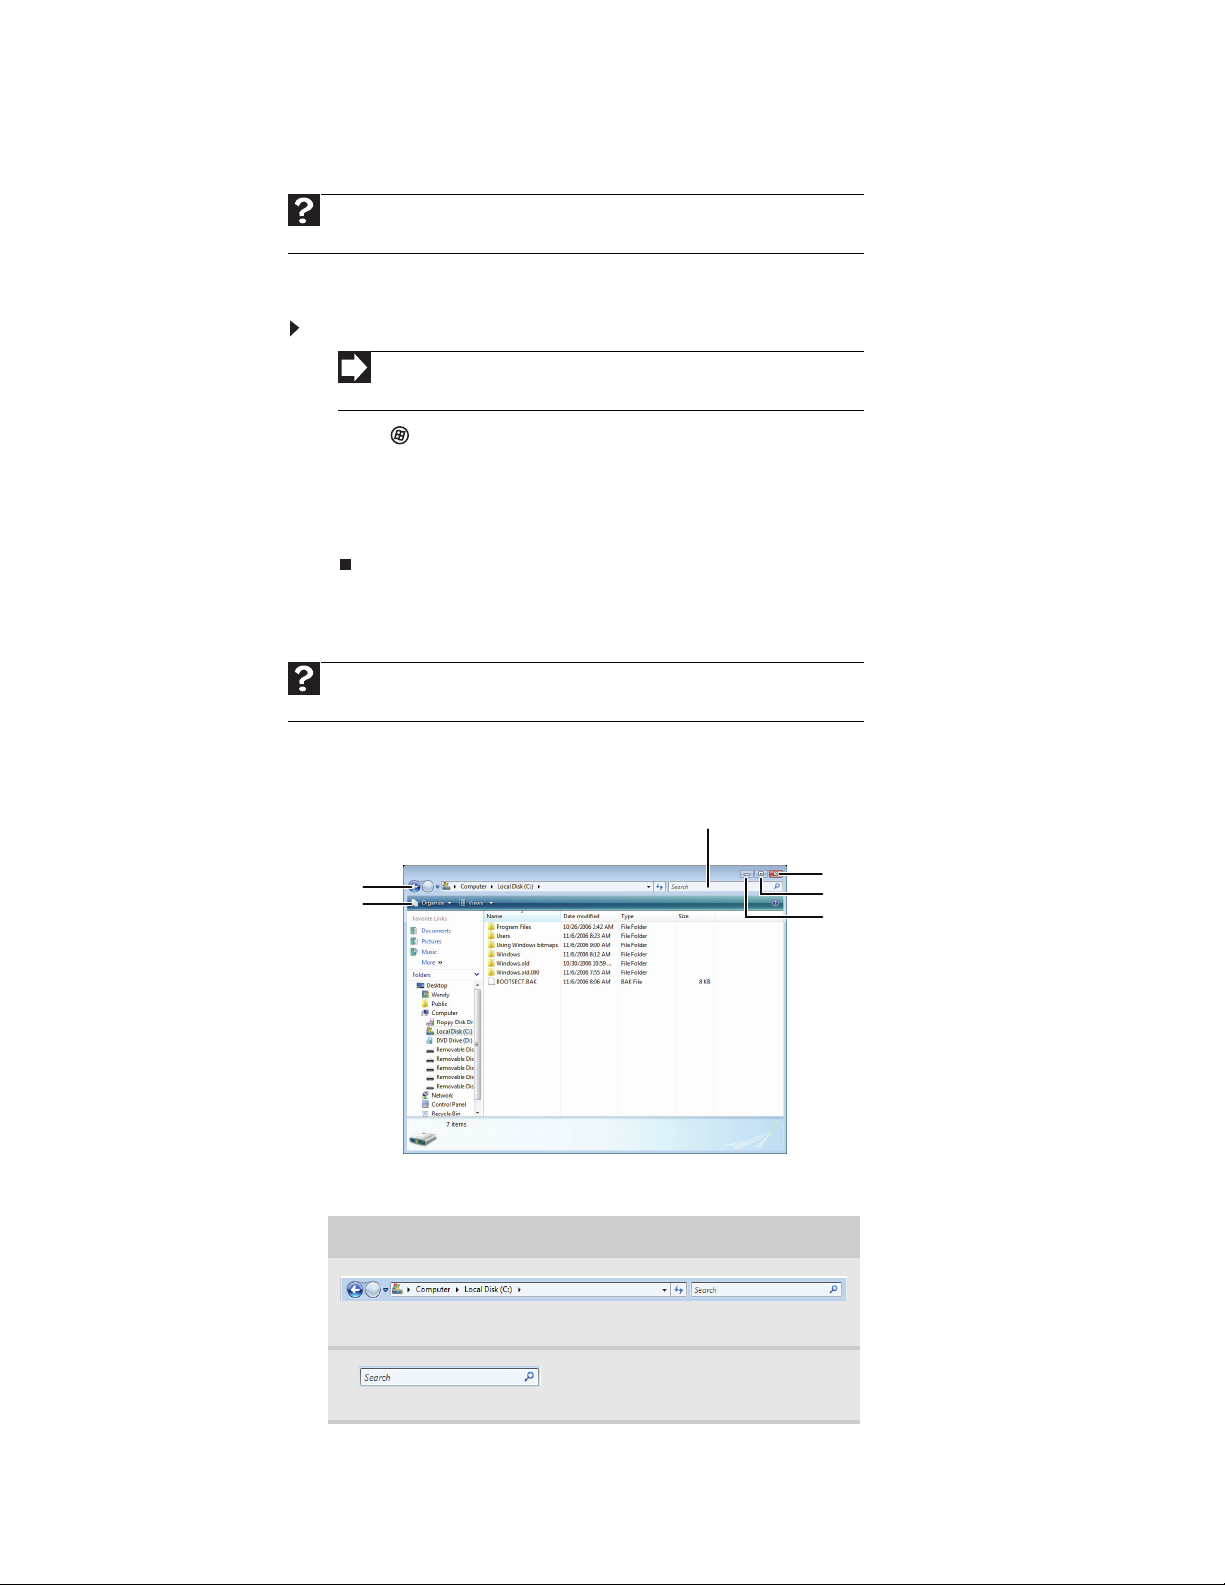
When you double-click the icon for a drive, folder, file, or program, a
NTER.
window
opens
on the desktop. This example shows the Local Disk (C:) window, which opens after
you double-click the Local Disk (C:)
Title
Menu
icon in the
Search box
Computer
window.
Close
Maximiz
Minimiz
Every program window looks a little different because each has its own menus, icons,
and controls. Most windows include these items:
Window item Description
8
The
title bar
shows the window title.
is the horizontal bar at the top of a window that
The Search box lets you search
for a word or phrase in the
current window.
www.gateway.com
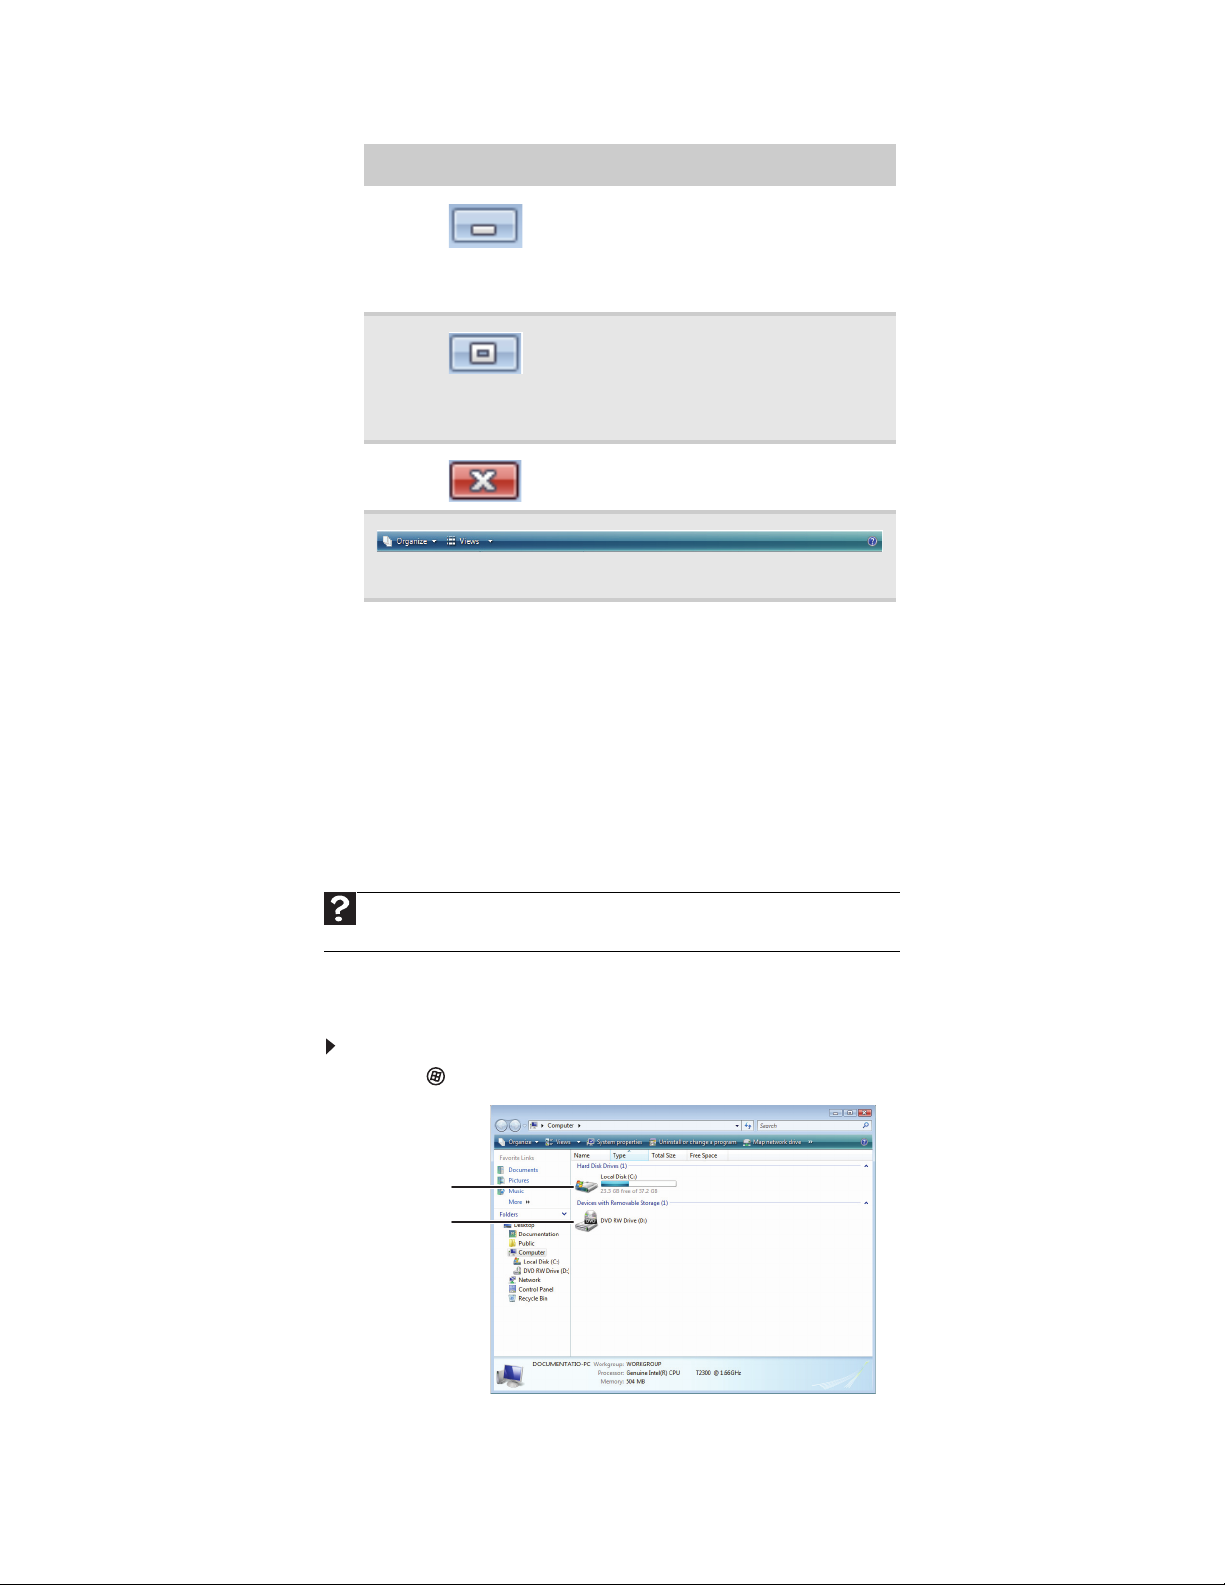
Window item Description
Clicking an item on the
or Save.
Clicking the
reduces the active window to a
button on the taskbar. Clicking
the program button in the
taskbar opens the window
again.
Clicking the
expands the active window to
fit the entire notebook display.
Clicking the maximize button
again restores the window to
its former size.
Clicking the
the active window or program.
menu bar
starts an action such as Print
minimize button
maximize button
close button
Working with files and folders
You can organize your files and programs to suit your preferences much like you
would store information in a file cabinet. You can store these files in folders and copy,
move, and delete the information just as you would reorganize and throw away
information in a file cabinet.
closes
Viewing drives
and Support. Type files and folders in the Search Help box, then press E
Drives
more than one drive. Each drive has a letter, usually Local Disk (C:) for the hard drive.
You may also have more drives such as a disc drive.
To view the drives, folders, and files on your notebook:
1 Click (Start), then click Computer.
Help
For more information about files and folders, click Start, then click Help
NTER.
are like file cabinets because they hold files and folders. A notebook may have
Hard
Disc drive
9

2 Double-click the drive icon.
Creating folders
CHAPTER 2: Using Windows
Folders
folders.
Files
keep on your notebook. In fact, all information on a notebook is stored in files.
are much like the folders in a file cabinet. They can contain files and other
are much like paper documents—letters, spreadsheets, and pictures—that you
Folders
Files
To create a folder:
Shortcut
Click File Á New Á Folder Á type name
1 Click (Start), then click Computer on the Start menu.
2 Double-click the drive where you want to put the new folder. Typically, Local
Disk (C:) is your hard drive.
3 If you want to create a new folder inside an existing folder, double-click the
existing folder.
4 Click Organize, then click New Folder. The new folder is created.
5 Type a name for the folder, then press E
the folder icon.
NTER. The new folder name appears by
For information about renaming folders, see “Shortcuts” on page 19.
Copying and moving files and folders
Important
The clipboard stores whatever you cut or copy until you cut or copy
again. Then the clipboard contains the new information only. Therefore, you
can paste copies of a file or folder into more than one place, but as soon as
you copy or cut a different file or folder, the original file or folder is deleted
from the clipboard.
The skills you need to copy and move files are called
When you
the Windows
folder you want the copy to go in (the
When you
location and place the file or folder on the Windows clipboard. When you decide
where you want the file or folder to go, you paste it there.
copy and paste
clipboard
cut and paste
, which temporarily stores it. Then, when you decide what
a file or folder, you remove the file or folder from its original
a file or folder, you place a
10
destination
copying, cutting
copy
of the file or folder on
folder), you
paste
, and
pasting
it there.
.
www.gateway.com
To copy a file or folder to another folder:
1 Locate the file or folder you want to copy. For more information, see “Viewing
drives” on page 9 and “Searching for files” on page 12.
2 Right-click (press the right touchpad button) the file or folder that you want
to copy. A pop-up menu opens on the desktop.
3 Click Copy on the pop-up menu.
4 Open the destination folder.
5 With the pointer inside the destination folder, right-click.
6 Click Paste. A copy of the file or folder appears in the new location.
Help
For more information about copying files and folders or moving
files or folders, click Start, then click Help and Support. Type copying
files and folders or moving files and folders in the Search Help box,
then press E
To move a file or folder to another folder:
1 Locate the file or folder you want to move. For more information, see “Viewing
drives” on page 9 and “Searching for files” on page 12.
2 Right-click (press the right touchpad button) the file or folder that you want
to move. A pop-up menu opens on the desktop.
3 Click Cut on the pop-up menu.
4 Open the destination folder.
5 With the pointer inside the destination folder, right-click.
6 Click Paste. The file or folder you moved appears in its new location and is
removed from its old location.
NTER.
Deleting files and folders
When you throw away paper files and folders, you take them from the file cabinet
and put them in a trash can. Eventually the trash can is emptied.
In Windows, you throw away files and folders by first moving them to the Windows
trash can, called the
You can recover any file in the Recycle Bin as long as the bin has not been emptied.
To delete files or folders:
1In the
2 Click Organize, then click Delete. Windows moves the files and folders to the
To recover files or folders from the Recycle Bin:
1 Double-click the Recycle Bin icon on your Windows desktop. The
2 Click the files or folders that you want to restore. For instructions on how to
3 Click Restore. Windows returns the deleted files or folders to their original
Computer
want to delete. For instructions on how to select multiple files and folders, see
“Shortcuts” on page 19.
If you cannot find the file you want to delete, see “Searching for files” on page 12.
Recycle Bin.
window opens and lists the files and folders you have thrown away since you
last emptied it.
select multiple files and folders, see “Shortcuts” on page 19.
locations.
Recycle Bin
or
, where they remain until you decide to empty the bin.
Windows Explorer
window, click the files or folders that you
Recycle Bin
11

CHAPTER 2: Using Windows
To empty the Recycle Bin:
Caution
Emptying the Recycle Bin permanently erases any files or folders
in the bin. These files cannot be restored.
1 Double-click the Recycle Bin icon on the Windows desktop. The
window opens.
2 Click Empty the Recycle Bin. Windows asks you if you are sure that you want
to empty the bin.
3 Click Yes. Windows permanently deletes all files in the Recycle Bin.
Help
For more information about emptying the Recycle Bin, click Start,
then click Help and Support. Type emptying the Recycle Bin in the
Search Help box, then press E
Searching for files
If you are looking for a particular file or folder or a set of files or folders that have
characteristics in common, but you do not remember where they are stored on your
hard drive, you can use the Search utility.
Files and folders found using this utility can be opened, copied, cut, renamed, or
deleted directly from the list in the results window.
Using the Windows Search
To find files and folders using the Search:
1 Click (Start), then click Search. The
2 If you want to search on your notebook by file or folder name, type in all or
part of the file or folder name in the
• If you type all of the name, Search will list all files and folders of that name.
• If you type part of the name, Search will list all of the file and folder names
containing the letters you typed.
NTER.
Search Results
Search
box in the top right of the window.
Recycle Bin
window opens.
12
3 Open a file, folder, or program by double-clicking the name in the list.
Help
For more information about searching for files and folders, click
Start, then click Help and Support. Type searching in the Search Help
box, then press E
NTER.
www.gateway.com
Using advanced search options
Search can find files meeting more criteria than file name. You can narrow your search
by selecting the search options that you want. You can search by the:
• Name or part of a name
• Creation date
• Modification date
• File type
• Tag
• Author
• Text contained in the file
• Time period in which it was created or modified
You can also combine search criteria to refine searches.
Files and folders found using this utility can be opened, copied, cut, renamed, or
deleted directly from the list in the results window.
Browsing for files and folders
A file or folder that you need is rarely right on top of your Windows desktop. It is
usually on a drive inside a folder that may be inside yet another folder, and so on.
Windows drives, folders, and files are organized in the same way as a real file cabinet
in that they may have many levels (usually many more levels than a file cabinet, in
fact). So you usually will have to search through levels of folders to find the file or
folder that you need. This is called
To browse for a file:
1 Click (Start), then click Computer. The
2 Double-click the drive or folder that you think contains the file or folder that
you want to find.
3 Continue double-clicking folders and their subfolders until you find the file or
folder you want.
browsing
.
Computer
window opens.
Help
For more information about browsing for files and folders, click
Start, then click Help and Support. Type files and folders in the Search
Help box, then press E
Using Tablet PC
Your notebook may have the Tablet PC features. Some of these features include:
• Tablet PC Settings—Set the properties for the digital pen, tablet buttons, display
screen, and Input Panel.
• Table PC Input Panel (TIP)—Use its writing pad or soft keyboard for entering
data.
• Windows Journal—Hand-write documents which you can turn into text or image
files.
• Sticky Notes—Make a quick note with your digital pen or voice, then drop it
into another program.
• Inkball—Practice and master digital pen input with this game.
NTER.
13
Calibrating your tablet
The first time you use your tablet PC, you should calibrate your digital pen for both
portrait and landscape orientations. Calibration ensures the accuracy of the digital
pen and adjusts the screen’s performance for different users.
If the on-screen pointer does not seem to line up with the tip of the digital pen—for
example, because someone else has used your tablet PC and adjusted it for their own
use—recalibrate it to your tapping patterns. Recalibrate if you write with the opposite
hand from the previous user—right-handed writer to left-handed writer.
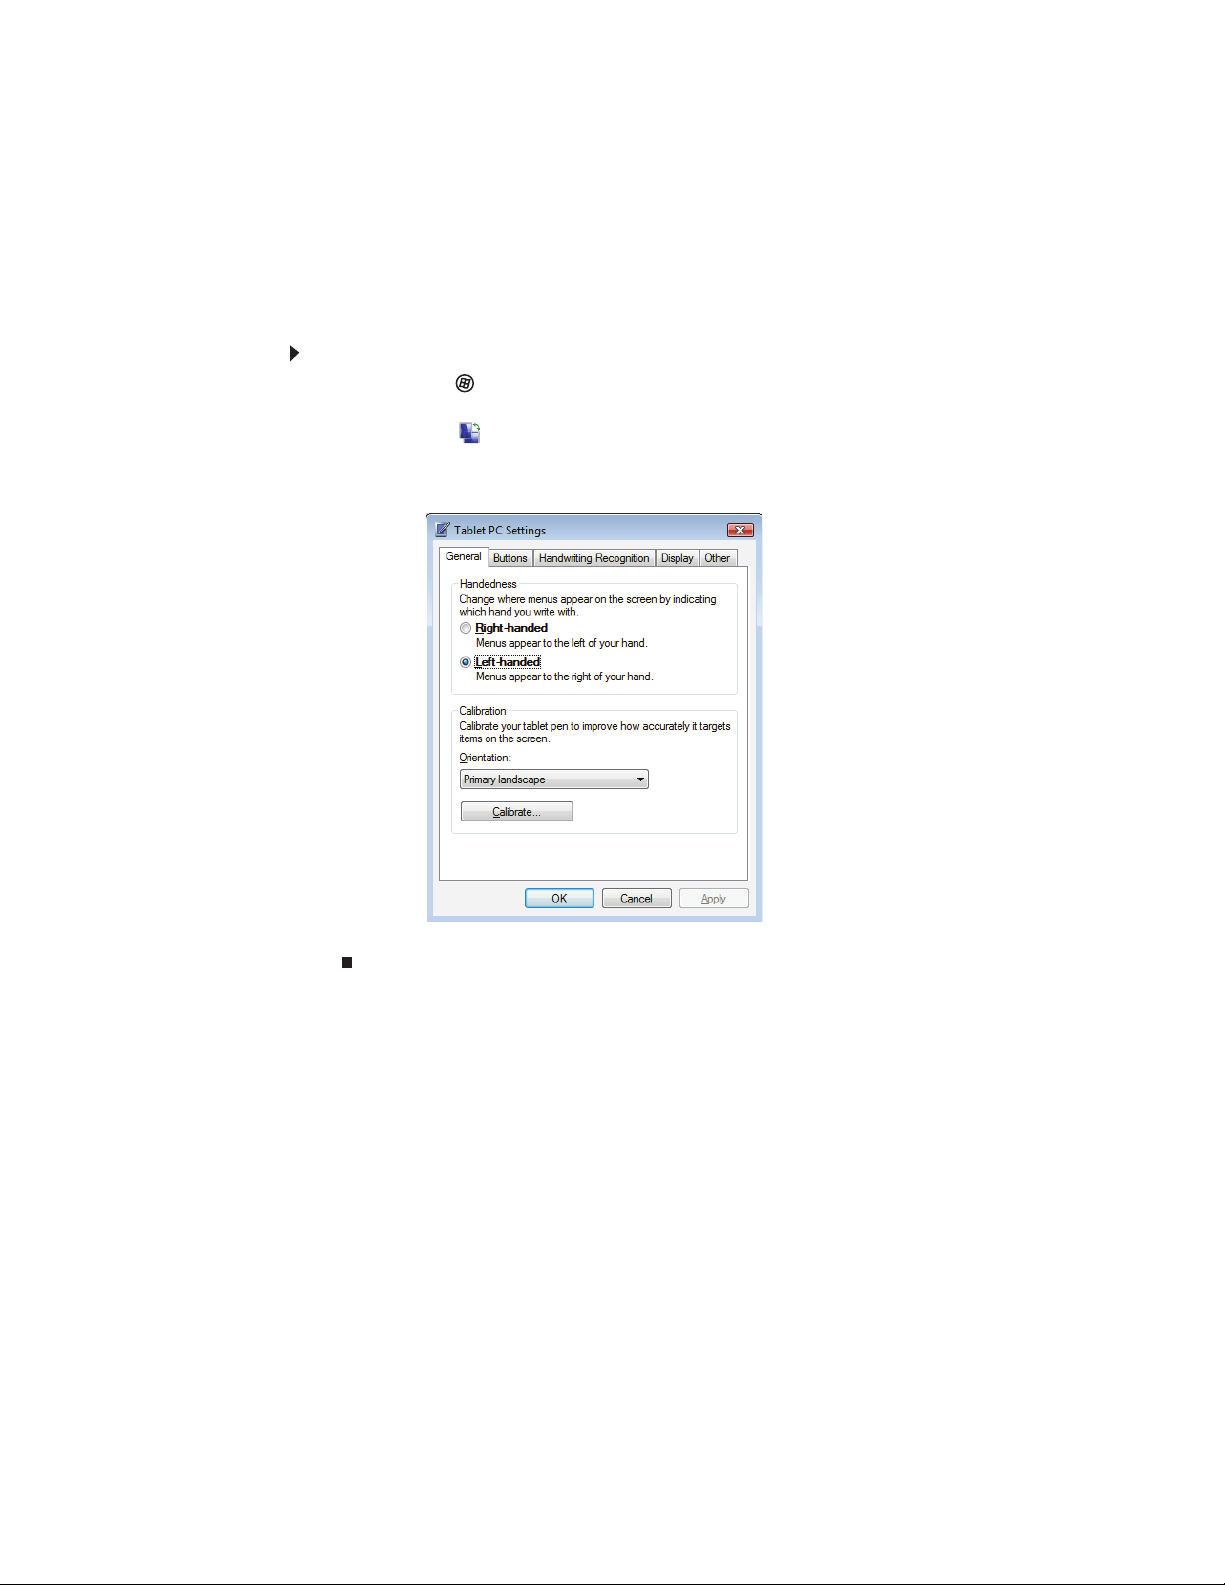
To calibrate your tablet:
1 Click or tap (Start), All Programs, Accessories
Mobility Center. The
2 Click or tap (Change Tablet PC settings). The
opens.
3 Click or tap the General tab.
CHAPTER 2: Using Windows
Windows Mobility Center
, then click or tap Windows
window opens.
Tablet PC Settings
dialog box
14
4 Click or tap Calibrate, then follow the on-screen instructions.

Using gestures
A gesture is a shape you draw with your digital pen to send a command to your
tablet PC Input Panel. You can also use gestures to control the insertion point in the
active program. When you use these gestures, you get the same result as pressing
the corresponding key on a standard keyboard.
www.gateway.com
Gesture To accomplish
BackspaceDraw a right-to-left line.
Space Draw a left-to-right line.
Enter Draw a vertical line down, then horizontally to the left
Tab Draw a vertical line up, then horizontally to the right.
Delete
• You will find more information about gestures and gesture symbols, as well as
handwriting tips, in the TIP help. For more information, see “Using the Tablet Input
Panel (TIP)” on page 16.
Using the digital pen
Digital pen button
The digital pen button serves the same function as the right button on a mouse. Press
it and tap (button-tap) to open right-click menus when they are available.
Tips
• Hold the digital pen the same way you hold a writing pen, and steady your
writing hand by resting it on the display surface.
• Line up the pointer with the object on the screen before you tap, in cases where
the pointer and digital pen point are out of alignment. The screen reads the
position of the pointer, not the tap.
• Store the digital pen in the tablet PC’s pen holder. Store extra pens in a drawer
to avoid prolonged pressure on the pen tip.
• The digital pen has internal electronics, so keep it dry and avoid contact with
liquids.
■
Strike through
■
Vertical scratch-out in the pattern of an M or W
■
Horizontal scratch-out in the pattern of a Z
■
Circular scratch-out
■
Angled scratch-out
15
CHAPTER 2: Using Windows
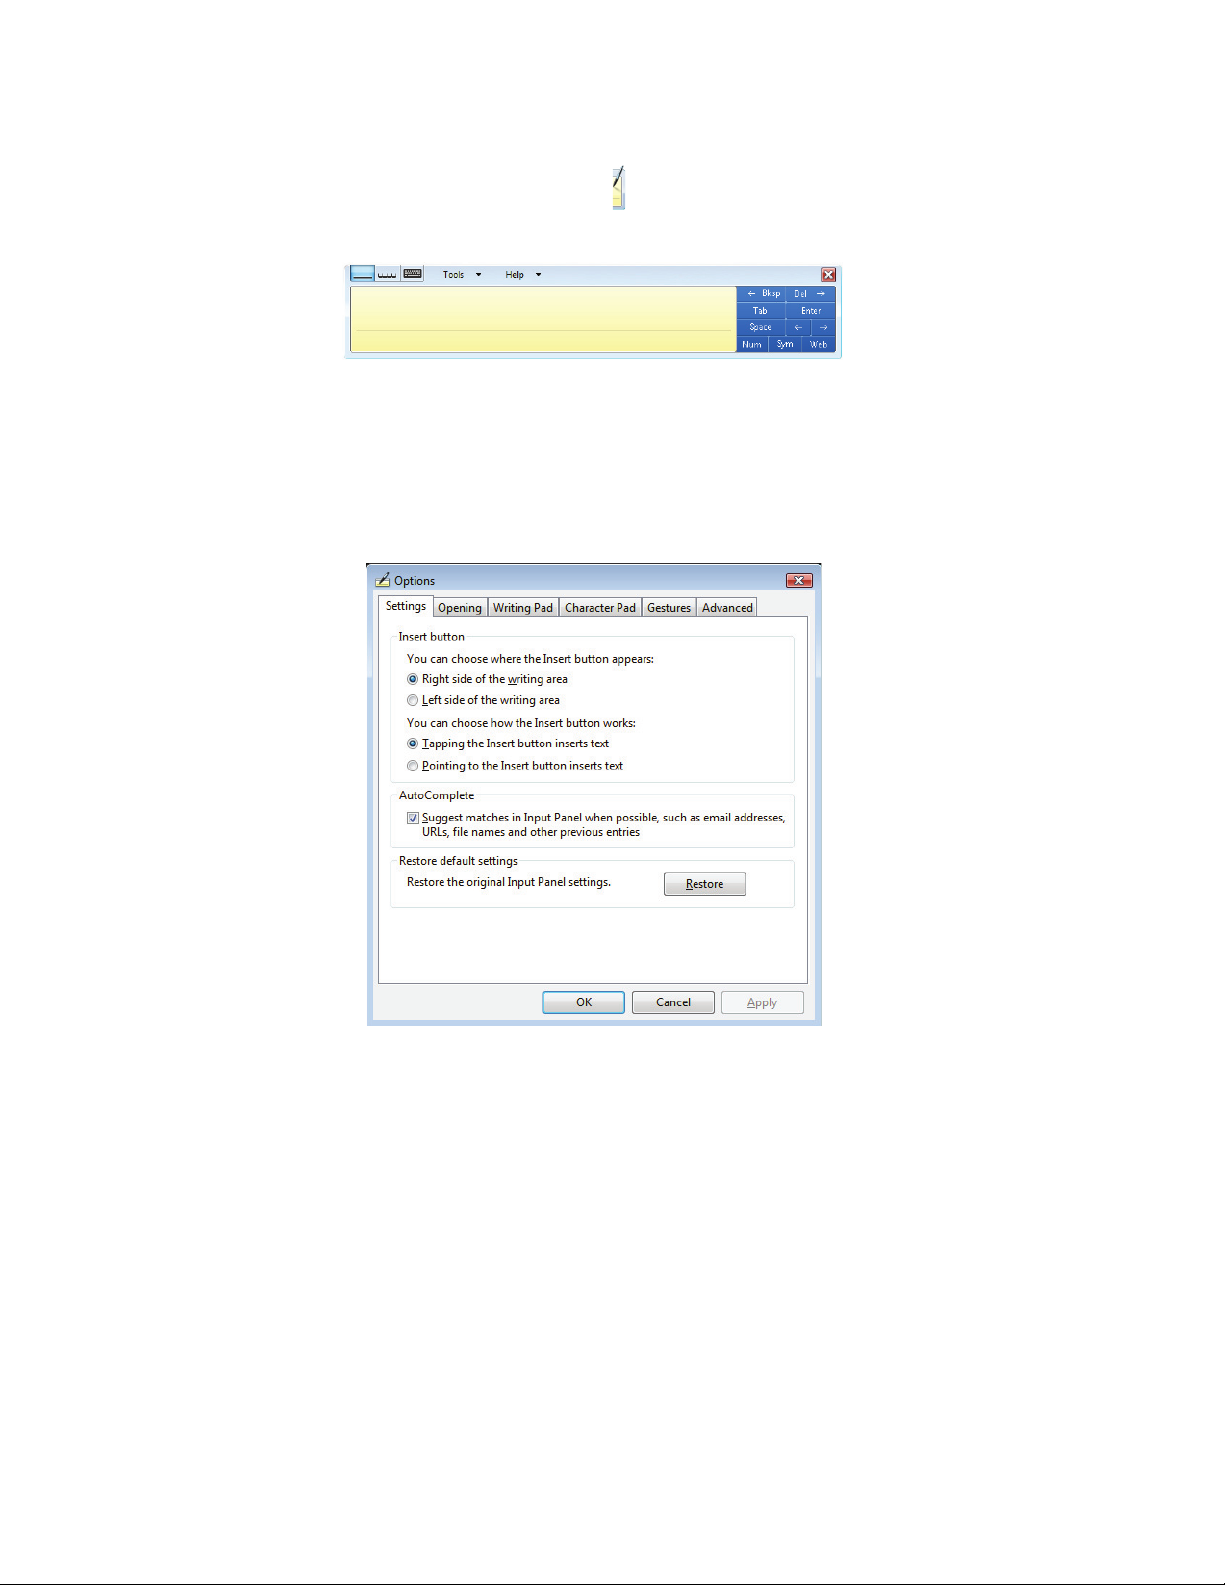
Using the Tablet Input Panel (TIP)
Tap the Tablet PC Input Panel icon on the left side of the screen to open the Tablet
Input Panel (TIP). Use the TIP to enter data by hand or soft keyboard into a word
processing program or a text-entry form.
Access the TIP keyboard and writing pad by tapping or clicking the buttons near the
top left of the window.
TIP tips
• Open a program for your input (for example, a word processing program or a
Web form) before using the writing pad or soft keyboard.
• To adjust writing pad and keyboard settings, click or tap Tools, then click or tap
Options.
16
• For security and accuracy when entering masked text (such as passwords), use
your tablet PC Input Panel’s soft keyboard instead of the writing pad.

www.gateway.com
Working with documents
Computer documents include word processing files, spreadsheet files, or other similar
files. The basic methods of creating, saving, opening, and printing a document apply
to most of these types of files.
The following examples show how to create, save, open, and print a document using
Microsoft
WordPerfect
For more information about using a program, click Help on its menu bar.
Creating a new document
To create a new document:
1 Click (Start), All Programs, Accessories, then click WordPad. Microsoft
®
WordPad. Similar procedures apply to other programs such as Corel®
®
, Microsoft Word, and Microsoft Excel.
WordPad starts and a blank document opens.
2 Begin composing your document. Use the menus and toolbar buttons at the top
of the window to format the document.
Saving a document
After you create a document, you need to save it if you want to use it later.
To save a document:
1 Click File, then click Save. The
File
name
2 Click Browse Folders to open the Folders list, then click the folder where you
want to save the file.
3 Type a new file name in the File name box.
4 Click Save.
click Help and Support. Type saving in the Search Help box, then press
E
NTER.
Save As
Help
For more information about saving documents, click Start, then
dialog box opens.
17
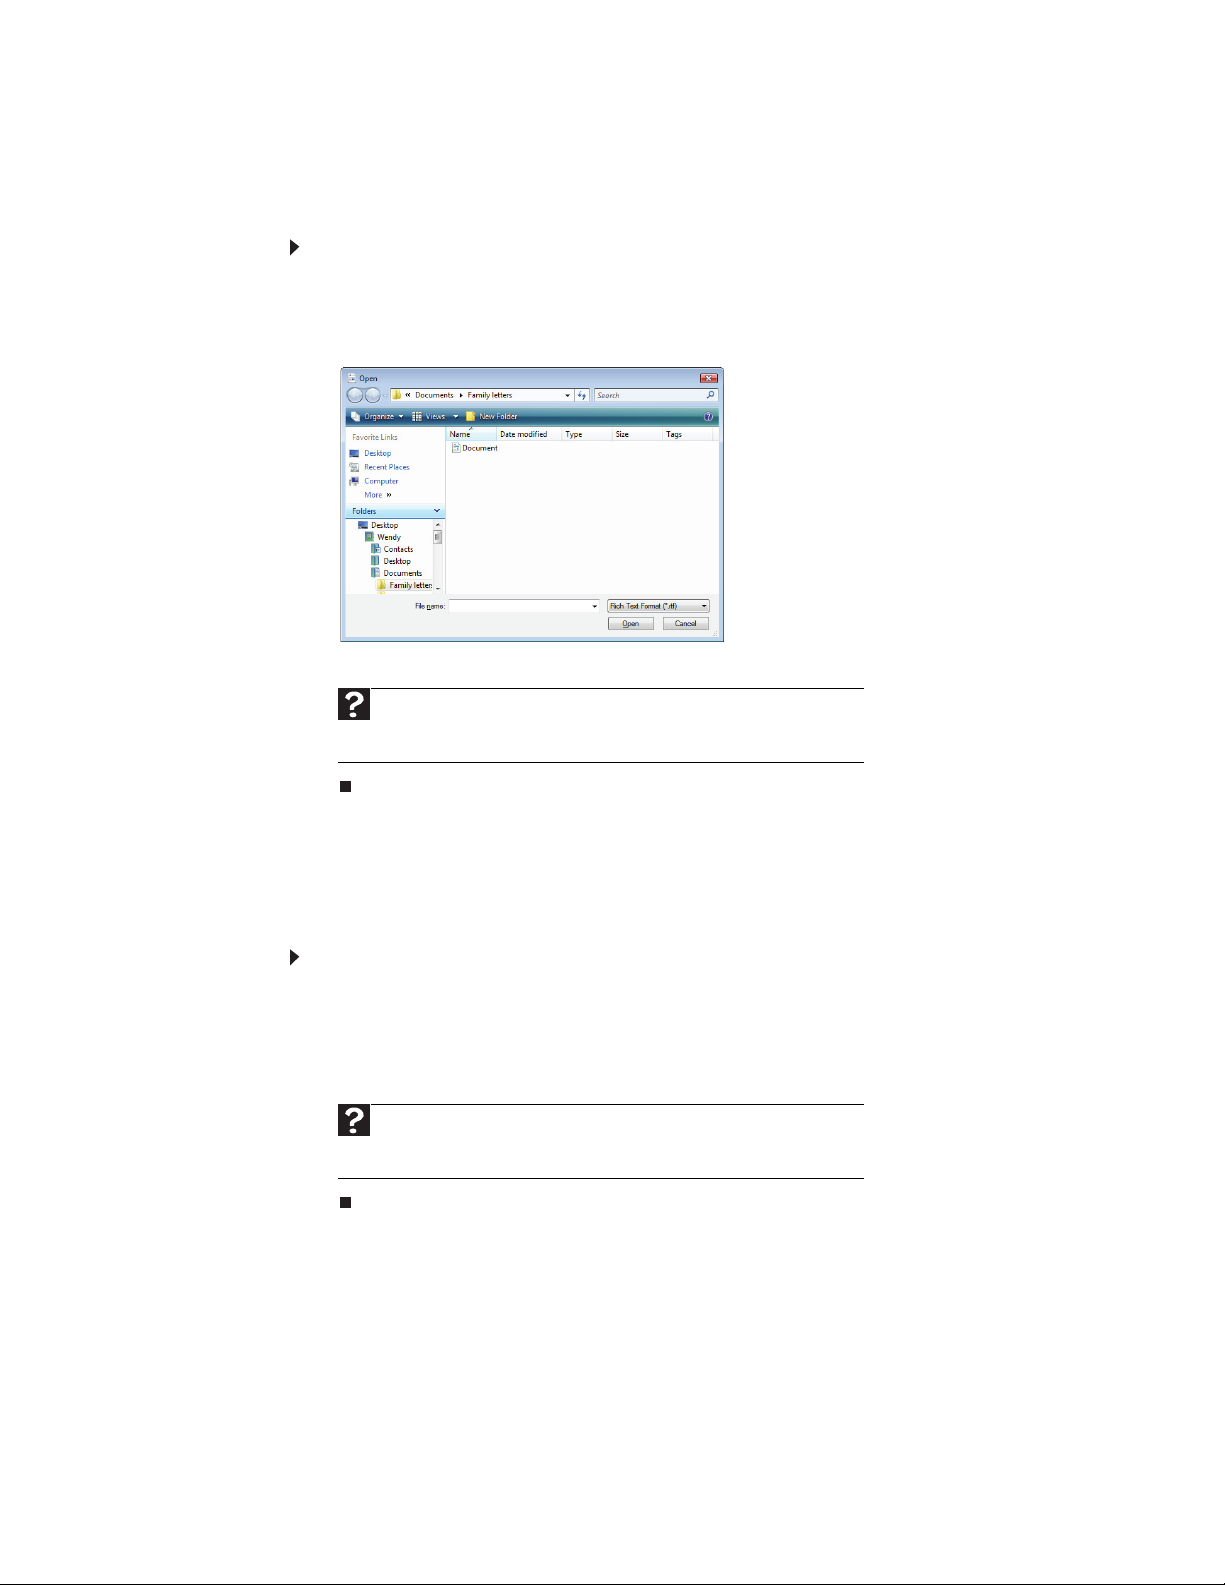
Opening a document
To view, revise, or print an existing document, first you need to open it. Open the
document in the program that it was created in.
To open a document:
1 Start the program.
2 Click File, then click Open.
3 Click Folders to open the Folders list, then click the folder you want to open.
CHAPTER 2: Using Windows
4 Double-click the document file name. The document opens.
Help
For more information about opening documents, click Start, then
click Help and Support. Type opening files in the Search Help box, then
press E
NTER.
Printing a document
To print a document, you must have a printer connected to your notebook or have
access to a network printer. For more information about installing or using your
printer, see the printer documentation.
To print a document:
1 Make sure that the printer is turned on and loaded with paper.
2 Start the program and open the document.
3 Click File, then click Print. The
4 Set the print options, then click Print. The document prints.
Help
For more information about printing documents, click Start, then
click Help and Support. Type printing in the Search Help box, then press
E
NTER.
Print
dialog box opens.
18

Shortcuts
then click Help and Support. Type Windows keyboard shortcuts in the Search
Help box, then press E
The following table shows a few shortcuts that you can use in Windows and almost
all programs that run in Windows. For more information about shortcuts, see your
Windows or program documentation.
www.gateway.com
Help
For more information about Windows keyboard shortcuts, click Start,
NTER.
To... Do this...
Copy a file, folder,
text, or graphic
Paste a file, folder,
text, or graphic
Select multiple items in
a list or window
Select multiple
adjacent items in a list
or window
Permanently delete a
file or folder
Rename a file or folder Click the file or folder, press F2, type the
Close the active
window or program
Switch to a different
file, folder, or running
program
Click the item, then press CTRL +C.
Click inside the folder or window where
you want to paste the object, then press
C
TRL +V.
Click the first item, press and hold down
the CTRL key, then click each of the
remaining items.
Click the first item in the list, press and
hold down the S
last item in the list.
Click the file or folder, then press
SHIFT +DELETE. The file or folder is
permanently deleted. The file or folder
is not stored in the Recycle Bin.
new name, then press E
Press ALT +F4.
Press A
LT +TAB.
HIFT key, then click the
NTER.
19

CHAPTER 2: Using Windows
20

CHAPTER 3
Using the Internet and
•
Learning about the Internet
•
Setting up an Internet account
•
Using the World Wide Web
•
Using e-mail
•
Using Windows Fax and Scan
•
Sending a Fax
•
Receiving and viewing a fax
Faxing
21
CHAPTER 3: Using the Internet and Faxing
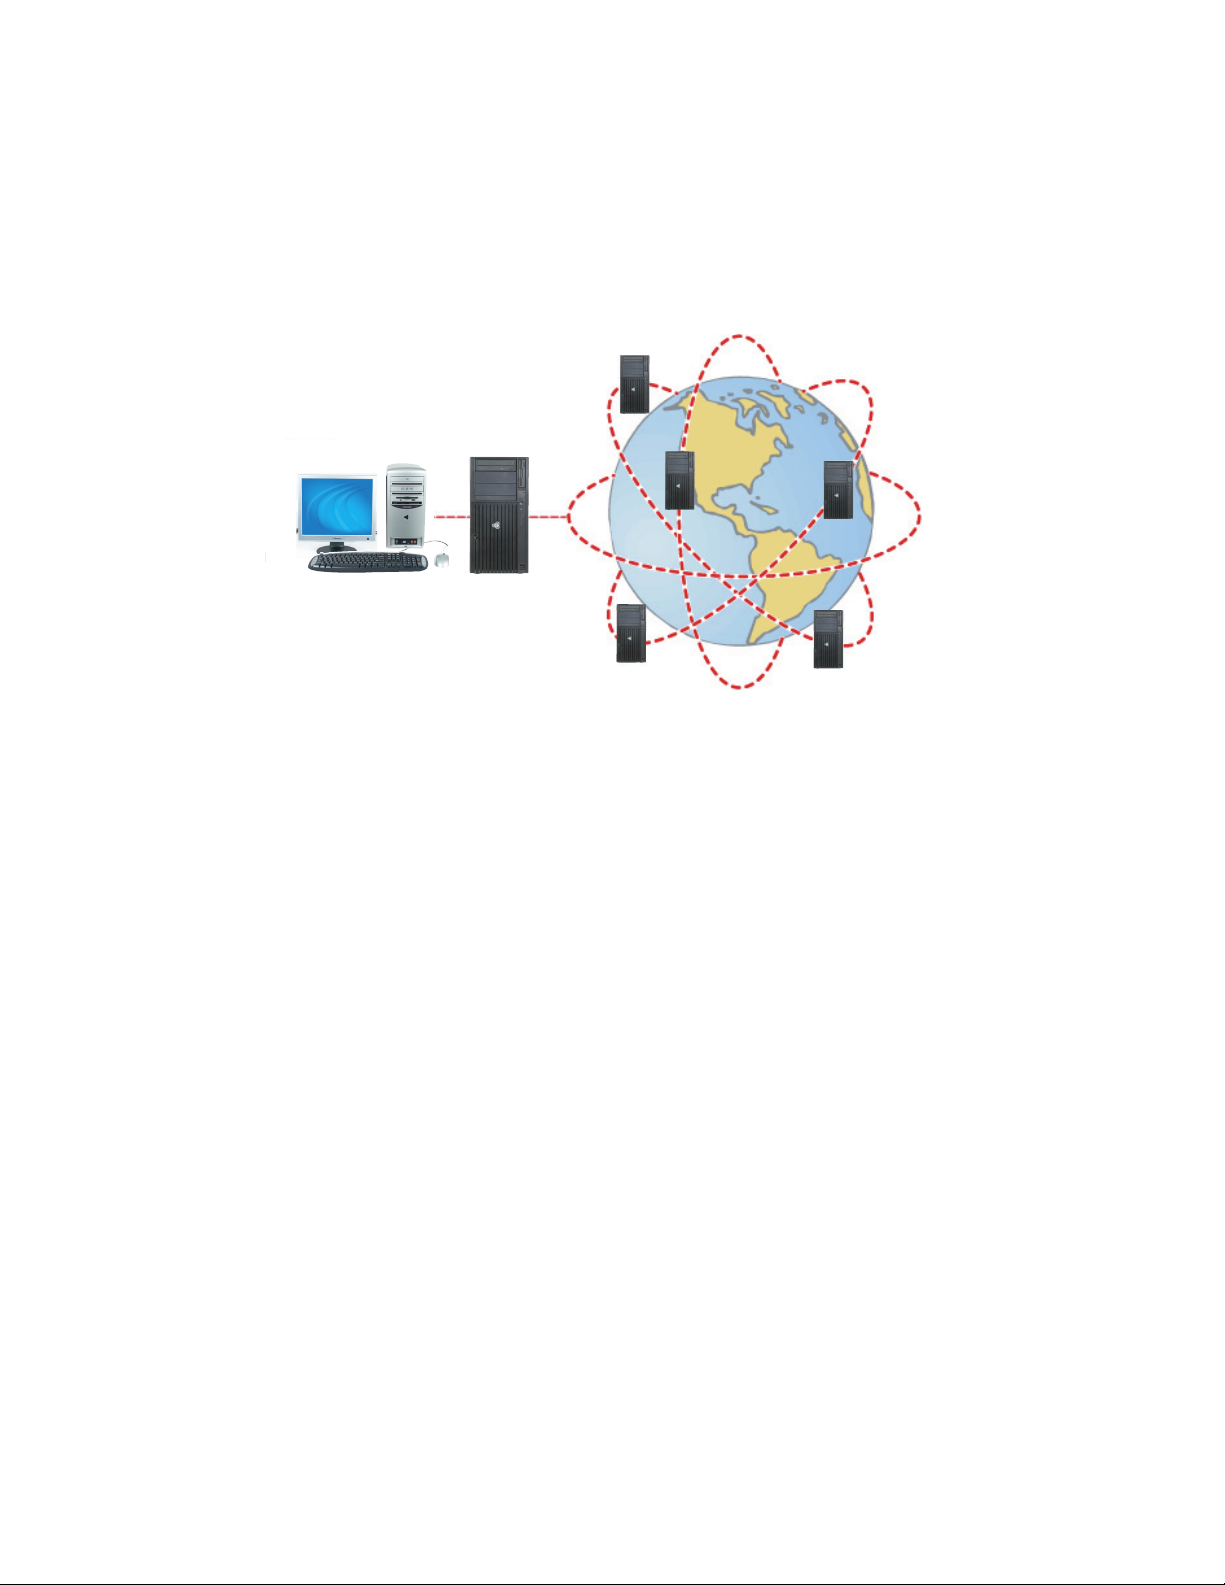
Learning about the Internet
The
Internet
information to people everywhere. The two most popular services on the Internet
are e-mail and the World Wide Web. You can access this network by connecting your
notebook to a telephone, DSL (Digital Subscriber Line), or cable television line and
signing up with an Internet service provider (ISP).
is a worldwide network of computers linked together to provide
Internet Servers
store information so other computers
can access it from the Internet.
Your computer
connects to the
Internet through an
ISP.
If you want to access the Internet you need:
ISP Servers
let you connect to the
Internet and access your
e-mail messages.
• A modem—a device that connects your notebook to other computers or servers
using a telephone, DSL, or cable television line. Your notebook may have a
built-in dial-up telephone modem. Cable and DSL modems connect to your
notebook through an Ethernet jack and provide a faster connection speed than
a standard telephone modem.
• An Internet service provider—a company that provides access to the Internet
through an ISP server. When you connect to an ISP, the ISP server lets you access
the Internet and your e-mail messages. Check your telephone book for a list of
Internet service providers available locally.
• A Web browser—a program that displays information from the World Wide
Web. Microsoft Internet Explorer was included with your notebook. For more
information, see “Using the World Wide Web” on page 23.
• An e-mail program—a program that lets you create, send, and receive e-mail
messages over the Internet. Microsoft Outlook or Outlook Express was included
with your notebook. For more information, see “Using e-mail” on page 25.
Setting up an Internet account
22
Before you can view the information on the World Wide Web, you need to set up
an Internet account with an Internet service provider (ISP). To set up an ISP service
or to transfer an existing account to this notebook, contact the ISP directly.
Dial-up Internet connections are those using a telephone system to connect to the
Internet. This may include ordinary analog telephone lines, ISDN connections, and in
some cases ADSL over PPP, or other technologies. Because dial-up connections are
designed to be temporary connections to the Internet, dial-up charges (with both your
telephone company and Internet service provider) often increase the longer you
connect to the Internet. To minimize the cost for dial-up Internet service, we suggest
that you only connect to the Internet during your e-mail and Web browsing session,
then disconnect when you are finished. Your Internet service provider can provide
instructions on how to connect to and disconnect from the Internet.
www.gateway.com
Cable and DSL modems, a connection known as broadband, use your cable television
or special telephone lines to connect to your ISP and access the Internet. In many
instances, broadband is considered an always-connected service. With this type of
service, your cost is the same regardless of the amount of time you use your Internet
connection.
Accessing your Internet account
Help
For general information about using Internet accounts, click Start, then
click Help and Support. Type ISP in the Search Help box, then press E
The method you use to access your Internet account varies from ISP to ISP. Contact
your ISP for the correct procedure.
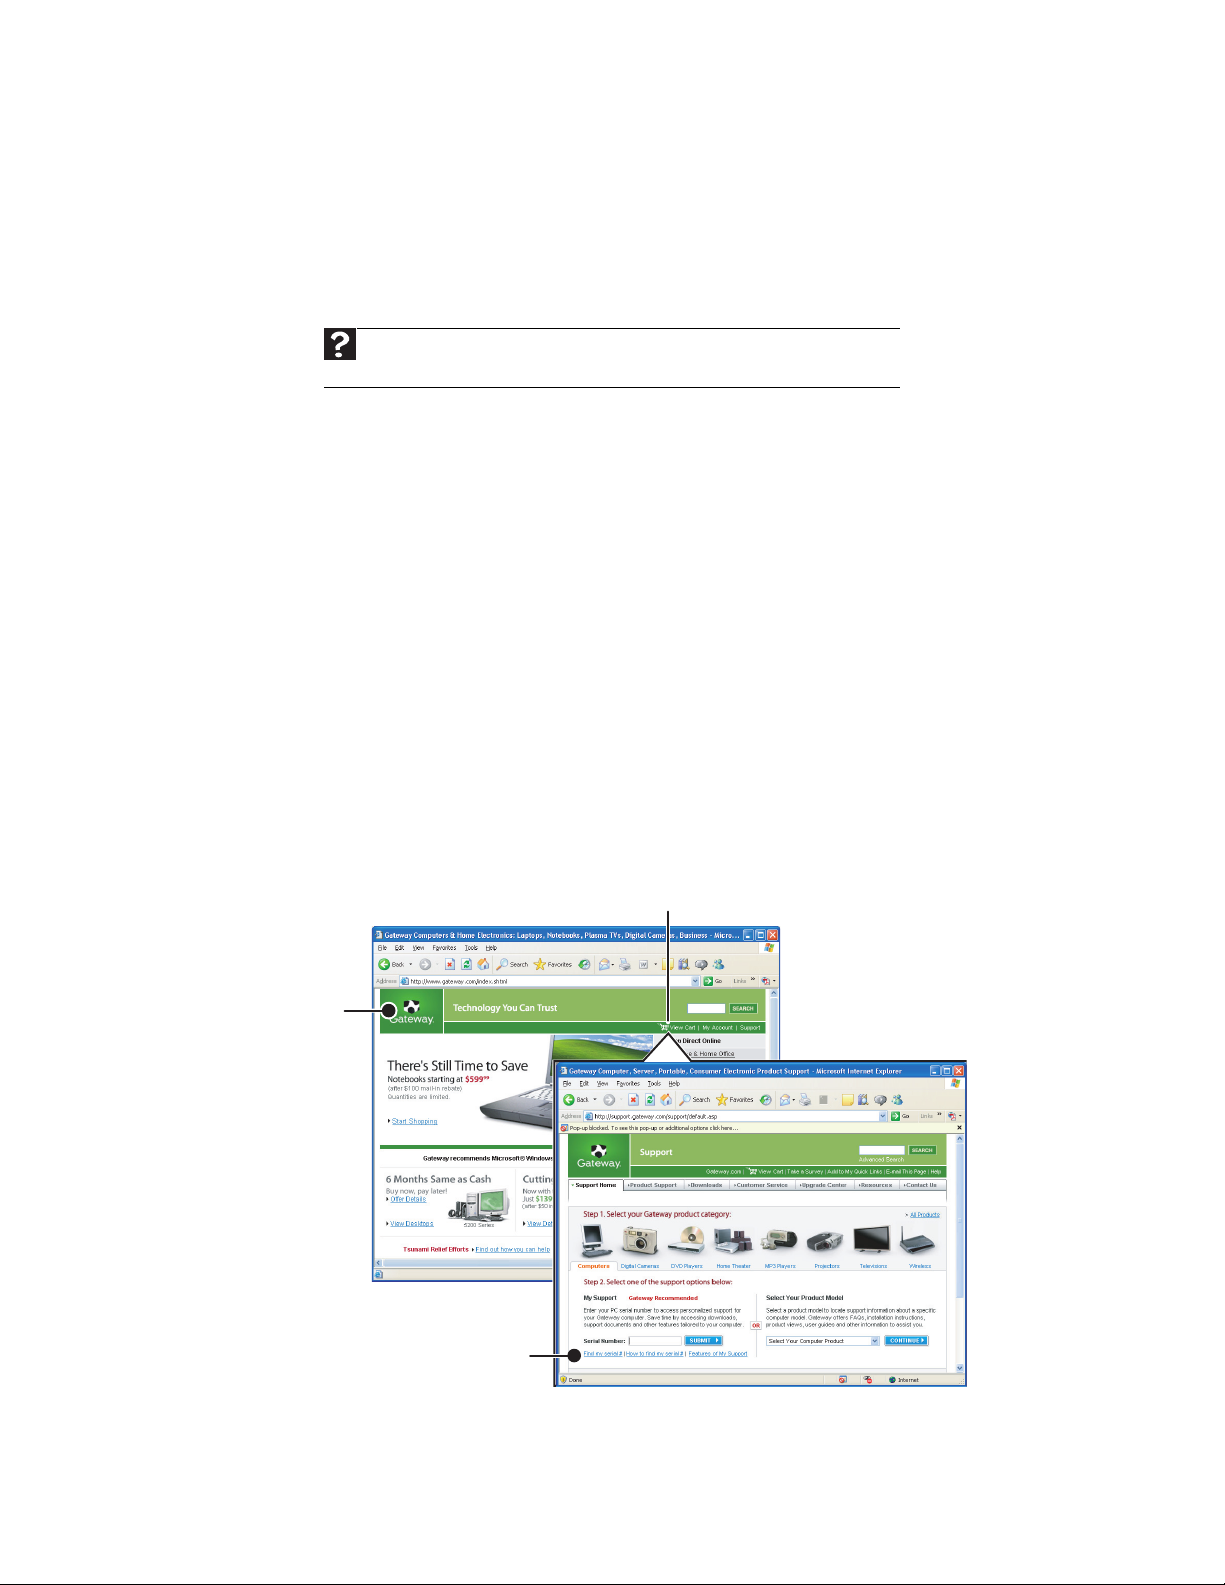
Using the World Wide Web
The World Wide Web is a multimedia window to the Internet that gives you access
to millions of information sources.
Information on the Web comes to you on
that you view using a Web page display program called a
of the commercially available Web browsers, like Microsoft Internet Explorer or
Netscape Navigator.
Web pages can contain text, animations, music, and other multimedia features. A
group of related Web pages is called a
track investments, read the news, download programs, and much more.
You can explore a Web site or visit other Web sites by clicking areas on a Web page
called
animated image. You can identify a link by moving the mouse pointer over it. If the
pointer changes to a hand, the item is a link.
To learn more about using the Web browser features, click Help in the menu bar.
links
or
hyperlinks
. A link may be colored or underlined text, a picture, or an
Web pages
Web site
Link
NTER.
, which are electronic documents
browser
. You can access Web sites to shop,
. You can use any
Web
page
Linked Web
page
23
CHAPTER 3: Using the Internet and Faxing
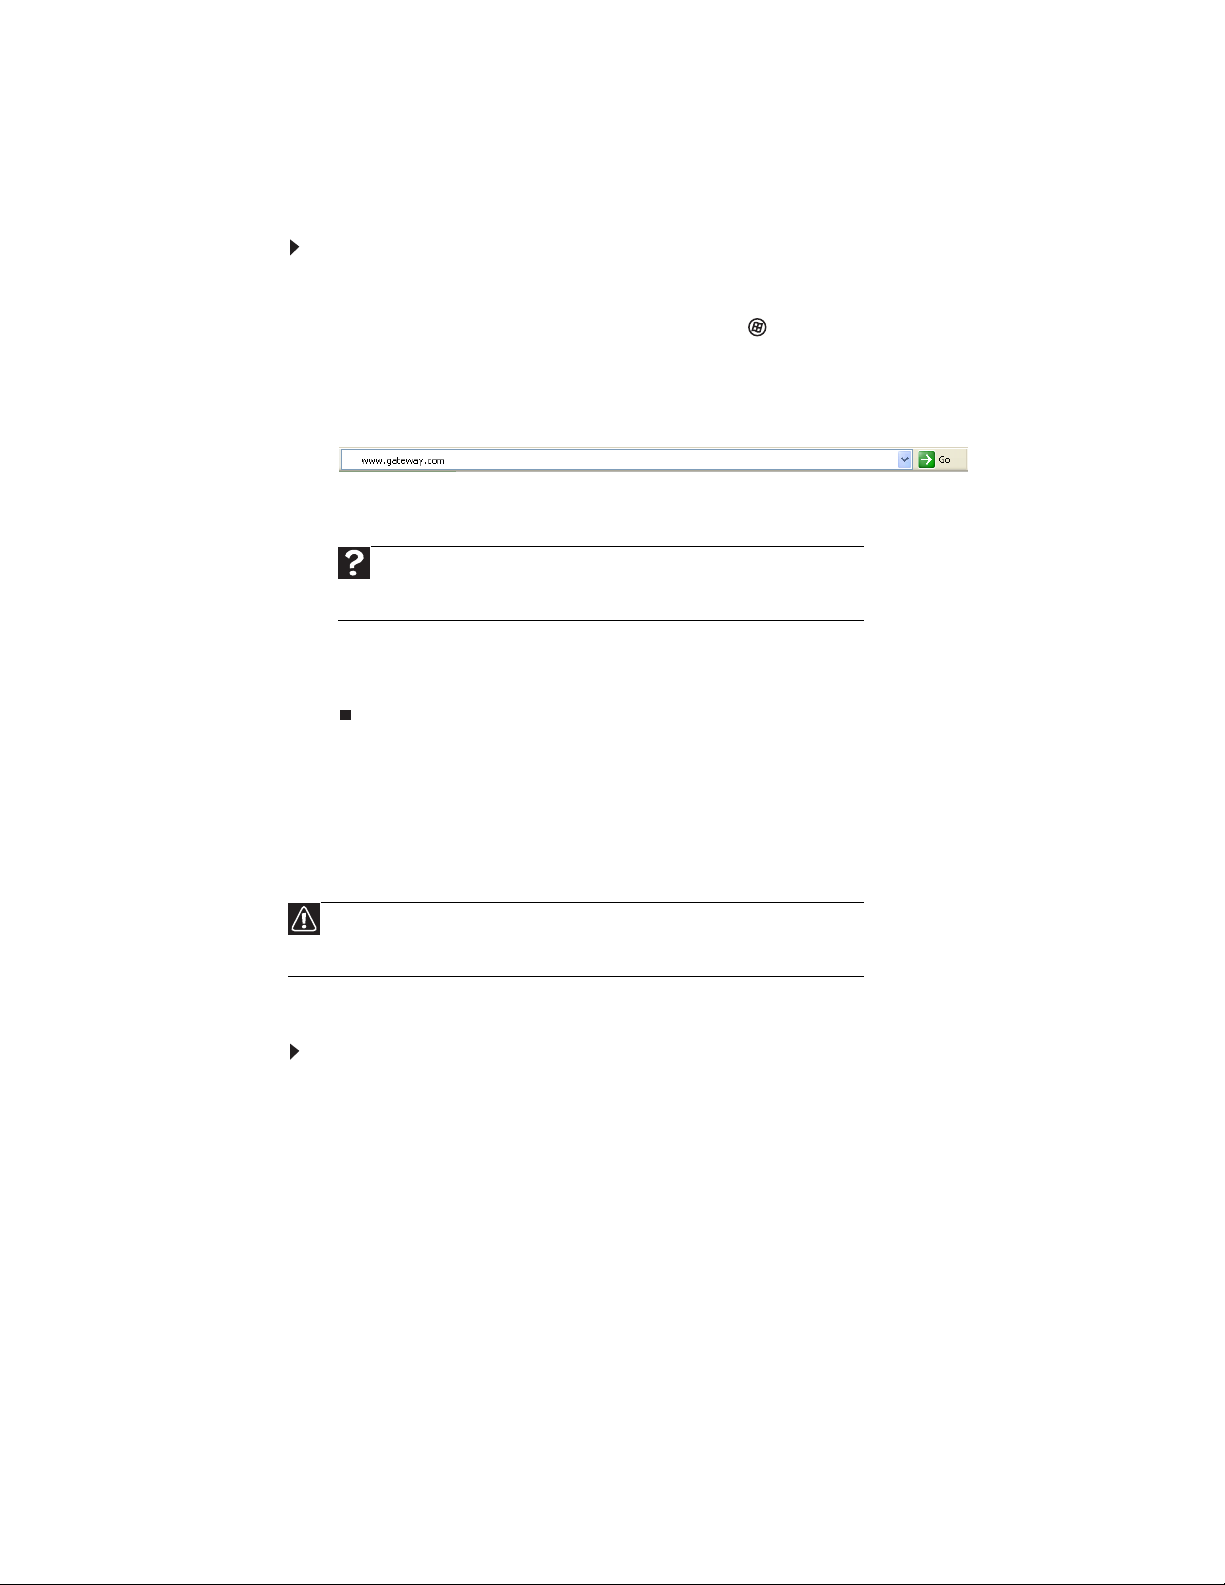
Connecting to a Web site
After you set up an account with an Internet service provider (ISP), you can access
the many information sources on the World Wide Web.
To connect to a Web site:
1 Connect to your Internet account.
2 Depending on the method you use to connect to your Internet account, you
may need to start your Web browser. Click (Start), then click Internet. Your
default Web browser opens showing an opening page or welcome screen.
3 To go to a different Web site, type the
Resource Locator”) in the browser address bar (for example www.gateway.com),
then click GO
- OR On the current Web page, click a link to a Web site.
Help
For more information about connecting to a Web site, click Start,
then click Help and Support. Type connecting to a Web site in the
Search Help box, then press E
address
on the browser address bar.
NTER.
(called a
URL
for “Universal
The Web browser locates the server computer on the Internet,
(transfers) data to your notebook, and displays the page on the site that you
requested.
Sometimes Web pages display slowly. The speed that a Web page displays on your
screen depends on the complexity of the Web page and other Internet conditions.
Additionally, the speed of your connection will determine how fast Web pages
display.
Downloading files
Caution
To protect your notebook against viruses, make sure that you scan the
files you download. For more information, see “Protecting your notebook
from viruses” on page 61.
Downloading
your notebook.
To download files or programs from a Web site:
1 Connect to your Internet account.
2 In the address bar, type the address of the Web site that contains the file or
program you want to download, then press E
- OR Click a link on a Web page to navigate to the Web site containing the file that
you want to download.
3 Create or locate the folder where you want to store the file on your notebook.
For more information, see “Working with files and folders” on page 9.
4 Click the link on the Web page for the file that you want to download.
5 Follow the on-screen instructions for saving the file in the folder that you want.
A copy of the file is downloaded to your notebook. The time that it takes to
transfer the file to your notebook depends on file size and Internet conditions.
6 Open the folder that you created.
downloads
is the process of transferring files from a computer on the Internet to
NTER.
24
 Loading...