

Wireless Cable Voice Gateway CG3000/CG3100 User Manual
NETGEAR, Inc.
350 East Plumeria Drive
San Jose, CA 95134
part number
July 2009

© 2009 by NETGEAR, Inc. All rights reserved.
Trademarks
NETGEAR and the NETGEAR logo are trademarks of NETGEAR, Inc. Microsoft, Windows, and Windows NT are
registered trademarks of Microsoft Corporation. Other brand and product names are registered trademarks or trademarks
of their respective holders.
Statement of Conditions
In the interest of improving internal design, operational function, and/or reliability, NETGEAR reserves the right to
make changes to the products described in this document without notice. NETGEAR does not assume any liability that
may occur due to the use or application of the product(s) or circuit layout(s) described herein.
FCC Warning Statement
This device complies with Part 15 of the FCC Rules. Operation is subject to the following two conditions:
(1) this device may not cause harmful interference, and
(2) this device must accept any interference received, including interference that may cause undesired operation.
This equipment has been tested and found to comply with the limits for a class B digital device, pursuant to part 15 of the
FCC Rules. These limits are designed to provide reasonable protection against harmful interference in a residential
installation.
This equipment generates, uses and can radiate radio frequency energy and, if not installed and used in accordance with
the instructions, may cause harmful interference to radio communications. However, there is no guarantee that
interference will not occur in a particular installation. If this equipment does cause harmful interference to radio or
television reception, which can be determined by turning the equipment off and on, the user is encouraged to try to
correct the interference by one or more of the following measures:
• Reorient or relocate the receiving antenna.
• Increase the separation between the equipment and receiver.
• Connect the equipment into an outlet on a circuit different from that to which the receiver is connected.
• Consult the dealer or an experienced radio/TV technician for help.
CAUTION: Any changes or modifications not expressly approved by the party responsible for compliance could void
the user’s authority to operate the equipment.
Prohibition of Collocation
This device and its antenna(s) must not be collocated or operating in conjunction with any other antenna or transmitter.
Safety Information
To maintain compliance with FCC’s RF exposure guidelines, this equipment should be installed and operated with
minimum distance of 20 cm between the radiator and your body. Use the supplied antenna.
Declaration of Conformity for R&TTE directive 1999/5/EC
Essential requirements – Article 3. Protection requirements for health and safety – Article 3.1a. Testing for electric
safety according to EN 60950-1 has been conducted. These are considered relevant and sufficient. Protection
requirements for electromagnetic compatibility – Artic le 3.1b. Te sting for electromagnetic compatibility according to
EN 301 489-1 and EN 301 489-17 has been conducted. These are considered relevant and sufficient. Effective use of the
ii
v1.0, July 2009

radio spectrum – Article 3.2. Testing for radio test suites according to EN 300 328- 2 has been conducted. These are
considered relevant and sufficient.
Bestätigung des Herstellers/Importeurs
Es wird hiermit bestätigt, daß das Wireless Cable Voice Gateway gemäß der im BMPT-AmtsblVfg 243/1991 und Vfg
46/1992 aufgeführten Bestimmungen entstört ist. Das vorschriftsmäßige Betreiben einiger Geräte (z.B. Testsender) kan n
jedoch gewissen Beschränkungen unterliegen. Lesen Sie dazu bitte die Anmerkungen in der Betriebsanleitung.
Das Bundesamt für Zulassungen in der Telekommunikation wurde davon unterrichtet, daß dieses Gerät auf den Markt
gebracht wurde und es ist berechtigt, die Serie auf die Erfüllung der Vorschriften hin zu überprüfen.
Certificate of the Manufacturer/Importer
It is hereby certified that the Wireless Cable Voice Gateway has been suppressed in accordance with the conditions set
out in the BMPT-AmtsblVfg 243/1991 and Vfg 46/1992. The operation of some equipment (for example, test
transmitters) in accordance with the regulations may, however, be subject to certain restrictions. Please refer to the notes
in the operating instructions.
Federal Office for Telecommunications Ap
and has been granted the right to test the series for compliance with the regulations.
provals has been notified of the placing of this equipment on the market
Technical Support
Thank you for choosing Netgear product(s). Ple
ase register online and take advantage of the
technical support resources such as NETGEAR online knowledge base. Technical support is
available 24 hours a day, seven days a week; please call your Cable Internet Service Provider.
Product and Publication Details
Model Number: CG3000/CG3100
Publication Date: July 2009
Product Family: Gateway
Product Name: Wireless Cable Voice Gateway
Home or Business Product: Home
Language: English
Publication Part Number: 202-10074-01
v1.0, July 2009
iii

iv
v1.0, July 2009

Contents
About This Manual
Conventions, Formats, and Scope ................................................................................... ix
How to Print This Manual ..................................................................................................x
Revision History ..................... ... ... .... ... ... ... .......................................... .... ... ... ... ... .... ...........x
Chapter 1
Connecting the Gateway
Package Contents ..........................................................................................................1-1
Gateway Front Panel ......................................................................................................1-1
Gateway Rear Panel ......................................................................................................1-3
Logging In to Your Gateway ...........................................................................................1-3
Viewing the Basic Settings .............................................................................................1-5
MTA Status .....................................................................................................................1-6
Chapter 2
Wireless Configuration
Planning Your Wireless Network ....................................................................................2-1
Wireless Placement and Range Guidelines .............................................................2-2
Wireless Security Options ......... ... ... ... .... ... ... .......................................... ... ... .... ... ... ..2-3
Manually Configuring Your Wireless Settings and Security ............................................2-3
Configuring WEP (Wired Equivalent Privacy) Wireless Security .............................2-7
Configuring WPA-PSK or WPA2-PSK Wireless Security .........................................2-8
Using Push 'N' Connect (WPS) to Configure Your Wireless Network and Security .......2-9
Using a WPS Button to Add a WPS Client .............................................................2-10
Using a PIN Entry to Add a WPS Client .................................................................2-12
Connecting Additional Wireless Client Devices ............................................................2-13
Adding Just WPS Clients ................................................................. ... ... ... ... .... ...... 2-13
Adding Both WPS and Non-WPS Clients ..............................................................2-14
Chapter 3
Content Filtering
Viewing or E-mailing Logs ..............................................................................................3-1
v1.0, July 2009
v

Wireless Cable Voice Gateway CG3000/CG3100 User Manual
Blocking Keywords, Sites, and Services .................. .... ... ... ... .... ... ... ... .... ... ... ... ... .... ... ... ..3-2
Blocking Keywords and Domains .............................................................................3-2
Services ................................. ................................................ .........................................3-4
Port Forwarding ........................................ .... ... ... ... ... .... ... .......................................... ... ..3-5
Adding a Custom Rule .............................................................. ...............................3-6
Chapter 4
Managing Your Network
Viewing the Modem Status .............................................................................................4-1
Viewing the Connection Status .......................................................................................4-4
Backing Up and Restoring Your Settings ........................................................................4-5
Changing the Built-In Password .....................................................................................4-6
Running Diagnostic Utilities ............................................................................................4-7
Testing Connectivity with the Ping Command ..........................................................4-8
Traceroute .......................................................... ...................................................... 4-9
Viewing the Event Log ..................................................................................................4-10
Chapter 5
Customizing Your Network
DMZ Host .......................................................................................................................5-1
LAN IP Setup ..................................................................................................................5-2
Reserving an IP Address for DHCP Use ..................................................................5-4
Configuring Universal Plug and Play (UPnP) .................................................................5-5
NAT ..................................... ...................... ....................... ....................... ........................5-6
Chapter 6
Troubleshooting
Basic Functions ..............................................................................................................6-1
Using LEDs to Troubleshoot ....................................................................................6-2
Connecting to the Gateway’s Main Menu .......................................................................6-3
Troubleshooting the ISP Connection ..............................................................................6-4
Troubleshooting a TCP/IP Network Using a Ping Utility .................................................6-4
Testing the LAN Path to Your Gateway ....................................................................6-4
Testing the Path from Your PC to a Remote Device ................................................6-5
Appendix A
Default Settings and Technical Specifications
Factory Default Settings ................................................................................................ A-1
Technical Specifications ................................................................................................. A-2
vi
v1.0, July 2009

Appendix B
Related Documents
Index
Wireless Cable Voice Gateway CG3000/CG3100 User Manual
v1.0, July 2009
vii

Wireless Cable Voice Gateway CG3000/CG3100 User Manual
viii
v1.0, July 2009
About This Manual
The NETGEAR® W ir eless Cable Modem Gateway CG3000 User Manual describes how to install,
configure and troubleshoot the Wireless Cable Voice Gateway . The information in this manual is
intended for readers with intermediate computer and Internet skills.
Conventions, Formats, and Scope
The conventions, formats, and scope of this manual are described in the following paragraphs:
• T
ypographical Conventions. This manual uses the following typographical conventions::
Italic Emphasis, books, CDs, file and server names, extensions
Bold User input, IP addresses, GUI screen text
Fixed Command prompt, code
italic URL links
• Formats. This manual uses the following formats to highlight special messages:
Note: This for
Tip: This format is used to highlight a procedure that will save time or resources.
Warning: Ignoring this type of note may result in a malfunction or damage to the
mat is used to highlight information of importance or special interest.
equipment.
v1.0, July 2009
ix

Wireless Cable Voice Gateway CG3000/CG3100 User Manual
• Scope. This manual is written for the Voice Gateway according to these specifications:
Product Version Wireless Cable Voice Gateway
Manual Publication Date July 2009
For more information about network, Internet, firewall, and VPN technologies, see the links to the
NETGEAR website in Appendix B, “Related Documents.”
Note: Product updates are available on the NETGEAR, Inc. website at
http://kbserver.netgear.com/pr
oducts/CG3000/CG3100.asp.
How to Print This Manual
T o print this manual, your computer must have the free Adobe Acrobat reader installed in order to
view and print PDF files. The Acrobat reader is available on the Adobe Web site at
http://www.adobe.com.
Tip: If your printer supports printing two pages on a single sheet of paper, you can
save paper and printer ink by selecting this feature.
Revision History
Part Number
202- 1.0 July 2009 Original publication
x
Version
Number
Date Description
v1.0, July 2009
Chapter 1
Connecting the Gateway
This chapter describes how to configure your Voice Gateway Internet connection. For help
installing your gateway, see the Wireless Cable Voice Gateway CG3000/3100 Quick Install
Guide.For information about product features and compatible NETGEAR products, see the
NETGEAR website at http://www.netgear.com.
Package Contents
The product package should contain the following items:
• NETGEAR® Wireless Cable Voice Gateway
• W
ireless Cable Voice Gateway CG3000/3100 Quick Install Guide
• AC power adapter with separate battery
• Category 5 (CAT5) Ethernet cable
• USB cable
• Resour
– This manual
– Application Notes, Tools, and other helpful information
ce CD, including:
If any of the parts are incorrect, missing, or damaged, contact your NETGEAR dealer. Keep the
carton, including t
he original packing materials, in case you need to return the product for repair.
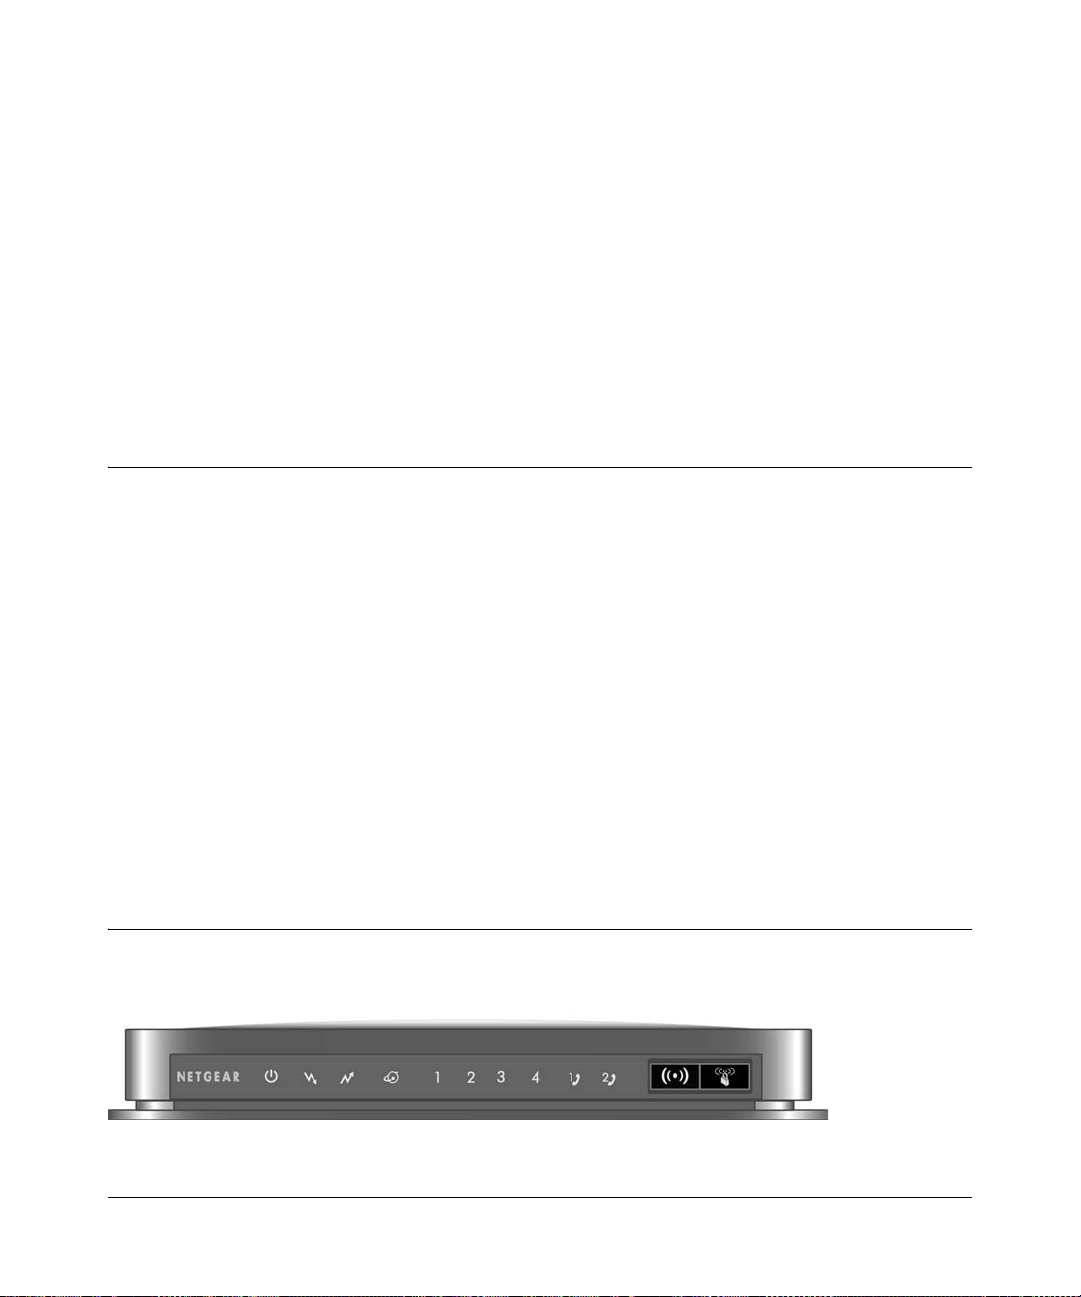
Gateway Front Panel
The front panel of the gateway contains status LEDs.
Figure 1-1
v1.0, July 2009
1-1
Wireless Cable Voice Gateway CG3000/CG3100 User Manual
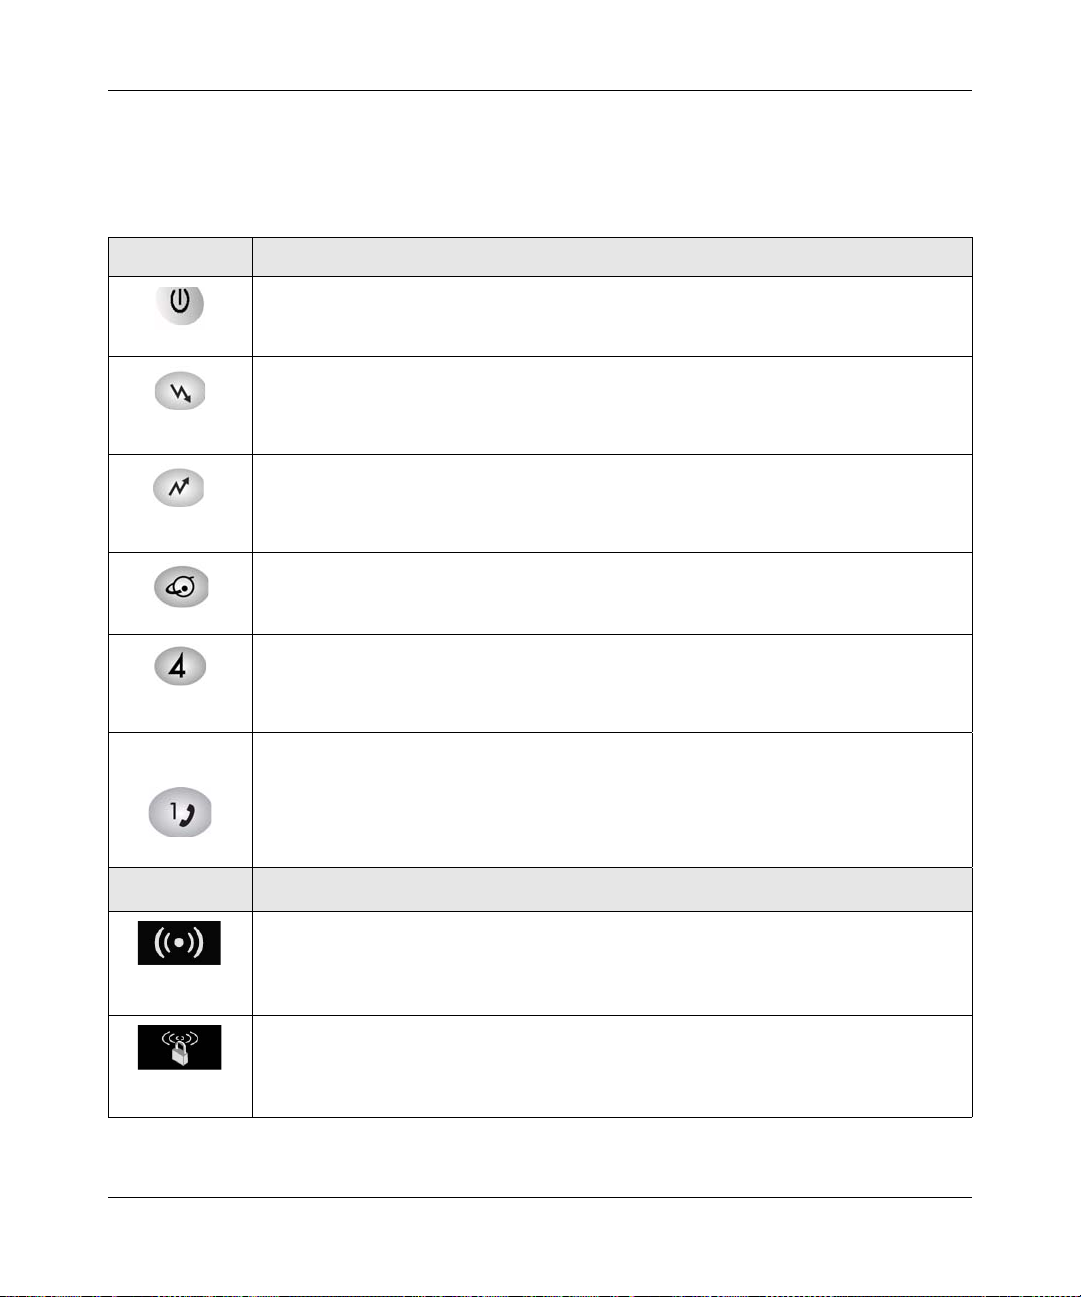
You can use the LEDs to verify status and connections. The following table lists and describes
each LED and button on the front panel of the gateway.
Table 1-1. LED and Front Panel Button Descriptions
LED Description
• So
lid green. Power is supplied to the cable modem.
• Off. No power.
Power
• So
lid green. The unit is synchronized, and all four channels are in use (channel
bonding).
Downstream
Upstream
Internet
Ethernet)
LAN (
Voice Ports
(1 and 2)
• Blinking. T
• Off. No downstream channels are locked.
• Solid green. The unit is synchronized, and all four channels are in use (channel
bonding).
• Blinking. The unit is scanning for an upstream channel.
• Off.
• So
lid green. The cable modem is online.
• Blinking. T
• Off. The cable modem is offline.
• Green indicates 1,000 Mbps. Amber indicates 10/100 Mbps.
• So
lid. An Ethernet device is connected and powered on.
• Blinking. Data is being transmitted or received on the Ethernet port.
• Off.
• Solid green. Registered with the Call Agent.
• Blinking. T
• Slow blink. Phone is “on-hook,” registration with Call Agent is in progress.
• Off. No phones are connected to the voice port.
he unit is scanning for a downstream DOCSIS channel.
No upstream channels are locked.
he cable modem is synchronizing with the cable provider’s CMTS.
No Ethernet device is detected on the Ethernet port.
here is an active call.
Button Description
Turn the wireless radio in the gateway on and off. The wireless radio is on by default. The
located below this button indicates if the wireless radio is on or off.
LED
Wireless
On/Off
Pushing this button opens a 2-minute window for the gateway to connect with other WPS-
bled devices. For more information, about using the WPS method to implement secu-
ena
Push 'N'
Connect (WPS)
1-2 Connecting the Gateway
rity, see the Wireless Cable Voice Gateway CG3000/CG3100 User Manual
v1.0, July 2009
Wireless Cable Voice Gateway CG3000/CG3100 User Manual
Power
Ethernet
Coaxial
Voice/phone
USB
ports LAN ports
adapter
input
cable
connector
Power On/Off
port
button
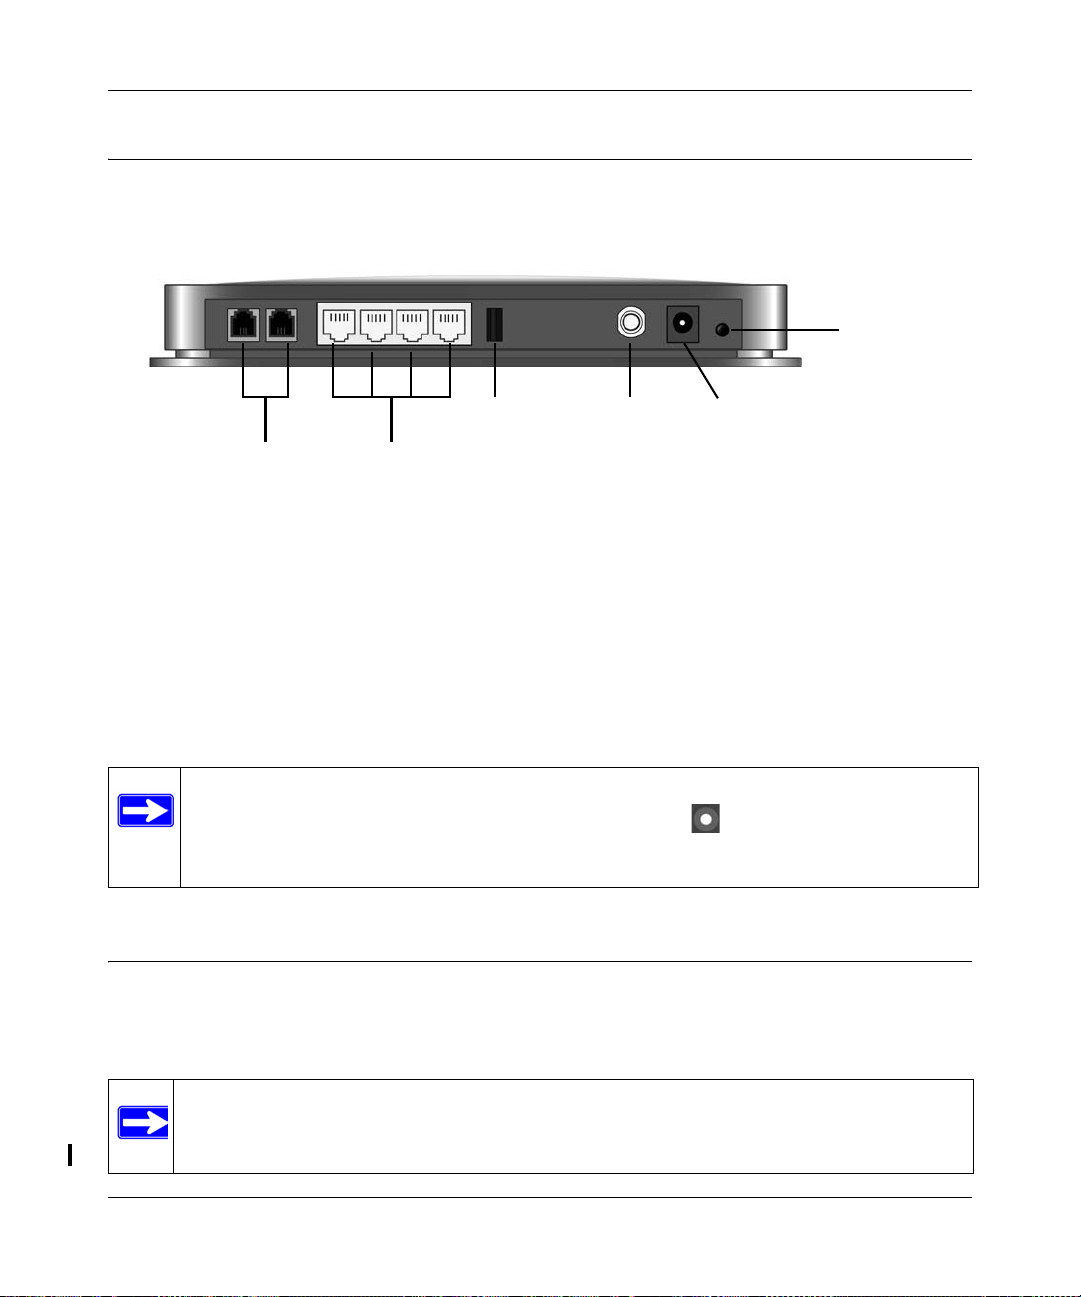
Gateway Rear Panel
The rear panel includes the following connections, viewed from left to right, as illustrated in the
following illustration:
Figure 1-2
• Two Voice/Phone ports: With VoIP service, connect one or two handsets to these ports.
• Four Ethern
• USB port: The USB p
et LAN ports: Use these ports to connect local computers.
ort is a USB host and can be used for connecting a USB hard drive,
flash drive, or printer.
oaxial cable connector: Attach coaxial cable to the cable service provider’s connection.
• C
• Power: AC powe
r adapter input.
Note: You can return the gateway to its factory settings. On the bottom of the gateway,
press and hold the Restore Factory Settings button
for over 7 seconds. The
gateway resets, and returns to its factory settings. See “Factory Default Settings” in
Appendix A.
Logging In to Your Gateway
You can log in to the gateway to view or change its settings. Links to Knowledge Base and
documentation are also available on the gateway main menu.
Note: Your computer must be configured for DHCP . For help with configuring DHCP, see
the documentation that came with your computer or see the link to the online
document in “Preparing a Computer for Network Access” in Appendix B.
Connecting the Gateway 1-3
v1.0, July 2009
Wireless Cable Voice Gateway CG3000/CG3100 User Manual
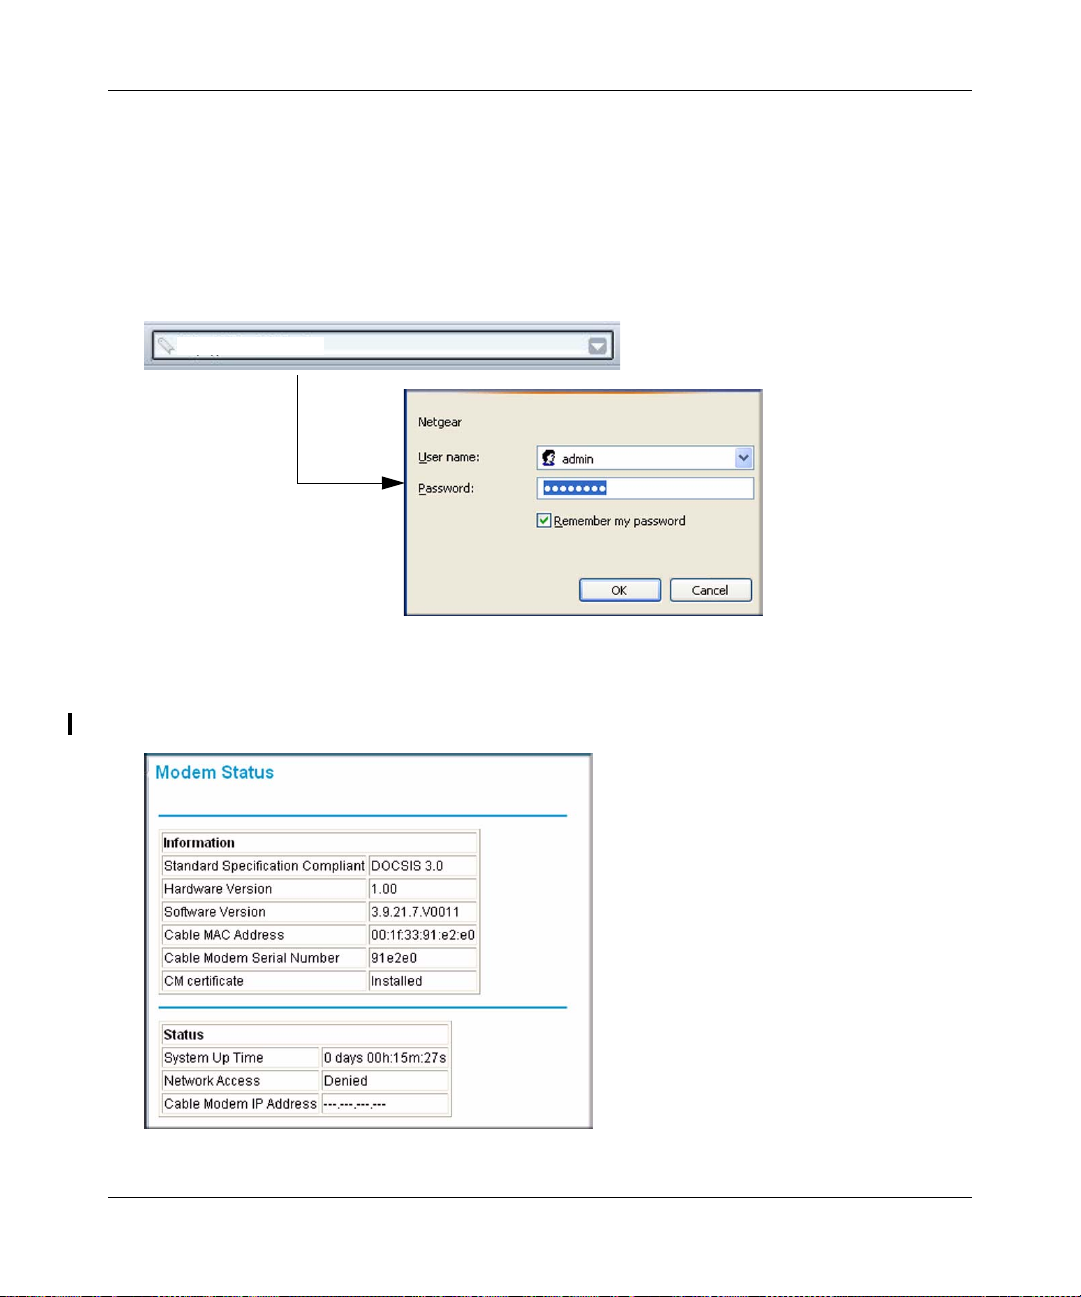
http://192.168.0.1
When you have logged in, if you do not click Logout, the gateway waits for 5 minutes after no
activity before it automatically logs you out.
To log in to the gateway:
1. Using the compute
r that you first used to access your cable modem Internet service, connect to
the gateway by typing http://192.168.0.1 in the address field of your Internet browser . A login
window displays:
Figure 1-3
2. Enter admin for the user name and password for the password, both in lower case letters.
When you connect to the gateway the Modem S
tatus screen displays:
Figure 1-4
1-4 Connecting the Gateway
v1.0, July 2009
Wireless Cable Voice Gateway CG3000/CG3100 User Manual
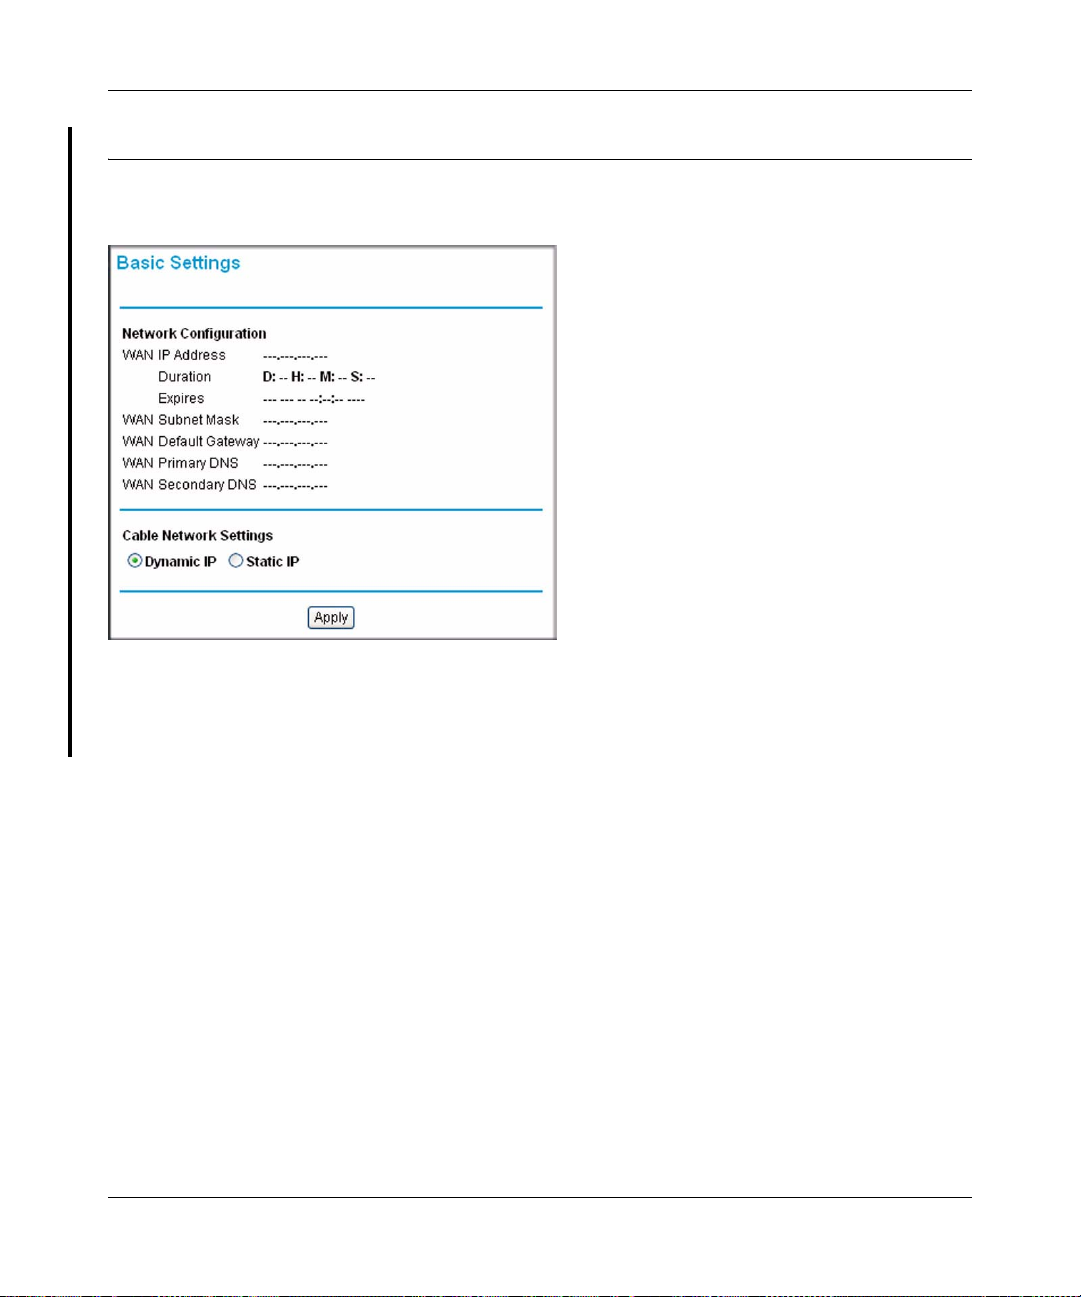
Viewing the Basic Settings
To view or configure the basic settings, select Basic Settings from the main menu:
Figure 1-5
By default Dynamic IP is selected. If you make changes, you must click Apply to accept the new
settings.
Connecting the Gateway 1-5
v1.0, July 2009
Wireless Cable Voice Gateway CG3000/CG3100 User Manual
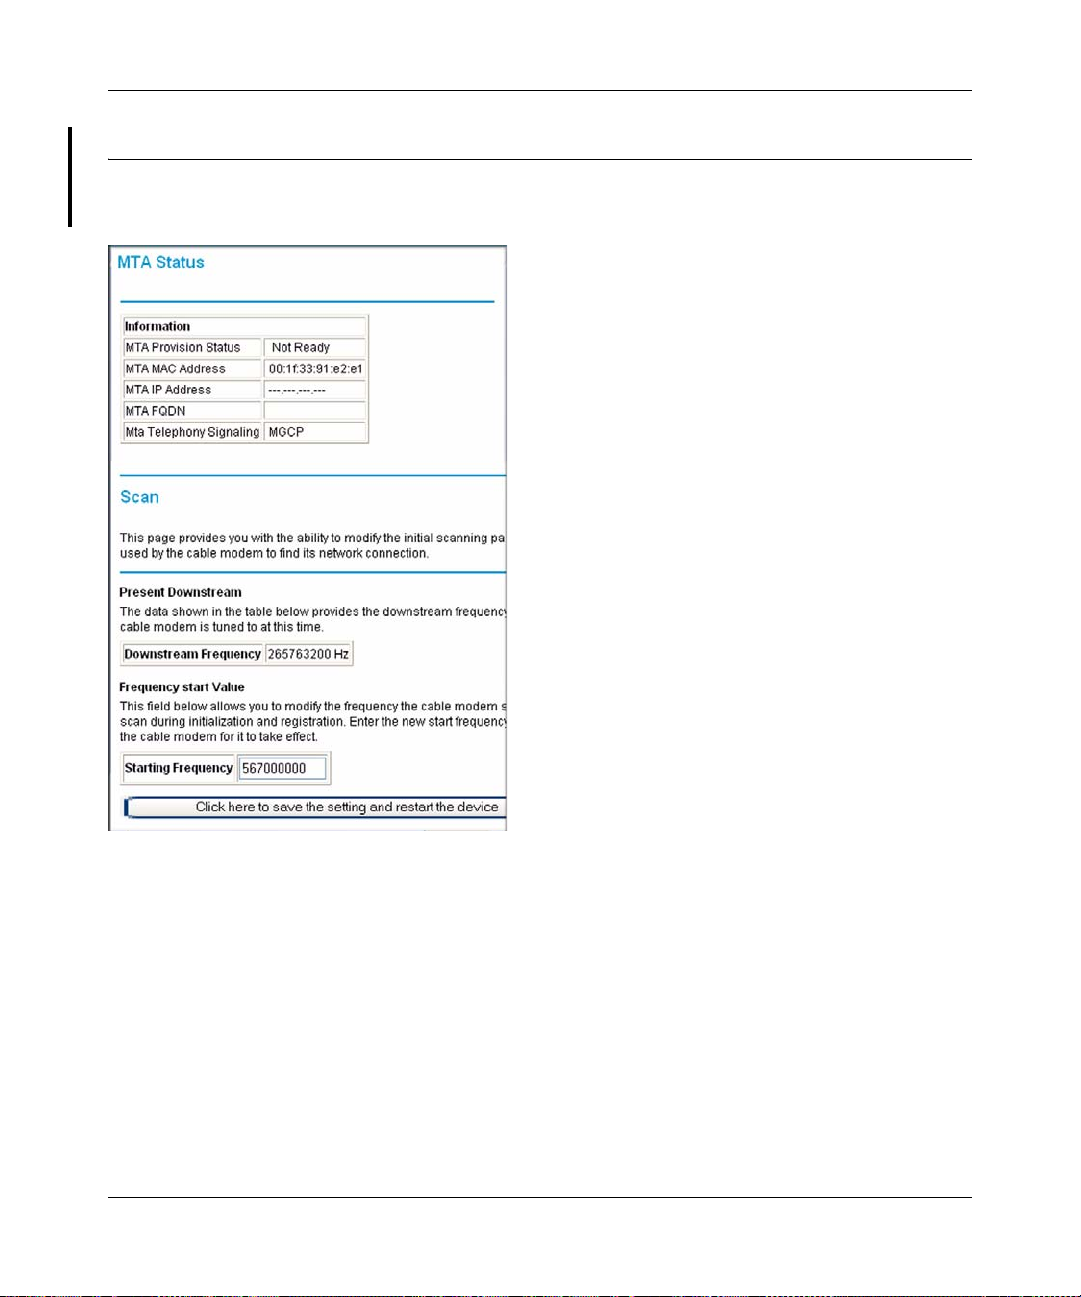
MTA Status
From the main menu select MTA Status to display the following screen:
Figure 1-6
1-6 Connecting the Gateway
v1.0, July 2009

Chapter 2
Wireless Configuration
For a wireless connection, the SSID, also called the wireless network name, and the wireless
security setting must be the same for the gateway and wireless computers or wireless adapters.
NETGEAR strongly recommends that you use wireless security. This chapter includes:
• “Planning Your Wireless Network”
• “Manually Configuring Your Wireless Settings and Security” on page 2-3
• “Using Push 'N' Connect (WPS) to Configure Your Wireless Network and Security” on
page 2-9
• “Connecting Additional Wireless Client Devices” on page 2-13
Planning Your Wireless Network
For compliance and compatibility between similar products in your area, the operating channel
and region must be set correctly.
To configure the wireless network, you can either specify the wireless settings, or you can use WiFi Protected Setup (WPS) to automatically set the SSID and implement WPA/WPA2 security.
• To manually configure the wireless settings, you must know the following:
– SSID. The default SSID for the gateway is Wireless.
– The wireless mode (802.11g, or 802.11 b) that each wireless adapter supports.
– Wireless security option. To successfully implement wireless security, check each wireless
adapter to determine which wireless security option it supports.
See “Manually Configuring Your Wireless Settings and Security” on page 2-3.
• Push 'N' Connect (WPS) automatically implements wireless security on the gateway while, at
the same time, allowing you to automatically implement wireless security on any WPSenabled devices (such as wireless computers and wireless adapter cards). You activate WPS by
pressing a WPS button on the gateway, clicking an onscreen WPS button, or entering a PIN
number. This generates a new SSID and implements WPA/WPA2 security.
2-1
v1.0, July 2009
Wireless Cable Voice Gateway CG3000/CG3100 User Manual
Note: NETGEAR’s Push 'N' Connect feature is based on the Wi-Fi Protected Setup
(WPS) standard (for more information, see http://www.wi-fi.org). All other Wi-
Fi-certified and WPS-capable products should
products that implement Push 'N' Connect.
To set up your wireless network using the WPS feature:
– Use the WPS button on the side of the gateway (there
enter the PIN of the wireless device.
be compatible with NETGEAR
is also an onscreen WPS button), or
– Make sure that all wireless computers and
wireless adapters on the network are Wi-Fi
certified and WPA or WPA 2 capable, and that they support WPS configuration.
See “Using Push 'N' Connect (WPS) to Configure Your Wireless Network and Security” on
page 2-9.
Wireless Placement and Range Guidelines
The range of your wireless connection can vary significantly based on the physical placement of
the gateway. The latency, data throughput performance, and notebook power consumption of
wireless adapters also vary depending on your configuration choices.
For best results, place your gateway according to the
• Near the center of the area in whi
• In an elevated location such as a high shelf where the wirelessly connected PCs have line-ofsight acc
• Away from sources of interference, such as PC
phones.
• Away from large metal surfaces.
• Put the antenna in a vertical position to provide the
in a horizontal position to provide the best up-and-down coverage.
ess (even if through walls).
ch your PCs will operate.
following guidelines:
s, microwave ovens, and 2.4 GHz cordless
best side-to-side coverage. Put the antenna
• If using multiple access points, it is better
frequency channels to reduce interference. The recommended channel spacing between
adjacent access points is 5 channels (for example, use Channels 1 and 6, or 6 and 11).
The time it takes to establish a wireless connection
settings and placement. WEP connections can take slightly longer to establish. Also, WEP
encryption can consume more battery power on a notebook computer.
2-2 Wireless Configuration
if adjacent access points use different radio
can vary depending on both your security
v1.0, July 2009
Wireless Cable Voice Gateway CG3000/CG3100 User Manual
Wireless Security Options
Indoors, computers can connect over 802.1 1n wireless networks at a maximum range of up to 300
feet. Such distances can allow for others outside your immediate area to access your network.
Unlike wired network data, your wireless data transmissions ca
can be received by anyone with a compatible adapter. For this reason, use the security features of
your wireless equipment. The Voice Gateway provides highly effective security features which are
covered in detail in this chapter. Deploy the security features appropriate to your needs.
There are several ways you can enhance the sec
• WEP
• WP
• Restrict access to your router.
For more information about wireless technology
Networking Basics” in Appendix B.
. Wired Equivalent Privacy (WEP) data encryption provides data security. WEP Shared
Key authentication and WEP data encryption block all but the most determined eavesdropper.
This data encryption mode has been superseded by WPA-PSK and WPA2-PSK.
A-PSK (TKIP), WPA2-PSK (AES). Wi-Fi Protected Access (WPA) using a pre-shared
key to perform authentication and generate the initial data encryption keys. The very strong
authentication along with dynamic per frame re-keying of WPA makes it virtually impossible
to compromise.
urity of your wireless network:
, see the link to the online document in “Wireless
n extend beyond your walls and
Manually Configuring Your Wireless Settings and Security
You can view or manually configure the wireless settings for the gateway in the Wireless Settings
screen. If you want to make changes, make sure to note the current settings first.
Note: If you use a wireless computer to change the wireless network name (SSID) or
wireless security settings, you will be disconnected when you click Apply. To
avoid this problem, use a computer with a wired connection to access the gateway.
To view or manually configure the wireless
1. Log in to the gate
Wireless Configuration 2-3
way as described in “Logging In to Your Gateway” on page 1-4.
settings:
v1.0, July 2009
Wireless Cable Voice Gateway CG3000/CG3100 User Manual
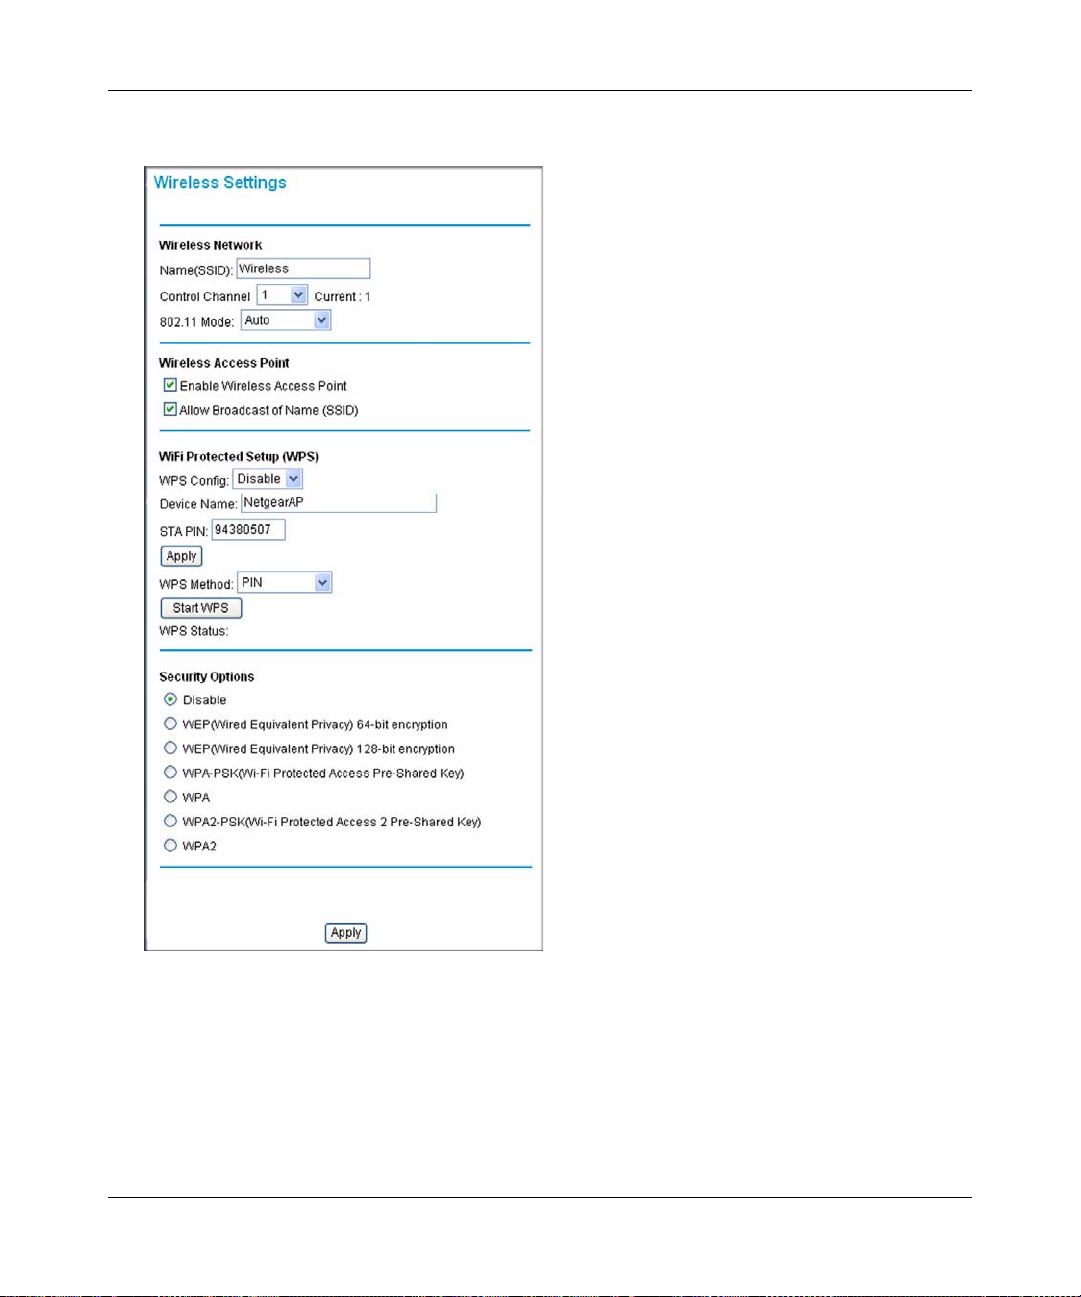
2. In the main menu, under Setup, select Wireless Settings to display the following screen:
Figure 2-1
3. If you make changes, you must click Apply for them to take effect.
2-4 Wireless Configuration
v1.0, July 2009

Wireless Cable Voice Gateway CG3000/CG3100 User Manual
Table 2-1. Wireless Settings
Settings Description
Wireless Network Name (SSID) The SSID is also known as the wireless network name.
Enter a 32-character (maximum) name in this field. The
characters are case sensitive.
In a setting where there is more than one wireless
network, different wireless network names provide a
means for separating the traffic. Any device you want to
participate in a wireless network must use the SSID.
Control Channel The wireless channel used by the gateway. The default is
channel 11.
You should not need to change the wireless channel
unless you experience interference (shown by lost
connections and/or slow data transfers). Should this
happen, you might need to try different channels to see
which is the best.
802.11 Mode Select the desired wireless mode. The options are:
•Auto
• b & g only. Only 802.11g and 802.11b wireless stations
can be used.
• g only. Only 802.11g wireless stations can be used.
• b only. Only 802.11b wireless stations can be used.
Wireless Access
Point
Enable Wireless Access
Point
Allow Broadcast Name
(SSID)
On by default, you can also turn off the wirel e ss rad i o to
disable access through this device. This can be helpful
for configuration, network tuning, or troubleshooting
activities.
On by default, the gateway broadcasts its SSID, allowing
wireless stations which have a “null” (blank) SSID to
adopt the correct SSID. The default SSID is NETGEAR.
If you disable broadcast of the SSID, only devices that
have the correct SSID can connect. This nullifies the
wireless network “discovery” feature of some products
such as Windows XP, but the data is still fully exposed to
a determined snoop using specialized test equipment
like wireless sniffers. For this reason NETGEAR
recommends that you also enable wireless security.
Wireless Configuration 2-5
v1.0, July 2009

Wireless Cable Voice Gateway CG3000/CG3100 User Manual
Table 2-1. Wireless Settings (continued)
Settings Description
Wi-Fi Protected
Setup (WPS)
Security Options Disable Wireless security is disabled by default. After the
Security Options
(continued)
WPS Config To use WPS, you must enable WPS Config and click
Apply.
Device Name The default is NetgearAP. This identifies your gateway
for client WPS devices that want to join the network.
STA PIN The PIN is displayed so that you can use it to configure
the gateway through WPS (Wi-Fi Protected Setup). It is
also displayed on the gateway’s label.
WPS Method PIN or Push Button can be used.
Start WPS If WPS Config is enabled, clicking Start WPS causes the
gateway to try to associate with a client. If security is set
to Disable, it is automatically set to WPA-PSK. For more
“Using Push 'N' Connect
• WEP (Wired Equivalent
Privacy) 64-bit encryption
• WEP (Wired Equivalent
Privacy) 128-bit encryption
• WP A-PSK (Wi-Fi
Protected Access PreShared Key)
•WPA
• WPA2-PSK (Wi-Fi
Protected Access 2 PreShared Key)
•WPA2
information about WPS, see
(WPS) to Configure Y our Wireless Network and Security”
on page 2-9.
gateway is connected to the Internet, NETGEAR strongly
recommends that you implement wireless security.
WEP security uses encryption keys to provides data
security. You can select 64-bit or 128-bit encryption. See
“Configuring WEP (Wired Equivalent Privacy) Wireless
Security” on page 2-7.
Wi-Fi Protected Access (WPA) data encryption provides
data security. The very strong authentication along with
dynamic per frame rekeying of WPA make it virtually
impossible to compromise.
• WPA uses the TKIP encryption type and a
pre-shared key passphrase
• WP A-PSK uses the TKIP encryption type with
authentication from a RADIUS server.
• WPA2-PSK uses the AES encryption type with
authentication from a RADIUS server.
• For more information about WPA, see “Configuring
WPA-PSK or WPA2-PSK Wireless Security” on
page 2-8.
2-6 Wireless Configuration
v1.0, July 2009

Wireless Cable Voice Gateway CG3000/CG3100 User Manual
Configuring WEP (Wired Equivalent Privacy) Wireless Security
Note: If you use a wireless computer to configure wireless security settings, you will be
disconnected when you click Apply. Reconfigure your wireless computer to match
the new settings, or access the gateway from a wired computer to make further
changes.
To configure WEP data encryption:
1. Log in to the gate
2. In the main menu, under Setup, selec
3. In the W
ireless Settings screen, depending on the encryption strength that you want, select one
way as described in “Logging In to Your Gateway” on page 1-4.
t Wireless Settings.
of these options:
• WEP (Wired Equivalent Privacy) 64-bit encryption
• WEP (Wired Equivalent Privacy) 128-bit encryption
Settings for WEP encryption are shown in the following figure (which is the
Wireless Settings screen).
bottom part of the
Figure 2-2
4. Select the WEP security encryption from the Authentication drop-down list. Select
Automatic, Open System or Shared Key. The default is Automatic.
Wireless Configuration 2-7
v1.0, July 2009

Wireless Cable Voice Gateway CG3000/CG3100 User Manual
5. Enter the WEP encryption key information:
• WEP PassPh
rase: To use a passphrase to automatically generate the keys, enter a
passphrase and click Generate. Wireless stations must use the passphrase or keys to
access the gateway.
• Ke
y 1 through Key 4: Y ou can manually enter the four data encryption keys. These values
must be identical on all computers and access points in your network. For 64-bit WEP,
enter 10 hexadecimal digits (any combination of
0–9 or A–F). For 128-bit WEP, enter
26 hexadecimal digits.
• Select which of the four keys will be the default. Data transmi
ssions are always encrypted
using the default key. The other keys can only be used to decrypt received data. The four
entries are disabled if WPA-PSK or WPA authentication is selected.
6. Click Ap
ply to save your settings.
Note: If you use a wireless computer to configure WEP settings, you will be
disconnected when you click Apply. Reconfigure your wireless adapter to match
the new settings or access the gateway from a wired computer to make any further
changes.
Configuring WPA-PSK or WPA2-PSK Wireless Security
Note: Not all wireless adapters support WPA. Furthermore, client software is required on
the client. Windows XP and Windows 2000 with Service Pack 3 or above do
include the client software that supports WPA. The wireless adapter hardware and
driver must also support WPA. Consult the product documentation for your
wireless adapter and WPA client software for instructions on configuring WPA
settings.
To configure WPA in the gateway:
1. Log in to the gate
2. In the main menu, under Setup, selec
2-8 Wireless Configuration
way as described in “Logging In to Your Gateway” on page 1-4.
t Wireless Settings.
v1.0, July 2009

Wireless Cable Voice Gateway CG3000/CG3100 User Manual
3. Select one of the WPA settings:
Figure 2-3
• WP
• WP
4. Depending on the WP
A-PSK. This setting provides the TKIP encryption type and a pre-shared key
passphrase.
A2-PSK. This setting provides the AES encryption type and a pre-shared key
passphrase.
A settings that you select, enter the required information:
For WPA-PSK or WPA2-PSK, enter the pre-shared ke
63 characters.
5. Click Ap
ply to save your settings.
y, which is a passphrase between 8 and
Using Push 'N' Connect (WPS) to Configure Your Wireless Network and Security
If your wireless clients support Wi-Fi Protected Setu p (WPS), you can use this feature to configure
the gateway’s SSID and security settings and, at the same time, connect the wireless client securely
and easily to the gateway. Look for the
connect wirelessly to the gateway are clients). WPS
Wireless Configuration 2-9
symbol on your client device (computers that will
uses the network name (SSID) that is
v1.0, July 2009

Wireless Cable Voice Gateway CG3000/CG3100 User Manual
specified in the Wireless Settings screen and sets the wireless security settings to either WPA-PSK
or WPA2-PSK and then and broadcasts these settings to the wireless client.
Note: NETGEAR’s Push 'N' Connect feature based on the Wi-Fi Protected Setup
(WPS) standard (for more information, see http://www.wi-fi.org). All other Wi-
Fi-certified and WPS-capable products should be compatible with NETGEAR
products that implement Push 'N' Connect.
Some considerations regarding WPS are:
• WPS supports only WPA-PSK and WPA2-PSK wireles
s security. WEP security is not
supported by WPS.
• Before you can add a WPS client, the Security Option
in the Wireless Settings screen must be
set to Disabled, WPA-PSK, or WPA2-PSK. See “Manually Configuring Your Wireless
Settings and Security” on page 2-3.
A WPS client can be added using the Push
• Using
the Push Button. This is the preferred method. See the following section, “Using a
Button method or the PIN method.
WPS Button to Add a WPS Client.
• Entering a
PIN. For information about using the PIN method, see “Using a PIN Entry to Add
a WPS Client” on page 2-12.
Using a WPS Button to Add a WPS Client
Any wireless computer or wireless adapter that will connect to the gateway wirelessly is a client.
The client must support a WPS PIN, and must have a WPS configuration utility, such as the
NETGEAR Smart Wizard or Atheros Jumpstart.
Before you can add a WPS client, the Security Option in the W
to Disabled, WPA-PSK, or WPA2-PSK. See “Manually Configuring Your Wireless Settings and
Security” on page 2-3.
To use the gateway WPS button to add a WPS client:
ireless Settings screen must be set
1. Log in to the gate
2-10 Wireless Configuration
way as described in “Logging In to Your Gateway” on page 1-4.
v1.0, July 2009

Wireless Cable Voice Gateway CG3000/CG3100 User Manual
WPS automatically
selects WPA-PSK
if security is disabled.
2. In the main menu, select Wireless Settings. Scroll down to the WPS section of the screen:
Figure 2-4
3. Select Enable in
4. In the WPS Method fie
5. Click S
• The WPS LED on the front of the gateway begins to blink.
• The gateway tries to communicate with
• If the Security Option in the Wireless Settings scree
6. Go
instructions to click a WPS button.
When the gateway adds the WPS client, it sends the SS
configuration to the client.
Wireless Configuration 2-11
Note: WPS is incompatible with WEP security. If WEP is configured in the gateway
then WPS cannot be enabled.
the WPS Config field and click Apply.
ld, select Push Button.
tart WPS or push the WPS button on the front panel of the gateway.
the client for 2 minutes.
n was set to Disabled, the gateway
automatically changes it to WPA-PSK (including a PSK security password).
to the client wireless computer, and run a WPS configuration utility. Follow the utility’s
ID and WPA-PSK or WPA2-PSK
v1.0, July 2009

Wireless Cable Voice Gateway CG3000/CG3100 User Manual
WPS automatically
selects WPA-PSK
if security is disabled.
To access the Internet from any computer connected to your gateway, launch a browser such as
Microsoft Internet Explorer or Mozilla Firefox. You should see the gateway’s Internet LED blink,
indicating communication to the ISP.
Using a PIN Entry to Add a WPS Client
Any wireless computer or wireless adapter that will connect to the gateway wirelessly is a client.
The client must support a WPS PIN, and must have a WPS configuration utility, such as the
NETGEAR Smart Wizard or Atheros Jumpstart.
Before you can add a WPS client, the Security Option in the W
ireless Settings screen must be set
to Disabled, WPA-PSK, or WPA2-PSK. See “Manually Configuring Your Wireless Settings and
Security” on page 2-3.
To use a PIN to add a WPS client:
1. Log in to the gate
2. In the main menu, select W
way as described in “Logging In to Your Gateway” on page 1-4.
ireless Settings. Scroll down to the WPS section of the screen:
Figure 2-5
2-12 Wireless Configuration
v1.0, July 2009

Wireless Cable Voice Gateway CG3000/CG3100 User Manual
Note: WPS is incompatible with WEP security. If WEP is configured in the gateway
then WPS cannot be enabled.
3. Select Enable in the WPS Config field and click Apply.
4. In the WPS Method fie
5. W
rite down the STA PIN number.
6. Go
7. On
To access the Internet from any computer connected to
Microsoft Internet Explorer or Mozilla Firefox. You should see the gateway’s Internet LED blink,
indicating communication to the ISP.
to the client wireless computer. Run a WPS configuration utility. Follow the utility’s
instructions to enter the gateway STA PIN number.
the Wireless Settings screen, click Start WPS.
• The WPS LED on the front of the gateway begins to blink.
• The gateway tries to communicate with
• If the Security Option in the Wireless Settings scree
automatically changes it to WPA-PSK (including a PSK security password).
When the gateway adds the WPS client, it sends the SS
configuration to the client.
ld, select PIN.
the client for 4 minutes.
n was set to Disabled, the gateway
ID and WPA-PSK or WPA2-PSK
your gateway, launch a browser such as
Connecting Additional Wireless Client Devices
You can add more WPS clients to your wireless network, or you can add a combination of WPSenabled clients and clients without WPS.
Adding Just WPS Clients
To add a wireless client device that is WPS-enabled, follow the procedures in “Using a WPS
Button to Add a WPS Client” on page 2-10 or “Using a PIN Entry to Add a WPS Client” on
page 2-12.
Wireless Configuration 2-13
v1.0, July 2009

Wireless Cable Voice Gateway CG3000/CG3100 User Manual
Adding Both WPS and Non-WPS Clients
For non-WPS clients, you cannot use the WPS setup procedures to add them to the wireless
network. You must record, and then manually enter your security settings (see
Configuring Your Wireless Settings and Security” on page 2-3).
To connect a combination of non-WPS enabled and WPS-Enabled clients to the gateway:
1. Restore the gateway to its factory default settings (press the Restore Factory Settings button
located on the bottom of the gateway for 7 seconds).
When the factory settings are restored, all existing wireless clients are disassociated and
disconnected from the gateway.
2. Configure the network name (SSID), select either the WPA/PSK or WPA2/PSK radio button
on the Wireless Settings screen (see
“Manually Configuring Your Wireless Settings and
Security” on page 2-3). and click Apply. On the WPA/PSK or WPA2/PSK screen, select a
passphrase and click Apply. Record this information to add additional clients.
3. For the non-WPS devices that you want to connect, open the networking utility and follow the
utility’s instructions to enter the security settings that you selected (the SSID, WPA/PSK or
WPA2/PSK security method, and passphrase).
4. For the WPS devices that you want to connect, follow the procedure “Using a WPS Button to
Add a WPS Client” on page 2-10 or “Using a PIN Entry to Add a WPS Client” on page 2-12.
“Manually
The settings that you configured are broadcast to the WPS devices so that they can connect to
the gateway.
2-14 Wireless Configuration
v1.0, July 2009

Chapter 3
Content Filtering
This chapter describes how to use content filtering s for the gateway. This chapter includes:
• “Viewing or E-mailing Logs”
• “Blocking Keywords, Sites, and Services” on page 3-2
• “Services” on page 3-4
• “Port Forwarding” on page 3-5
Viewing or E-mailing Logs
Your gateway logs security-related events such as Denial of Service (DoS) attacks, hacker probes,
and administrator logins, according to your settings on this screen. If you have set up content
filtering on the Block Sites screen, you can also log when someone on your network tried to access
a blocked site. You can specify which events are logged and you can send the logs to a Syslog
server.
1. Log in to the gate
2. In the main menu, under Content F
Figure 3-1
way as described in “Logging In to Your Gateway” on page 1-4.
iltering, select Logs. The Logs screen displays.
3-1
v1.0, July 2009

Wireless Cable Voice Gateway CG3000/CG3100 User Manual
To e-mail logs:
1. Fill in the Contact Email Address and SMTP Server Name fields.
2. Select the Enable check box for E-mail Alerts.
3. Click Apply so that your changes take effect.
4. To e-mail the log now, click E-mail Log.
To delete all log entries, click Clear Log. To see the most recent entries, click Refresh.
Blocking Keywords, Sites, and Services
The gateway provides a variety of options for blocking Internet based content and communications
services. With its content filtering feature, the gateway prevents objectionable content from
reaching your PCs. The gateway allows you to control access to Internet content by screening for
keywords within Web addresses. It also has the capability to block access to all sites except those
that are explicitly allowed.
Key content filtering options include:
• Blocking access from your LAN to Internet locations that contain keywords that your specify.
• Blocking access to websites that you specify as off-limits.
• Allowing access to only websites that you specify as allowed.
Blocking Keywords and Domains
The gateway allows you to restrict access to Internet content based on functions such as Web
address keywords and Web domains. A domain name is the name of a particular website. For
example, for the address www.NETGEAR.com, the domain name is NETGEAR.com.
To bl ock keywords and domains:
1. Log in to the gateway as described in “Logging In to Your Gateway” on page 1-4.
3-2 Content Filtering
v1.0, July 2009

Wireless Cable Voice Gateway CG3000/CG3100 User Manual
2. In the main menu, under Content Filtering, select Block Sites. The Block Sites screen displays.
Figure 3-2
3. T
o use keyword blocking, select the Keyword Blocking Enable check box. You can enter up
to eight keywords. After you have entered a keyword in the field to the left of the Add
Keyword button, click Add Keyword. The keyword will be shown in the Keyword List.
Note the following:
• If the keyword XXX is specified,
• If the keyword .c
om is specified, only websites with other domain suffixes (such as .edu,
the URL www.zzzyyqq.com/xxx.html is blocked.
.org, or .gov) can be viewed.
• Enter the keyword “.”
To remove a keyword from the Keyword List, select the keyword, and then click Re
to block all Internet browsing access.
move
Keyword.
4. Y
ou can use the Domain List to create a list of allowed domains, or to create a list of denied
domains. To use domain blocking, select the Domain Blocking Enable check box. After you
have entered a domain in the field to the left of the Add Domain button, click Add Domain.
The domain will be shown in the Domain List.
Content Filtering 3-3
v1.0, July 2009

Wireless Cable Voice Gateway CG3000/CG3100 User Manual
If the domain www.zzzyyqq.com is specified, the URL <http://www.zzzyyqq.com/xxx.html>
is blocked, along with all other URLs in the www.zzzyyqq.com site.
To remove a domain from the Domain List, sele
ct the domain, and then click Remove
Domain.
5. Click Ap
ply to save your settings.
Services
You can use the Services screen to disable certain gateway features.
1. Log in to the gate
2. In the main menu, under Content F
way as described in “Logging In to Your Gateway” on page 1-4.
iltering, select Services.
Figure 3-3
To disable a feature, clear its check box and then click Apply
• Fir
ewall Features. The gateway performs St ateful Packet Inspection (SPI) and protect against
Denial of Service (DoS) attacks.
• IPSec Pass-Thr
ough. IPSec traffic is forwarded. If you clear this check box then this traffic
will be blocked.
3-4 Content Filtering
v1.0, July 2009

Wireless Cable Voice Gateway CG3000/CG3100 User Manual
• PPTP Pass-Through. PPTP traffic is forwarded. If you clear this check box then this traffic
will be blocked.
• Multicast. The gateway can pass multicasting streams through the firewall.
• Port Scan Detection. When enabled, the gateway can respond to Internet-based port scans.
• IP Flood Detection. Allows the is gateway to block malicious devices that are attempting to
flood devices.
• You can use the Web Features to set certain Web-oriented cookies, java scripts, and pop-up
windows to be blocked by the firewall.
Port Forwarding
Configuring Port Forwarding to Local Servers
Using the port forwarding feature, you can allow certain types of incoming traffic to reach servers
on your local network. For example, you might make a local Web server, FTP server, or game
server visible and available to the Internet.
Use the Port Forwarding screen to configure the router to forward specific incoming protocols to
computers on your local network. In addition to servers for specific applications, you can also
specify a default DMZ server to which all other incoming protocols are forwarded. The DMZ
server is configured in the WAN Setup screen, as discussed in “
Server” on page 5-4.
“Setting Up a Default DMZ
Before starting, you need to determine which type of service, application, or game you will
provide, and the local IP address of the computer that will provide the service. Be sure the
computer’s IP address never changes.
To configure port forwarding to a local server:
1. Log in to the gateway as described in “Logging In to Your Gateway” on page 1-4.
2. Select Port Forwarding under Advanced in the main menu. The Port Forwarding screen
displays:
Content Filtering 3-5
v1.0, July 2009

Wireless Cable Voice Gateway CG3000/CG3100 User Manual
Figure 3-4
3. From the Service list, select the service or game that you will host on your network.
If the service does not appear in the list, see
the following section, “Adding a Custom Rule” on
page 3-6.”
4. Click Ad
d. The service appears in the list in the screen.
Adding a Custom Rule
T o define rule that does not appear in the Service list, you must first determine which port number
or range of numbers is used by the application. You can usually determine this information by
contacting the publisher of the application or user groups or newsgroups. When you have the port
number information, follow these steps:
1. In the Port Forwarding screen, enter the
the screen.
2. In the St
arting Port field, enter the beginning port number.
• If the application uses only a single port, enter the
field.
• If the application uses a range of ports, enter th
Ending Port field.
3. In the Se
3-6 Content Filtering
rvice Type field, select the protocol. If you are unsure, select TCP/UDP.
name of the rule in the Add Custom Rules section of
same port number in the Ending Port
e ending port number of the range in the
v1.0, July 2009

Wireless Cable Voice Gateway CG3000/CG3100 User Manual
4. In the Local IP Address field, enter the IP address of your local computer that will provide
this service.
5. Click Apply. The service appears in the list.
Application Example: Making a Local Web Server Public
If you host a W eb serv er on your local network, you can use port forwarding to allow Web requests
from anyone on the Internet to reach your Web server.
To make a local Web server public:
1. Assign your W eb server either a fixed IP address or a dynamic IP address using DHCP address
reservation, as explained in “Using Address Reservation” on page 4-5. In this example, your
router will always give your Web server an IP address of 192.168.1.33.
2. 2. In the Port Forwarding screen, configure the router to forward the HTTP service to the local
address of your Web server at 192.168.1.33. HTTP (port 80) is the standard protocol for Web
servers.
3. (Optional) Register a host name with a Dynamic DNS service, and configure your router to use
the name as described in ““Configuring Dynamic DNS” on page 5-1.
T o access your Web server from the Internet, a remote user must know the IP address that has been
assigned by your ISP. However, if you use a Dynamic DNS service, the remote user can reach your
server by a user-friendly Internet name, such as mynetgear.dyndns.org.
Content Filtering 3-7
v1.0, July 2009

Wireless Cable Voice Gateway CG3000/CG3100 User Manual
3-8 Content Filtering
v1.0, July 2009

Chapter 4
Managing Your Network
This chapter describes how to perform network management tasks with your Voice Gateway.
When you log in to the gateway, these tasks are grouped under Maintenance.
This chapter includes:
• “Viewing the Modem Status”
• “Viewing the Connection Status” on page 4-4
• “Backing Up and Restoring Your Settings” on page 4-5
• “Changing the Built-In Password” on page 4-6
• “Running Diagnostic Utilities” on page 4-7
• “Viewing the Event Log” on page 4-10
Viewing the Modem Status
Use the Modem Status screen to see hardware and firmware details about the gateway and to see
basic status information.
1. Log in to the gateway as described in “Logging In to Your Gateway” on page 1-4.
2. In the main menu, under Maintenance, select Modem Status. The following screen displays:
v1.0, July 2009
4-1

Wireless Cable Voice Gateway CG3000/CG3100 User Manual
Figure 4-1
The Modem Status screen fields are explained in the following table.
Table 4-1. Modem Status Fields
Field Description
Standard Specification
Compliant
Hardware Version
Software Version
Cable MAC Address The MAC address used by the cable modem port of the
Cable Modem Serial number The serial number of the gateway hardware.
CM Certificate If the cable modem certificate is Installed, it is possible for the
System Up Time
Network Access
Cable Modem IP Address The current Internet IP address. If assigned dynamically and
DOCSIS 3.0
gatew
ay. This MAC address may need to be registered with
your cable service provider.
service provider to upgrade your Data Over Cable service
securely.
not connected to the Internet, this will be blank.
4-2 Managing Your Network
v1.0, July 2009

Wireless Cable Voice Gateway CG3000/CG3100 User Manual
Viewing the Connection Status
Use the Connection screen to track the gateway’s initialization procedure, and to get details about
the downstream and upstream cable channel. The time is displayed after the gateway is initialized.
Figure 4-2
Managing Your Network 4-3
v1.0, July 2009

Wireless Cable Voice Gateway CG3000/CG3100 User Manual
The gateway automatically goes through the following steps in the provisioning process:
• Scan and lock the downstream frequency, and then link back
• Obtain an IP address for the gateway itself. Then the
gateway assigns an IP address for the
in upstream direction.
connected PC.
• Connect to the Internet.
Backing Up and Restoring Your Settings
The configuration settings of the gateway are stored in a configuration file in the gateway. To see
the backup settings:
1. Log in to the gate
2. In the main menu, under Maintenance, select Backup Settings to displ
way as described in “Logging In to Your Gateway” on page 1-4.
ay the following screen:
Figure 4-3
You can save a copy of the current configuration settings or restore the saved settings:
• To save a copy of the current
• To restore the saved configuration settings from a backup fil
a. Click Br
b. Loc
c. Click R
4-4 Managing Your Network
owse.
ate and select the previously saved backup file.
estore.
configuration settings, click Back Up.
e:
v1.0, July 2009

Wireless Cable Voice Gateway CG3000/CG3100 User Manual
A message notifies you when the gateway has been restored to previous settings. Then, the
gateway restarts, which takes about one minute.
Note: When restoring configuration settings, do not interrupt the process by going online,
turning off the gateway, or shutting down the computer.
Changing the Built-In Password
For security reasons, the gateway has its own user name and password. Also, after a period of
inactivity for a set length of time, the administrator login will automatically disconnect. You can
change the gateway’s password.
NETGEAR recommends that you change the default pas
sword to a more secure password. The
ideal passwords should contain no dictionary words from any language, and should be a mixtu re of
both upper and lower case letters, numbers, and symbols. Your passwords can be up to 30
characters.
To change the password:
1. Log in to the gate
2. In the ma
Figure 4-4
in menu, under Maintenance, select Set Password. The Set Password screen displays.
way as described in “Logging In to Your Gateway” on page 1-4.
3. To change the password, first enter the old password, and then enter the new password twice.
Managing Your Network 4-5
v1.0, July 2009

Wireless Cable Voice Gateway CG3000/CG3100 User Manual
4. Click Apply to save your changes.
Note: After changing the password, you will be required to log in again to continue the
configuration. If you have backed up the gateway settings previously, you should
do a new backup so that the saved settings file includes the new password.
Running Diagnostic Utilities
From the Diagnostics screen you can use Ping or Traceroute.
To use diagnostics:
1. Log in to the gate
2. In
the main menu, under Maintenance, select Diagnostics. The Diagnostics screen displays
Figure 4-5
way as described in “Logging In to Your Gateway” on page 1-4.
.
4-6 Managing Your Network
v1.0, July 2009

Wireless Cable Voice Gateway CG3000/CG3100 User Manual
Testing Connectivity with the Ping Command
To start a ping test, enter the IP address in the Diagnostics screen, and click the Ping button. The
Ping Results are displayed:
Figure 4-6
Traceroute
To start a Traceroute test:
1. In the Diagnostics screen,
Figure 4-7
Managing Your Network 4-7
select Traceroute in the Utility field:
v1.0, July 2009

Wireless Cable Voice Gateway CG3000/CG3100 User Manual
2. Fill in the fields:
• T
arget. The IP address or host name of the computer you would like to trace.
• Max Hop
• Data Size. Th
• Base Por
• Res
s. Maximum number of hops to search for target.
e size of the packet.
t. The port number to send packet.
olve Host. Turn On or OFf to resolve the host name to IP address .
3. Click St
4. Click the Refr
art Test to begin the Traceroute.
esh button to see the results.
Viewing the Event Log
The gateway logs security-related events such as denied incoming service requests and hacker
probes. To see the event log:
1. Log in to the gate
2. In
the main menu, under Maintenance, select Event Log. The Event Log screen displays:
way as described in “Logging In to Your Gateway” on page 1-4.
Figure 4-8
To clear the log, click Clear Log; to refresh the log, click Refresh. You can enable e-ma il
notification to receive these logs in an e-mail message. For information about e-mail
notifications, see “Configuring Logs” on page 3-1.
4-8 Managing Your Network
v1.0, July 2009

Wireless Cable Voice Gateway CG3000/CG3100 User Manual
Chapter 5
Customizing Your Network
This chapter describes how to customize your network through the advanced settings on your
gateway. When you log in to the gateway, these tasks are grouped under Advanced.
This chapter includes:
• “DMZ Host” on page 5-1”
• “LAN IP Setup” on page 5-2
• “Configuring Universal Plug and Play (UPnP)” on page 5-5
“NAT” on page 5-6
•
Note: For information about port forwarding, see “Firewall Rules” on page 3-5.
Log in to the gateway using its default address
unit is currently configured. Use the default user name of admin and default password of
password, or the password you have set up.
of http://192.168.0.1 or at whatever IP address the
DMZ Host
You can use the DMZ Host screen to set up a default DMZ computer. Specifying a default
DMZ computer allows you to set up a PC that is available to anyone on the Internet for
services that you have not defined. There are security issues with doing this, so only set up
the DMZ host if you are willing to risk open access. If you do not define a DMZ host the
gateway discards any undefined service requests.
Customizing Your Network 5-1
v1.0, July 2009

Wireless Cable Voice Gateway CG3000/CG3100 User Manual
To set up a DMZ host:
1. In
the main menu, under Advanced, select DMZ Host. The following screen displays:
Figure 5-1
2. If desired, select the Respond to Ping on WAN Port check box.
3. T
ype the last digit(s) of the IP address in the DMZ Address field.
4. Click Ap
ply.
LAN IP Setup
The LAN IP screen allows you to configure LAN services such as the IP address of the gateway
and DHCP. The TCP/IP and DHCP default values work fine in most cases.
5-2 Customizing Your Network
v1.0, July 2009

To configure LAN IP settings:
Wireless Cable Voice Gateway CG3000/CG3100 User Manual
1. In the main menu, under Advance
d, select LAN IP. The LAN IP screen displays.
Figure 5-2
2. Enter the following LAN IP settings:
• LAN IP Addr
ess. Enter the LAN IP address that you would like to assign for your
gateway in dotted decimal notation. The factory default settings is 192.168.0.1.
• IP Su
bnet Mask. Enter the network number portion of an IP address. Unless you are
implementing subnetting, use 255.255.255.0 as the subnet mask.
Customizing Your Network 5-3
v1.0, July 2009

Wireless Cable Voice Gateway CG3000/CG3100 User Manual
• DHCP Server. The gateway is set up by de fault as a Dynamic Host Configuration
Protocol (DHCP) server, which provides the TCP/IP configuration for all the computers
that are connected to the gateway. You can change the default setting.
s. Select this settings to enable the DHCP server on the gateway and assign IP
– Ye
addresses to computers on your LAN automatically.
– No. Select
this settings to assign IP addresses manually, or if you have another DHCP
server on your network.
Note: If you disable the DHCP server, you will need to assign to your PC a
static IP address to reconnect to the gateway and enable the DHCP
server again.
• S
tarting IP Address. Complete the first of the contiguous addresses in the IP address
pool. 192.168.0.10 is the default start address.
• Endi
ng IP Address. Complete the last of the contiguous addresses in the IP address pool.
192.168.0.19 is the default end address.
3. Click Ap
ply to save your LAN settings.
Reserving an IP Address for DHCP Use
To reserve an IP address for DHCP use, enter the DHCP server reservation settings for the private
LAN under DHCP Reservation Lease Info in the LAN Setup screen:
1. Enter the MAC addres
2. Enter the pe
3. Click Ad
rmanent IP address for the PC.
d to save your settings.
s of the PC for which you want to reserve an IP address.
The MAC address and IP address are displayed in the DHCP Client Lea
se Info table. The current
system time is also displayed.
To delete an IP address from the DHCP Client Lease Info table:
1. In the DHCP Client
Lease Info table, click the radio button for the MAC and IP address that
you want to remove.
2. Click De
lete to remove the information for the selected MAC and IP address from the DHCP
Client Lease Info table.
To remove all information from the DHCP Client
5-4 Customizing Your Network
v1.0, July 2009
Lease Info table, click Clear DHCP Leases.

Wireless Cable Voice Gateway CG3000/CG3100 User Manual
Configuring Universal Plug and Play (UPnP)
Universal Plug and Play (UPnP) helps devices, such as Internet appliances and computers, access
the network and connect to other devices as needed. UPnP devices can automatically discover the
services from other registered UPnP devices on the network.
To configure UPnP:
the main menu, under Advanced, select UPnP. The UPnP screen displays.
1. In
Figure 5-3
2. Select the Turn UPnP On check box. The default setting is disabled, which prevents the
gateway from allowing any device to automatically control of its the resources, such as port
forwarding.
3. Enter the following information:
• Adve
rtisement Period. Enter how often the gateway broadcasts its UPnP information.
The default is 30 minutes.Shorter durations will ensure that control points have current
device status at the expense of additional network traffic. Longer durations may
compromise the freshness of the device status but can significantly reduce network traffic.
• Adve
rtisement Time to Live. Enter the time to live for the advertisement, which is
measured in hops (steps) for each UPnP packet that is sent. A hop is the number of steps
that are allowed to propagate for each UPnP advertisement before it disappears. The
number of hops can range from 1 to 255. The default value for the advertisement time to
live is 4 hops, which should be fine for most home networks. If you notice that some
devices are not being updated or reached correctly, you might need to increase this value
slightly.
Customizing Your Network 5-5
v1.0, July 2009

Wireless Cable Voice Gateway CG3000/CG3100 User Manual
The UPnP Portmap Table displays the IP address of each UPnP device that is currently
accessing the gateway and which internal and external ports of the gateway were opened by
that device. The UPnP Portmap Table also displays the protocol for the port that was opened
and if that port is still active for each IP address.
4. Perform one of the following actions:
• Click Ap
• Click Ca
• Click R
currently opened by UPnP devices.
ply to save your settings.
ncel to disregard any unsaved changes.
efresh to update the UPnP Portmap Table and to show the active ports that are
NAT
You can enable or disable network address translation (NAT) protocol. In the main menu, under
Advanced, select NAT The following screen displays.
Figure 5-4
Normally the Turn NAT On check box should be selected, which is the default setting.
5-6 Customizing Your Network
v1.0, July 2009

Chapter 6
Troubleshooting
This chapter gives information about troubleshooting your W ireless Cable Voice Gateway . For the
common problems listed, go to the section indicated.
Tip: NETGEAR provides helpful articles, documentation, and the latest software
updates at http://www.netgear.com/support.
• Have I connected the gateway correctly?
Go to “Basic Functions” on page 6-1.
• I cannot access the gateway configuration with my browse
Go to “Connecting to the Gateway’s Main Menu” on page 6-3.
• I have configured the gateway but
Go to “T
• I cannot remember the gateway’s configuration password
and start over again.
Go to “Factory Default Settings” in Appendix A.
roubleshooting the ISP Connection” on page 6-4.
I cannot access the Internet.
r.
or I want to clear the configuration
Basic Functions
After you have turned on power to the gateway, you should do the following:
1. When power is first applied, verify that the Power LED is on.
2. V
erify that the numbered Ethernet LEDs come on momentarily.
3. After a few
connected.
If any of these conditions does not occur, refer
seconds, verify that the Local port Link LEDs are lit for any local ports that are
to the appropriate following section.
v1.0, July 2009
6-1

Wireless Cable Voice Gateway CG3000/CG3100 User Manual
Using LEDs to Troubleshoot
The following table provides help when using the LEDs for troubleshooting.
Table 6-1. Using LEDs to Troubleshoot
LED Behavior Action
All LEDS are off when the gateway
is plugged in.
All LEDs Stay On • Clear the gateway’s configuration to factory defaults. This will set the
LAN LED is off for a port with an
Ethernet connection.
Internet LED is off and the
gateway is connected to the cable
television cable.
Make sure that the power cord is properly connected to your gateway
and that the power supply adapter is properly connected to a
functioning power outlet.
Check that you are using the 12VDC powe
NETGEAR for this product.
If the error persists, you have a hardware problem and should contact
cal support.
techni
gateway’s IP address to 192.168.0.1. See “Factory Default Settings”
in Appendix A.
• If the error persists, you might have a hardware problem and should
act technical support.
cont
• Make sure that the Ethernet cable connections are secure at the
gateway and at the hub or PC.
• Make sure that power is turned on to the connected hub or PC.
• Be sure you are using the correct cable.
• Make sure that the coaxial cable connections are secure at the
gateway and at the wall jack.
• Make sure that your cable internet service has been provisioned by
cable service provider. Your provider should verify that the signal
your
quality is good enough for cable modem service.
• Remove any excessive splitters you may have on your cable line. It
may be necessa
cable enters your home.
ry to run a “home run” back to the point where the
r adapter supplied by
6-2 Troubleshooting
v1.0, July 2009

Wireless Cable Voice Gateway CG3000/CG3100 User Manual
Connecting to the Gateway’s Main Menu
If you are unable to access the gateway’s main menu from a computer on your local network,
check the following:
• Check the Ethernet connection between the compu
previous section.
• Make sure that your PC’s IP address is on the same subnet as the
recommended addressing scheme, your PC’s address should be in the range of 192.168.0.10 to
192.168.0.254. Refer to the link to the online document “ITCP/IP Networking Basics” in
Appendix B for help configuring your computer.
Note: If your PC’s IP address is shown as 169.254.x.x:
Recent versions of Windows and MacOS will generat
address if the computer cannot reach a DHCP server. These auto-generated
addresses are in the range of 169.254.x.x. If your IP address is in this range,
check the connection from the PC to the gateway and reboot your PC.
• If your gateway’s IP address has been chang
clear the gateway’s configuration to factory defaults. This will set the gateway’s IP address to
192.168.0.1. This procedure is explained in “Enabling Remote Management” on page 5-13.
• Make sure your browser has Java, JavaScript, or ActiveX enabled. If you
Explorer, click Refresh to make sure that the Java applet is loaded.
• Try quitting the browser and launching it again.
• Make sure you are using the correct login information
lower-case (Caps Lock should be off):
ter and the gateway as described in the
gateway. If you are using the
e and assign an IP
ed and you don’t know the current IP address,
are using Internet
. The gateway has two user names both
– The superuser login name is mso
– The other login name is ad
If the gateway does not save changes you have made, check the following:
• When entering configuration sett
another screen, or your changes are lost.
• Click the Refresh or Reload button in the Web
the Web browser may be caching the old configuration.
Troubleshooting 6-3
min with the default password of password.
with the default password of changeme.
ings, be sure to click the Apply button before moving to
browser. The changes may have occurred, but
v1.0, July 2009

Wireless Cable Voice Gateway CG3000/CG3100 User Manual
Troubleshooting the ISP Connection
If your gateway is unable to access the Internet and your Cable Link LED is on, you may need to
register the Cable MAC Address and/or Device MAC Address of you gateway with your cable
service provider.
Additionally, your PC may not have the gateway configured as its TCP/IP gateway. If your PC
obtains its information from the gateway by DHCP, reboot the PC and verify the gateway address.
See the link to the online document
“ITCP/IP Networking Basics” in Appendix B.
Troubleshooting a TCP/IP Network Using a Ping Utility
Most TCP/IP terminal devices and routers contain a ping utility that sends an echo request packet
to the designated device. The device then responds with an echo reply. Troubleshooting a TCP/IP
network is made easier by using the ping utility in your PC or workstation.
Testing the LAN Path to Your Gateway
You can use ping to verify that the LAN path to your gateway is set up correctly.
To ping the gateway from a PC running Windows 95 or later:
1. From the Windows toolbar, click on the Start button and select Run.
2. In the field provided, type Ping followed by the IP address of the gateway, as in this example:
ping 192.168.0.1
3. Click OK.
You should see a message like this one:
Pinging <IP address> with 32 bytes of data
If the path is working, you see this message:
Reply from < IP address >: bytes=32 time=NN ms TTL=xxx
If the path is not working, you see this message:
Request timed out
6-4 Troubleshooting
v1.0, July 2009

Wireless Cable Voice Gateway CG3000/CG3100 User Manual
If the path is not working correctly, you could have one of the following problems:
• Wrong physical connections.
– Make sure the LAN port LED is on. If the LED is off, see “Using LEDs to
Troubleshoot” on page 6-2.
– Check that the corresponding Link LEDs are on for your network interface card and
for the hub ports (if any) that are connected to your workstation and gateway.
• Wrong network configuration.
– Verify that the Ethernet card driver software and TCP/IP software are both installed
and configured on your PC or workstation.
– Verify that the IP address for your gateway and your workstation are correct and that
the addresses are on the same subnet.
Testing the Path from Your PC to a Remote Device
After verifying that the LAN path works correctly, test the path from your PC to a remote device.
From the Windows run menu, type:
PING -n 10 <IP address>
where <IP address> is the IP address of a remote device such as your ISP’s DNS server.
If the path is functioning correctly, replies as in the previous section are displayed. If you do not
receive replies:
• Check that your PC has the IP address of your gateway listed as the default gateway. If the IP
configuration of your PC is assigned by DHCP, this information will not be visible in your
PC’s Network Control Panel. Verify that the IP address of the gateway is listed as the default
gateway. See the link to the online document
“ITCP/IP Networking Basics” in Appendix B.
• Check to see that the network address of your PC (the portion of the IP address specified by
the netmask) is different from the network address of the remote device.
• Check that your Cable Link LED is on.
• If your ISP assigned a host name to your PC, enter that host name as the Account Name in the
Basic Settings screen.
Troubleshooting 6-5
v1.0, July 2009

Wireless Cable Voice Gateway CG3000/CG3100 User Manual
6-6 Troubleshooting
v1.0, July 2009

Appendix A
Default Settings and Technical Specifications
Factory Default Settings
You can return the gateway to its factory settings. On the bottom of the gateway, press and hold the
Restore Factory Settings button
factory settings.
Your device will return to the factory configuration settings shown in the
following table.
Gateway Login
User login URL http://192.168.1.1
User name and password (case
sen
sitive)
Local Network (LAN)
LAN IP 192.168.0.1
Subnet mask 255.255.255.0
DHCP server Enabled
DHCP starting IP address 192.168.0.10
DHCP Ending IP address 192.168.0.19
Firewall
Inbound communication from the Internet Disabled (except traffic on port 80, the http port)
Outbound communication to the Internet Enabled (all)
Source MAC filtering Disabled
Internet Connection
WAN MAC address Use default hardware address
WAN MTU size 1500
for over 7 seconds. The gateway resets, and returns to its
admin/password
Default Settings and Technical Specifications A-1
v1.0, July 2009

Wireless Cable Voice Gateway CG3000/CG3100 User Manual
Wireless
Wireless communication Enabled
SSID name Wireless
Security Disabled
Broadcast SSID Enabled
Transmission speed Auto
Country/region United States (varies by region)
RF channel 6
Operating mode g and b
Data rate
Output power
Access point Enabled
Authentication type Open System
Wireless card access list All wireless stations allowed
a. Maximum Wireless signal rate derived from IEEE Standard 802.11 specifications. Actual throughput will
vary. Network conditions and environmental factors, including volume of network traffic, building
materials and construction, and network overhead, lower actual data throughput rate.
a
Best
Full
Technical Specifications
The table below describes the technical specifications for the gateway.
Feature Description
Network Protocol and Standards Compatibility
Data and Routing Protocols: TCP/IP, DHCP server and client, DNS relay, NA T (many-to-one),
TFTP client, VPN pass through (IPSec, PPTP)
Power Adapter
North America (input): 120V, 60 Hz, input
All regions (output): 15 V DC @ 1.2A output, 15W maximum
Physical Specifications
Dimensions: 6.9 by 4.5 by 1.2 in. (175 by 114 by 30 mm)
Weight: 0.68 lb (0.31 kg)
A-2 Default Settings and Technical Specifications
v1.0, July 2009

Wireless Cable Voice Gateway CG3000/CG3100 User Manual
Feature Description
Environmental Specifications
Operating temperature: 32140 F (0 to 40 C)
Operating humidity: 90% maximum relative humidity, noncondensing
Electromagnetic Emissions Meets requirements of: FCC Part 15 Class B
Interface Specifications
Local: 10BASE-T or 100BASE-Tx, RJ-45
USB 1.1 Function
802.11g and 802.11b Wireless Access Point
Internet: DOCSIS 2.0. Downward compatible with DOCSIS 1.0 and
DOCSIS 1.1.
Default Settings and Technical Specifications A-3
v1.0, July 2009

Wireless Cable Voice Gateway CG3000/CG3100 User Manual
A-4 Default Settings and Technical Specifications
v1.0, July 2009

Appendix B
Related Documents
This appendix provides links to reference documents you can use to gain a more complete
understanding of the technologies used in your NETGEAR product.
Document Link
Windows XP and Vista Wireless
Configuration Utilities
Internet Networking and TCP/IP
Addressing
Wireless Communications
Preparing a Computer for
Network Access
Virtual Private Networking (VPN)
Glossary
http://documentation.netgear.com/reference/enu/winzerocfg/index.htm
http://documentation.netgear.com/reference/enu/tcpip/index.htm
http://documentation.netgear.com/reference/enu/wireless/index.htm
http://documentation.netgear.com/reference/enu/wsdhcp/index.htm
http://documentation.netgear.com/reference/enu/vpn/index.htm
http://documentation.netgear.com/reference/enu/glossary/index.htm
Related Documents B-1
v1.0, July 2009

Wireless Cable Voice Gateway CG3000/CG3100 User Manual
B-2 Related Documents
v1.0, July 2009

Index
Numerics
192.168.0.1, default IP address 1-4
B
backing up the configuration file 4-5
Basic Settings 1-5
blocking
keywords 3-2
sites 3-2
C
cable channel 4-4
configuration
backup 4-5
erasing 4-5
Connection Status 4-4
D
DHCP 5-4
reserved IP address 5-4
server 5-4
DMZ Host 5-1
E
Erase configuration 4-5
Event log 4-10
F
factory default settings
list of A-1
front panel 1-1
G
gateway
backup 4-5
main menu 6-3
placement and range guidelines 2-2
gateway front panel 1-1
gateway rear panel 1-3
I
IP address 1-4
IP addresses, auto-generated 6-3
L
LAN
IP address 5-3
IP settings 5-2
LEDs 1-2
troubleshooting 6-2
logging in 1-3
logging out 1-4
logs 3-1, 4-10
M
Modem Status 4-1
MTA Status 1-6
N
NAT 5-6
P
package contents 1-1
v1.0, July 2009
Index-1

Wireless Cable Voice Gateway CG3000/CG3100 User Manual
passphrase 2-8
password, changing 4-6
Ping 4-8
ping utility 6-4
Push 'N' Connect 2-10
Push N Connect 2-9
S
security options 2-6
Services (firewall) 3-4
SSID 2-5
T
TCP/IP
network, troubleshooting 6-4
technical specifications A-2
Traceroute 4-9
troubleshooting 6-1
ISP connection 6-4
LEDs 6-2
ping utility 6-4
TCP/IP network 6-4
wireless security 2-13
Wireless Security Options 2-3
WPA 2-6, 2-9
WPA2 2-6, 2-9
WPA2-PSK 2-6, 2-9
WPA-PSK 2-6, 2-9
WPS 2-9, 2-10, 2-12, 2-14
WPS button 1-2
U
Universal Plug and Play (UPnP) 5-5
URL 3-4
W
WEP 2-6, 2-7
128-bit encryption 2-7
64-bit encryption 2-7
keys 2-8
passphrase 2-8
wireless
access point 2-5
channel 2-5
manually configuring settings 2-3
wireless network
planning 2-1
Index-2
v1.0, July 2009
 Loading...