


Gateway DC-M42 User Manual
FCC STATEMENT
FCC declaration of conformity
Responsible party: Gateway Companies, Inc.
610 Gateway Drive, North Sioux City, SD 57049
(605) 232-2000 Fax: (605) 232-2023
This device complies with Part 15 of the FCC Rules. Operation is subject to the following two conditions:
1.This device may not cause harmful interference, and
2.This device must accept any interference received, including interference that may cause undesired operation
Note:
This equipment has been tested and found to comply with the limits for Class B digital devices, pursuant to Part 15 of the FCC rules. These limits are designed to provide reasonable protection against harmful interference in a residential installation. This equipment generates, uses and can radiate radio frequency energy and, if not installed and used in accordance with the instructions, may cause harmful interference to radio communications. However,there is no guarantee that interference will not occur in a particular installation.If this equipment does cause harmful interference to radio or television reception, which can be determined by turning the equipment off and on, the user is encouraged to try to correct the interference by one or more of the following measures:
1

Reorient or relocate the receiving antenna.
Increase the separation between the equipment and receiver.
Connect the equipment into an outlet on a circuit different from that to which the receiver is connected.
Consult the dealer or an experienced radio/TV technician for help.
Use cables and power supplies of equivalent performance to what was shipped with the unit must be used.
Do not make any changes or modifications to the equipment unless otherwise specified in the manual. If such changes or modifications should be made, you could be required to stop operation of the equipment.
Canada
Industry Canada (IC)
Unintentional emitter per ICES-003/NMB-003
This digital apparatus does not exceed the Class B limits for radio noise emissions from digital apparatus as set out in the radio interference regulations of Industry Canada.
Le présent appareil numérique n’émet pas de bruits radioélectriques dépassant les limites applicables aux appareils numériques de Classe B prescrites dans le réglement sur le brouillage radioélectrique édicté par Industrie Canada.
2
TRADEMARK INFORMATION
©2003 Gateway, Inc. All rights reserved. Gateway, Gateway Country, the Gateway stylized logo, and the black-and-white spot design are trademarks or registered trademarks of Gateway, Inc. in the United States and other countries. All other brands and product names are trademarks or registered trademarks of their respective companies.
 Microsoft® and Windows® are U.S. registered trademarks of Microsoft Corporation.
 Pentium® is a registered trademark of Intel Corporation.
 Macintosh is a trademark of Apple Computer, Inc.
 SDTM is a trademark.
 PhotoSuite, PhotoVista are trademarks.
 Other names and products may be trademarks or registered trademarks of their respective owners.
READ THIS FIRST
Please start by reading the important messages below first.
1. The bundled driver, software, design, specifications and user's manual that were packaged with the camera are subject to change without notice.
2. For driver updates, refer to our website or contact Gateway.
3. Gateway is not liable whatsoever for any compensation arising from errors in descriptions in this user's manual.
4. To contact Gateway Tech Support please visit the www.gateway.com/support website for online
and chat support or call 1-888-737-6949 Monday-Friday 7am to 9pm (Central Time).
3

WARNINGS
 Do not use the camera if it is emitting smoke, unusual odor or noise, becoming unusually hot to be touched, or if it is in any other abnormal state. Operating the camera in any of these
circumstances may cause a fire or an electrical shock. Stop using the camera immediately, turn the camera off, and then disconnect the power source (batteries or AC power adapter). (If you are using the AC power adapter from the AC power outlet after you have disconnected the camera.) After checking that smoke is no longer being emitted, contact your dealer or authorized service facility for repairs.Never attempt to repair this camera by yourself, as this is dangerous.
 Do not use the camera if any foreign objects have entered the camera. Turn the camera off, remove the batteries, and then disconnect the power source (batteries or an AC power
adapter.) (If you are using the AC power adapter, unplug the adapter from the AC power outlet after you have disconnected the camera.) Later on contact your dealer or autorized service facility. Do not continue to use the camera as this may cause a fire or an electrical shock.
 Do not place the camera in any unstable locations such as on a wobbly table or slopping surface where the camera may fall or tip over and cause damage.
4

 If the camera has been dropped or if the camera case has been damaged, turn the camera off, and then disconnect the power source (batteries or AC power adapter.) (If you are using
the AC power adapter, unplug the adapter form the AC power outlet after you have disconnected the camera.) Then contact to your dealer or authorized service facility. Do not continue to use the camera as this may cause a fire or an electrical shock.
 Do not expose the camera to moisture and avoid water gets into the camera. Take particular care when using the camera under extreme weather conditions, such as rain or snow, or
when operating the camera at the beach or near water. Water in the camera may cause a fire or an electrical shock.
 Do not touch the power plug during a thunderstorm if you are using the AC power adapter. This may cause an electrical shock.
 Do not attempt to modify the camera. This may cause a fire or an electrical shock.
 Do not remove the camera casing. This may cause an electrical shock. Internal inspection, maintenance and repairs should only be carried out by our authorized service facility.
 Do not touch the power plug during a thunderstorm if you are using the AC power adapter. This may cause an electrical shock.
5

CAUTIONS
 Do not place the camera in damp or dusty locations. This may cause a fire or an electrical shock.
 Do not place the camera in a location affected by oil fumes or steam, such as near a cooking stove or humidifier. This may cause a fire or an electrical shock.
 Do not cover or wrap the camera or the AC power adapter with a cloth or quilt. This may cause heat to build up, distort the case and cause a fire. Always use the camera and its accessories in well-ventilated locations.
 Handle the camera carefully and do not bump the camera into any hard object. Handling the camera roughly may cause a malfunction.
 Do not move the camera while it is switched on. (If you are using the AC power adapter, unplug the adapter from the AC power outlet after you have switched off the camera.) Ensure that any connector cords or cables to other devices are disconnected before moving the camera. Failure to do so may damage the cords or cables and cause a fire or an electrical shock.
6

 When leaving the camera unused for long periods, such as during a vacation, always unplug the camera from the power source (batteries or AC power adapter) for safety. (If you are using the AC power adapter, unplug the adapter from the AC power outlet after you have disconnected the camera.) Failure to do so could result in a fire.
 Do not use batteries other than those specified for use with the camera. The use of unsuitable batteries may result in the batteries splitting or leaking and causing a fire, injury, or soiling of the battery compartment.
 When installing batteries into the camera, check the polarity markings on the battery (- and +) to ensure that you insert the battery correctly. Incorrect battery polarity may result in the batteries splitting or leaking and causing a fire, injury, or soiling of the battery compartment.
 Remove the batteries if the camera will not be used for an extended period of time. The batteries may leak and cause a fire, injury or soiling of the battery compartment. If the batteries leak, clean and wipe the battery compartment carefully and install new batteries. Wash your hands carefully if you touch the battery fluid.
7
CONTENTS |
|
INTRODUCTION ...................................................................................................... |
12 |
Overview .......................................................................................................... |
12 |
Package Contents ........................................................................................... |
13 |
GETTING TO KNOW YOUR CAMERA .................................................................... |
14 |
Front View ...................................................................................................... |
14 |
Rear View ....................................................................................................... |
15 |
Mode Dial ........................................................................................................ |
16 |
LED Indicators................................................................................................. |
17 |
LCD Monitor Information .................................................................................. |
18 |
GETTING STARTED ............................................................................................... |
21 |
Installing the Batteries .................................................................................... |
21 |
Using the AC Power Adapter (optional accessory) ........................................... |
22 |
Loading an SD Memory Card (optional accessory) ........................................... |
23 |
Attaching the Camera Strap ............................................................................. |
24 |
Attaching the Lens Strap............................................................................... |
24 |
8
Choosing the Language ................................................................................... |
25 |
Setting the Date and the Time ......................................................................... |
25 |
Setting the Image Resolution and Quality ........................................................ |
26 |
TAKING PHOTOGRAPHS ...................................................................................... |
28 |
Basic Setting .................................................................................................. |
28 |
Using the Viewfinder .......................................................................................... |
28 |
Using the LCD Monitor ....................................................................................... |
29 |
Using the Zoom Functions ................................................................................ |
30 |
Using the Self-Timer .......................................................................................... |
31 |
Using the Flash .................................................................................................. |
32 |
Photography in a Variety of Modes .................................................................. |
34 |
Selecting Manual Mode ...................................................................................... |
35 |
Selecting Auto Mode ........................................................................................... |
36 |
Selecting Macro Mode ........................................................................................ |
37 |
Selecting Portrait Mode ...................................................................................... |
38 |
Selecting Landscape Mode ................................................................................ |
39 |
Selecting Night Scene Mode .............................................................................. |
40 |
Selecting Sports Mode ....................................................................................... |
41 |
|
9 |
PLAYBACK MODE ................................................................................................. |
42 |
Viewing Images ............................................................................................... |
43 |
Zoom Playback ............................................................................................... |
44 |
Displaying Thumbnail Images .......................................................................... |
45 |
Slide Show Display ......................................................................................... |
46 |
Setting DPOF .................................................................................................. |
47 |
Deleting Images/Video Clips ........................................................................... |
48 |
To Delete One Image/Video Clip At A Time ........................................................ |
48 |
To Delete All Images/Video Clips At A Time ...................................................... |
49 |
Formatting an SD Card or Internal Memory.................................................... |
50 |
MOVIE MODE ........................................................................................................ |
51 |
Recording Video Clips ..................................................................................... |
51 |
Viewing Video Clips ........................................................................................ |
52 |
TRANSFERRING RECORDED IMAGES/VIDEO CLIPS TO YOUR COMPUTER ....... |
53 |
Step 1: Connecting the Camera to Your Computer .......................................... |
54 |
Step 2: Downloading Images/Video Clips ........................................................ |
55 |
For Computers Running Windows .................................................................... |
55 |
10
INSTALLING PHOTOSUITE .................................................................................... |
56 |
INSTALLING PHOTOVISTA..................................................................................... |
57 |
MENU OPTIONS ..................................................................................................... |
58 |
The Capture Menu ........................................................................................... |
58 |
The Playback Menu ........................................................................................ |
65 |
The Setup Menu .............................................................................................. |
66 |
CONNECTINGTHE CAMERA TO OTHER DEVICES ............................................... |
69 |
CAMERA SPECIFICATIONS ................................................................................. |
70 |
11

INTRODUCTION
Overview
Your new digital camera delivers high quality, 2304 x 1728 resolution images using a 4.0 Megapixels CCD sensor. Using either the optical viewfinder or the 1.6" TFT color image LCD monitor, you can compose images and then examine them in detail. An auto-flash sensor automatically detects the shooting (lighting) conditions and determines whether the flash should be used. This feature helps ensure that your images turn out right.
In addition to still images, you can record short videos using the movie function. Images you have taken can be downloaded to your computer using the USB cable. You can enhance and retouch your images on your computer by using the provided editing software, or image editing software you may already own. You may share your images with your friends via e-mail, in a report, or on a website.
DPOF functionality allows you to print your images on a DPOF compatible printer by simply inserting the memory card.
12

Package Contents
Carefully unpack your kit box and ensure that you have the following items. In the event that any item is missing or if you find any mismatch or damage, promptly contact Gateway.
|
Digital Camera |
|
USB Cable |
|
|
||
|
|
||
|
User's Manual |
|
Video Cable |
|
|
||
|
|
||
|
Lens Strap |
|
Camera Strap |
|
|
||
|
|
||
|
Software CD-ROM |
|
2 x AA Alkaline Batteries |
|
|
||
|
|
13

GETTING TO KNOW YOUR CAMERA
Front View
|
|
|
|
|
|
|
|
|
|
|
|
|
|
|
|
|
|
|
|
|
|
|
|
|
|
|
|
|
|
|
|
|
|
|
|
|
|
|
|
|
|
|
|
|
|
|
|
|
|
|
|
|
|
|
|
|
|
|
|
|
|
|
|
|
|
|
|
|
|
|
|
|
|
|
|
|
|
|
|
|
|
|
|
|
|
|
|
|
|
|
|
|
|
|
|
|
|
|
|
|
|
|
|
|
|
|
|
|
|
|
|
|
|
|
|
|
|
|
|
|
|
|
|
|
|
|
|
|
|
|
|
|
|
|
|
|
|
|
|
|
|
|
|
|
|
|
|
|
|
|
|
|
|
|
|
|
|
|
|
|
|
|
|
|
|
|
|
|
|
|
|
|
|
|
|
|
|
|
|
|
|
|
|
|
|
|
|
|
|
|
|
|
|
|
|
|
|
|
|
|
|
|
|
|
|
|
|
|
|
|
|
|
|
|
|
|
|
|
|
|
|
|
|
|
|
|
|
|
|
|
|
|
|
|
|
|
|
|
|
|
|
|
|
|
|
|
|
|
|
|
|
|
|
|
|
|
|
|
|
|
|
|
|
|
|
|
|
|
|
|
|
|
|
|
|
|
|
|
|
|
|
|
|
|
|
|
|
|
|
|
|
|
|
|
|
|
|
|
|
|
|
|
|
|
|
|
|
|
|
|
|
|
|
|
|
|
|
|
|
|
|
|
|
|
|
|
|
|
|
|
7. |
Power switch |
|
||||
|
|
|
|
|
|
|
|
|
|
|
|
|
|
|
|
|
|
|
|||||||
|
|
|
|
|
|
|
|
|
|
|
|
|
|
|
|
|
|
|
|||||||
|
|
|
|
|
|
|
|
|
|
|
|
|
|
|
|
|
|
|
|||||||
|
|
|
|
|
|
|
|
|
|
|
|
|
|
|
|
|
|
|
|||||||
|
1. |
Mode dial |
|
|
|||||||||||||||||||||
2. |
Shutter button |
|
8. |
Flash |
|
||||||||||||||||||||
|
|
3. |
Camera strap |
|
|
9. |
Viewfinder window |
|
|||||||||||||||||
|
|
4. |
A/V OUT (Audio/Video Out) terminal |
|
|
10. Lens |
|
||||||||||||||||||
|
|
5. |
USB digital terminal |
|
|
11. |
Self-timer LED |
|
|||||||||||||||||
14 |
6. |
DC-in connector |
|
|
|
|
|
|
|
|
|
||||||||||||||
|
|
|
|
|
|
|
|
|
|
|
|
|
|
|
|
|
|
|
|
|
|
|
|
||

Rear View
|
|
|
|
|
|
|
|
|
|
|
|
|
|
|
|
|
1. |
Viewfinder |
|
|
|
T Zoom in button ( p.30) |
|
|
|
|
|
|
|
|
|||
|
|
|
|
|
|
|
|
|
|
|
||||||
|
|
|
|
|
|
|
|
|
|
|
||||||
6. |
|
|
|
|
|
|
|
|
||||||||
|
|
|
|
|
|
|
|
|||||||||
|
|
|
|
|
|
|
|
|||||||||
|
|
|
|
|
|
|
|
|||||||||
|
|
|
|
|
|
|
|
|||||||||
1. |
|
|
Arrow button (Up) |
|
|
|
||||||||||
|
2. |
LED indicator |
|
|
|
|
|
Digital zoom button |
|
|
|
|
Flash button |
|
||
3. |
LCD monitor ( |
p.29) |
W Zoom out button |
|
2. |
|
|
Arrow button (Right) |
|
|||||||
|
|
|
|
|
|
|
|
|
|
3. |
|
|
Arrow button (Down) |
|
||
|
|
|
|
|
|
|
|
|
|
|
|
|
||||
4. |
Delete button |
|
|
Thumbnail button |
|
|
|
|
||||||||
|
|
|
|
|
|
Self-timer button |
|
|||||||||
|
|
|
|
|
|
|
|
|
|
|
|
|
||||
5. |
Tripod socket |
7. |
|
|
Playback button |
|
|
|
|
|||||||
|
|
|
4. |
|
|
Arrow button (Left) |
|
|||||||||
|
|
|
|
|
|
|
|
Menu button |
|
|
||||||
|
|
|
|
8. |
|
|
|
|
||||||||
|
|
|
|
|
5. |
OK OK button |
||||||||||
|
|
|
|
|
||||||||||||
|
|
|
|
|
|
|
|
|
||||||||
9.Battery/SD card cover
15

Mode Dial
|
|
|
|
|
|
|
|
|
|
|
|
|
|
|
|
|
|
|
|
|
|
|
|
|
|
|
|
|
|
|
|
|
|
|
|
|
|
|
|
|
|
|
|
|
|
|
|
|
|
|
|
|
|
|
|
|
|
|
|
|
|
|
|
|
|
|
|
|
|
|
|
|
|
|
|
|
|
|
|
|
|
|
|
|
|
|
|
|
|
|
|
|
|
|
|
|
|
|
|
|
|
|
|
|
|
|
|
|
|
|
|
|
|
|
|
|
|
|
|
|
|
|
|
|
|
|
|
|
|
|
|
|
|
|
|
|
|
|
|
|
|
|
|
|
|
|
|
|
|
|
|
|
|
|
|
|
|
|
|
|
|
|
|
|
|
|
|
|
|
|
Mode |
Description |
|
|
|||||
1. |
M |
|
Manual Mode |
Select this mode to set the aperture value and shutter |
||||||||||
|
|
|
|
|
|
|
|
|
|
|
|
speed values separately. ( |
p.35) |
|
2. |
A |
|
Auto Mode |
Select this mode to a just "point-and-shoot" action.( |
p.36) |
|||||||||
3. |
|
|
|
|
|
Macro Mode |
Select this mode to shoot a close-up of the subject.( |
p.37) |
||||||
4. |
|
|
|
|
|
Portrait Mode |
Select this mode to make people stand out with the |
|||||||
|
|
|
|
|
|
|
|
|
|
|
|
background out-of-focus.( |
p.38) |
|
5. |
|
|
|
|
|
Landscape Mode |
This mode is used when the distance to the subject is |
|||||||
|
|
|
|
|
|
|
|
|
|
|
|
between 0.4m and infinity.( |
p.39) |
|
6. |
|
|
|
|
|
Night Scene Mode |
Select this mode to take photographs of people against a |
|||||||
|
|
|
|
|
|
|
|
|
|
|
|
dark or night-time background.( p.40) |
|
|
7. |
|
|
|
|
|
Sports Mode |
Select this mode to capture fast-moving subjects.( |
p.41) |
||||||
8. |
|
|
|
|
|
Setup Mode |
Select this mode to adjust the camera settings.( |
p.66) |
||||||
9. |
|
|
|
|
|
Movie Mode |
Select this mode to record video (movie) clips.( |
p.51) |
||||||
16

LED Indicators
|
|
|
|
Indicator |
Status |
Description/Activity |
Sound |
LED indicator |
Solid red |
The camera is powering up |
No |
LED indicator |
Solid green |
The camera is powered and ready |
Yes *(1) |
LED indicator |
Blinking red |
Camera error |
Yes *(3) |
LED indicator |
Blinking red |
Charging the flash |
No |
LED indicator |
Blinking green Image is being recorded to the memory card No |
||
LED indicator |
Blinking green |
USB communication/transfer in progress |
No |
LED indicator |
Solid green |
The camera is ready to record images |
Yes *(1) |
|
|
(or movies) |
|
Self-timer indicator |
Blinking red |
The self-timer function is activated |
Yes *(1) |
---- |
---- |
Error message |
Yes *(3) |
---- |
---- |
Valid button event |
Yes *(1) |
(1) The camera sounds one beep.
(3) The camera sounds three beeps.
17

LCD Monitor Information
These indicators are displayed when recording still images:
1. Exposure mode
[M] |
Manual mode |
|
[A] |
|
Auto mode |
[ |
] Macro mode |
|
[ |
] Portrait mode |
|
[ |
] Landscape mode |
|
[ |
] Night Scene mode |
|
[ |
] Sports mode |
|
2. Image size |
||
[ |
] |
2304 x 1728 pixels |
[ |
] |
1600 x 1200 pixels |
[ |
] |
1280 x 960 pixels |
[ |
] |
640 x 480 pixels |
3. Image quality
[  ] Fine
[ ] Normal
[  ] Economy
4. Saturation |
|
[ |
] High |
[ |
] Medium |
[ |
] Low |
18

LCD Monitor Information
5.Sharpness
[ ] High
[ ] Medium [
  ] Low
] Low
6.White balance
Auto
[ |
] |
Daylight |
|||
[ |
] |
Cloudy |
|||
[ |
|
|
|
] |
Sunset |
|
|
|
|||
[ |
] |
Tungsten |
|||
[ |
|
|
] |
Fluorescent |
|
|
|||||
7.ISO
Auto 100 200 400
8.Flash mode
[ ] Auto flash
[ ] Red-eye reduction [
  ] Fill flash (on)
[ ] Flash off
9.Color
[  ] Full color
[  ] Black and White [
  ] Sepia
10.Card indicator
11.Possible number of shots remaining
12.[ ] Adapter indicator
Battery level
[ |
] Full battery power |
[ |
] Medium battery power |
[ |
] Virtually no battery power |
13.EV compensation
19
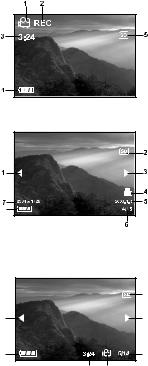
Recording video clips indicators:
1.Movie mode
2.Recording indicator
3.Video counter
4.Battery level/ Adapter
5.Card indicator.
Playing images indicators:
1.Reverse key
2.Card indicator
3.Forward key
4.Print indicator
5.Date (year.month.day)
6. Current image/total number of images 7.Image size
8.Battery level/ Adapter
Playing video clips indicators:
1. Reverse key 2.Battery level/ Adapter 3.Card indicator 4.Forward key
5.Current image number/total number of image 6.Movie mode
7.Recorded time 20
8 |
|
3 |
1 |
4 |
2 |
5 |
7 |
6 |
GETTING STARTED
You can use either 2 AA size batteries (Alkaline or Ni-MH) or a 3.0V/2.5A (available separately as part of the Gateway DC-M42 Accessory Kit) to power the camera. Battery power is convenient for capturing images or recording video clips while an AC power adapter is useful when transferring images to your computer.
Installing the Batteries
1. Make sure the camera is off.
2. Slide the battery/SD memory card cover open.
3. Insert the batteries, noting correct polarity (+ and -). 4. Close the battery/SD memory card cover firmly.
If you won't be using the batteries for an extended period of time, remove them from the camera to prevent the leakage or corrosion.
Never use manganese batteries.
Avoid using the batteries in extremely cold environments as low temperatures may shorten the battery life and reduce the camera performance.
21

Using the AC Power Adapter (optional accessory)
An AC Power is available separately as part of the Gateway
DC-M42 Accessory Kit.
1.Make sure the camera is turned off.
2.Open the port cover and connect one end of the AC power adapter to the jack labeled "DC IN".
3. Connect the other end to an electrical outlet.
Make sure to use only the AC power adapter specified for the camera. Damage caused by the use of an incorrect adapter is not covered under the warranty.
To prevent unexpected auto power off resulting from no battery power left during the process of transferring your images to the computer, use the AC power adapter as a power supply.
22
 Loading...