


 Loading...
ET-4550 User's Guide

Contents |
|
ET-4550 User's Guide................................................................................................................................ |
13 |
Your Ink Tank System ............................................................................................................................... |
14 |
Product Basics .......................................................................................................................................... |
15 |
Using the Control Panel ..................................................................................................................... |
15 |
Control Panel Buttons and Lights .................................................................................................. |
15 |
Status Icons .............................................................................................................................. |
16 |
Entering Characters on the LCD Screen ....................................................................................... |
17 |
Changing LCD Screen Language.................................................................................................. |
17 |
Turning Off Control Panel Sounds................................................................................................. |
18 |
Adjusting the Screen Contrast ....................................................................................................... |
18 |
Product Parts Locations ..................................................................................................................... |
19 |
Product Parts - Top and Front ....................................................................................................... |
20 |
Product Parts - Inside .................................................................................................................... |
23 |
Product Parts - Back...................................................................................................................... |
24 |
Using Eco Mode and Other Power Saving Settings ........................................................................... |
24 |
Changing the Eco Settings ............................................................................................................ |
25 |
Changing the Sleep Timer Settings ............................................................................................... |
25 |
Changing the Power Off Timer Settings ........................................................................................ |
26 |
Epson Connect Solutions for Smartphones, Tablets, and More ......................................................... |
27 |
Using Epson Email Print ............................................................................................................... |
27 |
Using the Epson iPrint Mobile App ................................................................................................ |
28 |
Using Epson Remote Print ........................................................................................................... |
28 |
Using Epson Scan to Cloud........................................................................................................... |
29 |
Using AirPrint .................................................................................................................................... |
29 |
Using Google Cloud Print................................................................................................................... |
30 |
Setting Up Google Cloud Print on a Chromebook ......................................................................... |
31 |
Using the Mopria Print Service .......................................................................................................... |
32 |
Wi-Fi or Wired Networking........................................................................................................................ |
33 |
Wi-Fi Infrastructure Mode Setup......................................................................................................... |
33 |
Selecting Wireless Network Settings From the Control Panel ....................................................... |
34 |
3
Wi-Fi Direct Mode Setup .................................................................................................................... |
36 |
Enabling Wi-Fi Direct Mode ........................................................................................................... |
37 |
Wi-Fi Protected Setup (WPS)............................................................................................................. |
39 |
Using WPS to Connect to a Network ............................................................................................. |
39 |
Printing a Network Status Sheet......................................................................................................... |
40 |
Changing or Updating Network Connections ..................................................................................... |
41 |
Accessing the Web Config Utility................................................................................................... |
41 |
Changing a USB Connection to a Wi-Fi Connection...................................................................... |
41 |
Changing a Wi-Fi Connection to a Wired Network Connection...................................................... |
42 |
Connecting to a New Wi-Fi Router ................................................................................................ |
42 |
Disabling Wi-Fi Features ............................................................................................................... |
43 |
Loading Paper ........................................................................................................................................... |
44 |
Loading Paper in the Cassette ........................................................................................................... |
44 |
Paper Loading Capacity ..................................................................................................................... |
50 |
Available Epson Papers ..................................................................................................................... |
51 |
Paper or Media Type Settings - Product Software.............................................................................. |
51 |
Selecting the Paper Settings - Control Panel ..................................................................................... |
52 |
Paper Type Settings - Control Panel ............................................................................................. |
53 |
Paper Source Settings................................................................................................................... |
53 |
Selecting Universal Print Settings.................................................................................................. |
53 |
Universal Print Settings Options ............................................................................................... |
54 |
Placing Originals on the Product ............................................................................................................. |
56 |
Placing Originals on the Scanner Glass ............................................................................................. |
56 |
Placing Originals in the Automatic Document Feeder ........................................................................ |
58 |
Copying...................................................................................................................................................... |
61 |
Copying Documents or Photos........................................................................................................... |
61 |
Paper Size Settings - Copying............................................................................................................ |
62 |
Copying Options................................................................................................................................. |
62 |
Printing from a Computer ......................................................................................................................... |
64 |
Printing with Windows ........................................................................................................................ |
64 |
Selecting Basic Print Settings - Windows ...................................................................................... |
64 |
Print Quality Options - Windows ............................................................................................... |
66 |
4
Multi-Page Printing Options - Windows..................................................................................... |
67 |
Selecting Double-sided Printing Settings - Windows ..................................................................... |
67 |
Double-sided Printing Options - Windows................................................................................. |
70 |
Selecting Additional Layout and Print Options - Windows ............................................................. |
71 |
Custom Color Correction Options - Windows............................................................................ |
73 |
Image Options and Additional Settings - Windows.................................................................... |
74 |
Header/Footer Settings - Windows ........................................................................................... |
75 |
Selecting a Printing Preset - Windows........................................................................................... |
76 |
Selecting Extended Settings - Windows ........................................................................................ |
77 |
Extended Settings - Windows ................................................................................................... |
78 |
Printing Your Document or Photo - Windows................................................................................. |
79 |
Checking Print Status - Windows.............................................................................................. |
81 |
Selecting Default Print Settings - Windows.................................................................................... |
81 |
Changing the Language of the Printer Software Screens ......................................................... |
82 |
Changing Automatic Update Options ............................................................................................ |
83 |
Printing with OS X .............................................................................................................................. |
84 |
Selecting Basic Print Settings - OS X ............................................................................................ |
85 |
Print Quality Options - OS X...................................................................................................... |
89 |
Print Options - OS X ................................................................................................................. |
89 |
Selecting Page Setup Settings - OS X........................................................................................... |
89 |
Selecting Print Layout Options - OS X........................................................................................... |
90 |
Selecting Double-sided Printing Settings - OS X ........................................................................... |
91 |
Double-sided Printing Options and Adjustments - OS X ........................................................... |
92 |
Sizing Printed Images - OS X ........................................................................................................ |
93 |
Managing Color - OS X.................................................................................................................. |
94 |
Color Matching and Color Options - OS X................................................................................. |
95 |
Selecting Printing Preferences - OS X........................................................................................... |
95 |
Printing Preferences - OS X...................................................................................................... |
96 |
Printing Your Document or Photo - OS X....................................................................................... |
97 |
Checking Print Status - OS X .................................................................................................... |
98 |
Cancelling Printing Using a Product Button........................................................................................ |
98 |
Scanning .................................................................................................................................................... |
99 |
Starting a Scan................................................................................................................................... |
99 |
5
Starting a Scan Using the Product Control Panel .......................................................................... |
99 |
Changing Default Scan Button Settings.................................................................................. |
100 |
Starting a Scan Using the Epson Scan Icon ................................................................................ |
101 |
Starting a Scan from a Scanning Program................................................................................... |
103 |
Selecting Epson Scan Settings ........................................................................................................ |
105 |
Scan Modes................................................................................................................................. |
105 |
Selecting the Scan Mode............................................................................................................. |
106 |
Scanning in Office Mode.............................................................................................................. |
106 |
Available Document Source Settings - Office Mode................................................................ |
108 |
Selecting a Scan Area - Office Mode ...................................................................................... |
109 |
Available Image Adjustments - Office Mode ........................................................................... |
111 |
Scanning in Home Mode ............................................................................................................. |
112 |
Selecting a Scan Area - Home Mode ...................................................................................... |
115 |
Available Image Adjustments - Home Mode ........................................................................... |
118 |
Selecting a Scan Size - Home Mode....................................................................................... |
119 |
Scanning in Professional Mode ................................................................................................... |
122 |
Available Document Source Settings - Professional Mode ..................................................... |
125 |
Available Image Types - Professional Mode ........................................................................... |
125 |
Selecting a Scan Area - Professional Mode............................................................................ |
125 |
Available Image Adjustments - Professional Mode ................................................................. |
128 |
Selecting a Scan Size - Professional Mode............................................................................. |
130 |
Image Preview Guidelines........................................................................................................... |
133 |
Scan Resolution Guidelines ........................................................................................................ |
133 |
Selecting Scan File Settings........................................................................................................ |
135 |
Available Scanned File Types and Optional Settings.............................................................. |
136 |
Scanning with OS X Using Image Capture....................................................................................... |
137 |
Available Scan Settings - OS X Image Capture........................................................................... |
139 |
Scanning Special Projects................................................................................................................ |
139 |
Scanning to a PDF File................................................................................................................ |
140 |
Restoring Photo Colors as You Scan .......................................................................................... |
143 |
Faxing....................................................................................................................................................... |
144 |
Connecting a Telephone or Answering Machine .............................................................................. |
144 |
Setting Up Fax Features .................................................................................................................. |
147 |
6
Setting Up Fax Features Using the Product Control Panel .......................................................... |
147 |
Selecting Your Country or Region........................................................................................... |
148 |
Selecting the Date and Time................................................................................................... |
148 |
Using the Fax Setting Wizard.................................................................................................. |
150 |
Selecting the Line Type........................................................................................................... |
152 |
Setting the Number of Rings to Answer .................................................................................. |
153 |
Selecting Advanced Fax Settings ........................................................................................... |
153 |
Basic Settings - Fax ................................................................................................................ |
154 |
Receive Settings - Fax............................................................................................................ |
155 |
Output Settings - Fax .............................................................................................................. |
156 |
Security Settings - Fax............................................................................................................ |
157 |
Printing Fax Reports ............................................................................................................... |
157 |
Fax Report Options................................................................................................................. |
158 |
Setting Up Fax Features Using the Fax Utility - Windows............................................................ |
158 |
Setting Up Fax Features Using the Fax Utility - OS X.................................................................. |
160 |
Setting Up Contacts and Contact Groups......................................................................................... |
161 |
Setting Up Contacts Using the Product Control Panel................................................................. |
162 |
Creating a Contact .................................................................................................................. |
162 |
Editing or Deleting a Contact .................................................................................................. |
164 |
Creating a Contact Group ....................................................................................................... |
165 |
Editing or Deleting a Group..................................................................................................... |
167 |
Setting Up Speed/Group Dial Lists Using the Fax Utility - Windows ............................................ |
169 |
Setting Up Speed/Group Dial Lists Using the Fax Utility - OS X .................................................. |
172 |
Sending Faxes ................................................................................................................................. |
174 |
Sending Faxes from the Product Control Panel........................................................................... |
174 |
Faxing from the Control Panel ................................................................................................ |
174 |
Fax Send Settings................................................................................................................... |
175 |
Dialing Fax Numbers from a Connected Telephone ............................................................... |
177 |
Sending a Fax at a Specified Time ......................................................................................... |
178 |
Sending Faxes Using the Fax Utility - Windows .......................................................................... |
179 |
Sending Faxes Using the Fax Utility - OS X................................................................................. |
182 |
Receiving Faxes............................................................................................................................... |
185 |
Fax Reception ............................................................................................................................. |
185 |
7
Receiving Faxes Automatically.................................................................................................... |
186 |
Receiving Faxes Manually........................................................................................................... |
186 |
Receiving a Fax by Polling .......................................................................................................... |
187 |
Refilling Ink .............................................................................................................................................. |
188 |
Ink Safety Precautions ..................................................................................................................... |
188 |
Check Ink Levels .............................................................................................................................. |
189 |
Checking Ink Levels .................................................................................................................... |
190 |
Checking Ink Levels with Windows.............................................................................................. |
190 |
Checking Ink Levels with OS X.................................................................................................... |
192 |
Disabling Special Offers with Windows ....................................................................................... |
193 |
Purchase Epson Ink ......................................................................................................................... |
194 |
Ink Bottle Part Numbers............................................................................................................... |
194 |
Refilling the Ink Tanks ...................................................................................................................... |
194 |
Adjusting Print Quality............................................................................................................................ |
200 |
Print Head Maintenance................................................................................................................... |
200 |
Print Head Nozzle Check............................................................................................................. |
200 |
Checking the Nozzles Using the Product Control Panel ......................................................... |
200 |
Checking the Nozzles Using a Computer Utility...................................................................... |
202 |
Print Head Cleaning .................................................................................................................... |
204 |
Cleaning the Print Head Using the Product Control Panel ...................................................... |
205 |
Cleaning the Print Head Using a Computer Utility................................................................... |
206 |
Power Ink Flushing ...................................................................................................................... |
209 |
Flushing the Ink Using a Computer Utility ............................................................................... |
209 |
Print Head Alignment ....................................................................................................................... |
210 |
Aligning the Print Head Using the Product Control Panel ............................................................ |
211 |
Aligning the Print Head Using a Computer Utility......................................................................... |
212 |
Cleaning the Paper Path .................................................................................................................. |
214 |
Checking the Number of Sheets....................................................................................................... |
215 |
Checking the Sheet Counter - Windows ...................................................................................... |
215 |
Checking the Sheet Counter - OS X ............................................................................................ |
216 |
Cleaning and Transporting Your Product ............................................................................................. |
218 |
Cleaning Your Product ..................................................................................................................... |
218 |
Transporting Your Product ............................................................................................................... |
220 |
8
Solving Problems .................................................................................................................................... |
224 |
Checking for Software Updates........................................................................................................ |
224 |
Product Status Messages ................................................................................................................ |
225 |
Running a Product Check ................................................................................................................ |
226 |
Resetting Control Panel Defaults ..................................................................................................... |
227 |
Solving Setup Problems ................................................................................................................... |
228 |
Noise After Filling the Ink............................................................................................................. |
228 |
Software Installation Problems .................................................................................................... |
229 |
Control Panel Setup Problems .................................................................................................... |
229 |
USB Connection Problems.......................................................................................................... |
229 |
Solving Network Problems ............................................................................................................... |
230 |
Product Cannot Connect to a Wireless Router or Access Point .................................................. |
230 |
Cannot Print Over a Network....................................................................................................... |
231 |
Network Software Cannot Find Product on a Network................................................................. |
233 |
Product Does Not Appear in OS X Printer Window...................................................................... |
233 |
Cannot Scan Over a Network ...................................................................................................... |
234 |
Solving Copying Problems ............................................................................................................... |
235 |
Product Makes Noise, But Nothing Copies.................................................................................. |
235 |
Product Makes Noise When It Sits for a While............................................................................. |
236 |
Solving Paper Problems................................................................................................................... |
236 |
Paper Feeding Problems............................................................................................................. |
236 |
Paper Jam Problems Inside the Product ..................................................................................... |
237 |
Paper Jam Problems in the Paper Cassette................................................................................ |
239 |
Paper Jam Problems in the Duplexer (Rear Cover)..................................................................... |
240 |
Document Jams in the Automatic Document Feeder................................................................... |
243 |
Paper Ejection Problems ............................................................................................................. |
246 |
Solving Problems Printing from a Computer..................................................................................... |
247 |
Nothing Prints.............................................................................................................................. |
247 |
Product Icon Does Not Appear in Windows Taskbar ................................................................... |
248 |
Printing is Slow ............................................................................................................................ |
248 |
Solving Page Layout and Content Problems.................................................................................... |
249 |
Inverted Image............................................................................................................................. |
250 |
Too Many Copies Print ................................................................................................................ |
250 |
9
Blank Pages Print ........................................................................................................................ |
250 |
Incorrect Margins on Printout....................................................................................................... |
251 |
Incorrect Characters Print............................................................................................................ |
251 |
Incorrect Image Size or Position.................................................................................................. |
252 |
Slanted Printout........................................................................................................................... |
252 |
Solving Print Quality Problems......................................................................................................... |
253 |
White or Dark Lines in Printout .................................................................................................... |
253 |
Blurry or Smeared Printout .......................................................................................................... |
254 |
Faint Printout or Printout Has Gaps ............................................................................................. |
256 |
Grainy Printout............................................................................................................................. |
256 |
Incorrect Colors ........................................................................................................................... |
257 |
Solving Scanning Problems ............................................................................................................. |
259 |
Scanning Software Does Not Operate Correctly ......................................................................... |
259 |
Cannot Start Epson Scan ............................................................................................................ |
259 |
Solving Scanned Image Quality Problems ....................................................................................... |
260 |
Image Consists of a Few Dots Only............................................................................................. |
261 |
Line of Dots Appears in All Scanned Images............................................................................... |
261 |
Straight Lines in an Image Appear Crooked ................................................................................ |
262 |
Image is Distorted or Blurry ......................................................................................................... |
262 |
Image Colors are Patchy at the Edges ........................................................................................ |
262 |
Image is Too Dark ....................................................................................................................... |
262 |
Back of Original Image Appears in Scanned Image .................................................................... |
263 |
Ripple Patterns Appear in an Image ............................................................................................ |
263 |
Image is Scanned Upside-Down ................................................................................................. |
263 |
Scanned Image Colors Do Not Match Original Colors................................................................. |
264 |
Scan Area is Not Adjustable in Thumbnail Preview ..................................................................... |
264 |
Scanned Image Edges are Cropped ........................................................................................... |
264 |
Solving Faxing Problems.................................................................................................................. |
265 |
Cannot Send or Receive Faxes................................................................................................... |
265 |
Cannot Receive Faxes with a Telephone Connected to Your Product ........................................ |
266 |
Message Appears Prompting You to Reset Ink Levels..................................................................... |
267 |
Uninstall Your Product Software....................................................................................................... |
267 |
Uninstalling Product Software - Windows.................................................................................... |
267 |
10
Uninstalling Product Software - OS X .......................................................................................... |
269 |
Where to Get Help............................................................................................................................ |
269 |
Technical Specifications ........................................................................................................................ |
271 |
Windows System Requirements ...................................................................................................... |
271 |
OS X System Requirements............................................................................................................. |
272 |
Scanning Specifications ................................................................................................................... |
272 |
Paper Specifications ........................................................................................................................ |
273 |
Printable Area Specifications ........................................................................................................... |
274 |
Ink Specifications ............................................................................................................................. |
275 |
Fax Specifications ............................................................................................................................ |
276 |
Dimension Specifications ................................................................................................................. |
277 |
Electrical Specifications ................................................................................................................... |
277 |
Environmental Specifications ........................................................................................................... |
277 |
Interface Specifications .................................................................................................................... |
278 |
Network Interface Specifications ...................................................................................................... |
278 |
Safety and Approvals Specifications ................................................................................................ |
279 |
Notices ..................................................................................................................................................... |
280 |
Important Safety Instructions............................................................................................................ |
280 |
General Product Safety Instructions ............................................................................................ |
280 |
Wireless Connection Safety Instructions ..................................................................................... |
282 |
Telephone Equipment Safety Instructions ................................................................................... |
282 |
LCD Screen Safety Instructions................................................................................................... |
282 |
FCC Compliance Statement............................................................................................................. |
283 |
Trademarks...................................................................................................................................... |
285 |
Copyright Notice............................................................................................................................... |
286 |
libTIFF Software Acknowledgment.............................................................................................. |
286 |
A Note Concerning Responsible Use of Copyrighted Materials................................................... |
287 |
Default Delay Times for Power Management for Epson Products ............................................... |
287 |
Copyright Attribution.................................................................................................................... |
287 |
11

ET-4550 User's Guide
Welcome to the ET-4550 User's Guide.
For a printable PDF copy of this guide, click here.
13

Your Ink Tank System
You should visually check the ink levels in the product's ink tanks regularly. For optimum printing results, refill the ink tanks to the upper line at least once a year.
Note: The product has a low ink alert system. The accuracy of this system depends on the user refilling the ink tanks correctly. The product cannot directly measure the ink levels in the tanks; instead it estimates the amount of ink remaining by internally monitoring ink usage. The low ink alert system may generate inaccurate messages if the ink tanks are not refilled according to these instructions.
Visually check the ink levels in the product’s ink tanks to confirm the actual ink levels. Continued use of the product when the ink is expended could damage the product.
To refill the ink tanks and reset the ink levels, click the link below.
Related tasks
Refilling the Ink Tanks
14

Product Basics
See these sections to learn about the basic features of your product.
Using the Control Panel
Product Parts Locations
Using Eco Mode and Other Power Saving Settings
Epson Connect Solutions for Smartphones, Tablets, and More
Using AirPrint
Using Google Cloud Print
Using the Mopria Print Service
Using the Control Panel
See these sections to learn about the control panel and select control panel settings.
Control Panel Buttons and Lights
Entering Characters on the LCD Screen
Changing LCD Screen Language
Turning Off Control Panel Sounds
Adjusting the Screen Contrast
Parent topic: Product Basics
Control Panel Buttons and Lights
15

1The  power button and light
2The  home button
3The 
 Redial/Pause button
4The  Stop/Reset button
5The LCD screen
6The arrow buttons and the OK button
7The  back button
8The numeric keypad
9The  Contacts button
10The Start  B&W button
11The Start  Color button
Status Icons
Parent topic: Using the Control Panel
Status Icons
Status icons may be displayed on the LCD screen depending on the product's status.
Icons |
Description |
|
Originals are detected in the ADF (Automatic Document Feeder) |
|
|
|
No Ethernet connection |
|
|
|
Ethernet connection has been established |
|
|
|
Wi-Fi network error has occurred or the product is searching for a connection |
|
|
|
Wi-Fi connection has been established; the number of bars indicates the |
|
connection's signal strength |
|
Ad hoc connection has been established |
|
|
|
Wi-Fi Direct mode connection has been established |
|
|
16

Icons |
Description |
|
Simple AP mode connection has been established |
|
|
|
Not connected to a Wi-Fi network |
|
|
|
Simple AP and Wi-Fi Direct modes are disabled |
|
|
|
Eco Mode setting is enabled |
|
|
Parent topic: Control Panel Buttons and Lights
Entering Characters on the LCD Screen
Follow these guidelines to enter characters for passwords and other settings.
•To enter letters or symbols, press the buttons on the numeric keypad repeatedly to scroll through characters.
•To enter numbers or change the case of letters, press the up or down arrow button.
•To delete the previous character, press the left arrow button.
•To enter a space, press the right arrow button.
Parent topic: Using the Control Panel
Changing LCD Screen Language
You can change the language used on the LCD screen.
1. Press the up or down arrow button, select Setup, and press the OK button.
17

You see a screen like this:
2.Press the down arrow button, select Common Settings, and press the OK button.
3.Press the down arrow button, select Language, and press the OK button.
4.Select a language and press the OK button.
5.Press the  home button to exit.
Parent topic: Using the Control Panel
Turning Off Control Panel Sounds
You can turn off the sound heard when you press buttons on the control panel.
1.Press the up or down arrow button, select Setup, and press the OK button.
2.Press the down arrow button, select Common Settings, and press the OK button.
3.Select Sound and press the OK button.
4.Select Button Press and press the OK button.
5.Press the down arrow button until the sound is turned off, then press the OK button.
6.Press the  home button to exit.
Parent topic: Using the Control Panel
Adjusting the Screen Contrast
You can adjust the contrast of the LCD screen.
1. Press the up or down arrow button, select Setup, and press the OK button.
18

You see a screen like this:
2.Press the down arrow button, select Common Settings, and press the OK button.
3.Select LCD Contrast and press the OK button.
4.Press the up or down arrow button to adjust the screen contrast.
5.Press the OK button.
6.Press the  home button to exit.
Parent topic: Using the Control Panel
Product Parts Locations
See these sections to identify the parts on your product.
Product Parts - Top and Front
Product Parts - Inside
Product Parts - Back
Parent topic: Product Basics
19
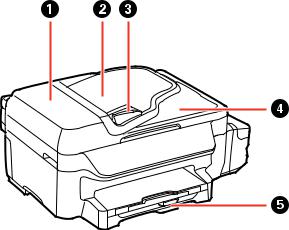
Product Parts - Top and Front
1ADF (Automatic Document Feeder) cover
2ADF input tray
3ADF edge guide
4ADF output tray
5Paper cassette
20
1Print head
2Output tray
3Edge guides
4Paper cassette
21

1Document cover
2Scanner glass
3Control panel
Parent topic: Product Parts Locations
22

Product Parts - Inside
1Scanner unit
2Ink tank unit
3Ink tanks
Parent topic: Product Parts Locations
23
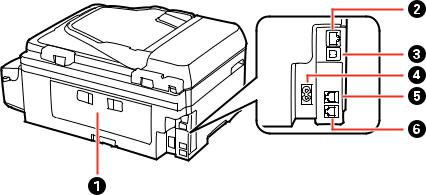
Product Parts - Back
1Rear cover
2LAN port
3USB port
4AC inlet
5LINE port
6EXT. port
Parent topic: Product Parts Locations
Using Eco Mode and Other Power Saving Settings
Your product enters sleep mode automatically and turns off the LCD screen if it is not used for a period of time. You can make the time period shorter and select other options to save energy and resources.
Changing the Eco Settings
Changing the Sleep Timer Settings
Changing the Power Off Timer Settings
Parent topic: Product Basics
24

Changing the Eco Settings
You can use the product control panel to change the Eco settings.
Note: The Sleep Timer setting in Eco Mode overrides the Sleep Timer setting in Common Settings. This setting can be locked by an administrator. If you cannot access or change this setting, contact your administrator for assistance.
1.Press the up or down arrow button, select Eco Mode, and press the OK button. You see a screen like this:
2.Select On and press the OK button.
3.Press the up arrow button to select Yes.
4.Change the settings as necessary.
5.Press the OK button to exit.
You see the  icon in the corner of the LCD screen to indicate that Eco settings are enabled.
Parent topic: Using Eco Mode and Other Power Saving Settings
Changing the Sleep Timer Settings
You can adjust the time period before your product enters sleep mode and turns off the LCD screen.
Note: The Sleep Timer setting in Eco Mode overrides the Sleep Timer setting in Common Settings. This setting can be locked by an administrator. If you cannot access or change this setting, contact your administrator for assistance.
1. Press the up or down arrow button, select Setup, and press the OK button.
25
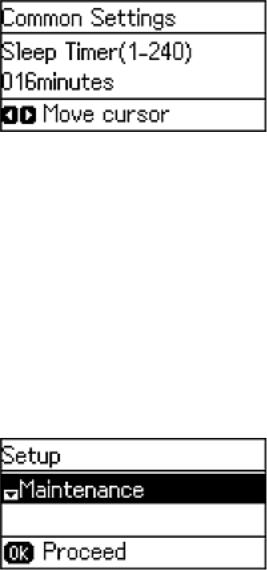
2.Press the down arrow button, select Common Settings, and press the OK button.
3.Press the down arrow button, select Sleep Timer, and press the OK button. You see a screen like this:
4.Use the numeric keypad to enter the number of minutes.
5.Press the left or right arrow button to move the cursor as necessary.
6.Press the OK button.
Parent topic: Using Eco Mode and Other Power Saving Settings
Changing the Power Off Timer Settings
You can have the product turn off automatically if it is not used for a specified period of time.
Note: This setting can be locked by an administrator. If you cannot access or change this setting, contact your administrator for assistance.
1.Press the down arrow button, select Setup, and press the OK button. You see a screen like this:
26
2.Press the down arrow button, select Common Settings, and press the OK button.
3.Press the down arrow button, select Power Off Timer, and press the OK button.
4.Press the down arrow button to select a time period between 30minutes and 12h (12 hours), and press the OK button.
5.Press the  home button to exit.
Parent topic: Using Eco Mode and Other Power Saving Settings
Epson Connect Solutions for Smartphones, Tablets, and More
You can print documents, photos, emails, and web pages from your home, office, or even across the globe. You can use your smartphone, tablet, or computer. Epson offers these solutions to print from anywhere: Epson Email Print, Epson iPrint Mobile App, Epson Remote Print, and Epson Scan to Cloud.
Using Epson Email Print
Using the Epson iPrint Mobile App
Using Epson Remote Print
Using Epson Scan to Cloud
Parent topic: Product Basics
Related tasks
Using AirPrint
Using Google Cloud Print
Using the Mopria Print Service
Using Epson Email Print
With Epson Email Print, you can print from any device that can send email, such as your smartphone, tablet, or laptop. Just activate your product's unique email address. When you want to print, attach a PDF, Microsoft Office document, or photo to an email and send it to your product.
1.Set up your product for network printing. See the link below.
2.If you did not already set up Email Print when you installed your product software, visit epson.com/connect to learn more about Email Print, check compatibility, and get detailed setup instructions.
3.Send an email with attachments to your product's Email Print address.
Note: Both the email and any attachments print by default. You can change these printing options by logging into your Epson Connect account.
27
Parent topic: Epson Connect Solutions for Smartphones, Tablets, and More
Related topics
Wi-Fi or Wired Networking
Using the Epson iPrint Mobile App
Use this free Apple and Android app to print to nearby Epson networked products. The Epson iPrint Mobile App lets you print PDFs, Microsoft Office documents, photos, and web pages over a wireless network. You can even scan and save a file on your device, send it as an email, or upload it to an online service such as Box, Dropbox, Evernote, or Google Drive.
1.Set up your product on a network. See the link below.
2.Visit epson.com/connect to learn more about Epson iPrint and check the compatibility of your mobile device.
3.Download Epson iPrint from the Apple App Store or Google Play.
4.Connect your mobile device to the same wireless network that your product is using.
5.Print from your mobile device to your Epson product.
Parent topic: Epson Connect Solutions for Smartphones, Tablets, and More
Related topics
Wi-Fi or Wired Networking
Using Epson Remote Print
With Epson Remote Print software, you can print to an Epson Email-enabled product anywhere in the world.
1.Set up your product for network printing. See the link below.
2.Visit epson.com/connect to learn more about Remote Print and how to download the software.
3.Download and install the Remote Print software.
4.Obtain the email address and optional access key of the Epson product you want to use for printing, and enter this address during Remote Print setup.
5.Select the print command in your application and choose the Remote Print driver for your Epson product.
Parent topic: Epson Connect Solutions for Smartphones, Tablets, and More
Related topics
Wi-Fi or Wired Networking
28

Using Epson Scan to Cloud
The Epson Scan to Cloud service sends your scanned files to a destination that you have registered with Epson Connect.
1.Set up your product for network scanning. See the link below.
2.Visit epson.com/connect for instructions on registering an account and your product with Epson Connect.
3.After registering, sign in to the Epson Connect web page with the email address and password you selected.
4.Select Destination List for Scan to Cloud.
5.Click Add, then follow the instructions on the screen to create your destination list.
6.When you're ready to scan, select the setting for the Scan to Cloud service on your product control panel.
Parent topic: Epson Connect Solutions for Smartphones, Tablets, and More
Related tasks
Starting a Scan Using the Product Control Panel
Related topics
Wi-Fi or Wired Networking
Using AirPrint
AirPrint enables instant wireless printing from iPhone, iPad, and iPod touch with the latest version of iOS, and Mac with the latest version of OS X.
1.Load paper in your product.
2.Set up your product for wireless printing. See the link below.
3.Connect your Apple device to the same wireless network that your product is using.
4.Print from your device to your product.
29
Note: For details, see the AirPrint page on the Apple website.
Parent topic: Product Basics
Related topics
Wi-Fi or Wired Networking
Epson Connect Solutions for Smartphones, Tablets, and More
Using Google Cloud Print
With a Google Account, you can print from your Apple or Android device to your Epson product. You can also print from Chromebooks and the Google Chrome browser without drivers or cables.
Set up your Epson product for network printing. See the link below.
Note: Make sure your Epson printer and computer are connected to the same network before starting the Google Cloud Print setup.
1.Connect your device to the same network that your Epson product is using.
2.Print a network status sheet.
3.Locate your product's IP address on the network status sheet.
4.Enter the IP address into the address bar of a web browser.
5.Select the Google Cloud Print Services option.
Note: If you don't see the Google Cloud Print Services option, turn your product off and back on. If the option still doesn't appear, select the Firmware Update option and follow the on-screen instructions to update your product.
6.Click Register.
7.Select the checkbox to agree to the Usage Advisory and click Next.
8.Click OK to launch the sign-in page. A separate browser window opens.
9.Enter your Google Account username and password and click Sign in, or, if you don't have an account, click Sign up for a new Google Account and follow the on-screen instructions.
10.Click Finish printer registration to complete setup and print a test page.
30
Loading...