


 Loading...
Pro 11880 Field Repair Guide |
9/27/10 |
|
|
Table Of Contents
Table Of Contents - - - - - - - - - - - - - - |
|
- |
- |
- |
|
- |
- |
- |
|
- |
- |
- |
|
- |
- |
- |
|
- |
- |
- |
|
- |
1 |
||||||||||||
Control Panel Map - - - |
- |
- |
- |
- |
|
- |
- |
- |
|
- |
- |
- |
|
- |
- |
- |
|
- |
- |
- |
|
- |
- |
- |
|
- |
- |
- |
|
- |
- |
- |
|
- |
7 |
Component Replacement |
- |
- |
- |
- |
|
- |
- |
- |
|
- |
- |
- |
|
- |
- |
- |
|
- |
- |
- |
|
- |
- |
- |
|
- |
- |
- |
|
- |
- |
- |
|
- 18 |
|
Board (AID) Removal |
|
- |
- |
- |
- |
- |
- |
- |
- |
- |
- |
- |
- |
- |
- |
- |
- |
- |
- |
- |
- |
- |
- |
- |
- |
- |
- |
- |
- |
- |
- |
19 |
|||
Board (Main) Removal |
- |
- |
- - - |
- - - |
- |
- |
- |
- |
- |
- |
- |
- |
- |
- |
- |
- |
- |
- |
- |
- |
- |
- |
- |
- |
- |
- |
22 |
||||||||
Board (Main) Installation - |
- |
- |
- |
- |
- |
- |
- |
- |
- |
- |
- |
- |
- |
- |
- |
- |
- |
- |
- |
- |
- |
- |
- |
- |
- |
- |
- |
- |
28 |
||||||
Board (Power Supply) Removal |
- |
- |
- |
- |
- |
- |
- |
- |
- |
- |
- |
- |
- |
- |
- |
- |
- |
- |
- |
- |
- |
- |
- |
- |
- |
36 |
|||||||||
Cleaning Unit Removal |
|
- |
- |
- |
- |
- |
- |
- |
- |
- |
- |
- |
- |
- |
- |
- |
- |
- |
- |
- |
- |
- |
- |
- |
- |
- |
- |
- |
- |
- |
38 |
||||
Cleaning Unit Installation |
- |
- |
- |
- |
- |
- |
- |
- |
- |
- |
- |
- |
- |
- |
- |
- |
- |
- |
- |
- |
- |
- |
- |
- |
- |
- |
- |
- |
49 |
||||||
Cover (Left Side) Removal - |
- |
- |
- |
- |
- |
- |
- |
- |
- |
- |
- |
- |
- |
- |
- |
- |
- |
- |
- |
- |
- |
- |
- |
- |
- |
- |
- |
63 |
|||||||
Cover (Rear) Removal |
- |
- |
- |
- |
- |
- |
- |
- |
- |
- |
- |
- |
- |
- |
- |
- |
- |
- |
- |
- |
- |
- |
- |
- |
- |
- |
- |
- |
- |
- |
70 |
||||
Cover (Right Side) Removal |
- |
- |
- |
- |
- |
- |
- |
- |
- |
- |
- |
- |
- |
- |
- |
- |
- |
- |
- |
- |
- |
- |
- |
- |
- |
- |
- |
72 |
|||||||
Cover (Top) Removal |
|
- |
- |
- |
- |
- |
- |
- |
- |
- |
- |
- |
- |
- |
- |
- |
- |
- |
- |
- |
- |
- |
- |
- |
- |
- |
- |
- |
- |
- |
- |
83 |
|||
Cutter Blade Assembly Removal |
- |
- |
- |
- |
- |
- |
- |
- |
- |
- |
- |
- |
- |
- |
- |
- |
- |
- |
- |
- |
- |
- |
- |
- |
89 |
||||||||||
Cutter Blade Solenoid Removal |
- |
- |
- |
- |
- |
- |
- |
- |
- |
- |
- |
- |
- |
- |
- |
- |
- |
- |
- |
- |
- |
- |
- |
- |
- |
92 |
|||||||||
Edge Detector (EdgeAD) Replacement |
|
- |
- |
- |
- |
- |
- |
- |
- |
- |
- |
- |
- |
- |
- |
- |
- |
- |
- |
- |
- |
- |
93 |
||||||||||||
Encoder (Carriage) Removal - |
- |
- |
- |
- |
- |
- |
- |
- |
- |
- |
- |
- |
- |
- |
- |
- |
- |
- |
- |
- |
- |
- |
- |
- |
- |
- |
97 |
||||||||
Encoder Disk (Paper Feed) Removal |
|
- |
- |
- |
- |
- |
- |
- |
- |
- |
- |
- |
- |
- |
- |
- |
- |
- |
- |
- |
- |
- |
- 101 |
||||||||||||
Encoder (Paper Feed) Removal |
- |
- |
- |
- |
- |
- |
- |
- |
- |
- |
- |
- |
- |
- |
- |
- |
- |
- |
- |
- |
- |
- |
- |
- |
- 104 |
||||||||||
Encoder Strip (Carriage) Replacement |
|
- |
- |
- |
- |
- |
- |
- |
- |
- |
- |
- |
- |
- |
- |
- |
- |
- |
- |
- |
- |
- 107 |
|||||||||||||
Ink Bay Removal (Left) - |
- |
- |
- |
- |
- |
- |
- |
- |
- |
- |
- |
- |
- |
- |
- |
- |
- |
- |
- |
- |
- |
- |
- |
- |
- |
- |
- |
- |
- 109 |
||||||
Ink Bay Removal (Right) - |
- |
- |
- |
- |
- |
- |
- |
- |
- |
- |
- |
- |
- |
- |
- |
- |
- |
- |
- |
- |
- |
- |
- |
- |
- |
- |
- |
- 120 |
|||||||
Pressure Pump Assembly Removal - |
- |
- |
- |
- |
- |
- |
- |
- |
- |
- |
- |
- |
- |
- |
- |
- |
- |
- |
- |
- |
- |
- 133 |
|||||||||||||
Print Head Removal |
- |
- |
- |
- |
- |
- |
- |
- |
- |
- |
- |
- |
- |
- |
- |
- |
- |
- |
- |
- |
- |
- |
- |
- |
- |
- |
- |
- |
- |
- |
- 138 |
||||
Printer Component, Software Item, LCD Display, Printer Button |
Page 1. |
Pro 11880 Field Repair Guide |
|
|
|
|
|
|
|
|
|
|
|
|
|
|
|
|
|
|
|
|
|
|
|
|
|
|
|
|
|
|
|
|
|
|
|
|
|
9/27/10 |
|
|
|
|
|
|
|
|
|
|
|
|
|
|
|
|
|
|
|
|
|
|
|
|
|
|
|
|
|
|
|
|
|
||||||||
Print Head Installation |
- |
- |
- |
- |
- |
- |
- |
- |
- |
- |
- |
- |
|
- |
- |
- |
- |
- |
- |
- |
- |
- |
- |
- |
- |
- |
- |
- |
- |
- |
- 150 |
||||||||
Pulley (Paper Feed) Removal |
|
- |
- |
- |
- |
- |
- |
- |
- |
|
- |
- |
- |
- |
- |
- |
- |
- |
- |
- |
- |
- |
- |
- |
- |
- |
- |
- 162 |
|||||||||||
Sensor (Edge Detector) Removal |
- |
- |
- |
- |
- |
- |
|
- |
- |
- |
- |
- |
- |
- |
- |
- |
- |
- |
- |
- |
- |
- |
- |
- |
- 164 |
||||||||||||||
Sensor (Ink Mark) Removal |
|
- |
- |
- |
- |
- |
- |
- |
- |
- |
|
- |
- |
- |
- |
- |
- |
- |
- |
- |
- |
- |
- |
- |
- |
- |
- |
- |
- 166 |
||||||||||
Take-Up Reel Instruction |
|
- |
- |
- |
- |
- |
- |
- |
- |
- |
- |
|
- |
- |
- |
- |
- |
- |
- |
- |
- |
- |
- |
- |
- |
- |
- |
- |
- |
- 168 |
|||||||||
Troubleshooting - - - - - - - - - - - - - |
- |
- |
|
- |
- |
- |
|
- |
- |
- |
|
- |
- |
- |
|
- |
- |
- |
|
- |
- |
- |
|
177 |
|||||||||||||||
Error Codes (Maintenance) |
|
- |
- |
- |
- |
- |
- |
- |
- |
- |
|
- |
- |
- |
- |
- |
- |
- |
- |
- |
- |
- |
- |
- |
- |
- |
- |
- |
- 178 |
||||||||||
Error Codes (Service) |
- |
- |
- |
- |
- |
- |
- |
- |
- |
- |
- |
- |
|
- |
- |
- |
- |
- |
- |
- |
- |
- |
- |
- |
- |
- |
- |
- |
- |
- |
- 179 |
||||||||
Paper Sensor Error |
|
- |
- |
- |
- |
- |
- |
- |
- |
- |
- - |
- |
- |
- - |
- |
- |
- |
- |
- |
- |
- |
- |
- |
- |
- |
- |
- |
- |
- |
- 189 |
|||||||||
Borderless Printing Errors |
- |
- |
- |
- - |
- |
- - |
- |
- |
- - |
- |
- |
- |
- |
- |
- |
- |
- |
- |
- |
- |
- |
- |
- |
- |
- 190 |
||||||||||||||
Color Shift |
- |
- |
- |
- |
- |
- |
- |
- |
- |
- |
- |
- |
- |
- |
- |
- |
- |
- |
|
- |
- |
- |
- |
- |
- |
- |
- |
- |
- |
- |
- |
- |
- |
- |
- |
- |
- 191 |
||
Drop of Ink - - - - - - |
- |
- |
- |
- |
- |
- |
- |
- |
- |
- |
- |
- |
|
- |
- |
- |
- |
- |
- |
- |
- |
- |
- |
- |
- |
- |
- |
- |
- |
- |
- 192 |
||||||||
Grainy or Ghosting |
|
- |
- |
- |
- |
- |
- |
- |
- |
- |
- |
- |
- |
- |
|
- |
- |
- |
- |
- |
- |
- |
- |
- |
- |
- |
- |
- |
- |
- |
- |
- |
- 193 |
||||||
Horizontal Banding |
|
- |
- |
- |
- |
- |
- |
- |
- |
- |
- - |
- |
- |
- - |
- |
- |
- |
- |
- |
- |
- |
- |
- |
- |
- |
- |
- |
- |
- |
- 194 |
|||||||||
INK CARTRIDGE ERROR: REPLACE INK CARTRIDGE |
- - |
- - - |
- - |
- - - |
- - - 196 |
||||||||||||||||||||||||||||||||||
No Control Panel Display |
|
- |
- |
- |
- |
- |
- |
- |
- |
- |
- |
|
- |
- |
- |
- |
- |
- |
- |
- |
- |
- |
- |
- |
- |
- |
- |
- |
- |
- 201 |
|||||||||
Paper Jam Error |
- |
- |
- |
- |
- |
- |
- |
- |
- |
- |
- |
- |
- |
- |
- |
|
- |
- |
- |
- |
- |
- |
- |
- |
- |
- |
- |
- |
- |
- |
- |
- |
- |
- 202 |
|||||
Random Nozzle Firing |
- |
- |
- |
- |
- |
- |
- |
- |
- |
- |
- |
- |
|
- |
- |
- |
- |
- |
- |
- |
- |
- |
- |
- |
- |
- |
- |
- |
- |
- |
- 203 |
||||||||
RIP / Ethernet Issue |
- |
- |
- |
- |
- |
- |
- |
- |
- |
- |
- |
- |
- |
|
- |
- |
- |
- |
- |
- |
- |
- |
- |
- |
- |
- |
- |
- |
- |
- |
- |
- 204 |
|||||||
Scratch - - - - - - - - |
- |
- |
- |
- |
- |
- |
- |
- |
- |
- |
- |
- |
|
- |
- |
- |
- |
- |
- |
- |
- |
- |
- |
- |
- |
- |
- |
- |
- |
- |
- 205 |
||||||||
Smudge |
- |
- |
- |
- |
- |
- |
- |
- |
- |
- |
- |
- |
- |
- |
- |
- |
- |
- |
- |
|
- |
- |
- |
- |
- |
- |
- |
- |
- |
- |
- |
- |
- |
- |
- |
- |
- |
- 206 |
|
Smear |
- |
- |
- |
- |
- |
- |
- |
- |
- |
- |
- |
- |
- |
- |
- |
- |
- |
- |
- |
- |
|
- |
- |
- |
- |
- |
- |
- |
- |
- |
- |
- |
- |
- |
- |
- |
- |
- |
- 207 |
Stuck In Cut Sheet Mode |
|
- |
- |
- |
- |
- |
- |
- - |
- |
- |
- - |
- |
- |
- |
- |
- |
- |
- |
- |
- |
- |
- |
- |
- |
- |
- |
- 208 |
||||||||||||
Vertical Banding - - - |
- |
- |
- |
- |
- |
- - |
- |
- - |
- |
- |
- - |
- |
- |
- |
- |
- |
- |
- |
- |
- |
- |
- |
- |
- |
- |
- |
- 209 |
||||||||||||
Adjustments - - - |
- |
- |
- |
- |
|
- |
- |
- |
- |
- |
- |
|
- |
- |
- |
|
- |
- |
- |
|
- |
- |
- |
|
- |
- |
- |
|
- |
- |
- |
|
- |
- |
- |
|
210 |
||
1800 Error |
- |
- |
- |
- |
- |
- |
- |
- |
- |
- |
- |
- |
- |
- |
- |
- |
- |
- |
|
- |
- |
- |
- |
- |
- |
- |
- |
- |
- |
- |
- |
- |
- |
- |
- |
- |
- 211 |
||
Printer Component, Software Item, LCD Display, Printer Button |
Page 2. |
Pro 11880 Field Repair Guide |
|
|
|
|
|
|
|
|
|
|
|
|
|
|
|
|
|
|
|
|
|
|
|
|
|
|
|
|
|
|
|
9/27/10 |
|
|
|
|
|
|
|
|
|
|
|
|
|
|
|
|
|
|
|
|
|
|
|
|
|
|
|
|
|
|
|
||
AID - - - - - - - - - - |
- |
- |
- |
- |
- |
- |
- |
- |
- |
- |
- |
- |
- |
- |
- |
- |
- |
- |
- |
- |
- |
- |
- |
- |
- |
- |
- |
- |
- |
- 212 |
||
AID PG Adjustment |
- |
- |
- |
- |
- |
- |
- |
- |
- |
- |
- |
- |
- |
- |
- |
- |
- |
- |
- |
- |
- |
- |
- |
- |
- |
- |
- |
- |
- |
- |
- 213 |
|
Auto Bi-D Adjustment |
- |
- |
- |
- |
- |
- |
- |
- |
- |
- |
- |
- |
- |
- |
- |
- |
- |
- |
- |
- |
- |
- |
- |
- |
- |
- |
- |
- |
- |
- 216 |
||
Auto Uni-D Adjustment |
|
- |
- |
- |
- |
- |
- |
- |
- |
- |
- |
- |
- |
- |
- |
- |
- |
- |
- |
- |
- |
- |
- |
- |
- |
- |
- |
- |
- |
- 217 |
||
Carriage Timing Belt Tension Adjustment |
- |
- |
- |
- |
- |
- |
- |
- |
- |
- |
- |
- |
- |
- |
- |
- |
- |
- |
- |
- 218 |
||||||||||||
Check Network Communication |
- |
- |
- |
- |
- |
- - |
- |
- |
- - |
- |
- |
- |
- |
- |
- |
- |
- |
- |
- |
- |
- |
- |
- 223 |
|||||||||
Check Nozzle |
- - - |
- |
- |
- |
- |
- |
- |
- |
- |
- |
- |
- |
- |
- |
- |
- |
- |
- |
- |
- |
- |
- |
- |
- |
- |
- |
- |
- |
- |
- |
- |
- 225 |
Cleaning - - - - - - - - - - |
- - |
- |
- |
- |
- |
- |
- |
- |
- |
- |
- |
- |
- |
- |
- |
- |
- |
- |
- |
- |
- |
- |
- |
- |
- |
- 226 |
||||||
Clear Counter [when replacing AID] - |
- |
- |
- |
- |
- |
- |
- |
- |
- |
- |
- |
- |
- |
- |
- |
- |
- |
- |
- |
- |
- |
- 227 |
||||||||||
Clear Counter [when replacing Carriage Unit] - |
- |
- |
- |
- |
- |
- |
- |
- |
- |
- |
- |
- |
- |
- |
- |
- |
- 228 |
|||||||||||||||
Clear Counter [when replacing Carriagde Holder (Ink Pad)] |
|
- |
- |
- |
- |
- |
- |
- |
- |
- |
- 229 |
|||||||||||||||||||||
Clear Counter [when replacing Cutter Solenoid] |
|
- |
- |
- |
- |
- |
- |
- - - |
- - |
- |
- - |
- - 230 |
||||||||||||||||||||
Clear Counter [when replacing INK SYSTEM ASSY] |
|
- - - |
- - - - |
- - |
- - - |
- - 231 |
||||||||||||||||||||||||||
Clear Counter [when replacing PF Motor] |
- |
- |
- |
- |
- |
- |
- |
- |
- |
- |
- |
- |
- |
- |
- |
- |
- |
- |
- |
- 232 |
||||||||||||
Clear Counter [when replacing Pump Motor] |
- |
- |
- |
- |
- |
- |
- |
- |
- |
- |
- |
- |
- |
- |
- |
- |
- |
- 233 |
||||||||||||||
Clear Counter [when replacing Pressure Motor] |
|
- |
- |
- |
- |
- |
- |
- |
- |
- |
- |
- |
- |
- |
- |
- |
- 234 |
|||||||||||||||
Clear Counter [when replacing Printhead] |
|
- |
- |
- |
- |
- |
- |
- |
- |
- |
- |
- |
- |
- |
- |
- |
- |
- |
- |
- 235 |
||||||||||||
Clear Counter [when replacing switching PG] - |
- |
- |
- |
- |
- |
- |
- |
- |
- |
- |
- |
- |
- |
- |
- |
- |
- 236 |
|||||||||||||||
CR Encoder Sensor Position Adjustment |
- |
- |
- |
- |
- |
- |
- |
- |
- |
- |
- |
- |
- |
- |
- |
- |
- |
- |
- |
- 237 |
||||||||||||
CR Lock UnLock/lock |
- |
- |
- |
- |
- |
- |
- |
- |
- |
- |
- |
- |
- |
- |
- |
- |
- |
- |
- |
- |
- |
- |
- |
- |
- |
- |
- |
- |
- |
- 238 |
||
Cutter Blade Position Adjustment - |
- |
- |
- |
- |
- |
- |
- |
- |
- |
- |
- |
- |
- |
- |
- |
- |
- |
- |
- |
- |
- |
- |
- 239 |
|||||||||
Fan Adjustment (CR) |
|
- |
- |
- |
- |
- |
- |
- |
- |
- |
- |
- |
- |
- |
- |
- |
- |
- |
- |
- |
- |
- |
- |
- |
- |
- |
- |
- |
- |
- |
- 242 |
|
Feed Adj. +T&B Adjustment |
- |
- |
- |
- |
- |
- |
- |
- |
- |
- |
- |
- |
- |
- |
- |
- |
- |
- |
- |
- |
- |
- |
- |
- |
- |
- |
- 243 |
|||||
Head Rank ID |
- - - |
- |
- |
- |
- |
- |
- |
- |
- |
- |
- |
- |
- |
- |
- |
- |
- |
- |
- |
- |
- |
- |
- |
- |
- |
- |
- |
- |
- |
- |
- |
- 245 |
Initial Ink Charge Flag On/Off |
- |
- |
- |
- |
- |
- |
- |
- |
- |
- |
- |
- |
- |
- |
- |
- |
- |
- |
- |
- |
- |
- |
- |
- |
- |
- 247 |
||||||
Input Serial Number |
- |
- |
- |
- |
- |
- |
- |
- |
- |
- |
- |
- |
- |
- |
- |
- |
- |
- |
- |
- |
- |
- |
- |
- |
- |
- |
- |
- |
- |
- |
- 248 |
|
Printer Component, Software Item, LCD Display, Printer Button |
Page 3. |
Pro 11880 Field Repair Guide |
|
|
|
|
|
|
|
|
|
|
|
|
|
|
|
|
|
|
|
|
|
|
|
|
|
|
|
|
|
|
|
|
9/27/10 |
|
|
|
|
|
|
|
|
|
|
|
|
|
|
|
|
|
|
|
|
|
|
|
|
|
|
|
|
|
|
|
|
||
IM Sensor Adjustment |
- |
- |
- |
- |
- |
- |
- |
- |
- |
- |
|
- |
- |
- |
- |
- |
- |
- |
- |
- |
- |
- |
- |
- |
- |
- |
- |
- |
- |
- |
- 249 |
||
IM (Ink Mark) Sensor Position Adjustment |
|
- |
- |
- |
- |
- |
- |
- |
- |
- |
- |
- |
- |
- |
- |
- |
- |
- |
- |
- 250 |
|||||||||||||
Paper Feed Belt Adjustment - |
- |
- |
- |
- |
- |
- |
|
- |
- |
- |
- |
- |
- |
- |
- |
- |
- |
- |
- |
- |
- |
- |
- |
- |
- |
- |
- 253 |
||||||
Paper Feed Encoder Alignment |
- |
- |
- |
- |
- |
|
- |
- |
- |
- |
- |
- |
- |
- |
- |
- |
- |
- |
- |
- |
- |
- |
- |
- |
- |
- 256 |
|||||||
Paper Thickness Sensor Adjustment |
- |
- |
|
- |
- |
- |
- |
- |
- |
- |
- |
- |
- |
- |
- |
- |
- |
- |
- |
- |
- |
- |
- 258 |
||||||||||
PG Adjustment - - - - - |
- - |
- - |
- - - |
- |
- |
|
- |
- |
- |
- |
- |
- |
- |
- |
- |
- |
- |
- |
- |
- |
- |
- |
- |
- |
- |
- 261 |
|||||||
Platen Position Adjustment |
- |
- |
- |
- |
- |
- |
- |
|
- |
- |
- |
- |
- |
- |
- |
- |
- |
- |
- |
- |
- |
- |
- |
- |
- |
- |
- |
- 265 |
|||||
Print Head Slant Adjustment (CR) |
- |
- |
- |
- |
|
- |
- |
- |
- |
- |
- |
- |
- |
- |
- |
- |
- |
- |
- |
- |
- |
- |
- |
- |
- 266 |
||||||||
Print Head Slant Adjustment (PF) |
- |
- |
- |
- |
|
- |
- |
- |
- |
- |
- |
- |
- |
- |
- |
- |
- |
- |
- |
- |
- |
- |
- |
- |
- 269 |
||||||||
RearAD Sensor Calibration |
|
- |
- |
- |
- |
- |
- |
- |
|
- |
- |
- |
- |
- |
- |
- |
- |
- |
- |
- |
- |
- |
- |
- |
- |
- |
- |
- |
- 273 |
||||
Rear Sensor Position Adjustment |
- |
- |
- |
- |
|
- |
- |
- |
- |
- |
- |
- |
- |
- |
- |
- |
- |
- |
- |
- |
- |
- |
- |
- |
- 274 |
||||||||
RTC & USBID Adjustment |
- |
- |
- |
- |
- |
- |
- |
- |
|
- |
- |
- |
- |
- |
- |
- |
- |
- |
- |
- |
- |
- |
- |
- |
- |
- |
- |
- |
- 276 |
||||
Skew Check |
- - - - |
- |
- |
- |
- |
- |
- |
- |
- |
- |
- |
- |
|
- |
- |
- |
- |
- |
- |
- |
- |
- |
- |
- |
- |
- |
- |
- |
- |
- |
- |
- |
- 278 |
Supersonic Cleaning |
- |
- |
- |
- |
- |
- |
- |
- |
- |
- |
- |
|
- |
- |
- |
- |
- |
- |
- |
- |
- |
- |
- |
- |
- |
- |
- |
- |
- |
- |
- |
- 279 |
|
Component Pictures - - |
- - - |
|
- |
- |
- |
|
- |
- |
- |
|
- |
|
- |
- |
|
- |
- |
- |
|
- |
- |
- |
|
- |
- |
- |
|
- |
- |
- |
|
280 |
|
Board (EDM) Picture |
- |
- |
- |
- |
- - |
- - - |
- |
- |
- |
- |
- |
- |
- |
- |
- |
- |
- |
- |
- |
- |
- |
- |
- |
- |
- |
- |
- |
- 281 |
|||||
Board (Carriage) Picture |
- |
- |
- |
- |
- - - |
- |
- |
- |
- |
- |
- |
- |
- |
- |
- |
- |
- |
- |
- |
- |
- |
- |
- |
- |
- |
- |
- 282 |
||||||
Board (Sub-B) Picture |
- |
- |
- |
- |
- |
- |
- |
- |
- |
- |
|
- |
- |
- |
- |
- |
- |
- |
- |
- |
- |
- |
- |
- |
- |
- |
- |
- |
- |
- |
- 283 |
||
Board (Sub-C) Picture |
- |
- |
- |
- |
- |
- |
- |
- |
- |
- |
|
- |
- |
- |
- |
- |
- |
- |
- |
- |
- |
- |
- |
- |
- |
- |
- |
- |
- |
- |
- 284 |
||
Board (Sub-D) Picture |
- |
- |
- |
- |
- |
- |
- |
- |
- |
- |
|
- |
- |
- |
- |
- |
- |
- |
- |
- |
- |
- |
- |
- |
- |
- |
- |
- |
- |
- |
- 285 |
||
Board (Main)Picture |
- |
- |
- |
- |
- |
- |
- |
- |
- |
- |
- |
|
- |
- |
- |
- |
- |
- |
- |
- |
- |
- |
- |
- |
- |
- |
- |
- |
- |
- |
- |
- 286 |
|
Board (Power Supply) Picture |
- |
- |
- |
- |
- |
- |
|
- |
- |
- |
- |
- |
- |
- |
- |
- |
- |
- |
- |
- |
- |
- |
- |
- |
- |
- |
- 287 |
||||||
Cleaning Unit |
- - - |
- |
- |
- |
- |
- |
- |
- |
- |
- |
- |
- |
|
- |
- |
- |
- |
- |
- |
- |
- |
- |
- |
- |
- |
- |
- |
- |
- |
- |
- |
- |
- 288 |
Control Panel Picture |
|
- |
- |
- |
- |
- |
- |
- |
- |
- |
- |
|
- |
- |
- |
- |
- |
- |
- |
- |
- |
- |
- |
- |
- |
- |
- |
- |
- |
- |
- |
- 294 |
|
CSIC Contact Assembly Pictures |
- |
- |
- |
- |
|
- |
- |
- |
- |
- |
- |
- |
- |
- |
- |
- |
- |
- |
- |
- |
- |
- |
- |
- |
- 295 |
||||||||
Cutter Blade Assembly Picture |
|
- |
- |
- |
- |
- |
|
- |
- |
- |
- |
- |
- |
- |
- |
- |
- |
- |
- |
- |
- |
- |
- |
- |
- |
- |
- 296 |
||||||
Printer Component, Software Item, LCD Display, Printer Button |
Page 4. |
Pro 11880 Field Repair Guide |
|
|
|
|
|
|
|
|
|
|
|
|
|
|
|
|
|
|
|
|
|
|
|
|
|
|
|
|
|
|
|
9/27/10 |
|
|
|
|
|
|
|
|
|
|
|
|
|
|
|
|
|
|
|
|
|
|
|
|
|
|
|
|
|||||
Encoder (Carriage) Pictures |
- |
- |
- |
- |
- |
- |
- |
- |
- |
- |
- |
- |
- |
- |
- |
- |
- |
- |
- |
- |
- |
- |
- |
- |
- |
- |
- 297 |
|||||
Encoder Disk (Paper Feed) Picture |
|
- |
- |
- |
- |
- |
- |
- |
- |
- |
- |
- |
- |
- |
- |
- |
- |
- |
- |
- |
- |
- |
- |
- 298 |
||||||||
Ink Cartridge Pictures |
- |
- |
- |
- |
- |
- |
- |
- |
- |
- |
- |
- |
- |
- |
- |
- |
- |
- |
- |
- |
- |
- |
- |
- |
- |
- |
- |
- |
- |
- 299 |
||
Pressure Pump Assembly Pictures |
- |
- |
- |
- |
- |
- |
- |
- |
- |
- |
- |
- |
- |
- |
- |
- |
- |
- |
- |
- |
- |
- |
- 301 |
|||||||||
Print Head Pictures |
- |
- |
- |
- |
- |
- |
- |
- |
- |
- |
- |
- |
- |
- |
- |
- |
- |
- |
- |
- |
- |
- |
- |
- |
- |
- |
- |
- |
- |
- |
- 306 |
|
Pulley (Paper Feed) Picture |
- |
- |
- |
- |
- |
- |
- |
- |
- |
- |
- |
- |
- |
- |
- |
- |
- |
- |
- |
- |
- |
- |
- |
- |
- |
- |
- 308 |
|||||
Sensor (Edge Detector) Pictures |
- |
- |
- |
- |
- |
- |
- |
- |
- |
- |
- |
- |
- |
- |
- |
- |
- |
- |
- |
- |
- |
- |
- |
- 309 |
||||||||
Reference - - - - - - - |
- - - |
- |
|
- |
- |
- |
|
- |
- |
- |
|
- |
- |
- |
|
- |
- |
- |
|
- |
- |
- |
|
- |
- |
- |
|
- |
- |
- |
|
310 |
Accessories List - - - - - - |
- |
- |
- |
- |
- |
- |
- |
- |
- |
- |
- |
- |
- |
- |
- |
- |
- |
- |
- |
- |
- |
- |
- |
- |
- |
- |
- 311 |
|||||
Carriage Release (Automatic) |
- |
- |
- |
- |
- |
- |
- |
- |
- |
- |
- |
- |
- |
- |
- |
- |
- |
- |
- |
- |
- |
- |
- |
- |
- |
- 312 |
||||||
Carriage Release (Manual) - |
- |
- |
- |
- |
- |
- |
- |
- |
- |
- |
- |
- |
- |
- |
- |
- |
- |
- |
- |
- |
- |
- |
- |
- |
- |
- |
- 317 |
|||||
Cleaning and Draining Cartridges |
- |
- |
- |
- |
- |
- |
- |
- |
- |
- |
- |
- |
- |
- |
- |
- |
- |
- |
- |
- |
- |
- |
- |
- 322 |
||||||||
Color Order |
- - - - |
- |
- |
- |
- |
- - |
- |
- |
- |
- |
- |
- |
- |
- |
- |
- |
- |
- |
- |
- |
- |
- |
- |
- |
- |
- |
- |
- |
- |
- |
- 323 |
|
Connectors / Wiring |
- |
- |
- |
- |
- |
- |
- |
- |
- |
- |
- |
- |
- |
- |
- |
- |
- |
- |
- |
- |
- |
- |
- |
- |
- |
- |
- |
- |
- |
- |
- 325 |
|
Consumable/Service Parts List |
|
- |
- |
- |
- |
- |
- |
- |
- |
- |
- |
- |
- |
- |
- |
- |
- |
- |
- |
- |
- |
- |
- |
- |
- |
- 330 |
||||||
Cover Sensor (Front) Bypass Procedure |
- |
- |
- |
- |
- |
- |
- |
- |
- |
- |
- |
- |
- |
- |
- |
- |
- |
- |
- |
- 332 |
||||||||||||
Cover Sensor (Ink) Bypass Procedure |
|
- |
- |
- |
- |
- |
- |
- |
- |
- |
- |
- |
- |
- |
- |
- |
- |
- |
- |
- |
- |
- 333 |
||||||||||
Firmware History (Printer) |
- |
- |
- |
- |
- |
- |
- |
- |
- |
- |
- |
- |
- |
- |
- |
- |
- |
- |
- |
- |
- |
- |
- |
- |
- |
- |
- |
- 334 |
||||
Firmware History (Ethernet) |
- |
- |
- |
- |
- |
- |
- |
- |
- |
- |
- |
- |
- |
- |
- |
- |
- |
- |
- |
- |
- |
- |
- |
- |
- |
- |
- 337 |
|||||
Firmware Update Procedure Using FWUpdate.exe |
- |
- |
- |
- |
- |
- |
- |
- |
- |
- |
- |
- |
- |
- |
- 338 |
|||||||||||||||||
Glossary - - - - - - - - - - |
- |
- |
- |
- |
- |
- |
- |
- |
- |
- |
- |
- |
- |
- |
- |
- |
- |
- |
- |
- |
- |
- |
- |
- |
- |
- |
- 339 |
|||||
Ink Draining Procedure |
|
- |
- |
- |
- |
- |
- |
- |
- |
- |
- |
- |
- |
- |
- |
- |
- |
- |
- |
- |
- |
- |
- |
- |
- |
- |
- |
- |
- |
- 345 |
||
Prime, On or Off - - |
- |
- |
- |
- |
- |
- |
- |
- |
- |
- |
- |
- |
- |
- |
- |
- |
- |
- |
- |
- |
- |
- |
- |
- |
- |
- |
- |
- |
- |
- |
- 347 |
|
Revision History - - - - - - |
- |
- |
- |
- |
- |
- |
- |
- |
- |
- |
- |
- |
- |
- |
- |
- |
- |
- |
- |
- |
- |
- |
- |
- |
- |
- |
- 348 |
|||||
Sensors, Motors, Solenoids, and Fans |
|
- |
- |
- |
- |
- |
- |
- |
- |
- |
- |
- |
- |
- |
- |
- |
- |
- |
- |
- |
- |
- 352 |
||||||||||
Service Tools |
- - - |
- |
- |
- |
- |
- |
- |
- |
- |
- |
- |
- |
- |
- |
- |
- |
- |
- |
- |
- |
- |
- |
- |
- |
- |
- |
- |
- |
- |
- |
- |
- 355 |
Printer Component, Software Item, LCD Display, Printer Button |
Page 5. |
Pro 11880 Field Repair Guide |
|
|
|
|
|
|
|
|
|
|
|
|
|
|
|
|
|
|
|
|
|
|
|
|
|
|
|
|
|
|
|
|
|
9/27/10 |
|
|
|
|
|
|
|
|
|
|
|
|
|
|
|
|
|
|
|
|
|
|
|
|
|
|
|
|
|
||||||
Stress Test (Test Image) - |
- |
- |
- |
- |
- |
- |
- |
- |
- |
- |
- |
- |
- |
- |
- |
- |
- |
- |
- |
- |
- |
- |
- |
- |
- |
- |
- |
- 356 |
||||||
Utilities - - - - - - - - - - |
|
- |
- |
- |
|
- |
- |
- |
|
- |
- |
- |
|
- |
- |
- |
|
- |
- |
- |
|
- |
- |
- |
|
- |
- |
- |
|
- |
- |
- |
|
357 |
Adjustment Wizard2 |
- |
- |
- |
- |
- |
- |
- |
- |
- |
- |
- |
- |
- |
- |
- |
- |
- |
- |
- |
- |
- |
- |
- |
- |
- |
- |
- |
- |
- |
- |
- 358 |
|||
FWUpdate.exe |
- |
- |
- - |
- |
- |
- |
- |
- |
- |
- |
- |
- |
- |
- |
- |
- |
- |
- |
- |
- |
- |
- |
- |
- |
- |
- |
- |
- |
- |
- |
- |
- |
- 362 |
|
NVRAM.EXE - |
- |
- |
- |
- |
- |
- |
- |
- |
- |
- |
- |
- |
- |
- |
- |
- |
- |
- |
- |
- |
- |
- |
- |
- |
- |
- |
- |
- |
- |
- |
- |
- |
- |
- 366 |
Printer Component, Software Item, LCD Display, Printer Button |
Page 6. |
Pro 11880 Field Repair Guide |
9/27/10 |
|
|
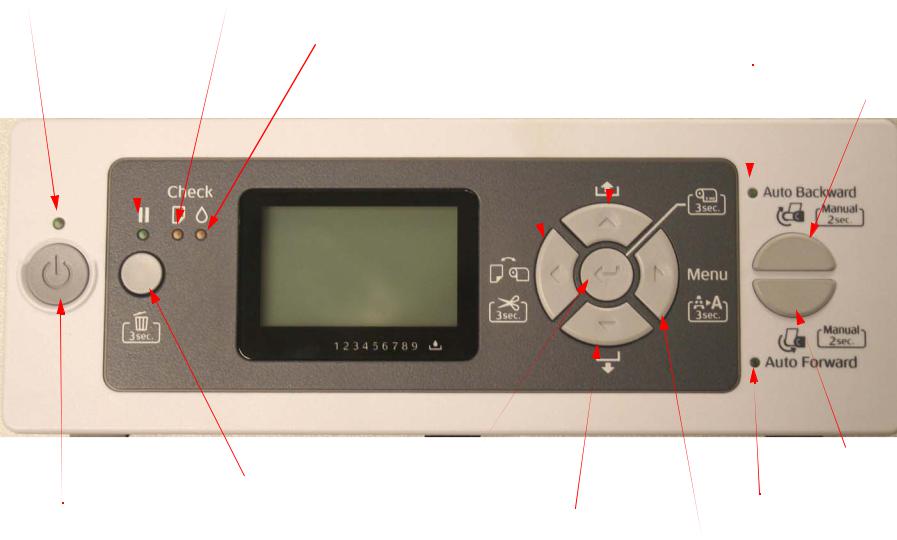
Control Panel Map
Power Light |
Paper Check Light |
Paper Source and Left Arrow |
||
Pause Light |
Ink Check Light |
Paper Feed (Reverse) and UpArrow |
||
|
||||
Auto Backward Light
Auto Backward
|
Enter |
Auto Forward |
|
|
|
||
|
Pause and Reset |
Auto Forward Light |
|
Power Button |
Paper Feed (Forward) and Down Arrow |
||
|
|||
|
Menu and Right Arrow |
||
|
|
Printer Component, Software Item, LCD Display, Printer Button |
Page 7. |
Pro 11880 Field Repair Guide |
9/27/10 |
|
|
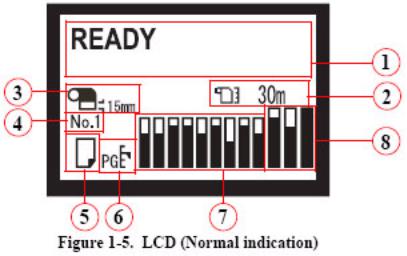
Printers LCD Display
1.Printer Status
2.Remaining Roll Paper
3.Roll Paper Margin Setting
4.Custom Paper Setting
5.Paper Type and Roll Paper Auto Cut Setting
6.Platen Gap Setting
7.Ink Levels
8.Waste Ink Cartridge Level
SERVICEMAN MODE: Down, Right, and Pause, at power on.
SELF TESTING: Down, Right, and Enter, at power on.
Parameter Backup and Restore Mode: Down, Right, and Pause, at power on.
F/W DOWNLOAD MODE: Up, Down, Left, and Right, at power on.
Maintenance Mode 1: Pause, at power on.
Printer Component, Software Item, LCD Display, Printer Button |
Page 8. |
Pro 11880 Field Repair Guide |
|
9/27/10 |
|
|
|
|
|
User Menu: Press the Menu button when |
|
|
|
the printer displays Ready |
3. MAINTENANCE |
||
1. PRINTER SETUP. |
|||
PLATEN GAP: *STANDARD, NARROW, WIDE, |
|
CUTTER ADJUSTMENT: EXEC |
|
WIDER, WIDEST |
|
CUTTER REPLACEMENT: EXEC |
|
PAGE LINE: *ON, OFF |
|
POWER CLEANING: EXECUTE |
|
ROLL PAPER MARGIN: *DEFAULT, TOP/BOTTOM |
CLEAN FOR EACH COLOR: C/VM, PK, MK/Y, LLK/LK, |
||
15mm, TOP 35/BOTTOM |
|
VLM/LC |
|
15mm,15mm, 3mm |
|
CLOCK SETTING: (mm/dd/yy hh:mm) |
|
PAPER SIZE CHK: *ON, OFF |
|
CONTRAST ADJUSTMENT: (nn) |
|
PAPER SKEW CHECK: *ON, OFF |
|
|
|
REFRESH MARGIN: *ON, OFF |
|
|
|
AUTO NOZZLE CHECK: ON:PERIODICALLY*, |
4. PRINTER STATUS. |
||
ON:EVERY JOB, OFF |
|||
PRINT NOZZLE PATTERN: OFF*, ON:EVERY PAGE, |
VERSION: (CURRENT FIRMWARE) |
||
ON EVERY 10 PAGES, |
|
PRINTABLE PAGES: (FOR EACH COLOR) |
|
INITIALIZE SETTINGS: EXEC |
|
(nnnnnn)PAGES |
|
|
|
INK LEVEL: (FOR EACH COLOR) (nnn%) |
|
|
|
MAINTENANCE TANK: LEFT (nnn%), CENTER |
|
|
|
REAR (nnn%), RIGHT (nnn%) |
|
|
|
USAGE COUNT: INK (nnnn.n)ML, PAPER (nn)ft (nn) |
|
2. TEST PRINT. |
|
inch |
|
|
CLEAR USAGE COUNT: INK:EXEC PAPER:EXEC |
||
NOZZLE CHECK: PRINT |
|
JOB HISTORY: N0.(n) INK:(n)ml, PAPER:(nnnn)cm2 |
|
STATUS SHEET: PRINT |
|
TOTAL PRINTS: (n) PAGES |
|
NETWORK STATUS SHEET: PRINT |
|
EDM STATUS: ENABLED, LAST UPLOADED (mm/ |
|
JOB INFORMATION: PRINT |
|
dd/yy hh:mm) |
|
CUSTOM PAPER: PRINT |
|
|
|
Printer Component, Software Item, LCD Display, Printer Button |
Page 9. |
Pro 11880 Field Repair Guide |
9/27/10 |
|
|
5. PAPER SETUP. |
6. Head Alignment. |
|
PAPER TYPE: Photo Paper, Proofing Paper, Fine Art |
|
PAPER THICKNESS: SELECT PAPER TYPE: |
Paper, Matte Paper, Plain Paper, Others, |
|
(Photo Paper, Proofing Paper, Fine Art Paper, |
Custom Paper, No Paper Selected |
|
Matte Paper, Plain Paper, Others SELECT |
ROLL PAPER REMAINING (This Menu is only active |
|
THICKNESS: (N)mil |
when paper is not loaded and |
ALIGNMENT: AUTO (UNI-D, BI-D 2-COLOR, |
|
the Paper Lever is closed) |
|
BI-D All, BI-D #1, BI-D #2, |
REMAINING PPR SETUP: *OFF, ON:PRINT EVERY |
BI-D #3, BI-D #3, BI-D #4) |
|
PAGE, ON: AT ROLL EXCHANGE |
|
MANUAL (UNI-D, BI-D 2- |
ROLL PAPER LENGTH: (nnn)ft (REMAINING PPR |
|
COLOR, BI-D All,) |
SETUP must be on to enable) |
|
|
ROLL LENGTH ALERT: (nn)ft (REMAINING PPR |
7. NETWORK SETUP: (*DISABLE, ENABLE) |
|
SETUP must be on to enable) |
||
CUSTOM PAPER: Paper NO. (1-10) |
|
IP ADDRESS SETTING: AUTO, PANEL, |
PAPER TYPE: Photo Paper, Proofing Paper, Fine Art |
BONJOUR: *ON, OFF |
|
Paper, Matte Paper, Plain Paper, Others |
|
INIT NETWORK SETTING: EXECUTE |
PLATEN GAP: NARROW, STANDARD, WIDE,
WIDER, WIDEST
THICKNESS PATTERN: PRINT
CUT METHOD: *STANDARD, THIN PAPER, THICK
PAPER FAST, THICK PAPER SLOW
PAPER FEED ADJUST: (n.nn)%
DRYING TIME: (n.n)sec
PAPER SUCTION: *STANDARD, -1, -2, -3, -4
Printer Component, Software Item, LCD Display, Printer Button |
Page 10. |
Pro 11880 Field Repair Guide |
9/27/10 |
|
|
Parameter Backup and Restore Mode
Release the Paper Lever, disengage 9 Ink Cartridges, remove the 3 Maintenance Tanks, hold the Down, Right, and Pause buttons and turn on the Printer. The Printer will display MENU: SELF TESTING.
Note: If the backup procedure fails, try re-booting the Printer and letting it come Ready. Then try the backup / restore procedure in READY mode.
Note: Parameter Backup can also be performed in F/W Download Mode. Parameter Restore can not.
F/W Download Mode
Hold the Up, Down, Left, and Right buttons and turn on the power. The Printer will display F/W Download.
Maintenance Mode 1: Press and hold the Pause button and turn on the Printer.
LANGUAGE: *ENGLISH, JAPANESE, FRENCH, GERMAN, ITALIAN, PORTUGUE, SPANISH, DUTCH (Panel Language)
UNIT: *FEET/INCH, METER (Set’s the unit of measure that the printer displays) CUT PRESSURE: *100% (0%-150%) (Adjusts the Paper Cutter pressure)
SS CLEANING: EXEC (Super Strong Cleaning)
PWR ON ROLL PPR FEED: *ON, OFF (On = Feeds the paper 3” lower, when auto cut is off)
(Off = Does not feed the paper 3” lower, when auto cut is off) SYLON MODE: *OFF, ON (Strobes the Ink Bay Lights while printing)
DEFAULT PANEL: EXEC (Resets to Factory Default all of the User Menus
INK INFO MENU: (FOR EACH COLOR) MANUFACTURER, COLOR, INK TYPE, INK CAPACITY, INK LEVEL, PRODUCTION DATE, EXPIRATION DATE, INK LIFE, INK AGE (CSIC information, for each ink cartridge)
Custom:*0 (0 - 9)
Printer Component, Software Item, LCD Display, Printer Button |
Page 11. |
Pro 11880 Field Repair Guide |
9/27/10 |
|
|
ServiceMan Mode: Press and hold the Down, Right, and Pause buttons, and turn on the Printer
Note: SERVICEMAN MODE turns on the USB Port even if there is an error condition.
Note: The printer must be displaying SELF TESTING in order to work properly with the Adjustment Wizard.
SELF TESTING:
Test:
Version: F/W: F(nnnnnnnn.nn.nnnn) (Displays the current firmware version) Panel: Key, LCD, LED, Ink LED(Button, LCD, and LED tests for the control panel)
Sensor: Paper Thick: 00, 01,10,11 (Paper Thickness Sensor test)
Paper Lever: Down, Up (Paper Release Sensor test) Ink Button: Off/Off Ink (Cover Release Button Test) InkCvr: Close/Close (Ink Cover Sensor Test)
Cover: Close/Close (Front Cover Sensor test) MTank: On, ON, ON(CSIC Contact Test)
INK NOT: 1,2,3,4,5,6,7,8 (Ink Cartridge Sensor test for 9 Ink Bays) RearAD: (nnn nnn) (Rear Paper Sensor test)
Auto Reel Sens.: On, Off (Auto Pick Up Reel Paper Slack Sensor Test)
Auto Reel Conect: On
Head Temp: (nn)C (Displays the current Print Head temperature in degrees centigrade) Drv. Temp: (nn)C (Displays the current Print Head Driver temperature in degrees centigrade)
AutoChk: [Enter]Start (Do Not use very dangerous) this means you Dennis Habbley
Encoder: CR (nnnn) (Carriage Encoder test. Counts up, moving away from home position) PF (nnnn) (Paper Feed Encoder test. Counts up, as the paper advances.)
Fan: Paper(ALL): (Fan test for all paper suction fans)
Paper(Duty): (200% - 0%) (Tests the fan suction for all paper suction fans) Paper1: (Fan test for paper suction fan #1 (Right Side Fan))
Paper2: (Fan test for paper suction fan #2 (Left Side Fan (Center Fan on 9800))) Paper3: (Fan test for paper suction fan #3 (Left Side Fan))
HT Fan: (Fan test for the Head Driver Cooling Fan)
Printer Component, Software Item, LCD Display, Printer Button |
Page 12. |
Pro 11880 Field Repair Guide |
9/27/10 |
|
|
Error History (list of past errors) CSIC: MTANK R/C/L
Cut Pressure: (0-100%)(approximately 55%)
Actuator2: Cutter Sol: [Enter], Start (Tests the Cutter Solenoid) InkCover Sol.: [Enter], Start (Tests the Ink Cover Solenoids) LeverLock Sol.: [Enter], Start (Tests the Lever Lock Solenoid) Ink Press Motor: [Enter], Start (Ink System Pressure Motor) Select Valve: [Enter], Start
Cap Motor: [Enter], Start (Tests the Cap Motor)
Auto Reel Motor: [Enter], Start (Tests the Auto Take Up Reel Motor) Edge Sns Lvl: [Enter], Start (Sets the black level of the Edge Detector)
Cap Uncap: UnCap, Cap
Adjustment
PG Adjust: Uncap, Cap (Sets the platen gap to standard and allows capping/uncapping of the Carriage). AID PG: [Enter]Start (Measures the distance between the Nozzle Plated and the Flushing Box)
Fan: Paper(ALL)(Runs all Suction Fans), Fan Adjust *0% (-10% to +10%) (Adjusts Suction Fans) Paper: Paper Thick 00, 01, 10, 11(Displays the output from the Paper Thickness Sensors) RearAD: [Enter]Start (nnn nnn nnn) (For adjusting the Rear Paper Sensor)
Init.Fill: [Enter]Start (Starts a initial fill)
Nozzle Check: Output Pattern: (Standard Nozzle Check)
Nozzle Alignment: Output Pattern: [Enter] Print, PG Select: 0.8mm, 1.2mm, 1.6mm, 2.1mm (Service nozzle check, displays Firmware Version)
Cutter: [Enter] Start:(Tests paper cutting)
Rear Sens.Pos: Set Cut Sheet Paper(Calibrates the EOF position for cut sheet media) InkCover Sol.: [Enter] Start (Tests in Ink Cover Solenoid)
Head Slant : CR, PF, Uncap, Cap (For adjusting Print Head rotation and camber)
IM Sensor: [Enter] Print(Adjusts sensitivity of the Edge Detector Sensor and the Ink Mark Sensor) Belleta Pos.Adj.: [Enter] Start, Belleta Pos. Confirm: [Enter], Start (Platen Position Adjustment) Check Skew: Please Set Paper (Tests for Paper Skewing)
Feed Adj.+T&B: [Enter] Print(Performs the 980mm, Top, Bottom, and Side Margin adjustments)
Printer Component, Software Item, LCD Display, Printer Button |
Page 13. |
Pro 11880 Field Repair Guide |
9/27/10 |
|
|
Gap Adj: Auto, Manual Uni-D, Manual Bi-D PG1.6, Manual Bi-D PG0.8, (Auto and Manual Bi-D/ Uni-D) AID: [Enter] Start (Tests the Auto Ink Detection system)
Print Adj. Variable1: [Enter] Print (Prints the numeric adjustment variables currently set) Print Adj. Variable2: [Enter] Print (Prints the numeric adjustment variables currently set) Clean Head: Remove Ink, Sucktion Wiping
Print Head Exchange: Drain, Head Exchange
SELF TESTING: Press and hold the Down, Right, and Enter buttons and turn on the Printer.
Test:
Version: F/W: F(nnnnnnnn.nn.nnnn) (Displays the current firmware version) Panel: Key, LCD, LED, Ink LED(Button, LCD, and LED tests for the control panel)
Sensor: Paper Thick: 00, 01,10,11 (Paper Thickness Sensor test) Paper Lever: Down, Up (Paper Release Sensor test)
Ink Button: Off/Off
InkCvr: Close/Close
Cover: Close, Open (Cover Sensor test) MTank: On, ON, ON(CSIC Contact Test)
INK NOT: 1,2,3,4,5,6,7,8,9 (Ink Cartridge Sensor test for 9 Ink Bays) RearAD: (nnn nnn) (Rear Paper Sensor test)
Auto Reel Sens.: On, Off Auto Reel Conect: On
Head Temp: (nn)C (Displays the current Print Head temperature in degrees centigrade) Drv. Temp: (nn)C (Displays the current Print Head Driver temperature in degrees centigrade)
AutoChk: [Enter]Start (Do Not use very dangerous) this means you Dennis Habbley
Encoder: CR (nnnn) (Carriage Encoder test. Counts up, moving away from home position) PF (nnnn) (Paper Feed Encoder test. Counts up, as the paper advances.)
Fan: Paper(ALL): (Fan test for all paper suction fans)
Paper(Duty): (200% - 0%) (Tests the fan suction for all paper suction fans) Paper1: (Fan test for paper suction fan #1 (Right Side Fan))
Paper2: (Fan test for paper suction fan #2 (Left Side Fan
Printer Component, Software Item, LCD Display, Printer Button |
Page 14. |
Pro 11880 Field Repair Guide |
9/27/10 |
|
|
Paper3: (Fan test for paper suction fan #3 (Left Side Fan)) HT Fan: (Fan test for the Head Driver Cooling Fan)
Error History (list of past errors) CSIC: MTANK R/C/L
Cut Adj.: (0 - 100%) (approximately 55%)
Actuator2: Cutter Sol: [Enter], Start (Tests the Cutter Solenoid) InkCover Sol.: [Enter], Start (Tests the Ink Cover Solenoids) LeverLock Sol.: [Enter], Start (Tests the Lever Lock Solenoid) Ink Press Motor: [Enter], Start (Ink System Pressure Motor) Select Valve: [Enter], Start
Cap Motor: [Enter], Start (Tests the Cap Motor)
Auto Reel Motor: [Enter], Start (Tests the Auto Take Up Reel Motor) Edge Sns Lvl: [Enter], Start (Sets the black level of the Edge Detector)
Cap Uncap: UnCap, Cap
Adjustment:
Input HeadRank: (Does not function, Japanese Bar Code Only) (QR Code)
Paper: Paper Thick 00, 01, 10, 11(Displays the output from the Paper Thickness Sensors) RearAD: [Enter]Start (nnn nnn nnn) (For adjusting the Rear Paper Sensor)
Init.Fill: [Enter]Start
Nozzle Check: Output Pattern: (Standard Nozzle Check)
Nozzle Alignment: Output Pattern: [Enter] Print, PG Select: 0.8mm, 1.2mm, 1.6mm, 2.1mm (Service nozzle check, displays Firmware Version, displays Head Rank)
Cutter: [Enter] Start:(Cut position check)
Fan: Paper(ALL)(Runs all Suction Fans), Fan Adjust *0% (-10% to +10%) (Adjusts Suction Fans) Rear Sens.Pos: Set Cut Sheet Paper(Calibrates the EOF position for cut sheet media)
InkCover Sol.: [Enter] Start PG Adjust: Uncap, Cap
Nozzle Check: Output Pattern: Cleaning:CL1, Cleaning:CL2, Cleaning:CL3(Standard Nozzle Check)
Head Slant:
AID PG: [Enter]Start
Printer Component, Software Item, LCD Display, Printer Button |
Page 15. |
Pro 11880 Field Repair Guide |
9/27/10 |
|
|
Nozzle Check: Output Pattern: Cleaning:CL1, Cleaning:CL2, Cleaning:CL3(Standard Nozzle Check) AID: [Enter] Start
IM Sensor: [Enter] Print(Adjusts sensitivity of the Edge Detector Sensor and the Ink Mark Sensor) Check Skew: Please Set Paper
Feed Adj.+T&B: [Enter] Print(Performs the 980mm, Top and Bottom Margin adjustments) Belleta Pos..: [Enter] Start, Belleta Pos.Adj Confirm: [Enter], Start
Nozzle Check: Output Pattern: Cleaning:CL1, Cleaning:CL2, Cleaning:CL3(Standard Nozzle Check) Gap Adj: Auto, Manual Uni-D, Manual Bi-D PG1.6, Manual Bi-D PG0.8, (Auto and Manual Bi-D/ Uni-D) Print Adj. Variable1: [Enter] Print (Prints the numeric adjustment variables currently set)
Print Adj. Variable1: [Enter] Print (Prints the numeric adjustment variables currently set) Clean Head: Remove Ink, Sucktion Wiping
Counter Clear: (Clears a variety of counters)(Do not use)
Cleaning:
Std. CL1 (5.3ml)
Std. CL2
Std. CL3 Parameter:
Initialize:
All: Initialize OK? (Resets all of the following counters at once) PF Resolution: Initialize OK? (Resets this counter only) Head Record: Initialize OK? (Resets this counter only) Wiping Record: Initialize OK? (Resets this counter only) Waste Record: Initialize OK? (Resets this counter only) CRmot Record: Initialize OK? (Resets this counter only) PFmot Record: Initialize OK? (Resets this counter only) Lever Record: Initialize OK? (Resets this counter only) Cover Record: Initialize OK? (Resets this counter only)
Ink Cover Record: Initialize OK? (Resets this counter only) Cutter Record: Initialize OK? (Resets this counter only)
Update: InkParameter: Init. Fill: (Set, Reset) (Reset, turns off the initial fill)
Printer Component, Software Item, LCD Display, Printer Button |
Page 16. |
Pro 11880 Field Repair Guide |
9/27/10 |
|
|
RTC: (mm/dd/yy hh:mm)
FunctionSelect: PulseMotorParam: Param0, Param1, Number of InkPress:3, 4
Display: Address: (nnnn)(Used for displaying data at specific RAM addresses)
Printer Component, Software Item, LCD Display, Printer Button |
Page 17. |
Pro 11880 Field Repair Guide |
9/27/10 |
|
|
Component
Replacement
Printer Component, Software Item, LCD Display, Printer Button |
Page 18. |
Pro 11880 Field Repair Guide |
9/27/10 |
|
|
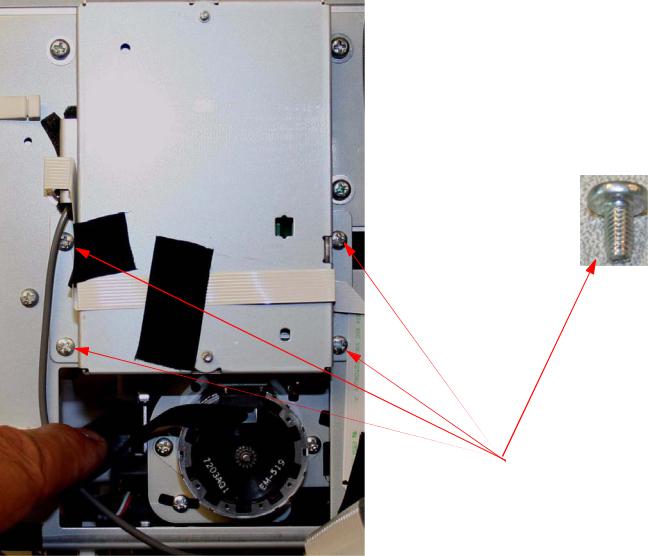
Board (AID) Removal
1.Remove the Right Side Cover.
2.Remove 4 Screws that fasten the AID Board Assembly to the top of the Cleaning Unit.
Remove
 4 Screws.
Board (AID) Removal |
Printer Component, Software Item, LCD Display, Printer Button |
Page 19. |
Pro 11880 Field Repair Guide |
9/27/10 |
|
|
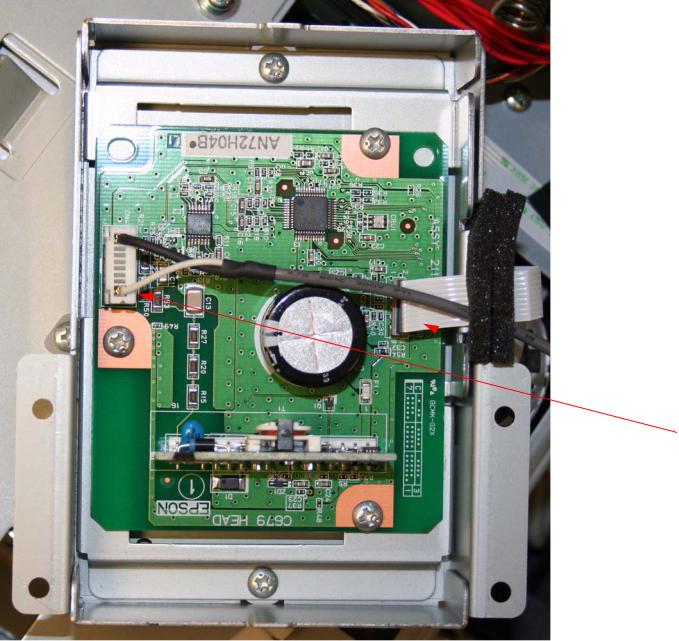
3. Turn over the AID Board Assembly, and unplug 2 Cables that connect it to the Printer.
1. Turn over the AID Board
Assembly.
2. Unplug 2 Cables.
Board (AID) Removal |
Printer Component, Software Item, LCD Display, Printer Button |
Page 20. |
Pro 11880 Field Repair Guide |
9/27/10 |
|
|
4.Remove 3 Screws that fasten the AID Board to the Case, and lift out the Board.
1.Remove 3 Screws.
the AID Board.
Board (AID) Removal |
Printer Component, Software Item, LCD Display, Printer Button |
Page 21. |
Pro 11880 Field Repair Guide |
9/27/10 |
|
|
Board (Main) Removal
Note: 11880 Main Board Part # 2113528 (the part # is stamped on the board)
Main Board Removal (Overview)
•Back up the Printer’s Parameters.
•Remove the Rear Cover.
•Unplug the Cables.
•Remove the Screws.
•Remove the Main Board.
•Remove the Ethernet Cover from the Main Board.
•Remove the EDM SIMM.
Main Board Removal (Detail)
1. Back up the Printer’s parameters using the Parameter Backup / Restore Utility (Nvram.exe)
Note: If the Printer’s parameters can not be “backed up”, print out the Print Head Calibration value (Head Rank). The Print Head Calibration value is printed on the Service Level Nozzle Check (ServiceMan Mode: Self Testing: Adjustment: Check Nozzle).
2.Turn off the Printer and UNPLUG from AC.
3.Remove the Cover (Rear).
Board (Main) Removal |
Printer Component, Software Item, LCD Display, Printer Button |
Page 22. |
Pro 11880 Field Repair Guide |
9/27/10 |
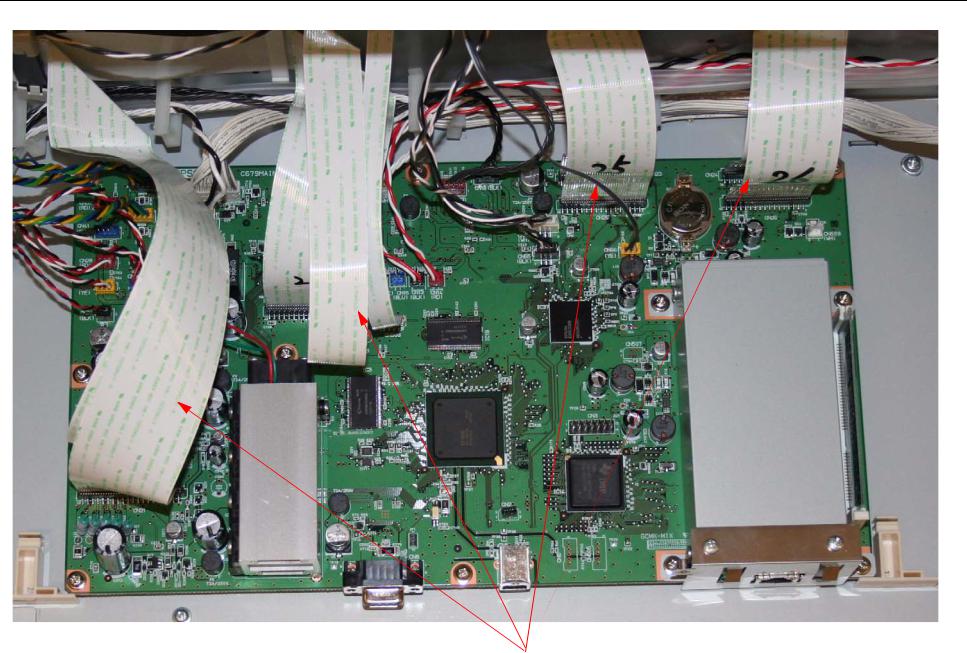
4. Unplug the 10 Foil Cables that attach the Main Board to the Printer.
Unplug 10 Foil Cables.
Board (Main) Removal |
Printer Component, Software Item, LCD Display, Printer Button |
Page 23. |
Pro 11880 Field Repair Guide |
9/27/10 |
|
|
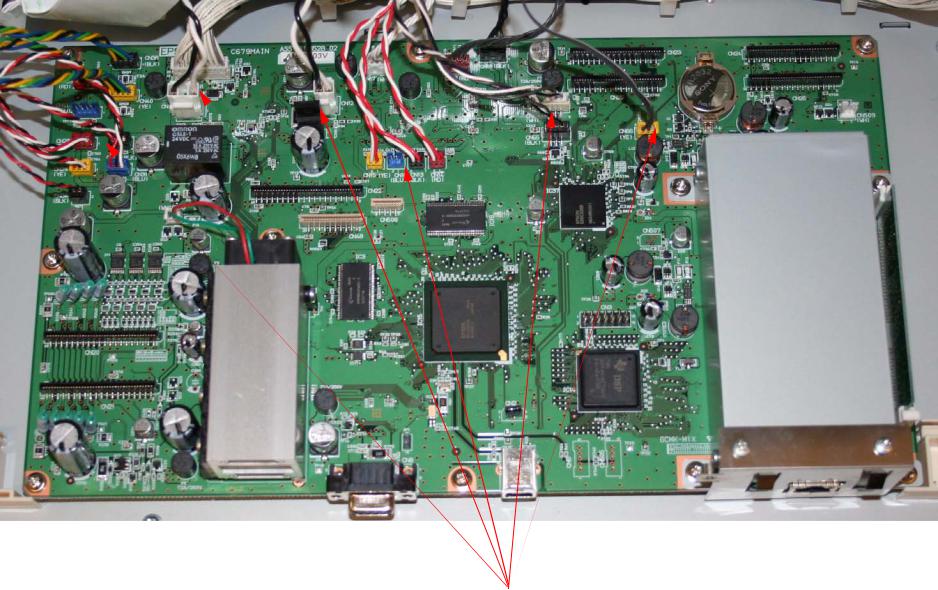
5. Unplug the 19 Wired Cables that attach the Main Board to the Printer.
Unplug 19 Wired Cables.
Board (Main) Removal |
Printer Component, Software Item, LCD Display, Printer Button |
Page 24. |

Pro 11880 Field Repair Guide |
9/27/10 |
|
|
6. Remove 11 Screws that fasten the Main Board to the Printer.
Remove 11 Screws
Board (Main) Removal |
Printer Component, Software Item, LCD Display, Printer Button |
Page 25. |

Pro 11880 Field Repair Guide |
9/27/10 |
|
|
7. Lift out the Main Board, and separate the Ethernet Cover from the Board.
1. Lift out the Main Board. |
2. Separate the Ethernet Cover from the Board. |
Board (Main) Removal |
Printer Component, Software Item, LCD Display, Printer Button |
Page 26. |
Pro 11880 Field Repair Guide |
9/27/10 |
|
|
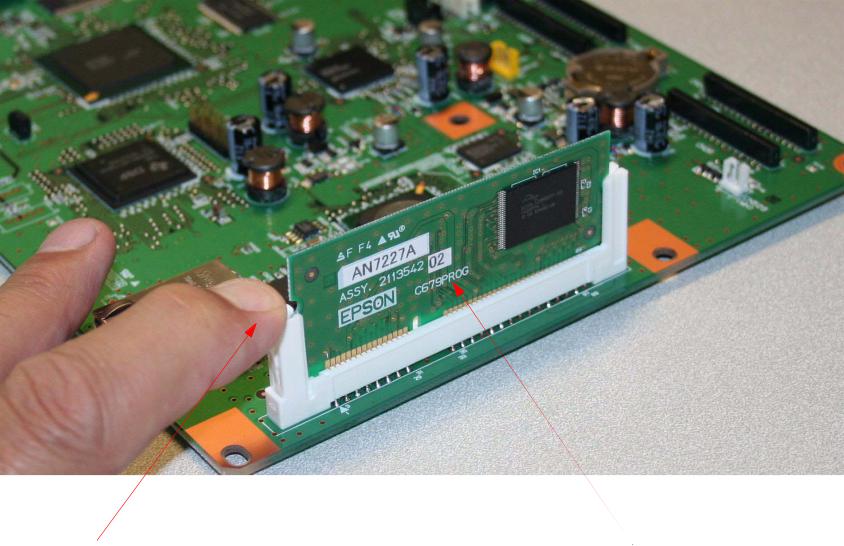
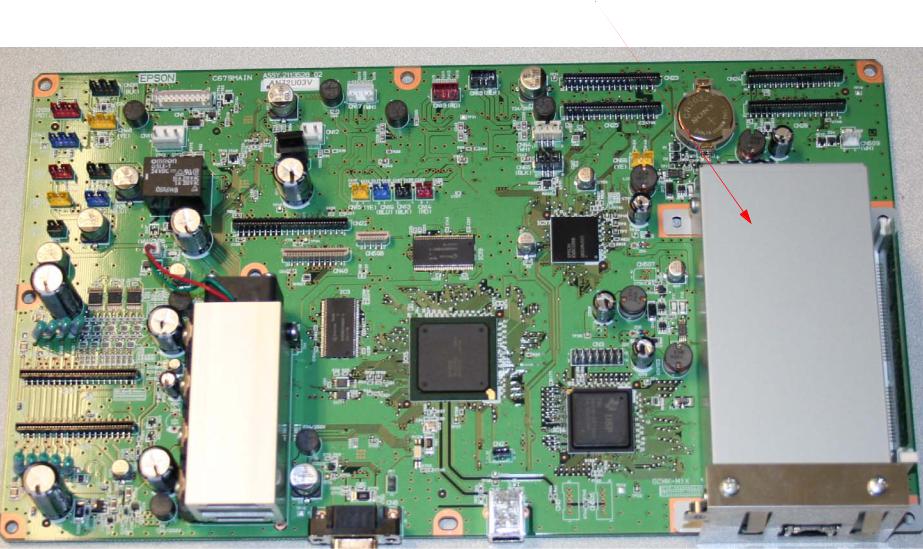
8. Remove the EDM SIMM from the Main Board.
1. Press here to release the EDM SIMM. |
2. Lift out the EDM SIMM. |
Board (Main) Removal |
Printer Component, Software Item, LCD Display, Printer Button |
Page 27. |
Pro 11880 Field Repair Guide |
9/27/10 |
|
|
Board (Main) Installation
Note: 11880 Main Board Part # 2113528 (the part # is stamped on the board)
Main Board Installation (Overview)
•Install the EDM SIMM on the New Main Board
•Install the Main Board.
•Install the Ethernet Cover onto the Main Board.
•Install the Screws.
•Plug in the Cables.
•Upload Firmware.
•Install the Printer’s Parameters.
•Perform the RTC&USBID Adjustment.
•Install the Rear Cover.
Main Board Installation (Detail)
1.Compare the New Main Board to the Old Main Board. Verify that the Components, Brackets, and Part Numbers match.
Board (Main) Installation |
Printer Component, Software Item, LCD Display, Printer Button |
Page 28. |
Pro 11880 Field Repair Guide |
9/27/10 |
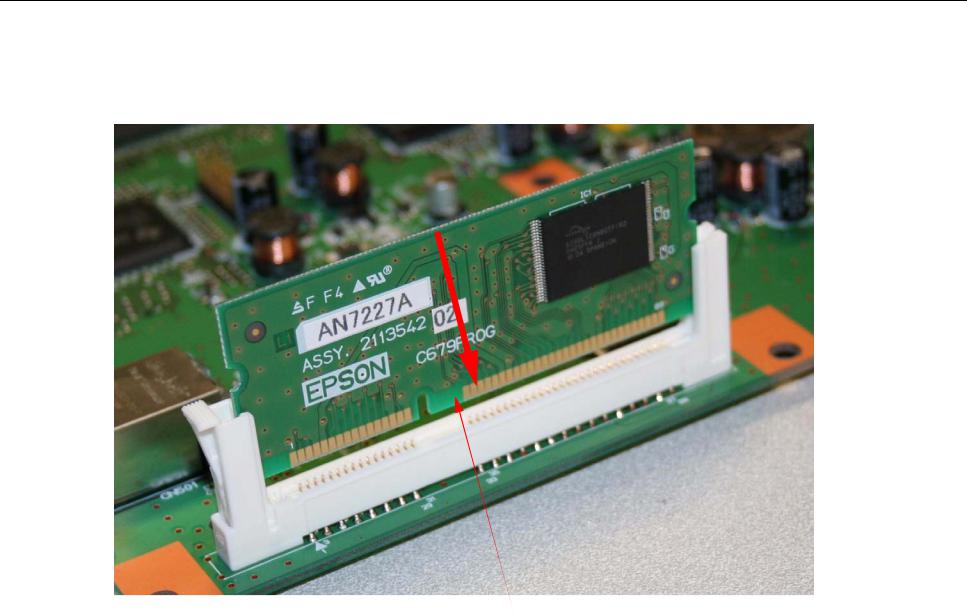
2. Install the EDM SIMM onto the Main Board.
Install the EDM SIMM.
Board (Main) Installation |
Printer Component, Software Item, LCD Display, Printer Button |
Page 29. |
Pro 11880 Field Repair Guide |
9/27/10 |
|
|
3. Install the Main Board into the Printer, and place the Ethernet Cover in position.
1. Drop in the Main Board. 2. Place the Ethernet Cover in position
Board (Main) Installation |
Printer Component, Software Item, LCD Display, Printer Button |
Page 30. |
Loading...