


 Loading...
Version 3.00 | 06/08/2016
User Manual
Mobile Wi-Fi Hotspot 21 Mbps
DWR-730

Preface
D-Link reserves the right to revise this publication and to make changes in the content hereof without obligation to notify any person or organization of such revisions or changes.
|
|
Manual Revisions |
|
|
|
Revision |
Date |
Description |
1.0 |
July 09, 2014 |
• Initial release |
|
|
|
2.0 |
July 11, 2014 |
• Change model description |
|
|
|
2.10 |
August 10, 2015 |
• Change Battery |
2.20December 24, 2015 • Added Windows 10 wireless setup guide
3.00 |
June 8, 2016 |
• Minor updates |
Trademarks
D-Link and the D-Link logo are trademarks or registered trademarks of D-Link Corporation or its subsidiaries in the United States or other countries. All other company or product names mentioned herein are trademarks or registered trademarks of their respective companies.
Copyright © 2016 by D-Link Corporation, Inc.
All rights reserved. This publication may not be reproduced, in whole or in part, without prior expressed written permission from D-Link Corporation, Inc.
D-Link DWR-730 User Manual |
i |

Table of Contents
Table of Contents
Manual Revisions........................................................................... |
i |
Trademarks....................................................................................... |
i |
Product Overview.............................................................. |
1 |
Package Contents......................................................................... |
1 |
System Requirements.................................................................. |
1 |
Introduction.................................................................................... |
2 |
Hardware Overview...................................................................... |
3 |
Front Side and Battery Cover............................................ |
3 |
OLED Display........................................................................... |
4 |
Installation.......................................................................... |
6 |
Connect to Your Network........................................................... |
6 |
Insert a microSD Card.................................................................. |
6 |
Wireless Installation Considerations...................................... |
7 |
Configuration..................................................................... |
8 |
Initial Connection to the Router.............................................. |
8 |
Connect via USB..................................................................... |
8 |
Driver Installation.................................................................. |
8 |
Connect via Wi-Fi................................................................... |
9 |
Web-Based Configuration........................................................ |
11 |
Configuration Utility........................................................... |
11 |
Home............................................................................................... |
12 |
Navigation............................................................................. |
12 |
Device Status........................................................................ |
13 |
Home....................................................................................... |
14 |
Wizard.............................................................................................. |
15 |
Internet........................................................................................... |
17 |
Connection............................................................................ |
17 |
2G/3G Modem...................................................................... |
19 |
SIM............................................................................................ |
20 |
PLMN........................................................................................ |
21 |
Network.......................................................................................... |
22 |
Wi-Fi.......................................................................................... |
22 |
DHCP........................................................................................ |
23 |
NAT........................................................................................... |
25 |
SMS................................................................................................... |
27 |
New Message........................................................................ |
27 |
Local......................................................................................... |
27 |
Wi-Fi................................................................................................. |
28 |
Basic......................................................................................... |
28 |
Wireless Security.................................................................. |
30 |
Wired Equivalent Privacy (WEP)................................ |
30 |
Wi-Fi Protected Access (WPA).................................... |
31 |
Wi-Fi Protected Setup (WPS)...................................... |
32 |
MAC Filter............................................................................... |
33 |
Station Lists........................................................................... |
34 |
Security........................................................................................... |
35 |
Firewall.................................................................................... |
35 |
IP Filter................................................................................ |
35 |
IPv6 Filter........................................................................... |
36 |
MAC Filter.......................................................................... |
37 |
D-Link DWR-730 User Manual |
ii |

Table of Contents
DDOS.................................................................................. |
38 |
URL Filter............................................................................ |
39 |
Application.................................................................................... |
40 |
About....................................................................................... |
40 |
Configuration........................................................................ |
41 |
Firmware Upgrade.............................................................. |
42 |
Standby Mode...................................................................... |
43 |
Password................................................................................ |
44 |
Date and Time...................................................................... |
45 |
Language............................................................................... |
47 |
System Log............................................................................ |
48 |
Connecting to a Wireless Network.................................. |
49 |
Using Windows 10 ..................................................................... |
49 |
Using Windows 8.1/8.0 ............................................................. |
51 |
Using Windows 7 ........................................................................ |
53 |
Configuring Wireless Security......................................... |
55 |
Using Windows Vista™............................................................... |
58 |
Configuring Wireless Security......................................... |
59 |
Using Windows® XP..................................................................... |
61 |
Configure WEP...................................................................... |
62 |
Configure WPA-PSK............................................................ |
64 |
Using Mac OS ............................................................................... |
66 |
Troubleshooting............................................................... |
68 |
Networking Basics............................................................ |
70 |
Check your IP address................................................................ |
70 |
Assign a Static IP address......................................................... |
71 |
Technical Specifications................................................... |
72 |
Regulatory Information................................................... |
73 |
D-Link DWR-730 User Manual |
iii |

Section 1 - Product Overview
Product Overview
Package Contents
D-Link DWR-730 Mobile Wi-Fi Hotspot 21 Mbps
Battery
USB Cable
If any of the above items are missing from your package, please contact your reseller.
System Requirements
•A compatible (U)SIM card with mobile data service1
•A computer a with Windows®, Macintosh® , or Linux-based operating system
•Internet Explorer 7, Firefox 12.0, Chrome 20.0 , or Safari 5.0
1 Subject to services and service terms available from your carrier.
D-Link DWR-730 User Manual |
1 |

Section 1 - Product Overview
Introduction
The D-Link DWR-730 Mobile Wi-Fi Hotspot 21 Mbps lets you share a fast mobile Internet connection with multiple PCs and mobile devices wherever you go. It offers 3G HSPA+ compatibility for fast downlink and uplink data rates, so you get mobile high-speed upload and download speeds. Set up a personal mobile network anywhere, anytime, allowing you and those around you to access the Internet and share files.
High-Speed Mobile Internet with 3G Connectivity
The DWR-730 Mobile Wi-Fi Hotspot 21 Mbps gives you high-speed access to the Internet. Using HSPA+ technology, you can achieve download speeds of up to 21.6 Mbps and upload speeds of up to 5.76 Mbps1. The built-in 3G antenna provides a reliable connection to your 3G service provider and a
separate Wi-Fi antenna gives extended coverage to the computers and mobile devices connected to the DWR-730.
Mobile Internet for All ofYour Devices
The Mobile Wi-Fi Hotspot 21 Mbps lets you share your fast mobile connection over Wi-Fi from a device small enough to fit in your pocket. With the DWR-730, you can get online with your laptop, smartphone, tablet, or any other wireless device using a single 3G mobile connection. The DWR-730 provides high-speed Wireless N coverage to give high-speed wireless access to everybody – whether you are with colleagues on a business trip or
travelling with friends and family.
Built-in Software for Instant Access Anywhere
The DWR-730 is truly plug-and-play, with drivers built right into the router so you can connect without the need to install anything. Open a browser, connect the router, and you can set up your network right from a web interface. Once the device is set up, simply power it on to start up your portable
mobile network.
Designed forTrue Portability
The DWR-730 Mobile Wi-Fi Hotspot 21 Mbps is small and slim enough to carry around in your purse, bag, or pocket. It features a microSD card slot for optional removable storage (up to 32 GB), allowing you to always have your files and contacts on hand. The built-in 2000 mAh rechargeable Li-Ion battery can provide up to six hours of mobile usage, meaning that you can share your mobile Internet connection in the car, in the park, or anywhere, and work or play longer without needing to recharge.
1 All references to speed are for comparison purposes only. Actual speeds will vary depending on a range of factors including mobile network coverage, signal strength, network activity, and environmental conditions.
D-Link DWR-730 User Manual |
2 |

Section 1 - Product Overview
Hardware Overview
Front Side and Battery Cover
1 


 5
5
2
3
|
|
|
|
|
|
|
|
|
|
|
|
|
|
|
|
4 |
|
|
||
|
|
|
|
|
|
|
1 |
Power Button |
Press and hold this button for 6 seconds to power on/off the device. |
||||
2 |
WPS Button |
Press this button to add new wireless devices quickly and easily using Wi-Fi Protected |
||||
Setup (WPS). Press and hold for more than 5 seconds to turn the wireless function on/off. |
||||||
|
|
|||||
3 |
microSD Card Slot |
Insert a microSD Card (up to 32GB) to access and share files and media wherever you go. |
||||
4 |
micro USB Connector |
Use the included cable to connect to a powered USB port to charge the device or to |
||||
|
|
access the configuration utility. |
||||
5 |
Default Network |
This label displays the DWR-730’s default network name (SSID) and network security key |
||||
Name and Password |
(Wi-Fi password). |
|||||
|
||||||
D-Link DWR-730 User Manual |
3 |
Section 1 - Product Overview
Hardware Overview
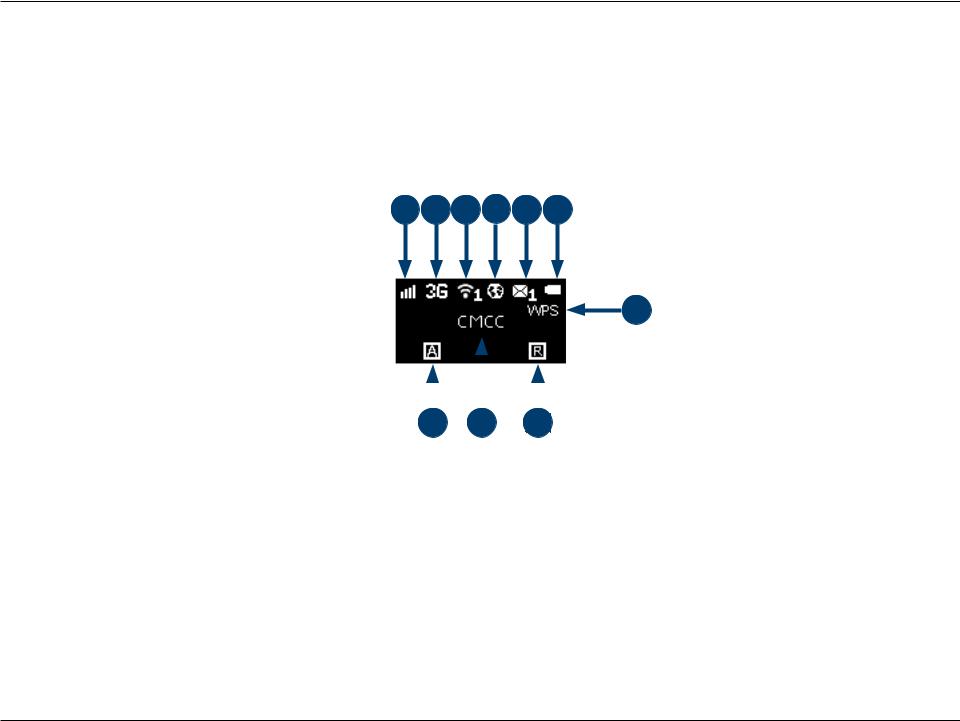
OLED Display
This OLED display shows the current status of the DWR-730’s functions including mobile network, Wi-Fi, security, Internet status, signal strength, and battery level. Please refer to the table below for the specific indications which are shown on the display.
1
 2
2
 3
3
 4
4
 5
5
 6
6
7
|
|
|
|
|
|
|
|
|
|
|
|
|
|
|
|
|
|
|
|
|
|
|
|
|
|
|
|
|
|
|
|
|
|
|
|
|||
|
|
8 |
9 |
|||||||||
|
|
|
10 |
|
||||||||
|
|
|
|
|
||||||||
Number |
Function |
Icon |
|
Indication |
||||||||
|
|
|
|
|
|
|
||||||
1 |
Network Strength |
0-5 Bars |
|
Indicates the strength of the current mobile network |
||||||||
|
connection. |
|||||||||||
|
|
|
|
|
|
|||||||
|
|
H+ |
|
Currently connected to DC-HSPA or HSPA+ mobile network. |
||||||||
|
|
H |
|
Currently connected to HSPA mobile network. |
||||||||
2 |
Network Type |
3G |
|
Currently connected to WCDMA mobile network. |
||||||||
|
|
2G |
|
Currently connected to GPRS/EDGE network. |
||||||||
|
|
No SIM |
|
No SIM card detected in device |
||||||||
D-Link DWR-730 User Manual |
4 |

Section 1 - Product Overview
3 |
Wi-Fi & Clients |
Number |
Indicates the number of clients currently connected to the |
|
device by Wi-Fi. |
||||
|
|
|
||
4 |
Internet Connection |
Internet |
If this icon is displayed, there is a connection to the Internet. |
|
Status |
|
|||
|
|
|
||
5 |
SMS |
Number |
There are unread SMS messages in the inbox. |
|
6 |
Battery Status |
Empty-Full |
Displays the current battery level. If charging, an animation will |
|
indicate charging status and current battery level. |
||||
|
|
|
||
7 |
Wi-Fi Protected Setup |
WPS |
The device is ready for WPS association with wireless clients. |
|
|
|
A |
The device is set to connect to the mobile network |
|
|
|
automatically. |
||
|
|
|
||
8 |
Connection Method |
M |
The device is set to connect to the mobile network manually. |
|
|
|
D = On Demand |
The device will connect to the preferred mobile network when |
|
|
|
Internet access is required. |
||
|
|
|
||
9 |
Operator |
Name |
The name of the mobile network operator to which device is |
|
currently connected. |
||||
|
|
|
||
10 |
Roaming |
R |
The device is currently roaming on a network other than the |
|
home network. |
||||
|
|
|
D-Link DWR-730 User Manual |
5 |

Section 2 - Installation
Installation
This section will guide you through the installation process.
Connect to Your Network
1.Ensure that your DWR-730 Mobile Wi-Fi Hotspot 21 Mbps is powered off.
2.Remove the back cover and take out the battery. Slide your (U)SIM card into the slot provided, ensuring that the alignment is the same as indicated by the logo next to the slot. The gold contacts on the card should be facing downwards.
Caution: Always unplug and turn off the router before installing or removing the SIM card. Never insert or remove the SIM card while the router is in use.
3.Press and hold the power button on the side of the router.
a.“D-Link”will be displayed on the screen as the router performs its initialization processes.
b.After a few moments, the OLED display will show the current status of the router’s various functions. For more details on the OLED display, please refer to “OLED Display” on page 4.
Insert a microSD Card
1.Ensure that your DWR-730 Mobile Wi-Fi Hotspot 21 Mbps is powered off.
2.Open the cover of the microSD slot on the side of the router.
3.Insert the microSD card into the slot and push it in until it locks into place.
D-Link DWR-730 User Manual |
6 |
Section 2 - Installation
Wireless Installation Considerations
The DWR-730 can be accessed using a wireless connection from anywhere within the operating range of its wireless network. Keep in mind that the quantity, thickness, and location of walls, ceilings, or other objects that the wireless signals must pass through may adversely affect wireless signals. Ranges vary depending on the types of materials and background RF (radio frequency) noise in your home or office. The key to maximizing the wireless range is to follow these basic guidelines:
1.Minimize the number of walls and ceilings between the router and other network devices. Each wall or ceiling can reduce your adapter’s range anywhere from 3 to 90 feet (1 to 30 meters).
2.Be aware of the direct line between network devices. A wall that is 1.5 feet thick (0.5 meters) appears to be almost 3 feet (1 meter) thick at a 45-degree angle. At a 2-degree angle it appears over 42 feet (13 meters) thick. Position devices so that the signal will travel straight through a wall or ceiling (instead of at an angle) for better reception.
3.Try to position access points, wireless routers, and computers so that the signal passes through open doorways and drywall. Materials such as glass, metal, brick, insulation, concrete, and water can affect wireless performance. Large objects such as fish tanks, mirrors, file cabinets, metal doors, and aluminum studs may also have a negative effect on range.
4.If you are using a 2.4 GHz cordless phone, make sure that the 2.4 GHz phone base is as far away from your wireless device as possible. The base transmits a signal even if the phone is not in use. In some cases, cordless phones, X-10 wireless devices, and electronic equipment such as ceiling fans, fluorescent lights, and home security systems may dramatically degrade wireless connectivity.
D-Link DWR-730 User Manual |
7 |
Section 3 - Configuration
Configuration
This section will show you how to configure your new D-Link mobile router using the configuration utility that can be accessed through a webbased user interface.
Initial Connection to the Router
When configuring the router for the first time, you will need to establish a direct connection with the router in order to access the web-based configuration utility. This can be done using the included USB cable, or by connecting wirelessly to the DWR-730. Once you have configured your router, you will be able to connect using the Wi-Fi settings that you have specified in the configuration process. Ensure that the router is powered on and has sufficient battery power before commencing the setup process.
Connect via USB
To connect to the router via USB, plug the provided micro USB cable into the micro USB port on the bottom of the router and plug the other end into an available USB port on your computer.
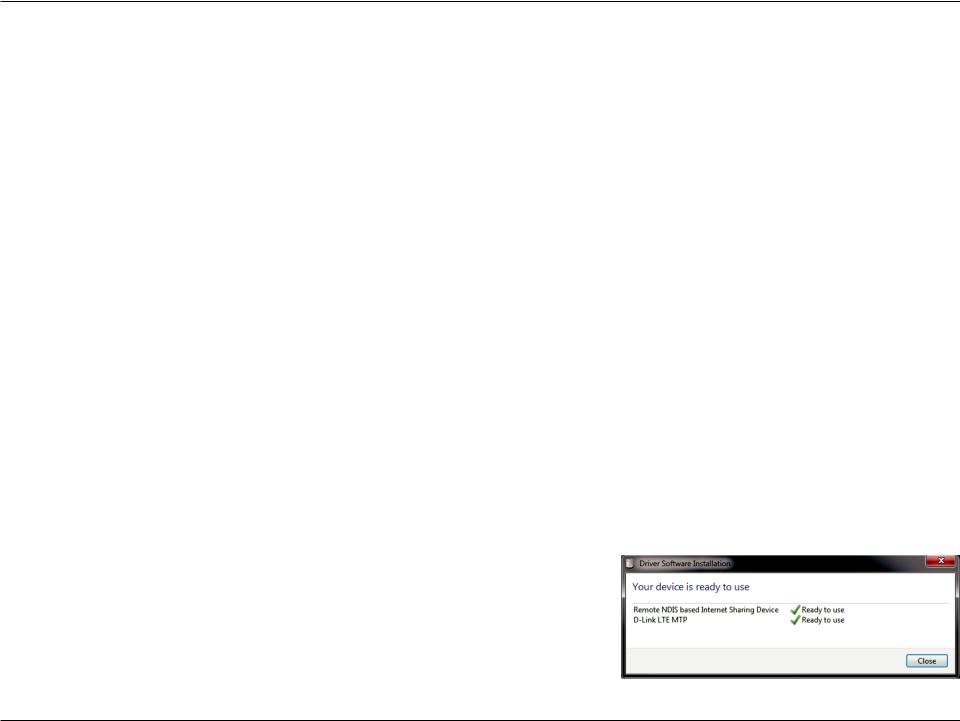
Driver Installation
When you plug the DWR-730 into your computer, any necessary drivers will immediately install (with your permission).
Note: These drivers are Windows-only. Mac and Linux users will still be able to configure the DWR-730 by connecting wirelessly and using the web configuration utility described in “Configuration Utility” on page 11.
D-Link DWR-730 User Manual |
8 |

Section 3 - Configuration
Connect via Wi-Fi
Note: The following example uses Windows 7’s built-in wireless connection utility. If you are using a different operating system or a third party connection utility, the process may be different. Please refer to “Connecting to a Wireless Network” on page 49 for further information on how to connect to a wireless network.
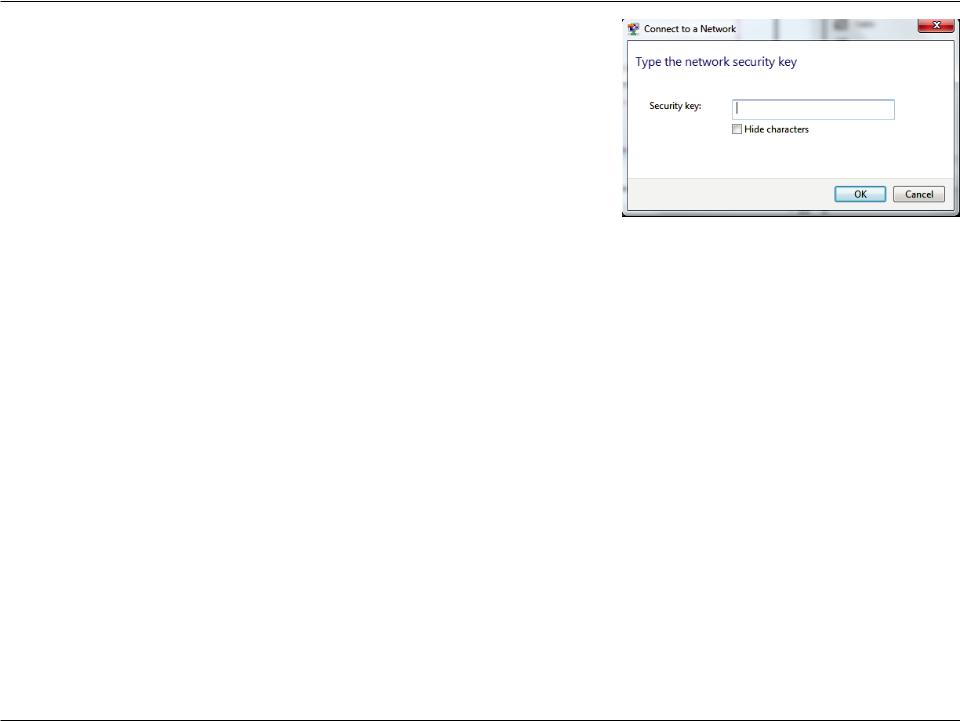
To connect to the router using Wi-Fi, open your operating system’s wireless networking utility and scan for available networks to connect to. By default, the network name (SSID) and network security key (Wi-Fi password) are printed on a label on the underside of the DWR-730’s battery cover. The DWR-730’s SSID will be in the format dlink_DWR-730xxxx, where“xxxx”represents the last four characters (or digits) of the router’s MAC address.
Once you have located this network with your wireless utility, connect to the network using your wireless networking utility.
D-Link DWR-730 User Manual |
9 |
Section 3 - Configuration
You will then be prompted to enter the network security key for your router.The unique security key for your router will be displayed on a sticker on the underside of router’s battery cover. Enter the security key in the box provided and click OK.Your wireless connection utility should confirm that the connection is successful, and you can move to the next step to continue the configuration process.
D-Link DWR-730 User Manual |
10 |
Section 3 - Configuration
Web-Based Configuration
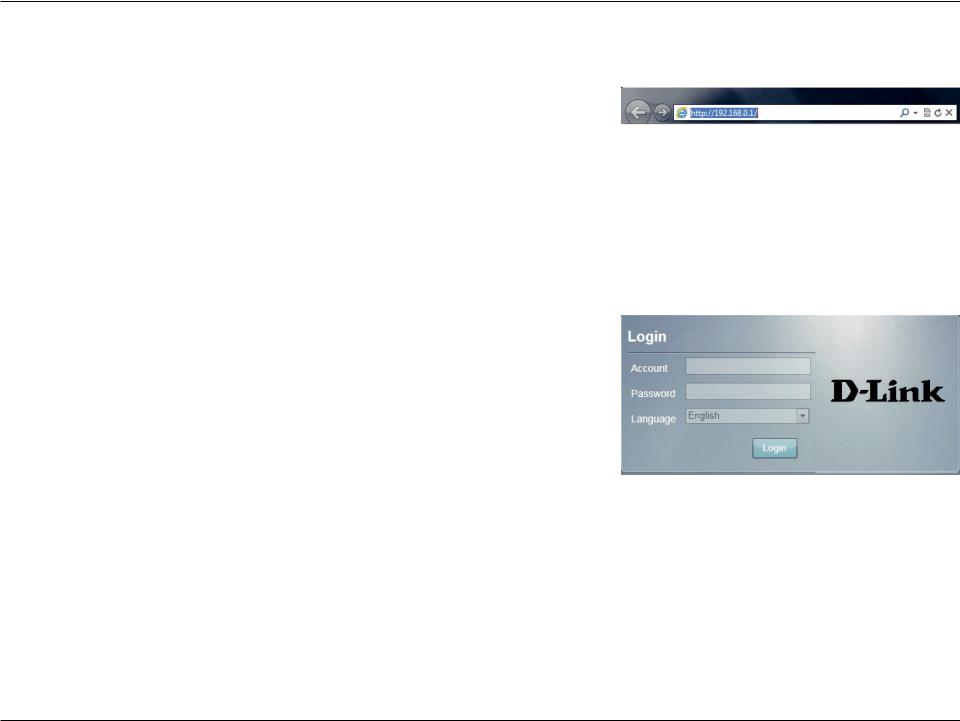
To access the configuration utility, open a web browser (such as Internet Explorer) and enter the IP address of the router, which is 192.168.0.1 by default.
Configuration Utility
Once you have reached the configuration utility through the installed software or your web browser, you will need to log in. Enter admin as the username. By default, the password is blank. You can also select your language from the drop-down menu.
Click Login to continue.
D-Link DWR-730 User Manual |
11 |
Section 3 - Configuration
Home
Navigation
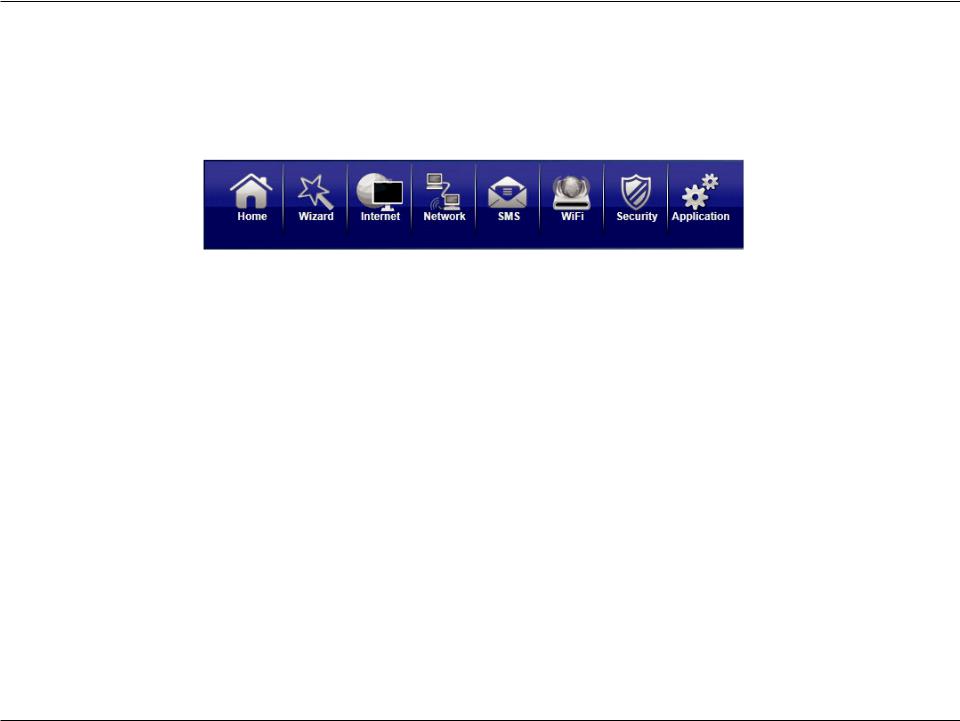
Throughout the interface you will find a menu bar at the top of the page which includes tabs for easy navigation, and a summary bar in the upper right corner with a quick view of essential information.
Home: The Home tab will return you the home page, where a summary of the system information is shown.
Wizard: Click on this tab to start the setup wizard, which will guide you through the basic setup process.
Internet: The Internet tab gives you Internet setup and settings options.
Network: The Network tab allows you to configure the network settings for your Local Area Network (LAN).
SMS: From the SMS tab you can view and send SMS messages via your mobile network.
Wi-Fi: The Wi-Fi tab allows you to configure your Wi-Fi network, as well as add new devices using WPS.
Security: The Security tab allows you to configure firewall and security settings to protect your network from WAN-side intrusions.
Application: From this tab, you can manage the administrative configuration of your router, such as time and date, firmware, language, and remote management.
D-Link DWR-730 User Manual |
12 |

Section 3 - Configuration
Device Status
A summary of the device’s current status will be displayed on the information panel at the top of the right-hand side of the navigation bar. The following is a description of the indications, from left to right.
SIM: This icon shows whether or not a compatible (U)SIM card has been inserted into the device.
SMS: The number to the right of this icon indicates the number of unread messages in the SMS inbox.
Signal Strength: Indicates the current strength of the mobile network signal being received.
Operator Name: The name of the mobile network operator to which the device is currently connected.
Roaming: Indicates that the device is connected to a network other than your service provider’s home network.
Internet: Indicates that there is an Internet connection present.
Wi-Fi Network: Indicates that the router’s Wi-Fi network is currently active. The number to the right of this icon indicates the number of wireless clients currently connected to the router’s Wi-Fi network.
Log out: Click this button to log out of the configuration interface.
D-Link DWR-730 User Manual |
13 |

Section 3 - Configuration
Home
The Home page acts as a dashboard to quickly display your configuration settings and provide a summary of the current status of your network.
System Resources: This area displays the percentage of the router’s memory and
CPU currently being used by the system.
LAN: This area displays a summary of the current settings for the router’s LAN.
2G/3G Modem: This area shows the current status of your 2G or 3G mobile network connection.
WAN: This area displays a summary of the router’s current WAN settings. These details will reflect the mobile network connection which is being received from the service provider.
Traffic Statistics: This area shows the amount of data which has been sent (TX) and received (RX) over the mobile network. This information may not reflect the amount recorded by your mobile service provider.
D-Link DWR-730 User Manual |
14 |
Section 3 - Configuration
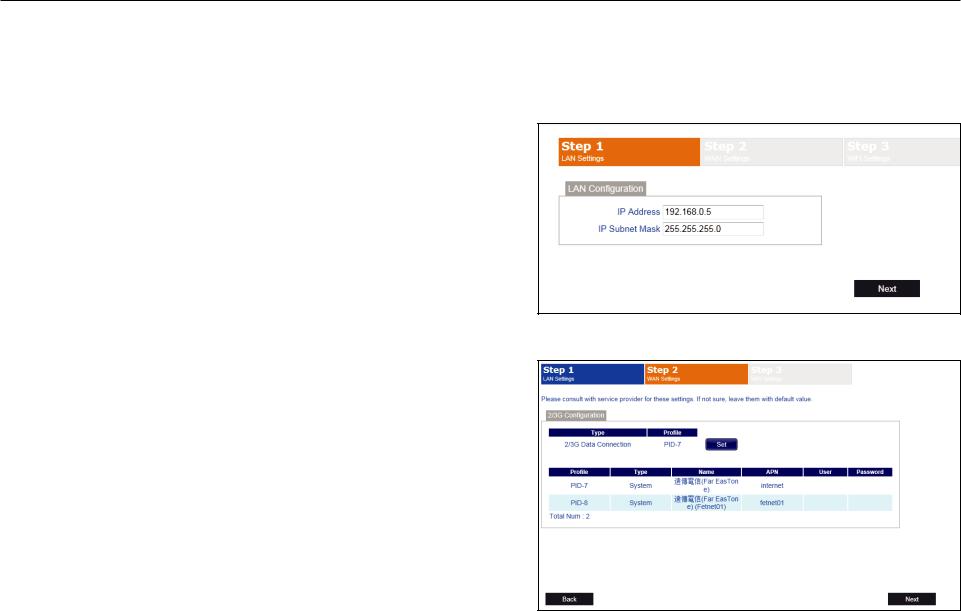
Wizard
The Wizard page will guide you through the steps required to configure the basic settings of your router such as the IP address, network name (SSID), and password. Click on the Wizard button on the navigation bar to commence the wizard.
LAN Configuration
IP Address:
IP Subnet Mask:
If you wish to change the router’s IP address, enter the new address here. If you change the IP address, you will need to enter the new address in your Internet browser’s address bar in order to access the web-based configuration utility.
If you wish to change the router’s subnet mask, enter it here.
Click Next to continue.
2/3G Configuration
If you wish to change the 2G or 3G service provider or connection type, click on a profile in the list to highlight it, and click Set to set that profile as the default.
Click Next to continue, or Back to return to the previous step.
|
|
|
|
|
|
|
|
|
|
|
|
D-Link DWR-730 User Manual |
15 |
|
Section 3 - Configuration
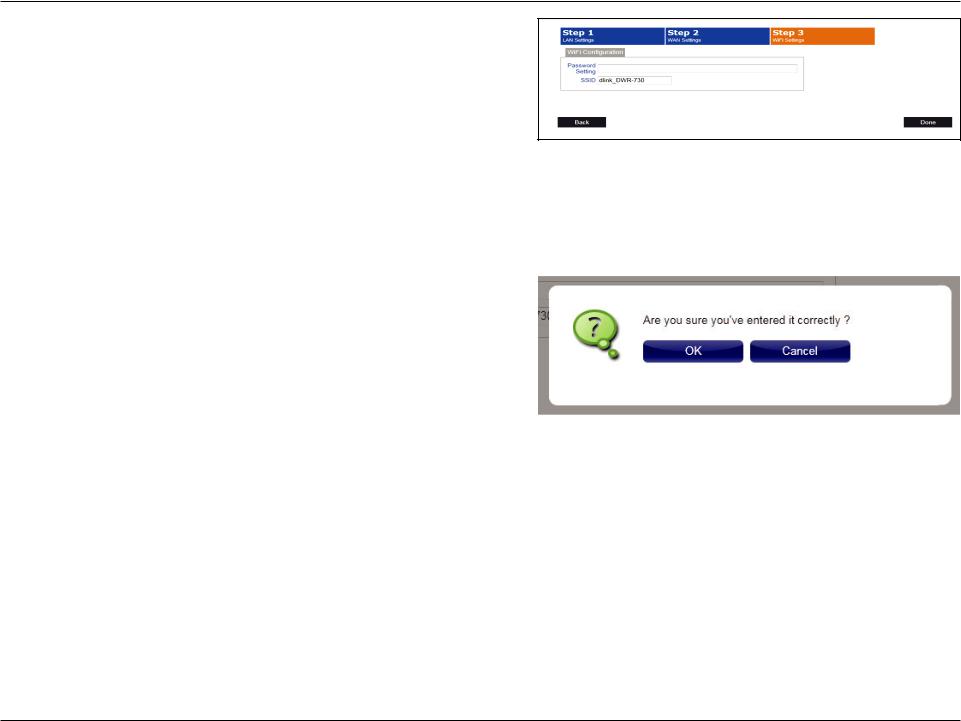
Wi-Fi Configuration
Password Setting:
SSID:
Choose a password for your wireless security. Clients will need this password in order to access your network
wirelessly. If you are currently connected to the router using Wi-Fi, you will need to reconnect to the router using your new password once the wizard has been completed.
If you wish to change your wireless network name (SSID), enter a new name in the field provided. If you change the SSID, you will need to reconnect to the router using the new SSID before you can access your network or the configuration utility.
Click Done to complete the wizard, or click Back to return to the previous page.
After you have clicked Done, a confirmation window will appear. Click OK to save the configuration.
D-Link DWR-730 User Manual |
16 |
Section 3 - Configuration
Internet
Connection
This page allows you to configure the Internet settings for your mobile network connection. Use the tabs in the left-hand column to navigate through the different settings categories.
Connection Operation
Flight Mode:
Preferred Cellular
Network:
Roaming Mode:
Flight mode turns off all communications so that the device can be powered on safely when in an aircraft. Select whether you want to Enable or Disable flight mode from the dropdown menu, and click Change to save the adjustment.
Select your preferred cellular network connection mode: Always On - The router will automatically connect to your preferred mobile network and remain connected while the device is powered on.
Manual - You must manually connect to the preferred mobile network.
On Demand - The router will connect to the preferred mobile network when Internet access is required.
Click Change to save the adjustment.
Select whether you would like to Enable or Disable mobile network roaming from the drop-down menu.
Caution: Roaming on networks other than your own may incur additional usage charges.
D-Link DWR-730 User Manual |
17 |
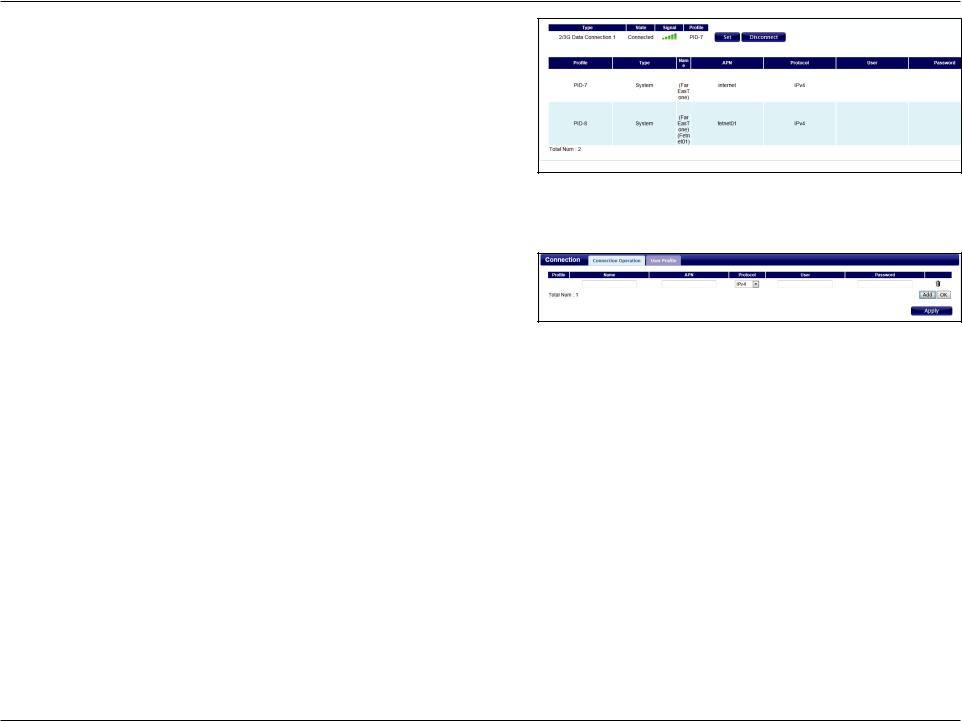
Section 3 - Configuration
Connection: Shows the type and status of the current mobile connection. To change the connection profile, select a user profile from the table below and click Set to activate the profile. Click Disconnect to manually disconnect the current mobile data service.
Profiles: The profiles table shows the details of currently configured user profiles. To add a new user profile, navigate to the User Profile tab at the top of this section.
User Profile
Click Add to add a new user profile.
Name:
APN:
Protocol:
User:
Password:
Delete:
Enter a name to identify the new user profile.
Enter the Access Point Name (APN) for the connection. If you do not know this information, please contact your service provider.
Select the protocol to be used for the connection from the drop-down menu.
Enter the username to be used for this connection.
Enter the password to be used for this connection.
Click the delete icon to delete this profile from the list.
Click OK to save the profile.
Click Apply to apply the profile settings and return to the Internet menu.
D-Link DWR-730 User Manual |
18 |

Section 3 - Configuration
2G/3G Modem
This section displays information about your 2G or 3G modem connection.
Information
Information: Displays information about your 2G or 3G modem.
Settings
Network: Select your preferred network type from the drop-down menu:
Auto - The modem will automatically select the modem type depending on the network it is connected to.
3G Only - The modem will only connect to 3G networks. 2G Only - The modem will only connect to 2G networks.
If you wish to change the network type, select your new network type and click Change to effect the change.
Re-enter the new PIN code.
Click Apply to apply the changes.
D-Link DWR-730 User Manual |
19 |

Section 3 - Configuration
SIM
This section allows you to turn SIM lock on or off for the SIM card which is currently inserted into the router.
PIN Code: Enter the PIN code for the SIM card. Click Enable to turn on
SIM lock, or click Disable to turn off SIM lock.
D-Link DWR-730 User Manual |
20 |
Section 3 - Configuration
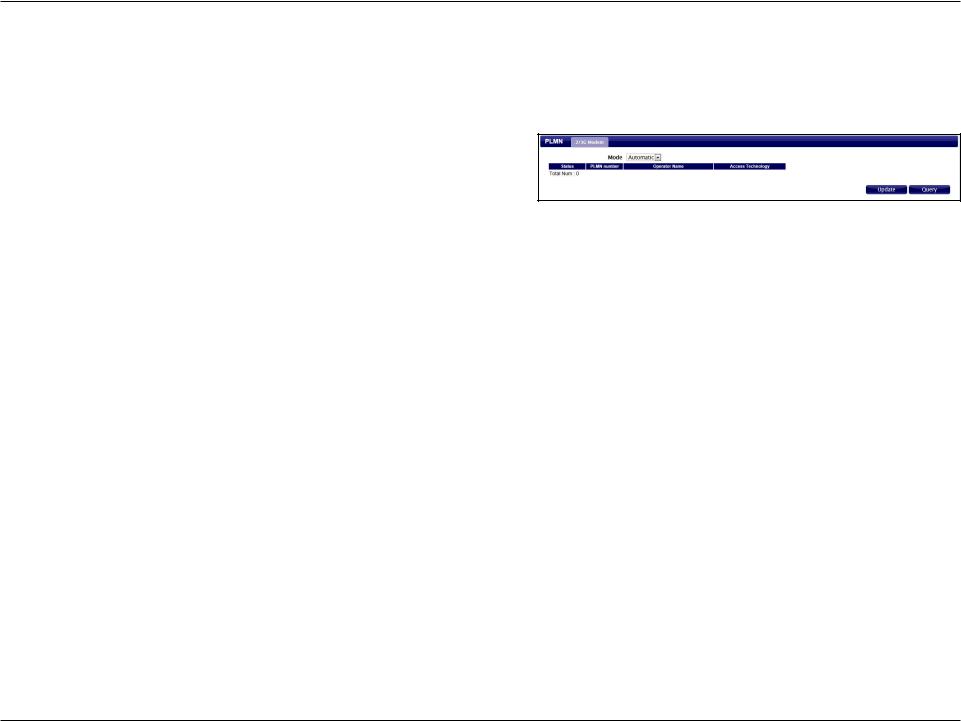
PLMN
This page allows you to view available Public Land Mobile Networks (PLMN). This page can also be used to select a preferred network when you are roaming outside of your home network.
Mode: Select Automatic to allow the router to automatically connect to the first available network when roaming. Select Manual to choose your preferred roaming network from the list below.
If you have selected Manual mode, click on the preferred network to select it, and then click the Update button to select that network as the preferred network. Click Query to refresh the list of available networks.
Note: You will need to manually disconnect the current mobile data service before selecting a network using PLMN. Please refer to “Connection” on page 17 for further information on how to do this.
D-Link DWR-730 User Manual |
21 |

Section 3 - Configuration
Network
The Network pages allow you to check the current status of your Local Area Network (LAN), and make changes to LAN settings.
Wi-Fi
This section allows you to configure the IP settings for your wireless network.
IP Address:
IP Subnet Mask:
IPv4
Enter the IPv4 address for your Wi-Fi network. If you change this address, you will need to enter the new address in your web browser’s address bar in order to access the web-based configuration utility.
Enter the IPv4 subnet mask for your Wi-Fi network.
Click Apply to save the current configuration.
IPv6 Address: Prefix for LAN:
RA Autonomous:
RA On-Link:
IPv6
Enter the IPv6 address for your Wi-Fi network.
Enter the prefix to be used to delegate IPv6 addresses to the LAN.
Check the box to set the router announcement mode to autonomous.
Check the box to enable router announcement on-link
Click Apply to save the current configuration.
DNS Name
DNS Device Name: Enter your router’s DNS device name in the field provided.
Click Apply to save the current configuration.
D-Link DWR-730 User Manual |
22 |

Section 3 - Configuration
DHCP
The DWR-730 has a built-in DHCP server which can assign IP addresses to connected clients. This section allows you to configure the DHCP settings.
DHCP Server
DHCP Mode:
Start IP:
End IP:
Lease Time:
Select None from the drop-down menu if you do not wish to enable the DHCP Server. Select Server to specify a DHCP server, and enter the information in the fields below.
Set the starting address of the IP range.
Set the ending address of the IP range.
Set the lease time of the IP addresses issued by the DHCP server.
Click Apply to save the current configuration.
DNS Server
First/Second/
Third DNS
Server:
Select None from the drop-down menus if you do not wish to specify a first, second, or third DNS server. Select User Define to specify a DNS server, and enter the address of the server in the field provided.
Click Apply to save the current configuration.
D-Link DWR-730 User Manual |
23 |

Section 3 - Configuration
Static DHCP
MAC Address:
IP Address:
Use this option to specify a DHCP address reservation to a particular device or machine based on the MAC address. To add a new reservation, click Add.
Enter the MAC address of the device or machine for which you wish to make the DHCP reservation.
Enter the IP address that you wish to reserve. This address must be within the DHCP address pool.
Click OK to save the reservation.
Leased Hosts
This table shows the details of clients currently receiving a DHCP address from the DHCP server. Click Refresh to update the table.
D-Link DWR-730 User Manual |
24 |
Loading...