


Dell™ Venue Pro
User's Manual
COMMENT

Notes, Cautions, and Warnings
NOTE: A NOTE indicates important information that helps you make better use of your device.
CAUTION: A CAUTION indicates potential damage to hardware or loss of data if instructions are not followed.
WARNING: A WARNING indicates a potential for property damage, personal injury, or death.
____________________
Information in this document is subject to change without notice. © 2010 Dell Inc. All rights reserved.
Reproduction of these materials in any manner whatsoever without the written permission of Dell Inc. is strictly forbidden.
Trademarks used in this text: Dell™ and the DELL logo are trademarks of Dell Inc. Microsoft®, Windows®, Excel®, Powerpoint®, Windows Live®, Hotmail®, Xbox Live®, Zune®, and SharePoint® are either trademarks or registered trademarks of Microsoft Corporation in the United States and/or other countries. Adobe Acrobat™ is a trademark of Adobe Systems Incorporated which may be registered in certain jurisdictions.
Other trademarks and trade names may be used in this document to refer to either the entities claiming the marks and names or their products. Dell Inc. disclaims any proprietary interest in trademarks and trade names other than its own.
October 2010 |
A00 |
Federal Communications Commission (FCC) Statement
This device complies with Part 15 of the FCC Rules. Operation is subject to the following two conditions:
1)this device may not cause harmful interference and
2)this device must accept any interference received, including interference that may cause undesired operation of the device.
FCC RF Radiation Exposure Statement:
For body worn operation, this phone has been tested and meets FCC RF exposure
guidelines when used with an accessory that contains no metal and that positions the handset a minimum of 1.5 cm from the body. Use of other accessories may not ensure
compliance with FCC RF exposure guidelines.

Contents
1Package Contents . . . . . . . . . . . . . . . . 6
2 Getting to Know Your Dell™
Venue Pro . . . . . . . . . . . . . . . . . . . . . . 7
3 Setting Up Your Dell™ Venue Pro. |
. |
11 |
Getting Your Phone Ready for Use . . . . . . |
. . |
11 |
Turning On Your Phone. . . . . . . . . . . . . |
. . |
14 |
Turning Off Your Phone . . . . . . . . . . . . |
. . |
15 |
Turning On the Screen . . . . . . . . . . . . . |
. . |
15 |
First-Time Setup . . . . . . . . . . . . . . . . . |
. . |
15 |
4 Using Your Dell™ Venue Pro . . . . . . 16
Physical QWERTY Keyboard . . . . . . . . . . . . |
16 |
Start Screen . . . . . . . . . . . . . . . . . . . . . |
18 |
Touch Screen Gestures . . . . . . . . . . . . . . . |
21 |
Screen Orientation . . . . . . . . . . . . . . . . . |
25 |
Applications list . . . . . . . . . . . . . . . . . . . |
26 |
Status Bar . . . . . . . . . . . . . . . . . . . . . . . |
27 |
Wallpaper . . . . . . . . . . . . . . . . . . . . . . . |
28 |
Contents 3

Navigating Applications . . . . . . . . . . . . . . 30
On-Screen Controls . . . . . . . . . . . . . . . . . 31
On-Screen Keyboard . . . . . . . . . . . . . . . . 35
5Communicating With People Using Your Dell™ Venue Pro . . . . . . . . . . . 38
Setting Up E-mail and Social Networking
|
Accounts . . . . . . . . . . . . . . . . . . . . . . . |
38 |
|
Using E-mail . . . . . . . . . . . . . . . . . . . . |
40 |
|
Calling. . . . . . . . . . . . . . . . . . . . . . . . . |
43 |
|
Managing Contacts Using the People |
|
|
Application . . . . . . . . . . . . . . . . . . . . . . |
49 |
|
Messaging . . . . . . . . . . . . . . . . . . . . . . |
53 |
6 |
Internet . . . . . . . . . . . . . . . . . . . . . . . |
58 |
|
Using bing Search . . . . . . . . . . . . . . . . . . |
58 |
|
Browsing the Internet. . . . . . . . . . . . . . . . |
59 |
|
Using Maps . . . . . . . . . . . . . . . . . . . . . . |
62 |
|
Marketplace . . . . . . . . . . . . . . . . . . . . . |
67 |
|
Games and Xbox LIVE . . . . . . . . . . . . . . . . |
69 |
7 |
Customizing Your Dell™ Venue Pro 70 |
|
4Contents

8 Applications . . . . . . . . . . . . . . . . . . . . 77
Camera . . . . . . . . . . . . . . . . . . . . . . . . |
77 |
Pictures . . . . . . . . . . . . . . . . . . . . . . . . |
80 |
Playing Music and Video Using Zune . . . . . . . |
81 |
Listening to FM Radio Using Zune . . . . . . . . |
84 |
Calendar . . . . . . . . . . . . . . . . . . . . . . . |
85 |
Alarms . . . . . . . . . . . . . . . . . . . . . . . . . |
88 |
Calculator . . . . . . . . . . . . . . . . . . . . . . |
88 |
Voice Recognition . . . . . . . . . . . . . . . . . . |
89 |
Office . . . . . . . . . . . . . . . . . . . . . . . . . |
89 |
9 Troubleshooting . . . . . . . . . . . . . . . . 98
Index . . . . . . . . . . . . . . . . . . . . . . . . . . . 104
Contents 5
Package Contents
Check the contents of your package to verify that you have the following:
NOTE: The contents of your package may vary based on your region.
U.S.A
Dell Venue Pro phone
Battery
Getting Started Guide
Safety, Environmental, and Regulatory Information
Warranty and Support Information
MicroUSB cable
Charger
US plug
Headset with microphone
Europe
Dell Venue Pro phone
Battery
Getting Started Guide
Safety, Environmental, and Regulatory Information
Warranty and Support Information
MicroUSB cable
Charger
UK plug
EURO plug
Headset with microphone
6Package Contents
Getting to Know Your Dell™ Venue Pro
This section provides information about the features available on your Dell Venue Pro phone.
1
 5
5
|
2 |
|
|
|
|
4 |
|
|
|
|
|
||
|
|
|
|
|
|
|
|
|
|
3 |
|
|
|
|
|
|
|
|
|
|
Feature |
Function(s) |
|||||
|
|
|
|
|
|
|
1 |
Earpiece |
Use to listen to phone conversations. |
||||
|
|
|
|
|
|
|
2 |
Back |
Touch to: |
||||
|
|
|
|
|||
|
|
|
• Return to the previous screen or web |
|||
|
|
|
page. |
|||
|
|
|
• Cancel an operation. |
|||
|
|
|
• Close an on-screen keyboard or a |
|||
|
|
|
menu. |
|||
|
|
|
|
|
|
|
3 |
Start |
• Touch to return to the Start screen |
||||
|
|
|
|
|||
from anywhere on the phone, including from a running application.
• Touch and hold for speech commands.
Getting to Know Your Dell™ Venue Pro |
|
7 |
|
Feature |
Function(s) |
||
|
|
|
|
4 |
Search button |
Touch to open the search box to find |
|
items from the Internet, contacts from |
|||
|
|
||
|
|
the contact list, or applications from |
|
|
|
Marketplace. |
|
|
|
||
5 Proximity sensor |
Detects and turns off the screen when |
||
|
|
you bring the phone close to your ear to |
|
make or receive calls, in order to prevent unintentional touch on the screen.
8Getting to Know Your Dell™ Venue Pro
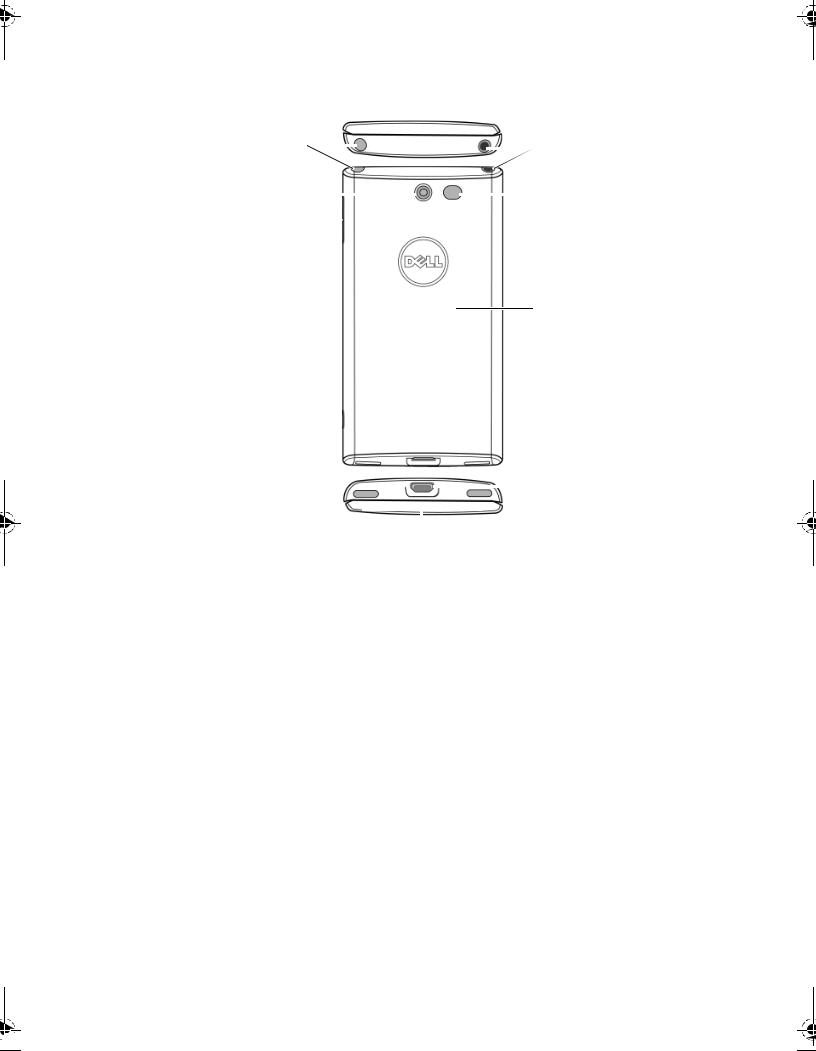
1 |
|
|
|
|
|
|
7 |
|||
|
|
|
|
|
|
|
|
|
||
|
|
|
|
|
|
|
||||
2 |
|
|
|
|
|
|
|
6 |
||
|
|
|
|
|
|
|
||||
|
|
|
|
|
|
|||||
5
|
|
|
|
4 |
|
|
|
||
|
|
|
|
|
|
||||
|
|
|
|
|
|
|
|
|
|
|
|
|
|
|
|
|
|
|
|
|
|
|
|
|
|
|
|
|
|
|
|
3 |
|
|
|
|
|
|
|
|
|
|
|
|
|
|
|
||
Feature |
Function(s) |
|
|||||||
|
|
|
|
|
|
|
|
||
1 Power and sleep/wake button |
• Press and hold to turn on the phone. |
|
|||||||
|
|
• Press and hold to turn off the phone. |
|
||||||
|
|
• Press to turn off the display. |
|
||||||
|
|
• Press to wake up the phone from the |
|
||||||
|
|
sleep mode. |
|
||||||
|
|
|
|
|
|
|
|
||
2 Camera |
Capture photos and videos. |
|
|||||||
|
|
|
|
|
|
|
|||
3 Speakers |
Audio output for video, music, and FM radio. |
||||||||
|
|
|
|
|
|
|
|||
4 Micro USB connector |
• Connects to a USB cable to transfer files |
||||||||
|
|
to a computer. |
|
||||||
|
|
• Connects to a charger to charge the |
|
||||||
|
|
phone. |
|
||||||
|
|
|
|
|
|
|
|
||
5 Back cover |
Secures the battery in place. |
|
|||||||
|
|
|
|
|
|
|
|||
6 Camera flash |
For using flash while capturing photos and |
||||||||
|
|
videos. |
|
||||||
|
|
|
|
|
|
|
|
||
7 Headphone connector |
Connects to headphones. |
|
|||||||
|
|
|
|
|
|
|
|
|
|
Getting to Know Your Dell™ Venue Pro |
|
|
9 |
||||||
|
|||||||||
1
2
Feature |
Function(s) |
|
|
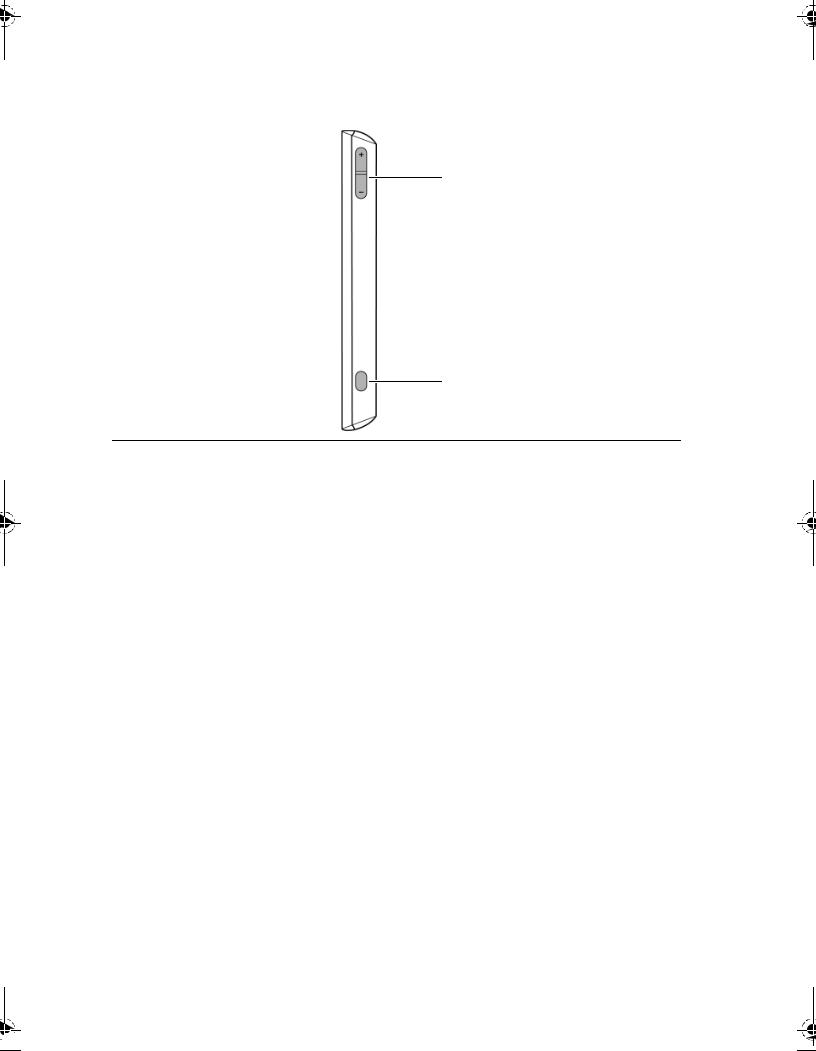
1 Volume control buttons |
During a phone call or while playing |
|
media such as music, FM radio, and |
|
video: |
|
• Press to increase or decrease the |
|
volume by one level. |
|
• Press and hold continuously to |
|
increase or decrease volume level. |
|
|
2 Camera button |
• Press to start the camera. |
|
• Press to capture a photo or video. |
|
• A half press of the button enables |
|
auto-focus. |
|
• When recording a video, press to |
|
stop. |
|
|
10 |
Getting to Know Your Dell™ Venue Pro |
Setting Up Your Dell™ Venue
Pro
This section provides information on setting up your Dell Venue Pro phone for the first time.
Getting Your Phone Ready for Use
1 Remove the back cover
a Slide the back cover up towards the top of the phone.
b Lift the back cover off the phone.
NOTE: Do not turn on the phone when the back cover is removed.
Setting Up Your Dell™ Venue Pro |
|
11 |
|
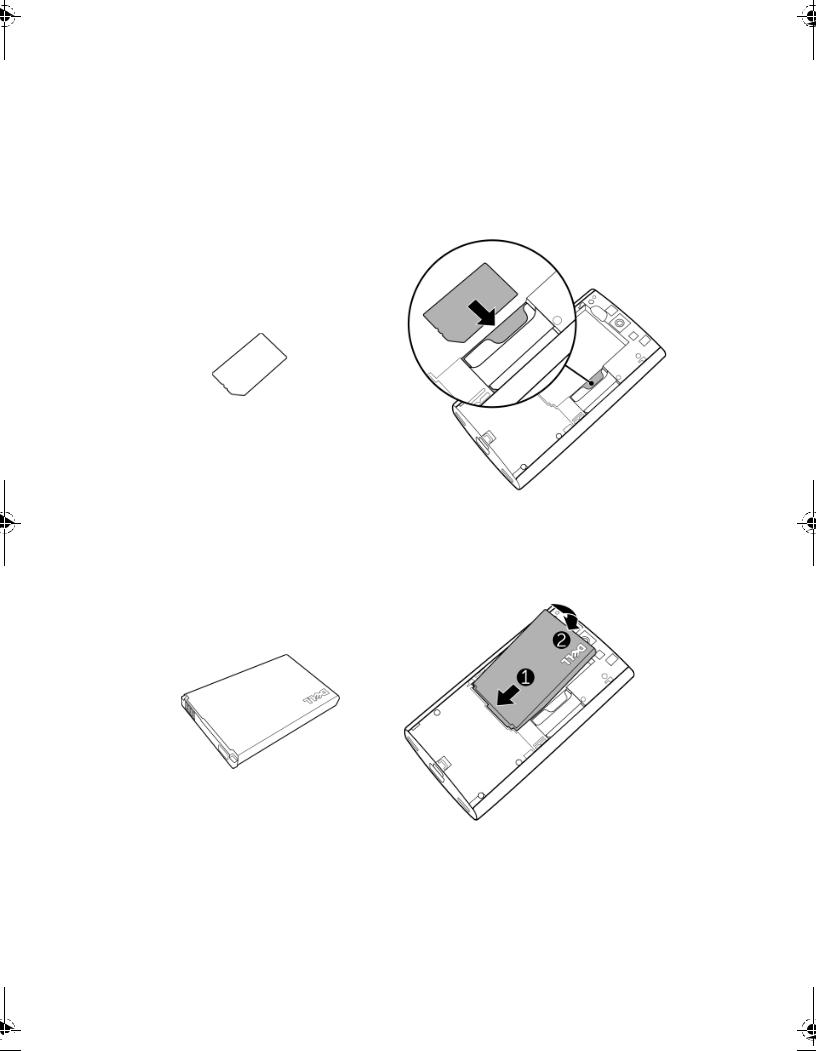
2 Insert the SIM card
Align the angled corner of the SIM card with the angled corner in the card holder and insert the card. If the card does not fit in the card holder easily, check to ensure that you have aligned the corner on the card with the corner on the card holder.
3 Insert the battery
Align the metal contacts on the battery with the contacts on the battery holder and place the battery.
12 |
Setting Up Your Dell™ Venue Pro |
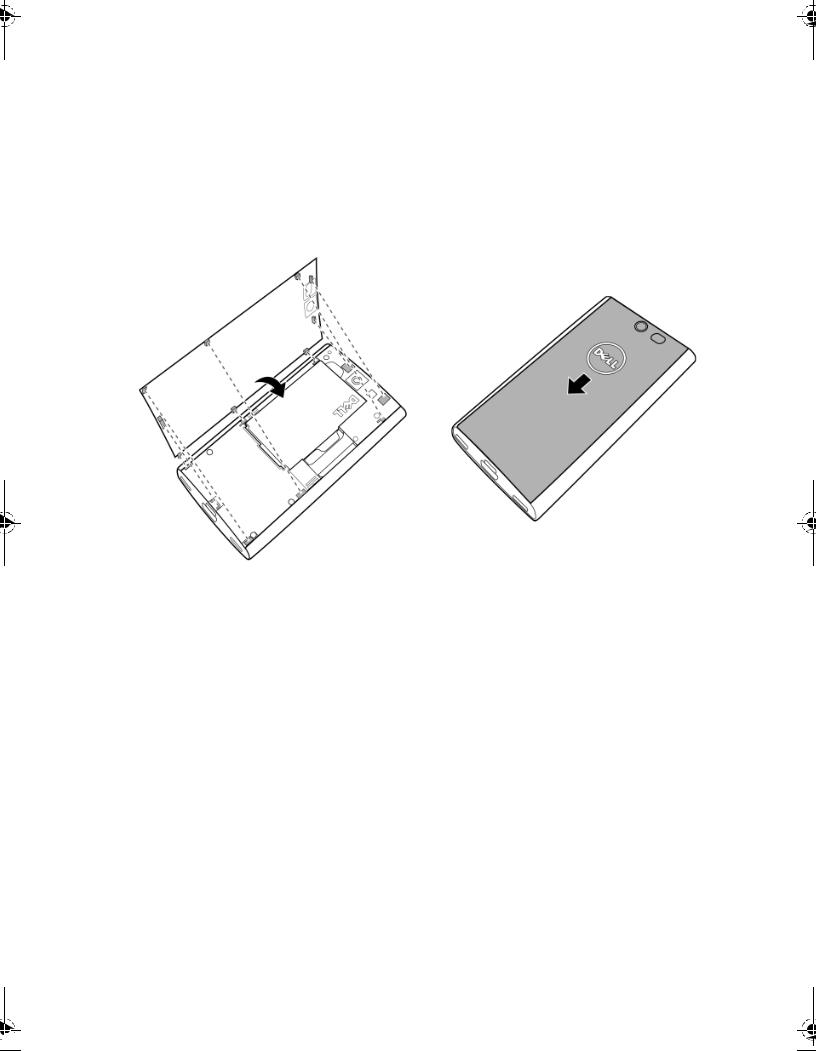
4 Close the back cover
a Align the tabs on the back cover with the slots on the phone.
b Place the cover onto the back of the phone, and then slide the cover towards the bottom of the phone to secure the cover in place.
Setting Up Your Dell™ Venue Pro |
|
13 |
|
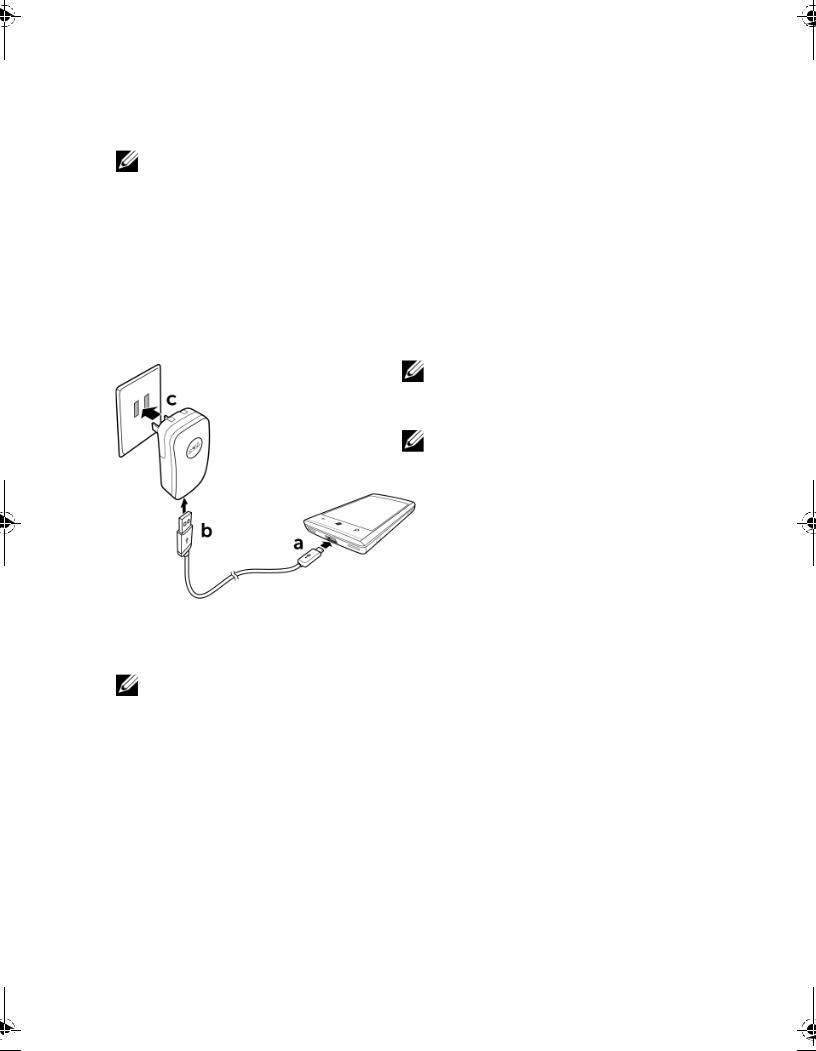
5 Charge the phone
NOTE: Charge the battery in an environmental temperature between 0°C and 45°C.
The battery is not fully charged when first unpacked.
a Connect the microUSB cable's connector into the connector on the phone.
b Connect the cable's USB connector into the supplied USB wall charger adapter.
cConnect the USB wall charger adapter into a power outlet and charge the phone till the battery is fully charged.
NOTE: The phone is fully charged within four hours when connected to a power outlet.
NOTE: To charge your phone using a computer, connect the microUSB cable's connector to the phone, and the cable's USB connector to a USB port on the computer.
Turning On Your Phone
NOTE: Use this phone in an environmental temperature between -10°C and 55°C.
1 Press the power and sleep/wake button to turn on your phone.
2The Windows Phone 7.0 operating system screen appears when the phone goes through a cold boot process.
3If your SIM card is locked by a Personal Identification Number (PIN), type the PIN by touching corresponding number keys on the on-screen keypad. Touch the enter button to confirm your input.
14 |
Setting Up Your Dell™ Venue Pro |

Turning Off Your Phone
Press and hold the power and sleep/wake button.
Turning On the Screen
If the device is on, but the screen is off, press the power and sleep/wake button to turn on the screen.
First-Time Setup
After the first-time cold boot, touch the get started button to let the phone take you through an initial setup process:
1 The phone detects whether an Internet connection is available.
NOTE: Connecting to the Internet requires an active Wi-Fi or mobile data connection (GPRS, EDGE, 3G, or HSPA). See Connectivity settings for more information on how to set up a data connection.
2The phone asks whether to retrieve time zone, date, and time information directly from the Internet server, or to set up time zone, date, and time manually.
3 Download the Microsoft Software Agreement.
4To connect your phone to Windows Live and use services including Windows Live® Messenger, Hotmail®, Zune®, and Xbox
LIVE®, touch the signbuttonin to sign in with your existing Windows Live ID, or touch the create one button to register a new Windows Live ID.
NOTE: Signing in to Windows Live also synchronizes all your Windows Live e-mails and contacts on your phone.
5 The phone is ready for use when the Start Screen appears.
Setting Up Your Dell™ Venue Pro |
|
15 |
|

Using Your Dell™ Venue Pro
Physical QWERTY Keyboard
You can use the physical QWERTY keyboard to type text into a text field in your phone.
To access the keyboard
Slide the phone up to access the keyboard.
NOTE: The on-screen keyboard closes automatically when the physical QWERTY keyboard is active.
16 |
Using Your Dell™ Venue Pro |

Keyboard controls
1 |
|
|
|
9 |
|
|
|
||
|
|
|
||
|
|
|||
2 |
|
|
|
8 |
|
|
|||
|
||||
3 |
|
|
|
7 |
|
|
|||
4 |
5 |
6 |
1Press to type alphabets in the text field.
2• Press the  key to switch between the uppercase and lowercase typing modes.
  in the status bar indicates that the lowercase
typing mode is active;  indicates that the uppercase typing mode is active.
• Press and hold the  key to enable the Caps Lock mode, as the icon
  indicates in the status bar. Press
  again to disable the Caps Lock
mode.
3• Press the blue fn key to enable the blue numbers and symbols. The
 icon will show up in the status bar to confirm this function is enabled. The input mode will automatically switch to the alphabet mode after you type a number or a symbol.
• To enable continuous number and symbol input, press and hold the
fn key. The |
icon will show up in |
the status bar to confirm this |
function is enabled. Press the same key to disable this mode.
4Press the  key to add accents to vowels. Multiple presses cycle through available accents. Press and hold the key to view the accent picker, and touch the accent to type in the text field.
NOTE: The accent key only works when the cursor immediately follows a vowel.
Using Your Dell™ Venue Pro |
|
17 |
|

5• Press the space bar to type a space.
• Double-press the space bar to insert a period.
6Press the  key to view the emoticon picker. Touch the desired emoticon to type the emoticon in the text box.
7• Press the sym key to open the on-screen symbol picker where you can touch the numbers, symbols, and punctuation marks that you want to type.
•When the symbol picker appears, touch  or
or  for more available symbols.
•Press the sym key to close the on-screen symbol picker.
8• Press the  key to enter a new line of text.
• Press the  key to confirm your text input.
9• Press the  key to delete a typed character, symbol, or a space.
• Press and hold the  key to quickly delete typed text.
Start Screen
The Start screen is the starting point for your phone activities, and is made up of customizable “tiles”—shortcuts or links that provide easy access to your favorite
or frequently used features, applications,
Tiles
contacts, web pages, and media playlists. Tiles are dynamic and updated in real time to display notifications of new text messages, e-mails, upcoming calendar events, missed calls, and latest feed updates on your social networks such as Twitter, Facebook, and Windows Live.
To open the Start screen
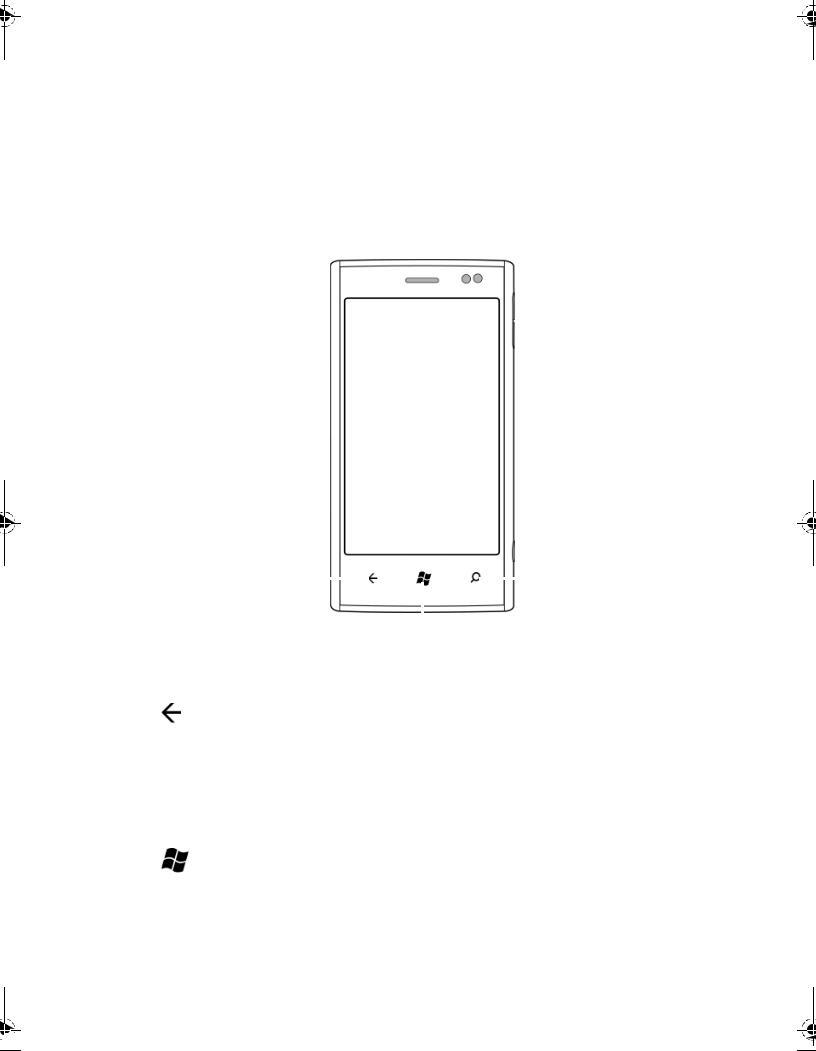
From any phone activities, touch Start  .
.
18 |
Using Your Dell™ Venue Pro |
To add a tile to the Start screen
You can “Pin” an application, media item, or favorite contact to add it as a tile on the Start screen.
1Touch and hold an application that you would like to pin as a tile on the Start screen.
2 From the context menu that appears, touch pin to start, or pin favorites to start .
NOTE: After you open a contact profile from the People application, touch the pin icon  in the application bar at the bottom to pin the contact to the Start screen.
To reposition a tile on the Start screen
1 |
Touch and hold the tile until it stands out to become movable. |
|
|
NOTE: When the moving mode is activated, you can touch another tile |
|
|
to make it movable. |
|
2 |
Drag or flick the tile to another location on the screen. |
|
3 |
Release the tile in the desired location. |
|
4 |
Touch the tile or the blank area |
on the screen to disable the |
|
moving mode. |
|
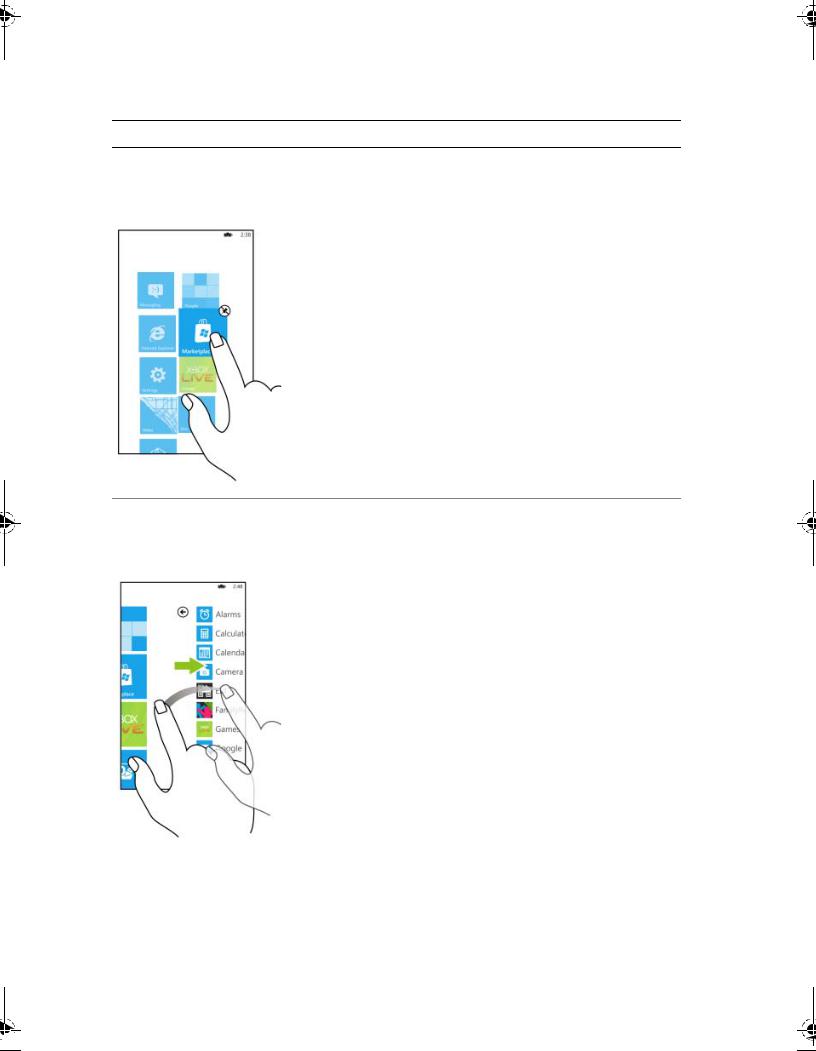
To remove a tile from the Start screen
1 Touch and hold the tile you want to remove.
2 Touch the unpin icon  .
.
To navigate the Start screen
1Flick or pan the Start screen upwards or downwards until it displays the desired tile.
NOTE: To stop the Start screen from moving, touch anywhere on the Start screen.
2 Touch the tile to open the associate application or feature.
Using Your Dell™ Venue Pro |
|
19 |
|

To change the tile color
You can change the tile color by changing the accent color.
1 Touch Start  →applications
  →
→ Settings.
2 Under system, select theme.
3 Touch the Accent color text box.
4 Touch a desired color sample from the ACCENTS list.
To change the background color of the Start screen
1 Touch Start  →applications
  →
→ Settings.
2 Under system, select theme.
3 Touch the Background list box.
4 From the Backgroundlist box, touch dark or light to change the background color.
20 |
Using Your Dell™ Venue Pro |
Touch Screen Gestures
Your phone has a multi-touch sensitive screen. You can touch the screen to navigate and control the phone. The following touch screen gestures are supported on your phone:
Touch Gestures |
Allows you to: |
Touch
Touch gently on the screen with your fingertip.
•Select screen items including buttons, icons, images, entries, and options.
•Start applications.
•Input text using the on-screen keyboard or numeric keypad.
•Stop any type of screen content from scrolling, for example the Applications list or a web page.
Using Your Dell™ Venue Pro |
|
21 |
|
Touch Gestures |
Allows you to: |
Touch and hold
Touch and hold your finger on the screen.
“Pin” an application, media item, or favorite contact to the Start screen to add it as a tile.
• To pin an item, touch and hold the item until the context menu
appears, and then touch pin to start or pin favorites to start.
•To remove a tile, touch and hold the tile, and then touch  .
.
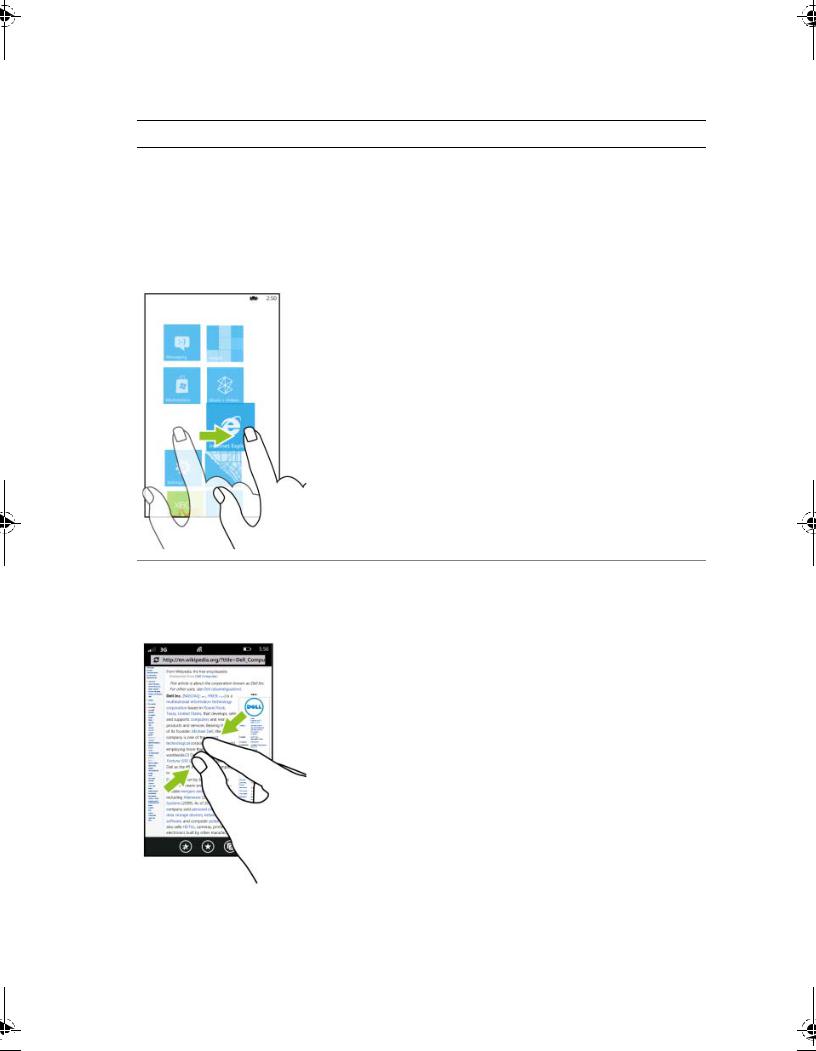
Flick or swipe
Slide a finger quickly in the direction you want the screen content to move.
Quickly scroll through different screens of content: the Start screen, Applications list, web pages, lists, entries, photos, and so on.
22 |
Using Your Dell™ Venue Pro |
Touch Gestures |
Allows you to: |
Pan
1 Touch a desired area on the screen.
2 Keeping your finger in contact with the screen, move your fingertip slowly in the direction you want the screen content to move.
•Move a tile somewhere else on Start at a controlled rate. Touch and hold the tile, then move it wherever you'd like.
•Scroll through lists, menus, or pages.
Pinch or Zoom-Out |
|
Move two fingers closer together on |
Zoom-out on websites, maps, or |
the screen to zoom-out. |
pictures. |
Using Your Dell™ Venue Pro |
|
23 |
|

Touch Gestures |
Allows you to: |
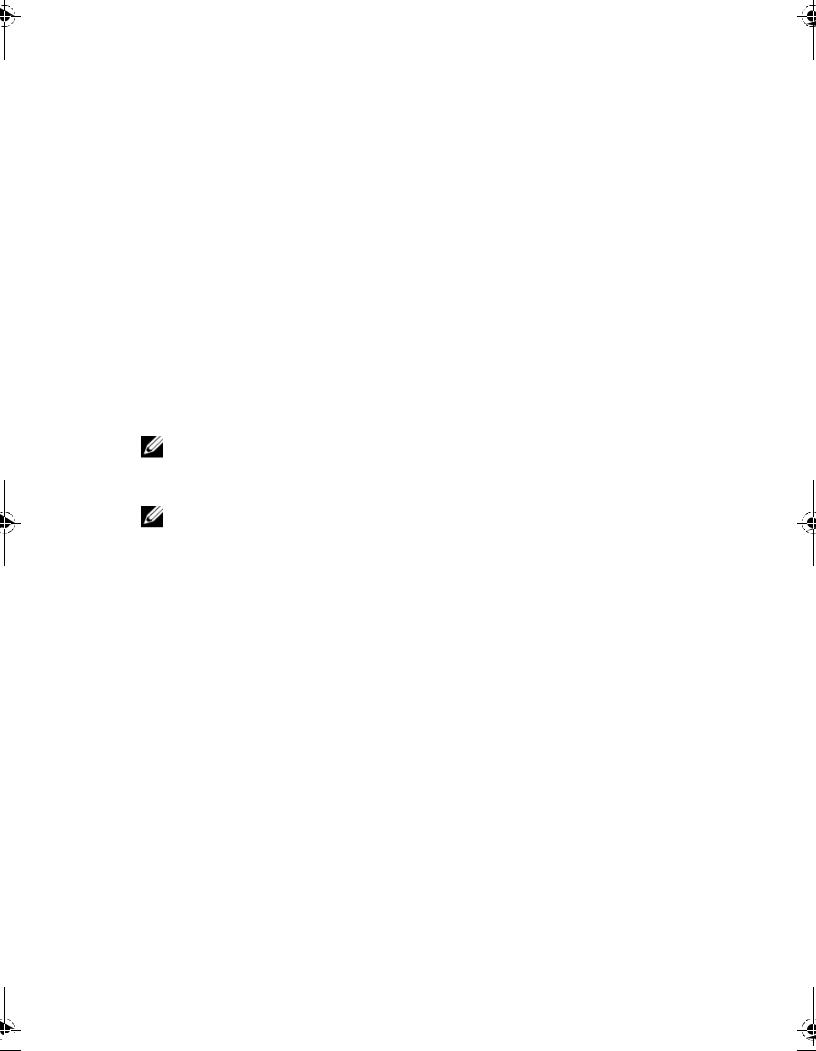
Stretch or Zoom-In
Move two fingers away from each other on the screen to zoom-in.
Zoom-in on websites, maps, or pictures.
Double-tap |
|
Tap the screen quickly twice. |
Toggle between the zoom-in and |
|
zoom-out states of a screen view, |
|
such as a picture or web page. The |
|
application defines the zoomed-in |
|
and zoomed-out scales and zooms in |
|
or out accordingly. |
24 |
Using Your Dell™ Venue Pro |
Screen Orientation
Your phone supports two types of or ientation: portrait and landscape. For optimal viewing experience, the screen rotates automatically to
portrait or landscape view depending on how you hold the phone.
Portrait orientation
In portrait-mode, the screen is vertically oriented where the height of the screen is greater than the width.
Landscape orientation
In landscape-mode, the screen is horizontally oriented where the width of the screen is greater than the height, and is suited for browsing the Internet, watching videos, and playing games.
NOTE: The Start screen and Applications list always appear in portrait mode. Landscape mode is not supported on certain applications or while the physical QWERTY keyboard is open.
NOTE: Certain applications downloaded from the Internet may not support automatic screen orientation to portrait or landscape.
Using Your Dell™ Venue Pro |
|
25 |
|
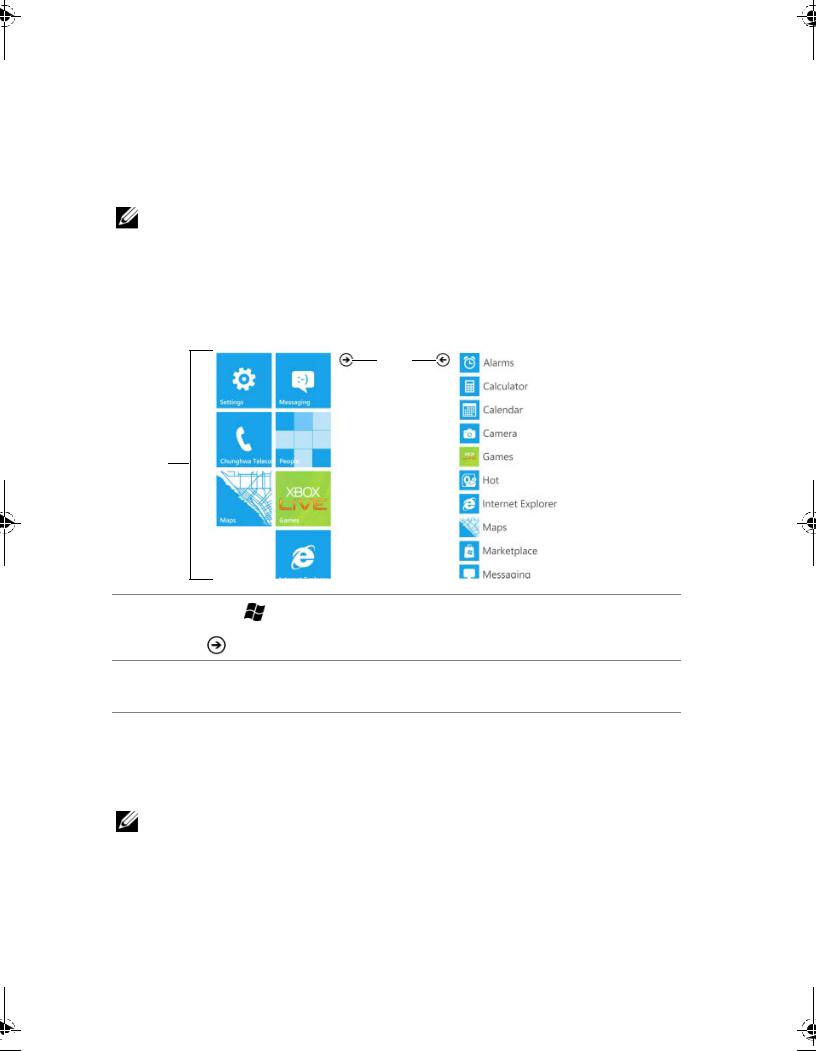
Applications list
The Applications list contains the list of all the applications available on your phone.
NOTE: If you have an application tile on your Start Screen, you will be able to access that application simply by touching the tile. For all other
applications that are not pinned to yo ur Start Screen, you will need to go to the applications list to access them.
To display the Applications list
23
1
1 |
Touch Start |
to open the Start screen. |
|
|
|||
|
|
|
|
2 |
Touch |
or flick the Start screen to the left to view the Applications list. |
|
|
|||
3To return to the Start screen from the Applications list, touch  or flick the Applications list to the right.
To navigate the Applications list
1Flick or pan the Applications list upwards or downwards until it displays the desired application.
NOTE: To stop the Applications list |
from moving, touch anywhere on |
the screen. |
|
2 Touch the application to open it. |
|
26 |
Using Your Dell™ Venue Pro |
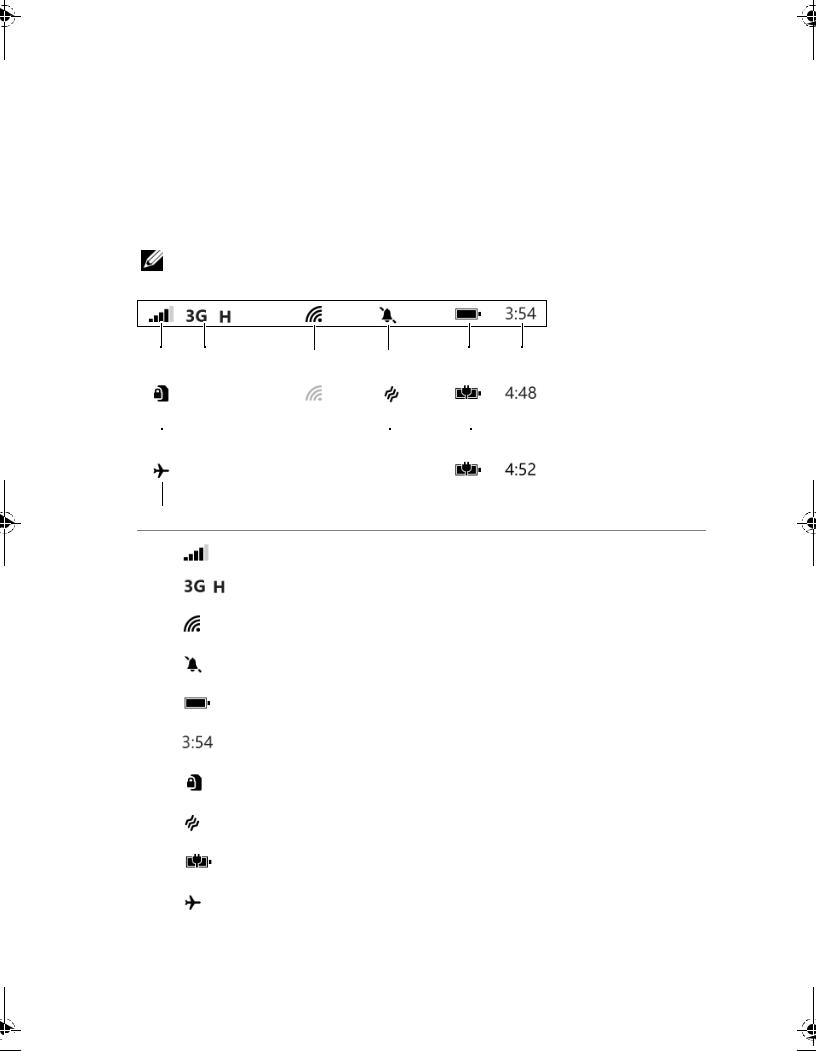
Status Bar
At the top of your smart phone screen, there is a thin bar known as the Status bar. The Status bar displays icon indicators for current time, battery power, signal strength, network connectivity, ringtone settings, and other system information.
NOTE: The Status bar hides the icons after a short period of time. To display the icons, touch the Status bar.
()
1 |
2 |
3 |
4 |
5 |
6 |
|
|||
|
|
|
|
|
|
|
|
|
|
|
|
|
|
|
|
|
|
|
|
|
|
|
|
|
|
|
|
|
|
7 |
8 |
9 |
|
|
|
|
|
|
|
|
|
10
1 |
Signal strength |
|
|
|
|
2 |
( ) Connected to a 3G (HSPA) data network |
|
|
3 |
Connected to a Wi-Fi network |
|
|
|
|
4 |
Silent mode is enabled |
|
|
|
|
5 |
Battery status |
|
|
|
|
6 |
Current time |
|
|
|
|
7 |
SIM card is locked |
|
|
|
|
8 |
Vibrate mode is enabled |
|
|
|
|
9 |
Phone is charging |
|
|
|
|
10 |
Airplane mode is enabled |
|
|
Using Your Dell™ Venue Pro |
|
27 |
|
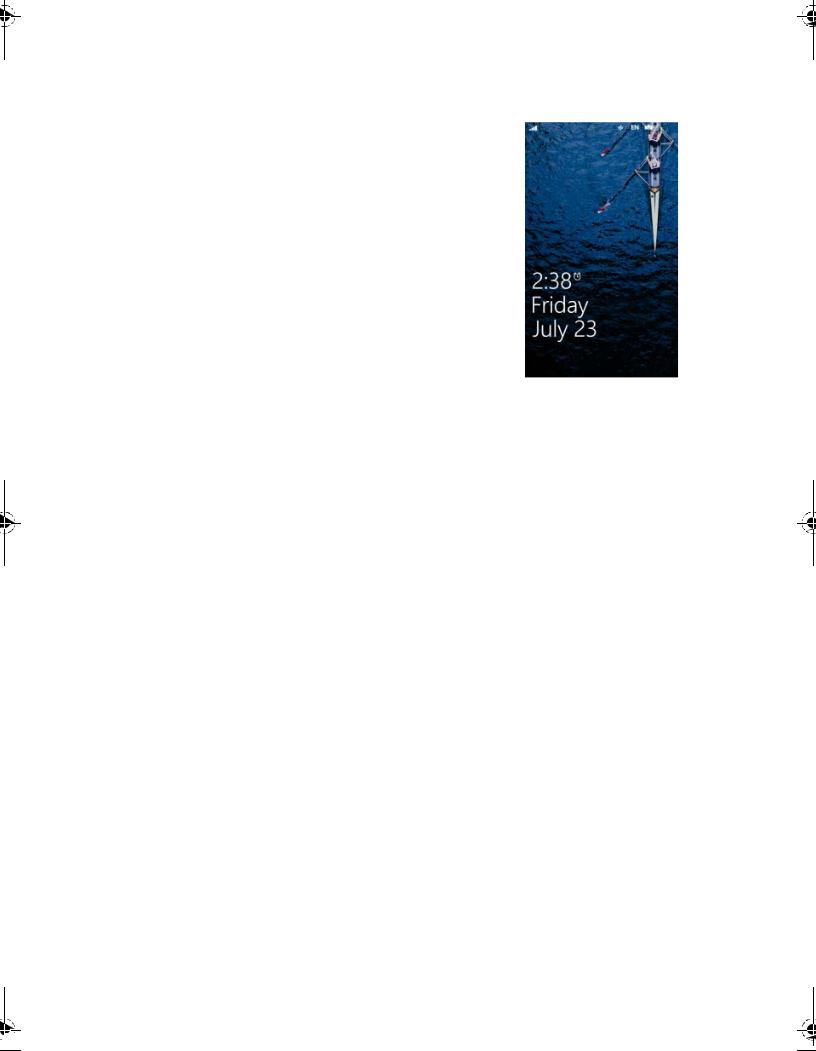
Wallpaper
The display turns off automatically after a timeout period of inactivity. The wallpaper then appears after you wake up the display by pressing the power and sleep/wake button, or when you slide open the QWERTY keyboard.
The wallpaper helps prevent unintentional touch on the screen, displays the date and time, missed calls, new messages, upcoming events, and the alarm set indicator.
To set the screen time-out period
1Touch Start  →applications
  →
→ Settings.
2Under system , touchlock & wallpaper.
3Touch the Screen time-out box and select the desired time period.
To hide the wallpaper
Flick the wallpaper up to view the last displayed screen. If the wallpaper is locked by a password, type the password to unlock it.
To lock the wallpaper with a password
1Touch Start  →applications
  →
→ Settings.
2Under system , touchlock & wallpaper.
3Touch or drag the Password toggle switch to turn on the password function.
4Type your password into both the New password and Confirm password boxes.
5Touch the done push button.
To change the wallpaper
Using the Settings option
1 Touch Start  →applications
  →
→ Settings.
2 Under system, touch lock & wallpaper.
3 Touch change wallpaper.
28 |
Using Your Dell™ Venue Pro |
4 Flick to view a picture collection such as all or Wallpapers. Touch the desired collection.
5 Touch the thumbnail view of a picture to display the picture.
6Pan the picture using the cropping frame to decide which portion of the picture you would like to use as the wallpaper. You can also enlarge the picture using the stretch or zoom-in gesture, then pan a desired area to crop as the wallpaper.
NOTE: The cropping tool is not available for the Wallpapers pictures in their original size.
7 |
Touch the |
cropbutton |
to set the picture as wallpaper. |
Using the Pictures option |
|
||
1 |
Touch Start |
→applications → Pictures. |
|
2 |
Flick to view a picture collection such as all or Wallpapers. Touch |
||
|
the desired collection. |
|
|
3 |
Touch the thumbnail view of a picture to display the picture. |
||
4Touch  or touch and hold the picture to view the context menu. Touch use as wallpaper.
5Pan the picture using the cropping frame to decide which portion of the picture you would like to use as the wallpaper. You can also enlarge the picture using the stretch or zoom-in gesture, then pan a desired area to crop as the wallpaper.
NOTE: The cropping tool is not available for the Wallpapers pictures in their original size.
6 Touch the |
cropbutton |
to set the picture as wallpaper. |
To set the time and date
1 Touch Start  →applications
  →
→ Settings.
2 Under system, touch date & time.
3 To set the date and time automatically according to the carrier network, touch or flick the Set automaticallytoggle switch to enable the function.
Using Your Dell™ Venue Pro |
|
29 |
|
To set the date and time manually, touch or flick the Set automatically toggle switch to disable the function, then type the date and time values into the respective text boxes.
4 Touch or flick the |
24-hour clock |
toggle switch to enable or |
disable the 24-hour format. |
|
|
Navigating Applications
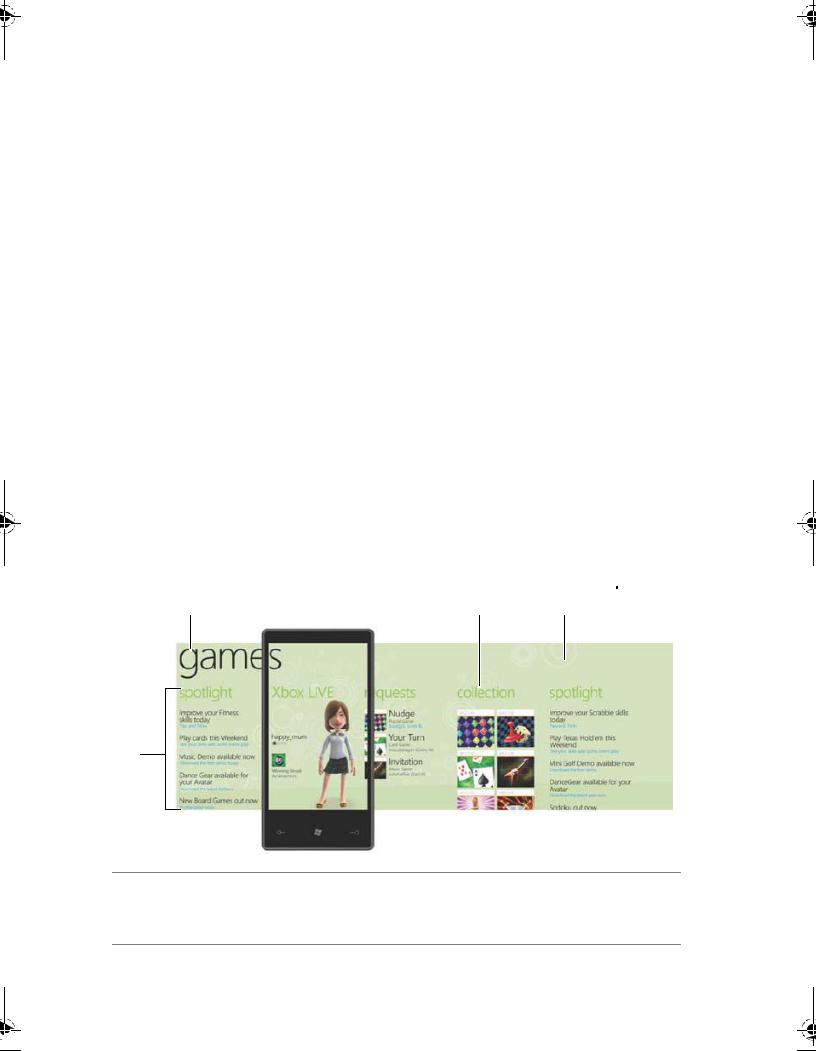
An application is a piece of software which allows you to perform a specific task. Your phone is preloaded with a variety of applications, and additional ones can be downloaded from the Marketplace.
Panoramic Screen
Many of the applications on your phone are presented as a panorama, which move in a continuous loop and extend horizontally beyond the
physical borders of the display. You can browse through the content by flicking or panning the screen horizontally.
Panoramic screen layers
When you flick or pan the panoramic screen, the four layers forming the panoramic screen move horizontally at different speeds:
1 |
4 |
3 |
2
1Panorama title
The panorama title is the title of the overall panoramic application. It lets you identify the application in use.
30 |
Using Your Dell™ Venue Pro |
 Loading...