

Page 1

Dell Docking Station WD15
User Guide
Page 2

Notes, cautions, and warnings
NOTE: A NOTE indicates important information that helps you make better use of your computer.
CAUTION: A CAUTION indicates either potential damage to hardware or loss of data and tells you
how to avoid the problem.
WARNING: A WARNING indicates a potential for property damage, personal injury, or death.
Copyright © 2016 Dell Inc. All rights reserved. This product is protected by U.S. and international copyright and
intellectual property laws. Dell™ and the Dell logo are trademarks of Dell Inc. in the United States and/or other
jurisdictions. All other marks and names mentioned herein may be trademarks of their respective companies.
2015 - 12
Rev. A00
Page 3

Contents
1 Introduction...........................................................................................................4
2 Package Contents ................................................................................................5
3 Hardware Requirements .....................................................................................7
4 Identifying Parts and Features ...........................................................................8
5 Input/Output (I/O) Connectors........................................................................11
6 Kensington Lock Slot......................................................................................... 12
7 Important Information.......................................................................................13
Updating the Dell Docking Station WD15 / Dell Thunderbolt Dock TB15 driver set........................13
Updating the Graphics drivers for your computer.............................................................................14
8 Quick Setup of Hardware .................................................................................15
9 LED Status Indicators......................................................................................... 17
Power Adapter LED..............................................................................................................................17
Docking Status Indicator..................................................................................................................... 17
10 Configuring the Intel HD Graphics utility....................................................18
11 Removing the USB Type-C Cable ..................................................................21
12 Troubleshooting the Dell Docking Station WD15......................................26
Symptoms and solutions.................................................................................................................... 26
13 Technical specifications..................................................................................29
Docking Specifications ...................................................................................................................... 29
Display resolution table.......................................................................................................................31
3
Page 4

1
Introduction
The Dell Docking Station WD15 is a device that links all your electronic devices to your computer using a
USB Type-C cable interface. Connecting the computer to the docking station allows you to access all
peripherals (mouse, keyboard, stereo speakers, external hard drive, and large-screen displays) without
having to plug each one into the computer.
CAUTION: Update your computer’s BIOS and the Dell Docking Station WD15 drivers to the latest
versions available at www.dell.com/support BEFORE using the docking station. Older BIOS
versions and drivers could result your computer not recognizing the docking station or not
functioning optimally. Please see the Important Information chapter for detailed instructions on
how to update your BIOS and graphics card drivers before using the Dell Docking Station WD15.
4
Page 5
Package Contents
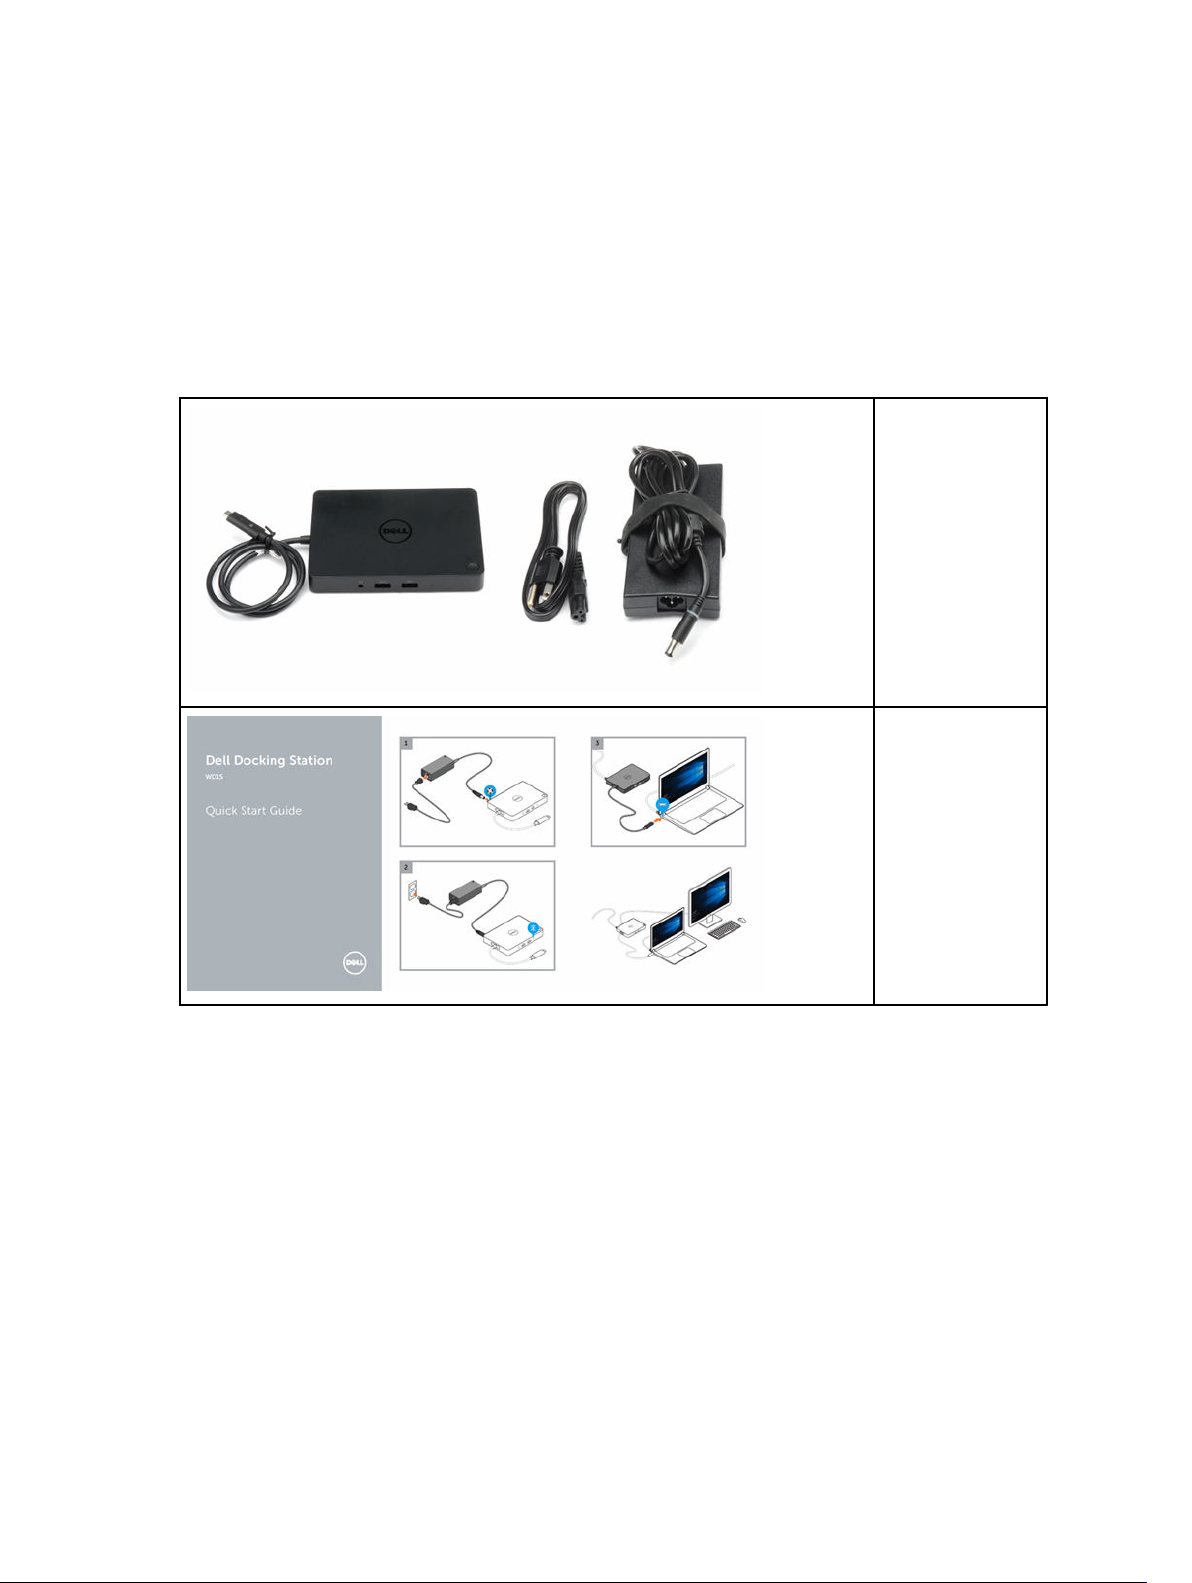
Your docking station ships with the components shown below. Ensure that you have received all the
components and contact Dell (see your invoice for contact information) if something is missing.
Docking Station
with USB Type-C
cable
Power Cord
Power Adapter
Quick Setup Guide
(QSG)
2
5
Page 6
Safety,
Environmental,
and Regulatory
Information
6
Page 7

Hardware Requirements
Before using the docking station, ensure that your laptop or PC has a DisplayPort over USB Type-C or
Thunderbolt port.
3
7
Page 8
Identifying Parts and Features
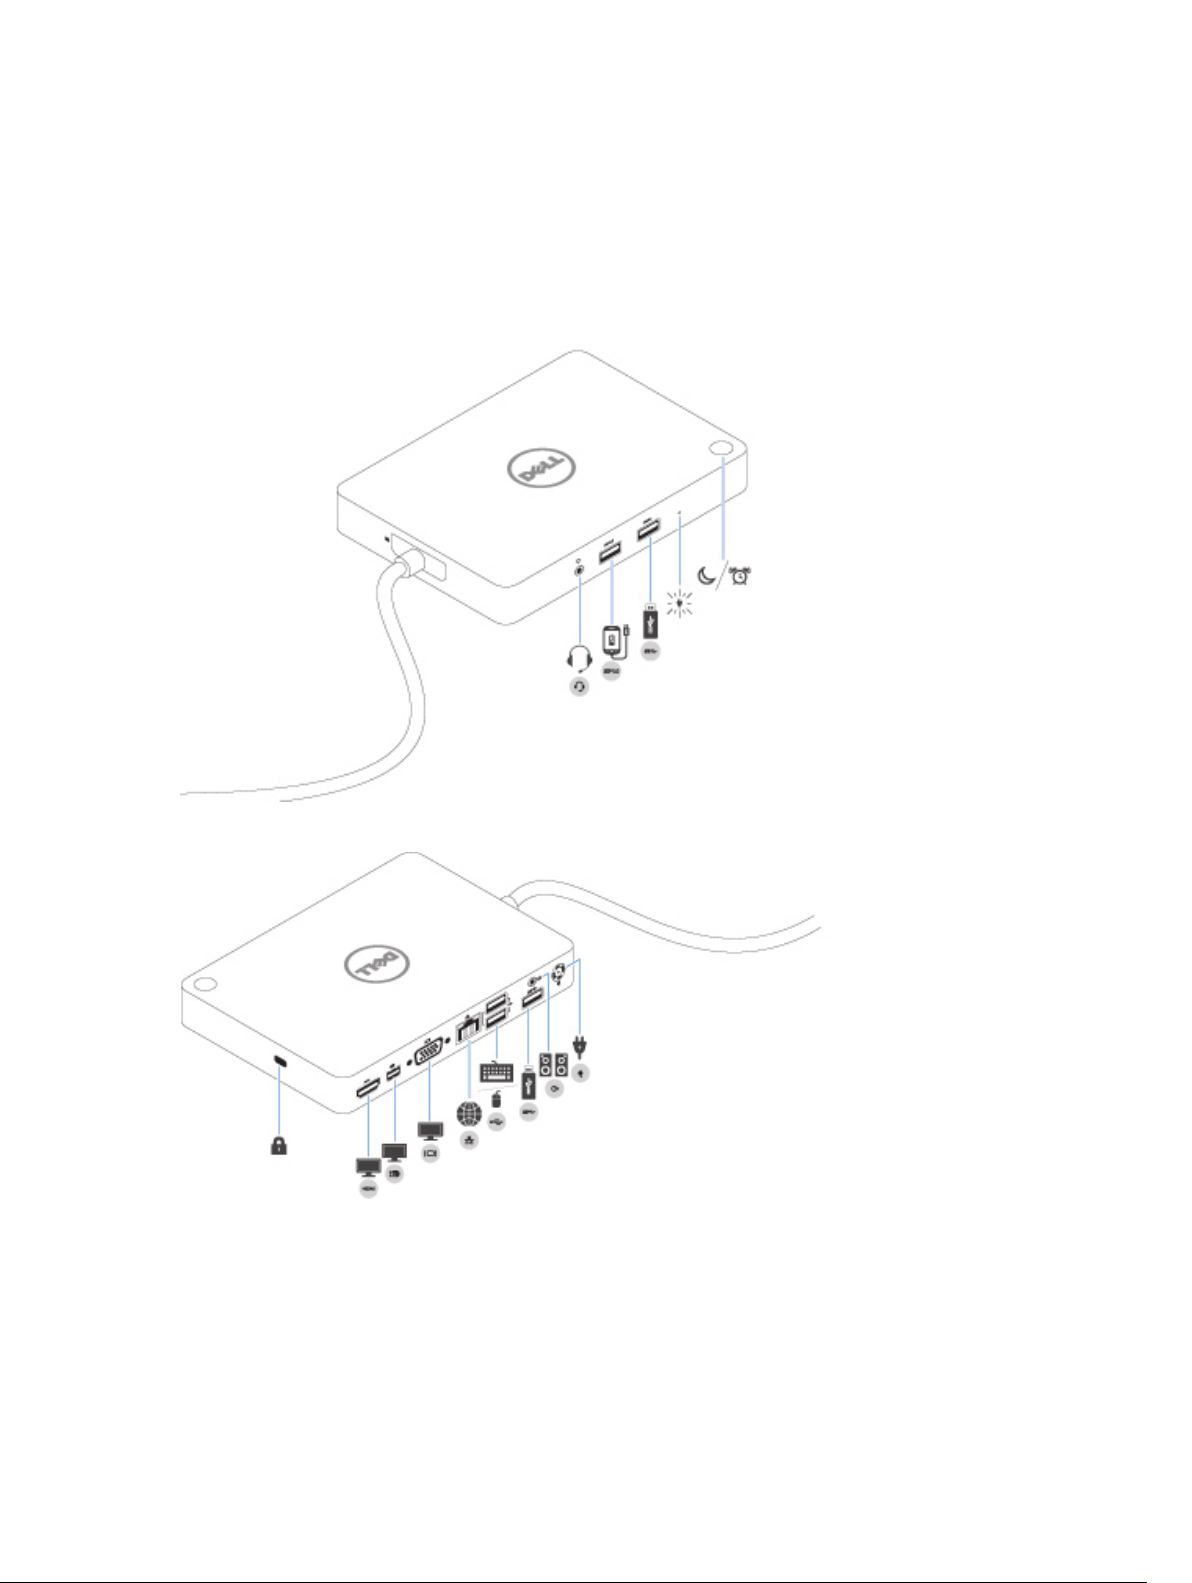
Figure 1. Identifying Parts and Features — Front
4
Figure 2. Identifying Parts and Features — Back
8
Page 9
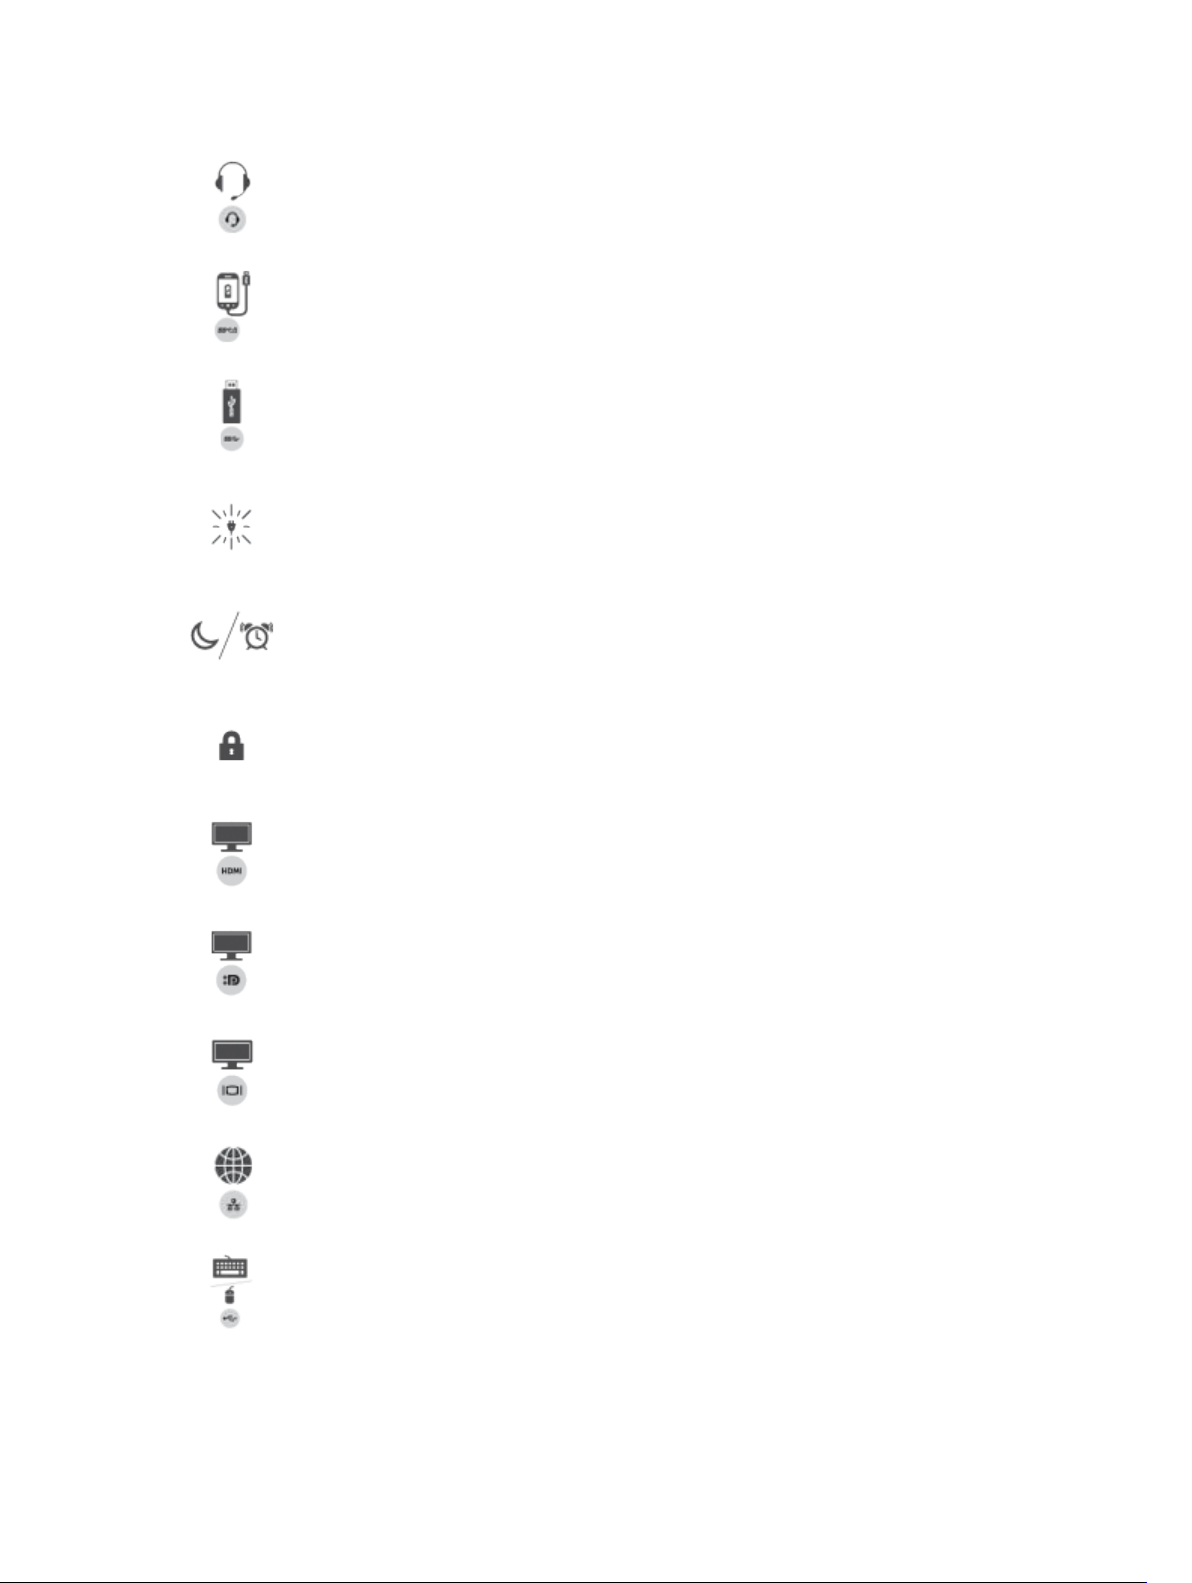
Audio headset port
USB 3.0 port
USB 3.0 port
LED Indicator
Sleep/Wake up button
Kensington Lock slot
HDMI port
Mini DisplayPort
VGA port
Network connector (RJ-45)
USB 2.0 port
9
Page 10

USB 3.0 port
Line-out
Power connector
10
Page 11

Input/Output (I/O) Connectors
The Dell Docking Station WD15 has the below I/O connectors:
5
Video Ports
Input/Output Ports
• mini DisplayPort x 1
• HDMI x 1
• VGA x 1
• USB 3.0 x 2
• USB 3.0 PowerShare x 1
• USB 2.0 x 2
• 7.4 mm DC-in x 1
• Gigabit Ethernet (RJ–45) x 1
• Headset connector x 1
• Line-out connector x 1
11
Page 12
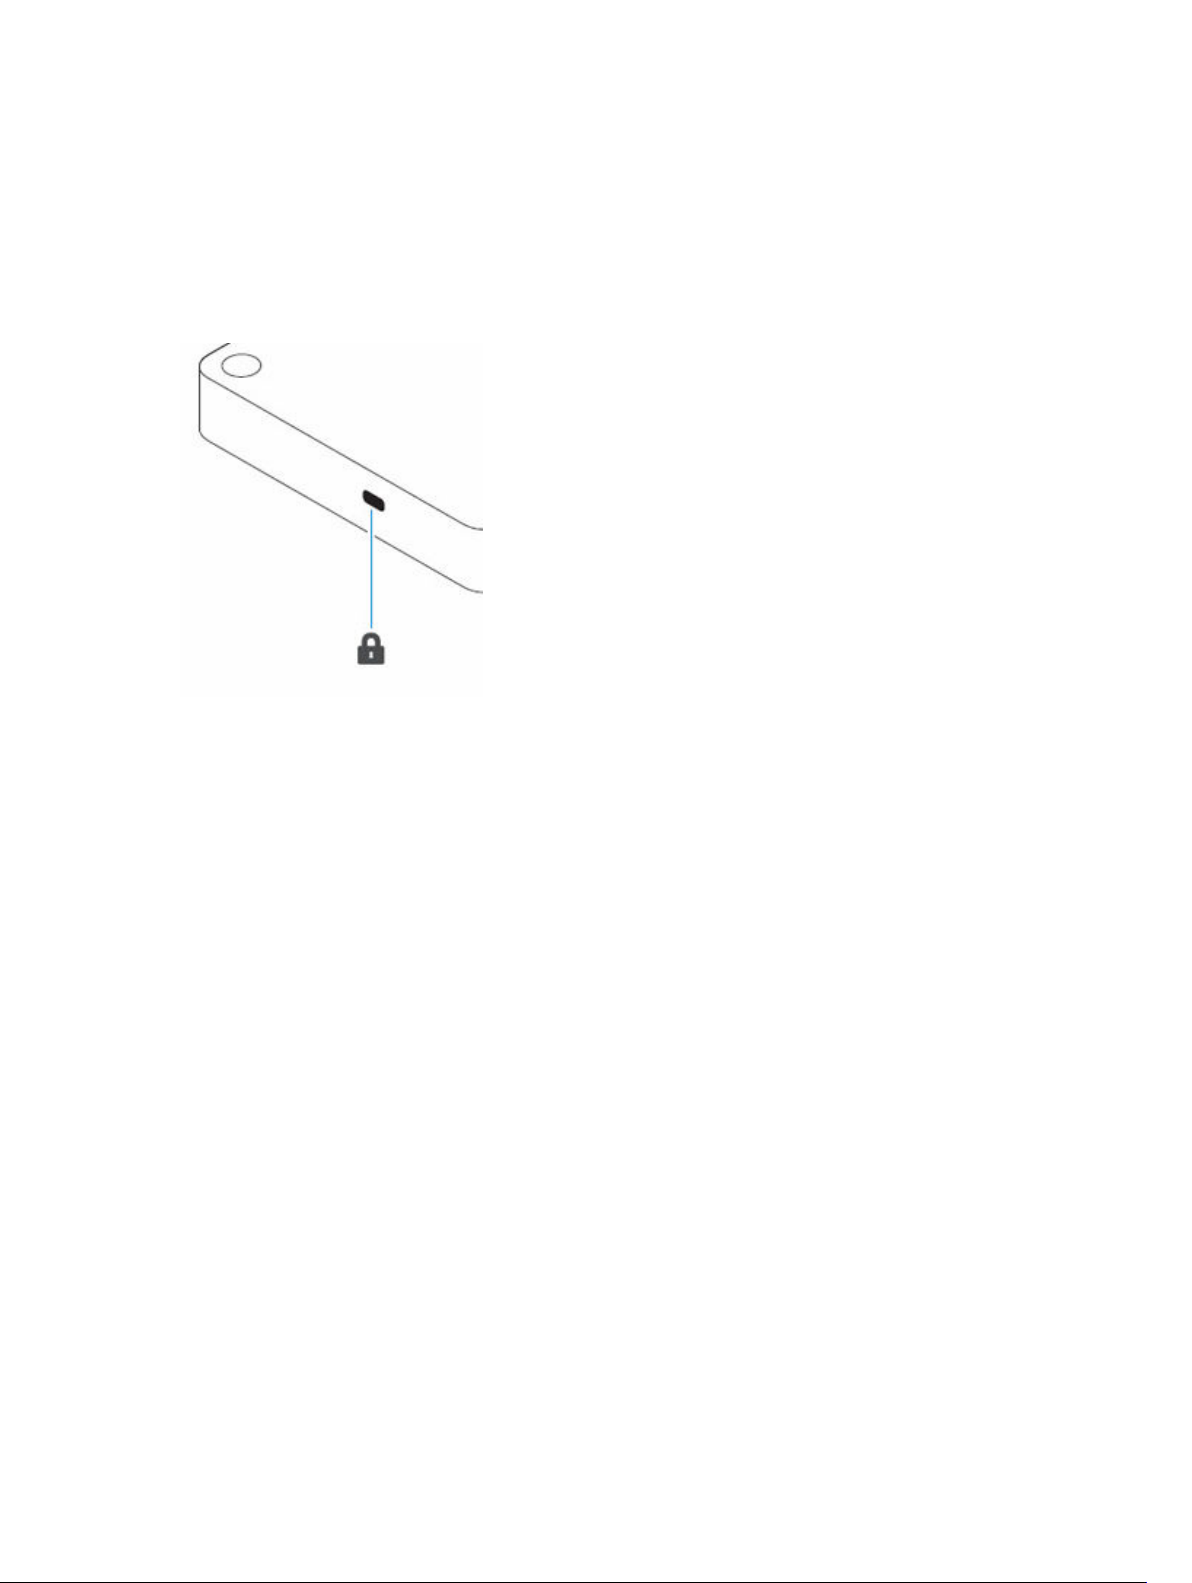
Kensington Lock Slot
Figure 3. Kensington Lock Slot
6
12
Page 13

7
Important Information
You must update your computer’s BIOS and the Dell Docking Station drivers to the latest versions
available at www.dell.com/support before using the docking station. Older BIOS versions and drivers
could result in the docking station not being recognized by your computer or not functioning optimally.
Updating the Dell Docking Station WD15 / Dell Thunderbolt Dock TB15 driver set
To fully support the new generation Dell Docking Station WD15 and the Dell Thunderbolt Dock TB15, it is
highly recommended to install the following BIOS/Drivers on a 64–bit Windows operating system.
1. Go to www.dell.com/support and click Detect Product to auto-detect your product, or enter your
computer’s Service Tag in the Enter a Service Tag or Express Service Code field, or click View
Products to browse to your computer model.
2. Flash the latest BIOS available for the system. This is available for download at dell.com/support
under the “BIOS” section. Re-start the computer before the next step.
3. Install the Intel Thunderbolt Controller Driver available for your system. This is available for
download at dell.com/support under the “Chipset” section. Re-start the computer before the next
step.
NOTE: Applicable only for systems with Intel Thunderbolt controller support.
4. Install the Intel Thunderbolt 3 Firmware Update available for your system. This is available for
download at dell.com/support under the “Docks/Stands” section. Re-start the computer before the
next step.
NOTE: Applicable only for systems with Intel Thunderbolt controller support.
5. Install the Realtek USB GBE Ethernet Controller Driver for Dell Thunderbolt Dock TB15 and Dell
Dock WD15 available for your system. This is available for download at dell.com/support under the
“Docks/Stand” section.
6. Install the Realtek USB Audio Driver for Dell Wireless Dock WLD15, Dell Thunderbolt Dock TB15,
and Dell Docking Station WD15 available for your computer. This is available for download at
dell.com/support under the “Docks/Stands” section.
7. For Windows 8.1 and Windows 10 operating systems only, install the Patch for USB audio/mouse
issue on Dell Thunderbolt Dock TB15 and Dell Dock WD15 available for your system. This is
available for download at dell.com/support under the “Docks/Stands” section. Re-start the computer
before the next step.
NOTE: The docking station is not required to be connected to the computer during the driver
installation.
13
Page 14

Updating the Graphics drivers for your computer
The Microsoft Windows operating systems include the VGA graphics drivers only. Therefore, for optimum
graphics performance, it is recommended that Dell graphics drivers applicable for your computer be
installed from dell.com/support under the “Video” section
NOTE:
1. For nVidia Discrete Graphics solutions on the Latitude E-Family and Mobile Precision 3rd
Generation and above computers:
a. First, install the Intel Media Adapter Graphics Driver applicable to your computer.
b. Second, install the nVidia Discrete Graphics Driver applicable to your computer.
2. For AMD Discrete Graphics solutions on the Latitude E-Family and Mobile Precision 5th
Generation and above computers:
a. First, install the Intel Media Adapter Graphics driver applicable to your computer.
b. Second, install the AMD Discrete Graphics driver applicable to your computer.
NOTE: Both 2nd and 3rd Generation Intel Core CPUs are available on the 4th Generation Latitude
E-Family and Mobile Precision computers. Please re-install the graphics drivers when you exchange
a 2nd Generation CPU for a 3rd Generation CPU, and vice versa.
NOTE: Both 3rd and 4th Generation Intel Core CPUs are available on the 5th Generation Latitude EFamily and Mobile Precision computers, except for the Dell Latitude 3440/3540 computers. Please
re-install the graphics drivers when you exchange a 3rd Generation CPU for a 4th Generation CPU,
and vice versa.
14
Page 15
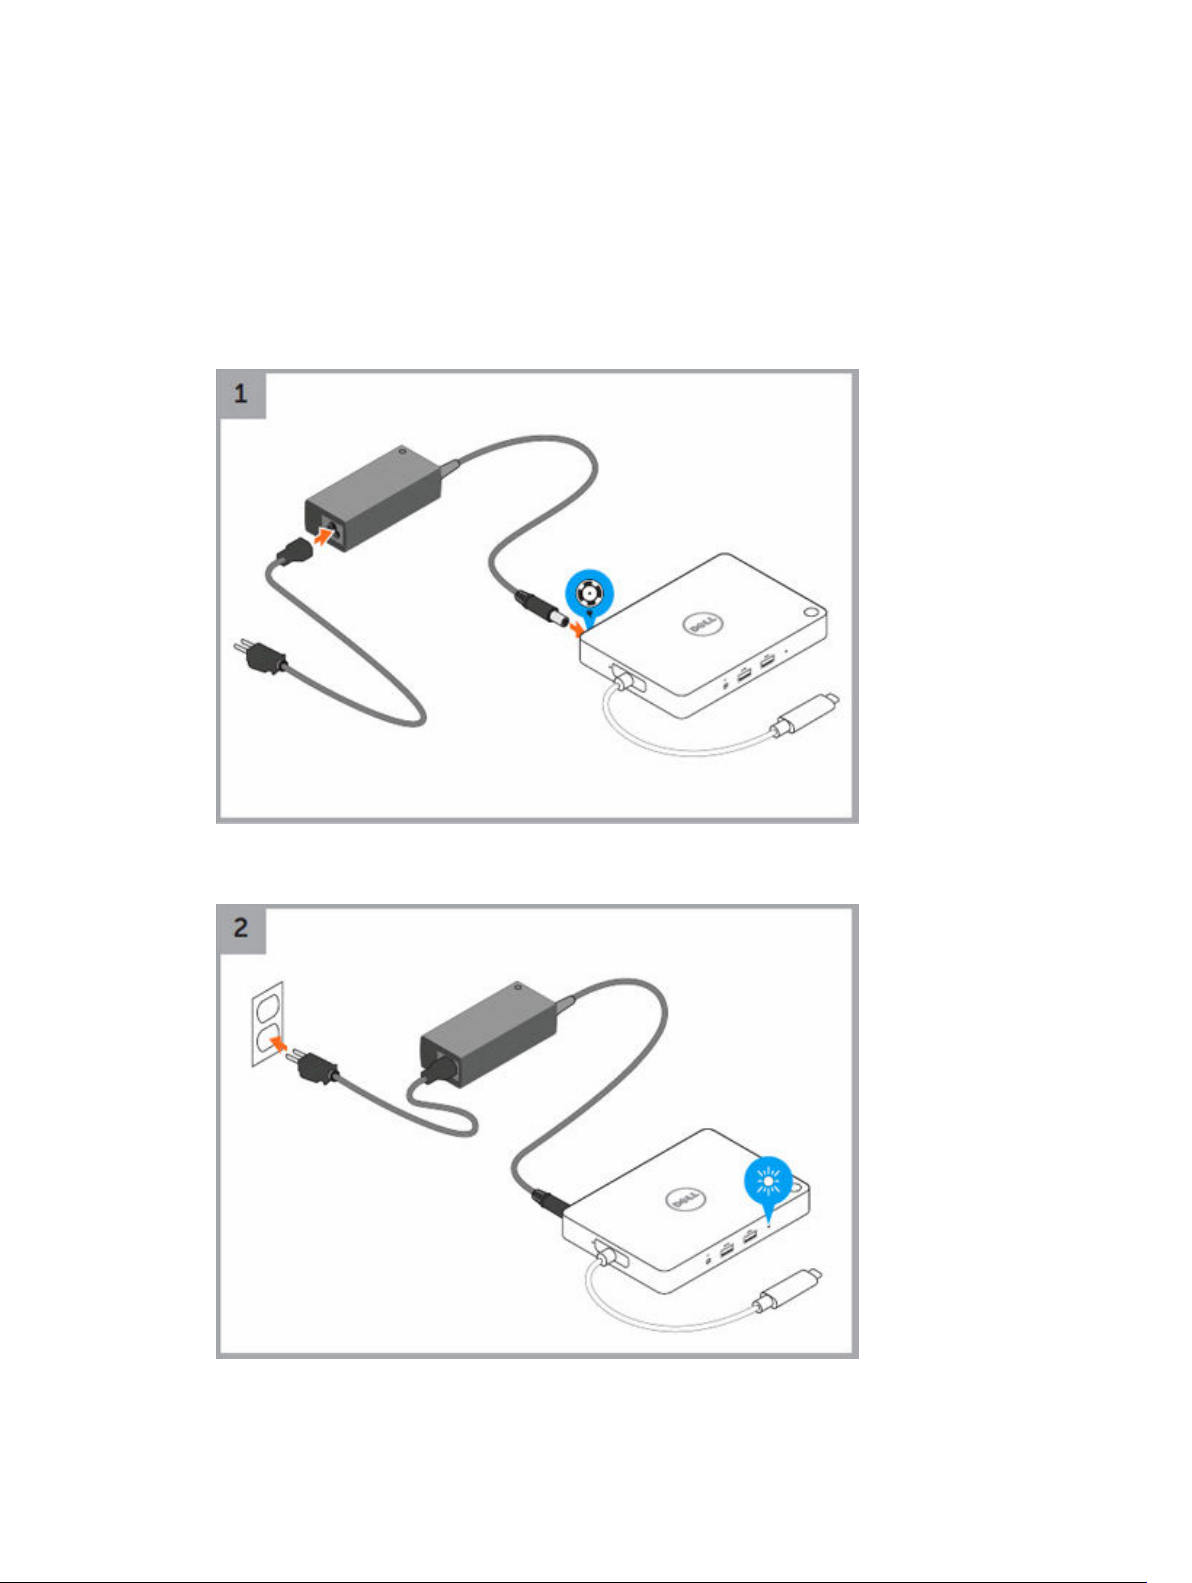
Quick Setup of Hardware
1. Connect the AC adapter to the 7.4 mm DC-in power input on the Dell Docking Station WD15.
8
Figure 4. Connecting the AC Adapter
2. Connect the AC adapter to a power outlet.
15
Page 16
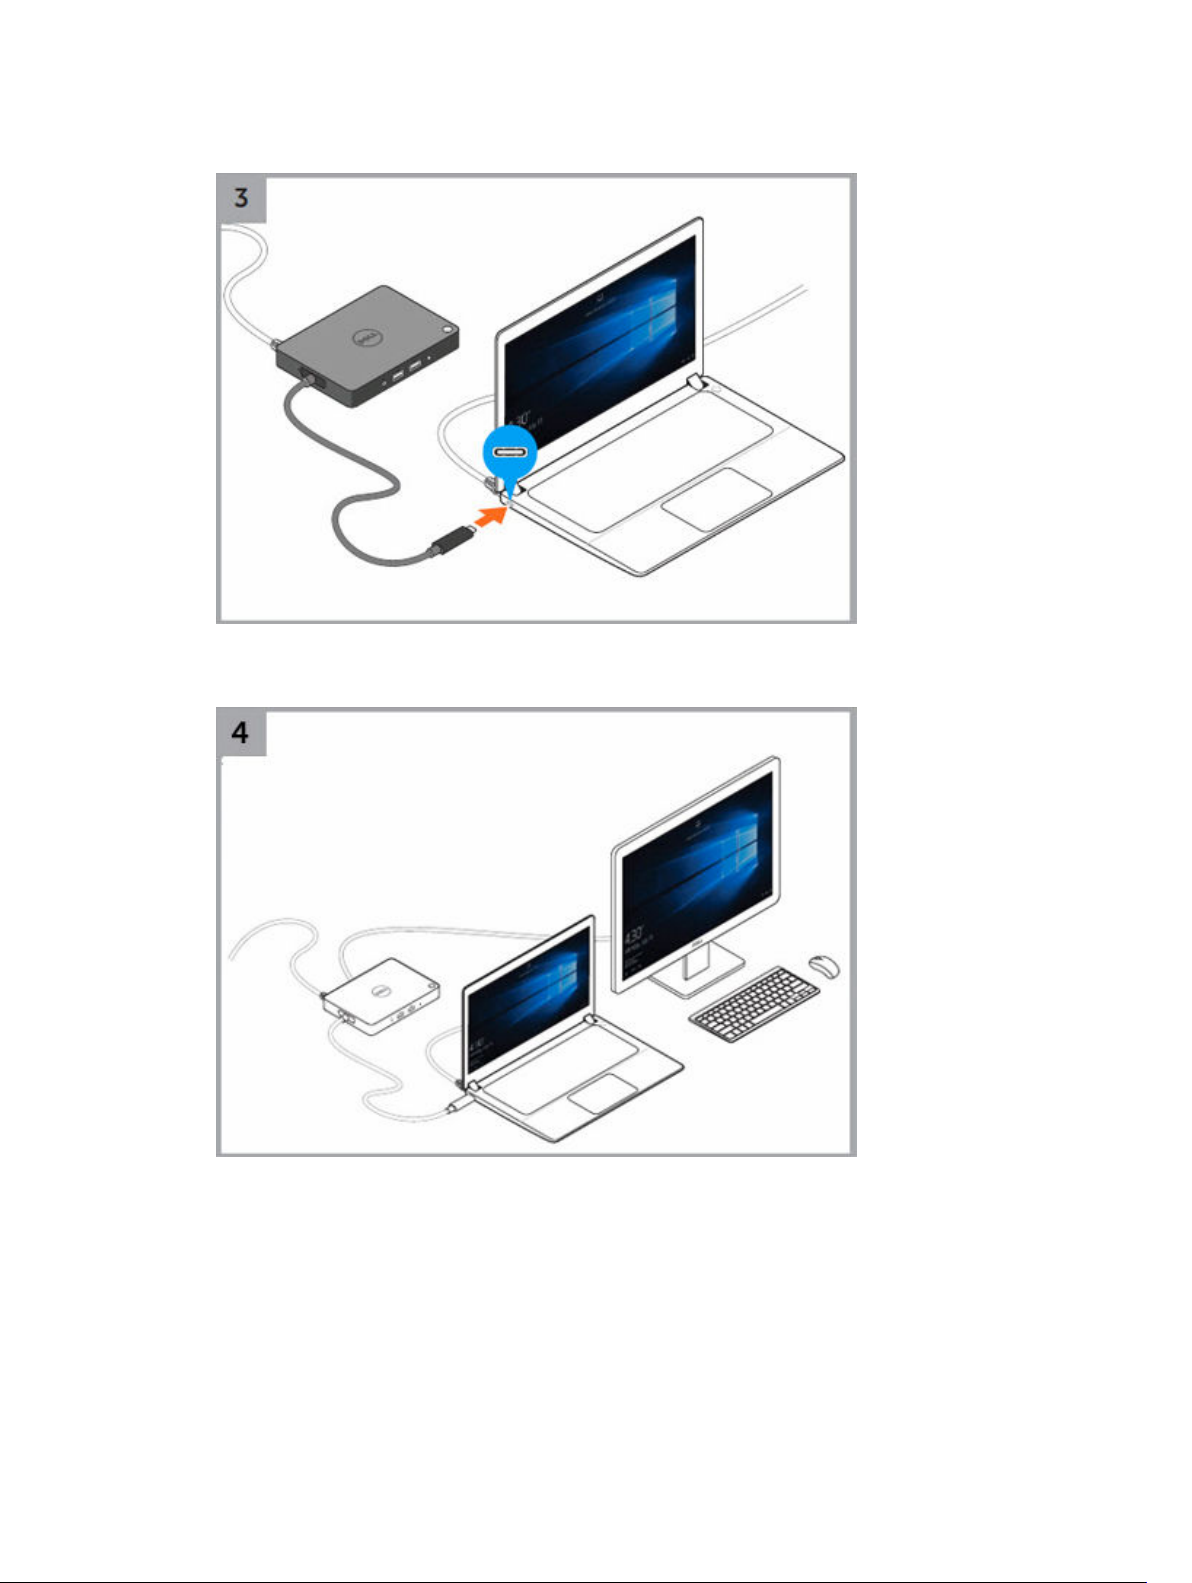
3. Connect the USB Type-C connector to the computer.
Figure 5. Connecting the USB Type-C connector
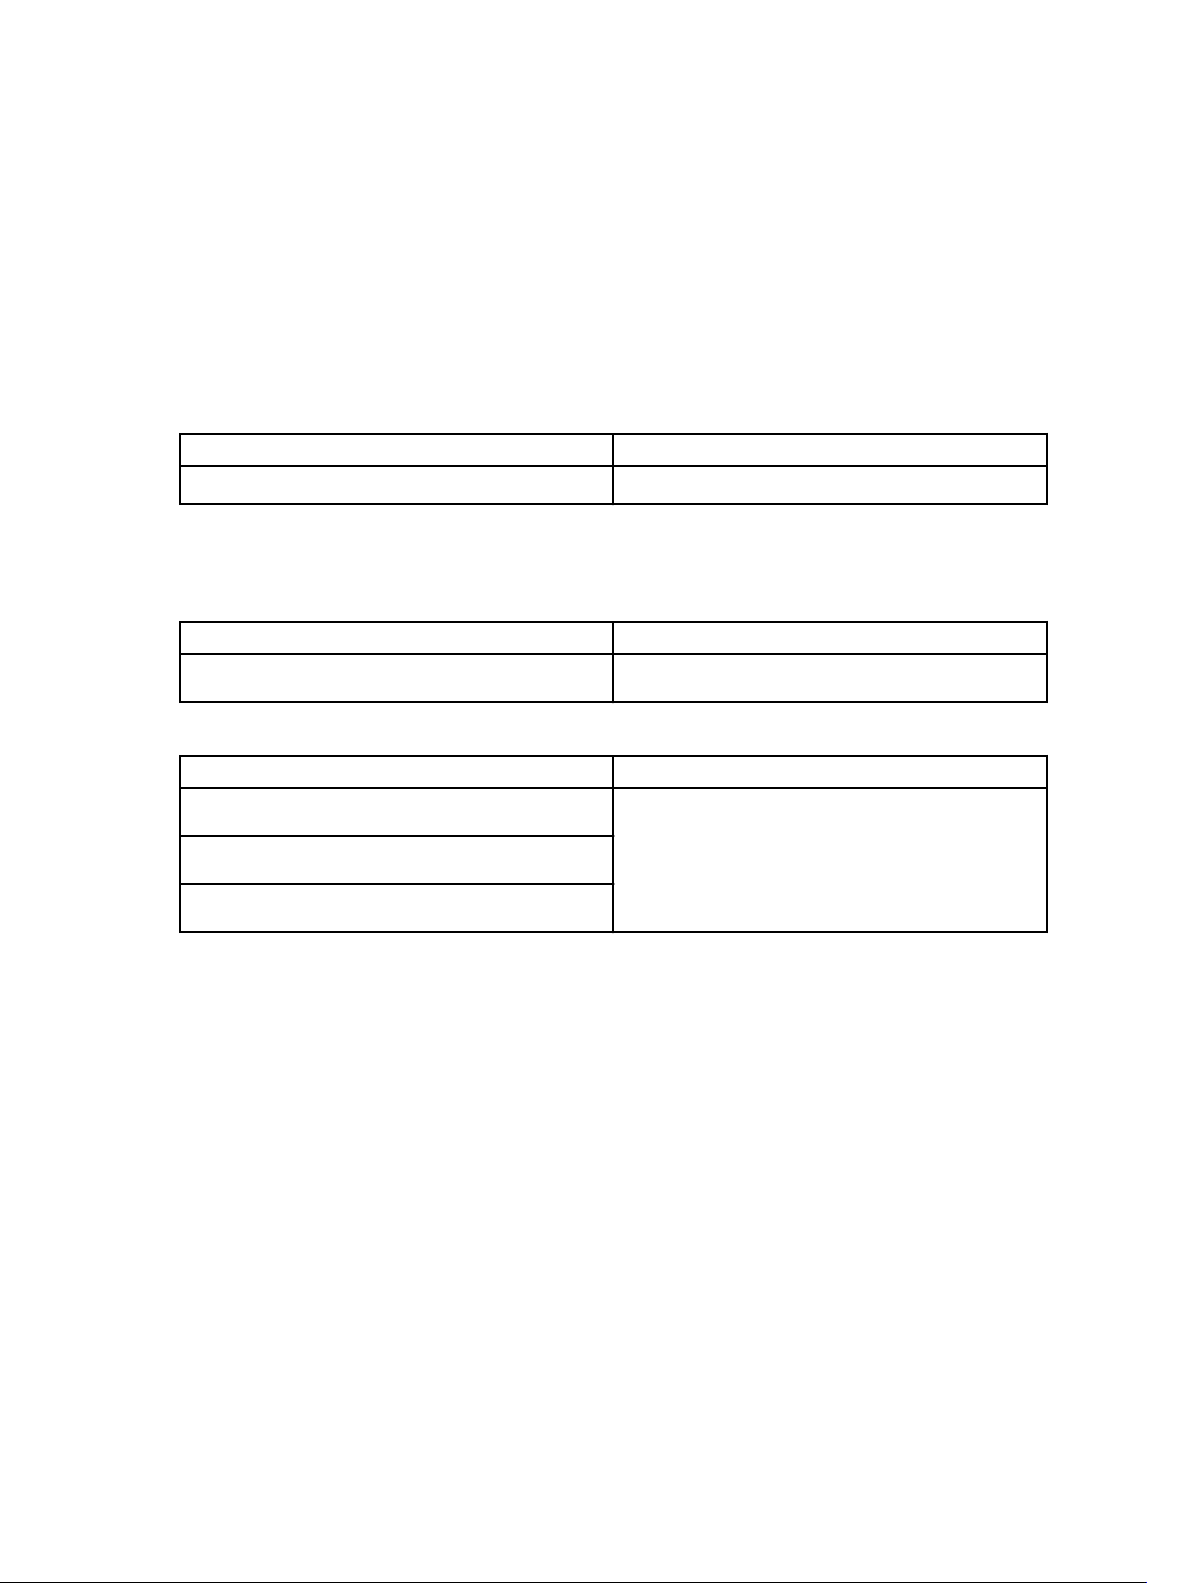
4. Connect multiple displays to the docking station, as needed.
16
Page 17
LED Status Indicators
Power Adapter LED
Table 1. Power Adapter LED indicator
State LED Behavior
Connected Solid White
Docking Status Indicator
Table 2. Docking Station LED Indicators
State LED Behavior
Connected Solid White
Table 3. RJ-45 LED Indicators
Link Speed Indicators Ethernet Activity Indicator
10 Mb = Green Yellow Flashing
9
100 Mb = Orange
1 Gb = Green + Orange
17
Page 18
10
Configuring the Intel HD Graphics utility
If connecting two displays, follow these steps:
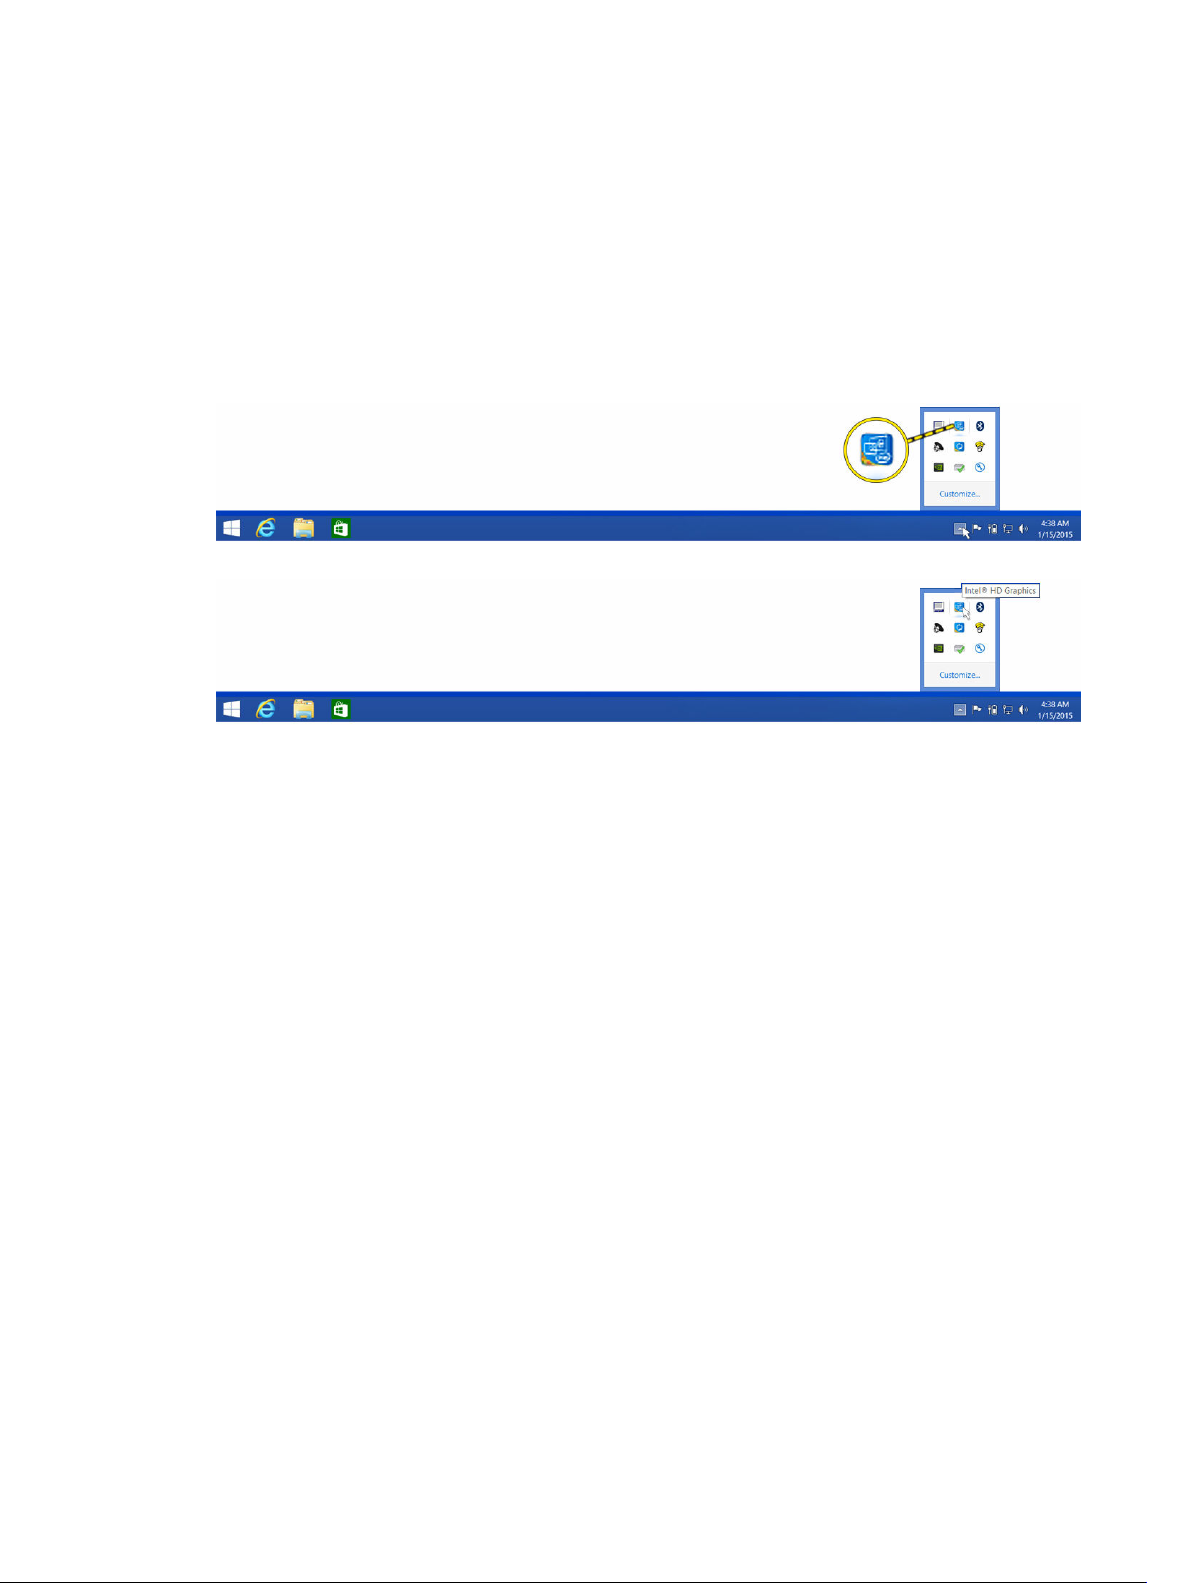
1. Click the icon list on the task bar.
2. Click the Intel HD Graphics utility on your taskbar as shown here.
18
Page 19
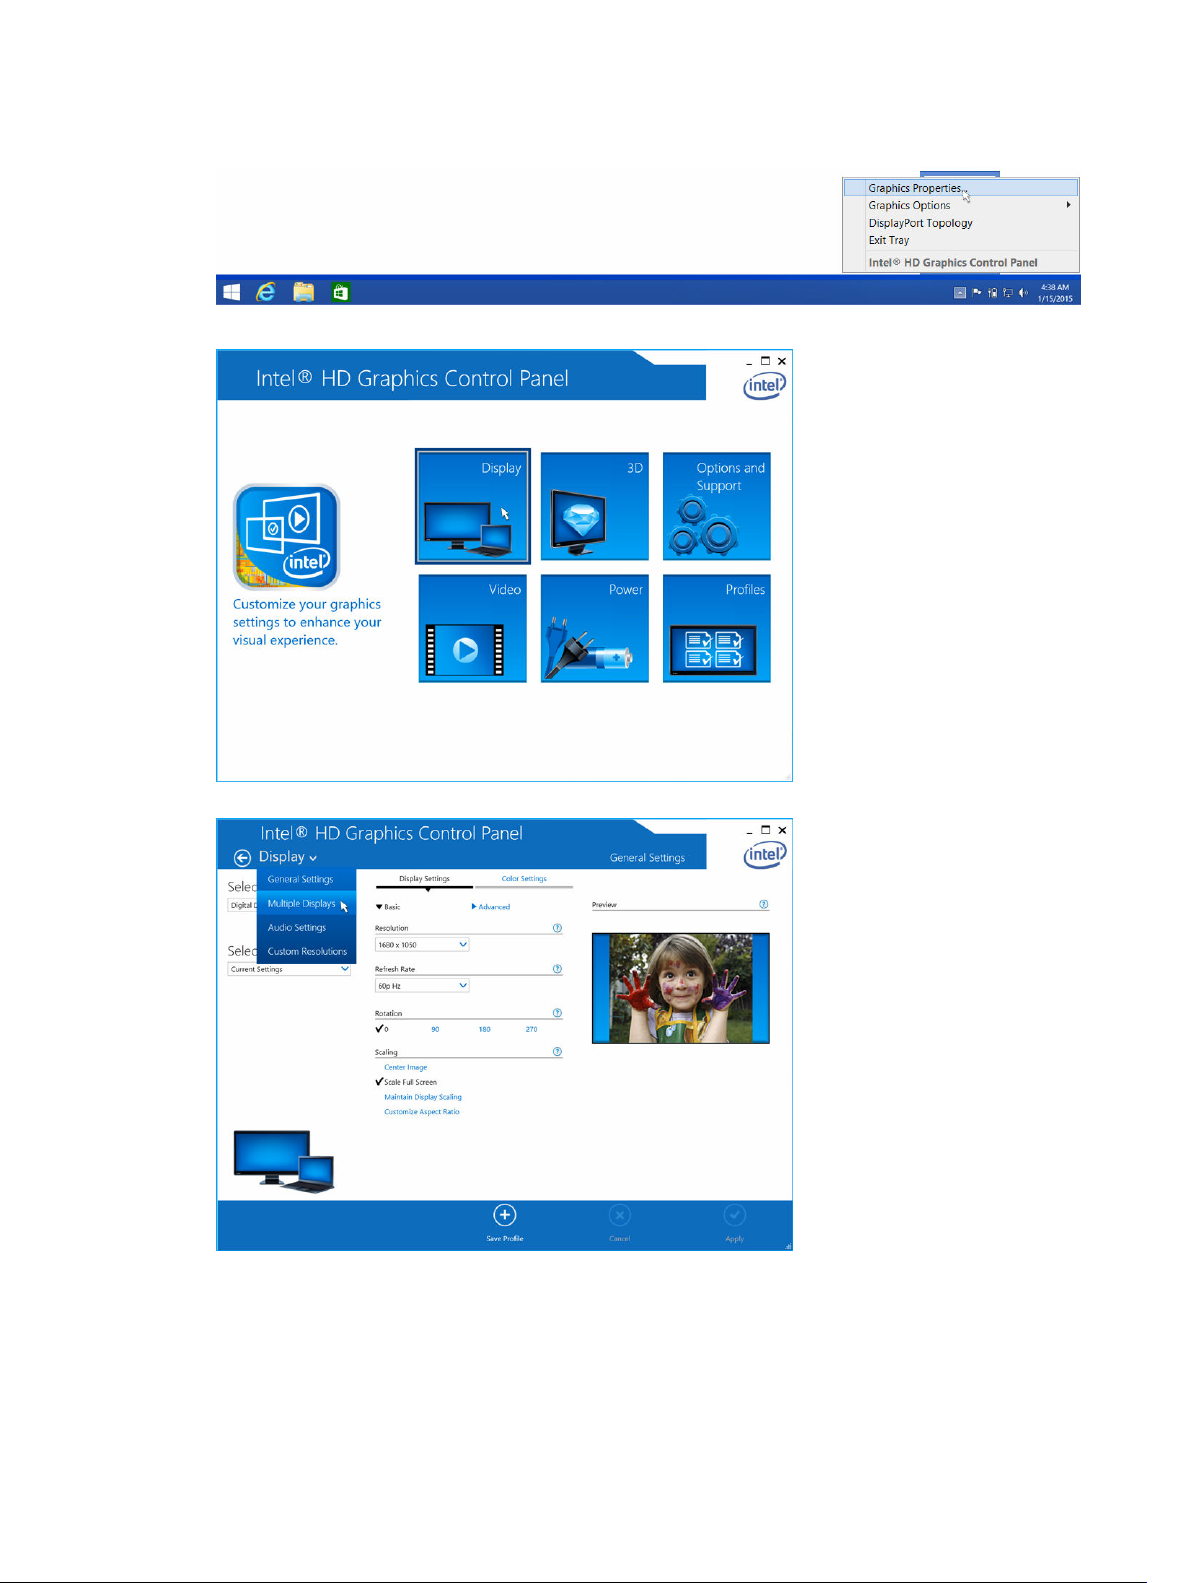
3. Click Graphics Properties.
4. Click Display.
5. Click Display and select Multiple Displays.
19
Page 20
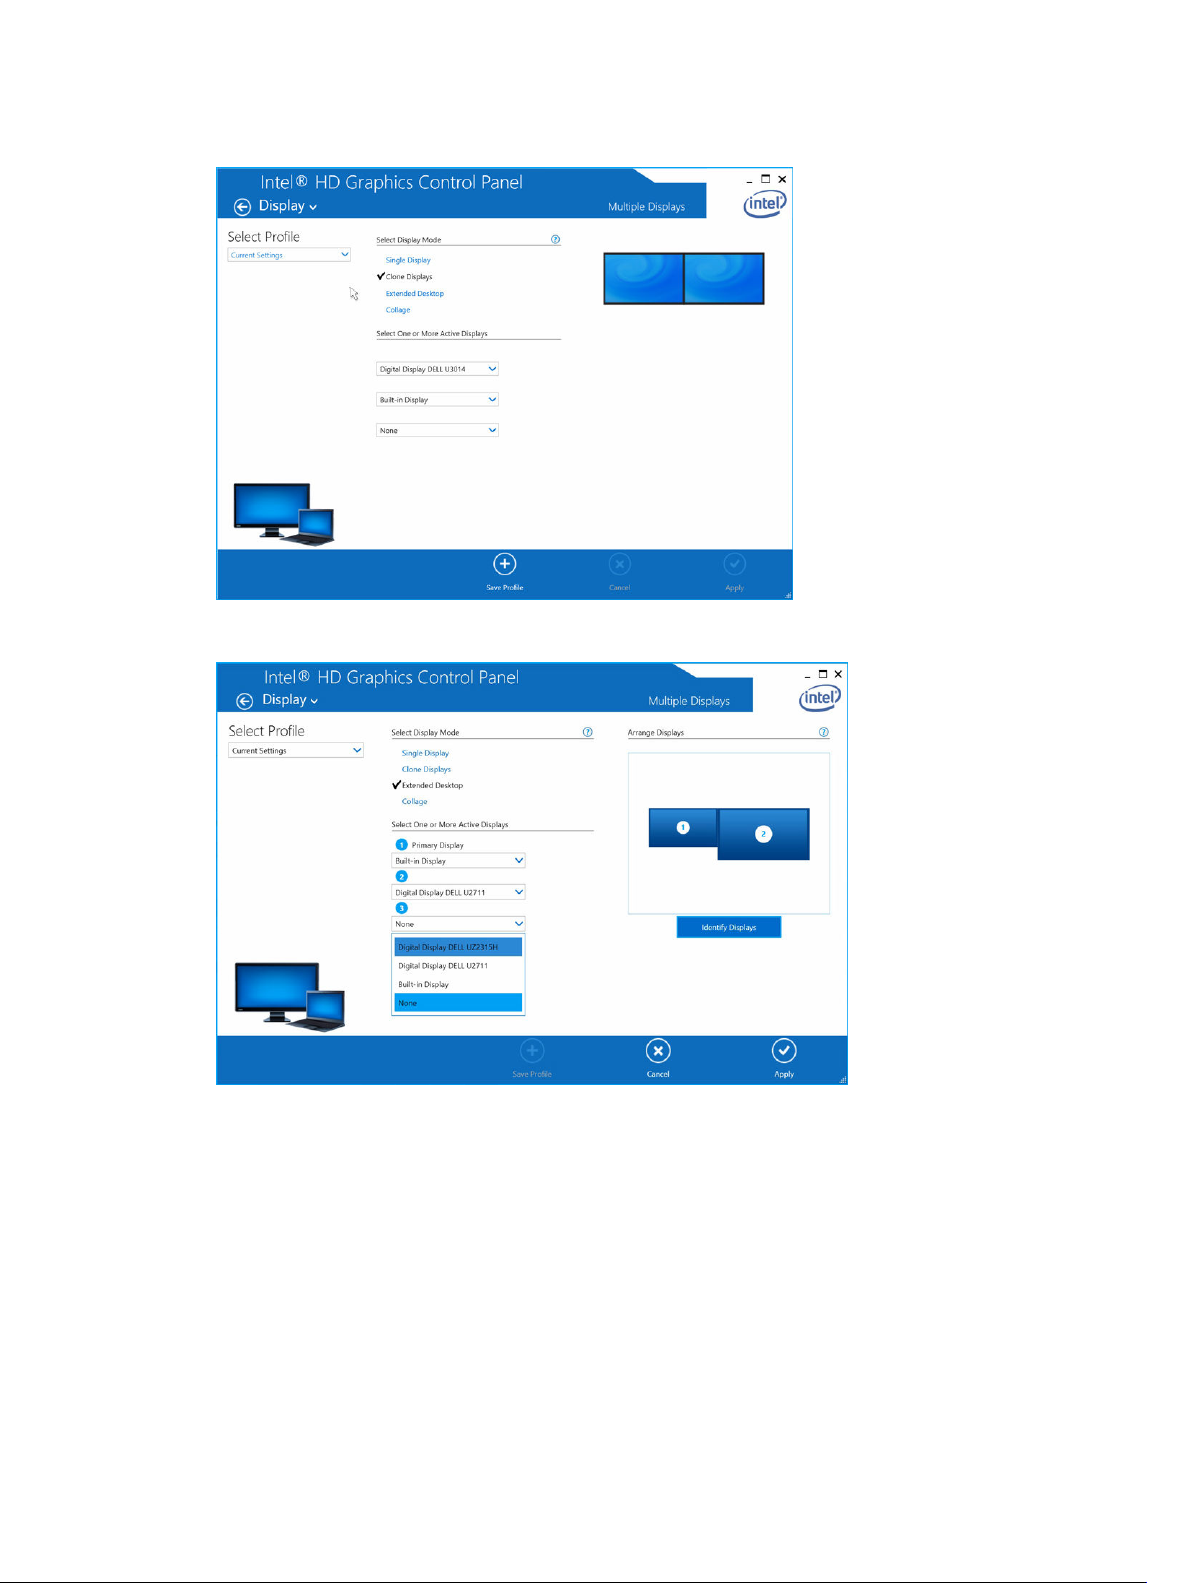
6. Select your preferred Display Mode.
7. Select and arrange your displays to your preferred positions and then click Apply for the changes to
take effect.
20
Page 21
11
Removing the USB Type-C Cable
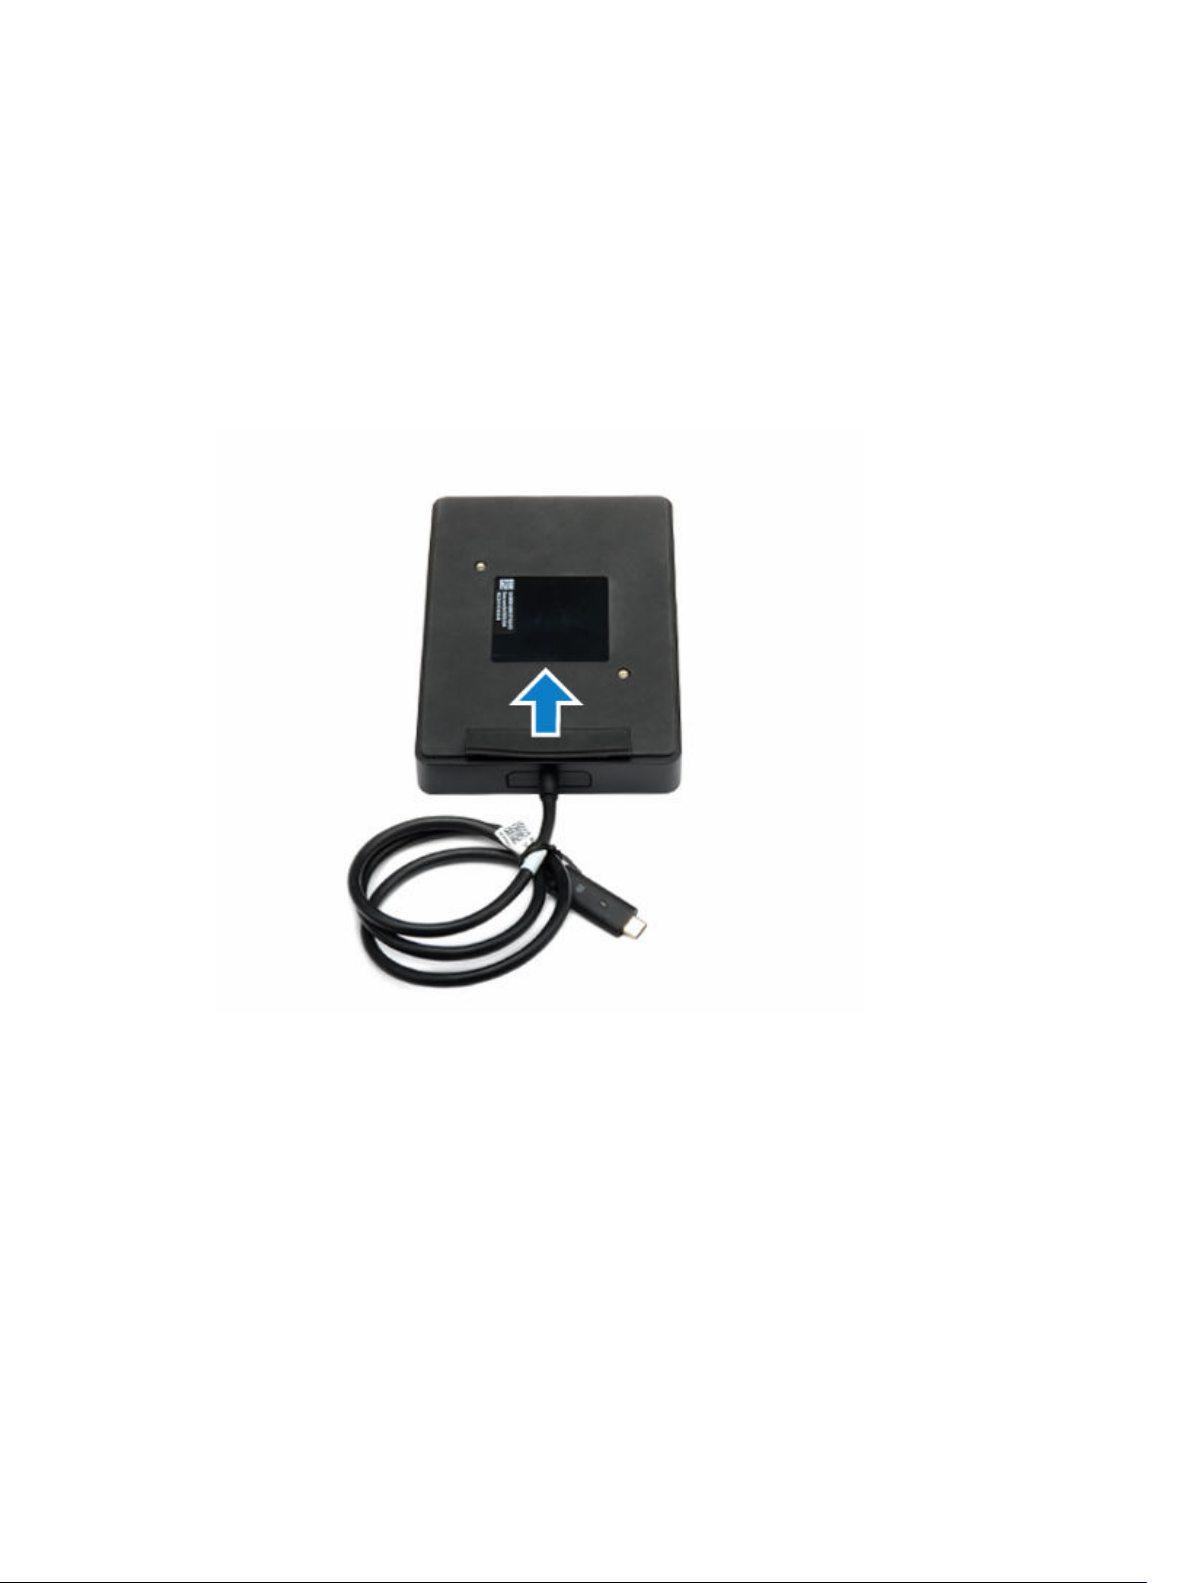
The Dell Docking Station WD15 is shipped with the USB Type-C cable attached. To remove/change the
cable, follow these steps:
1. Turn over the docking station.
21
Page 22
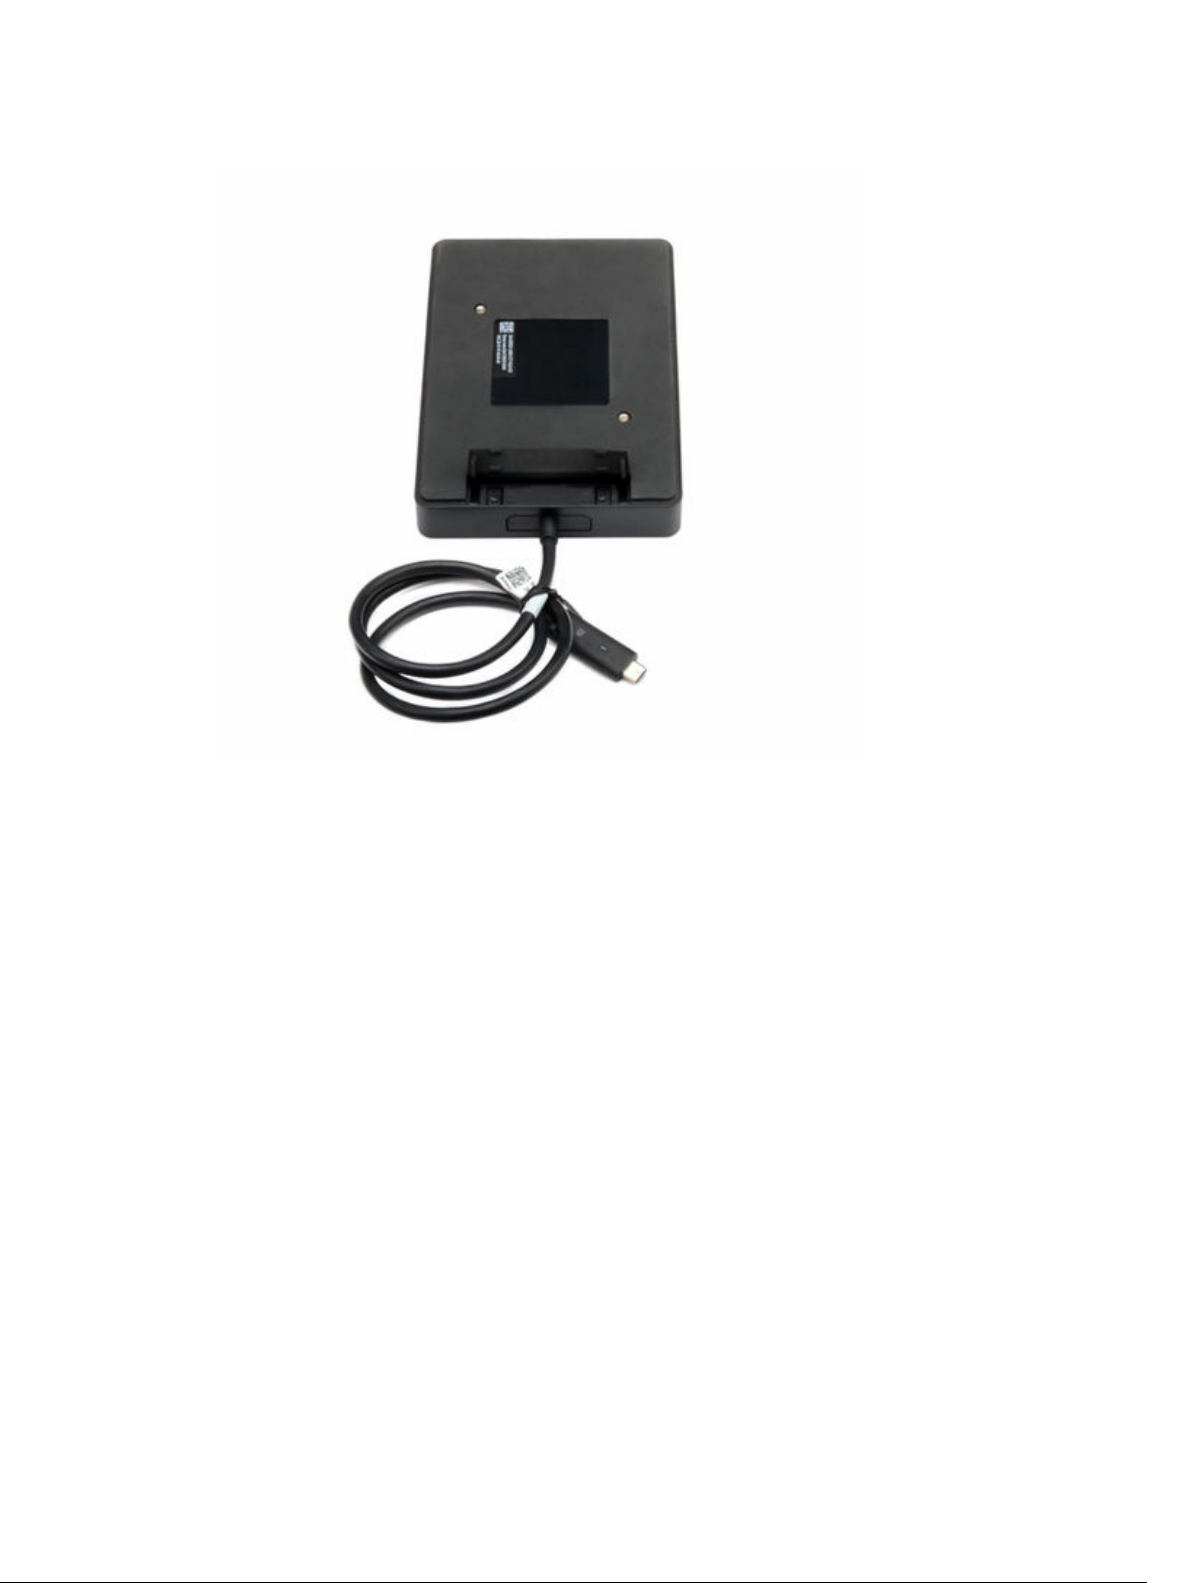
2. Peel back the rubber safety shield as shown.
22
Page 23
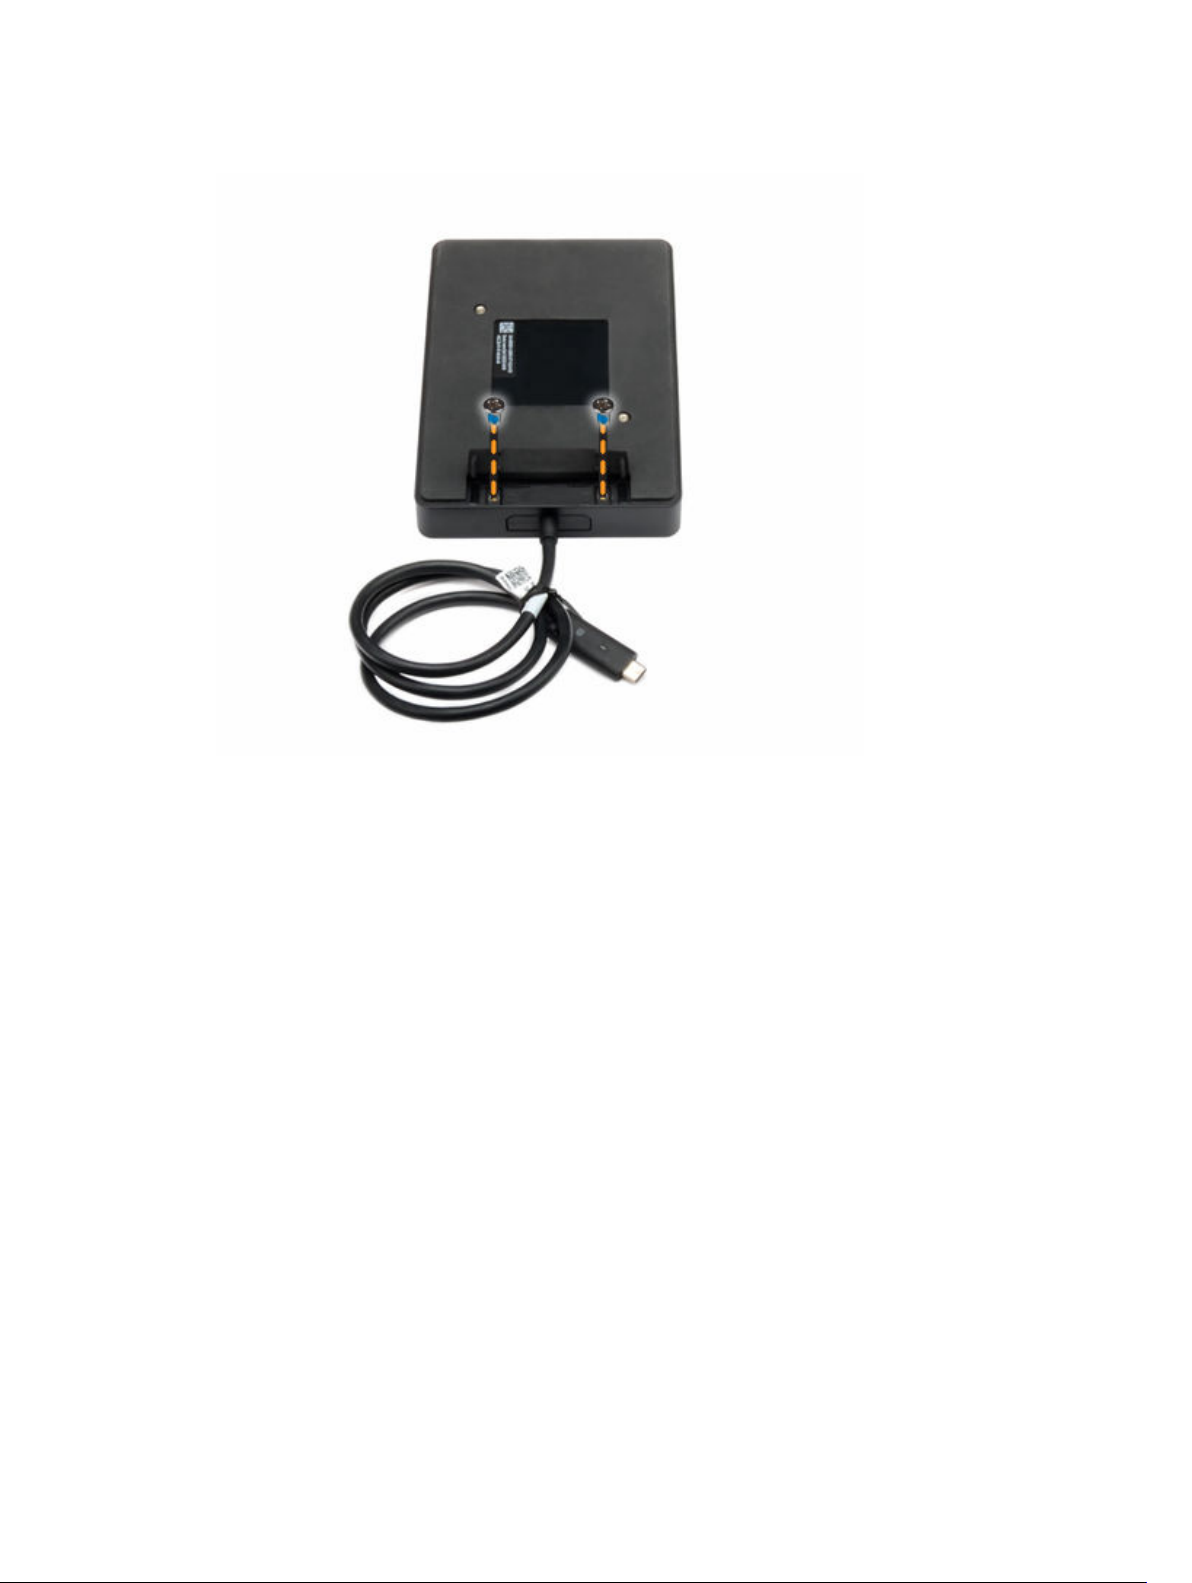
3. Remove the two M2.5 x 5 screws.
23
Page 24
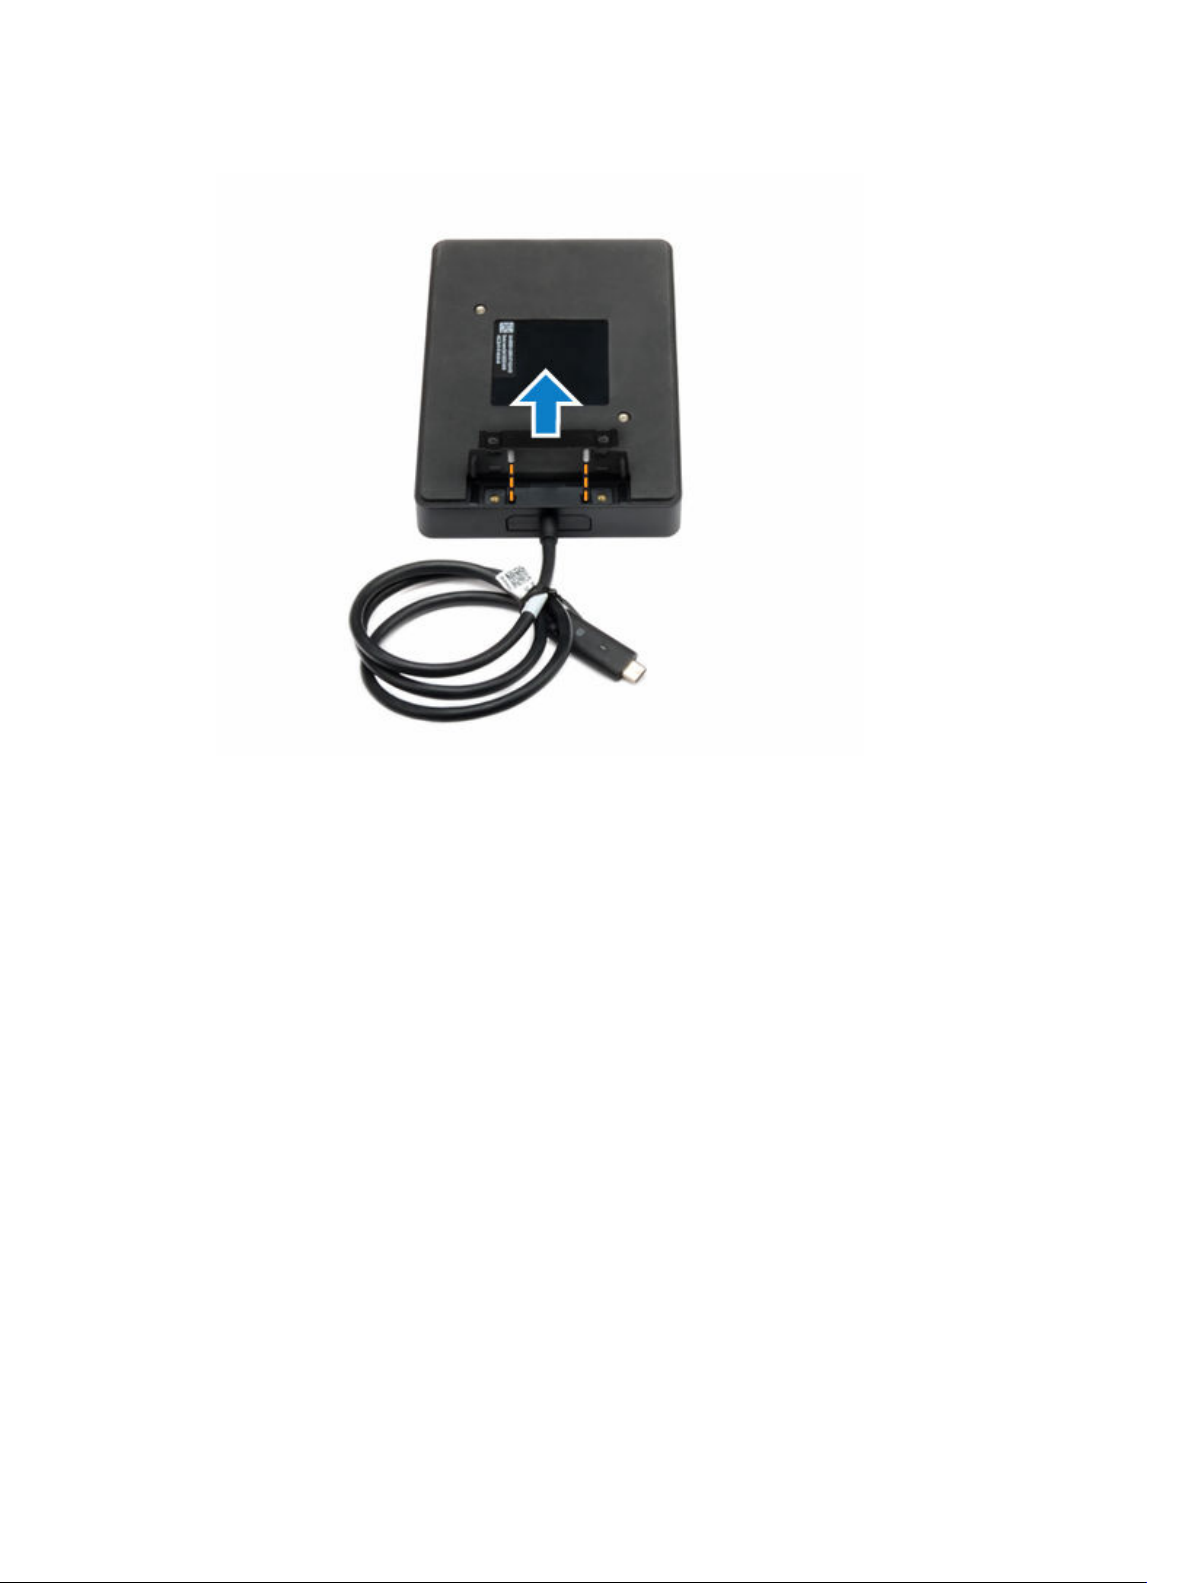
4. Lift and remove the metal cable bracket.
24
Page 25
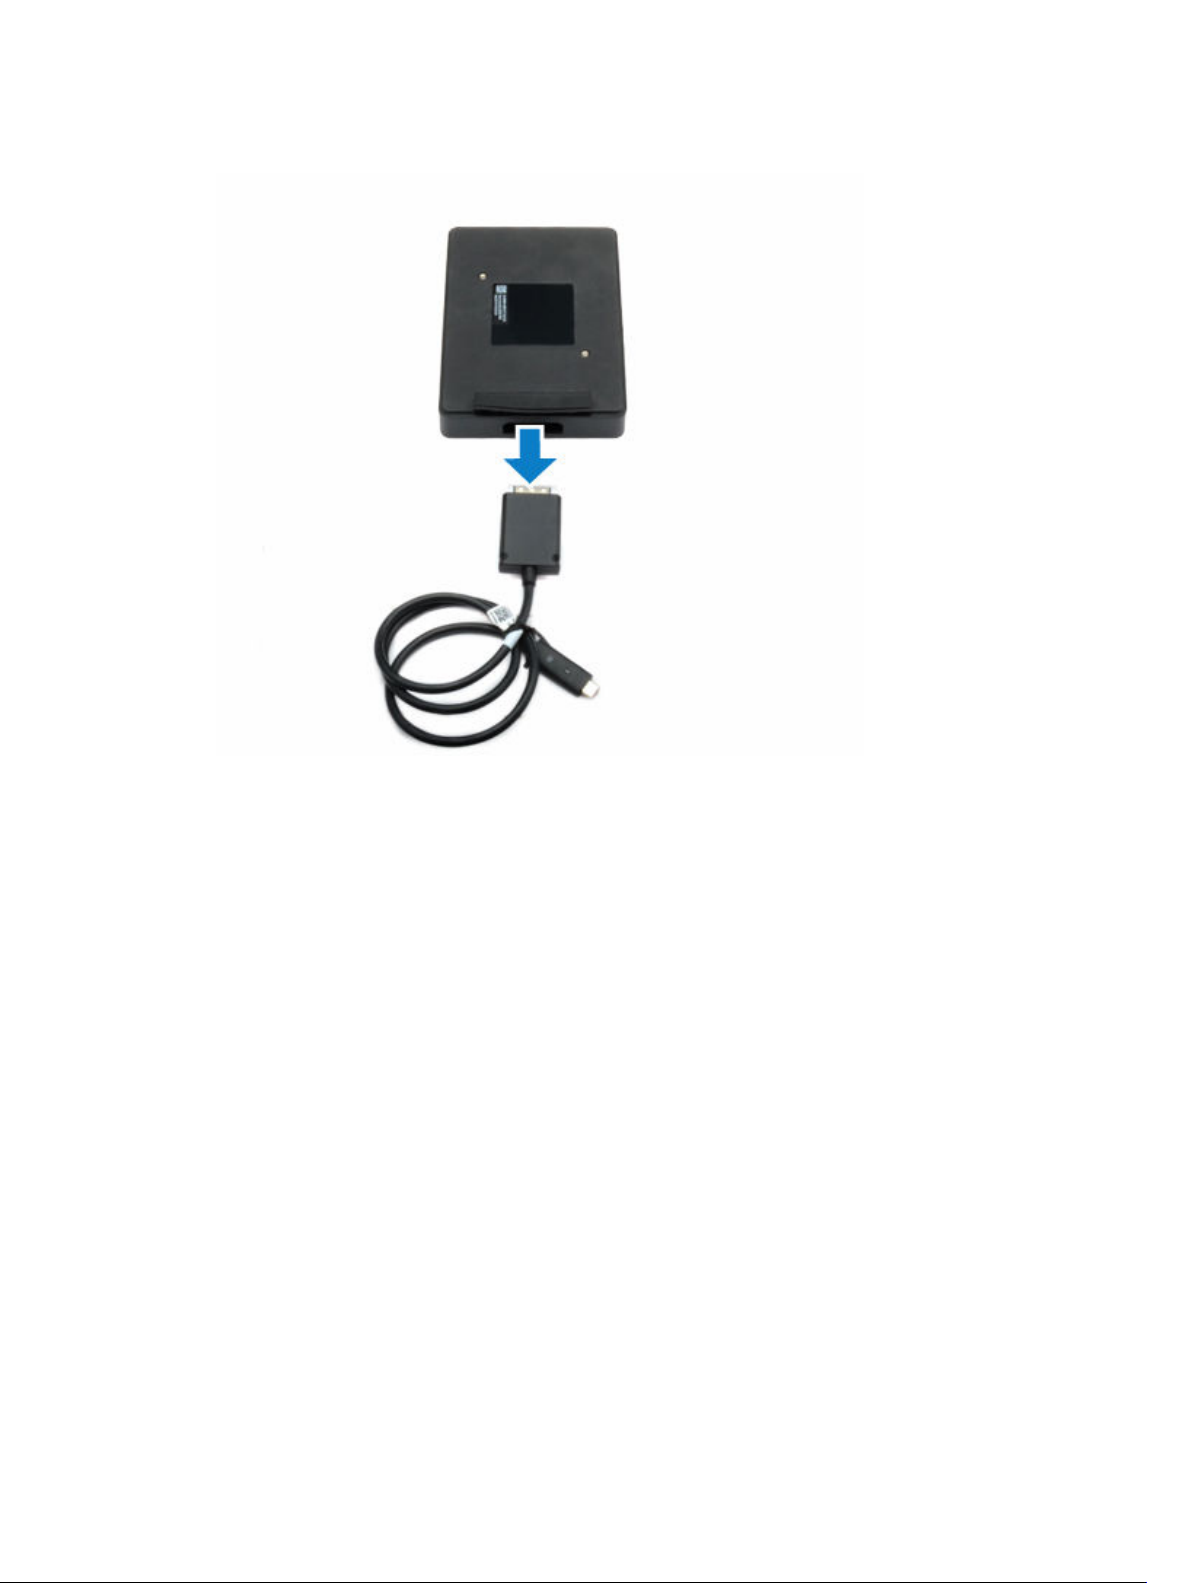
5. Pull out the USB Type-C cable from its connector inside the docking station.
25
Page 26
12
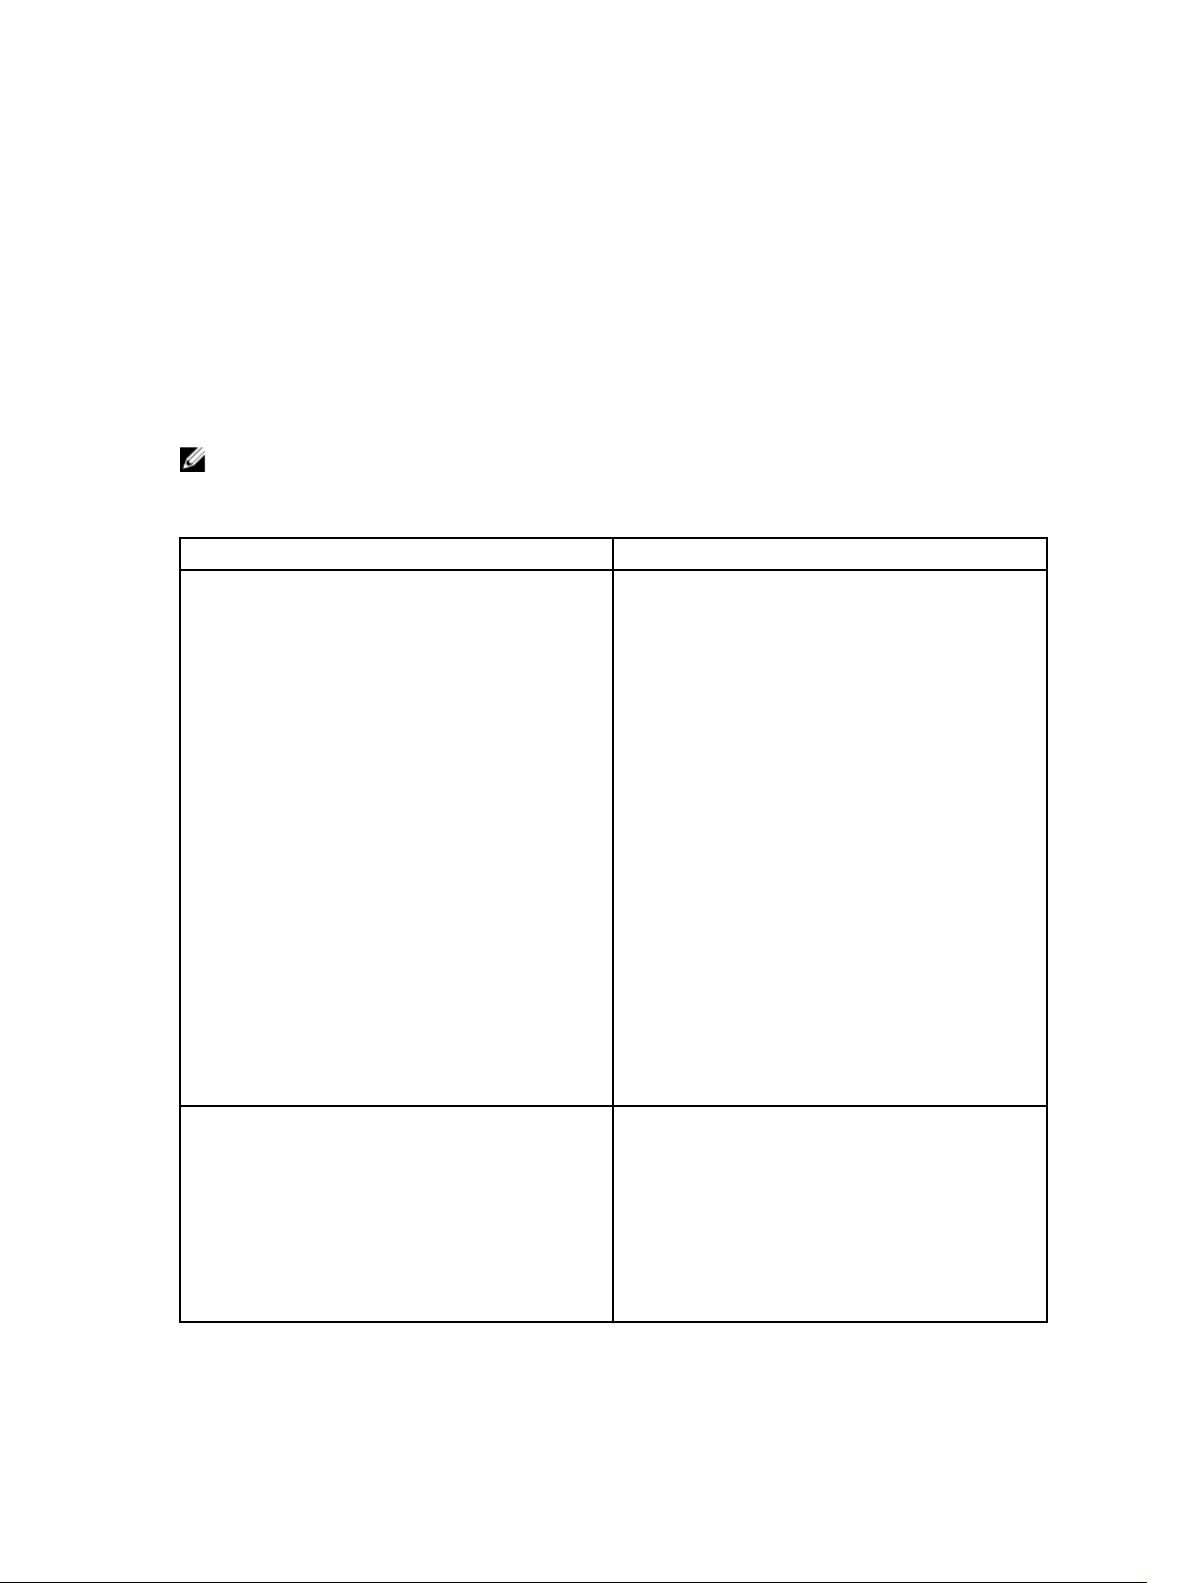
Troubleshooting the Dell Docking Station WD15
Symptoms and solutions
NOTE: The Dell Docking Station WD15 only works with DisplayPort over USB-C or Thunderbolt
protocols and is not compatible with all USB-C ports.
Table 4. Symptoms and solutions
Symptoms Suggested solutions
No video on the monitors attached to the HDMI,
miniDP port, or the VGA port on the docking
station.
• Ensure that the computer is connected with
the docking station to disconnect and
reconnect to the docking station.
• Ensure that the:
– Video cable attached to the panel is tightly
secured to the video port in the docking
station
– Monitor’s display output setting is set to the
correct output.
• This may be due to the monitor(s) supporting
higher resolutions than docking station is able
to support. In the Intel Graphics Control Panel,
under General Settings, ensure that the
resolution is set to 1920 x 1200 or 1920 x 1080
at 59 Hz or 60 Hz for both the monitors.
• If only one monitor is shown, while the other is
not, go to the Intel Graphics Control Panel, and
under Multiple Displays, select the output for
the second monitor.
• If your monitor is connected to a docking
station, then the video output on your
computer may be disabled. Consult your
computer’s user manual or contact your
computer manufacturer for assistance on
enabling this feature.
The video on the attached monitor is distorted or
flickering.
26
• Make sure the video cable attached to the
monitor is tightly secured to the video port in
the docking station.
• When the monitor is distorted or flickering,
please reset your monitor to restore it to its
original settings. You can reset the monitor by
pressing the Menu button on the monitor itself,
and selecting Restore Factory Settings. Or
disconnect the monitor from your docking
station and power off and on to reset.
Page 27
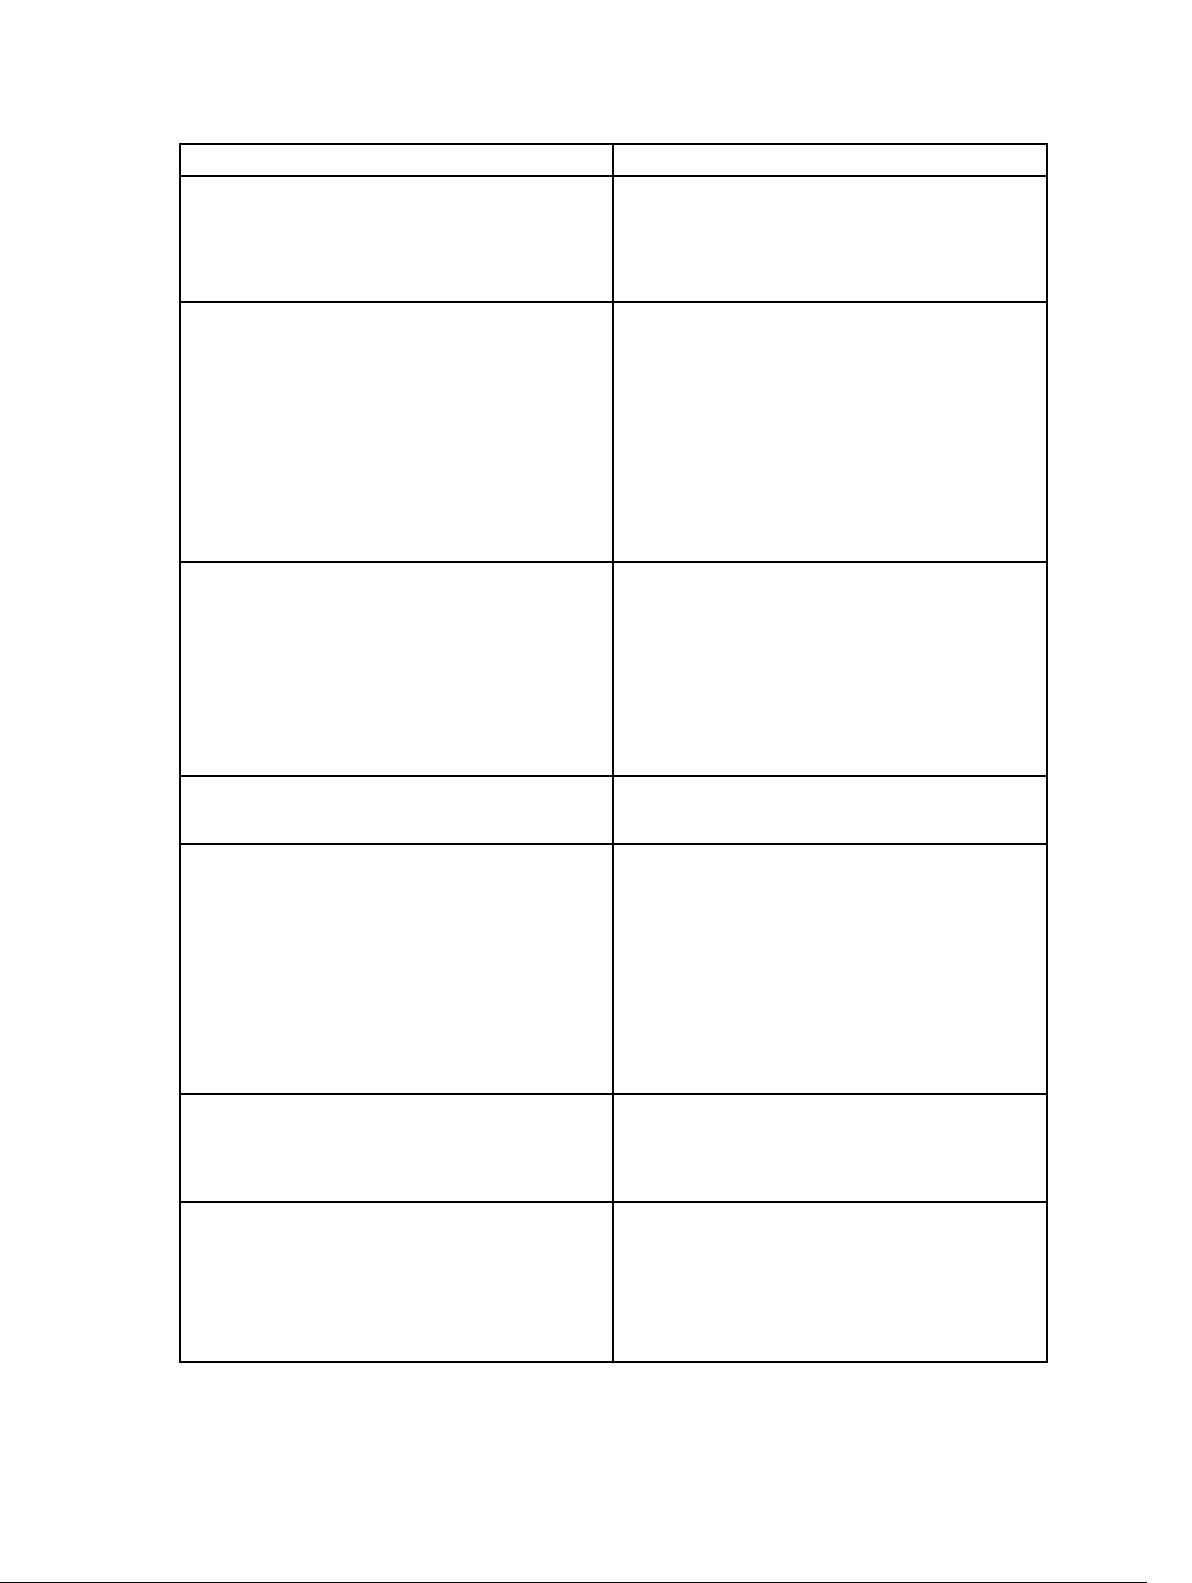
Symptoms Suggested solutions
The video on the attached monitor is not
displaying as an extended monitor.
• Make sure the Intel HD Graphics software is
installed in the Windows Device Manager.
• Open the Intel HD Graphics Control Panel and
go to the Multiple Displays control to set the
display to the extended mode.
The audio connector is not functioning or there is
a lag in the audio.
The USB ports are not functioning on the docking
station.
The HDCP content is not displayed on the
attached monitor.
The LAN port is not functioning.
• Ensure that the correct playback device is
selected in the computer.
• If your BIOS setup has an Audio Enabled/
Disabled option, make sure that it is set to
Enabled.
• The most likely cause of audio output
problems on the docking station is a bad
audio-out connector. First try powering off and
then powering on the docking station. If that
fails, try to replug in the audio cable to the
docking station from the external speaker
output.
• Ensure that the computer is connected with
the docking station. Try to disconnect and
reconnect again with the docking station.
• If your BIOS setup has a USB Enabled/Disabled
option, make sure that it is set to Enabled.
• Check the USB ports. Try plugging the USB
device into another port.
• Please check if the plugged device is shown in
the Windows Device Manager.
The docking station does not support HDCP
content.
• Ensure that the Ethernet cable connections are
secured at the firewall and the hub or
workstation.
• If your BIOS setup has a LAN/GBE Enabled/
Disabled option, make sure that it is set to
Enabled.
• Make sure the Realtek Gigabit Ethernet
controller is installed in the Windows Device
Manager.
• Please reinstall the Realtek Ethernet Driver or
update your BIOS from Dell.com/support.
Cable LED is not ON after it is connected to your
host.
USB port does not function in pre-OS
environment.
• Ensure that your WD15 is connected to AC.
• Ensure that the computer is connected to the
docking station. Try to disconnect and
reconnect again with the docking station.
If your BIOS has a USB/Thunderbolt Configuration
page, please make sure that the following options
are checked:
1. Enable USB Boot Support
2. Enable External USB Port
27
Page 28

Symptoms Suggested solutions
3. Enable Thunderbolt Boot Support
PXE boot on dock does not function.
USB Boot does not function.
• If your BIOS has an Integrated NIC page, please
select Enabled w/PXE.
• If your BIOS has a USB/Thunderbolt
Configuration page, please make sure that the
following options are checked:
a. Enable USB Boot Support
b. Enable Thunderbolt Boot Support
If your BIOS has a USB/Thunderbolt Configuration
page, please make sure that the following options
are checked:
1. Enable USB Boot Support
2. Enable External USB Port
3. Enable Thunderbolt Boot Support
28
Page 29
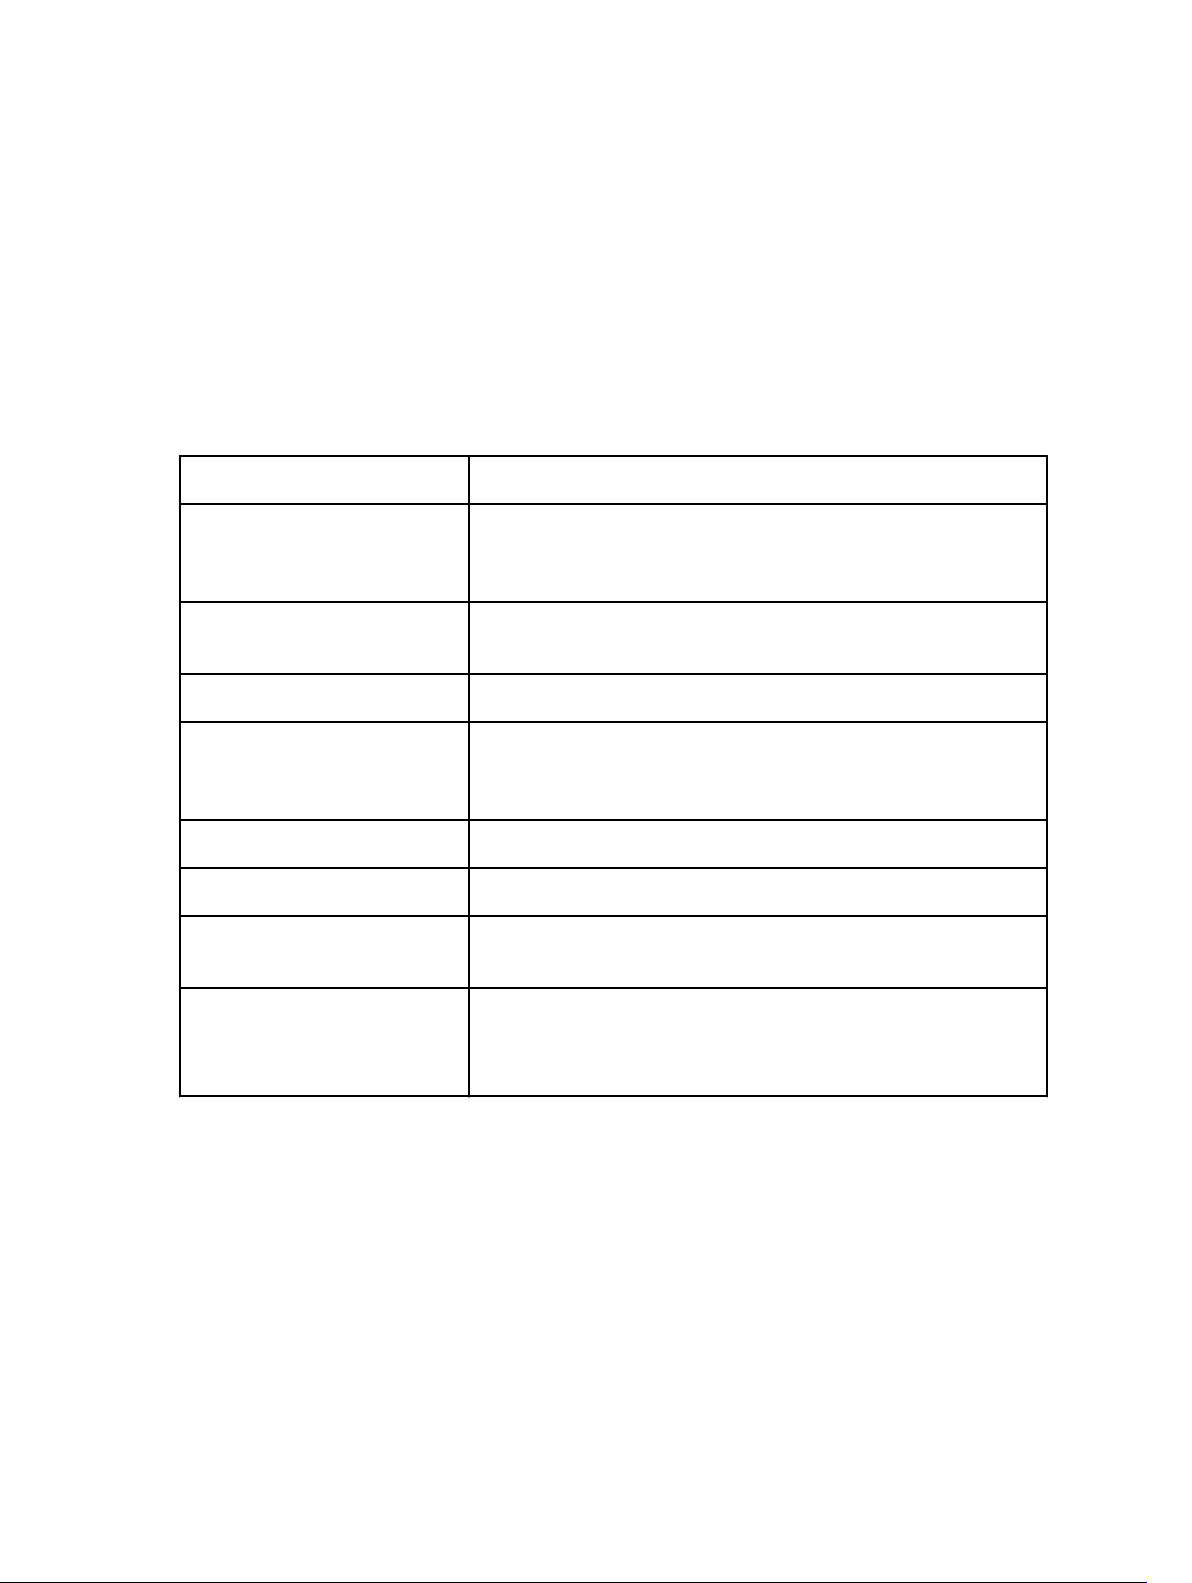
Technical specifications
Docking Specifications
13
Standard
Video Ports
IO Ports
Network Port
USB Ports
DC-in Port
USB Type-C cable length
Buttons
LEDs
• USB Type-C
• mini DisplayPort x 1 (supports DP 1.2)
• HDMI x 1 (supports HDMI 1.4a)
• VGA Port x 1
• Headset connector x 1
• Speaker out x 1
• Gigabit Ethernet (RJ-45) x 1
• 2 Front USB 3.0 Ports (one with PowerShare)
• 1 Rear USB 3.0 Port
• 2 Rear USB 2.0 Ports
• one 7.4 mm DC-in port
• 0.8 m
• Sleep/Wakeup
• Reset
• Front status indicator
– Connected Mode - White
– Firmware Upgrade: White
29
Page 30
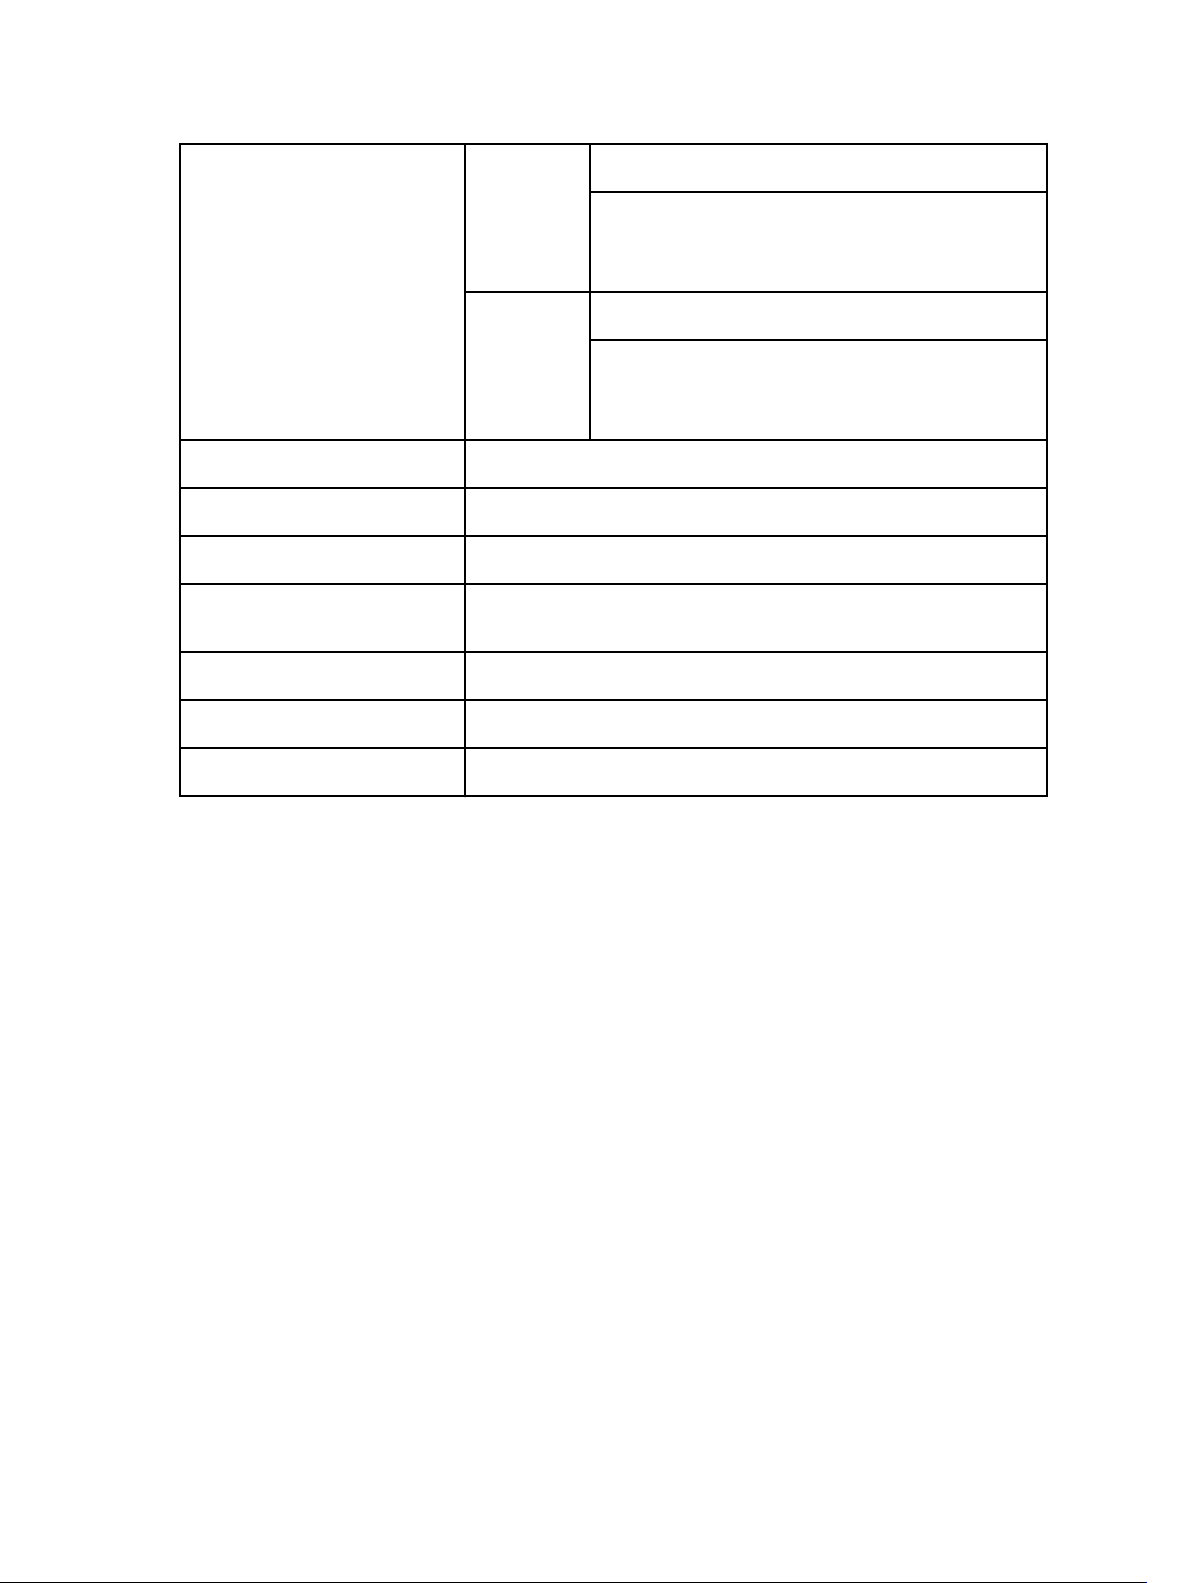
Environmental Characteristics Temperature Operating: 0 °C to 35 °C
Non-operating:
• Storage: -20 °C to 60 °C (-4 °F to 140 °F)
• Shipping: -20 °C to 60 °C (-4 °F to 140 °F)
Humidity Operating: 10% to 80% (non-condensing)
Non-operating:
• Storage: 5% to 90% (non-condensing)
• Shipping: 5% to 90% (non-condensing)
Power Adapter Input Voltage AC 100~240 V
Power Adapter Output Voltage 19.5 V / 3.34 A
Average Power Consumption 4.384 W
Network Standby Power
Consumption
Dimension 155 mm x 110 mm x 21 mm
Weight 420 g (minimum)
VESA Mounting options Yes — via Dell Docking Station Mounting Kit MK15
5.8 W
30
Page 31

Display resolution table
Table 5. Display resolution table
Universal cable
with Thunderbolt
system
Up to 21.6 G of
DisplayPort
bandwidth (x4 DP
lanes)
USB Type-C cable
or Universal cable
with nonThunderbolt
system
Up to 10.8 G of
DisplayPort
bandwidth (x2 DP
lanes)
NOTE: Resolution support is also dependent on the monitor’s Extended Display Identification Data
(EDID) resolution.
Single Display
(maximum
resolution)
mDP: 4k x 2k @ 60
Hz
HDMI: 4k x 2k @
30 Hz
VGA: 1920 x 1200
@ 60 Hz
Single Display
(maximum
resolution)
mDP or HDMI: 4k x
2k @ 30 Hz
VGA: 1920 x 1200
@ 60 Hz
Dual Display
(maximum
resolution)
2x WQXGA (2560 x
1600 @ 60 Hz)
Dual Display
(maximum
resolution)
2x FHD or WUXGA
(1920 x 1080 @ 60
Hz)(1920 x 1200 @
60 Hz)
Triple Display
(maximum
resolution)
3x FHD or WUXGA
(1920 x 1080 @ 60
Hz(1920 x 1200 @
60 Hz)
Triple Display
(maximum
resolution)
3x SXGA (1280 x
1024 @ 60 Hz)
Quad Display
(maximum
resolution)
Not supported
Quad Display
(maximum
resolution)
Not supported
31
 Loading...