


 Loading...
Venue 7/8
User's Manual
Tablet model: Venue 7, Venue 8, Venue 7 3730, Venue 7 HSPA+, Venue 8 3830, Venue 8 HSPA+
Regulatory model: T01C/T02D
Regulatory type: T01C001, T02C002/T02D001, T02D002

 NOTE: A NOTE indicates important information that helps you make better use of your tablet.
 CAUTION: A CAUTION indicates potential damage to hardware or loss of data if instructions are not followed.
 WARNING: A WARNING indicates a potential for property damage, personal injury, or death.
© 2013 Dell Inc. All rights reserved.
Information in this document is subject to change without notice. Reproduction of these materials in any manner whatsoever without the written permission of Dell Inc. is strictly forbidden.
Trademarks used in this text: Dell™, the DELL logo, and Venue™ are trademarks of Dell Inc. Bluetooth® is a registered trademark owned by Bluetooth SIG, Inc. and is used by Dell under license. Other trademarks and trade names may be used in this document to refer to either the entities claiming the marks and names or their products. Dell Inc. disclaims any proprietary interest in trademarks and trade names other than its own.
2013 – 10 Rev. A00
Contents
Features . . . . . . . . . . . . . . . |
. . . . . |
5 |
Charging the Battery . . . . . . . . . |
. . . . . |
6 |
Inserting the MicroSD Card and |
|
|
Micro-SIM Card (optional) . . . . . . |
. . . . . . 7 |
|
Getting Started . . . . . . . . . . . . . . . . . 8 |
||
Turning on/off the tablet . . . . . . . . |
. . . . . |
8 |
Finishing Android setup |
|
8 |
Customizing the screen . . . . . . . . |
. . . . . . |
9 |
Locking and unlocking your tablet . . . . |
. . . . . |
10 |
Touch tips |
|
10 |
Status bar |
|
11 |
Screen orientation . . . . . . . . . . |
. . . . . . |
11 |
Keys and functions . . . . . . . . . . |
. . . . . . |
12 |
Apps and widgets |
|
12 |
Using Your Tablet . . . . . . . . . . |
. . . . . 13 |
|
Contacts . . . . . . . . . . . . . . |
. . . . . . |
13 |
Text entry . . . . . . . . . . . . . . |
. . . . . |
14 |
Managing your tablet's storage . . . . . |
. . . . . |
14 |
Internet . . . . . . . . . . . . . . . . . . . . 15 |
||
Connecting to the Internet using Wi-Fi |
|
15 |
Connecting to the Internet using mobile |
|
|
broadband . . . . . . . . . . . . . . |
. . . . . |
16 |
Using the airplane mode |
|
17 |
3
Browsing the Internet . . . . . . . . . . . . . . .17 Email . . . . . . . . . . . . . . . . . . . . . 18
Customizing Your Tablet . . . . . . . . . . . |
. 19 |
Display settings . . . . . . . . . . . . . . . . |
. 19 |
Sound settings |
20 |
Date, time, and time zone |
20 |
Protecting Your Tablet . . . . . . . . . . . . . 20 |
|
Screen-unlock pattern |
20 |
PIN |
21 |
Password |
21 |
Face unlock . . . . . . . . . . . . . . . . . . |
22 |
Protecting your SIM card with the SIM lock |
|
password (LTE/HSPA+ models only) |
22 |
Apps . . . . . . . . . . . . . . . . . . . . |
. 23 |
Camera |
23 |
Copying files to and from the tablet |
23 |
Bluetooth |
24 |
Gallery . . . . . . . . . . . . . . . . . . . . |
25 |
Calendar . . . . . . . . . . . . . . . . . . . |
. 26 |
Clock . . . . . . . . . . . . . . . . . . . . |
. 26 |
Troubleshooting . . . . . . . . . . . . . . . |
26 |
Specifications . . . . . . . . . . . . . . . . |
. 28 |
4

Features
8 |
9 |
10 |
1 |
|
|
2 |
|
11 |
|
|
|
3 |
|
|
|
7 |
|
6 |
4 |
5 |
Part |
|
Functionality |
1. |
Front camera |
Use to make video calls or to capture front photos and videos. |
2. |
Micro-USB port |
Connect the USB cable to charge your tablet or to connect to |
|
|
your computer. |
3.Volume button • Press to increase or decrease the volume by one level.
•Press and hold to continuously increase or decrease the volume.
4. |
Service Tag label |
Provide the Service Tag when contacting Dell for support. |
5. |
Speaker |
Outputs sound. |
6. |
MicroSD-card slot |
Insert a microSD card to expand the storage on your tablet. |
7. |
Micro-SIM card slot |
Insert a micro-SIM card to access mobile broadband. |
|
(HSPA+ models |
|
|
only) |
|
8. |
Power button |
• Press and hold to turn on your tablet. |
|
|
• Press and release to lock or unlock the screen. |
|
|
• In standby mode, press and hold to open the options menu. |
9. |
Microphone |
Use for recording sound or inputting voice in other |
|
|
voice-based apps. |
10. |
Headset connector |
Connect headphones or headset. |
11. |
Rear camera |
Capture pictures and videos. |
Features 5

Charging the Battery
 NOTE: Your tablet may not be fully charged when you receive it. It is recommend to charge the tablet for 4 hours for the first time.
1.Connect the micro-USB end of the USB cable to the USB port of the tablet.
2.Connect the other end of the USB cable to the power adapter.
3.Connect the power adapter to a power outlet.
An animated icon appears on the screen while the battery is being charged. When the battery is fully charged, the icon is static.
4.While disconnecting the cable, unplug the power adapter from the power outlet and then the micro-USB end of the USB cable from the USB port of your tablet.
6 Charging the Battery
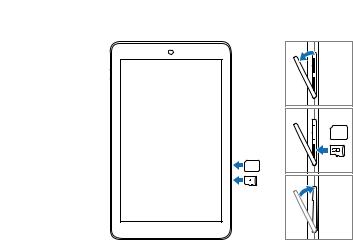
Inserting the MicroSD Card and Micro-SIM
Card (optional)
Open the card-slot door, insert the cards into their respective slots, and close the card-slot door.
 NOTE: Make sure the cards are correctly aligned and are inserted all the way.

 SIM
SIM
SIM
Inserting the MicroSD Card and Micro-SIM Card (optional) 7

Getting Started
Turning on/off the tablet
To turn on your tablet, press and hold the power button for about 3 seconds.
To turn off your tablet, press and hold the power button to open the options menu, and then select Power off→ OK.
Finishing Android setup
After you turn on your tablet for the first time, follow the prompts on the screen to finish Android setup.
You can configure settings such as language, date and time, connect to your Wi-Fi network, sign-in to your Google account, enable Google location services, and so on.
→
8 Getting Started
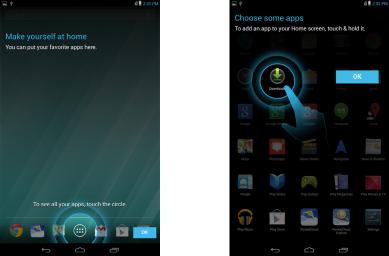
Customizing the screen
After finishing several Android setup optionally, you can customize your tablet's screen as prompted.
→
Getting Started 9
Loading...