


Washing Machine |
WMD 67125 |
Waschmaschine |
WMD 67105 |
Lave-linge |
|
|
|
|
|
|
|
1 Warnings |
Safety instructions |
|
|
• This appliance must be connected to |
|
General Safety |
||
• Never place your machine on a carpet |
an earthed outlet protected by a fuse of |
|
suitable capacity. |
||
covered floor. Otherwise, lack of airflow |
||
• The supply and draining hoses must |
||
from below of your machine may cause |
||
always be securely fastened and remain in |
||
electrical parts to overheat. This may cause |
||
an undamaged state. |
||
problems with your washing machine. |
||
• Fit the draining hose to a washbasin or |
||
• If the power cable or mains plug is |
||
bathtub securely before starting up your |
||
damaged you must call Authorized Service |
||
machine. There may be a risk of being |
||
for repair. |
||
scalded due to high washing temperatures! |
||
• Fit the drain hose into the discharge |
||
• Never open the loading door or remove the |
||
housing securely to prevent any water |
||
filter while there is still water in the drum. |
||
leakage and to allow machine to take in |
||
• Unplug the machine when it is not in use. |
||
and discharge water as required. It is very |
||
• Never wash down the appliance with a |
||
important that the water intake and drain |
||
water hose! There is the risk of electric |
||
hoses are not folded, squeezed, or broken |
||
shock! |
||
when the appliance is pushed into place |
||
• Never touch the plug with wet hands. Do |
||
after it is installed or cleaned. |
||
not operate the machine if the power cord |
||
• Your washing machine is designed to |
||
or plug is damaged. |
||
continue operating when the power |
||
• For malfunctions that cannot be solved by |
||
restores after a power interruption. The |
||
information in the operating manual: |
||
machine will resume its program when the |
||
• Turn off the machine, unplug it, turn off |
||
power restores. Press the “Start/Pause/ |
||
the water tap and contact an authorized |
||
Cancel” button for 3 seconds to cancel the |
||
service agent. You may refer to your local |
||
program (See, Canceling a Program) |
||
agent or solid waste collection center in |
||
• There may be some water in your machine |
||
your municipality to learn how to dispose of |
||
when you receive it. This is from the quality |
||
your machine. |
||
control process and is normal. It is not |
||
If there are children in your |
||
harmful to your machine. |
||
• Some problems you may encounter may |
house... |
|
be caused by the infrastructure. Press |
• Keep children away from the machine |
|
“Start/Pause/Cancel” button for 3 seconds |
when it is operating. Do not let them |
|
to cancel the program set in your machine |
tamper with the machine. |
|
before calling the authorized service. |
• Close the loading door when you leave the |
|
First Use |
area where the machine is located. |
|
• Carry out your first washing process |
|
|
without loading your machine and with |
|
|
detergent under “Cottons 90°C” program. |
|
|
• Ensure that the cold and hot water |
|
|
connections are made correctly when |
|
|
installing your machine. |
|
|
• If the current fuse or circuit breaker is less |
|
|
than 16 Amperes, please have a qualified |
|
|
electrician install a 16 Ampere fuse or |
|
|
circuit breaker. |
|
|
• While using with or without a transformer, |
|
|
do not neglect to have the grounding |
|
|
installation laid by a qualified electrician. |
|
|
Our company shall not be liable for any |
|
|
damages that may arise when the machine |
|
|
is used on a line without grounding. |
|
|
• Keep the packaging materials out of reach |
|
|
of children or dispose them by classifying |
|
|
according to waste directives. |
|
|
Intended use |
|
|
• This product has been designed for home |
|
|
use. |
|
|
• The appliance may only be used for |
|
|
washing and rinsing of textiles that are |
|
|
marked accordingly. |
|
2 - EN

2 Installation
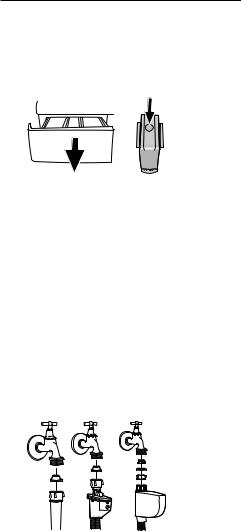
Removing packaging reinforcement
Tilt the machine to remove the packaging reinforcement. Remove the packaging reinforcement by pulling the ribbon.
Opening the transportation locks
ATransportation safety bolts must be removed before operating the washing machine! Otherwise, the machine will be damaged!
1.Loosen all the bolts with a spanner until they rotate freely (“C”)
2.Remove transportation safety bolts by turning them gently.
3.Fit the covers (supplied in the bag with the Operation Manual) into the holes on the rear panel. (“P”)
C Keep the transportation safety bolts in a safe place to reuse when the washing machine needs to be moved again in the future.
C Never move the appliance without the transportation safety bolts properly fixed in place!
Adjusting the feet
ADo not use any tools to loosen the lock nuts. Otherwise, they can be damaged.
1.Manually (by hand) loosen the lock nuts on the feet.
2.Adjust them until the machine stands level and firmly.
3.Important: Tighten all lock nuts up again.
Connecting to the water supply.
Important:
•The water supply pressure required to run the machine must be 1-10 bar (0,1 – 1 MPa).
•Connect the special hoses supplied with the machine to the water intake valves on
the machine.
•If you are going to use your double waterinlet machine as a single (cold) water-inlet unit, you must install the stopper*, supplied with your machine to the hot water valve.
•If you want to use both water inlets of the product, you can connect the hot water hose after removing the stopper and gasket group from the hot water valve.
* Applies for the products supplied with a blind stopper group.
•Models with a single water inlet should not be connected to the hot water tap.
When returning the appliance to its place after maintenance or cleaning, care should be taken not to fold, squeeze or block the hoses.
Connecting to the drain
The water discharge hose can be attached to the edge of a washbasin or bathtub. The drain hose should be firmly fitted into the drain as to not get out of its housing.
Important:
•The end of the drain hose must be directly connected to the wastewater drain or to the washbasin.
•The hose should be attached to a height of at least 40 cm, and 100 cm at most.
•In case the hose is elevated after laying it on the floor level or close to the ground (less than 40 cm above the ground), water discharge becomes more difficult and the laundry may come out wet.
•The hose should be pushed into the drainage for more than 15 cm. If it is too long you may have it shortened.
•The maximum length of the combined hoses must not be longer than 3.2 m.
3 - EN

Electrical connection
Connect the machine to an earthed outlet protected by a fuse of suitable capacity.
Important:
•Connection should comply with national regulations.
•The voltage and the allowed fuse protection are specified in the section “Technical Specifications”.
•The specified voltage must be equal to your mains voltage.
•Connection via extension cords or multi- B plugs should not be made.A damaged power cable must be replaced
by a qualified electrician.
BThe appliance must not be operated unless it is repaired! There is the risk of electric shock!
can be opened when the symbol fades out.
Detergents and softeners
Detergent Drawer
The detergent drawer is composed of three compartments:
The detergent dispenser may be in two different types according to the model of your machine.
–(I) for prewash
–(II) for main wash - (III) siphon
–( ) for softener
3 Initial preparations for
washing
Preparing clothes for washing
Laundry items with metal attachments such as, bras, belt buckles and metal buttons will damage the machine. Remove metal attachments or place the items in a clothing bag, pillow case, or something similar.
•Sort the laundry according to type of fabric, color, and degree of soiling and permissible water temperature. Always follow the advice on the garment labels.
•Place small items like infants’ socks and nylon stockings, etc. in a laundry bag, pillow case or something similar. This will also save your laundry from getting lost.
•Wash “machine washable” or “hand washable” labeled products only with an appropriate program.
•Do not wash colors and whites together. New, dark colored cottons may release a lot of dye. Wash them separately.
•Use only dyes/color changers and lime removers suitable for machine wash. Always follow the instructions on the packaging.
•Wash trousers and delicate clothes turned inside out.
Correct load capacity
C Please follow the information in the "Program Selection Table". Washing results will degrade when the machine is overloaded.
Loading door
The door locks during program operation and the Door Locked Symbol lights up. The door
Detergent, softener and other cleaning agents
Add detergent and softener before starting the washing program.
Never open the detergent dispenser drawer while the washing program is running!
When using a program without pre-wash, no detergent should be put into the pre-wash compartment (Compartment no. I).
Detergent quantity
The amount of washing detergent to be used depends on the amount of laundry, the degree of soiling and water hardness.
•Do not use amounts exceeding the quantities recommended on the package to avoid problems of excessive foam, poor rinsing, financial savings and finally, environmental protection.
•Never exceed the (> max <) level marking; otherwise, the softener will be wasted without being used.
•Do not use liquid detergent if you want to wash using the time delay feature.
4 - EN
4 Selecting a Program and Operating Your Machine
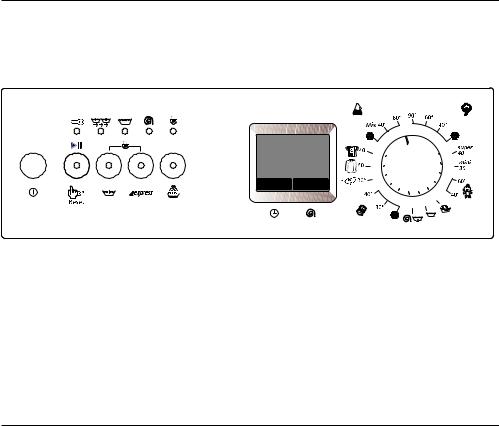
Control panel
9 |
8 |
|
7 |
6 |
5 |
||||||
|
|
|
|
|
|
|
|
|
|
|
|
|
|
|
|
|
|
|
|
|
|
|
|
|
|
|
|
|
|
|
|
|
|
|
|
|
|
|
|
|
|
|
|
|
|
|
|
|
|
|
|
|
|
|
|
|
|
|
|
|
|
|
|
|
|
|
|
|
|
|
|
|
|
|
|
|
|
|
|
|
|
|
|
|
|
|
|
|
|
|
|
|
|
|
|
|
|
|
|
|
|
|
|
|
|
|
|
|
|
|
|
|
|
|
|
|
|
|
|
|
|
|
|
|
|
|
|
|
|
|
|
|
|
|
|
|
|
|
|
|
|
|
|
|
4 |
3 |
2 |
1 |
1 |
- Spin Speed Adjustment Button |
7 |
- Child-proof Lock Indicator* |
|
2 |
- Time Delaying Button |
|
8 |
- Program Follow-up Indicators |
3 |
- Auxiliary Function Keys |
9 |
- On/Off Button |
|
4 |
- Start/Pause/Cancel Button |
|
|
|
5 |
- Program Selection Knob |
* According to your machine’s model |
||
6 |
- Display |
|
|
|
Turning the machine on
Plug in your machine. Turn the tap on completely. Check if the hoses are connected tightly. Place the laundry in the machine. Add detergent and softener. Press the “On/Off” button.
Program selection
Select the appropriate program from the program table and the following washing temperature table according to type, amount and degree of soiling of the laundry. Select the desired program with the program selection button.
C Programs are limited with the highest spin speed appropriate for that particular type of cloth.
Main programs
Depending on the type of textile, the following main programs are available:
•Cottons
You can wash your durable clothes with this program. Your laundry will be washed with vigorous washing movements during a longer washing cycle.
•Synthetics/Mix
You can wash your less durable clothes on this program. Lighter washing movements and shorter washing cycle is used compared to “Cottons” program. It is recommended for your synthetic clothes (such as shirts, blouses, synthetic/cotton blended garments, etc.).
For curtains and lace, the “Synthetic(mix)40” program with pre-wash and anti-creasing functions selected is recommended.
•Woolens
You can wash your machine-washable woolen garments on this program. Wash by selecting the proper temperature according to the labels of your clothes. It is recommended to use appropriate detergents for woolens.
5 - EN

Additional programs
For special cases, there are also extra programs available:
• Delicates
You can wash your delicate clothes on this program. It has more sensitive washing movements and does not make intermediate spinning compared to “Synthetic” program.
• Shirt
You can use this program to wash cottons and synthetics together. There is no need to sort them.
• Sport
This program is suitable for clothes that are normally worn for a short time such as
sportswear. It is used to quickly wash a small amount of cotton/synthetic blended clothes.
• Super
This program washes for a longer period at 40°C and gives the same result as the
“Cottons 60°C” program, thus it saves energy. It is suitable for clothes for which you cannot use the “Cottons 60°C” program.
• Mini
This program is used to quickly wash (30 minutes) a small amount of lightly soiled cotton garments.
• Babycare
Increased hygiene is provided by a longer heating period and an additional rinse cycle. It is recommended for baby clothes and clothes worn by allergic people.
• Hand Wash
You can wash your woolen/delicate clothes that bear “not machinewashable” labels for which hand wash is recommended on this program. It washes the laundry with very tender washing movements without damaging your clothes.
C Sort the laundry according to type of fabric, color, degree of soiling and permissible water temperature when choosing a program.
If you only want to drain the water without spinning your laundry, select “Spin and Pump” program, and then select no spin function with spin speed selection button. Press “Start/ Pause/Cancel” button.
AYou should use a lower spin speed for delicate laundries.
Spin Speed selection
Whenever a new program is selected, the maximum spin speed of the selected program is displayed on the spin speed indicator.
To decrease the spin speed, press the “Spin” button. Spin speed decreases gradually. Then, rinse hold and no spin options are shown respectively.
Rinse hold is shown with “ ” and no spin is shown with “ ” symbols.
If you do not want to unload your clothes immediately after the program, you may use rinse hold function in order to prevent your clothes become wrinkled in anhydrous conditions. With this function, your laundry is kept in the final rinsing water. If you want to spin your laundry that you left in water:
-Adjust the spin speed.
-Press “Start/Pause/Cancel” button.
Program resumes. Your machine drains the water and spins your laundry.
You can use no spin function in order to drain the water without spinning at the end of the program.
Special programs
For specific applications, you can select any of the following programs:
• Rinse
This program is used when you want to rinse or starch separately.
• Spin and Pump
This program is used to apply an additional spin cycle for the laundry or to drain the water in the machine.
Before starting this program, select the desired spin sped and press “Start/Pause/ Cancel” button. Your machine drains the water after spinning at the set spin speed.
6 - EN
Program and consumption table
Programme |
|
(kg)LoadMax. |
DurationProgramme(~min) |
ConsumptionWater (l) |
ConsumptionEnergy (kWh) |
Prewash |
WashQuick |
PlusRinse |
Creasing-Anti |
HoldRinse |
HeatNo |
|
|
|
|
|
|
|
|
|
|
|
|
||
|
|
|
|
|
|
|
|
|
|
|
|
|
Cottons |
|
90 |
7 |
138 |
52 |
2.72 |
• |
• |
• |
• |
• |
• |
|
|
|
|
|
|
|
|
|
|
|
|
|
Cottons |
|
60** |
7 |
135 |
52 |
1.33 |
• |
• |
• |
• |
• |
• |
|
|
|
|
|
|
|
|
|
|
|
|
|
Cottons |
|
40 |
7 |
129 |
52 |
0.78 |
• |
• |
• |
• |
• |
• |
|
|
|
|
|
|
|
|
|
|
|
|
|
Super |
|
40 |
7 |
167 |
52 |
0.84 |
|
|
|
|
• |
|
|
|
|
|
|
|
|
|
|
|
|
|
|
Babycare |
|
60 |
7 |
180 |
73 |
1.40 |
|
|
* |
• |
• |
• |
|
|
|
|
|
|
|
|
|
|
|
|
|
Sports |
|
40 |
3.5 |
75 |
44 |
0.40 |
• |
• |
• |
• |
• |
• |
|
|
|
|
|
|
|
|
|
|
|
|
|
Synthetics |
|
60 |
3 |
103 |
52 |
0.88 |
• |
• |
• |
• |
• |
• |
|
|
|
|
|
|
|
|
|
|
|
|
|
Synthetics(mix) |
|
40 |
3 |
96 |
52 |
0.66 |
• |
• |
• |
• |
• |
• |
|
|
|
|
|
|
|
|
|
|
|
|
|
Shirts |
|
40 |
3.5 |
91 |
47 |
0.38 |
• |
• |
• |
• |
|
• |
|
|
|
|
|
|
|
|
|
|
|
|
|
Delicate |
|
30 |
2 |
65 |
47 |
0.23 |
|
|
• |
• |
• |
• |
|
|
|
|
|
|
|
|
|
|
|
|
|
Woollens |
|
40 |
1.5 |
60 |
47 |
0.19 |
|
|
• |
|
• |
• |
|
|
|
|
|
|
|
|
|
|
|
|
|
Hand wash |
|
30 |
1 |
39 |
35 |
0.18 |
|
|
|
|
|
• |
|
|
|
|
|
|
|
|
|
|
|
|
|
Mini |
|
30 |
2.5 |
30 |
36 |
0.17 |
|
|
|
|
|
• |
|
|
|
|
|
|
|
|
|
|
|
|
|
• : Selectable
* : Automatically selected, not cancellable. **: Energy Label programme (EN 60456)
Water and power consumption and programme duration may differ from the table shown, subject to changes in water pressure, water hardness and temperature, ambient temperature, type and amount of laundry, selection of auxiliary functions, and fluctuations in the supply voltage.
“Super 40” programme may be selected instead of “Cotton 60*” programme during winter in areas where the input water temperature is low and/or in areas with low supply voltage.
C The auxiliary functions in the table may differ according to the model of your machine.
7 - EN
Auxiliary functions
Auxiliary Function Selection Buttons
Select the required auxiliary functions before starting the program.
C Some combinations cannot be selected together. (Ex.: Pre-wash and Quick Wash.
Warning signal on the selected auxiliary function will light up.
Auxiliary function selection
If an auxiliary function that should not be selected together with a previously selected function is chosen, the first selected function will be cancelled and the last auxiliary function selection will remain active.
(Ex.: If you want to select pre-wash first and then quick wash, pre-wash will be cancelled and quick wash will remain active.
Auxiliary function that is not compatible with the program cannot be selected. (see, “Program Selection Table”)
C Auxiliary function buttons may differ according to the model of your machine.
Pre-wash
A pre-wash is only worthwhile for heavily soiled laundry. Without pre-wash you save energy, water, detergent and time.
C Pre-wash without detergent is recommended for lace and curtains.
Quick wash
This function can be used for “Cottons” and “Synthetics” programs. It decreases the washing times for lightly soiled laundries and also the number of rinsing steps.
Rinse Plus
With this function, you can increase the number of current rinsing steps. Thus, sensitive skins’ risk of being affected by the remainder detergent on the clothes will be decreased.
Anti-creasing
With this function, drum movement will be lessened to prevent creasing and spinning speed is limited. In addition, washing is carried out at a higher water level.
C Whenever you select this auxiliary function, load your machine with half of the maximum laundry specified in the program table.
No Heat
If you wish to wash your clothes in cold water, you can use this program.
Time display
The display shows the time remaining for the program to complete while a program is running. Program duration may differ
from the values in the consumption table subject to the changes in the water pressure, water hardness and temperature, ambient temperature, type and amount of laundry, auxiliary functions selected, and changes in the supply voltage.
Time delay
With the “Time delay” function you can delay the program start up to 24 hours. Time delay can be set with steps of one hour for the first three hours and with steps of three hours for the remainder (1, 2, 3, 6, 9, …24).
1. Pres “Time Delay” button to adjust the desired time.
2. Press “Start/Pause/Cancel” button. The time delay will start to count down.
C More laundry may be loaded during the time delay period.
Changing the delay time
If you want to change the time during the countdown:
1.Press “Start/Pause/Cancel” button.
2.Pres “Time Delay” button to adjust the desired time delay.
3.Press “Start/Pause/Cancel” button.
Canceling the time delay
If you want to cancel the time delay countdown and start the program:
1.Press “Start/Pause/Cancel” button.
2.Pres “Time Delay” button to decrease the time delay.
3.Press “Start/Pause/Cancel” button to start the program.
Starting the Program
1.Press “Start/Pause/Cancel” button to start the program.
2.Program follow-up lamp showing the startup of the program will light up.
Progress of program
Progress of a running program is shown through the program follow-up indicator. At the beginning of every program step, the relevant indicator lamp will light up and light of the completed step will turn off. The symbol that is lit up at the far right of the series of symbols indicates the step that is being carried out.
C If the machine is not spinning, the program may be in rinse hold mode or the automatic spin correction system has been
8 - EN
activated due to an excessive unbalanced distribution of laundry in the machine.
Changing the selections after the program has started
Turning the program knob while the program is in a normal flow will not change the program.
Switching the machine to standby mode
Press “Start/Pause/Cancel” button momentarily to switch your machine to the standby mode. Auxiliary functions can be cancelled or selected in accordance with the step the program is at. The door can be opened if the water level is suitable. Laundry may be added / taken out by opening the door.
Door lock
The loading door can not be opened yet due to safety reasons while the “Ready” lamp is flashing. The loading door can be opened once the “Ready” lamp starts lighting up continuously.
5 Maintenance and cleaning
Detergent Drawer
Remove any powder residue buildup in the drawer. To do this;
1.Press the dotted point on the siphon in the softener compartment and pull towards you until the compartment is removed from the machine.
CIf more than a normal amount of water and softener mixture starts to gather in the softener compartment, the siphon must be cleaned.
2.Wash the dispenser drawer and the siphon with plenty of lukewarm water in a washbasin.
3.Replace the drawer into its housing after cleaning. Check if the siphon is in its original location.
Child-proof lock
You can protect the appliance from being tampered by children by means of the childproof lock. In this case, no change can be made in the running program.
The machine is switched to child-lock by pressing the 1st and 2nd auxiliary functions for 3 sec. “C on” (Child lock is activated) label appears on the screen. The same symbol will also be displayed whenever any button is pressed while the machine is child-locked.
Child-proof lock lamp on the program followup indicator will light up when the child-proof lock is activated.
To deactivate the child-proof lock, press the 1st and 2nd auxiliary function buttons for 3 sec. “C OFF” (Child-proof lock is deactivated) symbol appears on the screen. Child-proof lock lamp on the program follow-up indicator will go off when the child-proof lock is deactivated.
Ending the program through canceling
“Start/Pause/Cancel” button is pressed for 3 seconds to cancel the program. “Ready” warning lamp flashes during canceling and “End” will appear on the display.
Inlet water filters
There is a filter at the end of each water intake valve at the back side of the machine and also at the end of each water intake hose where they are connected to the tap. These filters prevent the foreign substances and dirt in the water to enter into the machine. Filters should be cleaned as they get dirty.
•Close the taps.
•Remove the nuts of the water intake hoses to clean the surfaces of the filters on the water intake valves with an appropriate brush.
•If the filters are very dirty, you can pull them out by means of pliers and clean them.
•Take out the filters on the flat ends of the water intake hoses together with the gaskets and clean thoroughly under streaming water.
•Replace the gaskets and filters carefully to their places and tighten the hose nuts by hand.
9 - EN
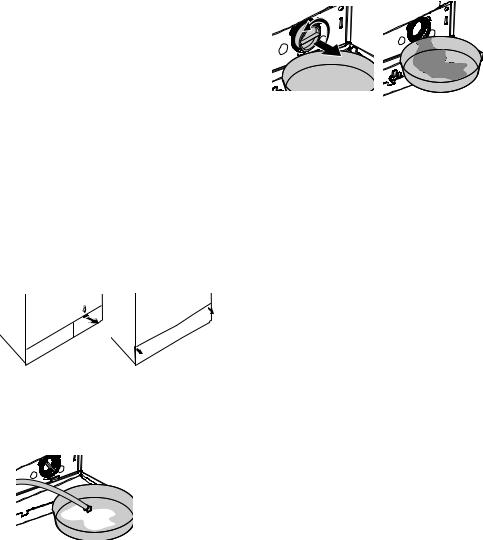
Draining any remaining water and |
by pulling out the plug at the end of the |
|
cleaning the pump filter |
hose. If the amount of water to be drained |
|
Your product is equipped with a filter system |
off is greater than the volume of the |
|
which ensures a cleaner water discharge that |
container, replace the plug, pour the water |
|
extends pump life by preventing solid items |
out, then resume the draining process. |
|
such as buttons, coins and fabric fibers from |
• After draining process is completed, |
|
clogging the pump propeller during discharge |
replace the plug into the end of the hose |
|
of the washing water. |
and fit the hose back into its place. |
|
• If your machine fails to drain the water, |
If your product is not supplied with an |
|
emergency drain hose, do the following as |
||
the pump filter may be clogged. You may |
||
shown in the figure below: |
||
have to clean it every 2 years or whenever |
||
it is plugged. Water must be drained off to |
|
|
clean the pump filter. |
|
|
In addition, water may have to be drained off |
|
|
completely in the following cases: |
|
•before transporting the machine (e.g. when moving house)
•when there is the danger of frost
In order to clean the dirty filter and discharge |
|
|
the water; |
• Place a large container in front of the filter |
|
1- Unplug the machine to cut off the supply |
||
to receive water flowing from the filter. |
||
power. |
||
• Loosen pump filter (anticlockwise) until |
||
AThere may be water at 90°C in the |
||
water starts to flow out of it. Direct the |
||
machine. Therefore, the filter must be |
||
flowing water into the container you have |
||
cleaned only after the inside water is |
||
placed in front of the filter. You can use a |
||
cooled down to avoid hazard of scalding. |
||
piece of cloth to absorb any spilled water. |
||
2- Open the filter cap. The filter cap may be |
||
• When there is no water left, turn the pump |
||
composed of one or two pieces according to |
||
filter until it is completely loose and remove |
||
the model of your machine. |
||
it. |
||
If it is composed of two pieces, press the tab |
||
• Clean any residues inside the filter as |
||
on the filter cap downwards and pull the piece |
well as fibers, if any, around the propeller |
|
out towards yourself. |
region. |
|
If it is composed of one piece, hold it from |
• If your product has a water jet feature, be |
|
both sides and open it by pulling out. |
sure to fit the filter into its housing in the |
|
|
pump. Never force the filter while replacing |
|
|
it into its housing. Fit the filter fully into its |
|
|
housing; otherwise, water may leak from |
|
|
the filter cap. |
|
|
4- Close the filter cap. |
|
|
Close the two-piece filter cap of your product |
|
|
by pushing the tab on it. |
|
3- An emergency drain hose is supplied with |
Close the one-piece filter cap of your product |
|
by fitting the tabs on the bottom into their |
||
some of our models. Others are not supplied |
positions and pushing the upper part of it. |
|
with this item. |
|
If your product is supplied with an emergency drain hose, do the following as shown in the figure below:
•Pull out the pump outlet hose from its housing.
•Place a large container at the end of the hose. Drain the water off into the container
10 - EN
6 Solution suggestions for problems
|
|
|
|
Problem |
Cause |
Explanation / Suggestion |
|
|
Machine may have switched |
|
|
Program cannot |
to self protection mode due to |
Reset your machine by pressing “Start/Pause/ |
|
be started or |
an infrastructure problem (such |
Cancel” button for 3 seconds. (see, Canceling a |
|
selected. |
as line voltage, water pressure, |
Program) |
|
|
etc.). |
|
|
There is water |
|
Be sure the seals of the water inlet hoses are |
|
coming from the |
There might be problems with |
securely fitted. |
|
bottom of the |
hoses or the pump filter. |
Tightly attach the drain hose to the tap. |
|
machine. |
|
Make sure that the pump filter is completely closed. |
|
Machine stopped |
Machine can stop temporarily |
It will resume operating when the voltage is back to |
|
shortly after the |
due to low voltage. |
the normal level. |
|
program started. |
|
||
|
|
The automatic spin correction system might have |
|
|
|
been activated due to the unbalanced distribution of |
|
It continuously |
|
the laundry in the drum. |
|
spins. |
There may be an imbalance of |
The laundry in the drum may be clustered (bundled |
|
Remaining time |
laundry in a bag). Laundry should be rearranged and |
|
|
does not count |
laundry in the machine. |
re-spun. |
|
down. |
|
No spinning is performed when the laundry is |
|
|
|
not evenly distributed in the drum to prevent any |
|
|
|
damage to the machine and to its environment. |
|
|
|
|
|
|
In the case of a paused |
|
|
|
countdown while taking in |
The machine will wait until there is a sufficient |
|
|
water: |
amount of water to avoid poor washing results due |
|
|
Timer will not countdown until |
to lack of water. Then the timer will start to count |
|
|
the machine is filled with the |
down. |
|
|
correct amount of water. |
|
|
|
In the case of a paused |
|
|
|
countdown at the heating step: |
|
|
It continuously |
Time will not count down until |
|
|
the selected temperature for |
|
|
|
washes. |
|
|
|
the program is reached |
|
|
|
Remaining time |
|
|
|
does not count |
|
The automatic spin correction system might have |
|
down. |
|
|
|
|
|
been activated due to the unbalanced distribution of |
|
|
In the case of a paused |
the laundry in the drum. |
|
|
countdown at the spinning |
The laundry in the drum may be clustered (bundled |
|
|
step: |
laundry in a bag). Laundry should be rearranged and |
|
|
There may be an imbalance of |
re-spun. |
|
|
laundry in the machine. |
No spinning is performed when the laundry is |
|
|
|
not evenly distributed in the drum to prevent any |
|
|
|
damage to the machine and to its environment. |
|
|
|
|
|
11 - EN
 Loading...