


Washing Machine
Пералня машина
Perilica rublja
Plně automatická pračka
WMD 76106 WMD 76126

1 Warnings
General Safety
•Never place your machine on a carpet covered floor. Otherwise, lack of airflow from below of your machine may cause electrical parts to overheat. This may cause problems with your washing machine.
•If the power cable or mains plug is damaged you must call Authorized Service for repair.
•Fit the drain hose into the discharge housing securely to prevent any water leakage and to allow machine to take in and discharge water as required. It is very important that the water intake and drain hoses are not folded, squeezed, or broken when the appliance is pushed into place after it is installed or cleaned.
•Your washing machine is designed to continue operating when the power restores after a power interruption. The machine will resume its program when the power restores. Press the “Start/Pause/ Cancel” button for 3 seconds to cancel the program (See, Canceling a Program)
•There may be some water in your machine when you receive it. This is from the quality control process and is normal. It is not harmful to your machine.
•Some problems you may encounter may be caused by the infrastructure. Press “Start/Pause/Cancel” button for 3 seconds to cancel the program set in your machine before calling the authorized service.
First Use
•Carry out your first washing process without loading your machine and with detergent under “Cottons 90°C” program.
•Ensure that the cold and hot water connections are made correctly when installing your machine.
•If the current fuse or circuit breaker is less than 16 Amperes, please have a qualified electrician install a 16 Ampere fuse or circuit breaker.
•While using with or without a transformer, do not neglect to have the grounding installation laid by a qualified electrician. Our company shall not be liable for any damages that may arise when the machine is used on a line without grounding.
•Keep the packaging materials out of reach of children or dispose them by classifying according to waste directives.
Intended use
•This product has been designed for home use.
•The appliance may only be used for washing and rinsing of textiles that are marked accordingly.
Safety instructions
•This appliance must be connected to an earthed outlet protected by a fuse of suitable capacity.
•The supply and draining hoses must always be securely fastened and remain in an undamaged state.
•Fit the draining hose to a washbasin or bathtub securely before starting up your machine. There may be a risk of being scalded due to high washing temperatures!
•Never open the loading door or remove the filter while there is still water in the drum.
•Unplug the machine when it is not in use.
•Never wash down the appliance with a water hose! There is the risk of electric shock!
•Never touch the plug with wet hands. Do not operate the machine if the power cord or plug is damaged.
•For malfunctions that cannot be solved by information in the operating manual:
•Turn off the machine, unplug it, turn off the water tap and contact an authorized service agent. You may refer to your local agent or solid waste collection center in your municipality to learn how to dispose of your machine.
If there are children in your
house...
•Keep children away from the machine when it is operating. Do not let them tamper with the machine.
•Close the loading door when you leave the area where the machine is located.
2 - EN
2 Installation
Removing packaging reinforcement
Tilt the machine to remove the packaging reinforcement. Remove the packaging reinforcement by pulling the ribbon.
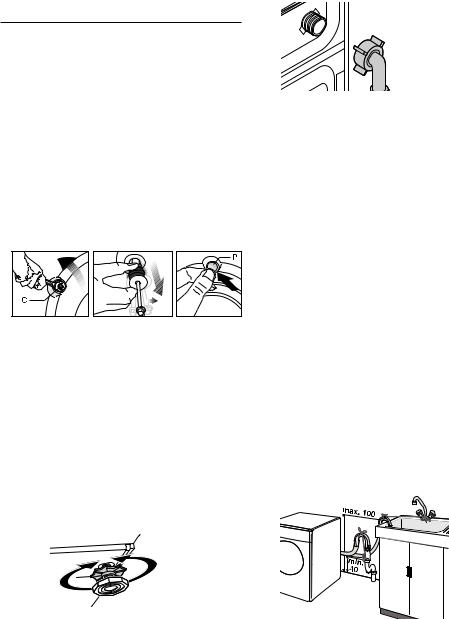
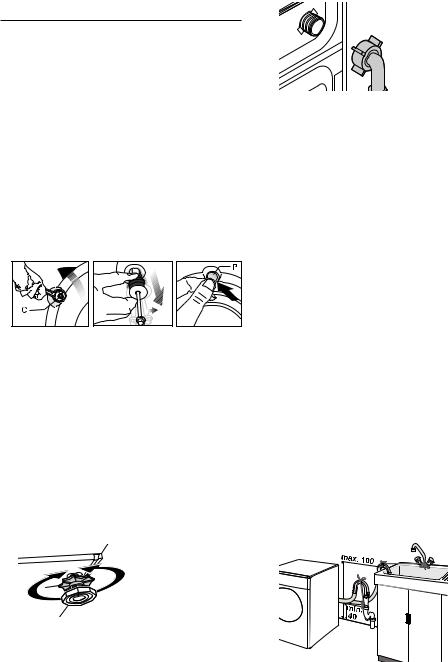
Opening the transportation locks
ATransportation safety bolts must be removed before operating the washing machine! Otherwise, the machine will be damaged!
1.Loosen all the bolts with a spanner until they rotate freely (“C”)
2.Remove transportation safety bolts by turning them gently.
3.Fit the covers (supplied in the bag with the Operation Manual) into the holes on the rear panel. (“P”)
C Keep the transportation safety bolts in a safe place to reuse when the washing machine needs to be moved again in the future.
C Never move the appliance without the transportation safety bolts properly fixed in place!
Adjusting the feet
ADo not use any tools to loosen the lock nuts. Otherwise, they can be damaged.
1.Manually (by hand) loosen the lock nuts on the feet.
2.Adjust them until the machine stands level and firmly.
3.Important: Tighten all lock nuts up again.
Connecting to the water supply.
Important:
•The water supply pressure required to run the machine must be 1-10 bar (0,1 – 1 MPa).
•Connect the special hoses supplied with the machine to the water intake valves on the machine.
•If you are going to use your double waterinlet machine as a single (cold) water-inlet unit, you must install the stopper*, supplied with your machine to the hot water valve.
•If you want to use both water inlets of the product, you can connect the hot water hose after removing the stopper and gasket group from the hot water valve.
* Applies for the products supplied with a blind stopper group.
•Models with a single water inlet should not be connected to the hot water tap.
When returning the appliance to its place after maintenance or cleaning, care should be taken not to fold, squeeze or block the hoses.
Connecting to the drain
The water discharge hose can be attached to the edge of a washbasin or bathtub. The drain hose should be firmly fitted into the drain as to not get out of its housing.
Important:
•The end of the drain hose must be directly connected to the wastewater drain or to the washbasin.
•The hose should be attached to a height of at least 40 cm, and 100 cm at most.
•In case the hose is elevated after laying it on the floor level or close to the ground (less than 40 cm above the ground), water discharge becomes more difficult and the laundry may come out wet.
•The hose should be pushed into the drainage for more than 15 cm. If it is too long you may have it shortened.
•The maximum length of the combined hoses must not be longer than 3.2 m.
3 - EN

Electrical connection |
Loading door |
|
Connect the machine to an earthed outlet |
The door locks during program operation and |
|
protected by a fuse of suitable capacity. |
the Door Locked Symbol lights up. The door |
|
Important: |
can be opened when the symbol fades out. |
|
• Connection should comply with national |
Detergents and softeners |
|
regulations. |
||
• The voltage and the allowed fuse |
Detergent Drawer |
|
protection are specified in the section |
The detergent drawer is composed of three |
|
“Technical Specifications”. |
compartments: |
|
• The specified voltage must be equal to |
The detergent dispenser may be in two |
|
your mains voltage. |
||
different types according to the model of your |
||
• Connection via extension cords or multi- |
||
machine. |
||
plugs should not be made. |
||
– (I) for prewash |
||
B A damaged power cable must be replaced |
||
– (II) for main wash |
||
by a qualified electrician. |
||
- (III) siphon |
||
B The appliance must not be operated unless |
||
it is repaired! There is the risk of electric |
– ( ) for softener |
|
shock! |
||
|
3 Initial preparations for |
|
||
washing |
|
Detergent, softener and other cleaning |
|
Preparing clothes for washing |
|||
agents |
|||
Laundry items with metal attachments such |
|||
Add detergent and softener before starting the |
|||
as, bras, belt buckles and metal buttons |
|||
washing program. |
|||
will damage the machine. Remove metal |
|||
Never open the detergent dispenser drawer |
|||
attachments or place the items in a clothing |
|||
while the washing program is running! |
|||
bag, pillow case, or something similar. |
|||
When using a program without pre-wash, no |
|||
• Sort the laundry according to type of fabric, |
|||
color, and degree of soiling and permissible |
detergent should be put into the pre-wash |
||
water temperature. Always follow the |
compartment (Compartment no. I). |
||
advice on the garment labels. |
Detergent quantity |
||
• Place small items like infants’ socks and |
|||
nylon stockings, etc. in a laundry bag, |
The amount of washing detergent to be used |
||
pillow case or something similar. This will |
depends on the amount of laundry, the degree |
||
also save your laundry from getting lost. |
of soiling and water hardness. |
||
• Wash “machine washable” or “hand |
• Do not use amounts exceeding the |
||
washable” labeled products only with an |
quantities recommended on the package |
||
appropriate program. |
to avoid problems of excessive foam, |
||
• Do not wash colors and whites together. |
poor rinsing, financial savings and finally, |
||
New, dark colored cottons may release a |
environmental protection. |
||
lot of dye. Wash them separately. |
• Never exceed the (> max <) level marking; |
||
• Use only dyes/color changers and lime |
otherwise, the softener will be wasted |
||
removers suitable for machine wash. |
without being used. |
||
Always follow the instructions on the |
• Do not use liquid detergent if you want to |
||
packaging. |
wash using the time delay feature. |
||
• Wash trousers and delicate clothes turned |
|
||
inside out. |
|
||
Correct load capacity
C Please follow the information in the "Program Selection Table". Washing results will degrade when the machine is overloaded.
4 - EN

4 Selecting a Program and Operating Your Machine
Control panel
Figure 1
1 |
|
7 |
3 |
6 |
8 |
|||||||
|
|
|
|
|
|
|
|
|
|
|
|
|
|
|
|
|
|
|
|
|
|
|
|
|
|
|
|
|
|
|
|
|
|
|
|
|
|
|
|
|
|
|
|
|
|
|
|
|
|
|
|
|
|
|
|
|
|
|
|
|
|
|
|
|
|
|
2 |
|
|
|
|
|
|
|
5 |
4 |
|
|
||
1 |
- |
Spin Speed Adjustment Button |
|
|
b- Quick Wash |
||
2 |
- |
Time Delaying Button (+/-) |
|
|
c- Rinse Plus |
||
3 |
- |
Temperature Adjustment Button |
|
|
d- Anti-creasing |
||
4 |
- |
Start/Pause/Cancel Button |
6 |
- |
Program Selection Knob |
||
5 |
- |
Auxiliary Function Keys |
7 |
- |
Display |
||
|
|
a- Prewash |
|
|
8 |
- |
On/Off Button |
Display symbols
7.a |
- |
Spin Speed Indicator |
Figure 2 |
|
|
|
|
|
|||||||||
7.b |
- |
Temperature Indicator |
|
|
|
|
|
|
|
|
|
|
|
|
|
|
|
|
|
|
|
|
|
|
|
|
|
|
|
|
|
|
|||
7.c |
- |
Spin Symbol |
|
|
|
|
|
|
|
|
|
|
|
|
|
|
|
7.d |
- |
Temperature Symbol |
|
|
|
|
|
|
|
|
|
|
|
|
|
|
|
7.e |
- Remaining Time and Delaying Time |
|
|
|
|
|
|
|
|
|
|
|
|
|
|
|
|
|
|
|
|
|
|
|
|
|
|
|
|
|
|
|
|||
|
|
Indicator |
|
|
|
|
|
|
|
|
|
|
|
|
|
|
|
|
|
|
|
|
|
|
|
|
|
|
|
|
|
|
|
|
|
7.f |
- Programme Indicator Symbols (pre- |
|
|
|
|
|
|
|
|
|
|
|
|
|
|
|
|
|
|
wash/main wash/rinse/softener/spin) |
|
|
|
|
|
|
|
|
|
|
|
|
|
|
|
|
|
|
|
|
|
|
|
|
|
|
|
|
|
|
|
|
|
7.g |
- |
Economy Symbol |
|
|
|
|
|
|
|
|
|
|
|
|
|
|
|
7.h |
- |
Time Delaying Symbol |
|
|
|
|
|
|
|
|
|
|
|
|
|
|
|
7.i |
- |
Door Locked Symbol |
|
|
|
|
|
|
|
|
|
|
|
|
|
|
|
7.j |
- |
Start Symbol |
|
|
|
|
|
|
|
|
|
|
|
|
|
|
|
7.k |
- |
Standby Symbol |
|
|
|
|
|
|
|
|
|
|
|
|
|
|
|
|
|
|
|
|
|
|
|
|
|
|
|
|
|
|
|||
7.l |
- |
Auxiliary Function Symbols |
|
|
|
|
|
|
|
|
|
|
|
|
|
|
|
|
|
|
|
|
|
|
|
|
|
|
|
|
|
|
|||
Turning the machine on
Plug in your machine. Turn the tap on completely. Check if the hoses are connected tightly. Place the laundry in the machine. Add detergent and softener. Press the “On/Off” button.
Program selection
Turn the Programme Selection Knob to the program mode that you wish to wash your laundry.
The recommended temperature and spin speed for the selected program appear. Press “Start/Pause/Cancel” button to start the program.
Main programs
Depending on the type of textile, the following main programs are available:
•Cottons
You can wash your durable clothes with this program. Your laundry will be washed with
5 - EN
vigorous washing movements during a longer |
fiber duvet for two persons. |
|||
washing cycle. |
• Xpress 39’ |
|||
•Intensive |
This program is used to wash lightly soiled and |
|||
You can wash your durable and heavily soiled |
unstained cotton garments with the maximum |
|||
clothes on this program. In this program, your |
load capacity within a time as short as 39 |
|||
clothes will be washed for a longer time and |
minutes. E.g.: bathrobes, duvet covers, sport |
|||
an extra rinse cycle will be made compared to |
wears, daily clothes and etc. used only once. |
|||
the “Cottons” program. |
|
|
|
|
•Hand Wash |
Economy Symbol |
|||
You can wash your woolen/delicate clothes |
Shows energy saving programs and |
|||
that bear “not machinewashable” labels for |
temperature selections. |
|||
which hand wash is recommended on this |
As “Intensive” and “Baby” programs are long |
|||
program. It washes the laundry with very |
programs with higher temperature selections |
|||
tender washing movements without damaging |
to ensure hygiene, “Economy” Symbol will not |
|||
your clothes. |
light up. |
|
||
•Woolens |
Special programs |
|||
You can wash your machine-washable woolen |
For specific applications, you can select any of |
|||
garments on this program. Wash by selecting |
the following programs: |
|||
the proper temperature according to the labels |
||||
• Rinse |
|
|||
of your clothes. It is recommended to use |
This program is used when you want to rinse |
|||
appropriate detergents for woolens. |
||||
or starch separately. |
||||
•Delicates |
||||
• Spin |
|
|||
You can wash your delicate clothes on this |
|
|||
This program spins with maximum possible |
||||
program. It has more sensitive washing |
||||
rpm in the default setting. |
||||
movements and does not make intermediate |
||||
C You should use a lower spin speed for |
||||
spinning compared to “Synthetic” program. |
||||
delicate laundries. |
||||
•Synthetics |
||||
• Pump |
|
|||
You can wash your less durable clothes on |
|
|||
This program is used to discharge the water of |
||||
this program. Lighter washing movements |
||||
the clothes soaked into water in the machine. |
||||
and shorter washing cycle is used compared |
||||
Temperature selection |
||||
to “Cottons” program. It is recommended for |
||||
your synthetic clothes (such as shirts, blouses, |
Whenever a new program is selected, the |
|||
synthetic/cotton blended garments, etc.). For |
temperature anticipated for that program |
|||
curtains and lace, the “Synthetic 40” program |
appears on the temperature indicator. |
|||
with pre-wash and anti-creasing functions |
To change the temperature, press the |
|||
selected is recommended. |
“Temperature” button. Temperature decreases |
|||
Additional programs |
in 10° increments. |
|||
For special cases, there are also extra |
Cold selection is shown with “-” symbol. |
|||
programs available: |
|
|
|
|
|
|
Normally soiled, white cottons |
||
C Additional programs may differ according to |
90˚C |
|
||
the model of your machine. |
|
|
and linens. |
|
• Mini |
|
|
Normally soiled, fade proof |
|
This program is used to quickly wash a small |
60˚C |
|
colored linens, cottons or |
|
number of lightly soiled cotton garments. |
|
synthetic clothes and lightly |
||
|
|
|||
• Baby (Babycare) |
|
|
soiled white linens |
|
Increased hygiene is provided by a longer |
|
|
|
|
40˚C |
|
Blended clothes including |
||
heating period and an additional rinse cycle. It |
|
|||
is recommended for baby clothes and clothes |
30°C |
|
synthetics and woolens as well |
|
worn by allergic people. |
Cold |
|
as delicates. |
|
• Super |
Spin Speed selection |
|||
This program washes for a longer period |
||||
at 40°C and gives the same result as the |
Whenever a new program is selected, the |
|||
“Cottons 60°C” program, thus it saves energy. |
maximum spin speed of the selected program |
|||
It is suitable for clothes for which you cannot |
is displayed on the spin speed indicator. |
|||
use the “Cottons 60°C” program. |
To decrease the spin speed, press the “Spin” |
|||
• Duvet |
button. Spin speed decreases gradually. Then, |
|||
You can also wash your machine-washable |
rinse hold and no spin options are shown |
|||
fiber duvets with this program. |
respectively. |
|
||
C You must not load more than 1 piece of |
|
|
|
|
6 - EN

Rinse hold is shown with “ ” and no spin is
shown with “ ” symbols.
If you do not want to unload your clothes immediately after the program, you may use the rinse hold function in order to prevent your clothes become wrinkled in an anhydrous condition. With this function, your laundry is kept in the final rinsing water. If you want to
spin your laundry after the rinse hold function:
-Adjust the spin speed.
-Press “Start/Pause/Cancel” button. Program resumes. Your machine drains the water and spins your laundry.
You can use no spin function in order to drain the water without spinning at the end of the program.
Program selection and consumption table
|
EN |
|
2 |
|
|
|
|
|
|
Auxiliary functions |
Temperature |
|
|||||||||
|
|
|
|
|
|
|
|
|
|
|
|
|
|
|
|
|
|
|
|
|
|
|
|
|
|
LoadMax.(kg) |
Programme Duration |
Water Consumption(l) |
|
Energy Consumption(kWh) |
speedSpin(rpm) |
Prewash |
Quick |
PlusRinse |
Creasing-Anti |
HoldRinse |
70-80-90 |
60 |
50 |
40 |
30 |
Cold |
|
|
Programme |
|
|
(~min) |
|
|
|
|
|
|
|
|
|
|
|
|
|
|
|
|
|
|
|
|
|
|
|
|
|
|
|
|
|
|
|
|
|
|
|
|
|
||
|
|
|
|
|
|
|
|
|
|
|
|
|
|
|
|
|
|
|
|
|
|
Cottons |
90 |
|
6 |
153 |
49 |
|
1.48 |
max. |
• |
• |
• |
• |
• |
• |
• |
• |
• |
• |
|
• |
|
|
|
|
|
|
|
|
|
|
|
|
|
|
|
|
|
|
|
|
|
|
|
Cottons |
60** |
|
6 |
144 |
49 |
|
1.02 |
max. |
• |
• |
• |
• |
• |
• |
• |
• |
• |
• |
|
• |
|
|
|
|
|
|
|
|
|
|
|
|
|
|
|
|
|
|
|
|
|
|
|
Cottons |
40 |
|
6 |
124 |
49 |
|
0.80 |
max. |
• |
• |
• |
• |
• |
• |
• |
• |
• |
• |
|
• |
|
|
|
|
|
|
|
|
|
|
|
|
|
|
|
|
|
|
|
|
|
|
|
Super |
40 |
|
6 |
159 |
49 |
|
0.87 |
max. |
|
|
|
|
• |
|
|
|
• |
|
|
|
|
|
|
|
|
|
|
|
|
|
|
|
|
|
|
|
|
|
|
|
|
|
|
Intensive |
60 |
|
6 |
189 |
70 |
|
1.36 |
max. |
|
|
* |
• |
• |
|
• |
• |
• |
|
|
|
|
|
|
|
|
|
|
|
|
|
|
|
|
|
|
|
|
|
|
|
|
|
|
Babycare |
90 |
|
6 |
139 |
60 |
|
1.86 |
max. |
|
|
* |
|
• |
• |
• |
• |
• |
|
|
|
|
|
|
|
|
|
|
|
|
|
|
|
|
|
|
|
|
|
|
|
|
|
|
Synthetics |
60 |
|
3 |
132 |
57 |
|
0.94 |
800 |
• |
• |
• |
• |
• |
|
• |
• |
• |
• |
|
• |
|
|
|
|
|
|
|
|
|
|
|
|
|
|
|
|
|
|
|
|
|
|
|
Synthetics |
40 |
|
3 |
97 |
57 |
|
0.54 |
800 |
• |
• |
• |
• |
• |
|
• |
• |
• |
• |
|
• |
|
|
|
|
|
|
|
|
|
|
|
|
|
|
|
|
|
|
|
|
|
|
|
Delicate |
40 |
|
2 |
75 |
46 |
|
0.38 |
600 |
|
|
• |
• |
• |
|
|
|
• |
• |
|
• |
|
|
|
|
|
|
|
|
|
|
|
|
|
|
|
|
|
|
|
|
|
|
|
Woollens |
40 |
|
1.5 |
69 |
42 |
|
0.32 |
600 |
|
|
• |
|
• |
|
|
|
• |
• |
|
• |
|
|
|
|
|
|
|
|
|
|
|
|
|
|
|
|
|
|
|
|
|
|
|
Hand wash |
30 |
|
1 |
49 |
32 |
|
0.21 |
600 |
|
|
|
|
|
|
|
|
|
• |
|
• |
|
|
|
|
|
|
|
|
|
|
|
|
|
|
|
|
|
|
|
|
|
|
|
Mini |
30 |
|
2.5 |
30 |
45 |
|
0.17 |
max. |
|
|
|
|
|
|
|
|
|
• |
|
• |
|
|
|
*** |
|
|
|
|
|
|
|
|
|
|
|||||||||
• |
Selectable |
|
|
|
|
|
|
|
|
|
|
|
|
|
|
|
|
|
|
|
|
* |
Automatically selected, not cancelable. |
|
|
|
|
|
|
|
|
|
|
|
|
|
|
||||||
**Energy Label program (EN 60456)
***: Refers to 1400 rpm in machines with a highest spin speed above 1400 rpm. Refers to the highest spin speed in machines with a highest spin speed below 1400 rpm.
Water and power consumption and programme duration may differ from the table shown, subject to changes in water pressure, water hardness and temperature, ambient temperature, type and amount of laundry, selection of auxiliary functions, and fluctuations in the supply voltage.
“Super 40” program may be selected instead of “Cotton 60” programme during winter in areas where the input water temperature is low and/or in areas with low supply voltage.
C The auxiliary functions in the table may differ according to the model of your machine.
7 - EN
Auxiliary functions
Auxiliary Function Selection Buttons
C Select the required auxiliary functions before starting the program.
C Some combinations cannot be selected together. (Ex.: Pre-wash) (Figure 1-5a) and Quick Wash (Figure 1-5b).
Auxiliary function selection
If an auxiliary function that should not be selected together with a previously selected function is chosen, the first selected function will be cancelled and the last auxiliary function selection will remain active.
(Ex.: If you want to select pre-wash first and then quick wash, pre-wash will be cancelled and quick wash will remain active.
Auxiliary function that is not compatible with the program cannot be selected. (see, “Program Selection Table”)
Pre-wash
When you select this function (5a), the display will indicate “1” symbol. A pre-wash is only worthwhile for heavily soiled laundry. Without pre-wash you save energy, water, detergent and time. Pre-wash without detergent is recommended for lace and curtains.
Quick wash
With this function (5b), the wash time is shortened. The “2” symbol will light up on the display. Use this function for smaller amounts or slightly soiled laundries.
Rinse plus
This function (5c) allows your machine to perform an extra rinsing in addition to the rinsing cycles performed by your machine after main washing cycle. Thus, the risk for sensitive skins (babies, allergic skins and etc.) to be effected by the minimal detergent remnants on the laundry is reduced. “3” symbol will light up on the display.
Anti-creasing
With this function (5d), drum movement will be lessened to prevent creasing and spinning speed is limited. In addition, washing is carried out at a higher water level. The “4” symbol will light up on the display.
CWhenever you select this auxiliary function, load your machine with half of the maximum laundry specified in the program table.
temperature, type and amount of laundry, auxiliary functions selected, and changes in the supply voltage.
Time delay
With the “Time delay” function you can delay the program start up to 24 hours. Setting can be made in intervals of 30 minutes.
1. Press “Time delaying” buttons “+” and “-” to set your desired time delay.
2. Press “Start/Pause/Cancel” button. Then the time delay starts to count down.
C More laundry may be loaded or taken out during the time delay period.
Changing the delay time
If you want to change the time during the countdown:
1.Press “Start/Pause/Cancel” button.
2.Press “Time delaying” buttons “+” or “-” to set the desired time delay.
3.Press “Start/Pause/Cancel” button.
Canceling the time delay
If you want to cancel the time delay countdown and start the program immediately:
1.Press “Start/Pause/Cancel” button.
2.Pres “Time Delaying” “-” button to decrease the time delay. Program duration after 30 minutes shall be displayed.
3.Press “Start/Pause/Cancel” button to start the program.
Starting the Program
1.Press “Start/Pause/Cancel” button to start the program.
2.The start symbol (Figure 2-7j) which indicates that the program has started will light up.
3.The door locks and the door locked symbol (Figure 2-7i) will light up.
4.The Symbol of the relevant step (prewash, main wash, rinse, softener and spin) that the program has started from will light up (Figure 2-7f).
CIf the machine is not spinning, the program may be in rinse hold mode or the automatic spin correction system has been activated due to an excessive unbalanced distribution of laundry in the machine.
Time display
The display shows the time remaining for the program to complete while a program is running. Program duration may differ from the values in the consumption table
subject to the changes in the water pressure, water hardness and temperature, ambient
Changing the selections after the program has started
The selected spin speed and program temperature fade out. An empty frame appears.
When the “Program selection” button is
8 - EN

brought to the appropriate position, rpm and temperature data reappear.
Switching the machine to standby
mode
Press “Start/Pause/Cancel” button momentarily to switch your machine to the standby mode. Auxiliary functions can be cancelled or selected in accordance with the step the program is at. The door can be opened if the water level is suitable. Laundry may be added / taken out by opening the door.
Door lock
The Door Locked Symbol (Figure 2-7i) lights up when the loading door is locked. This symbol will flash until the door is allowed to open. Do not force the door at this stage. You may open the door after the symbol fades out.
Child-proof lock
You can protect the appliance from being tampered by children by means of the childproof lock. In this case, no change can be made in the running program.
CYour machine can be turned on and off with On/Off button while the child-proof lock is activated. In this case, your machine will resume its program with child-proof lock activated.
The machine is switched to child-lock by pressing the 2nd and 4th auxiliary functions for 3 sec. “C:on” (Child lock is activated) label appears on the screen. The same symbol will also be displayed whenever any button is pressed while the machine is child-locked.
To deactivate the child-proof lock, press the 2nd and 4th auxiliary function buttons for 3 sec. “C:OFF” (Child lock is deactivated) label appears on the screen.
Ending the program through canceling
“Start/Pause/Cancel” button is pressed for 3 seconds to cancel the program. Start symbol (Figure 2-7j) will flash during cancellation. After cancellation, the symbol of the corresponding step at which the cancellation was made will remain lit and “End” will appear on the screen.
End of program
When the program is finished, the symbols of the relevant steps will remain lit up and the auxiliary function, spin and temperature data selected at the start-up of the program will remain selected. “End” will appear on the display.
5 Maintenance and cleaning
Detergent Drawer
Remove any powder residue buildup in the drawer. To do this;
1.Press the dotted point on the siphon in the softener compartment and pull towards you until the compartment is removed from the machine.
CIf more than a normal amount of water and softener mixture starts to gather in the softener compartment, the siphon must be cleaned.
2.Wash the dispenser drawer and the siphon with plenty of lukewarm water in a washbasin.
3.Replace the drawer into its housing after cleaning. Check if the siphon is in its original location.
Inlet water filters
There is a filter at the end of each water intake valve at the back side of the machine and also at the end of each water intake hose where they are connected to the tap. These filters prevent the foreign substances and dirt in the water to enter into the machine. Filters should be cleaned as they get dirty.
•Close the taps.
•Remove the nuts of the water intake hoses to clean the surfaces of the filters on the water intake valves with an appropriate brush.
•If the filters are very dirty, you can pull them out by means of pliers and clean them.
•Take out the filters on the flat ends of the water intake hoses together with the gaskets and clean thoroughly under streaming water.
•Replace the gaskets and filters carefully to their places and tighten the hose nuts by hand.
9 - EN
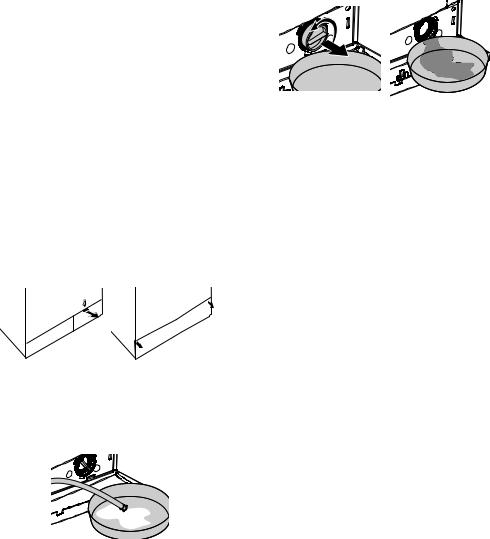
Draining any remaining water and |
hose. Drain the water off into the container |
|
cleaning the pump filter |
by pulling out the plug at the end of the |
|
Your product is equipped with a filter system |
hose. If the amount of water to be drained |
|
off is greater than the volume of the |
||
which ensures a cleaner water discharge that |
||
container, replace the plug, pour the water |
||
extends pump life by preventing solid items |
||
out, then resume the draining process. |
||
such as buttons, coins and fabric fibers from |
||
• After draining process is completed, |
||
clogging the pump propeller during discharge |
||
replace the plug into the end of the hose |
||
of the washing water. |
||
and fit the hose back into its place. |
||
• If your machine fails to drain the water, |
||
If your product is not supplied with an |
||
the pump filter may be clogged. You may |
||
emergency drain hose, do the following as |
||
have to clean it every 2 years or whenever |
||
shown in the figure below: |
||
it is plugged. Water must be drained off to |
||
|
||
clean the pump filter. |
|
|
In addition, water may have to be drained off |
|
|
completely in the following cases: |
|
•before transporting the machine (e.g. when moving house)
•when there is the danger of frost
In order to clean the dirty filter and discharge the water;
1- Unplug the machine to cut off the supply |
• Place a large container in front of the filter |
power. |
to receive water flowing from the filter. |
AThere may be water at 90°C in the |
• Loosen pump filter (anticlockwise) until |
machine. Therefore, the filter must be |
water starts to flow out of it. Direct the |
cleaned only after the inside water is |
flowing water into the container you have |
cooled down to avoid hazard of scalding. |
placed in front of the filter. You can use a |
2- Open the filter cap. The filter cap may be |
piece of cloth to absorb any spilled water. |
composed of one or two pieces according to |
• When there is no water left, turn the pump |
the model of your machine. |
filter until it is completely loose and remove |
If it is composed of two pieces, press the tab |
it. |
on the filter cap downwards and pull the piece |
• Clean any residues inside the filter as |
out towards yourself. |
well as fibers, if any, around the propeller |
If it is composed of one piece, hold it from |
region. |
both sides and open it by pulling out. |
• If your product has a water jet feature, be |
|
sure to fit the filter into its housing in the |
|
pump. Never force the filter while replacing |
|
it into its housing. Fit the filter fully into its |
|
housing; otherwise, water may leak from |
|
the filter cap. |
|
4- Close the filter cap. |
|
Close the two-piece filter cap of your product |
|
by pushing the tab on it. |
3- An emergency drain hose is supplied with |
Close the one-piece filter cap of your product |
some of our models. Others are not supplied |
by fitting the tabs on the bottom into their |
with this item. |
positions and pushing the upper part of it. |
If your product is supplied with an emergency |
|
drain hose, do the following as shown in the |
|
figure below: |
|
•Pull out the pump outlet hose from its housing.
•Place a large container at the end of the
10 - EN
6 Solution suggestions for problems
Problem |
Cause |
Explanation / Suggestion |
|
Machine may have switched |
|
Program cannot |
to self protection mode due to |
Reset your machine by pressing “Start/Pause/ |
be started or |
an infrastructure problem (such |
Cancel” button for 3 seconds. (see, Canceling a |
selected. |
as line voltage, water pressure, |
Program) |
|
etc.). |
|
There is water |
|
Be sure the seals of the water inlet hoses are |
coming from the |
There might be problems with |
securely fitted. |
bottom of the |
hoses or the pump filter. |
Tightly attach the drain hose to the tap. |
machine. |
|
Make sure that the pump filter is completely closed. |
Machine stopped |
Machine can stop temporarily |
It will resume operating when the voltage is back to |
shortly after the |
due to low voltage. |
the normal level. |
program started. |
||
|
|
The automatic spin correction system might have |
It continuously |
|
been activated due to the unbalanced distribution of |
spins. |
|
the laundry in the drum. |
Remaining time |
There may be an imbalance of |
The laundry in the drum may be clustered (bundled |
does not count |
laundry in a bag). Laundry should be rearranged and |
|
down. |
laundry in the machine. |
re-spun. |
(For models with |
|
No spinning is performed when the laundry is |
a display) |
|
not evenly distributed in the drum to prevent any |
|
|
damage to the machine and to its environment. |
|
|
|
|
In the case of a paused |
|
|
countdown while taking in |
The machine will wait until there is a sufficient |
|
water: |
amount of water to avoid poor washing results due |
|
Timer will not countdown until |
to lack of water. Then the timer will start to count |
|
the machine is filled with the |
down. |
|
correct amount of water. |
|
|
In the case of a paused |
|
It continuously |
countdown at the heating step: |
|
Time will not count down until |
|
|
washes. |
|
|
the selected temperature for |
|
|
Remaining time |
|
|
the program is reached |
|
|
does not count |
|
|
down. |
|
The automatic spin correction system might have |
(For models with |
|
|
a display) |
|
been activated due to the unbalanced distribution of |
|
In the case of a paused |
the laundry in the drum. |
|
countdown at the spinning |
The laundry in the drum may be clustered (bundled |
|
step: |
laundry in a bag). Laundry should be rearranged and |
|
There may be an imbalance of |
re-spun. |
|
laundry in the machine. |
No spinning is performed when the laundry is |
|
|
not evenly distributed in the drum to prevent any |
|
|
damage to the machine and to its environment. |
|
|
|
11 - EN

7 Specifications
|
WMD 76106 |
WMD 76126 |
Models |
|
|
|
|
|
Maximum dry laundry capacity (kg) |
6 |
6 |
|
|
|
Height (cm) |
84 |
84 |
|
|
|
Width (cm) |
60 |
60 |
|
|
|
Depth (cm) |
50 |
50 |
|
|
|
Net Weight (kg) |
64 |
64 |
|
|
|
Electricity (V/Hz.) |
230 V / 50Hz |
230 V / 50Hz |
|
|
|
Total Current (A) |
10 |
10 |
|
|
|
Total Power (W) |
2200 |
2200 |
|
|
|
Spinning cycle (rpm max.) |
1000 |
1200 |
|
|
|
Specifications of this appliance may change without notice to improve the quality of the product. Figures in this manual are schematic and may not match your product exactly.
Values stated on the machine labels or in the documentation accompanying it are obtained in laboratory in accordance with the relevant standards. Depending on operational and environmental conditions of the appliance, values may vary.
This appliance’s packaging material is recyclable. Help recycle it and protect the environment by dropping it off in the municipal receptacles provided for this purpose. Your appliance also contains a great amount of recyclable material. It is marked with this label to indicate the used appliances that should not be mixed with other waste. This way, the appliance recycling organised by your manufacturer will be done under the best possible conditions, in compliance with European Directive 2002/96/EC on Waste Electrical and Electronic Equipment. Contact your town hall or your retailer for the used appliance collection points closest to your home. We thank you doing your part to protect the environment.
|
|
|
|
|
|
|
|
|
|
|
|
|
|
|
|
|
|
|
|
|
|
|
|
|
|
|
|
|
|
|
|
|
|
|
|
|
|
|
|
|
|
|
|
|
|
|
|
|
|
|
|
|
|
|
|
|
|
|
|
|
|
|
|
|
|
|
|
|
|
|
|
|
|
|
|
|
|
|
|
|
|
|
|
|
|
|
|
|
|
|
|
|
|
||
|
|
|
|
|
12 - EN |
|
|
|
|
|
|

1 Предпазни мерки
Обща безопасност
•Никога не поставяйте пералнята на под, покрит с килим. В противен случай
възпрепятстването на достъпа на въздух отдолу може да доведе до прегряване на електрическите части и проблеми с пералната Ви машина.
•Ако захранващият кабел или шепсел са повредени, се свържете с оторизирания сервиз за ремонт.
•Наместете внимателно маркуча за източване в отводното гнездо за да избегнете изтичане на вода, като същевременно позволите на пералнята правилно да вкарва и изкарва вода. Много е важно маркучите за входяща и изходяща вода да не се прегънат, притиснат или пречупят при преместването на пералнята след нейното инсталиране или почистване.
•Вашата перална машина е настроена да продължи работата си след прекъсване на електрическото захранване. Пералнята няма да започне програмата отначало след възобновяване на захранването. Натиснете бутона Старт/Пауза/Отказ за 3 секунди за да откажете програмата (Виж “Отказ на програма”)
•Възможно е, при получаването на пералнята Ви, в нея да има известно количество вода, останало след процедурите за качествен контрол. Това е нормално и не вреди на пералнята Ви.
•Може възникналите проблеми да са причинени от външен проблем. Натиснете бутона Старт/Пауза/Отказ за 3 секунди за да откажете програмата, зададена в пералнята, преди да се обадите в оторизирания сервиз.
Първо ползване
•При първото ползване на пералната машина сложете перилен препарат без да зареждате пералнята с пране и пуснете на програма “Памучни тъкани 90°C”
•Уверете се, че отводите за топла и студена вода са свързани правилно при инсталацията.
•Ако бушонът или прекъсвачът Ви са под 16 Ампера, моля повикайте квалифициран електротехник да инсталира 16-Амперов бушон или прекъсвач.
•При употреба с или без трансформатор, уверете се, че заземяването на инсталацията е извършено от квалифициран електротехник. Фирмата ни не носи отговорност за повреди, възникнали в следствие на включване на пералнята в незаземен контакт.
•Дръжте опаковъчните материали от пералнята далеч от деца или ги изхвърлете в съответствие с изискванията за разделно изхвърляне на отпадъци.
Желателна употреба
•Този уред е предназначен за домашна употреба.
•Този уред може да се ползва за пране и
изплакване само на текстилни тъкани, означени по съответния начин.
Инструкции за безопасност
•Уредът трябва да бъде свързан към заземен контакт, защитен с предпазител с подходящ капацитет.
•Маркучите за входяща и изходяща вода трябва винаги да са надлежно свързани и невредими.
•Поставете внимателно изходящия маркуч
вмивката или ваната преди да стартиратe пералнята. Съществува риск от изгаряне поради високите температури на пране!
•Никога не отваряйте вратата на пералнята за да извадите филтъра ако в резервоара има останала вода.
•Извадете щепсела от контакта когато не ползвате нашината.
•Никога не мийте пералнята с маркуч за вода! Съществува риск от електрически удар!
•Никога не пипайте щепсела с мокри ръце. Не използвайте пералнята ако захранващият кабел или щепсел са повредени.
•При неизправности, за които информацията
втова ръководство не дава решение:
•Изключете пералнята, извадете щепсела от контакта, затворете крана за водата и се свържете с оторизирания сервиз. Може да се обърнете към местния агент или голям център за събиране на отпадъци в общината Ви, за да се информирате по какъв начин да изхвърлите пералнята.
Ако в дома си имате деца...
•Дръжте децата далеч от пералнята когато тя работи. Не им позволявайте да си играят с пералната машина.
•Затваряйте вратата на пералнята когато не се намирате близо до нея.
14 - BG
2 Инсталация
Отстраняване на подсилващите опаковъчни материали
Наклонете пералнята за да отстраните подсилващите опаковъчни материали като издърпате опаковъчната лента.
Отваряне на болтовете за транспортиране
AБолтовете за обезопасяване при транспортиране трябва да бъдат свалени преди работа с пералната машина! В противен случай ще повредите пералнята!
1.Разхлабете винтовете с гаечен ключ докато започнат да се въртят свободно
(“C”)
2.Отстранете винтовете за обезопасено пренасяне като ги развиете внимателно.
3.Наместете капачките (намират се в пакета с упътването) в дупките от винтовете на задния панел. (“P”)
C Съхранявайте болтовете за обезопасено транспортиране, за да може да ги ползвате отново ако се налага пренасяне на пералнята в бъдеще.
C Никога не пренасяйте пералнята без да сте завили правилно болтовете по местата им!
Регулиране на крачетата
AНе използвайте никакви уреди за разхлабване на контрагайките. В противен случай може да ги повредите!
1.Разхлабете ръчно (с ръка) контрагайките на крачетата.
2.Нагласете ги така, че пералнята да бъде нивелирана и стабилна.
3.Важно: Затегнете отново всички контрагайки.
Свързване към водното захранване
Важно:
•Необходимото водно налягане за работа на пералнята трябва да е 1-10 бара (0,1 – 1 мегапаскала).
•Свържете специалните маркучи, които се доставят заедно с пералната машина, към входящите отвори за водно захранване, разположени върху пералнята.
•За да се избегнат течове, които могат да възникнат по местата на свръзка, са осигурени гумени уплътнители (4
уплътнителя за моделите с двойно водно захранване и 2 уплътнителя за другите модели), закрепени към маркучите. Тези уплътнители се поставят на двата края на маркуча, откъм крана и откъм пералнята. Правият накрайник на маркуча, оборудван с филтър, се свързва с крана, а кривият накрайник се свързва с пералнята. Затегнете добре гайките на маркуча с ръка; никога не използвайте гаечен ключ за завиването им.
•Моделите с единично водно захранване не се свързват с кран с топла вода.
Когато връщате уреда на мястото му след ремонт или почистване, трябва да внимавате да не прегънете, притиснете или блокирате маркучите.
Свързване към отводнителната система
Маркучът за изходящата вода може да се прикрепи към страничната стена на кухненска мивка или вана. Изходящият маркуч трябва да се закрепи стабилно в отводнителната тръба за да не се изскубне от гнездото си.
Важно:
•Накрайникът на изходящия маркуч трябва да е свързан директно с канала за мръсна вода или мивката.
•Маркучът трябва да се инсталира на наймалко 40 см и най-много 100 см височина.
•В случай, че маркучът е повдигнат след като е поставен на нивото на земята (помалко от 40см над земята), източването на водата се затруднява и прането може да остане мокро.
•Поне 15см от маркуча трябва да се намират в отводната тръба. Ако е твърде дълъг, може да го скъсите.
•Максималната дължина на свързаните маркучи не трябва да надвишава 3,2 метра.
15 - BG
 Loading...